Mec MONADOCK Installation and operation manual

1
MEC MONADNOK
This booklet tells you how to prepare, assemble, and maintain your
new tent; please keep it for future reference. Set up your tent at
home before your first trip; this will allow you to inspect it for any
manufacturing defects, check that all parts are present, and learn the
assembly procedure with minimal stress on the tent and on you..
MONADNOCK Height inside 1.36m
2.2m
2.4m
1.0m 1.0m
1.13m
Your Monadnok
tent package includes:
Tent body
Tent fly
Four aluminum poles
Aluminum stakes and nylon guylines
Aluminum pole repair sleeve
Tent sack and pole sack
Monadnok eng.indd 1Monadnok eng.indd 1 3/1/05 2:31:06 PM3/1/05 2:31:06 PM

2
SEAM SEALING
The seams of your tent have been waterproof taped on all exposed
seams. All features, such as Velcro® pole anchors and door tiebacks, have
been welded onto the inside of the fly to avoid any small leak points.
However, for extremely wet and windy conditions, you may want to re-
seal selected parts of your tent. These include parts of the inner tent
where condensation or windblown rain could potentially wick through,
such as lantern loops or pole clip suspension points. You may also wish to
seal the “in” side of any untaped floor seams exposed to ground moisture
or rainfall. For seam sealing and tent repairs, we recommend a quality
after-market polyurethane sealer such as McNett Seam Grip®.
Work in a well-ventilated area to avoid inhaling sealant vapours. For
complete sealing, evenly apply only the minimum required amount of
sealant into needle holes, thread, and fabric joints. Allow to dry and cure
overnight. McNett sealants (Seam Grip, and similar) cure more quickly in
a moist or humid environment. Before packing the tent for the first time,
dust newly sealed areas with talcum powder or spray them with 303TM
Protectant; freshly cured sealer can bond to itself even when dry. If the
tent is used hard and often you may need to reapply seam sealer in high-
wear areas.
SITE PREPARATION
Remove sharp objects that might puncture the tent floor.
A ground sheet beneath the tent is not necessary for waterproofness,
but it will reduce long-term wear on the tent floor. A ground sheet should
be cut or folded smaller than the tent floor to prevent water pooling
between the floor and the ground sheet. Another light and convenient
option is MEC’s custom-made, coated nylon Footprint.
In winter conditions, we recommend digging out a platform with
surrounding walls. To avoid melting depressions in the snow under the
tent, pack the snow down solidly by ski or foot.
Monadnok eng.indd 2Monadnok eng.indd 2 3/1/05 2:31:11 PM3/1/05 2:31:11 PM

3
SET-UP
A note about shock-corded poles
Shockcord (bungee cord) is meant to keep pole sections in the proper
order—not as an automatic assembly mechanism for poles. Do not hold
one section while whipping the rest of the pole back and forth, or toss
the poles into the air; either procedure excessively stresses the pole joints
and shockcord. Instead, fit poles together section by section, making sure
that each piece slides completely into the next. Forcing an improperly
assembled pole into place can damage the pole and/or the tent body
and fly.
Assembling the Tent
1 Assemble all poles carefully as described in the previous paragraph.
You will have two straight black poles and two crooked orange poles.
2 Lay the tent body out flat. In windy conditions, peg all the floor corners
before proceeding.
3 Lay the two black poles on top of the tent body so that each one crosses
diagonally from one corner to the opposite corner; the two poles should
cross in the centre to form an “X.”
4 The pole clips are attached to the canopy with “ribbon” that is colour-
coded to match the poles: black-ribboned clips go onto the black poles;
orange-ribboned clips go onto the orange poles. Each pole also follows a
single canopy seam from end to end.
Clip the black-ribboned clips to the two crossed poles. The clip at the top
of the tent should be attached to the outside (uppermost) pole.
5 Carefully fit the pole ends into the grommets on the black webbing
tabs at the four corners of the tent.
It may help to have one person lifting the top of the tent to loft it up as
you tension these two poles. Be especially careful in windy conditions:
this is the stage when the greatest stress can be placed on the poles.
There is more than one grommet on each webbing tab so that you can
increase or decrease the tautness of the tent to compensate for fabric
slackening or tightening caused by changes in humidity. When first
erecting the tent it is best to use the outermost (loosest) grommet
on each tab.
Monadnok eng.indd 3Monadnok eng.indd 3 3/1/05 2:31:12 PM3/1/05 2:31:12 PM

4
6 Two orange webbing tabs with grommets are located at ground level
on each side of the tent. Note how a single canopy seam runs from one of
these tabs, over one of the doors at the far end of the tent, and then back
down to the corresponding webbing tab on the opposite side of the tent:
Each of the orange poles is meant to follow one of these seams.
Starting at a point over one of the doors, slide one of the orange poles so
that it runs under both black poles and follows one of the seams to the
orange webbing tabs at the far ends of the tent.
7 Slip the ends of the orange pole into the appropriate grommets, then
attach the appropriate pole clips.
8 Repeat Steps 6 and 7 at the other end of the tent with the remaining
orange pole.
9 At both points where the orange poles cross each other (low on either
side of the tent), they share a single clip. Each of these two clips should
be attached to the outside pole.
Unclip and reattach either of these clips if necessary.
10 If you have not already done so as part of Step 2, peg out the corners of
the tent now. If conditions require it, you can also peg the orange webbing
loops along the tent sides.
Attaching the Fly
1 Drape the fly over the tent so that the doors in the fly line up with the
doors in the canopy.
The doors in the fly can be quickly identified by their hooded vents. Note
that the colours of the webbing tabs on the fly correspond to those on
the tent body; drape the fly accordingly.
2 On the underside of the fly, opposite each of the four points where the
orange and the black poles overlap, is a Velcro® wrap-tie.
Lift up each corner of the fly, and attach the wrap-ties over the appropriate
pole intersection. To do this: wrap the longer Velcro tab horizontally twice
around both poles, pull on the tab end to cinch it tight, then secure it by
folding the shorter Velcro tab over it.
Attaching these tie-wraps is very important for strengthening the tent:
The tie-wraps allow the poles to reinforce one another in a series of
trusses; they also connect the corner guyline attachment points directly
to the poles for maximum stiffness when these guylines are rigged.
3 Two similar Velcro tie-wraps fasten to the orange poles at the peak
above each door. Attach both these tie-wraps now.
Monadnok eng.indd 4Monadnok eng.indd 4 3/1/05 2:31:13 PM3/1/05 2:31:13 PM

5
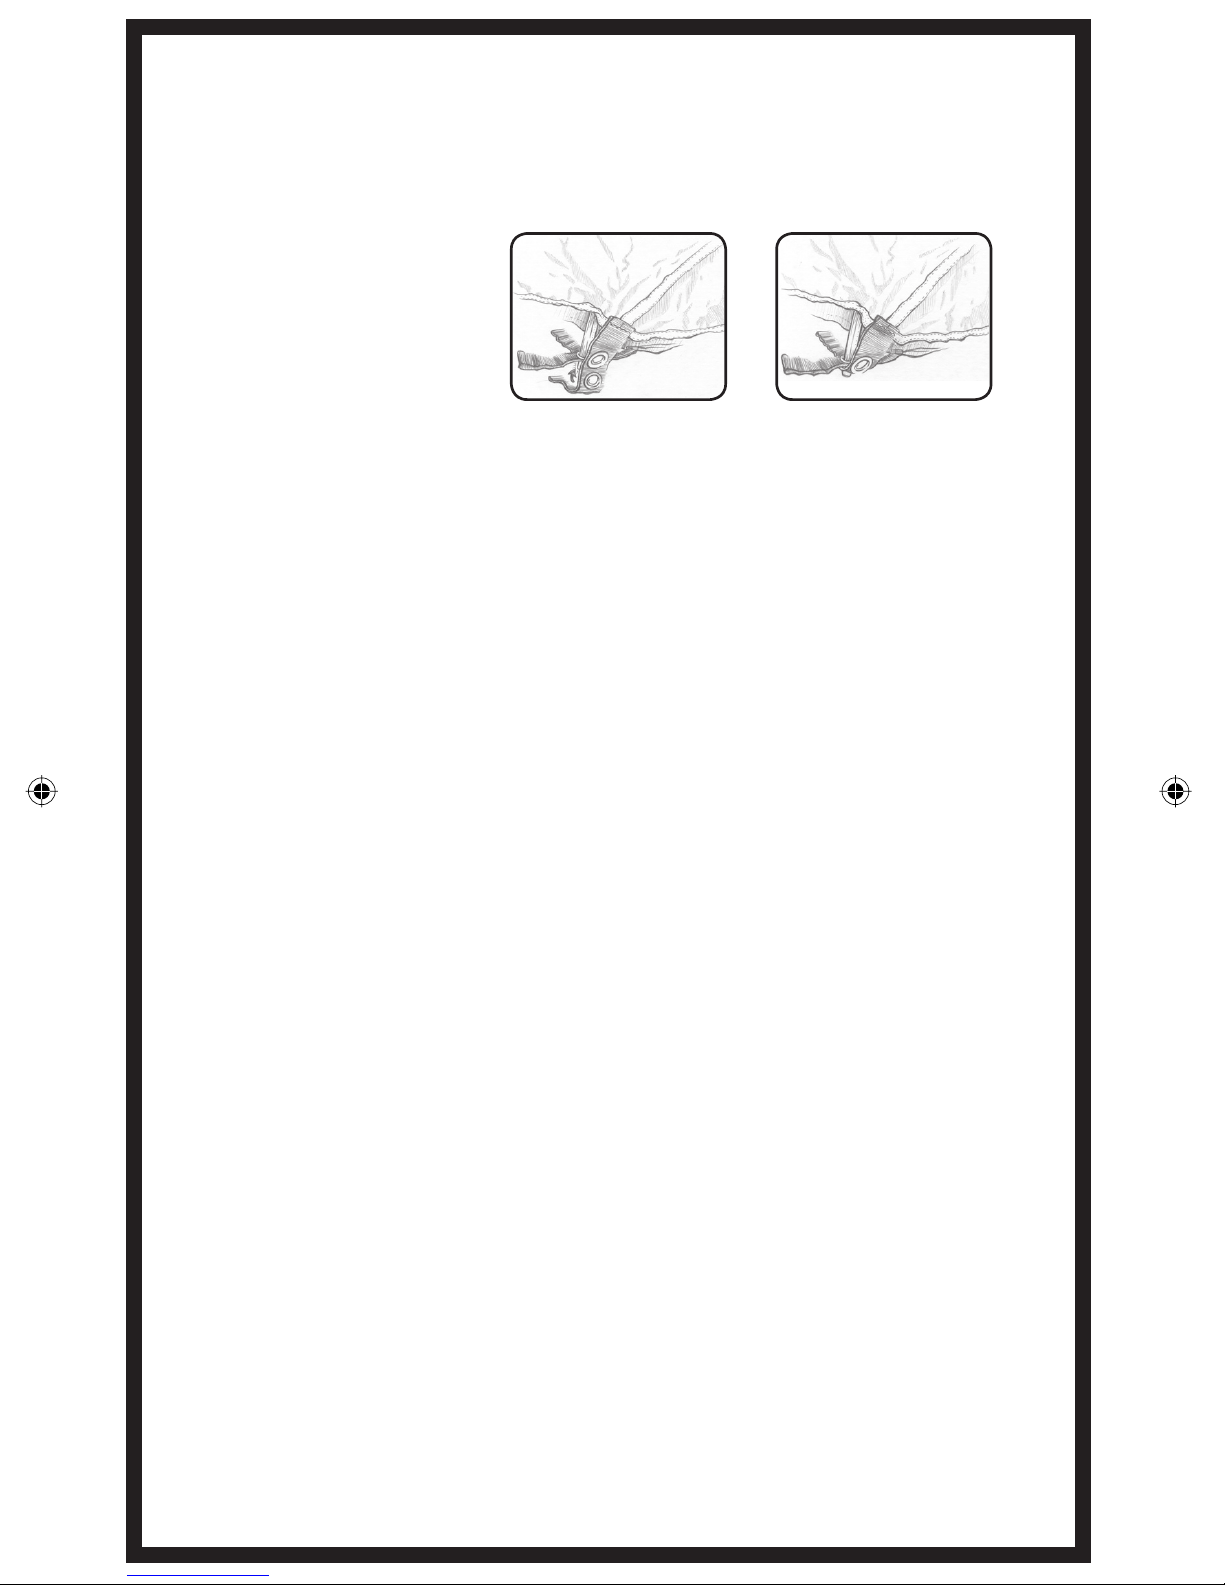
4 Fit all of the grommetted webbing tabs on the fly over the appropriate
pole ends as shown in figures A and B; these tabs are colour-coded to
simplify this process.
Staking and Guying Out the Tent
1 Pull out both vestibules and peg them out with the webbing loops.
Note that each door has a webbing loop on either side of the door zipper
where it reaches the ground. By staking out one loop or the other, you
can make the door side-opening or centre-opening to adapt it to the
prevailing wind or local landscape features.
2 Rather than depending on thick, heavy poles for its strength, the
Monadnock employs light, sturdy guylines as an essential part of its
structure. This is the secret to the Monadnock’s comparatively low weight
for its generous floor space and headroom. The design also makes it
very important to rig the guylines thoroughly in any amount of wind. Not
doing so could make for a restless night as the tent bends and flexes! (As
with any tent, a little shelter from trees, rock, or snow walls will make for
a quieter night under stormy conditions.)
Attach, peg out, and tension the four corner guylines. Note that the
attachment points are designed so that these lines can run straight out
from the sides rather than at a forty-five degree angle; this is so the
guylines are out of the way of the doors.
In really bad weather, attach, peg out, and tension the guylines in the
centre of the sides and on either side of the roof peak. If necessary, you
may also guy out the vent hoods over the doors. (You will need additional
guylines to guy out all these points at once.)
Anchoring the Tent
The #7001-T6 aluminum stakes included with the tent are suitable for
general use on relatively soft ground. However, in very hard-packed
ground you will need stronger (and heavier!) stakes that can withstand
the force needed to drive them in. On snow, sand, or other loose-packed
surfaces, wider T-Stakes or aluminum snow stakes will hold better; these
stakes hold best buried horizontally. You can also improvise with other
“stakes” (hiking staffs, ice axes, branches, rocks, trees), using the tent’s
stake loops or cord as required.
figure A figure B
Monadnok eng.indd 5Monadnok eng.indd 5 3/1/05 2:31:14 PM3/1/05 2:31:14 PM

6
When packing for your trip, consider the conditions you’ll likely encounter
and what sort of anchors you’ll require. You can often leave several of
the supplied pegs at home and replace them with improvised anchors,
thereby saving weight and space in your pack.
Ventilating the Tent
Proper ventilation is the key to minimizing condensation in any tent. Keep
fabric doors open as widely as the prevailing weather permits. If bugs
or drafts aren’t a problem, leave mesh doors open too. Crack each door
open from the top down; warm, moist air rises and will escape through
high openings. If the design of your tent allows for it, have openings at
both ends or both sides of the tent to allow air to flow through for best
ventilation. On very hot nights, when you are confident there will be no
rain or dewfall, you can leave the flysheet off and use the inner tent alone
as a “bug tent.”
Disassembling the Tent
The most important consideration in taking down a tent is not to stress
the poles and fabrics. First, disconnect guylines and release the tension
from the tent. Next, release all the poles. If your tent has pole sleeves,
push the poles out of the sleeves instead of pulling them out. To minimize
the stress on the bungee cord in the poles and to speed disassembly,
fold each pole in half first, and then fold down towards the outsides, two
sections at a time.
Packing the Tent
If possible, fold and roll the tent rather than stuffing it into its sack—rolling
makes a smaller package, and causes fewer creases in the polyurethane
coating. The tent and poles may be carried separately for easier packing
or load sharing. There are two drawcords on the tent sack. Use the lower
one when carrying the tent separately from the poles; this makes a
shorter package that fits sideways into a pack. If carrying the pole sack
on the outside of a pack, securely attach the drawcord to the pack to
avoid loss.
CARE AND MAINTENANCE
Protecting the Tent
Ultraviolet damage is the single largest hazard your tent faces in its
lifetime. Fabrics should not be exposed to sunlight for extended periods
of time; this will eventually result in colour fading and fabric failure. The
uncoated fabrics of the tent canopy are most susceptible to damage from
UV and should be covered by the more durable fly. If extended exposure
is unavoidable, cover the tent with a tarp or a sheet of nylon.
Monadnok eng.indd 6Monadnok eng.indd 6 3/1/05 2:31:16 PM3/1/05 2:31:16 PM

7
Lighting your Tent
Using a candle lantern in a tent carries definite risks. Never leave a candle
lantern burning unattended; always watch for fire hazard from overheating
fabrics or spilling wax. Spilling wax can be dangerous, particularly to eyes
and other sensitive areas. It is your responsibility to use candle lanterns
wisely and with extreme caution: we do not endorse the use of any
flame or heat source in a tent. Cooking in a tent is strongly discouraged
because of fire hazards and carbon monoxide inhalation risks. Unlike
campfire smoke and other fumes, which cause you to gasp for air, carbon
monoxide can render you unconscious without any warning.
Food in Tents
Mop up spills promptly with water. Many foods, particularly acidic ones
like fruit or juices, can weaken synthetic fabrics over time. In any case it is
best to eat and store food away from a tent to avoid attracting animals.
Cleaning
Clean the tent by hand while it is set up, using a sponge, a mild non-Clean
the tent by hand while it is set up, using a sponge, a mild non-detergent
soap, and warm water. Rinse thoroughly. Do not dry clean, machine wash,
or machine dry. Stubborn stains like tar can be left in place and dusted with
talcum powder to prevent transfer to other areas of the tent in storage.
After cleaning, a spray-on water repellent designed for synthetic fabrics
may be applied to the flysheet if surface water repellency is weakening.
(This is apparent when water droplets no longer bead up on the fabric.)
If the poles are exposed to salt or salt water, rinse them in fresh water and
allow them to dry before storing. (While aluminum does not rust, it can
become brittle through unseen corrosion over time.)
Lubricating the Poles
Occasionally apply a light coating of a silicone-based lubricant like 303TM
Protectant to the tent pole connections. If the poles are used extensively
in marine environments, treat them more frequently.
Storing your Tent
Dry the tent and poles completely before storage to avoid mildew or
hidden pole corrosion. Store in a cool, dry place out of direct light.
Mildewed tents can be cleaned as described above, but there is no way to
remove the dark stains without damaging the fabric. Mildew will probably
take some time to affect the waterproof coatings, so the tent should
still be usable.
Monadnok eng.indd 7Monadnok eng.indd 7 3/1/05 2:31:17 PM3/1/05 2:31:17 PM

8
REPAIRING YOUR TENT
Fabric Tears
Watertight repairs to rips can be made with seam sealant such as McNett
FreesoleTM, AquasealTM, or Seam Grip®. For tears shorter than about 1.5cm
(1/2in.), apply duct tape to one side and sealant to the other. On longer
tears, apply duct tape to one side of the tear and, on the other side,
a patch of no-see-um netting that extends about 6-12mm (1/4-1/2in.)
beyond each edge of the tear. Use oval or circular patches (rounded
edges are less likely to peel away than sharp corners). Cover the patch
thoroughly in sealant. Once the sealant is completely dry, the duct tape
can be removed from small and large repairs alike.
For longer trips, we recommend taking an expedition sewing kit and extra
nylon, webbing, a spare pole section, and narrow-diameter (2.5mm) tent
pole shockcord. Coghlan’s Seam Saturant or the like will prevent wicking
through a tent fly via seams or webbing.
Fixing a Pole in the Field
Slip the pole repair sleeve over one pole end. Slide the sleeve along
until it is centred over the break in the pole, then wrap it into place with
duct tape. Be careful not to damage the tent fabrics when removing the
damaged pole.
Replacing a Broken Pole Section
The MEC Grip-TipTM pole tips are press-fitted into place. Carefully tug out
the pole end tip nearest to the broken section. Being mindful of how
to retie it later, untie the end tip. Slide pole sections off the cord until
you reach the damaged section. Remove the broken piece, being careful
not to damage the shockcord. Thread on a new section of appropriate
length and diameter, followed by the other sections, then re-tie the end
tip knot.
Zippers
A worn slider is the cause of most zipper problems. An occasional
application of 303TM Protectant or a silicone-based lubricant will help
reduce wear. Grit accelerates slider wear. Keep zippers clean by rinsing
them under water after use in windy/sandy environments. Sometimes,
carefully squeezing the top ends of the slider with a pair of pliers will
restore some life. If an inner door slider fails, run it as far as possible toward
one end of the zipper, and use only the other slider for the duration of the
trip. A sewing repair shop can replace inoperable sliders.
Monadnok eng.indd 8Monadnok eng.indd 8 3/1/05 2:31:18 PM3/1/05 2:31:18 PM
Table of contents
Other Mec Tent manuals

Mec
Mec LIGHTFIELD User manual

Mec
Mec Tarn 3 User manual

Mec
Mec Mercury Installation and operation manual

Mec
Mec Funhouse 4 User manual

Mec
Mec Opera House 2 User manual

Mec
Mec Frontenac User manual

Mec
Mec Nunatak Installation and operation manual

Mec
Mec HUMMINGBIRD 2 User manual

Mec
Mec TARN 2 Assembly Instructions

Mec
Mec Wanderer 2 Installation and operation manual