manuals.online logo
Brands
  1. Home
  2. •
  3. Brands
  4. •
  5. Meccano
  6. •
  7. Toy
  8. •
  9. Meccano 15306 User manual

Meccano 15306 User manual

Other Meccano Toy manuals

Meccano O OUTFIT Manual

Meccano

Meccano O OUTFIT Manual

Meccano 15103 User manual

Meccano

Meccano 15103 User manual

Meccano MECCASPIDER User manual

Meccano

Meccano MECCASPIDER User manual

Meccano 0 User manual

Meccano

Meccano 0 User manual

Meccano 18208 User manual

Meccano

Meccano 18208 User manual

Meccano 18206 User manual

Meccano

Meccano 18206 User manual

Meccano Erector User manual

Meccano

Meccano Erector User manual

Meccano 0301 User manual

Meccano

Meccano 0301 User manual

Meccano Junior User manual

Meccano

Meccano Junior User manual

Meccano Spykee User manual

Meccano

Meccano Spykee User manual

Meccano 16211 User manual

Meccano

Meccano 16211 User manual

Meccano 17305 User manual

Meccano

Meccano 17305 User manual

Meccano Ducati Desmosedici GP User manual

Meccano

Meccano Ducati Desmosedici GP User manual

Meccano 19605 User manual

Meccano

Meccano 19605 User manual

Meccano tower crane User manual

Meccano

Meccano tower crane User manual

Meccano 17202 User manual

Meccano

Meccano 17202 User manual

Meccano Desert Adventure User manual

Meccano

Meccano Desert Adventure User manual

Meccano 17308 User manual

Meccano

Meccano 17308 User manual

Meccano Junior User manual

Meccano

Meccano Junior User manual

Meccano M.A.X 17401 User manual

Meccano

Meccano M.A.X 17401 User manual

Meccano 17307 User manual

Meccano

Meccano 17307 User manual

Meccano 4505 User manual

Meccano

Meccano 4505 User manual

Meccano RESCUE SQUAD SECOURS User manual

Meccano

Meccano RESCUE SQUAD SECOURS User manual

Meccano Robot Wars Sir Killalot User manual

Meccano

Meccano Robot Wars Sir Killalot User manual

Popular Toy manuals by other brands

FUTABA GY470 instruction manual

FUTABA

FUTABA GY470 instruction manual

LEGO 41116 manual

LEGO

LEGO 41116 manual

Fisher-Price ColorMe Flowerz Bouquet Maker P9692 instruction sheet

Fisher-Price

Fisher-Price ColorMe Flowerz Bouquet Maker P9692 instruction sheet

Little Tikes LITTLE HANDIWORKER 0920 Assembly instructions

Little Tikes

Little Tikes LITTLE HANDIWORKER 0920 Assembly instructions

Eduard EF-2000 Two-seater exterior Assembly instructions

Eduard

Eduard EF-2000 Two-seater exterior Assembly instructions

USA Trains EXTENDED VISION CABOOSE instructions

USA Trains

USA Trains EXTENDED VISION CABOOSE instructions

Modellbau Laffont Z1601 Assembly instructions

Modellbau Laffont

Modellbau Laffont Z1601 Assembly instructions

NOCH 12905 instruction manual

NOCH

NOCH 12905 instruction manual

Eduard Ki-61-Id quick start guide

Eduard

Eduard Ki-61-Id quick start guide

Viessmann Vollmer 45616 Mounting instruction

Viessmann

Viessmann Vollmer 45616 Mounting instruction

Vollmer 42004 Mounting instruction

Vollmer

Vollmer 42004 Mounting instruction

Phoenix Model CLASSIC-EP instruction manual

Phoenix Model

Phoenix Model CLASSIC-EP instruction manual

H-KING Sopwith Camel British WW1 Fighter instruction manual

H-KING

H-KING Sopwith Camel British WW1 Fighter instruction manual

MODSTER Predator 4x4 Crawler user manual

MODSTER

MODSTER Predator 4x4 Crawler user manual

DHK Hobby 8136 User instruction manual

DHK Hobby

DHK Hobby 8136 User instruction manual

THUNDER TIGER Raptor 50 V2 kit manual

THUNDER TIGER

THUNDER TIGER Raptor 50 V2 kit manual

Timberkits Skateboarder instructions

Timberkits

Timberkits Skateboarder instructions

Hangar 9 Funtana 125 Assembly manual

Hangar 9

Hangar 9 Funtana 125 Assembly manual

manuals.online logo
manuals.online logoBrands
  • About & Mission
  • Contact us
  • Privacy Policy
  • Terms and Conditions

Copyright 2025 Manuals.Online. All Rights Reserved.

EMPIRE STATE
BUILDING
ARC DE TRIOMPHE
15306
1
5
3
0
6
Instructions
Notice de
montage
Instrucciones de
construcción
Bauanleitung
Bouwinstructie
Istruzioni
Instruções
Инструкции
12+
x
AA
4
Merci d’imprimer à échelle 1 sans les marges de l’imprimante.
Please print at scale 1 without the printer margins.
Den Maßstab 1 bitte randlos drucken.
Stampare la scala 1 senza i margini della stampante.
Imprimir a escala 1 sin los márgenes de la impresora.
É favor imprimir escala 1 sem as margens da impressora.
Skriv ut i skala 1 utan skrivarens marginaler.
Portaiden painatuksen jälkeen reunat eivät saa näkyä .
É favor imprimir escala 1 sem as margens da impressora.
Σας παρακαλώ τυπώστε την κλίμακα 1 μέσα στα περιθώρια του εκτυπωτή.
Пожалуйста, печатайте в масштабе 1:1 без отступов от края.
Udskriv venligst i målestoksforhold 1 uden printermargener.
FR
GB
D
IT
E
P
S
NL
GR
R
DK
FIN
1:1
GB. For information on how this product supports today’s STEM curriculum,
visit www.meccano.com.
F. Pour découvrir l'intérêt pédagogique de ce produit dans le cadre des
matières STEM, rendez-vous sur www.meccano.com.
E. Para mayor información sobre cómo este producto respalda las materias
STEM visita: www.meccano.com.
D. Für Informationen wie dieses Produkt den technisch-mathematischen
Lehrplan (STEM) unterstützt, besuchen Sie bitte www.meccano.com.
NL. Ga naar www.meccano.com voor meer informatie over hoe dit product het
huidige STEM-curriculum ondersteunt.
I. Per informazioni su come questo prodotto contribuisce ad aiutare i ragazzi
nelle materie STEM “scientifiche e tecniche”, visitare il sito www.meccano.com.
P. Para informações sobre a compatibilidade deste produto com os programas
atuais STEM, acesse www.meccano.com.
R. Информация о том, как с помощью этого продукта можно повысить
эффективность процесса изучения дисциплин STEM, представлена на сайте
www.meccano.com.
NEW TOOLS / NOUVEAUX OUTILS
NUEVAS HERRAMIENTAS / NEUE WERKZEUGE
NIEUW GEREEDSCHAP / NUOVI ATTREZZI
NOVAS FERRAMENTAS / НОВЫЕ ИНСТРУМЕНТЫ
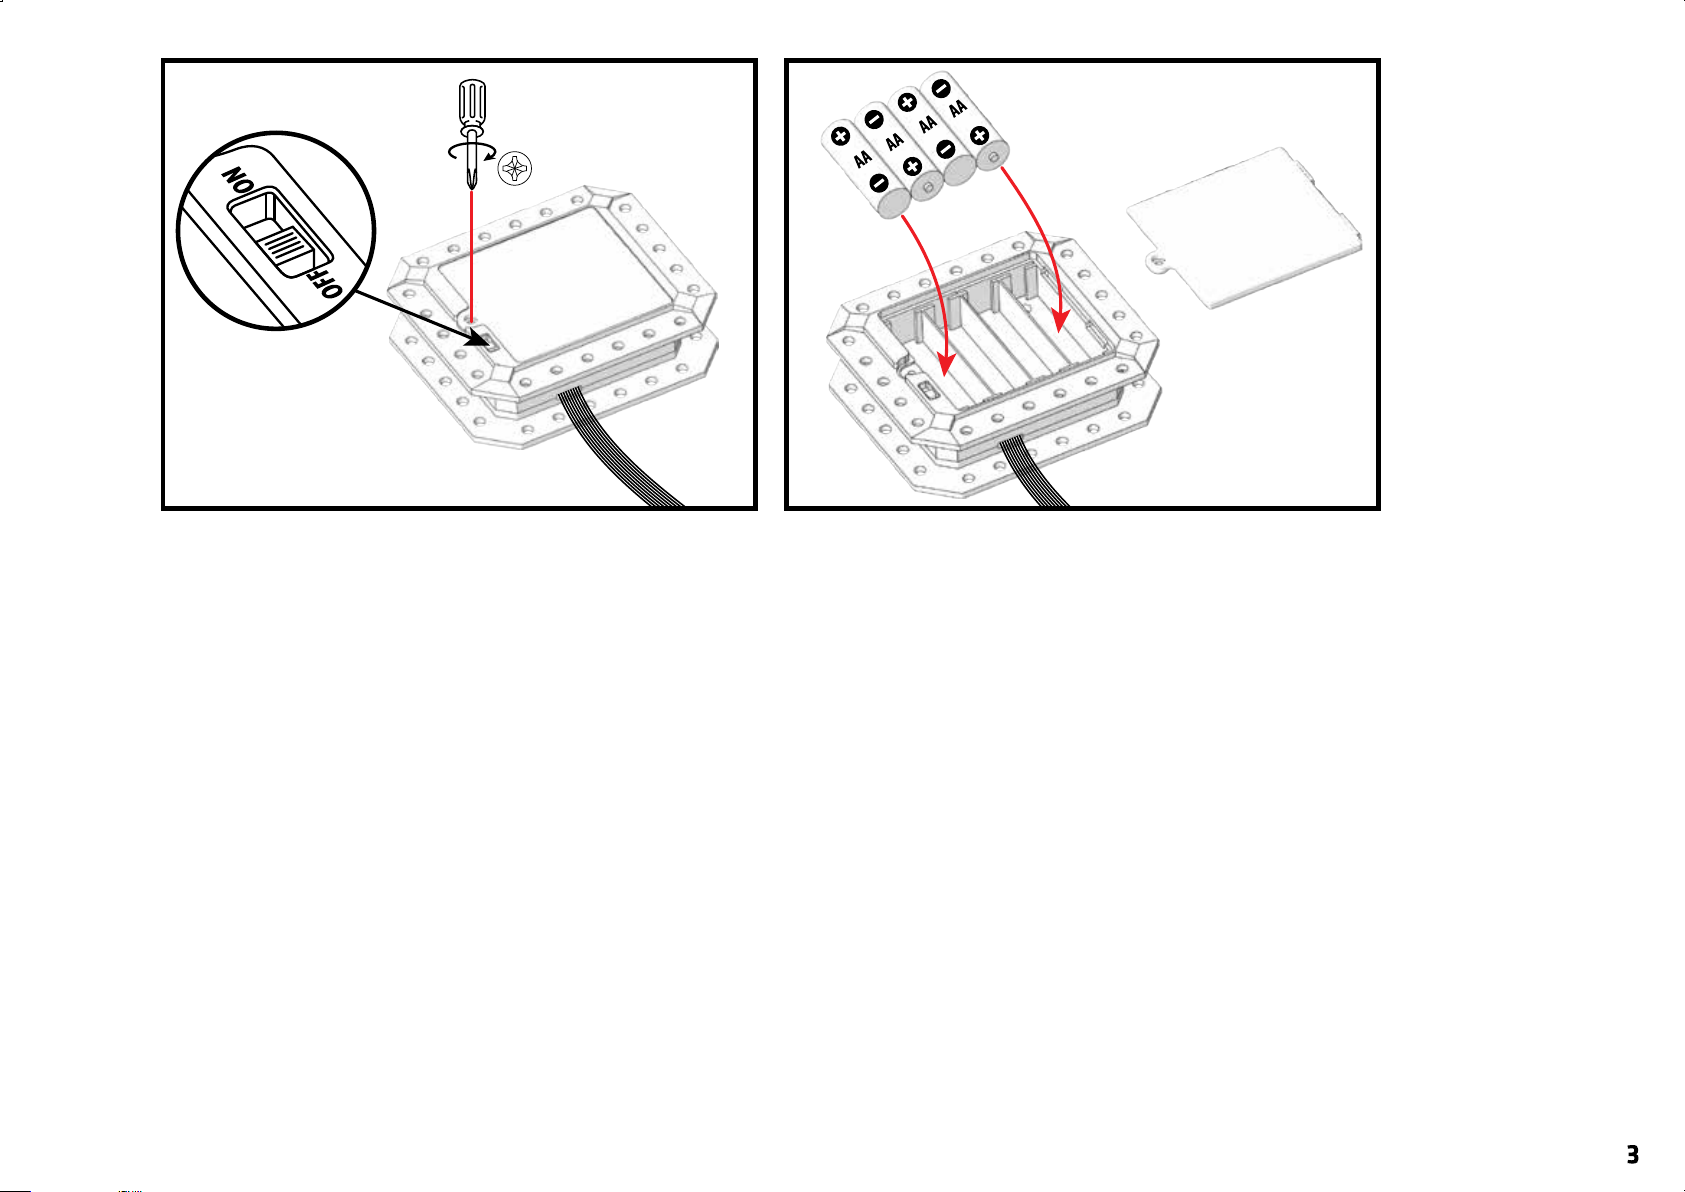
1. Open the battery door with a screwdriver.
2. If used batteries are present, remove these batteries from the unit by pulling up on one end of each battery.
DO NOT remove or install batteries using sharp or metal tools.
3. Install new batteries as shown in the polarity diagram (+/-) inside the battery compartment.
4. Replace battery door securely.
5. Check your local laws and regulations for correct recycling and/or battery disposal.
1. Откройте крышку отсека элементов питания с помощью отвертки.
2. Извлеките старые или истощенные элементы питания из отсека (при их наличии), подняв каждый элемент
питания за край. Запрещается извлекать или у станавливать батареи с помощью острых или металлических
предметов.
3. Установите новые элементы питания внутри отсека, соблюдая полярность (+/-).
4. Надежно закройте крышку отсека.
5. Ознакомьтесь с законами и нормативами вашей страны, установленными в отношении правил переработки
и/или утилизации элементов питания.
1. Aprire lo scomparto pile con un cacciavite.
2. Se sono presenti pile usate, rimuoverle dall'unità sollevandole da un'estremità. NON usare oggetti metallici o
appuntiti per rimuovere o installare le pile.
3. Inserire le nuove pile seguendo il diagramma della polarità (+/-) all'interno dello scomparto pile.
4. Riporre saldamente lo sportello dello scomparto pile.
5. Eliminare e/o riciclare le pile secondo quanto previsto dalle normative locali vigenti.
1. Batteriefachabdeckung mit einem Schraubendreher önen.
2. Wenn sich gebrauchte Batterien darin benden, diese einzeln herausziehen. Batterien NICHT mit scharfen
oder metallenen Gegenständen entfernen oder einlegen.
3. Neue Batterien unter Beachtung des Polaritätsdiagramms (+/-) in das Batteriefach einlegen.
4. Batteriefachabdeckung wieder anbringen.
5. Örtliche Gesetze und Bestimmungen für das Recycling bzw. die Entsorgung von Altbatterien beachten.
1. Open het batterijdeksel met een schroevendraaier.
2. Verwijder eventueel gebruikte aanwezige batterijen uit de unit door één kant van elke batterij omhoog te
trekken. Verwijder of plaats batterijen NIET met behulp van scherpe of metalen voorwerpen.
3. Plaats de nieuwe batterijen zoals weergegeven op het polariteitsdiagram (+/-) aan de binnenkant van het batterijvak.
4. Sluit het vak af met het batterijdeksel.
5. Lees de plaatselijke voorschriften en regelgeving om de batterijen op de juiste wijze te recyclen of af te voeren.
1. Ouvrir le compartiment des piles à l’aide d’un tournevis.
2. S’il contient des piles usagées, les retirer en les soulevant par l’une des extrémités. NE PAS utiliser d’objet
coupant ou métallique pour retirer ou insérer des piles.
3. Insérer les nouvelles piles en respectant le schéma de polarité (+/-) dans le compartiment des piles.
4. Bien refermer le compartiment des piles.
5. Recycler ou jeter les piles usagées conformément à la législation locale.
1. Abra la tapa del compartimento de las pilas con un destornillador.
2. Si las pilas están gastadas, tire hacia arriba de uno de sus extremos para extraerlas. NO utilice herramientas
metálicas o puntiagudas para instalar o extraer las pilas.
3. Instale las pilas nuevas como se muestra en el esquema de polaridad (+/-) dentro del compartimento de las pilas.
4. Vuelva a colocar la tapa del compartimento de las pilas.
5. Consulte la normativa local relativa al reciclaje y desecho de las pilas.
GB
F
D
NL
R
1. Abra a tampa do compartimento de pilhas com uma chave de fenda.
2. Se houver pilhas usadas, retire-as da unidade individualmente, puxando pela extremidade de cada uma. NÃO retire
ou coloque pilhas com qualquer acessório pontiagudo ou metálico.
3. Instale pilhas novas seguindo o diagrama de polaridade (+/-) dentro do compartimento de pilhas.
4. Coloque de novo a porta do compartimento com cuidado.
5. Consulte as leis, as normas e os regulamentos locais de reciclagem e/ou descarte de pilhas e baterias.
P
I
E
4
5
6
7
8
9
10