MedChip Solutions SpiroConnect User manual

1
SpiroConnect
Spirometer
Operating Instructions
Issue 1.2
Copyright © MedChip Solutions Ltd. All Rights Reserved

SpiroConnect Instructions for Use
MedChip Solutions Ltd. Page 2 of 26 001.105 Issue 1.2
Contents
1Introduction ............................................................................................................................................3
2Package Contents ...................................................................................................................................4
3Warnings and Cautions...........................................................................................................................5
4Contraindications....................................................................................................................................5
5Intended Use...........................................................................................................................................6
6Environment ...........................................................................................................................................6
7Getting Started........................................................................................................................................7
7.1 Installing SpiroConnect Data Manager Software................................................................................7
8Operation................................................................................................................................................9
8.1 Patient Selection: ................................................................................................................................9
8.2 Unit Connection: ................................................................................................................................9
8.3 Forced Spirometry: ...........................................................................................................................10
8.4 Relaxed Vital Capacity:....................................................................................................................12
8.5 Review Results: ................................................................................................................................14
8.6 General information pertaining to the reviewing of examinations: ...................................................15
8.7 Calibration:.......................................................................................................................................15
8.8 Settings:............................................................................................................................................17
8.9 Menu Bar options: ............................................................................................................................17
8.10 Patient Database: ..............................................................................................................................17
9Battery Management ............................................................................................................................18
10 Looking after your SpiroConnect .........................................................................................................18
11 Cleaning ...............................................................................................................................................19
12 Accessories...........................................................................................................................................19
13 Servicing ..............................................................................................................................................20
14 Warranty and Liability..........................................................................................................................20
15 Software License Agreement................................................................................................................21
16 Trouble Shooting Information ..............................................................................................................21
17 Electromagnetic Compatibility (EMC).................................................................................................22
18 Symbols................................................................................................................................................24
19 Classification ........................................................................................................................................25
20 Specifications .......................................................................................................................................25

SpiroConnect Instructions for Use
MedChip Solutions Ltd. Page 3 of 26 001.105 Issue 1.2
1Introduction
Thank you for choosing the SpiroConnect from MedChip Solutions. Please take a moment to
familiarise yourself with the instructions for use detailed in this manual and for further
information please refer to our website: www.medchipsolutions.com.
The SpiroConnect transmits real-time spirometric flow and volume data followed by diagnostic
quality spirometry indices to a PC running SpiroConnect Data Manager software over a
Bluetooth connection.
The spirometer is compact, battery operated, and fully portable.
The spirometer uses the MedChip Solutions turbine transducer. This is an extremely stable form
of volume transducer, which measures expired air directly at B.T.P.S (Body Temperature and
Pressure with Saturated water vapour) thus avoiding the inaccuracies of temperature
corrections. This transducer is insensitive to the effects of condensation and temperature and
avoids the need for individual calibration prior to performing a test.
The vertical turbine technology employed in the SpiroConnect ensures exceptional
performance at low flows exceeding the ATS/ERS requirements to respond to flows as low as
0.025l/s.

SpiroConnect Instructions for Use
MedChip Solutions Ltd. Page 4 of 26 001.105 Issue 1.2
2Package Contents
1 SpiroConnect spirometer
2 SpiroConnect Data Manager software on USB flash drive memory stick
(May be supplied by distributor on alternative format)
3 SpiroConnect dongle
4 Carrying pouch
5 2 Alkaline AA cells
6 Nose Clip

SpiroConnect Instructions for Use
MedChip Solutions Ltd. Page 5 of 26 001.105 Issue 1.2
3Warnings and Cautions
Caution: Possibility of injury or serious damage
Warning: conditions or practices that could result in personal injury.
Please Note: Important information for avoiding damage to the instrument or facilitating
operation of the instrument.
CAUTION: Read the manual before use
WARNING: The instrument is not suitable for use in the presence of explosive or flammable gases,
flammable anaesthetic mixtures or in oxygen rich environments.
WARNING: The use of portable phones or other radio frequency (RF) emitting equipment near the
system may cause unexpected or adverse operation
WARNING: Medical electrical equipment needs special precautions regarding EMC and needs to be
installed and put into service according to the EMC information provided in the accompanying
documents
WARNING: Portable and mobile RF communications equipment can affect medical electrical
equipment
WARNING: Equipment should not be used adjacent to or stacked with other equipment and that if
adjacent or stacked use is necessary, the equipment or system should be observed to verify normal
operation.
WARNING: The USB socket on the device is for factory use only. Do not make any connection to this
socket.
PLEASE NOTE: The product you have purchased should not be disposed of as unsorted
waste. Please utilise your local WEEE collection facilities for the disposal of this product.
WARNING: No modification of this equipment is allowed
4Contraindications
WARNING: Do not use in the presence of a known or suspected respiratory infection
WARNING: Do not use when haemoptysis (coughing up blood) of unknown origin is present
WARNING: Do not use in the presence of pneumothorax (collapsed lung)
WARNING:Do not use in the presence of unstable cardiovascular status: recent (within one month)
myocardial infarction (heart attack), uncontrolled hypertension or pulmonary embolism
WARNING:Do not use in the presence of uncontrolled hypertension or history of haemorrhagic
cerebrovascular event (stroke)
WARNING:Do not use in the presence of recent thoracic abdominal or eye surgery
WARNING:Do not use in the presence of nausea, vomiting or pain
WARNING: Do not use in the presence of confusion or dementia
WARNING: Do not use in the presence of thoracic or abdominal aneurysms
WARNING: Do not use on patients with a history of syncope (fainting) associated with forced
exhalation

SpiroConnect Instructions for Use
MedChip Solutions Ltd. Page 6 of 26 001.105 Issue 1.2
5Intended Use
The intended use of the SpiroConnect is to provide spirometry measurements used for the
diagnosis of common respiratory diseases such as asthma and COPD in adults and children
over 5. The SpiroConnect is intended to be used in doctors’ offices, hospitals and clinics.
6Environment
The SpiroConnect is designed for routine clinical use in an office environment. Use in
temperatures outside the range 10 to 40 OC should be avoided.
The environment should be free of excessive vibrations, and sources of electrical noise.

SpiroConnect Instructions for Use
MedChip Solutions Ltd. Page 7 of 26 001.105 Issue 1.2
7Getting Started
Insert 2 AA size alkaline batteries as shown below taking care to observe the correct polarity:
WARNING: do not touch the patient when the battery cover is removed.
7.1 Installing SpiroConnect Data Manager Software
The SpiroConnect DM software is supplied on a USB flash drive memory stick together with this
user manual.
Install the software as follows:
N.B. If the software is supplied by the distributor then follow their installation instructions
Run SpiroConnectDataManagerSetup_v1.00.exe. There is no need to run any of the other
executable files on the drive, these will be automatically run during installation.
Please ensure the SpiroConnect Dongle is not plugged in to the USB port during installation.
After installation completes, plug the SpiroConnect Dongle into a free USB port, and wait until
Windows completes loading the correct drivers for the device and reports it as being ready for
use.
At this point, installation is complete and the system is ready for use.
When the application is launched it will automatically check for an updated software version if
the PC is connected to the internet. If an updated version is available, the operator will be

SpiroConnect Instructions for Use
MedChip Solutions Ltd. Page 8 of 26 001.105 Issue 1.2
taken to a download page where he can download the installer for the newer version. This file
should be downloaded and then run to complete the update.

SpiroConnect Instructions for Use
MedChip Solutions Ltd. Page 9 of 26 001.105 Issue 1.2
8Operation
WARNING: Do not attempt to connect the SpiroConnect to the PC using the USB socket on the
SpiroConnect device via USB cable.
WARNING: keep the patient away from the PC during use.
Start the SpiroConnect Data Manager software by clicking on the desktop icon, or from the
Windows Start Menu.
The Home Screen will then be displayed:
8.1 Patient Selection:
Before performing a test, click on in order to open the Patient Selector. Select an existing
patient, or click ‘Create New’ to create a new patient. Click ‘Choose Selected’ when the
desired patient is selected. The program will return to the screen shown above.
From this screen a forced spirometry test or relaxed vital capacity test may be selected.
8.2 Unit Connection:
Before ‘Start’ is clicked to initiate a test, the unit needs to be powered on and connected in
order for tests to be performed.
Connect a disposable or clean reusable, CE-marked, mouthpiece onto the mouthpiece holder
of the spirometer.
Turn the unit on at any point by pressing and releasing the power button.
The LED indicator will flash blue at a fast rate for a few seconds whilst connection with
SpiroConnect Dongle is established, and then change to a slow blue flash whilst connection
with the SpiroConnect Data Manager application is established, finally displaying solid blue
once ready. will also be displayed in the bottom left hand corner of the PC
application, indicating successful connection and approximate remaining battery capacity.
SpiroConnect Instructions for Use
MedChip Solutions Ltd. Page 10 of 26 001.105 Issue 1.2
Once ‘Start’ is clicked to initiate a test, the LED shows solid green to show that the unit is ready
for a blow.
8.3 Forced Spirometry:
Press in the bottom right corner of the Spirometry Examination screen to initiate the test.
A flow-volume graph will be shown and the unit will beep to indicate that it is ready. At this
point the operator can select the Volume/Time or Incentive tab, if he wishes to view the VT
graph or Child Incentive graphic as an alternative to the default Flow Volume loop during the
live blow.
Instruct the patient to inhale as deeply as possible, then place the unit to their lips – ensuring a
good seal – and blast out the air in their lungs as fast as they can and continue, until they
cannot squeeze any more air out of their lungs. They should aim to exhale for at least 6
seconds – the graph border will turn green after 6 seconds as a visual aid to assist with this.
They should then inhale as deeply and as rapidly as possible, before removing the unit from
their lips. After two seconds has passed without the unit detecting any further flow, it will sound
a beep and a test summary will be shown.
All parameters that have been selected for display in Settings are shown, along with the
normal value (if available), percentage change from Best Base blow (if the blow is a Post blow),
blow quality assessment, overall examination quality assessment and interpretation. Selecting

SpiroConnect Instructions for Use
MedChip Solutions Ltd. Page 11 of 26 001.105 Issue 1.2
the ‘Results’ tab will change the display to show detailed results, and an interpretation, if
available.
NEXT can be clicked in order that the current blow is accepted into the exam stage and a new
blow is initiated. REJECT can be clicked to initiate a new blow without adding the last blow to
the exam. DONE can be clicked when all the desired blows have been added, and you wish
to end the current exam stage and review results. After DONE is clicked, no further blows can
be added to the current exam stage. Post1 or Post2 blows can be added at a later stage if they
do not exist already.
A maximum of eight blows are allowed in any exam stage and the Next/Reject buttons should
be used to disregard blows of poor quality and eventually end with an exam that conforms to
the examination quality criteria. These are explained further below.
The QUALITY CHECK message for the blow can be seen above the Results tab. This reports the
quality of an individual blow (as opposed to overall exam quality – see the next section below),
and could be one of the three following messages:
Slow Start:
The patient appeared to have paused slightly at the beginning of the
manoeuvre. He/she should blast air out as hard as possible from the very
beginning of test
Abrupt End:
The patient appeared to stop blowing suddenly. The patient should
continue to squeeze every last bit of air out of their lungs at the end of
exhalation. A good guideline is that they should not stop before they have
exhaled for 6 seconds at least (the graph border turns green after 6
seconds to indicate this time has elapsed)
Possible Cough:
A possible cough has been detected.
Good Blow:
The blow is of good quality

SpiroConnect Instructions for Use
MedChip Solutions Ltd. Page 12 of 26 001.105 Issue 1.2
The ACCEPTANCE CRITERIA messages for the current exam are shown below the Results area.
These messages report on the overall quality of the current and existing exam stages (Base,
Post1, Post2) and may contain messages similar to those below:
Not Met: A minimum of 3 good quality tests are required
-An exam stage needs at least 3 blows that have a Quality Check of ‘Good Blow’
Not Met
: The two largest FEV1 values must not differ by more than 150mL
-The FEV1 result for the two largest blows vary too much
Not Met
: The two largest FVV values must not differ by more than 150mL
-The FVC result for the two largest blows vary too much
Criteria Met:
-This exam stage meets the acceptance quality criteria.
Please note that one can select either ATS/ERS or BTS acceptance criteria to be used for this
assessment, see the Settings tab to select between the two.
After DONE is clicked examination notes can be added, a report can be printed, or a PDF
report can be exported. The exam will automatically be saved into the database from where it
can be reviewed in the future.
8.4 Relaxed Vital Capacity:
*Please note: Relaxed Vital Capacity tests MUST be added as the first test in any exam stage.
If Forced Spirometry is performed first, there will be no option to add a Relaxed Spirometry test
*
From the home screen, click on to select Relaxed Spirometry. Press in the bottom
right corner of the Spirometry Examination screen to initiate the test. A volume-time graph will
be shown and the unit will beep to indicate that it is ready.
The relaxed test may be performed with a single expiration, a single inspiration, or expiration
and inspiration after tidal breathing. The latter is used to provide a number additional indices
including Expiratory or Inspiratory Reserve Volume and tidal breathing indices if required.
For Expiratory Vital capacity instruct the patient to fully inhale and then seal their lips around
the mouthpiece and exhale at a comfortable rate until they have completely emptied their
lungs. The expiratory volume/time curve will be displayed:
For Inspiratory Vital capacity instruct the patient to fully exhale and then seal their lips around
the mouthpiece and inhale at a comfortable rate until they have completely filled their lungs.
The inspiratory volume/time curve will be displayed:

SpiroConnect Instructions for Use
MedChip Solutions Ltd. Page 13 of 26 001.105 Issue 1.2
For the tidal breathing method instruct the patient to seal their lips around the mouthpiece and
breathe normally. The device will beep on each beginning of inhalation and monitor tidal
breathing until it has determined a stable tidal pattern has been recognised. At this point the
unit will beep three times in very quick succession as well as change the graph border to a
green colour, indicating that it is ready for the vital capacity manoeuvre. At this point the
patient should inhale as deeply as possible and then exhale as deeply as possible (if EVC is
desired), or exhale as deeply as possible then inhale as deeply as possible (if IVC is desired).
Once this has been done, the patient can remove the device from their lips and the results will
be displayed.

SpiroConnect Instructions for Use
MedChip Solutions Ltd. Page 14 of 26 001.105 Issue 1.2
Forced tests (and subsequent post-BD tests) can be added using the buttons on the bottom
right of the screen.
8.5 Review Results:
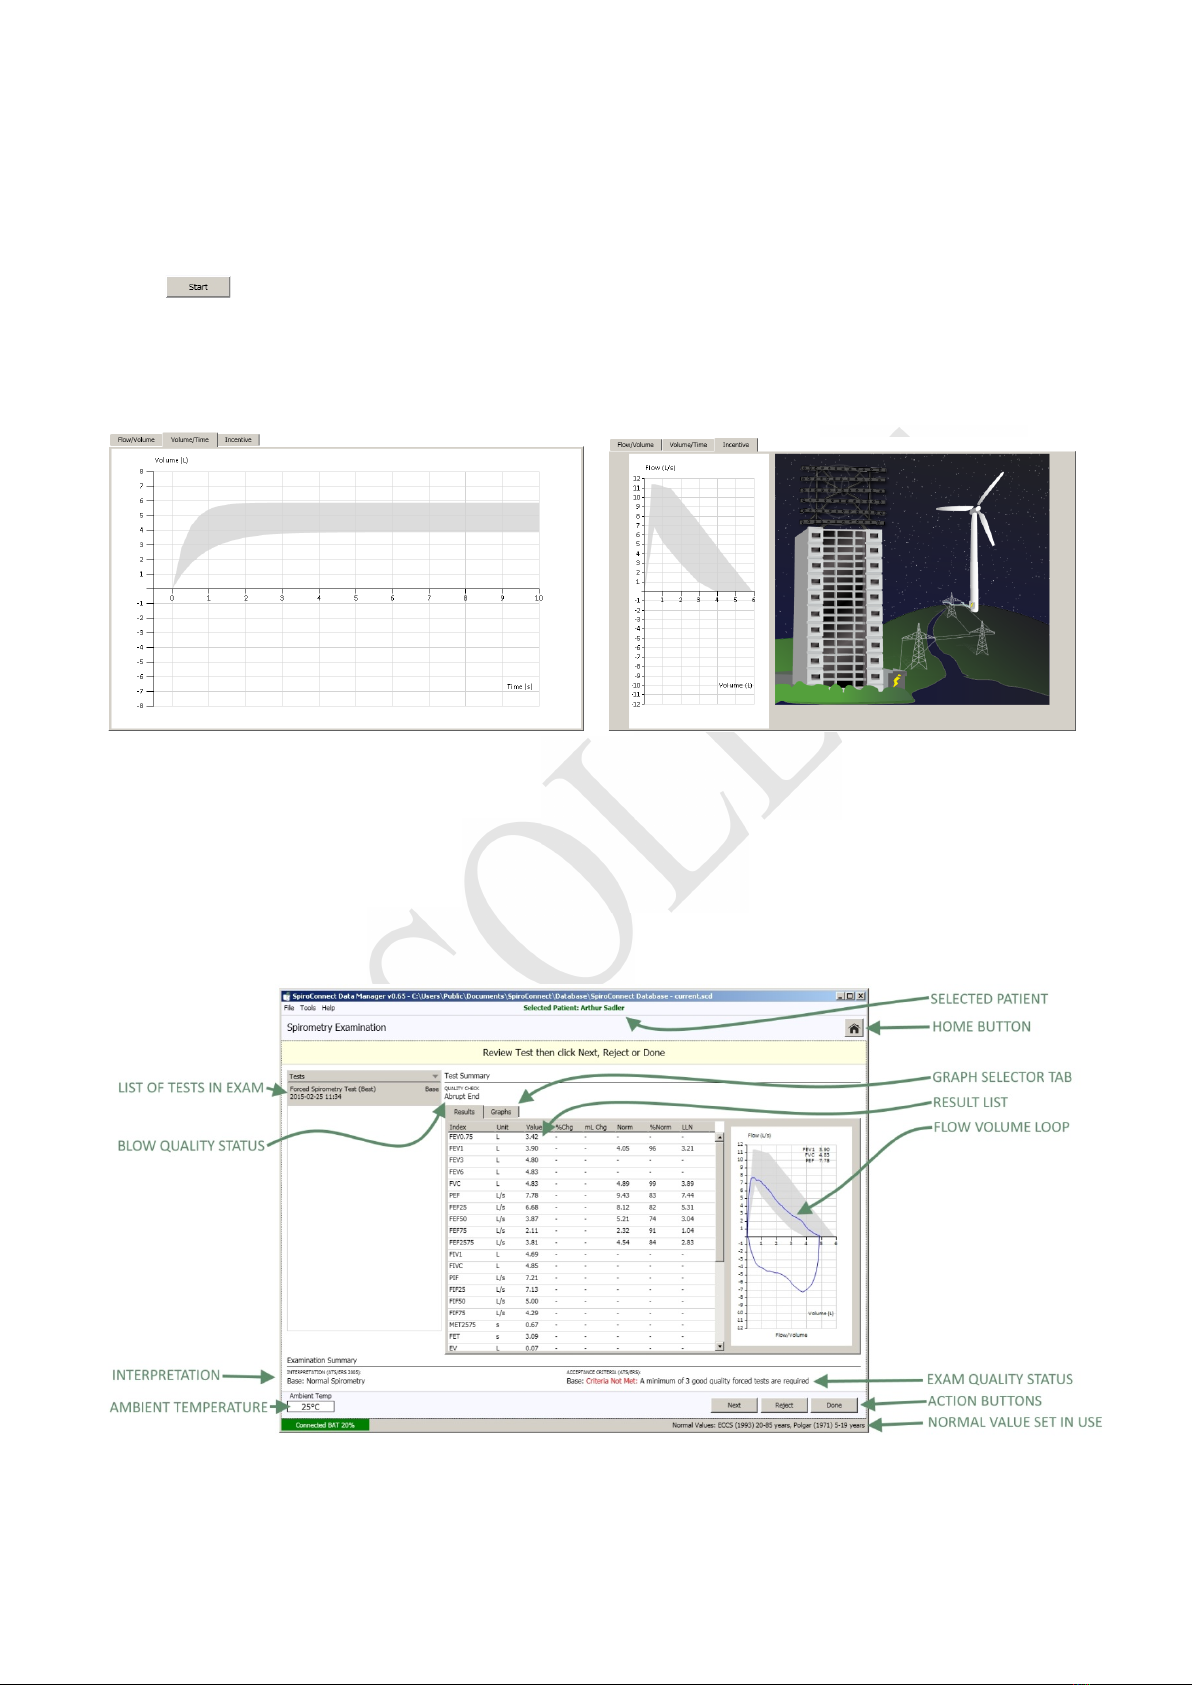
From the main window, clicking the Review Examinations button will open the Exam
Selector. This screen lists saved exams (the oldest exam at the top, newest at the bottom)
which can be opened for review and printing, or the addition of post-BD tests.
When reviewing an exam, specific tests can also manually be selected as Best Tests (over-
riding the automatic Best Test selection) by right-clicking on the test in question and selecting
‘Set as Best Test’.
Notes can also be added to the examination by clicking on the ‘Examination Notes’ panel at
the bottom of the list of tests within an exam, and typing the notes into the Notes window:

SpiroConnect Instructions for Use
MedChip Solutions Ltd. Page 15 of 26 001.105 Issue 1.2
8.6 General information pertaining to the reviewing of examinations:
Please note that when reviewing an existing exam, the patient details used for determination of
normal values and interpretations are that of the patient when the base exam was conducted.
The normal values therefore will not change with time, and even if SpiroConnect Data
Manager has been configured to use a different Normal Value set to that used at the time the
exam was created, the original Normal Value Set in use at the time of exam creation will
always be used when reviewing or adding post bronchodilator blows to that exam.
There are things that this does not apply to: Best Blow Criteria , Interpretation and Acceptance
Criteria. These are always based on whatever the currently selected settings are in Settings.
Thus if Best blow criteria changes, the interpretation could change as the interpretation is
based on the Best Blow.
Regarding Best Blow Criteria:
It may also be noticed that when Individual Best is selected as the Best Blow Criteria, a best
blow is not marked as such until the DONE button is clicked after adding all desired blows to
an exam stage. This is in contrast to other Best Blow settings, in which the best blow is updated
after each blow. The reason for this is that in individual Best mode, the best blow is comprised
of all the best parts of the other blows in the exam stage, and is therefore only calculated
when all desired blows are present.
8.7 Calibration:
Calibration mode can be entered by clicking the icon.
A 3 litre syringe should be connected to the device, and the plunger fully withdrawn prior to
commencement of calibration. The unit should be in a vertical orientation or inverted by
180degrees – not orientated sideways. Once ‘Start’ is clicked, the syringe plunger should be
pushed in at a controlled rate such that the waveform enters and remains within the green
shaded area for the longest time possible, and upon reaching the end of the syringe discharge,

SpiroConnect Instructions for Use
MedChip Solutions Ltd. Page 16 of 26 001.105 Issue 1.2
the should pause for approximately one second before withdrawing the plunger, again at a
pace such that the trace remains within the green shaded area.
Three consecutive cycles will be performed, each with a higher flow rate than the last. Once
the final highest flow rate cycle has been performed, click ‘Done’ and the calibration check
results dialog will be shown.
The procedure just performed is considered a calibration check if the results are reported as
‘Calibration OK’, and ‘No’ (in response to ‘Calibrate Anyway?’) is clicked.
If ‘No is clicked, the calibration check results are saved. If ‘Yes is clicked, the calibration values
are updated and the procedure is then deemed a calibration rather than a calibration check.
In either case, the results are stored for record keeping purposes, and the option to print a
report is displayed.
If the calibration values are unexpectedly large or small, the operator will be notified and
calibration will not be allowed. This could indicate a faulty turbine or syringe.

SpiroConnect Instructions for Use
MedChip Solutions Ltd. Page 17 of 26 001.105 Issue 1.2
8.8 Settings:
The settings pane is accessed by clicking the icon. There are three tabs in the Settings
pane:
Display – regional specific formats
Spirometry – best blow criteria, normal value set, and other spirometry related settings
Parameters – select which indices the user wishes to be displayed on the results screens
8.9 Menu Bar options:
Tools - ‘Spirometer Details’ displays data from the connected handheld unit,
temperature reading, serial number, firmware version.
‘Settings’ as Settings above.
Help – ‘About’ displays the version number of the PC software
‘Check for Updates’ if the PC is connected to the Internet will check for a later
version of software.
8.10 Patient Database:
The location of the currently used database is displayed in the SpiroConnect Data Manager
title bar. The database can support thousands of patients (each with numerous exams) up to a
maximum database size of 4GB. There may be occasions when the operator wishes to cease
using an existing database and create a new, either due to a size limitation being reached, or
to keep a database specific to a set of exams that has been conducted, or a time period over
which the database has been used. The procedure for doing so is as follows:
Open SpiroConnect Data Manager, and take note of the database path and name as shown
in the title bar. Close SpiroConnect Data Manager, and use Windows Explorer to navigate to
the database file. Create a folder called ‘Archive’ in the database folder, and Move (don’t
copy, the original file must not exist in the database directory after this step is complete) the
existing database file into it. You may wish to rename the file to something which describes it
to make it easy to recognise should you ever wish to load it up again.
Run SpiroConnect Data Manager. Upon launch it will fail to find the recently moved database,
and prompt the operator to create a new database. The same strategy can be employed to
cease using the existing database and load up an existing database, simply select ‘No’ to
browse to and select an existing database instead of ‘Yes’, which creates a new database.
The database file must not be located on a shared network location, or a folder that is
accessed by file sharing/syncing software like SkyDrive, Dropbox or GoogleDrive.
It is the responsibility of the operator to provide a backup mechanism for the database if he
wishes to have this function. SpiroConnect data Manager does not provide automatic
database backups.

SpiroConnect Instructions for Use
MedChip Solutions Ltd. Page 18 of 26 001.105 Issue 1.2
9Battery Management
The SpiroConnect is designed to use 2 alkaline AA size primary cells.
Note:
To ensure maximum lifetime of the batteries the unit will automatically turn off approximately 5
minutes after a measurement is made. Remove the batteries if you do not intend to use the
device for more than 3 months.
10 Looking after your SpiroConnect
Please observe the following precautions:
* Avoid exposing the SpiroConnect to direct sunlight.
* Avoid operating the spirometer in dusty conditions or near to heating appliances or
radiators.
* Do not keep the spirometer in a damp place or expose it to extremes of temperature.
* Do not direct the transducer holder towards a strong light source whilst operating the
spirometer.

SpiroConnect Instructions for Use
MedChip Solutions Ltd. Page 19 of 26 001.105 Issue 1.2
11 Cleaning
The casing of the unit may be cleaned using a damp cloth. Take care that no water is allowed
to enter the unit.
The transducer requires no routine maintenance or servicing. However, if you wish to sterilise
or clean the transducer it may be removed by means of the following procedure:
1 Remove the transducer by rotating the mouthpiece holder assembly anti clockwise by
90oand gently pulling from the main body.
2 The transducer may now be immersed in warm soapy water for routine cleaning or
immersed in cold sterilising solutions e.g. Perasafe for a period not exceeding 10 minutes.
(Alcohol and chloride solutions should be avoided.) After cleaning/sterilising, the transducer
should be rinsed in distilled water and dried.
3 Re-assemble the transducer into the main body by reversing the steps shown for
disassembly.
12 Accessories
The following accessories are recommended for use with your spirometer.
•SpiroConnect Dongle (for Bluetooth communications)
•Replacement batteries (Energiser E91 x 2)
•USB memory stick (with Operators Manual and Software)
•Nose Clip
•Disposable Mouthpiece
•Pulmonary Filter
Please contact your distributor for pricing and purchasing options for the accessories above, or
email sales@medchipsolutions.com to obtain the details of your local distributor.

SpiroConnect Instructions for Use
MedChip Solutions Ltd. Page 20 of 26 001.105 Issue 1.2
13 Servicing
Routine maintenance consists of regular calibration checks and cleaning of the transducer. The
SpiroConnect should be returned to the supplier every 2 years for transducer inspection and
accuracy check unless local guidelines require a more frequent check.
Please contact service@medchipsolutions.com if you unit requires service or repair to obtain a
Returned Goods Authorisation (RGA) number. No product should be returned to MedChip
except in accordance with the MedChip Warranty and Return Goods Policy (for full details
please visit www.medchipsolutions.com)
There are no user serviceable parts in the SpiroConnect.
14 Warranty and Liability
The SpiroConnect hardware is guaranteed against manufacturing defects for 2 years.
MedChip Solutions Ltd undertakes to ensure that the software meets the specification given in
the product literature; it does not warrant that the software supplied in this package is suitable
for your specific requirements or usage.
The warranty does not extend to any damage or corruption to the supplied media or
documentation subsequent to your receipt of the product, however caused; nor does it extend
to any damage or corruption of the program image on your computer subsequent to
installation.
MedChip Solutions Ltd does not warrant the compatibility of the software on any computer
other than that described in the product specification, and takes no responsibility for any
incompatibility or problems arising from the use of other operating systems or application
programs on your computer.
MEDCHIP SOLUTIONS LTD OR ITS SUPPLIERS SHALL, IN NO EVENT, BE LIABLE FOR SPECIAL,
CONSEQUENTIAL, OR INDIRECT DAMAGES OR LOSS ARISING FROM THE USE OR MISUSE
OF THIS PRODUCT, EVEN IF MEDCHIP SOLUTIONS LTD OR ITS SUPPLIERS HAVE BEEN
ADVISED OF THE POSSIBILITY OF SUCH DAMAGES. IN ANY CASE, THE ENTIRE LIABILITY OF
MEDCHIP SOLUTIONS LTD UNDER THE PROVISION OF THIS AGREEMENT SHALL BE LIMITED
TO THE AMOUNT PAID BY YOU FOR THE SOFTWARE LICENSE.
Should you need to request replacement or repair of the software or documentation under the
terms of this warranty or if you have any questions regarding this license agreement, please
email service@medchipsolutions.com quoting the date of purchase and the name of the
supplier.
Other manuals for SpiroConnect
1
Table of contents
Popular Measuring Instrument manuals by other brands

thermastor
thermastor Humiport 10 owner's manual

Blackmagicdesign
Blackmagicdesign H.264 Pro Operation manual

In-situ
In-situ VuLink CI Operator's manual

Aqualytic
Aqualytic SD 400 Oxi L quick start guide

Kyoritsu Electrical Instruments Works, Ltd.
Kyoritsu Electrical Instruments Works, Ltd. KEW6315 Quick manual

Num'axes
Num'axes TEL1050 user guide

Hellermann Tyton
Hellermann Tyton 2608 operating instructions

Microtech
Microtech SUB-MICRON 1250511006 user manual

M-TI
M-TI Proforma 300i user manual

Master cool
Master cool R1234yf operating instructions

Pro's Kit
Pro's Kit TE-8202A-W Series Operation manual

HANYOUNG NUX
HANYOUNG NUX GE Series instruction manual


