Mediaedge USDP-R1000SH User manual

Signage Player corresponding to 4K
USDP-R1000SH/H
Simple Description
June 16, 2021
The 1.0th edition
Copyright c 2021 MEDIAEDGE Corporation

1
I-1. Before use
Thank you for purchasing USDP-R1000SH /USDP-R 1000H. The matter we would like
you to confirm before use of apparatus or a setup is explained.
■ I-1-1. The check of the contents of a package
Please check that the following accessories are contained into the package of USDP-
R1000. Although I have taken all possible measures against packing of the product, if
there are some which should run short, please contact the purchased store or the
following customer support.
Media edge incorporated company
Customer support
TEL:078-265-1552
FAX:078-265-1550
Mail: support@mediaedge.co.jp
(A 10:00-12:00, 13:00 - 17:00 * public holiday and the appointed holiday of our
company are excluded on Monday - Friday)
USDP-R1000SH /USDP-R1000H enclosure thing
l USDP-R1000 SH/H main part x1
l AC/DC adaptor and power cable x1
l Remote control (and AAA two dry cells) x1
l Simple description (our paper) x1
* An operation manual is downloadable from our homepage.
■ I-1-2. Product registration
In order to accept service of the guarantee of a product, technical support, etc., please
give me registration of a product. You access the following page and please give me user's
registration using the serial number indicated to the product face plate.
http://www.mediaedge.co.jp/enq/u-reg.html

2
■ I-1-3. The acquisition place of data required for a setup of this product
Please confirm the latest information, manual data, etc. in our Web page before using it.
https://www.mediaedge.co.jp/
About the newest operation manual, it can obtain from the download page of the
following URL.
https://www.mediaedge.co.jp/product/usdp-r1000/

3
I-2. The outline of USDP-1000
■ I-2-1. Outline
These products are a contents file of storage with a built-in main part, or USB storage, a
server, and 4K UHD player that reproduces the stream (H. data encoded by 265, H.264,
and MPEG-2) which a live encoder distributes. USB storage besides a network can
perform renewal of contents.
Moreover, if DCM (Display Content Manager: option) is used, the playlist reproduction
which arranged schedule reproduction, the animation, the still picture, and the telop on
one screen is possible. Renewal of contents and condition monitoring of two or more sets
of these products can be managed collectively. All the functions, such as control,
surveillance, and renewal of contents, can carry out from a network. It can cooperate
also with our cloud services.
4
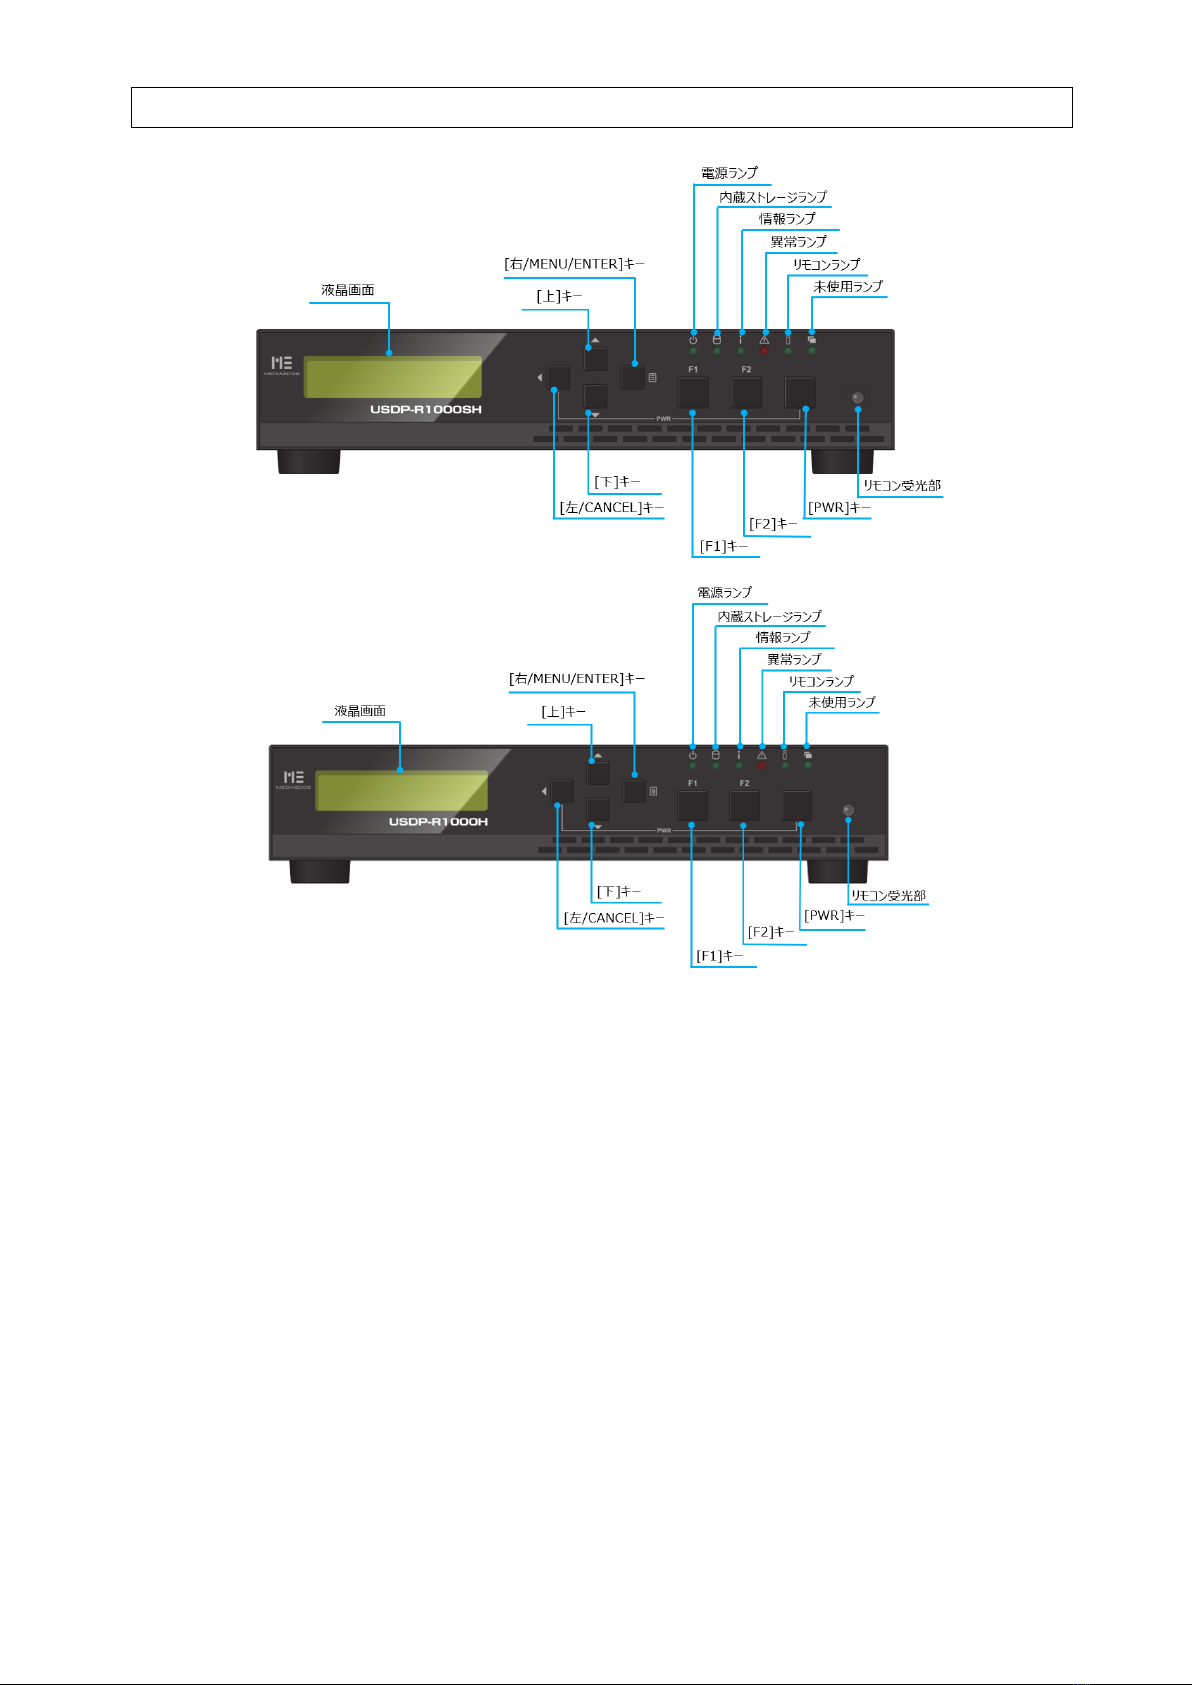
■ I-2-2. The USDP-R1000SH /USDP-R1000H front
(1) Power Lamp…………………… Display the status associated with power operations
such as startup and shutdown.
² Putting-out-lights… Power supply is not on.
² Green blink (every 0.5 second)
It is under end or during starting.
² Green lighting……… It is an operating state.
² Orange lighting…… It is in shutdown state.
² Orange blink…………It is firmware under updating.
(2) Built-in storage lamp…………When it reads and writes to a built-in storage, switch on
the light. (Only SSD loading model)
(3) Information lamp…………… Display the access state of external storage and built-in
storage.
² Putting-out-lights… External storage is not connected, or it is
write-protected, and is mounted.
² Blink………………… It writes in external storage or built-in storage.

5
² Lighting……………External storage is mounted in the state which can be
written in.
(4) Unusual lamp……………… Display the error condition resulting from hardware.
² Putting-out-lights…It is operating normalcy.
² Blink……………… The fan's abnormalities were detected.
(5) Remote control lamp………The light will be switched on if a remote control is
recognized.
(6) Intact lamp………………… Don't carry out use.
(7) Remote control euphotic part
The infrared euphotic part of the remote control is built in.
(8) Liquid crystal display………Display status display and a setting menu.
(9) [Top] key…………………… It moves to the upper item at the time of setting menu
manipulation.
(10) [Bottom] key…………… · It moves to a lower item at the time of setting menu
manipulation.
(11) [Left/CANCEL] key……… It is used as a movement/cancellation key to the item in
front of one at the time of key setting menu manipulation.
(12) [Right/MENU/ENTER] key
It is used as a key which decides an item at the time of
setting menu manipulation.
(13) [F1] Key…………………… Don't carry out use.
(14) [F2] Key……………………Don't carry out use.
(15) [PWR] key…………………It is starting of a main part by pressing the [PWR] key,
pressing the [left/CANCEL] key.
Unusual lamp
Detection of failure of equipment will light up and blink an unusual lamp.
In this case, please contact our customer support.

6
■ I-2-3. The back of USDP-R1000SH /USDP-R1000H main part
USDP-R1000SH
USDP-R1000H
(1) Power connector…………… Connect the AC/DC adaptor attachment.
※ Please do not use it by any means other than an
attached AC/DC adaptor.
(2) COM…………………………… Use it for serial connection.
(3) LAN…………………………… Connect a LAN cable.
(4) SDI OUT 1/2………………… They are 3G/HD-SDI output terminal.
(Only USDP-R1000SH)
※ A signal with SDI OUT1 and 2 the same is outputted.
※ Video and an audio are simultaneously outputted to
a SDI OUT terminal.
※ The SDI output is not equivalent to 4K output
(12 G-SDI).
(5) HDMI OUT…………………… HDMI
(6) It is an output terminal. (Only USDP-R1000SH)
※ Video and an audio are simultaneously outputted to
a HDMI OUT terminal.
(7) HDMI OUT 1/2……………… They are HDMI output terminal. (Only USDP-R 1000H)
※ Video and an audio are simultaneously outputted to
a HDMI OUT terminal.
(8) LINE OUT …………………… It is an analog audio output.
(9) MIC IN………………………… It is a microphone input terminal.
(10) USB 3.0……………………… It is a terminal which connects USB storage. The upper
part is USB1 and the lower part is USB2.
(11) USB 2.0……………………… Connect UPS and a USB keyboard.

7
※ Even if it connects USB storage, don't recognize as a
contents drive.
■ I-2-4. Connection of apparatus
Please connect USDP-R1000 and peripheral equipment to reference for the following
examples of connection (in the case of USDP-R 1000H).
When sound is taken out from HDMI
When sound is taken out from an analog voice terminal
● Connect a monitor with USDP-R1000.
● The voice response can choose SDI / HDMI / analog voice response by setup.
When hearing sound with an external speaker, voice response is set as analog voice
response, and it is LINE of USDP-R1000. A speaker is connected with an OUT terminal
with an analog audio cable.
● Connect a network cable if needed.
If contents are only reproduced from built-in storage or USB storage, it is not
necessary to connect a network cable.

8
● Network connection is required to perform the case "control via a network when
using a network for renewal of contents", and a setup.
● Check that AC plug (electric socket side) of an AC/DC adaptor has fallen out, and
connect DC plug (main part side) of an AC/DC adaptor to the power supply terminal
of a main part. If AC plug is connected to an electric socket, USDP-R1000 will be
turned on and equipment will start.
Attention at the time of AC/DC adaptor connection
When you connect an AC/DC adaptor to a main part, please carry out in order of
the following.
(1) Extract, when AC plug is connected to the electric socket.
(2) Connect DC plug to a main part.
(3) Connect AC plug to an electric socket.
■ I-2-5. Starting and a shutdown
Starting
There is the following method in starting USDP-R1000.
● Connect an AC/DC adaptor to an electric socket.
● Press the (POWER) key of the remote control.
● Press the [PWR] key, pressing the left / the [CANCEL] key of a front panel.
If this machine carries out the completion of starting, a power
indicator will light up green. Moreover, a liquid crystal display
becomes a status display like the right.
Shutdown
There is the following method in shut USDP-R1000.
● Press the (POWER) key of the remote control.
● Press the [PWR] key, pressing the left / the [CANCEL] key of a front panel.
● [5. from the setting menu of a front panel SHUTDOWN] > Choose [Power off].
● [Equipment management] of a Web console > Perform [a shutdown] from [reboot /
shutdown] screen.
A shutdown of this machine will switch on a power indicator in orange. Moreover, nothing
is no longer displayed on a liquid crystal display.
USDP-R1000SH
STOP

9
Attention at the time of a shutdown
The shut during renewal of firmware by any means.
When you turn off a power supply, please be sure to perform shutdown
operation, and to extract an AC/DC adaptor from an electric socket, after
checking that the power indicator of a front panel is on in orange. When a power
supply is turned off without carrying out shutdown operation, there is a possibility
that a system may not start. Moreover, there are failure of built-in storage and
fear of breakage of a contents file.
Moreover, please do not use it except for the case, shut although it is possible to
drop a power supply on long aggressiveness the [PWR] key compulsorily,
pressing the left / the [CANCEL] key.
I-3. Initial setting
■ I-3-1. Network setup
I-3-1-1. A setup by a front panel
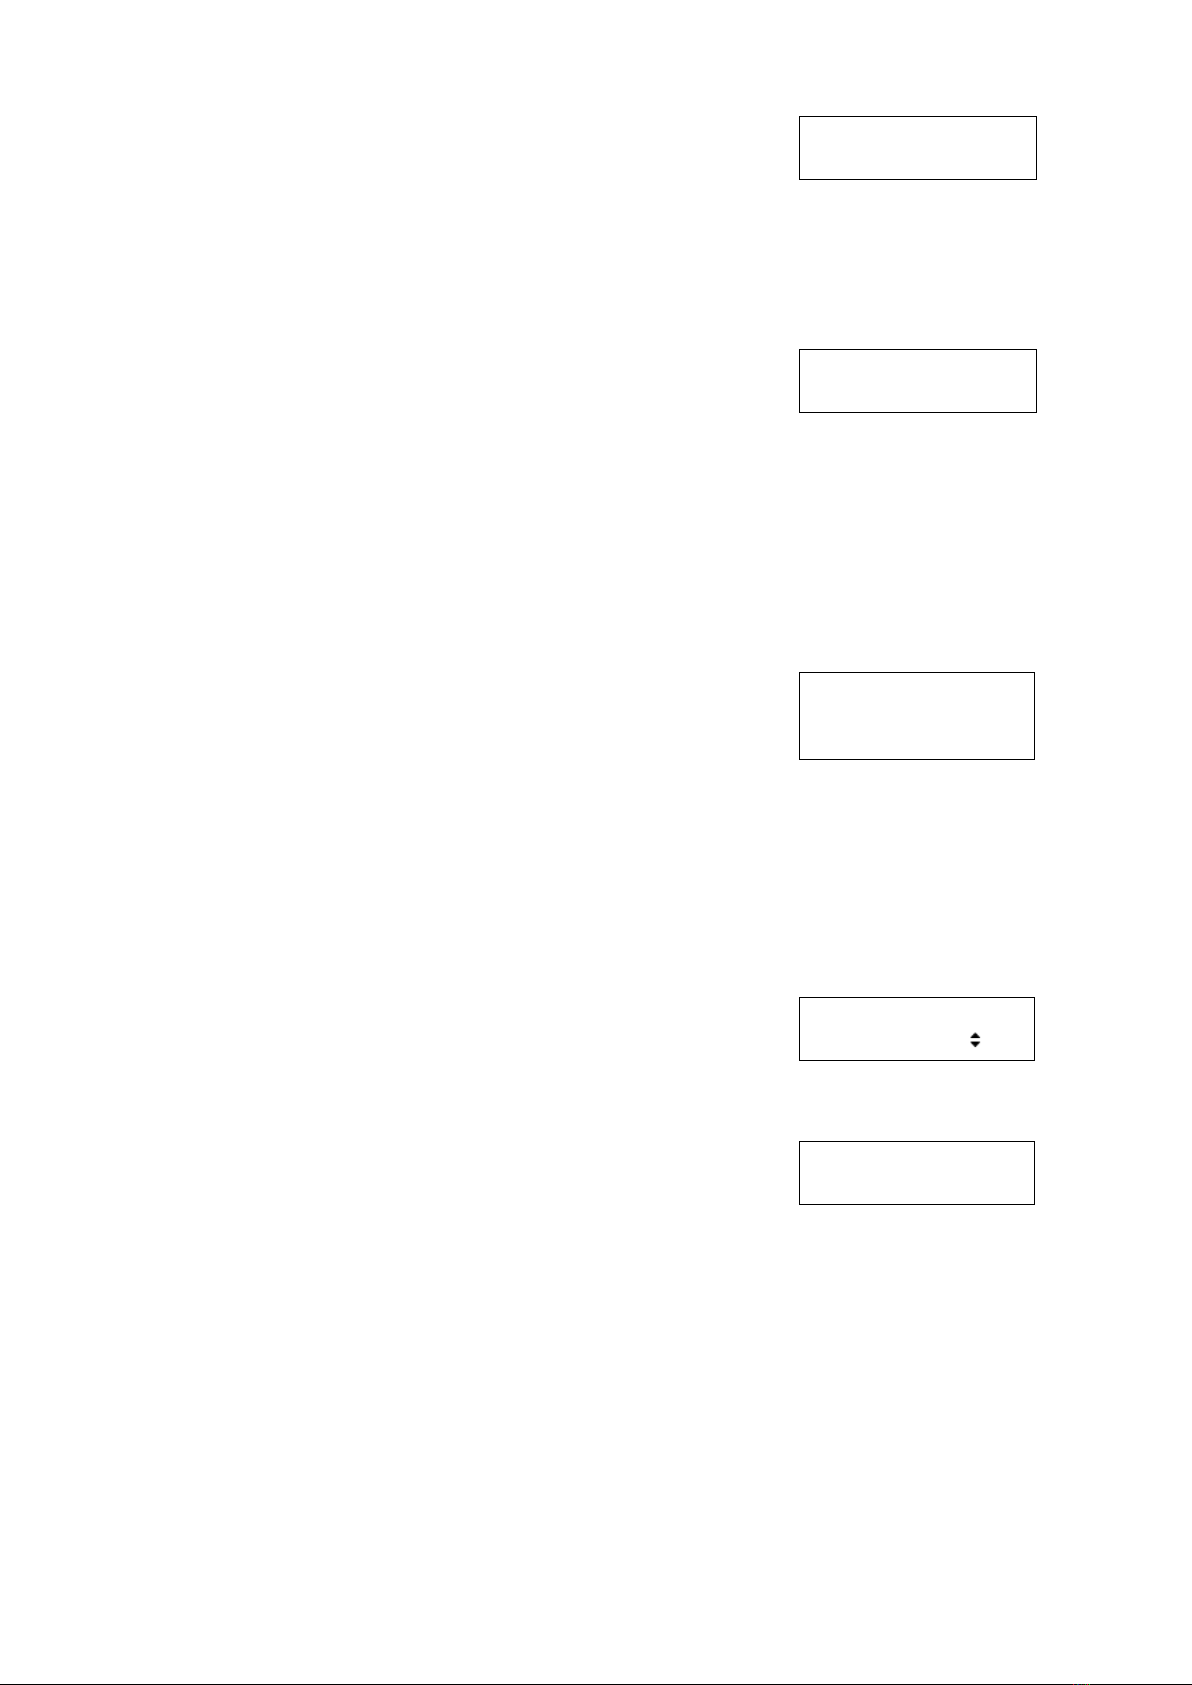
● If USDP-R1000 starts, it will become a status display
like the right.
● [The right/MENU/ENTER] A key is pressed and change
to a setting menu.
● The [bottom] key is pressed, and [2. NETWORK] is
chosen and press the right / the [MENU/ENTER] key.
● Pressing the [bottom] key, [2.IPv4] is chosen and
press the right / the [MENU/ENTER] key.
● The [bottom] key is pressed, and [Manual] is chosen
and press the right / the [MENU/ENTER] key.
● [1. IP address] is chosen and press the right / the
[MENU/ENTER] key.
USDP-R1000SH
STOP
MENU
1.VIDEO
NETWORK
1.IPv6
IPv4
[DHCP ]
Manual setting
1.IP address
IP address
000.000.000.000.
000
10
● Set up an IP address.
A digit number is changed by [the left/CANCEL], and
the right / the [MENU/ENTER] key, and a [top]
changes a number by a [bottom] key. Pressing the
right / the [MENU/ENTER] key by the 12th figure, an
IP address is the completion of a setting.
Example: 192.168.0.20
● [2. Subnet mask] is chosen, and the right / the
[MENU/ENTER] key is pressed, and set up a subnet
mask.
A digit number is changed by [the left/CANCEL], and
the right / the [MENU/ENTER] key, and a [top]
changes a number by a [bottom] key. Pressing the
right / the [MENU/ENTER] key by the 12th figure, a
subnet mask is the completion of a setting.
Example: 255.255.255.0
● [3. Gateway] is chosen, and the right / the
[MENU/ENTER] key is pressed, and set up a default
gateway.
A digit number is changed by [the left/CANCEL], and
the right / the [MENU/ENTER] key, and a [top]
changes a number by a [bottom] key. Pressing the
right / the [MENU/ENTER] key by the 12th figure, a
default gateway is the completion of a setting.
Example: 0.0.0.0 ("0.0.0.0" means no specifying.)
● Press the left / the [CANCEL] key until a right screen
is displayed.
● If [Yes] is chosen and the right / the [MENU/ENTER]
key is pressed, a setup will be saved and USDP-R1000
will reboot.
If [No] is chosen and the right / the [MENU/ENTER]
key is pressed, a setup will be canceled and will return
to a status display. In this case, please set up again.
IP address
192.168.000.020
Subnet mask
255.255.255.000
Gateway
000.000.000.000.
000
Save config ?
[Yes ]
Reboot...

11
I-3-1-2. Set up from a Web console.
A setup of USDP-R1000 from Web console.
LAN of USDP-R1000 is connected with PC in the same network, and it is from a Web
console with the following methods.
The check of a setup and a state can be performed.
● At Windows 10, it is the [network] of Explorer. > The host name of USDP-R1000
linked to the same network is displayed on [other devices], and if a device is double-
clicked, a browser will rise.
Generate automatically from a MAC Address like when not setting up a host name
"USDP-xxxxxx".
● USDP-R1000 can be connected with PC in the same network, and it can detect using
MEDIAEDGE Finder installed in PC.
If it clicks [PRESENTATION URL] of detected USDP-R1000, a browser will rise.
※ MEDIAEDGE Finder is downloadable from our homepage.
HDMA-4100, MEDIAEDGE-STB 4H, MEDIAEDGE LEB
Pro2/Pro/Express/Recorder, and MEDIAEDGE Decoder other than USDP-R1000
are detected.
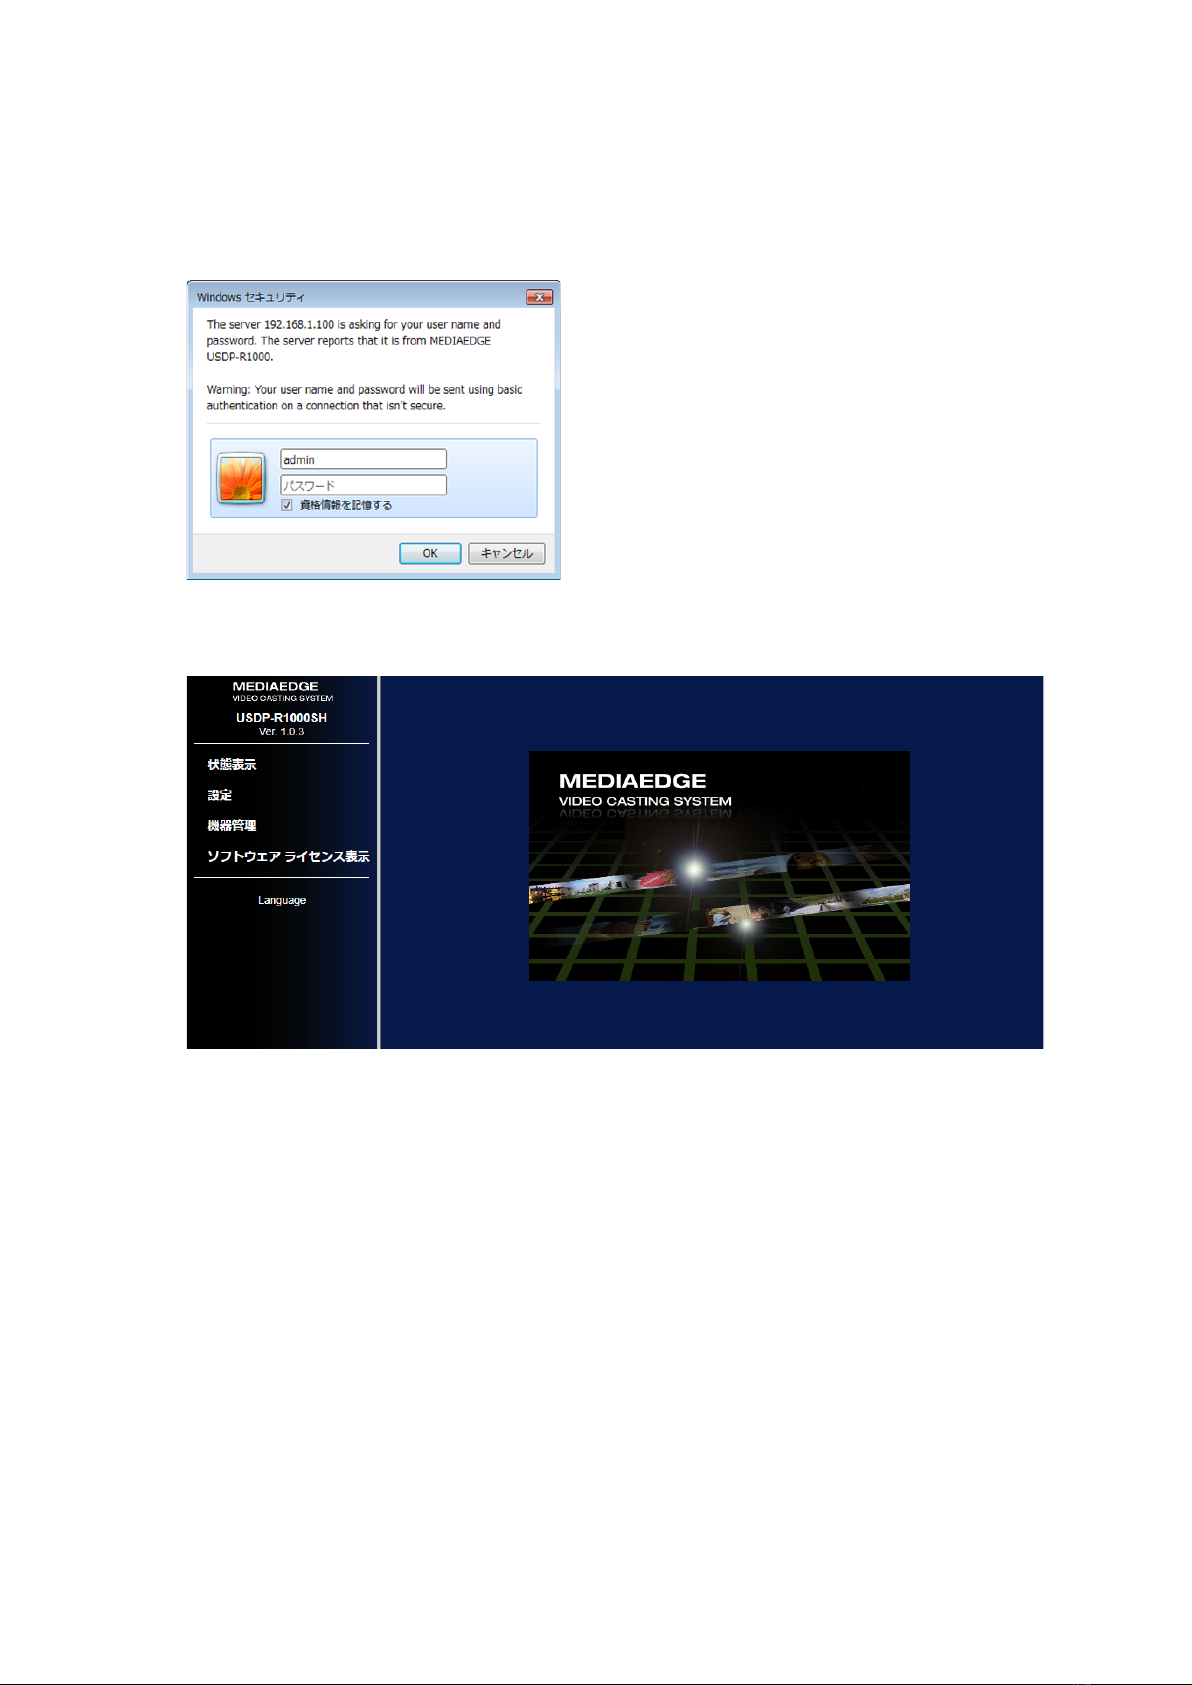
● Since the following screens are displayed, enter a user name and a password.
* At the time of factory shipments, in a setup, a user name is admin and a password
is nothing (not set up).

12
[Setup] > Please open the setting screen of a [network] to a network and set up
[IPv6], [cable LAN], a [host name], and [NTP]. A setup of the network set up here is
reflected in a LAN port.
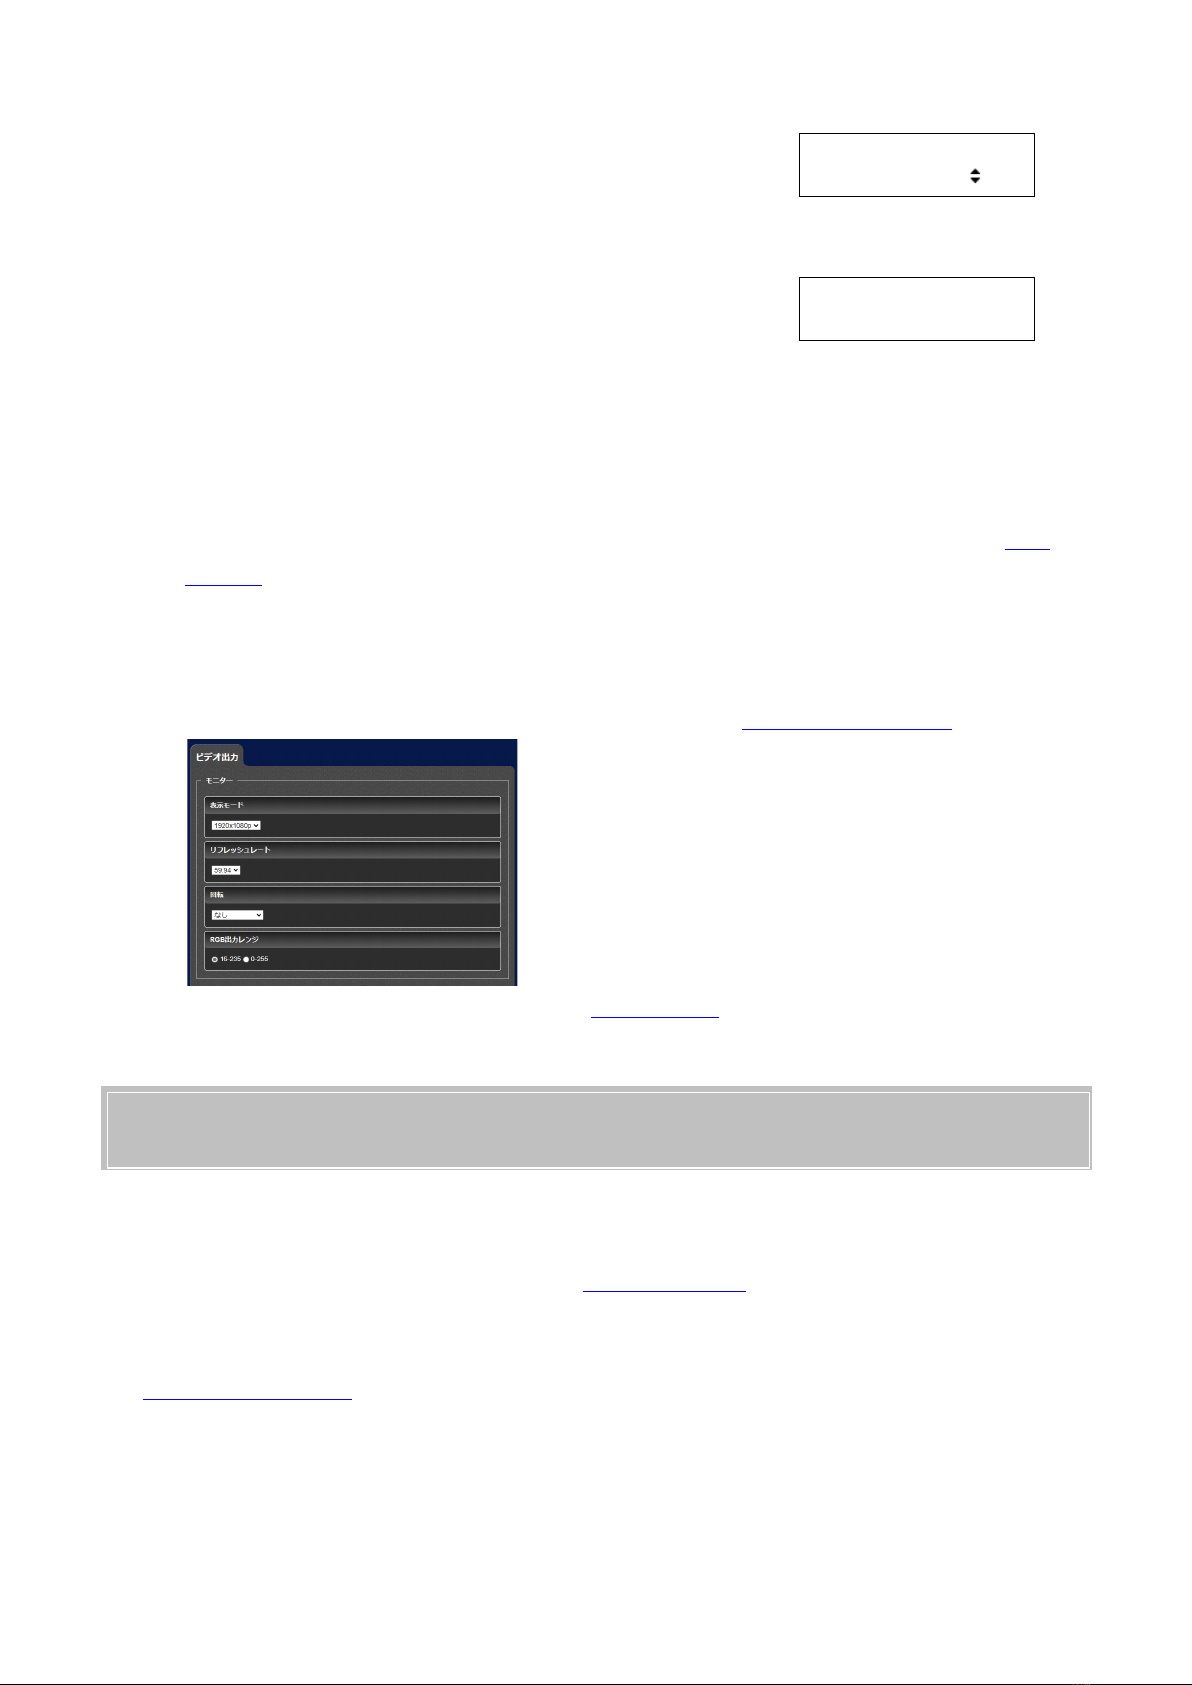
■ I-3-2. Display setup
I-3-2-1. A setup by a front panel
● If USDP-R1000 starts, it will become a status display
like the right.
● [Right/MENU/ENTER] A key is pressed and change to
a setting menu.
● [Right/MENU/ENTER] Press a key.
● [Right/MENU/ENTER] Press a key.
● [Top]/[Bottom] key is pressed, and a proper video
output setup is chosen and press the right / the
[MENU/ENTER] key.
USDP-R1000SH
STOP
MENU
1.VIDEO
VIDEO
1.Video format
Video format
[1920x1080/59p ]
VIDEO
1.Video format
13
● Press the left / the [CANCEL] key until a right screen
is displayed.
● A setup is saved, if [Yes] is chosen and the right / the
[MENU/ENTER] key is pressed. Reboot automatically
after that.
I-3-2-2. A setup with a Web console
A monitor is connected with USDP-R1000 by the SDI cable or a HDMI cable.
● A setup is in the state which connected correctly the monitor which uses it from Web
console. A setup is reflected after a reboot.
● Keep in mind if monitor's cable is drawn out, not displayed as a setting during
operation.
● Connection of the selected display mode and the monitor which does not support a
refresh rate may display nothing. In that case, please set up at front panel.
For the setting method, please refer to Web console.
I-4. Web console
Please open USDP-R1000 by a web browser (Microsoft Edge which operates on Windows,
Internet Explorer 11, Google Chrome, Mozilla Firefox). the case where the IP address of
USDP-R1000 is not known, please refer to Network setting.
Example: When IPv4 address of USDP-R1000 is 192.168.0.20, input URL as follows.
http://192.168.0.20 or 192.168.0.20
Save config ?
[Yes ]
Saving...
14
Since the following screens are displayed, please enter a user name and a password.
※ At the time of factory shipments, in a setup, a user name is admin and a password is
nothing (not set up).
The next Web console screen is displayed.
A display language can be chosen from Japanese/English from [Language] of the
left-hand side menu lower part.
Please download and refer to an operation manual for the details of other setup or
operation from our company HP.
Other manuals for USDP-R1000SH
1
This manual suits for next models
1
Other Mediaedge Media Player manuals


