MediaShop cook it User manual

Gebrauchsanleitung . . . . . . . . . . . . . . . . . . . . . . . . . . . . . . . . . . . . . . . . . . . . . . . . .3
Instructions for Use. . . . . . . . . . . . . . . . . . . . . . . . . . . . . . . . . . . . . . . . . . . . . . . . . .7
Mode d’emploi . . . . . . . . . . . . . . . . . . . . . . . . . . . . . . . . . . . . . . . . . . . . . . . . . . . . . .11
Manuale di utilizzazione . . . . . . . . . . . . . . . . . . . . . . . . . . . . . . . . . . . . . . . . . .16
Gebruiksaanwijzing. . . . . . . . . . . . . . . . . . . . . . . . . . . . . . . . . . . . . . . . . . . . . . . .20
Használati utasítás . . . . . . . . . . . . . . . . . . . . . . . . . . . . . . . . . . . . . . . . . . . . . . . . .25
Návod k použití . . . . . . . . . . . . . . . . . . . . . . . . . . . . . . . . . . . . . . . . . . . . . . . . . . . . .29
Návod na použitie . . . . . . . . . . . . . . . . . . . . . . . . . . . . . . . . . . . . . . . . . . . . . . . . . .33
Instrucţiuni de utilizare. . . . . . . . . . . . . . . . . . . . . . . . . . . . . . . . . . . . . . . . . . . .38
Instrucciones de uso . . . . . . . . . . . . . . . . . . . . . . . . . . . . . . . . . . . . . . . . . . . . . .42
2
DE
Lieferumfang: 1x Cook it – Multifunktionsgrill,
1x Bedienungsanleitung inkl. leckeren Rezepten
EN
Scope of delivery: 1x Cook it - multifunction grill,
1x instruction manual including delicious recipes
FR
Étendue de la livraison : 1 grill multifonctions Cook it,
1 mode d’emploi avec de savoureuses recettes
IT
Contenuto della confezione: 1x Cook It – multifunctionele grill,
1x istruzioni per l’uso inclusivo di tante buone ricette
NL
Inhoud van de verpakking: 1x Cook It - multi-functionele grill,
1x handleiding incl. lekkere recepten
HU
A csomag tartalma: 1 Cook It – Többfunkciós grillező,
1 Használati utasítás receptekkel
CZ
Obsah dodávky: 1x multifunkční gril Cook it,
1x návod k použití s lahodnými recepty
SK
Obsah dodávky: 1x Cook it – multifunkčný gril,
1x návod na obsluhu vrát. chutných receptov
RO
Pachetul de livrare: 1x Cook It - grătar multifuncional,
1x manual de utilizare inclusiv reete delicioase
ES
Volumen de suministro: 1x plancha multifuncional Cook It,
1x instrucciones de uso incl. sabrosas recetas
SW-2007.pdf 1 16.10.17 16:14
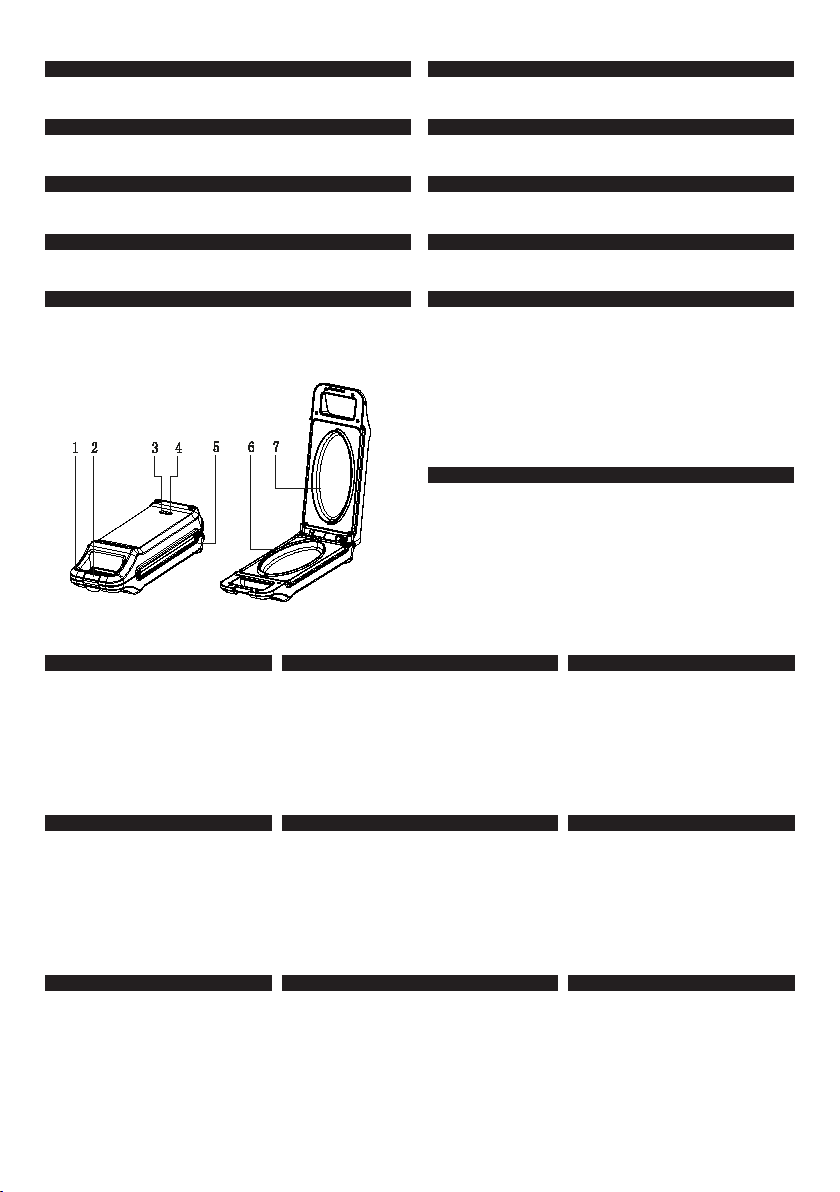
DE
1. Oberes Gehäuse
2. Sperre
3. Betriebsanzeige
4. Bereitschaftsanzeige
5. Unteres Gehäuse
6. Bodenplatte
7. Obere Platte
EN
1. Upper casing
2. Lock
3. Operating display
4. Readiness indicator
5. Lower casing
6. Base plate
7. Upper plate
FR
1. Boîtier supérieur
2. Verrouillage
3. Témoin Marche
4. Témoin Prêt à l’emploi
5. Boîtier inférieur
6. Plaque de fond
7. Plaque supérieure
IT
1. Corpo superiore
2. Dispositivo di blocco
3. Display
4. Spia di “pronto all’uso”
5. Corpo inferiore
6. Piastra inferiore
7. Piastra superiore
NL
1. Bovenste gedeelte van de behuizing.
2. Vergrendeling
3. Gebruiksindicator
4. Gereedheidsindicator
5. Onderste gedeelte van de behuizing
6. Bodemplaat
7. Bovenste plaat
HU
1. Felső burkolat
2. Zár
3. Üzem-kijelző
4. Készenléti jelzőfény
5. Alsó burkolat
6. Alsó sütőlap
7. Felső sütőlap
CZ
1. Horní plášť
2. Zámek
3. Ovládací displej
4. Kontrolka připravenosti
5. Spodní plášť
6. Základová deska
7. Horní deska
SK
1. Horný kryt
2. Zámok
3. Kontrolka prevádzky
4. Kontrolka pripravenosti
5. Dolný kryt
6. Dolná platňa
7. Horná platňa
RO
1. Carcasa superioară
2. Blocare
3. Afișaj de funcionare
4. Indicator de pregătire
5. Carcasa inferioară
6. Placa de bază
7. Placa superioară
ES
1. Carcasa superior
2. Bloqueo
3. indicador de estado
4. indicador de estado Preparado
5. Carcasa inferior
6. Placa inferior
7. Placa superior

3
DE
Wir danken Ihnen, dass Sie „COOK IT“ gewählt haben.
„COOK IT“ ist ein Produkt, das außergewöhnlich leicht
und sicher zu bedienen ist. Wir ersuchen Sie, die im
Folgenden beschriebenen Sicherheitshinweise
zu
beachten, damit Sie „COOK IT“ richtig bedienen können:
SICHERHEITSHINWEISE UND
ALLGEMEINE HINWEISE
1. Lesen Sie die folgenden Zeilen
aufmerksam durch, um so die
Gefahr von Bränden, Strom-
stößen oder Verbrennungen zu
vermeiden!
2. Berühren Sie niemals die heißen
Flächen.
3. Reinigen Sie das noch warme Gerät
mit einem Papiertuch.
4. Achten Sie darauf, dass „COOK IT“
nicht mit Wasser oder sonstigen
Flüssigkeiten in Berührung kommt,
dies kann einen Kurzschluss oder
einen Stromstoß auslösen.
5. Lassen Sie den eingeschalteten
„COOK IT“ niemals unbeaufsichtigt.
6. Stecken Sie „COOK IT“ ab, wenn Sie
ihn nicht mehr benötigen.
7. Lassen Sie „COOK IT“ gut auskühlen,
bevor Sie ihn wegstellen, auseinan-
dernehmen oder reinigen.
8. Benutzen Sie „COOK IT“ niemals,
wenn das Kabel oder „COOK IT“
selbst kaputt sind. Suchen Sie den
„COOK IT“ Händler auf, um mit dem
nächstgelegenen offiziellen Service-
betrieb in Kontakt zu treten.
9. Bestandteile, die nicht für „COOK IT“
hergestellt wurden, können Unfälle
verursachen.
10. Lassen Sie das Verbindungskabel
niemals über den Tischrand hängen
und schützen Sie es vor heißen und
scharfen Gegenständen. Achten Sie
darauf, dass sich das Kabel nicht
verwickelt.
11. Es kann zu Verformungen, Beschädi-
gungen und Mängeln führen, wenn
„COOK IT“ nicht auf festen Oberflä-
chen benutzt oder Feuchtigkeit oder
Hitze ausgesetzt wird.
12. Benutzen Sie das Gerät nur so, wie
es seiner Bestimmung entspricht!
13. Bewahren Sie die vorliegende
Gebrauchsanweisung so auf, dass
sie stets zur Hand ist!
14. Starke Stöße oder Stürze können
„COOK IT“ beschädigen!
15. Benutzen Sie niemals Besteck aus
Metall!
16. Tauchen Sie „COOK IT“ niemals in
Wasser oder in der Spüle unter. Dies
kann den Apparat beschädigen und
einen Stromstoß verursachen!
17. Stecken Sie das Gerät vor dem
Reinigen ab und stellen Sie vor dem
neuerlichen Anstecken sicher, dass
der Stecker trocken ist.
18. Achtung! Nur der zum Gerät passen-
de Stecker darf verwendet werden!
19. Diese Geräte können von Kindern ab
8 Jahren sowie von Personen mit
reduzierten physischen, sensorischen
oder mentalen Fähigkeiten oder
Mangel an Erfahrung und/oder
Wissen benutzt werden, wenn sie

4
beaufsichtigt oder bezüglich des
sicheren Gebrauchs des Gerätes
unterwiesen wurden und die daraus
resultierenden Gefahren verstanden
haben. Kinder dürfen nicht mit dem
Gerät spielen. Reinigung und Benut-
zer-Wartung dürfen nicht durch
Kinder durchgeführt werden, es sei
denn, sie sind älter als 8 Jahre und
beaufsichtigt. Kinder jünger als 8
Jahre sind vom Gerät und der An-
schlussleitung fernzuhalten.
20. Der Gebrauch von externen Zeit-
schaltern oder gesonderten Fernbe-
dienungssystemen zum Betrieb des
Geräts ist verboten!
ANLEITUNG
„COOK IT“ ist wahrlich ein Multitalent! Sie können
nicht nur Fleisch, Toasts, Desserts, oder Röstis
zubereiten. Sie können mit dem platzsparenden Gerät
auch grillen, toasten, backen, überbacken oder rösten.
Mit „COOK IT“ kommt der moderne Lifestyle direkt in
Ihre Küche. Die antihaft-beschichteten Heizplatten
machen schnell und kinderleicht Spiegelei oder „Easy
Over Eggs“ und Ihre Toast, Rösti oder Bratkartoffel
knusprig braun. Einfach und leicht zu reinigen. Die
verlässliche Kontrollleuchte für „Ein + Aus“ und eine
für „Bereit“ zeigen Ihnen die Bereitschaft des Gerätes
an. Ein hoch-hitzebeständiges Gehäuse sorgt für lang
haltbare Schönheit, Anti-Rutsch-Füße sorgen für
sicheren Stand. Die Ober- und Unterhitze sowie die
hochwertige Keramikbeschichtung erleichtern das
zubereiten Ihrer Speisen! Multifunktionale Zuberei-
tungs möglichkeiten, auch durch den „FLIP OVER
Effekt“: Grillen, Backen, Toasten, Rösten. Nach
Gebrauch platzsparend aufrecht stehend auf
bewahren oder für den täglichen Gebrauch auf
Ihrem Arbeitstisch aufstellen.
HINWEIS:
➔Beim ersten Gebrauch kann das Gerät etwas
Rauch entwickeln.
➔Entfernen Sie eventuelle Verpackungsrückstände,
dann reinigen Sie das Gehäuse des „COOK IT“ mit
einem feuchten Tuch.
➔Reinigen Sie auch die Back-Platten nur mit einem
feuchten Tuch oder einem weichen Schwamm,
„COOK IT“ bietet leichte Reinigung durch Lotus-
Abperleffekt.
➔Die Back-Platten vor dem allerersten Gebrauch
einmal einfetten, in Folge entfällt das Einfetten
aufgrund der Antihaftbeschichtung.
VERWENDUNG
1. Stecken Sie zum Vorheizen des „COOK IT“ den
Stecker in die Steckdose. Die rote und grüne
Kontroll-Lampe leuchtet auf. Bevor Sie die
Sandwiches toasten, müssen Sie den „COOK IT“
so lange vorheizen, bis die grüne Kontrolllampe
das erste Mal erlischt. ACHTUNG: Das Gerät wird
jetzt heiß. Sobald die grüne Anzeige erlischt, ist
„COOK IT“ bereit zur Verwendung.
2. Öffnen Sie den „COOK IT“.
3. Legen Sie Ihr vorbereitetes Sandwich mit Zutaten
in den „COOK IT“. Sie können die Toastscheiben
von außen und innen mit Butter bestreichen, um
eine schöne goldbraune Farbe zu erzielen.
4. Nun den „COOK IT“ schließen, dabei umfassen
Sie den Griff, und rasten Sie die Sicherungsklam-
mer ein. Achten Sie darauf, dass der Verschluss
der Griffverrieglung einrastet.
5. Lassen Sie das Sandwich 3 bis 5 Minuten im
„COOK IT“ je nach gewünschter Bräune. Wenn
ein Sandwich zu groß ist, schneidet „COOK IT“ es
automatisch zu. Zu jeder Zeit können Sie „COOK
IT“ öffnen, um zu sehen, ob Ihr Sandwich fertig
ist. Je nach Brot oder Zutaten ist die Zuberei-
tungszeit abhängig von Ihrem persönlichen
Geschmack.Hinweis: Während der Zubereitung
schaltet sich die grüne Anzeige ein und aus.
6. Wenn Ihr Sandwich fertig ist, nehmen Sie es
vorsichtig heraus, verwenden Sie dazu Holz- oder
Kunststoff-Besteck, keine Gegenstände aus Metall.
PROBLEM / URSACHE
Sandwiches werden zu dunkel
Sandwiches wurden zu lange gebacken
Gerätegriff rastet nicht ein
Sandwiches wurde zu dick belegt
Sandwiches kleben an der Backform fest
Außenseiten der Toasts wurden nicht mit Butter
bestrichen

5
REINIGUNG
Reinigen Sie die Back-Platten nie mit aggressiven
Scheuermitteln oder Scheuerschwämmen, um die
Antihaft-Beschichtung nicht zu beschädigen. Tauchen
Sie den „COOK IT“ niemals in Wasser oder andere
Flüssigkeiten; auch nicht unter fließendem Wasser
abwaschen.
1. Keine Gegenstände aus Metall oder scheuernde
Utensilien verwenden.
2. Ziehen Sie den Netzstecker des „COOK IT“ raus
und trennen Sie ihn so vom Stromnetz.
3. Lassen Sie den „COOK IT“ geöffnet abkühlen.
4. Entfernen Sie hartnäckige Lebensmittelreste wie
angebrannten Käse mit einem Spatel aus Holz
oder Plastik von Ihrem „COOK IT“.
5. Reinigen Sie die Back-Platten mit einem feuchten
weichen Tuch oder Schwamm.
6. Reinigen Sie das Gehäuse des Geräts mit einem
feuchten Tuch.
7. Bewahren Sie den „COOK IT“ in horizontaler oder
vertikaler Position auf.
ACHTUNG: Gerät keinesfalls überfüllen! Vor allem bei
Eiern und flüssigen Zutaten darauf achten, dass nur
bis zur Behälter-Oberkante befüllt wird. Bei der
Zubereitung von Eiern empfehlen wir mit geöffnetem
„COOK IT“ zu arbeiten und erst wenn die Speise
gewendet werden soll, das Gerät zu schließen.
REZEPTE
SCHINKENKÄSE SANDWICH
Zutaten:
4 Scheiben Toast, 1 dicke Scheibe gekochten
Schinken, 70 g Käse (Gouda o. Gruyere), Butter,
Pfeffer
Zubereitung:
Die Außenseiten der 4 Toastscheiben mit Butter
bestreichen. Den geriebenen Käse (oder in Streifen
geschnitten) jeweils zur Hälfte auf den Toastscheiben
verteilen. Eine halbe Scheibe Schinken darauflegen,
würzen und den übrigen Käse darauf geben. Mit den
beiden restlichen Toastscheiben abdecken. In den
„COOK IT“ geben und zuklappen (Griff einrasten!).
Je nach gewünschtem Bräunungsgrad für 4 -6
Minuten backen lassen.
AMERIKANISCHES SANDWICH
Zutaten:
4 Toastscheiben, 4 TL Mayonnaise, 4 kleine Tomaten,
4 Scheiben Chester oder Emmentaler Käse,
4 Scheiben Schinkenspeck
Zubereitung:
Die Außenseiten der Toastscheiben dünn mit Butter
bestreichen. Die Innenseiten dünn mit Sauce Tartar
bestreichen, dünne Tomatenscheiben darauf verteilen
und mit Schmelzkäse abdecken. Schinkenspeck in
Streifen gitterförmig darüberlegen und mit den
restlichen Toastscheiben bedecken. In den „COOK IT“
geben und zuklappen (Griff einrasten!). Je nach
gewünschtem Bräunungsgrad für 4 -6 Minuten
backen lassen.
GEFÜLLTE, ÜBERBACKENE AVOCADO
Zutaten:
1 Pckg Shrimps, 2 EL Zitronensaft, 1 kleine Avocado,
1 Spritzer Chilisauce, Schmelzkäse gerieben
Zubereitung:
Die Avocado in der Mitte durchschneiden und das
Fruchtfleisch aus der Schale aushöhlen. Die Shrimps
auftauen lassen (oder abgetropft aus dem Glas) und
mit Zitronensaft würzen. Die Avocadomasse
zerdrücken, mit dem Shrimps mischen und nach
Geschmack würzen (Chilisauce darüber spritzen).
Jetzt gut mit Reibkäse bestreuen und In den
„COOK IT“ geben und zuklappen (Griff einrasten!).
Jetzt noch für 4-6 Minuten backen lassen.
RÖSTI
Zutaten:
1 EL Butterschmalz, 300 g mehlige Kartoffeln, 1 kleine
Zwiebel, Pfeffer und Salz nach Geschmack
Zubereitung:
Kartoffeln schälen und fein reiben, die Zwiebel
schälen und fein hacken. Die Kartoffeln mit den
Zwiebeln, Salz und Pfeffer mischen. Das Buttersch-
malz im „COOK IT“ erhitzen, mit einem Esslöffel die
Rösti-Mischung in den „COOK IT“ geben und flach
drücken, gut anbraten, nach 2 - 3 Minuten den
„COOK IT“ einfach per „FLIP OVER„ wenden und von
der anderen Seite knusprig fertig braten lassen. Die
Rösti auf Küchenkrepp abtropfen lassen und heiß
servieren.

6
OMELETTE
Zutaten:
2 Eier, 1/2 TL Mehl, 2 EL Milch, 50 g Edamer,
1 Scheibe Schinken (in feine Streifchen geschnitten)
1/4 TL Chili-Gewürz, 2 EL Olivenöl, Salz, Butter,
1/2 Tomate, 1 Zweig Petersilie
Zubereitung:
Die Eier und das Öl für das Schinken-Käse- Omelette
gut verquirlen und schaumig rühren. Käse, Milch,
Mehl, Schinken und Gewürze hinzufügen und
durchrühren. Die Eimasse in den erhitzten und leicht
gefetteten „COOK IT“ gießen und in 2-3 Minuten
stocken lassen. Tomatenscheiben daraufgeben, den
„COOK IT“ komplett wenden (,,FLIP OVER“) und
weitere 1-2 Minuten erhitzen lassen. Mit Petersilie
garnieren.
SPIEGELEI „SUNNYSIDE UP“ UND
„EASY OVER“
Zutaten:
2 Eier, Salz und eine Spur Butter
Zubereitung:
„COOK IT“ mit einer Spur Butter einreiben und
verheizen. 2 große Hühnereier vorsichtig aufschlagen
und in den „COOK IT“ einlaufen lassen und bei
geöffnetem Gerät bis zu der gewünschten Konsistenz
braten lassen.
Tip: Werden die Eier nicht als „Sunnyside up“
gewünscht, dann kurz vor Ende den „COOK IT“
schliessen und „FLIP OVER“ umdrehen und noch kurz
nachbraten lassen.
SCHOKOKUCHEN
Zutaten:
40 g Butter, 100 g Schokolade, 2 Eier (60 g),
50 g Zucker Feinkristall, 3 EL Mehl, 1 TL Backpulver,
Puderzucker, 1 Rippe Milchschokolade
Zubereitung:
Die Butter schmelzen lassen und die Eier trennen.
Eigelb und 50 g Zucker mit der geschmolzenen Butter
verrühren. Die Schokolade schmelzen und zum
Butter-Gemisch geben. Das Eiweiß steif schlagen.
Einen gehäuften EL Mehl in die Masse rühren und
den Eischnee vorsichtig unterheben. Die Schoko-
masse in den vorgeheizten und leicht gefetteten
„COOK IT“ gießen, die Schokorippe obenauf legen
und den „COOK IT“ Schließen und verriegeln.
Für ca. 8-10 Minuten backen lassen. Danach den
„COOK IT“ komplett wenden (,,FLIP OVER“) und
weitere 3 -5 Minuten backen lassen. Den fertigen
Kuchen vorsichtig herausnehmen (Achtung: Flüssige
heiße Schokolade inside!) und mit Puderzucker
bestäuben.
HACKBRATEN MIT EI
Zutaten:
250 g gemischtes Hackfleisch (Faschiertes), 2 Eier
(Größe M), 1 kleine Zwiebel, 100 g Semmelbrösel
Petersilie, Salz, Pfeffer, 30 g Butter oder Margarine,
2-3 EL dunkler Soßenbinder Petersilie, Fett
Zubereitung:
1 Ei etwa 6-8 Minuten kochen, abschrecken und
abkühlen lassen. Zwiebel schälen und fein würfeln.
Brot fein zerkrümeln. Petersilie waschen und fein
hacken. Das Hackfleisch, das zweite Ei, Semmelbrösel,
Zwiebel und Petersilie gut miteinander vermischen.
Mit Salz und Pfeffer kräftig abschmecken. Aus dem
faschierten Hackteig einen kleinen Laib formen umd
das geschälte, hartgekochte Ei in der Mitte des Laibes
verstecken und den Teig darüber wieder zusammen-
drücken. In den vorgeheizten und eingefetteten
„COOK IT“ setzen, zuklappen und sichern und ca. 20
bis etwa 30 Minuten braten lassen. Hin und wieder
per „FLIP OVER“ wenden. Danach den Hackbraten
aus dem „COOK IT“ nehmen. Wenn gewünscht, den
Bratensatz mit 3 EL Wasser lösen und für die Soße
kurz aufkochen lassen, den Soßenbinder unter
Rühren einstreuen. Mit Salz und Pfeffer abschmecken.
Mit Kartoffelpürree servieren. Soße extra reichen.
Die Tabelle basiert auf den angegebenen
Gewichten.
Die Garzeiten variieren mit der Veränderung
des Gewichtes.
Ihrer Fantasie sind keine Grenzen gesetzt. Sie können
mit allen Lebensmitteln köstliche Gerichte erzeugen:
Zum Beispiel mit Salami, gekochtem Schinken,
Thunfisch, auch Reste vom Sonntagsbraten können
verwendet werden, Früchte oder Gemüse wie z.B.
Tomaten, Paprikaschoten, Spargel, Gurken, Zwiebeln,
Pilze, Ananas, Pfirsiche, Aprikosen, Mandarinen,
Bananen, Käse in jeder Erscheinungsform, ob in
Scheiben, gerieben oder zerdrückt. Zum überba-
cken besonders geeignet sind leicht schmelzende
Käse-Sorten. Die Verwendung von Gewürzen erfolgt
nach persönlichem Geschmack.

7
Was ich koche Gar+Bratzeiten Anmerkung
Steak ca. 4 Min. pro Seite ca. 150 gr., dick geschnitten
2-3 Min. ruhen lassen
Schnitzel natur ca. 5 Min. pro Seite ca. 150 gr. trockentupfen
Schnitzel paniert ca. 4 Min. pro Seite ca. 150 gr. Immer in Fett
Lammkotlett ca. 4 Min. pro Seite Ideal mit Rosmarin
Frische Fische z. B. Forelle klein,
Pangasius, Zander, Seelachs-Filet
3 - 5 Min. pro Seite Vorsichtig wenden, langsam braten
Gefrorener Fisch (Tiefkühlkost)
z.B. Lachs, Seelachs
5 Min. dann wenden Erst nach dem Braten würzen
Hühnerbrust / Hühnerschnitzel 4 Min. dann wenden Bei etwa 150 gr. per Stück
Putenschnitzel 3 Min. dann wenden 150 gr. dünn geschnitten
Gemüse aller Art 8-12 Min. kleingeschnitten, je nach Gemüsesorte
Kartoffeln gekocht (Scheiben) ca. 12 - 15 Min. Am besten mit Butter, mehrmals wenden
Rohe Kartoffeln braten (Scheiben) ca. 25 Min. Am besten mit Schmalz, mehrmals wenden
Kartoffeln roh (Berner Rösti) ca. 8 Min. pro Seite Kartoffeln mit der Reibe
Kartoffel-Pfannkuchen ca. 2 Min. pro Seite Vorsichtig wenden, knusprig bräunen
Eier-Omeletten ca. 3 Min. pro Seite Omelette aus 2 Eiern, mit Schnittlauch
servieren
EN
SAFETY AND GENERAL
INFORMATION
1. Read the following lines carefully
to prevent the risk of fire, electric
shocks and burns!
2. Never touch the hot surfaces.
3. Clean the device with a paper towel
while it is still warm.
4. Make sure that your “COOK IT” does
not come into contact with water or
any other liquids, as this can cause a
short circuit or an electric shock.
5. Never leave your “COOK IT” unatten-
ded while it is switched on.
6. Unplug your “COOK IT” when you
have finished using it.
7. Give your “COOK IT” plenty of time
to cool down before you put it away,
disassemble it or clean it.
8. Never use your “COOK IT” if there
is something wrong with the cable
or the “COOK IT” itself. Consult your
“COOK IT” retailer in order to contact
your nearest official service company.
9. Components that have not been
manufactured for the “COOK IT” can
cause accidents.
10. Never allow the connection cable to
hang over the edge of a table and pro-
tect it from hot or sharp objects. Make
sure cable doesn’t get tangled up.
11. Distortion, damage or defects can
occur if your “COOK IT” is not used

8
on a firm surface or is exposed to
moisture or heat.
12. Only use the appliance as it is inten-
ded to be used.
13. Keep these operating instructions
where they are easily accessible at
any time!
14. Your “COOK IT” may be damaged if it
suffers a fall or a heavy knock!
15. Never use cutlery made from metal!
16. Never immerse your “COOK IT” in wa-
ter or in the sink. This can damage the
appliance and cause an electric shock!
17. Unplug the appliance before cleaning
it and make sure the plug is dry befo-
re plugging it into the mains again.
18. Attention! The appliance may only be
used with the plug it is compatible with!
19. This appliance may be used by chil-
dren over the age of 8 years, as well
as by people of reduced physical,
sensory or mental capabilities or lack
of experience and/or knowledge,
provided they are supervised and
instructed in the safe use of the ap-
pliance and understand the possible
resulting dangers. Children must not
play with the appliance. Cleaning
and user-maintenance must not be
carried out by children, unless they
are older than 8 years and supervi-
sed. Children under 8 years should
be kept away from the appliance and
the connection cable.
20. Using external timers or separate
remote control systems to operate
the appliance is prohibited!
INSTRUCTIONS
The “COOK IT“ kitchen aid is a true all-rounder! This
space-saving device cannot only be used to prepare
meat, toasties, desserts or röstis, but also to grill, toast,
bake, gratinate or roast. The “COOK IT“ kitchen aid
brings a modern lifestyle directly into your kitchen.
Thanks to the non-stick heating plates, you can
prepare fried eggs or „easy over eggs“ quickly and
simply, and your toasted sandwiches, röstis or roast
potatoes will be crispy brown. lt can nevertheless
be cleaned with little effort afterwards. The reliable
„On + Off“ indicator light shows whether or not the
device is ready for use. A highly heat-resistant casing
ensures that the device looks good for a long time and
non-slip feet provide stability. The top and bottom heat
and high-quality ceramic layer make it easy to prepare
your dishes! Multi-functional preparation options, also
thanks to the (“FLIP OVER“): grill, bake, toast, roast.
Store in an upright position after use to save space or
place on your work surface for daily use.
PLEASE NOTE:
➔The device may produce smoke when used for
the first time.
➔Remove any packaging residues and clean the
casing of the “COOK IT“ with a damp cloth.
➔The baking plates should also only be cleaned
with a damp cloth or soft sponge; the lotus effect
facilitates cleaning of the “COOK IT“ kitchen aid.
➔Grease the baking plates before using the device
for the first time. The non-stick coating means
that this is not necessary for subsequent use
PREPARING TO USE
1. Plug the “COOK IT“ into the power socket to
preheat it. The red and green control lamp
lights up. Before toasting the sandwiches, the
“COOK IT“ kitchen aid must be preheated until
the green control lamp goes off for the first time.
ATTENTION: The device will now become hot.
As soon as the green display goes off, the
“COOK IT“ is ready for use.
2. Open the “COOK IT“.
3. Place your prepared sandwich in the “COOK IT“.
You can spread butter on the inside and outside of
the toast to create a lovely golden-brown colour.
4. Close the “COOK IT“ by holding the handle and
engaging the safety clip. Ensure that the handle
lock clicks into place.
5. Leave the sandwich in the “COOK IT“ for 3 to 5
minutes, depending on the desired brownness. lf

9
a sandwich is too big, the “COOK IT“ automatically
cuts it to size. You can open the “COOK IT“
at any time to see if your sandwich is ready.
The preparation time depends on the bread or
ingredients and your personal taste. Please note:
The green indicator light switches itself on and off
while the sandwich is being prepared.
6. When your sandwich is ready, carefully remove it
using wooden or plastic utensils; do not use any
metal utensils.
PROBLEM / CAUSE
Sandwiches are too dark.
Sandwiches were left in for too long.
Handle does not click into place.
Sandwiches were too full.
Sandwiches stick to the baking plates.
Butter was not spread on the outside of the toast.
CLEANING
To avoid damaging the non-stick coating, never clean
the baking plates with abrasive scouring agents or
scouring sponges. Never submerge the “COOK IT“ in
water or other liquids; da not rinse it under running
water.
1. Do not use metal objects or scouring utensils.
2. Unplug the “COOK IT“ and disconnect it from the
power supply.
3. Let the “COOK IT“ cool down while it is open.
4. Remove stubbom food remains such as bumt
cheese from your “COOK IT“ with a wooden or
plastic spatula.
5. Clean the baking plates with a soft damp cloth or
sponge.
6. Clean the device casing with a damp cloth.
7. Store the “COOK IT“ in a horizontal or vertical
position.
CAUTION: Be careful to not overfill the unit! Make
sure to fill up the container to no more than the top
edge when cooking eggs or other liquid ingredients.
In addition we recommend leaving Cook It open while
preparing eggs or other liquid ingredients and only
close the unit to flip dishes over.
RECIPES
HAM & CHEESE SANDWICH
lngredients:
4 slices of bread, 1 thick slice of cooked ham,
70 g cheese (Gouda or Gruyere), butter, pepper
Preparation:
Butter the outside of the 4 slices of bread. Divide half
of the grated (or sliced) cheese between the slices of
bread. Place a slice of ham on top, season and add the
remaining cheese. Cover with the two remaining slices
of bread. Place in the “COOK IT“ kitchen aid and close
(click handle into place!). Grill for 4-6 minutes until the
desired brownness has been achieved.
AMERICAN SANDWICH
lngredients:
4 slices of bread, 4 tsp mayonnaise, 4 small tomatoes,
4 pieces of Chester or Emmental cheese, 4 rashers of
bacon
Preparation:
Lightly butter the outside of the slices of bread.
Spread a thin layer of tartar sauce on the inside of
the bread, arrange thin slices of tomato on top and
cover with cheese. Arrange the bacon on top in a grid
pattern and cover with the remaining slices of bread.
Place in the “COOK IT“ kitchen aid and close (click
handle into place!). Grill for 4-6 minutes until the
desired brownness has been achieved.
FILLED AVOCADO GRATIN
lngredients:
1 pack of shrimps, 2 tbsp lemon juice, 1 small
avocado, 1 dash of chilli sauce, grated processed
cheese
Preparation:
Cut the avocado through the middle and scoop out
the pulp. Defrost the shrimps (or drain them from
the jar) and flavour them with lemon juice. Mash the
avocado pulp, mix it with the shrimps and season
to taste (splash of chilli sauce on top). Sprinkle with
grated cheese and then place in the “COOK IT“
kitchen aid and close (click handle into place!). Now
cook for 4 - 6 minutes.

10
RÖSTI
lngredients:
1 tbsp clarified butter, 300 g floury potatoes, 1 small
onion, salt and pepper to taste
Preparation:
Peel and finely grate the potatoes. Peel and finely
chop the onion. Mix the potatoes with the onions, salt
and pepper. Heat the clarified butter in the “COOK IT“
kitchen aid, add the rösti mixture to the “COOK IT“
using a tablespoon and press it flat. Brown well for
2-3 minutes and then simply turn the “COOK IT“
kitchen aid over, using the (,,FLIP OVER“) function,
and continue to cook until it becomes crispy. Place the
rösti onto kitchen paper and allow the excess to drip
off. Serve hot.
OMELETTE
lngredients:
2 eggs, 1/2 tsp flour, 2 tbsp milk, 50 g Edam, 1 slice of
ham (cut into thin strips) 1/4 tsp chilli powder, 2 tsp
olive oil, salt, butter, 1/2 tomato, 1 sprig of parsley
Preparation:
Whisk the eggs and oil for the ham & cheese omelette
until frothy. Add the cheese, milk, flour, ham and
spices and stir well. Heat the egg mixture and pour
into the lightly greased “COOK IT“ kitchen aid. Leave
to thicken for 2-3 minutes. Place the tomato slices on
top, turn the “COOK IT“ kitchen aid over completely
(,,FLIP OVER“) and heat for a further 1-2 minutes.
Garnish with parsley.
„SUNNY SIDE UP“ AND „EASY OVER“
FRIED EGG
lngredients:
2 eggs, salt and a touch of butter
Preparation:
Grease the “COOK IT“ kitchen aid with a touch of
butter and preheat it. Carefully beat 2 large chicken
eggs and pour into the “COOK IT“ kitchen device.
Leave the device open and cook the eggs until they
achieve the desired consistency.
Hint: lf you do not want the eggs to be „sunny side
up“, close the “COOK IT“ kitchen aid just before the
end and turn the setting to (,,FLIP OVER“). Leave to
cook for just a short time.
CHOCOLATE CAKE
lngredients:
40 g butter, 100 g chocolate, 2 eggs (60 g), 50 g fine
sugar, 3 tbsp flour, 1 tsp baking powder, icing sugar,
1 strip of milk chocolate
Preparation:
Melt the butter and separate the eggs. Mix the egg
yolk and 50 g sugar with the melted butter. Melt the
chocolate and add to the butter mixture. Beat the egg
whites until stiff. Stir a heaped tablespoon of flour
into the mixture and carefully fold in the beaten egg
whites. Pour the chocolate mixture into the preheated
and lightly greased “COOK IT“ kitchen aid, place the
strip of chocolate on top and then close and lock the
“COOK IT“ kitchen aid. Bake for approx. 8-10 minutes.
Then turn the “COOK IT“ kitchen aid over completely
(,,FLIP OVER“) and bake for further 3 -5 minutes.
Carefully take out the finished cake (careful: hot liquid
chocolate inside} and sprinkle with icing sugar.
MEATLOAF WITH EGG
lngredients:
250 g mixed minced meat, 2 medium eggs, 1 small
onion, 100 g breadcrumbs, parsley, salt, pepper,
30 g butter or margarine, 2-3 tbsp dark sauce
thickener, parsley, shortening
Preparation:
Cook 1 egg for 6-8 minutes. Rinse with cold water
and allow to cool down. Peel and finely chop the
onions. Finely crumble the bread. Wash and finely
chop the parsley. Combine the minced meat, second
egg, breadcrumbs, onion and parsley well. Season
generously with salt and pepper.
Form a small loaf from the minced meat mixture. Hide
the peeled, hard boiled egg in the middle of the loaf
and then press the mixture together again around it.
Place it in the preheated and greased “COOK IT“
kitchen aid, close and secure. Cook for approx. 20 to
30 minutes. Occasionally turn it over with the
(,,FLIP OVER“) function. Remove the meat loaf from
the “COOK IT“ kitchen device.
lf desired, dissolve the cooking juice in 3 tablespoons
of water and boil briefly for the sauce. Add the sauce
thickener while stirring. Season with salt and pepper.
Serve with mashed potato. Serve the sauce separately.

11
The table is based on the weights stated.
The cooking times vary according to the weight.
There are no limits to your imagination! You can create
delicious recipes from all kinds of food. For example
with salami, cooked ham, tuna fish, even Sunday
roast leftovers can be used; fruit or vegetables (e.g.
tomatoes, peppers, asparagus, cucumbers, onions,
mushrooms, pineapple, peaches, apricots, mandarin
oranges, bananas); cheese in any form, sliced, grated
or mashed. Cheeses that melt easily are particularly
suitable for gratins. Season according to your personal
taste.
What am i cooking Cooking+roasting times Comment
Steak Approx. 4 min. per side Approx. 150 g, thickly cut. Leave to
rest for 2-3 min.
Plain escalope Approx. 5 min. per side Approx. 150 g. Pat dry.
Breaded escalope Approx. 4 min. per side Approx. 150 g Always in fat
Lamb chop Approx. 4 min. per side Ideal with rosemary
Fresh fish e. g. small traut,
pangasius, pikeperch, pollack fillet
3 - 5 min. per side Turn carefully, cook slowly
Frozen fish (frozen food)
e.g. salmon Pollack
5 min. then turn Do not season until after cooking
Chicken breast / escalope 4 min. then turn Approx. 150 g per piece
Turkey escalope 3 min. then turn 150 g, thinly cut
All types of vegetables 8-12 min. Cut small, depending
on the type of vegetable
Cooked potatoes (slices) Approx. 12-15 min. Best with butter, turn several times
Raw potatoes (Bernese Rösti) Approx. 8 min. per side Grated potatoes
Potato pancakes Approx. 2 min. per side Turn carefully, brown until crisp
Egg omelettes Approx. 3 min. per side Omelette made from
2 eggs, serve with chives
FR
CONSIGNES DE SÉCURITÉ ET
CONSIGNES GÉNÉRALES
1. Veuillez lire attentivement les
lignes suivantes pour éviter les
risques d’incendies, de déchar-
ges électriques ou de brûlures !
2. Ne touchez jamais les surfaces
brûlantes.
3. Nettoyez l’appareil encore chaud
avec un chiffon en papier.
4. Veillez à ce que le « COOK IT »
n’entre pas en contact avec de l’eau
ou d’autres liquides, car cela pourrait
provoquer un court-circuit ou une
décharge électrique.
5. Ne laissez jamais le « COOK IT » en
marche sans surveillance.
6. Débranchez le « COOK IT » si vous
ne l’utilisez plus.
7. Laissez bien refroidir le « COOK IT »
avant de le ranger, de le démonter
ou de le nettoyer.
8. N’utilisez jamais le « COOK IT » si le
câble ou le « COOK IT » lui-même

12
sont endommagés. Contactez le
commerçant « COOK IT » pour entrer
en contact avec le SAV officiel le
plus proche.
9. Les pièces qui n’ont pas été fabri-
quées pour le « COOK IT » peuvent
provoquer des accidents.
10. Ne laissez jamais pendre le câble de
raccordement par-dessus le bord de
la table et protégez-le des objets
chauds et tranchants. Veillez à ce
que le câble ne soit pas emmêlé.
11. Des déformations, des dommages ou
des défauts peuvent se produire si le
« COOK IT » n’est pas utilisé sur des
surfaces solides ou exposé à l’humi-
dité ou à la chaleur.
12. Utilisez l’appareil uniquement en
conformité à son usage !
13. Conservez le présent mode d’emploi
pour l’avoir toujours près de la main!
14. Les chocs violents ou les chutes
peuvent endommager le « COOK IT » !
15. N’utilisez jamais d’ustensiles en métal !
16. Ne plongez jamais le « COOK IT »
dans de l’eau ou dans l’évier. Cela
pourrait endommager l’appareil et
provoquer une décharge électrique!
17. Débranchez l’appareil avant de le
nettoyer et assurez-vous que le
connecteur est sec avant de le
rebrancher.
18. Attention ! Utilisez uniquement le
connecteur convenant à l’appareil!
19. Ces appareils peuvent être utilisés
par des enfants à partir de 8 ans ainsi
que des personnes à capacités
mentales, sensorielles ou physiques
réduites ou manquant d‘expérience
et/ou de connaissances s‘ils sont
surveillés ou bien informés d‘une
utilisationsûre de l‘appareil et qu‘ils
ont compris les risques inhérents. Les
enfants ne doivent pas jouer avec
l‘appareil. Le nettoyage et l‘entretien
de l‘utilisateur ne doivent pas être
réalisés par des enfants, à moins
qu‘ils aient plus de 8 ans et sous
surveillance. Les enfants de moins de
8 ans doivent être tenus éloignés de
l‘appareil et de son branchement.
20. L’utilisation de minuteries externes ou
de systèmes de télécommande
spéciaux est interdite pour le foncti-
onnement de l’appareil !
MODE D’EMPLOI
L’accessoire de cuisine « COOK IT » est un véritable
multitalent ! Vous pouvez non seulement préparer de
la viande, des toasts, des desserts ou des röstis, mais
aussi griller, toaster, frire, gratiner ou rôtir avec
l’ustensile peu encombrant. Avec l’ustensile de cuisine «
COOK IT », l’art de vivre moderne arrive directement
dans votre cuisine. Les plaques chauffantes
antiadhésives rendent croustillants et dorés les œufs
sur le plat, les œufs « easy Over », les toasts, les röstis
ou les pommes de terre sautées avec rapidité et
simplicité. Et toujours simple et facile à nettoyer ensuite.
Le témoin de contrôle fiable de « Marche + Arrêt » et
celui de « Prêt à l’emploi » vous indiquent la disponibilité
de fonctionnement de l’appareil. Un boîtier hautement
résistant à la chaleur permet de conserver longtemps la
beauté de l’appareil. Les pieds antidérapants
garantissent un maintien sûr. La chaleur supérieure et
inférieure et le revêtement céramique de qualité
supérieure facilitent la préparation de vos aliments !
Possibilités de préparation multifonctions, aussi grâce à
l’« Effet FLIP OVER » : griller, frire, toaster, rôtir.
Conserver debout après usage pour un gain de place
ou poser sur votre plan de travail pour usage quotidien.

13
INDICE :
➔Une légère fumée peut se dégager de l’appareil à
la première utilisation.
➔Enlevez les éventuels résidus d’emballage, puis
nettoyez le boîtier du « COOK IT » avec un chiffon
humide.
➔Nettoyez aussi les plaques de cuisson
uniquement avec un chiffon humide ou une
éponge douce. L’ustensile de cuisine « COOK IT »
garantit un nettoyage facile grâce à l’effet lotus.
➔Graisser une fois les plaques de cuisson avant le
tout premier usage. Cela n’est ensuite plus
nécessaire grâce au revêtement antiadhésif.
MODE D’EMPLOI
1. Fichez le connecteur à la prise pour préchauffer
le « COOK IT ». Le témoin de contrôle rouge et
vert s’allume. Vous devez préchauffer l’ustensile
de cuisine « COOK IT » jusqu’à ce que le témoin
de contrôle vert s’éteigne la première fois avant
de toaster les sandwichs. ATTENTION : l’appareil
est chaud. Le « COOK IT » est prêt à l’emploi dès
que le te témoin vert s’éteint.
2. Ouvrez le « COOK IT ».
3. Posez le sandwich préparé avec les ingrédients
dans le « COOK IT ». Vous pouvez enduire de
beurre les toasts à l’intérieur et à l’extérieur pour
obtenir une belle couleur dorée.
4. Maintenant, fermer le « COOK IT ». Pour cela,
saisir la poignée et faire prendre encoche à
l’agrafe de sécurité. Veillez à ce que la fermeture
du verrouillage de la poignée prenne encoche.
5. Laissez le sandwich 3 à 5 minutes dans le « COOK
IT » selon la coloration souhaitée. Si le sandwich
est trop gros, le « COOK IT » le coupe automat-
iquement. Vous pouvez ouvrir le « COOK IT » à
tout moment pour voir si le sandwich est prêt. Le
temps de cuisson dépend du type de pain et des
ingrédients et de votre goût personnel Remarque :
Le témoin vert s’allume et s’éteint pendant la
cuisson.
6. Lorsque votre sandwich est prêt, retirez-le avec
précaution. Pour cela, utilisez un objet en bois ou
en plastique, mais aucun objet métallique.
PROBLÈME / CAUSE
Les sandwichs sont trop foncés
Les sandwichs ont été cuits trop longtemps
La poignée de l’appareil ne prend pas encoche
Les sandwiches sont garnis trop épais
Les sandwichs collent au moule
Les côtés extérieurs des toasts n’ont pas été enduits
de beurre
NETTOYAGE
Ne nettoyez jamais les plaques de cuisson avec un
produit abrasif agressif ou une éponge à récurer pour
ne pas endommager le revêtement antiadhésif. Ne
plongez jamais le « COOK IT » dans de l’eau ou
d’autres liquides ; ne pas le laver à l’eau courante.
1. N’utiliser aucun objet en métal ou des ustensiles
abrasifs.
2. Débranchez le connecteur du « COOK IT » et
déconnectez-le du réseau électrique.
3. Laissez refroidir le « COOK IT » ouvert.
4. Enlevez les restes de produits alimen-taires
tenaces de votre « COOK IT » comme le fromage
brûlé avec une spatule en bois ou en plastique.
5. Nettoyez les plaques de cuisson avec un chiffon
doux humide ou une éponge.
6. Nettoyez le boîtier de l’appareil avec un chiffon
humide.
7. Rangez le « COOK IT » en position horizontale ou
verticale.
Attention : Ne jamais trop remplir l’appareil !
Principalement avec les œufs et les ingrédients
liquides, veiller à ne remplir que jusqu’au bord
supérieur du récipient. Pour la préparation des œufs,
nous vous conseillons de travailler avec le Cook it
ouvert et de ne fermer l’appareil que lorsque l’aliment
doit être retourné.
RECETTES
SANDWICH JAMBONFROMAGE
Ingrédients :
4 toasts, 1 épaisse tranche de jambon cuit, 70 g de
fromage (Gouda ou Gruyère), beurre, poivre
Préparation :
Enduire les côtés extérieurs des 4 toasts avec du
beurre. Répartir le fromage râpé (ou coupé en
lamelles) pour la moitié sur les toasts. Placer dessus
une demi-tranche de jambon, assaisonner et recouvrir
du reste de fromage. Recouvrir avec les deux toasts
restants. Mettre dans l’ustensile de cuisine « COOK IT »
et fermer. (La poignée doit prendre encoche !). Faire
cuire 4 -6 minutes suivant le degré de coloration
souhaitée .

14
SANDWICH AMÉRICAIN
Ingrédients :
4 toasts, 4 cc de mayonnaise, 4 petites tomates,
4 tranches de Chester ou d‘emmental, 4 tranches de
lard de jambon
Préparation :
Enduire les côtés extérieurs des 4 toasts avec du
beurre. Enduire les côtés intérieurs finement de sauce
tartare, répartir de fines rondelles de tomate dessus et
recouvrir de fromage fondu. Placer le lard de jambon
en lamelles en forme de grille dessus et recouvrir des
toasts restants. Mettre dans l’ustensile de cuisine «
COOK IT » et fermer. (La poignée doit prendre
encoche !). Faire cuire 4 -6 minutes suivant le degré
de coloration souhaitée .
AVOCATS FARCIS GRATINÉS
Ingrédients :
1 sachet de crevettes, 2 cs de jus de citron, 1 petit
avocat, 1 pointe de sauce Chili, fromage fondu râpé
Préparation :
Couper l’avocat en son centre et creuser la chair de
l’avocat. Faire décongeler les crevettes (ou les
égoutter du verre) et les assaisonner de jus de citron.
Écraser la chair d’avocat, mélanger les crevettes et
assaisonner selon le goût (verser quelques gouttes de
sauce Chili dessus). Bien parsemer de fromage râpé,
mettre dans l’ustensile de cuisine « COOK IT » et
fermer. (La poignée doit prendre encoche !). Faire
cuire maintenant 4 - 6 minutes.
RÖSTIS
Ingrédients :
1 cs de beurre concentré, 300 g de pommes de terre
farineuses, 1 petit oignon, sel et poivre selon le goût
Préparation :
Peler les pommes de terre et les râper finement, peler
l’oignon et le hacher finement. Mélanger les pommes
de terre avec l’oignon, le sel et le poivre. Faire chauffer
le beurre concentré dans l’ustensile de cuisine «
COOK IT », mettre le mélange de rösti avec la cuiller à
soupe dans l’ustensile de cuisine « COOK IT »
et aplatir, bien faire revenir, retourner l’ustensile de
cuisine « COOK IT » après 2 - 3 minutes simplement
avec le « FLIP OVER » et faire dorer croustillant de
l’autre côté. Laisser égoutter les röstis sur du papier
crêpe et servir chaud.
OMELETTE
Ingrédients :
2 œufs, 1/2 cc de farine, 2 cs de lait, 50 g d‘edamer,
1 tranche de jambon (coupé en fines lamelles)
1/4 cc d’épices chili, 2 cs d’huile d’olive, sel, beurre,
1/2 tomate, 1 brin de persil
Préparation :
Bien battre les œufs et l’huile pour l’omelette
jambon-fromage et battre en mousse. Ajouter le
fromage, le lait, la farine, le jambon et les épices et
bien mélanger. Verser la masse dans l’ustensile de
cuisine « COOK IT » chauffé et légèrement graissé et
laisser prendre 2-3 minutes. Mettre les rondelles de
tomate dessus, retourner complètement l’ustensile de
cuisine « COOK IT » (« FLIP OVER ») et faire chauffer
encore 1-2 minutes. Garnir de persil.
ŒUF SUR LE PLAT SUNNYSIDE UP
ET EASY OVER
Ingrédients :
2 œufs, sel et un rien de beurre
Préparation :
Frotter l’ustensile de cuisine « COOK IT » avec un rien
de beurre et faire chauffer. Casser 2 gros œufs de
poule avec précaution, les verser dans l’ustensile de
cuisine « COOK IT » et les laisser frire dans l’appareil
ouvert jusqu’à la consistance souhaitée. Conseil : Si
l’on ne souhaite pas les œufs « Sunnyside up », fermer
l’ustensile de cuisine « COOK IT » juste avant la fin de
la cuisson, retourner le « FLIP OVER » et poursuivre
brièvement la cuisson.
GÂTEAU CHOCO
Ingrédients :
40 g de beurre, 100 g de chocolat, 2 œufs (60 grammes),
50 g de sucre fin cristallisé, 3 cs de farine, 1 cc de
levure, sucre en poudre, 1 barre de chocolat au lait
Préparation :
Faire fondre le beurre et séparer les œufs. Mélanger le
jaune d’œuf et 50 grammes de sucre au beurre fondu.
Faire fondre le chocolat et l’ajouter au mélange beurré.
Battre le blanc d’œuf en neige. Mélanger une cs bien
remplie de farine à la masse et mélanger délicatement
les œufs battus en neige. Verser la masse de chocolat
dans l’ustensile de cuisine « COOK IT » préchauffé et
légèrement graissé, poser la barre de chocolat dessus,

15
fermer l’ustensile de cuisine « COOK IT » et le
verrouiller. Faire cuire env. 8-10 minutes. Retourner
ensuite complètement l’ustensile de cuisine « COOK IT »
« FLIP OVER » et poursuivre la cuisson pendant 3 -5
minutes. Démouler le gâteau cuit avec précaution
(Attention : chocolat liquide chaud à l’intérieur !) et
saupoudrer de sucre en poudre.
HACHIS AVEC ŒUF
Ingrédients :
250 g de mélange de viande hachée (hachis), 2 œufs
(taille M), 1 petit oignon, 100 g de chapelure, persil,
sel, poivre, 30 g de beurre ou de margarine, 2-3 cs de
liant pour sauce foncée, persil, graisse
Préparation :
Faire cuire 1 œuf 6-8 minutes, le passer sous l’eau
froide et le laisser refroidir. Peler l’oignon et le couper
en petits dés. Émietter finement le pain. Laver le persil
et le hacher finement. Bien mélanger le hachis, le
second œuf, la chapelure, l’oignon et le persil. Bien
assaisonner avec le sel et le poivre. Former un petit
pain de viande hachée et cacher l’œuf dur sans la
coquille au centre du pain, puis presser pour refermer.
Placer dans l’ustensile de cuisine « COOK IT »
préchauffé et graissé, refermer, verrouiller et laisser
frire env. 20 à 30 minutes. Retourner avec le « FLIP
OVER » de temps en temps. Sortir ensuite le hachis de
l’ustensile de cuisine « COOK IT ». Si on le souhaite,
mouiller le fond avec 3 cs d’eau et laisser bouillir
brièvement pour la sauce, saupoudrer le liant pour
sauce en le mélangeant. Assaisonner avec le sel et le
poivre. Servir avec une purée de pommes de terre.
Servir la sauce à part.
Votre imagination ne connait pas de limites. Vous
pouvez préparer de délicieux plats avec tous les
produits :
Par exemple avec les produits alimentaires suivants :
Salami, jambon cuit, thon, aussi les restes de rôti du
dimanche peuvent être utilisés, des fruits ou des
légumes comme les tomates, les poivrons, les asperges,
les concombres, les oignons, les champignons, les
ananas, les pêches, les abricots, les mandarines,
les bananes, le fromage sous toutes ses formes, en
tranches, râpé ou pressé. Les fromages à pâte fondant
facilement conviennent particulièrement aux gratins.
L’utilisation des épices se fait selon le goût de chacun.
Quelle cuisson Temps de cuisson Remarque
Steak env. 4 minutes par côté Épaisseur env. 150 gr. Laisser reposer
2-3 minutes
Escalope nature env. 5 minutes par côté env. 150 gr, sécher
Escalope panée env. 4 minutes par côté env. 150 gr. dans graisse
Côte d’agneau env. 4 minutes par côté Idéale avec du romarin
Poisson frais ex: petite truite,
pangasius, sandre, filet de lieu noir
3 - 5 minutes par côté Retourner avec précaution, cuire douce-
ment
Poisson congelé (surgelés) ex:
saumon, lieu noir
5 minutes, retourner Assaisonner après la cuisson
Blanc / escalope de poulet 4 minutes, retourner env. 150 gr. par unité
Escalope de dinde 3 minutes, retourner 150 gr., tranche fine,
Toutes sortes de légumes 8-12 minutes En petits morceaux, selon le légume
Pommes de terre cuites
(rondelles)
env. 12 - 15 minutes De préférence avec du beurre, retourner
plusieurs fois
Pommes de terre crues frire
(rondelles)
env. 25 minutes min. De préférence dans du sain-doux, retourner
plusieurs fois
Pommes de terre crues
(Rösti bernois)
env. 8 minutes par côté Pommes de terre râpées
Pommes de terre coupées
Galettes
env. 2 minutes par côté Retourner avec précaution, faire brunir
croustillant
Omelette aux œufs env. 3 minutes par côté Omelette de 2 œufs, servir avec de la
ciboulette

16
IT
AVVISI GENERALI E DI SICUREZZA
1. Leggere attentamente i presenti
avvisi di sicurezza per scongiura-
re il pericolo di incendi, elettrocu-
zioni o ustioni!
2. Non toccare mai le superfici bollenti.
3. Pulire l’utensile ancora caldo con
della carta da cucina.
4. Assicurarsi che il COOK IT non venga
a contatto con acqua o altri liquidi,
poiché questo potrebbe essere
causa di cortocircuiti o elettrocuzioni.
5. Non lasciare mai il COOK IT incusto-
dito quando è acceso.
6. Scollegare sempre il COOK IT dalla
corrente quando non è più necessario.
7. Lasciar raffreddare bene il COOK IT
prima di riporlo, smontarlo o pulirlo.
8. Non utilizzare mai il COOK IT se il
cavo o l’apparecchio stesso è
danneggiato o malfunzionante.
Rivolgersi al rivenditore del COOK IT
onde poter contattare il servizio di
assistenza ufficiale più vicino.
9. Tutti gli accessori che non sono
specificamente concepiti per il COOK IT
possono essere causa di incidenti.
10. Evitare che il cavo di corrente penda
oltre il ciglio del tavolo e tenerlo lontano
da oggetti molto caldi e/o taglienti.
Assicurarsi che il cavo non si ingarbugli.
11. Se utilizzato su superfici non stabili, o
se esposto all’umidità o al calore, il
COOK IT potrebbe deformarsi, danneg-
giarsi o non funzionare correttamente.
12. Utilizzare l’apparecchio esclusiva-
mente per l’uso per cui è concepito.
13. Conservare le presenti istruzioni per
l’uso in modo tale da poterle reperire
in ogni momento!
14. Glu urti e le cadute possono danneg-
giare il COOK IT!
15. Non utilizzare mai posate o utensili di
metallo!
16. Non immergere mai il COOK IT in
acqua o nel lavandino, poiché questo
potrebbe danneggiare l’apparecchio
ed essere causa di elettrocuzione!
17. Prima di pulire l’apparecchio, estrarre
sempre la spina dalla presa di corrente
e assicurarsi che la spina sia asciutta
prima di reinserirla nella presa.
18. Attenzione! Utilizzare esclusivamente
la spina compatibile con l’apparecchio!
19. Questi apparecchi possono essere utiliz-
zati da bambini di età pari o superiore a
8 anni e da persone con ridotte facoltà
fisiche, sensoriali o mentali nonché da
persone prive di sufficiente esperienza o
conoscenza dello stesso se sorvegliate
da una persona responsabile della loro
sicurezza o se istruite in merito all‘utiliz-
zo sicuro dell‘apparecchio e consapevoli
degli eventuali rischi derivanti da un
utilizzo improprio. I bambini non devono
utilizzare l‘apparecchio come un gio-
20. cattolo. I bambini non devono né pulire
né utilizzare l‘apparecchio da soli a
meno che non abbiano un‘età superiore
agli 8 anni e che siano assistiti da parte
di un adulto. Tenere lontano dall‘appa-
recchio e dal cavo di alimentazione i

17
bambini di età inferiore agli 8 anni.
21. È vietato l’uso di interruttori a tempo
esterni o sistemi di comando a
distanza separati per azionare
l’apparecchio!
ISTRUZIONI
Il robot da cucina “COOK IT” è davvero un multitalento!
Non soltanto potrete preparare carne, toast, dessert o
rösti. Con quest’apparecchio salvaspazio, infatti, potrete
anche grigliare, tostare, cuocere, gratinare e arrostire.
Con il robot da cucina “COOK IT” porterete il moderno
lifestyle direttamente nella vostra cucina. Le piastre
elettriche con rivestimento antiaderente cuociono in
pochissimo tempo e in maniera semplicissima le vostre
uova al tegamino, toast, rösti o patate arrostite, dandogli
la giusta croccantezza e la classica doratura. E poi sono
semplicissime da pulire. Le fidate spie luminose di
controllo per “ON/OFF” e “Pronto” vi avvisano quando il
vostro piatto è pronto. Il corpo ad alta resistenza al
calore salvaguarda la bellezza del vostro robot, mentre i
piedini antiscivolo gli conferiscono una posizione stabile
e sicura. Le resistenze superiore e inferiore, nonché il
rivestimento di ceramica di alta qualità, semplificano la
preparazione dei vostri piatti! E garantisce diverse
possibilità di cottura, anche grazie alla possibilità di
capovolgerlo (,FLIP OVER): grigliare, cuocere, tostare,
arrostire. Dopo l’uso, potrete conservare il robot in
posizione verticale salvaspazio oppure tenerlo sul vostro
tavolo da lavoro per l’uso quotidiano.
AVVERTENZA:
➔Al primo utilizzo, l’apparecchio potrebbe emettere
del fumo.
➔Rimuovere eventuali residui di imballaggio, quindi
pulire il corpo del „COOK IT“ con un panno
umido.
➔Pulire anche le piastre utilizzando unicamente un
panno umido o una spugna morbida: grazie al suo
effetto loto, il robot da cucina “COOK IT” è molto
semplice da pulire.
➔Ingrassare le piastre prima del primo utilizzo; in
seguito, l’unto sparirà grazie al rivestimento
antiaderente.
ISTRUZIONI
1. Per preriscaldare il COOK IT, inserire la spina nella
presa di corrente. La spia luminosa di controllo
rossa e verde si accende. Prima di tostare i panini,
preriscaldare il COOK IT fino al primo spegnimen-
to della spia luminosa di controllo. ATTENZIONE:
L’apparecchio diventerà molto caldo. Non appena
la spia luminosa verde si spegne, COOK IT è pron-
to per l’uso.
2. Aprire il COOK IT.
3. Collocare il panino già preparato con gli
ingredienti nel COOK IT. Per ottenere un bel
colore bruno dorato, spalmare le fette di pan carré
o di pane con del burro sia all’interno che
all‘esterno.
4. Adesso chiudere il COOK IT afferrando l’impugna-
tura e facendo scattare il fermo di sicurezza.
Assicurarsi che il fermo dell‘impugnatura
dell’impugnatura si chiuda con uno scatto.
5. Lasciar cuocere il panino nel COOK IT da 3 a 5
minuti a seconda della doratura desiderata. Se un
panino è troppo grande, COOK IT lo taglia
automaticamente. Potrete aprire il COOK IT in
qualsiasi momento per controllare se il panino è
pronto. A seconda del tipo di pane e degli
ingredienti, il tempo di preparazione varia in base
alle vostre preferenze Avviso. Durante la
preparazione, la spia luminosa verde si accende e
si spegne.
6. Quando il panino è pronto, toglierlo con la
necessaria cautela utilizzando un utensile di legno
o plastica (non di metallo).
PROBLEMA / CAUSA
I panini diventano troppo scuri
I panini sono stati cotti troppo a lungo
Il manico non si chiude
Il panino è imbottito eccessivamente
I panini restano appicciati allo stampo
I lati esterni del toast non sono stati spalmati con del
burro
PULIZIA
Non pulire mai le piastre di cottura con detergenti
abrasivi aggressivi o con spugne abrasive per non
danneggiare il rivestimento antiaderente. Non
immergere mai il COOK IT in acqua o in altri liquidi e
non lavarlo sotto acqua corrente.
1. Non utilizzare oggetti di metallo o utensili abrasivi.
2. Estrarre la spina del COOK IT dalla presa di
corrente.
3. Lasciar raffreddare il COOK IT aperto.

18
4. Rimuovere i residui più ostinati di cibo, come il
formaggio bruciato, con una spatola di legno o
plastica dal vostro COOK IT.
5. Pulire le piastre con un panno o una spugna
inumiditi.
6. Pulire il corpo dell’apparecchio con un panno
umido.
7. Conservare il COOK IT in posizione orizzontale o
verticale.
ATTENZIONE: evitare di riempire eccessivamente
l‘apparecchio! In particolar modo quando si utilizzano
uova o ingredienti liquidi, assicurarsi di non superare
mai l’estremità superiore del contenitore. In sede di
cottura delle uova, si consiglia di lavorare con il COOK
IT aperto e di chiuderlo unicamente quando bisogna
girare il piatto.
RICETTE
PANINO AL PROSCIUTTO
E FORMAGGIO
Ingredienti:
4 fette di pan carré, 1 fetta spessa di prosciutto cotto,
70 g di formaggio (Gouda o Gruviera), butto, pepe
Preparazione:
Spalmare i lati esterni delle fette di pan carré con del
burro. Spargere il formaggio grattugiato (o tagliato a
strisce) sulle fette di pan carré in quantità uguali.
Collocarci sopra una mezza fetta di prosciutto e ricopr-
ire il tutto con il formaggio rimasto. Chiudere il panino
con entrambe le fette di pan carré rimaste. Inserire i
panini all’interno del robot da cucina COOK IT e
chiuderlo bene (finché il fermo del manico non scatta
in posizione con un clic!). A seconda del grado di
doratura desiderato, far cuocere il tutto per 4-6 minuti
PANINO AMERICANO
Ingredienti:
4 fette di pan carré, 4 cucchiaini di maionese,
4 pomodorini, 4 fette di Chester o Emmental, 4 fette di
speck
Preparazione:
Spalmare i lati esterni delle fette di pan carré con un
sottile strato di burro. Spalmare i lati interni con della
salsa tartara, collocarci sopra i pomodori tagliati a
fettine sottili e ricoprire il tutto con del formaggino.
Quindi, aggiungerci sopra lo speck tagliato a strisce a
comporre una griglia e ricoprire il tutto con le altre
fette di pan carré. Inserire il panino nel robot da
cucina COOK IT e chiuderlo (il fermo del manico deve
scattare in posizione con un clic!). A seconda
del grado di doratura desiderato, lasciar cuocere il
tutto per 4-6 minuti.
AVOCADO RIPIENO GRATINATO
Ingredienti:
1 pacco di gamberetti, 2 cucchiai di succo di limone,
1 piccolo avocado,1 spruzzo di salsa al peperoncino,
formaggino grattugiato
Preparazione:
Tagliare l’avocado al centro ed estrarre la polpa dal
guscio. Scongelare i gamberetti (oppure scolarli dal
barattolo) e speziarli con del succo di limone.
Schiacciare la massa di avocado, mescolarla con i
gamberetti e speziare il tutto a piacere (spruzzarci
sopra la salsa al peperoncino). Adesso cospargere
con il formaggio grattugiato e inserire il tutto nel
COOK IT e chiuderlo (far scattare il fermo del manico
in posizione!). Lasciarlo cuocere per 4-6 minuti.
RÖSTI
Ingredienti:
1 Cucchiaio di burro chiarificato, 300g di patate
farinose, 1 cipolla piccola, sale e pepe a piacere
Preparazione:
Pelare le patate e grattugiarle finemente, pelare le
cipolle e tritarle finemente. Unire le patate con le
cipolle, il sale e il pepe. Riscaldare il burro chiarificato
nel robot da cucina COOK IT, inserire la mescola per il
rösti all’interno del COOK IT e schiacciarla, quindi
farla cuocere bene. Dopo 2-3 minuti, capovolgere la
griglia COOK IT (funzione FLIP OVER) e lasciar
cuocere anche dall’altro lato fino ad ottenere una
massa croccante. Lasciar sgocciolare il rösti su della
carta da cucina e servirlo caldo.
OMELETTE
Ingredienti:
2 uova, 1/2 cucchiaino di farina, 2 cucchiai di latte,
50 g di Edamer, 1 fetta di prosciutto (tagliata a strisce
sottili) 1/4 cucchiaino di peperoncino, 2 cucchiai di
olio d’oliva, sale, burro, 1/2 pomodoro, 1 rametto di
prezzemolo

19
Preparazione:
Sbattere bene le uova e l’olio per l’omelette al
formaggio e prosciutto e mescolare fino a ottenere
una consistenza schiumosa. Aggiungere formaggio,
latte, farina, prosciutto e spezie e mescolare il tutto.
Versare la massa ottenuta nel COOK IT preriscaldato e
leggermente imburrato e lasciarla addensare.
Aggiungerci sopra le fette di pomodoro, capovolgere
completamente la griglia COOK IT (funzione FLIP
OVER) e far cuocere per altri 1-2 minuti. Guarnire con
del prezzemolo.
UOVO AL TEGAMINO “SUNNYSIDE
UP” E “EASY OVER”
Ingredienti:
2 uova, sale e un pizzico di burro
Preparazione:
Ingrassare il COOK IT con un pizzico di burro e farlo
riscaldare. Rompere due grosse uova, versarle con
cautela all’interno del COOK IT e cuocerle fino ad
ottenere la consistenza desiderata. Consiglio: se non
si desiderano le uova in stile “Sunnyside up”, allora si
consiglia di chiudere il COOK IT poco prima della fine
della cottura, capovolgere la griglia e continuare a
cuocerle.
DOLCE AL CIOCCOLATO
Ingredienti:
40 g di burro, 100 g di cioccolata, 2 uova (60 g), 50 g
di zucchero finissimo, 3 cucchiai di farina, 1 cucchiai-
no di lievito, zucchero a velo, 1 barretta di cioccolato
al latte
Preparazione:
Sciogliere il burro e separare i tuorli dagli albumi.
Mescolare i tuorli con 50 grammi di zucchero e il
burro sciolto. Sciogliere la cioccolata e incorporarla al
burro. Sbattere gli albumi fino ad ottenere una massa
densa. Aggiungere un cucchiaio ricolmo di farina e
incorporare con cautela gli albumi montati a neve.
Versare la massa di cioccolato nel COOK IT preriscal-
dato e chiudere il COOK IT con il fermo. Far cuocere
per circa 8-10 minuti, quindi capovolgere la griglia
COOK IT (FLIP OVER) e far cuocere per altri 3-5
minuti. Estrarre il dolce finito con cautela (attenzione:
all’interno potrebbe esserci del cioccolato fuso
bollente!) e guarnire con lo zucchero a velo.
POLPETTONE CON UOVO
Ingredienti:
250 g di carne macinata mista (tritata),
2 uova (taglia M), 1 piccola cipolla 100g di pan
grattato Prezzemolo, sale, pepe, 30g di burro o
margarina, 2-3 cucchiai di agente addensante,
prezzemolo, grasso
Preparazione:
Bollire 1 uovo per circa 6-8 minuti, quindi metterlo in
acqua e lasciarlo raffreddare. Sbucciare la cipolla e
tagliarla a dadini. Sbriciolare il pane. Lavare il
prezzemolo e tritarlo finemente. Mescolare la carne
macinata, il secondo uovo, il pan grattato, la cipolla e il
prezzemolo. Speziare con sale e pepe a volontà. Col
polpettone ottenuto, formare un piccola pagnotta.
Incorporare l’uovo sodo al centro della pagnotta e
impastare nuovamente. Mettere il tutto nel COOK IT
preriscaldato e ingrassato, chiudere e lasciar cuocere
per circa 20-30 minuti. Girare il polpettone semplice-
mente capovolgendo la griglia (FLIP OVER). Quindi,
togliere la carne macinata dal COOK IT. A piacere,
diluire il fondo per arrosti con 3 cucchiai d’acqua e
portarlo brevemente a ebollizione per il sugo, quindi
aggiungere l’addensante per il sugo mescolando.
Insaporire con sale e pepe. Servire accompagnato da
purè di patate. Aggiungere altro sugo.
La tabella si basa sui pesi e sulle quantità
indicate.
I tempi di cottura variano col variare del peso.
Non avrete più limiti per la vostra fantasia.
Potrete creare degli ottimi piatti con qualsiasi in-
grediente: ad esempio con salame, prosciutto cotto,
tonno, avanzi dell’arrosto della domenica, frutta o
verdura come pomodori, baccelli di paprika, asparagi,
cetrioli, cipolle, funghi, ananas, pesche, albicocche,
mandarini, banane, formaggio in qualsiasi formato
(fette, grattugiato o schiacciato. Per gratinare si con-
siglia di utilizzare i formaggi più semplici da sciogliere.
Speziare a piacimento.

20
Cosa cucino Tempo di cottura Nota
Bistecca ca. 4 minuti per lato ca. 150g, taglio spesso, lasciar riposare per
2-3 minuti
Cotoletta al naturale ca. 5 minuti per lato ca. 150g, tamponare con carta da cucina
Cotoletta impanata ca. 4 minuti per lato 150g. sempre nel grasso
Cotoletta di agnello ca. 4 minuti per lato ideale con rosmarino
Pesce fresco es. Trota piccola,
pangasio, luccioperca, filetto di
merluzzo
3 - 5 minuti per lato Girare con cautela, cuocere lentamente
Pesce surgelato es. Salmone,
luccioperca
5 minuti, poi girare Speziare unicamente dopo la cottura
Petto / cotoletta di pollo / 4 minuti, poi girare Circa 150g per pezzo
Cotoletta di tacchino 3 minuti, poi girare 150g a taglio sottile
Verdure di ogni tipo 8-12 minuti
Taglio piccolo, a seconda del tipo di verdure
Patate cotte (fette) ca. 12 - 15 minuti Guarnire con burro, girare più volte
Patate arrostite (fette) ca. 25 minuti Cuocere con strutto, girare più volte
Patate grezze (Rösti bernesi) ca. 8 minuti a lato Patate con la grattugia
Patate tagliatePancake ca. 2 minuti per lato Girare con cautela, cuocerle fino a farle
diventare croccanti
Omelette di uova ca. 3 minuti per lato Usare 2 uova, servire con erba cipollina
NL
VEILIGHEIDSINSTRUCTIES EN
ALGEMENE AANWIJZINGEN
1. Lees de volgende regels zorgvul-
dig door om zo het gevaar van
brand, stroomstoten of verbran-
dingen te voorkomen!
2. Raak nooit de warme oppervlakken
aan.
3. Veeg het nog warme apparaat
schoon met een stuk papier.
4. Voorkom dat de “COOK IT” in
aanraking komt met water of andere
vloeistoffen, want dit kan kortsluiting
of een stroomstoot veroorzaken.
5. Laat de ingeschakelde “COOK IT”
nooit onbeheerd achter.
6. Haal de stekker uit het stopcontact,
wanneer u de “COOK IT” niet meer
nodig heeft.
7. Laat de “COOK IT” goed afkoelen
voordat u deze wegzet, uit elkaar
haalt of reinigt.
8. Gebruik de “COOK IT” nooit wanneer
de kabel of de “COOK IT” zelf kapot
is. Zoek een “COOK IT” handelaar op
om met de dichtstbijzijnde officiële
klantenservice in contact te treden.
9. Onderdelen die niet voor de “COOK
IT” zijn gemaakt kunnen ongevallen
veroorzaken.
10. Laat de verbindingskabel nooit over
de tafelrand hangen en bescherm
deze tegen warme of scherpe
voorwerpen. Let erop dat de kabel
Table of contents
Languages:
Other MediaShop Grill manuals


Popular Grill manuals by other brands


 Installation Instructions and Use & Care Guide")

KitchenAid
KitchenAid KBNU367TSS Installation Instructions and Use & Care Guide

Nexgrill
Nexgrill DeLuxe dual energy 1900635 Assembly instructions

Coleman
Coleman EVEN HEAT Assembly manual

emerio
emerio RG-122652 instruction manual

Delfino
Delfino Delfino DLHG-443 Instruction booklet

Landmann
Landmann Triton PTS 3.0 Assembly and operating manual