MEDIATEK Genio 1200 User manual

MediaTek Proprietary and Confidential. © 2022 MediaTek Inc. All rights reserved.
Unauthori ed reproduction or disclosure of this document, in whole or in part, is strictly prohibited.
Use of this document and any information contained therein is subject to the terms and conditions set forth in Exhibit 1. This document
is subject to change without notice.
Version: 0.2
Release date: 2023-05-25
Genio 1200 Evaluation Kit
Quick Start Guide

MediaTek Proprietary and Confidential. © 2022 MediaTek Inc. All rights reserved. Unauthori ed reproduction or disclosure of this document, in whole or in part, is strictly prohibited.
2
Genio 1200 EVK
Genio
120
0 Evaluation Kit Quick Start Guide
Version Histor
Version Date Author Description
0.1 2023-05-09 MediaTek Draft Release
0.2 2023-05-25 MediaTek Update Figure 3-1, Figure 3-2

MediaTek Proprietary and Confidential. © 2022 MediaTek Inc. All rights reserved. Unauthori ed reproduction or disclosure of this document, in whole or in part, is strictly prohibited.
3
Genio 1200 EVK
Genio
120
0 Evaluation Kit Quick Start Guide
Table of Contents
Version History ··········································································································································································· 2
Table of Contents ······································································································································································· 3
List of Figures ············································································································································································· 3
List of Tables ··············································································································································································· 3
1 Packing List ········································································································································································ 4
2 Genio 1200 EVK System Setup ··········································································································································· 5
3 Genio 1200 EVK Board Overview ······································································································································· 6
4 Camera Daughter Board Installation ································································································································· 8
5 MIPI DSI Panel FPC and Touch Cable Connection ·············································································································· 9
6 How to Power Up the System ·········································································································································· 10
Exhibit 1 Terms and Conditions ················································································································································ 11
List of Figures
Figure 2-1 Genio 1200 EVK Set ··················································································································································· 5
Figure 3-1 Genio 1200 EVK Top View ········································································································································· 6
Figure 3-2 Genio 1200 EVK Bottom View ··································································································································· 7
Figure 4-1 D2/D6 Camera Daughter Board Installation ·············································································································· 8
Figure 5-1 Connect the MIPI DSI Panel FPC ································································································································ 9
Figure 5-2 Connect the Touch Cable ·········································································································································· 9
Figure 6-1 Power Up the System ·············································································································································· 10
Figure 6-2 Log Result Show on Screen ····································································································································· 10
List of Tables
Table 1-1 Genio 1200 EVK Packing List ······································································································································· 4
MediaTek Proprietary and Confidential. © 2022 MediaTek Inc. All rights reserved. Unauthori ed reproduction or disclosure of this document, in whole or in part, is strictly prohibited.
4
Genio 1200 EVK
Genio
120
0 Evaluation Kit Quick Start Guide
1Packing List
Table 1-1 Genio 1200 EVK Packing List
S.No
Part Number or Marketing Item Name Description Quantit
1 Genio 1200 EVK-P1V2 Genio 1200 EVK Main Board 1
2 IoT-CAM-DTB -D1V2-D2 D2 Camera Board Camera Daughter Board Using
IMX214 Image Sensor 1
3 IoT-CAM-DTB-D1V3-D6 D6 Camera Board Camera Daughter Board Using
AR0830 Image Sensor 1
4 KD070FHFID078-01-C021A 7” LCD Panel LCM Module 1
5 M.2 Wi-Fi 6 module
AW-XB468NF (IC: MT7921L) Wi-Fi Module Installed 1
6 IPEX to IPEX cable-158mm Installed on Mainboard 1
7 IPEX to IPEX cable-50mm Installed on Mainboard 1
8 SMA antenna Wi-Fi Antenna 2
9 12V AC adaptor + power cord 1

MediaTek Proprietary and Confidential. © 2022 MediaTek Inc. All rights reserved. Unauthori ed reproduction or disclosure of this document, in whole or in part, is strictly prohibited.
5
Genio 1200 EVK
Genio
120
0 Evaluation Kit Quick Start Guide
2Genio 1200 EVK S stem Setup
The Genio 1200 EVK, the entire peripherals include:
1: LCM module with touch panel (installed)
2: D2 camera daughter board
3: D6 camera daughter board
4: Wi-Fi module (installed) with 2 antennas
5: Power adapter with power cord
Figure 2-1 Genio 1200 EVK Set

MediaTek Proprietary and Confidential. © 2022 MediaTek Inc. All rights reserved. Unauthori ed reproduction or disclosure of this document, in whole or in part, is strictly prohibited.
6
Genio 1200 EVK
Genio
120
0 Evaluation Kit Quick Start Guide
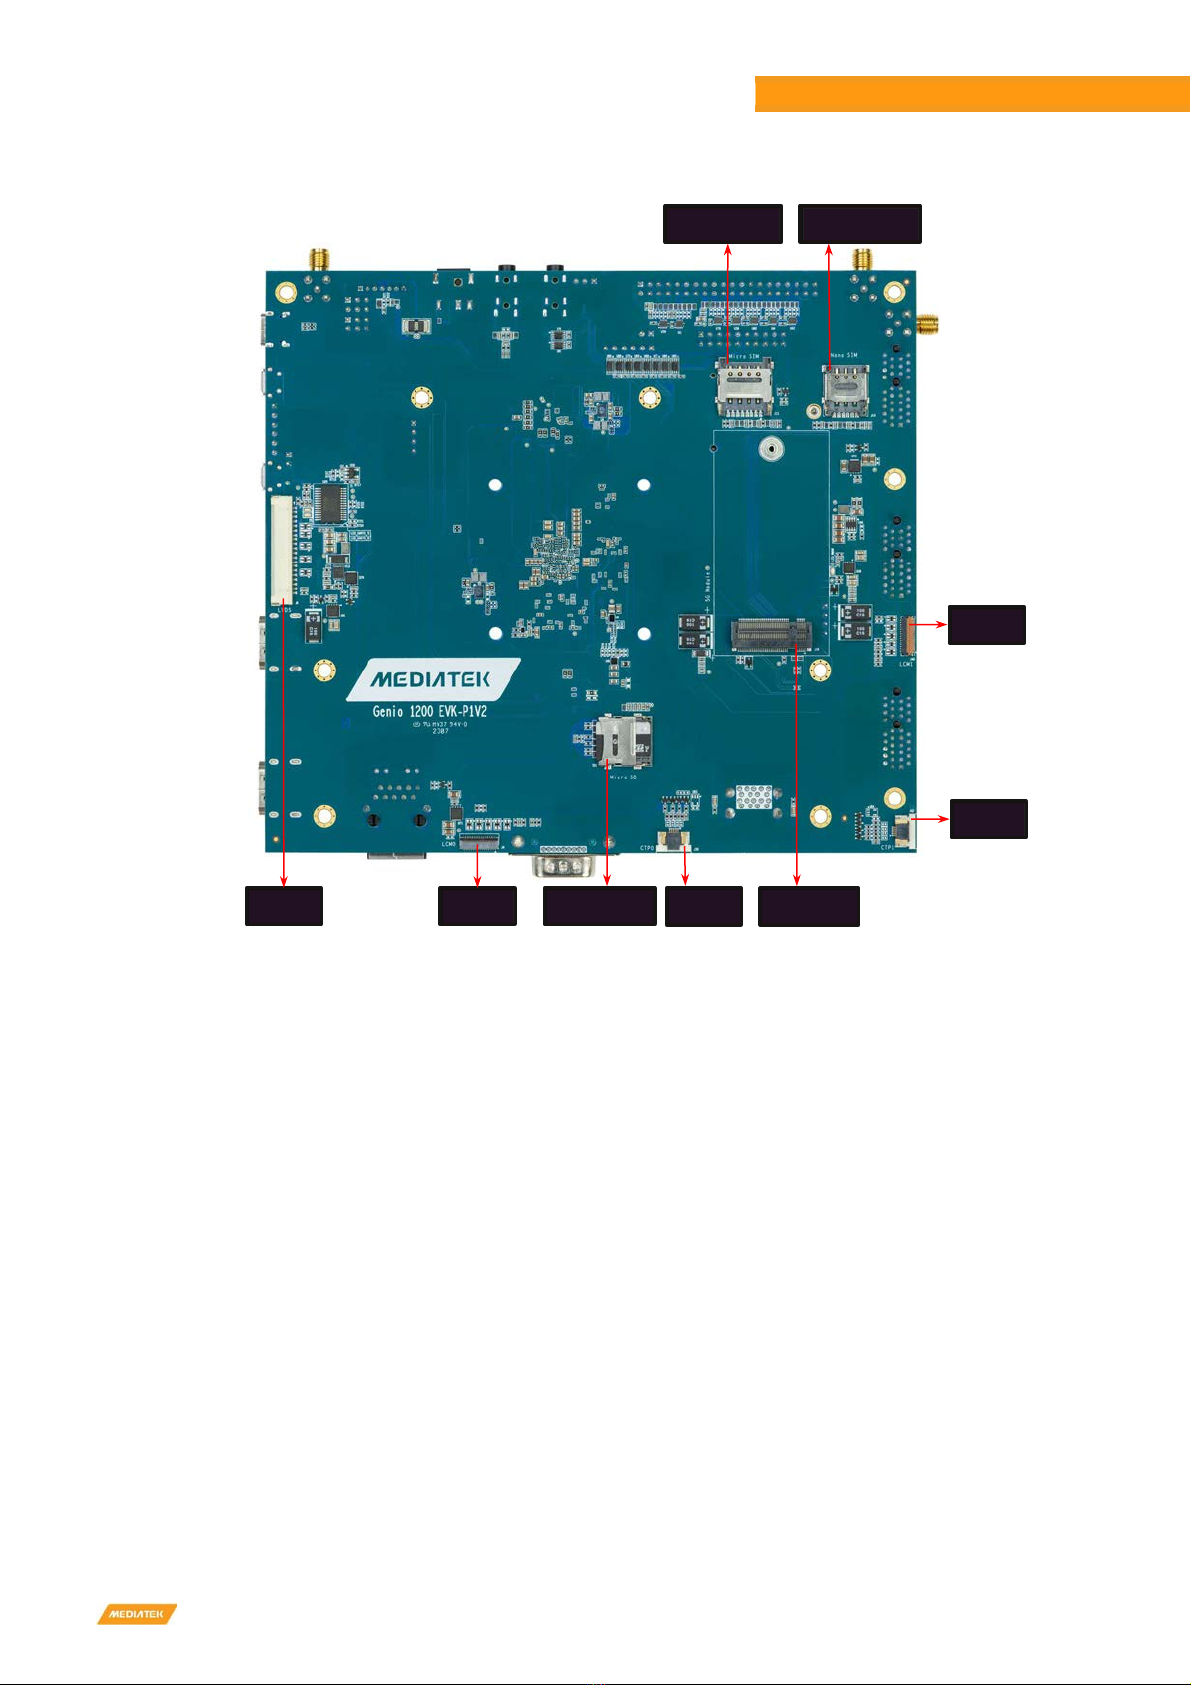
3Genio 1200 EVK Board Overview
Please refer below picture for IO function overview of EVK.
Figure 3-1 Genio 1200 EVK Top View
RJ-45
Connector
CAN FD
Connector
Raspberry Pi Like
Connector
Earphone
Connector
Speaker
Connector
DC IN
Jack
Battery
Connector
Wi-Fi ANT1
Connector
Wi-Fi ANT2
Connector
Wi-Fi ANT3
Connector
Camera CAM2
Connector
Camera CAM1
Connector
Camera CAM0
Connector
USB 3.2
Connector
HDMI RX
Connector
Download Key
M.2 Connector for
MT7921 Wi-Fi Module
HDMI TX
Connector
UART 0 Debug
Connector
Micro USB
Connector
UART 1 Debug
Connector
USB Type-C
Connector
Power Key
Reset Key
Home Key
eDP Connector
eMMC / UFS
Switch
MediaTek Proprietary and Confidential. © 2022 MediaTek Inc. All rights reserved. Unauthori ed reproduction or disclosure of this document, in whole or in part, is strictly prohibited.
7
Genio 1200 EVK
Genio
120
0 Evaluation Kit Quick Start Guide
Figure 3-2 Genio 1200 EVK ottom View
Micro SIM Card
Connector
Nano SIM Card
Connector
LVDS
Connector
LCM1
Connector
CTP1
Connector
M.2 Connector for
5G Module
Micro SD Card
Connector
CTP0
Connector
LCM0
Connector
MediaTek Proprietary and Confidential. © 2022 MediaTek Inc. All rights reserved. Unauthori ed reproduction or disclosure of this document, in whole or in part, is strictly prohibited.
8
Genio 1200 EVK
Genio
120
0 Evaluation Kit Quick Start Guide
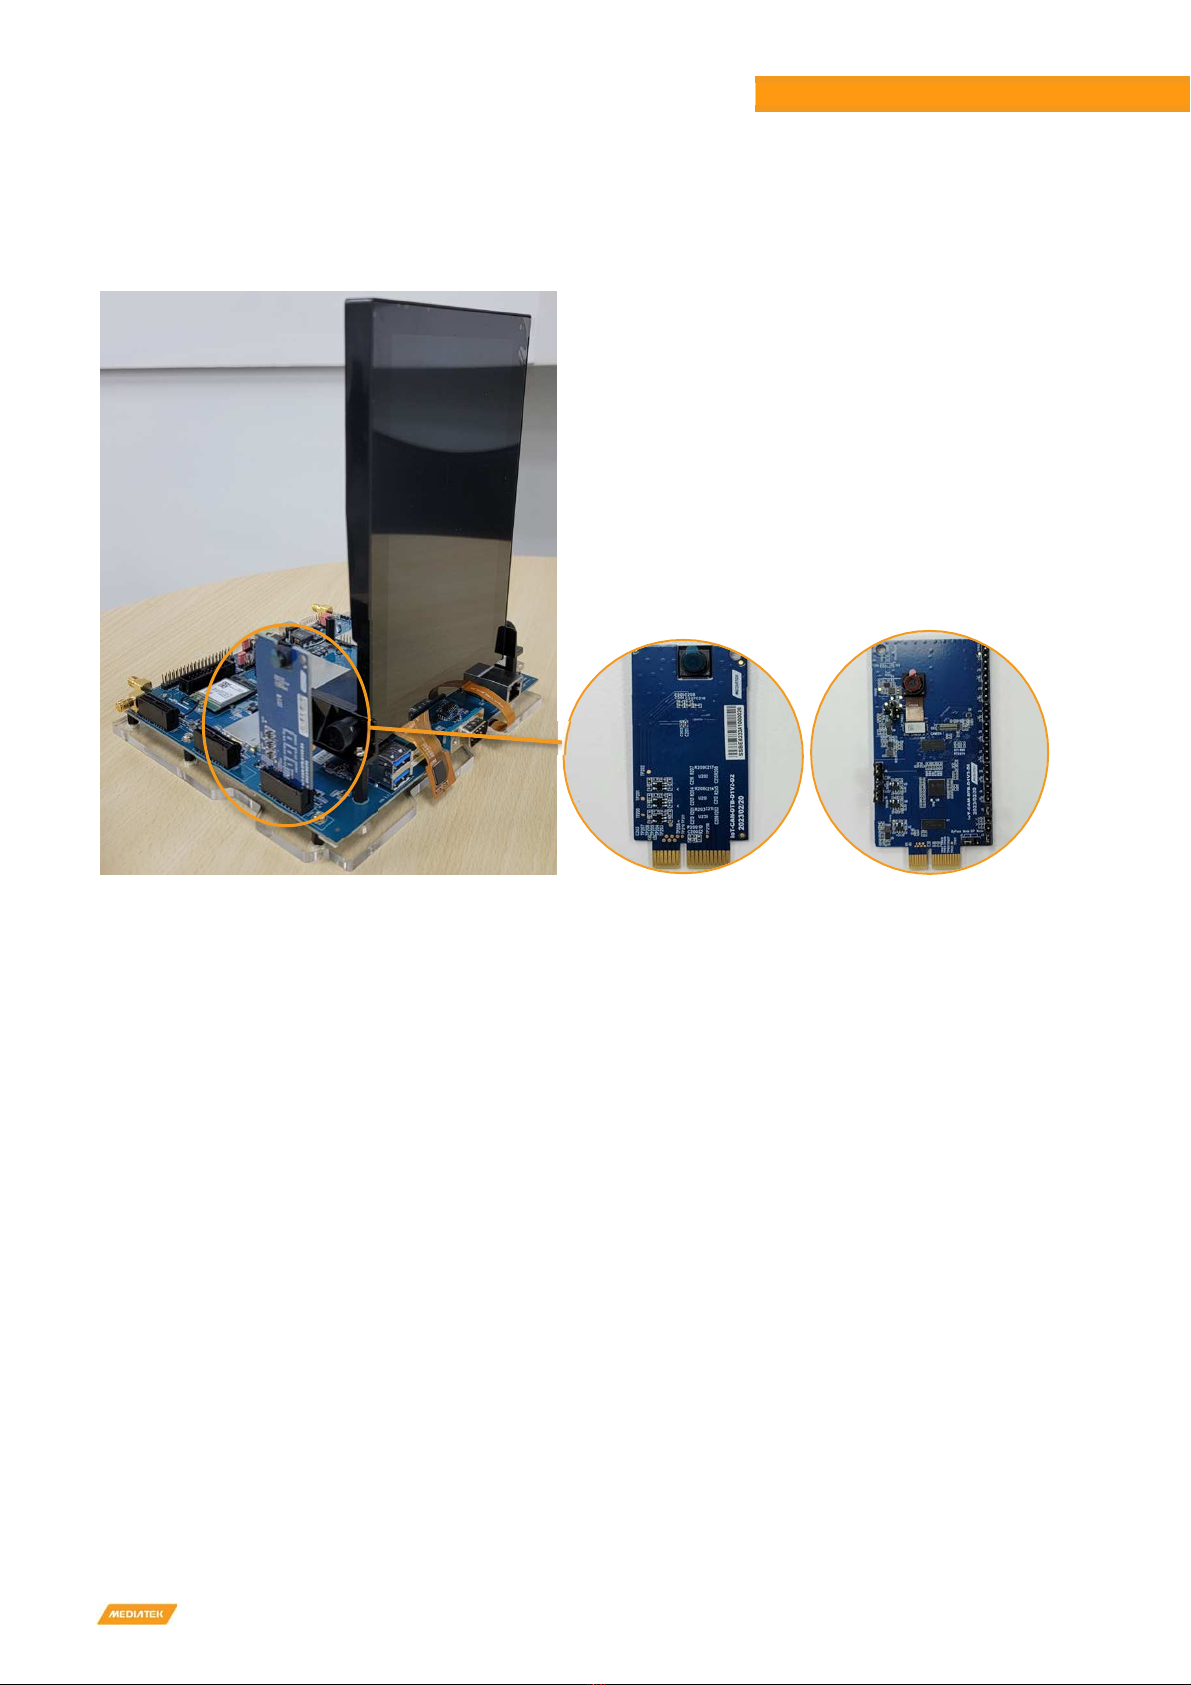
4Camera Daughter Board Installation
Insert D2/D6 camera daughter board to Genio 1200 EVK CAM0 (or CAM2) connector.
Figure 4-1 D2/D6 Camera Daughter oard Installation

MediaTek Proprietary and Confidential. © 2022 MediaTek Inc. All rights reserved. Unauthori ed reproduction or disclosure of this document, in whole or in part, is strictly prohibited.
9
Genio 1200 EVK
Genio
120
0 Evaluation Kit Quick Start Guide
5MIPI DSI Panel FPC and Touch Cable Connection
Install procedure:
•Step 1
Insert the MIPI DSI panel FPC into Genio 1200 EVK LCM0 connector. After cable inserted, the FPC connector must be
pressed down firmly.
Figure 5-1 Connect the MIPI DSI Panel FPC
•Step 2
Loosen the Genio 1200 EVK CPT0 connector head, insert the touch cable into CPT0 connector. After cable insert, press
tightly the connector head.
-
Figure 5-2 Connect the Touch Cable
MediaTek Proprietary and Confidential. © 2022 MediaTek Inc. All rights reserved. Unauthori ed reproduction or disclosure of this document, in whole or in part, is strictly prohibited.
10
Genio 1200 EVK
Genio
120
0 Evaluation Kit Quick Start Guide
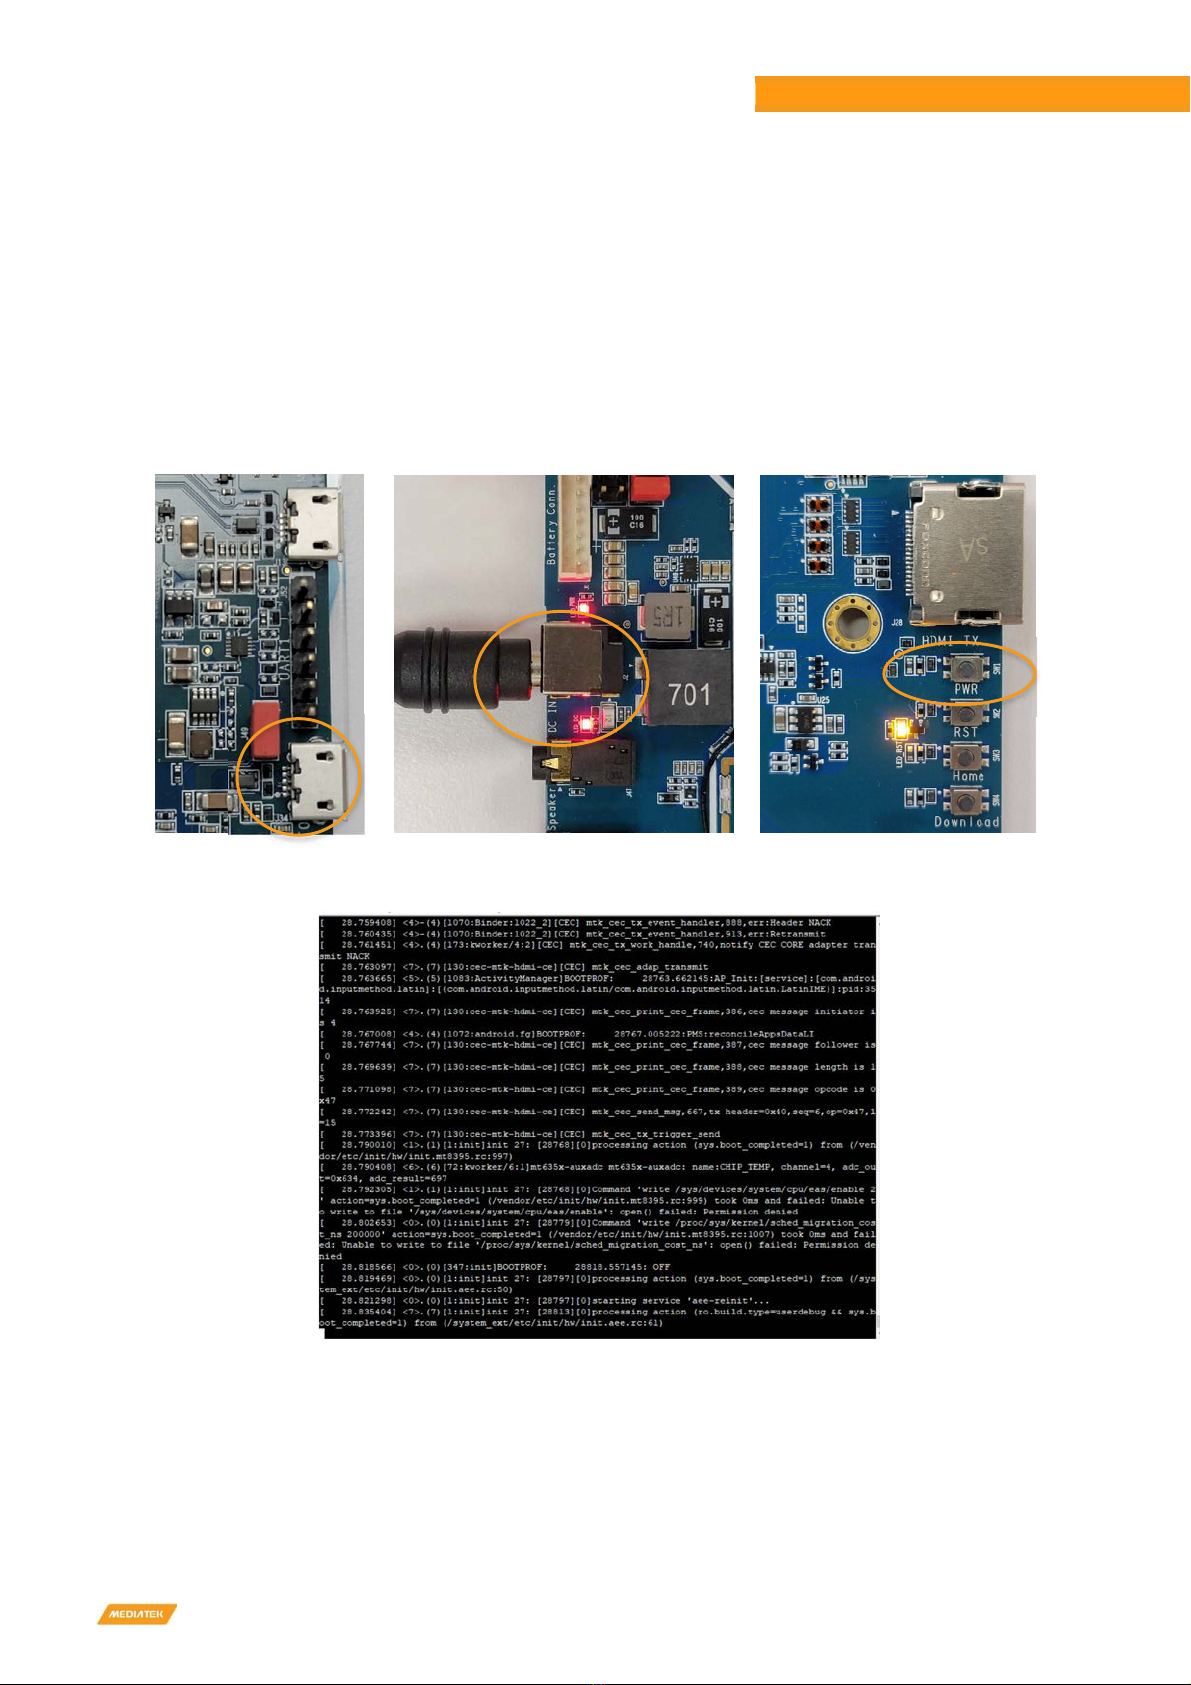
6How to Power Up the S stem
Step1: Must install Camera DTB on CAM0 or CAM2 connector.
(If camera app without in Android desktop, please refer to chapter 7 Appendix of Genio 1200 EVK User Guide for fixed it)
Step2: Connect UART0 to the computer via a micro-USB cable. (If you want to see the logs)
Step3: Plug in the DC 12V power adapter.
Step4: Long press PWR button more than 3 seconds.
You will see the screen is shown on MIPI display and some trace logs in UART0.
Figure 6-1 Power Up the System
Figure 6-2 Log Result Show on Screen

MediaTek Proprietary and Confidential. © 2022 MediaTek Inc. All rights reserved. Unauthori ed reproduction or disclosure of this document, in whole or in part, is strictly prohibited.
11
Genio 1200 EVK
Genio
120
0 Evaluation Kit Quick Start Guide
Exhibit 1 Terms and Conditions
Your access to and use of this document and the information contained herein (collectively this “Document”) is subject to your (including the corporation
or other legal entity you represent, collectively “You”) acceptance of the terms and conditions set forth below (“T&C”). By using, accessing or
downloading this Document, You are accepting the T&C and agree to be bound by the T&C. If You don’t agree to the T&C, You may not use this
Document and shall immediately destroy any copy thereof.
This Document contains information that is confidential and proprietary to MediaTek Inc. and/or its affiliates (collectively “MediaTek”) or its licensors
and is provided solely for Your internal use with MediaTek’s chipset(s) described in this Document and shall not be used for any other purposes (including
but not limited to identifying or providing evidence to support any potential patent infringement claim against MediaTek or any of MediaTek’s suppliers
and/or direct or indirect customers). Unauthori ed use or disclosure of the information contained herein is prohibited. You agree to indemnify
MediaTek for any loss or damages suffered by MediaTek for Your unauthori ed use or disclosure of this Document, in whole or in part.
MediaTek and its licensors retain titles and all ownership rights in and to this Document and no license (express or implied, by estoppels or otherwise) to
any intellectual propriety rights is granted hereunder. This Document is subject to change without further notification. MediaTek does not assume any
responsibility arising out of or in connection with any use of, or reliance on, this Document, and specifically disclaims any and all liability, including,
without limitation, consequential or incidental damages.
THIS DOCUMENT AND ANY OTHER MATERIALS OR TECHNICAL SUPPORT PROVIDED BY MEDIATEK IN CONNECTION WITH THIS DOCUMENT, IF ANY, ARE
PROVIDED “AS IS” WITHOUT WARRANTY OF ANY KIND, WHETHER EXPRESS, IMPLIED, STATUTORY, OR OTHERWISE. MEDIATEK SPECIFICALLY DISCLAIMS
ALL WARRANTIES OF MERCHANTABILITY, NON-INFRINGEMENT, FITNESS FOR A PARTICULAR PURPOSE, COMPLETENESS OR ACCURACY AND ALL
WARRANTIES ARISING OUT OF TRADE USAGE OR OUT OF A COURSE OF DEALING OR COURSE OF PERFORMANCE. MEDIATEK SHALL NOT BE RESPONSIBLE
FOR ANY MEDIATEK DELIVERABLES MADE TO MEET YOUR SPECIFICATIONS OR TO CONFORM TO A PARTICULAR STANDARD OR OPEN FORUM.
Without limiting the generality of the foregoing, MediaTek makes no warranty, representation or guarantee regarding the suitability of its products for
any particular purpose, nor does MediaTek assume any liability arising out of the application or use of any product, circuit or software. You agree that
You are solely responsible for the designing, validating and testing Your product incorporating MediaTek’s product and ensure such product meets
applicable standards and any safety, security or other requirements.
The above T&C and all acts in connection with the T&C or this Document shall be governed, construed and interpreted in accordance with the laws of
Taiwan, without giving effect to the principles of conflicts of law.
Other manuals for Genio 1200
1
Table of contents
Other MEDIATEK Motherboard manuals

MEDIATEK
MEDIATEK MT7612 User manual

MEDIATEK
MEDIATEK Genio 510 User manual

MEDIATEK
MEDIATEK LinkIt 7697 HDK User manual

MEDIATEK
MEDIATEK Genio 700 Installation manual

MEDIATEK
MEDIATEK Genio 350 Installation manual

MEDIATEK
MEDIATEK LinkIt Smart 7688 Instruction Manual

MEDIATEK
MEDIATEK LinkIt Smart 7688 Specification sheet

MEDIATEK
MEDIATEK Genio 1200 User manual

MEDIATEK
MEDIATEK Genio 700 EVK User manual

MEDIATEK
MEDIATEK Genio 350 User manual


 user manual")


