Medidenta Sonus Operation instructions

Medidenta
Toll Free: 800.221.0750
Web: www. Medidentaendo.com
Email: [email protected]
3575 W. Post Rd. , Las Vegas, NV 89118
LED Piezo U l trason ic Scaler
User and Operating Manual
Read this manual carefully before operating.
Keep it in a safe place for further consultation

Contents
1. Installation. Components description ........................................... 3
2. Installation. Setup .......................................................................... . 7
3. Maintenance. Troubleshooting.................................................... 16
4. Cleaning, disinfection and sterilization ...................................... 20
5. Precautions. Contraindications……………………………….... 27
6. After service ...................................................................................32
7. Symbolsinstructions.....................................................................33
8. Environmental protection .............................................................34
9. Manufacturer’s liability..................................................................34
10. European authorized representative ..........................................34
11. EMC - Declaration of conformity .................................................35
12. Statement........................................................................................39
13. Tips Power Table ........................................................................... 40

3
1. Installation. Components description.
1.1 Introduction
Thanks for purchasing the SonusTM LED Piezo Ultrasonic Scaler.
The Medidenta medical device that you are about to install
and use in your practice is a medical device designed for
professional use. It comprises the chosen tool with which you will
provide treatment within the context of your work.
To ensure optimum safety for yourself and your patients, comfort in
your daily practice and to benefit fully from the technology of your
medical device, please read the documentation provided carefully.
If youhave received this medical device by mistake, please contact
Medidenta to arrange for it to be collected.
This piezoelectric unit is used for preservation and restoration
dentistry, including hygiene, periodontics, endodontics,implant
maintenance, restorative and prosthesis.
WARNINGS:
•Read all instructions before operating this unit. The manufacturer
accepts no liability for any damage resulting from improper use of this
unit and/or for any purpose other than those covered by these
instructions.
•US Federal law restricts this unit to sale by or on the order of a
dentist.
•As per Endodontic Standards of Care, always use a rubber dam
when performing endodontic treatment.
•Do not use dry heat sterilization on any of the device’s components.
1.2 Components description
1.2.1 The components are listed in the packing list.
1.2.2 Sonus LED Piezo Ultrasonic Scaler is composed of circuit board,
water pump, reservoir (tank and accessory bottles), and ultrasonic
transducer handpiece.
1.2.3 Sonus LED Piezo Ultrasonic Scaler is used dental procedures

4
such as hygiene, periodontics, endodontics, implant maintenance
and cavity preparations.
1.3 Technical specifications
1.3.1 LED Piezo Ultrasonic Scaler:
a) Main unit input: 110V~ 50Hz/60Hz 280 mA.
b) Output primary tip vibration excursion: ≤90μm.
c) Output half-excursion force: <2N.
d) Output tip vibration frequency: 28kHz±3kHz.
e) Output power: 3W to 20W.
f) Main unit fuse: T0.5AL 250V.
g) Water pressure: 0.01MPa to 0.5MPa.
h) Weight of main unit: 3.97 pounds (1.8 Kg).
i) Operating mode: Continuous operation.
j) Type of protection against electric shock: class II equipment.
k) Degree of protection against electric shock: Type BF applied part.
l) Applied part of the equipment: handpiece and tip. Degree of
protection against harmful ingress of water: ordinary equipment.
Foot switch is drip-proof equipment (IPX1).
m) Degree of safety of application in the presence of a flammable
anesthetic mixture with air, oxygen or nitrous oxide: equipment not
suitable for being used in the presence of a flammable anesthetic
mixture with air, oxygen or nitrous oxide.
5
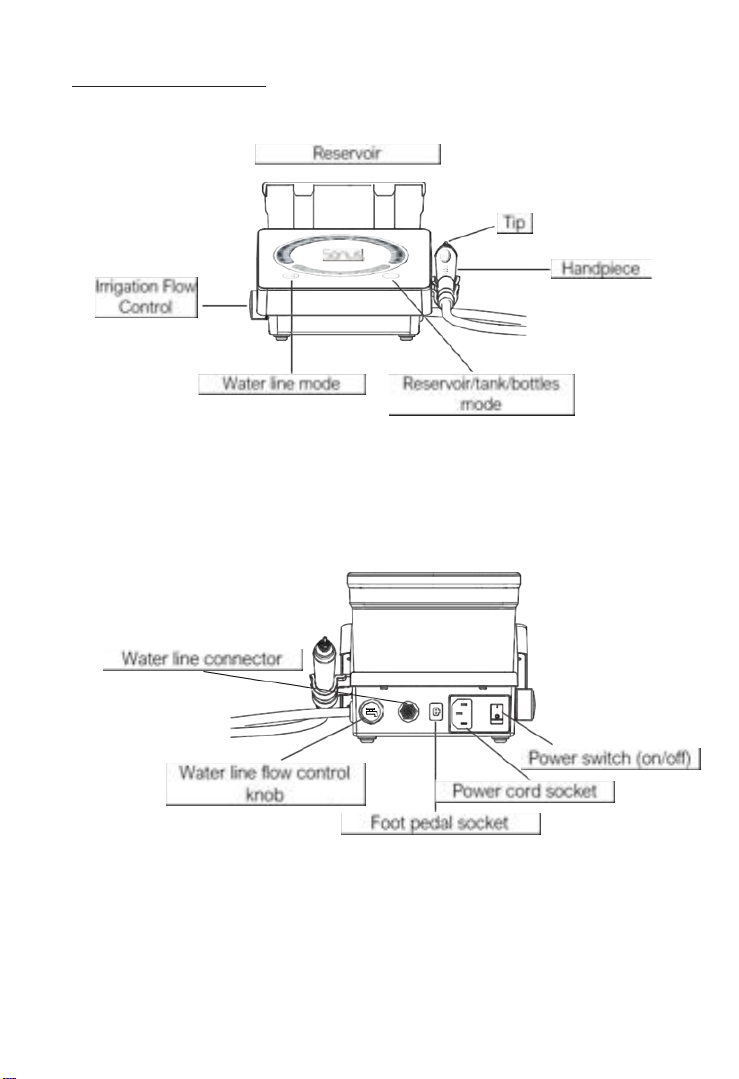
1.4.2 Main components
Main unit (front)
Fig. 1. Front view details.
Main unit (back)
Fig. 2. Back view details.

6
Handpiece components
Fig. 3. Handpiece.
Handpiece/handpiece cable coupling
Fig. 4. Handpiece and handpiece cable connection alignment guides
matching.
Tip installation. Torque Wrench/ Wrench
Fig. 5. Torque wrench and wrench.

7
Touch screen display with water, vibration and power (amplitude)
controls.
Fig. 6. Touch screen display.
Accessory bottles.
Fig. 7. Accessory bottles (300 ml maximum) for irrigants.
2. Installation/Setup
2.1 Unpacking the device
WARNING:
When you receive your medical device, check for any damage that
may have occurred during transportation. If you have received this
medical device by mistake, please contact the supplier to arrange for
it to be collected.
2.1.1 Open the packing box. Make sure that all parts and
accessories are complete according to the packing list. Take the main

8
unit out of the box, and place it on a secure and flat surface facing to
the operator.
2.1.2 Installing cords. Check if the cords do not hinder the
movement or free circulation of anyone.
2.1.3 Never rotate the handpiece connector on its cord as this
can damage your medical device.
2.1.4 Never wrap the handpiece cord around the medical
device.
2.1.5 Make sure that it is not possible to wheel over or walk on
the different cords.
2.1.6 Set the device to OFF position (power switch, Fig. 2).
Check that the power voltage is compatible with that indicated
on the device or its power plug.
WARNING:
Sonus voltage is 110V, 50-60Hz, 280 mA.
2.1.7 Next, connect the cord to the wall socket in compliance
with the standards in force in the country of use.
2.1.8 A different voltage would cause damage to the medical
device and could injure the patient and/or user. Any variation in
the electrical network voltage or electromagnetic field that is
non-compliant with the limits in force, could interfere with the
medical device’s operation.
2.1.9 The medical device’s ground must be connected to a
supply network equipped with a protective ground.
2.1.10 Turn the irrigation flow control knob (Fig. 1) to maximum
turning the knob counterclockwise. Turn the water line flow control
knob (Fig. 2) to maximum turning the knob counterclockwise. Do not
screw it over tight.
2.1.11 Insert the foot pedal cord plug to its socket (Fig. 2).

9
If you are going touse the water line:
2.1.12 Connect one end of the water pipe to the water entrance, and
the otherend to the clean water source (Fig. 2).
NOTE:
The water line hoseand its connectors are not included in this
device package.
WARNINGS:
•The CDC recommends that dental unit water used in
nonsurgical procedures measure less than or equal to 500 colony
forming units of heterotrophic bacteria per milliliter (≤500 CFU/mL)
of water, the standard set for drinking water by the Environmental
Protection Agency (EPA).
•Use sterile saline or sterile water as a coolant/irrigant when
performing surgical procedures (such prophylaxis, scaling and/or
periodontics treatments).
•Follow dental unit manufacturer’s instructions for maintaining
and monitoring the quality of dental unit water.
2.1.13 With the water connections in place, press the water line mode
button on the touch panel (Fig. 6).
If you are going to use the reservoir (tank) or bottles:
WARNING:
The device is equipped with a reservoir (tank) and accessory bottles
(Fig. 7) designed to hold the irrigation solution. The irrigation solution
reservoir is fitted with a cover. Neither the reservoir, the cover or
accessory bottles can be sterilized.
2.1.14 Fill the reservoir up to the line with distilled water. Do not
overfill. With the reservoir/bottles in place, press the
reservoir mode button on the touch panel (Fig. 6).
2.1.15 Sonus comes with accessories bottles (Fig. 7) to be used
during endodontic irrigation. Place the bottle for different solutions

10
activation/irrigation.
WARNING:
Do not leave the reservoir (original tank or accessorybottles) with
irrigants in place after finishing the procedure. The permanent
contact of the reservoir/bottles filled with endodontic irrigants (i.e.,
sodium hypochlorite, EDTA, chlorhexidine and others) can cause
permanent corrosion of the internal parts of the device.
2.1.16 Choose the tip accordingly (see tips Tip Power Table, pg. 40),
and install it using the torque wrench (Fig. 5). For install endodontic
(E) tips, use the wrench (both included).
WARNING:
The screw thread of the tips produced by other manufacturers
maybe coarse, rusty and collapsed, which will damage the
screw thread of the handpiece irretrievably. Please use Medidenta
brand tips.
2.1.17 Turn on the power switch (Fig. 2).
WARNING:
Every time that the device is turn off and turn on again, the system
will be pre-configurated for power (amplitude) 1, vibration mode E
(for endodontics tips) and reservoir/tank/bottle irrigant mode (Fig. 8).
Fig. 8. Pre-set configuration after turning the device on.
11
2.1.18 Use the touch panel for adjusting the water/irrigant supply mode
(water line or reservoir modes), vibration intensity modes (G, P or E)
and power (1-10, amplitude).
2.1.19 Vibration intensity mode (buttons G, P and E): adjust the
vibrating intensity according to the procedure:
•G(scaling, hygiene)
•P(periodontics, and cavity preparation)
•E(endodontics, including endodontics irrigation/activation)
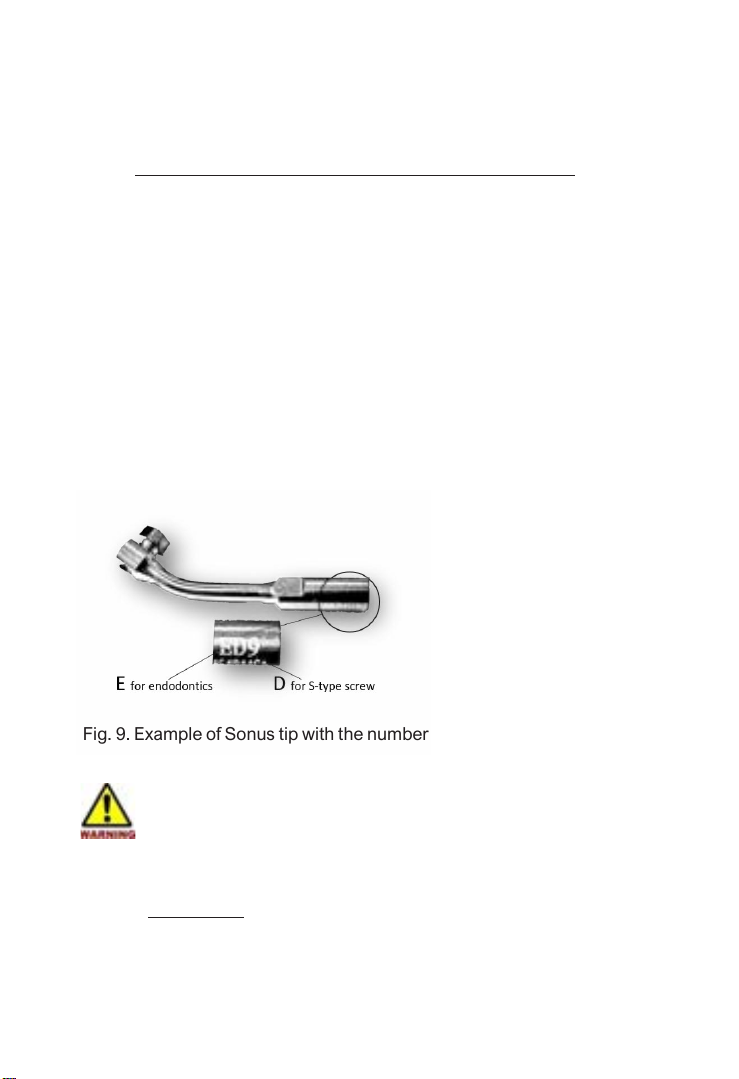
2.1.20 Sonus uses the Stype tips screw thread design configuration.
Sonus tips are identified by letters and numbers. The first letter
indicates the vibration intensity model, starting with G (scaling,
hygiene), P (periodontics), E (endodontics), and SB (for cavity
preparation). The second letter refers to the screw design type (Fig.
9).
Fig. 9. Example of Sonus tip with the number/letters code identification. Letter
Estands for endodontic tip; letter Dstands for S type screw design tip.
WARNING:
Always use Stype tips for Sonus. It is highly recommended to use
Medidenta ultrasonic tips with the Sonus LED Piezo Ultrasonic
Scaler. Do not use Etype tips (consult tip instructions for use before
using ultrasonic tips). The screw thread of the tips produced by
other manufacturers maybe coarse, rusty and collapsed,
which will damage the screw thread of the handpiece
irretrievably. It is highly recommended to use Medidenta brand

12
tips.
2.1.21 Choose the vibration intensity mode (G, P or E) based on the
procedure/tip you are willing to perform (Fig. 6).
IMPORTANT:
Pressing twice the Ebutton the system will go to irrigation mode (E
mode at power amplitude 3). This feature allows the proper set for
polymer irrigation tips. In this setup the Ebutton at the touch panel
will blink.
2.1.22 Choose the water/irrigant source pressing the water line
mode or reservoir mode button.
2.1.23 Water/irrigant volume adjustment: step on the foot switch (control
pedal). The tip begins to vibrate.
•If you are using the reservoir mode: turn the irrigation flow control
knob (Fig. 1) clockwise/counterclockwise.
•If you are using the water line mode: turn the water line flow control
knob (Fig. 2) clockwise/counterclockwise.
Adjust the knob to achieve a suitable irrigant spray to cool down the
handpiece and helps to rinse the treatment area. This adjustment
depends on the tip design and procedure. As work habits, feedback and
professional training differ from one professional to another, the user
must make sure that the irrigation flow is perfectly adapted to the
treatment to be carried out to avoid burning the treatment area. Adjust
to the minimal irrigant volume for continuous flow endodontic irrigation
(CUI).
CAUTION:
•Always use PPE devices such as visor, face mask and high
evacuation system to evacuate aerosol from the field of operation.
Clean thoroughly the area around the perimeter of usage with
proper disinfectants.

13
2.1.24 Operating power adjustment (scale number from 1 to 10):
always start the power at a minimal rate (1), adjusting/increasing
during the clinical treatment according to the procedure
development. Various factors need to be evaluated such as patient's
sensitivity, and/or volume of calculus, among others.
WARNING:
Consult “Tips Power Table”(pg. 40) before starting the procedure.
Special attention needed to endodontic procedures such as
activation/irrigation with polymer tips (Polysonic tip using the
ED70 connector). These tips need to be activated (turned on)
only when inside the canal, with operating power level from 1
(minimum) to 3 (maximum).
2.1.25 Start the ultrasonic vibration stepping on the foot switch pedal.
Once the tip begins to vibrate, a LED light on the top of the handpiece
(Fig. 3) turns on. Once the foot switch is released, the LED ilumination
will stay on for 10 seconds.
When using hygiene/scaling/periodontics tips, do not use
excessive pressure when the tip touches the enamel surface.
Always use horizontal orientated movements (Fig. 10) with the tip
slightly angled toachieve efficiency with lower sensitivity.
Fig. 10 Horizontal movements with the tip slightly angled.
WARNING:

14
2.1.26 After finishing operation, remove the reservoir
and dispose the remaining irrigant. Rinse the tank with
water. Fill the tank with distilled water to a quarter of its
capacity. Reinstall the tank. Start the cleaning mode by
pressing simultaneously the two buttons on
the touch screen panel (water line mode and reservoir
mode buttons, Fig. 6). A single beep alarm will sound and the
reservoir mode button will start to blink. Step on the foot switch once
to start the cleaning mode (purge) cycle. A continuous flow volume
of distilled water will clean the system internally, preventing corrosion
or mineral accumulation automatically for 30 seconds. Step on the
foot switch for ending the cleaning mode cycle before 30 seconds if
necessary. After the cleaning cycle, press again the two buttons
simultaneously to exit cleaning mode.
2.1.27 Unscrew the tip, verify any worn or distortion. Clean and
sterilize it.
WARNING:
Do not screw/unscrew tips when the device is on (stepping on the
foot switch pedal).
2.2 Cleaning mode (purge cycle)
It is important to clean internally (purge) the device after use to
prevent corrosion or mineral deposits alongside the system.
2.2.1 Operation:
a. After finishing operation, remove the reservoir and dispose the
remaining irrigant. Rinse the tank with water. Fill the tank with distilled
water to a quarter of its capacity.
b. Reinstall the tank. Press simultaneously the two buttons on the
touch screen panel (water line mode and reservoir mode
buttons, Fig. 6).
c. A single beep alarm will sound and the reservoir mode button
will start to blink . Step on the foot switch once to start the

15
cleaning mode (purge) cycle. A continuous flow volume of distilled
water will clean the system internally, preventing corrosion or mineral
accumulation automatically for 30 seconds.
d. Step on the foot switch pedal for ending the cleaning mode
cycle before 30 seconds if necessary. After the cleaning cycle, press
again the two buttons simultaneously to exit cleaning mode.
WARNING:
•Cleaning mode (purge cycle) needs to be done always after the
use of reservoir (tank) or accessory bottles.
•Do not leave irrigants/water inside the reservoir/bottles after use.
Discard the irrigants used ina proper way.
•Special attention with corrosive irrigants like sodium hypochlorite
is need. Do not use concentrations more than 2.5%. Handle
sodium hypochlorite with maximum care.

16
3. Maintenance
3.1 Troubleshooting
Fault Possible cause Solutions
No operation. The
tip doesn't vibrate,
and there is no
water flowing out
when stepping on
the foot switch.
No electrical current. Contact your electrician.
Faulty connection
between the power cord
and the electrical wall
socket.
Connect the power cord
to the electrical wall
socket properly.
The foot switch is in
loose contact.
Insert the foot switch to
its socket tightly.
Internal fuse is not
working.
Contact
Medidenta.
The tip doesn't
vibrate but there is
water flowing out
when stepping on
the switch.
The tip is in loose
contact.
Make sure that the
right tip (S type) is
being used. Screw the
tip on the handpiece
tightly.
Handpiece and
handpiece cord are in
loose contact.
Make sure there is no
gap between the
handpiece and the
handpiece cord
coupling.
The tip vibrates
but there is no
spray when
stepping on the
foot switch.
The water control knob
is off or at minimum.
Turn on the water
control knob. Adjust
the flow turning the
knob counterclockwise.
No irrigation solution at
the tank.
Fill the tank with
irrigation solution.

17
The tip does not
vibrate at the
expected
frequency, the
treatment is not
progressing as
normal and is
taking longer or is
at a standstill.
The tip hasn't been
screwed on completely
to the handpiece.
Make sure that the
right tip (S type) is
being used. The E type
screw thread is very
similar but with a
slightly different thread
configuration. Replace
with a S type
(Medidenta
recommended) and
screw the tip on the
handpiece tightly.
The tip is loose.
Screw on the tip tightly.
The coupling between
the handpiece and the
handpiece cord isn't
dry.
Thoroughly fry the
electrical contacts.
The tip is damaged. Replace the tip.
Polymer tip is
melting at the end
part of the tip.
Excessive heat during
vibration.
Do not activate (turn
on) the tip outside the
canal. Use the right
vibration (E) mode and
the right power (1-3).
Make sure there is
irrigation.
There is liquid
leaking from the
coupling between
the handpiece
and handpiece
cord.
The waterproof O-ring is
damaged. Replace the waterproof
O-ring.

18
The handpiece
generates heat.
Low irrigant flow.Adjust the flow to
a higher rate.
No spray. Low
spray.
Low irrigant flow.
Turn the knob to
a high
grade [note 1].
The water pressure is
not
enough.
Enhance the
water
pressure.
The water pipe is
jammed.
Clean water pipe
with air-water
syringe
[note2].
The vibrating
intensity control
knob is seized
up.
The potentiometer is
damaged.
Contact
Medidenta.
LED light is off.
Poor contact.Contact tightly.
LED worn.Replace the LED.
If the problem still can't be solved, contact Medidenta.

19
3.2 Corrective maintenance
In the event of faulty operation, the following corrective maintenance
actions may be performed by the user.
3.2.1 Clean the water pipe with the air-water syringe (Fig. 11):
Fig. 11. Water line at the back of the unit.
a. Snip the water pipe at a distance of 5 to 7 inches from the
external water connection.
b. Turn on the power switch.
c. Adjust the tip of the air-water syringe to the water pipe.
d. Screw off the tip or pull out the handpiece.
e. Step on the foot switch.
f. Turn on the air-water syringe pressing air or water into the water
pipe to unblock the system.
3.3 Cleaning mode
It is important to purge the system after use preventing corrosion or
mineral deposits alongside the internal system.
3.3.1 Operation:
a. After finishing operation, remove the reservoir and dispose the
remaining irrigant. Rinse the tank with water. Fill the tank with distilled
water to a quarter of its capacity. Reinstall the tank. Press
simultaneously the two buttons on the touch
screen panel (water line mode and reservoir
mode buttons, Fig. 6).

20
b. A single beep alarm will sound and the reservoir mode
button will start to blink. Step on the foot switch once to start
the cleaning mode (purge) cycle. A continuous flow
volume of distilled water will clean the system internally, preventing
corrosion or mineral accumulation automatically for 30 seconds.
c. Step on the foot switch pedal for ending the cleaning mode cycle
before 30 seconds if necessary. After the cleaning cycle, press again
the two buttons simultaneously to exit cleaning mode.
4. Cleaning, Disinfection and Sterilization
The cleaning, disinfection and sterilization of handpiece, tip, and
wrench (include torque wrench and wrench) are as follow.
Unless otherwise stated, it will be hereinafter referred to as “products”.
WARNINGS:
•The use of strong detergent and disinfectant (alkaline pH>9 or acid
pH <5) will reduce the life span of products. And in such cases, the
manufacturer takes no responsibility.
•Do not clean the handpiece with ultrasound cleaning machine. This
device shall not be exposed to high temperature above 138℃.
•Processing limit. The products have been designed for a large
number of sterilization cycles. The materials used in manufacture were
selected accordingly. However, with every renewed preparation for
use, thermal and chemical stresses will result in ageing of the
products. The maximum number of sterilizations for handpiece is 600
times. For tips, it is 300 times. And for wrench, it is 1000 times.
4.1 Initial processing
4.1.1 Processing principles
It is only possible to carry out effective sterilization after the completion
of effective cleaning and disinfection. Please ensure that, as part of
your responsibility for the sterility of products during use, only
sufficiently validated equipment and product-specific procedures are
used for cleaning/disinfection and sterilization, and that the validated
Table of contents
Other Medidenta Media Converter manuals

Popular Media Converter manuals by other brands

Behringer
Behringer ULTRAGAIN PRO-8 DIGITAL ADA8000 quick start guide

Mitsubishi Electric
Mitsubishi Electric AJ65SBT2B-64DA user manual

Avenview
Avenview 3G/HD/SD-SDI to HDMI Converter user guide

Radial Engineering
Radial Engineering MR5 user guide

Lantronix
Lantronix S3100 Series install guide

ABB
ABB TEIP11 operating instructions

URIT Medical Electronic
URIT Medical Electronic VRN DA-20 user manual

D-Link
D-Link 1000Base-T to mini-GBIC Media Converter... Quick installation guide

IMC Networks
IMC Networks McBasic-Gigabit Operation manual

Singmai Electronics
Singmai Electronics SM06 user manual

CTS
CTS IAC-3012 user guide

CYP
CYP DCT-9 Operation manual


