Medifab Carrot 3000 Swivel Base User manual
# 4116-0180-104
Serial Number:
User Manual for all Carrot Swivel Base
Manual: Carrot Swivel- 20180813
IMPORTANT CONSUMER INFORMATION NOTICE:
This manual contains important instructions that
must be passed on to the user of this product.
Please do not remove this manual before delivery
to the end user.
SUPPLIER:
This manual must be given to the user of this product.
USER:
Before using this product, read entire manual and save
for future reference.
Carrot 3000
Swivel Base
Installation and
User Manual

2
Dear parents
with the ISO-TURN, you have chosen an especially high-quality product. Because of the extre ely solid
construction, the ISO-TURN can be needed for any years. Your dealer can help you with the asse bly.
EC declaration of confor ity of edical devices (in accordance with Annexes II, V, VI and VIII of the EC
Directive 93/42/EEC concerning edical devices):
Hereby we declare that the ISO-TURN is equivalent to the relevant provisions of the Act and the Medical
Device Directive 93/42 EEC. The ISO-TURN with ISOFIX connection is produced under the control of
quality anage ent in accordance to DIN EN ISO 9100 and DIN EN 46001.
Distributed in Australia/New Zealand by: Medifab Ltd
Head Office: 32 Detroit Drive, Rolleston 7675, New Zealand
AU Office: 26 Pardoe Street, East Devonport, TAS 7310, Australia
Telephone +64 3 307 9790 Fax +64 3 307 2820
Email: [email protected] www.medifab.com
Index
Before using the ISO-TURN page 3
Safety arrangements page 4
Use of the ISO-TURN page 5
1. Fix the Carrot/Carrot II on the ISO-TURN page 5
2. Proper fix on the car seat with the ISOFIX connection page 5
3. Back angle adjust ent page 6
4. Adjust ent of the footwell brace to the footwell page 6
5. Spinning process page 7
6. How to re ove the ISO-TURN page 7
Warranty page 8
3
ISO-TURN with ISOFIX connection
Instruction anual
Before using the ISO-TURN
To ensure the safe use of the ISO-TURN please read and use the instruction anual and especially the safety
arrange ents. Please understand that the instruction anual ay be different to the various designs of the
product.
Keep the instruction anual well. A warranty card is attached on the last page. Please keep it carefully so
you can sub it the warranty card in case of a defect. The instruction anual always have to be present also
if you co it the product to others or lend it.
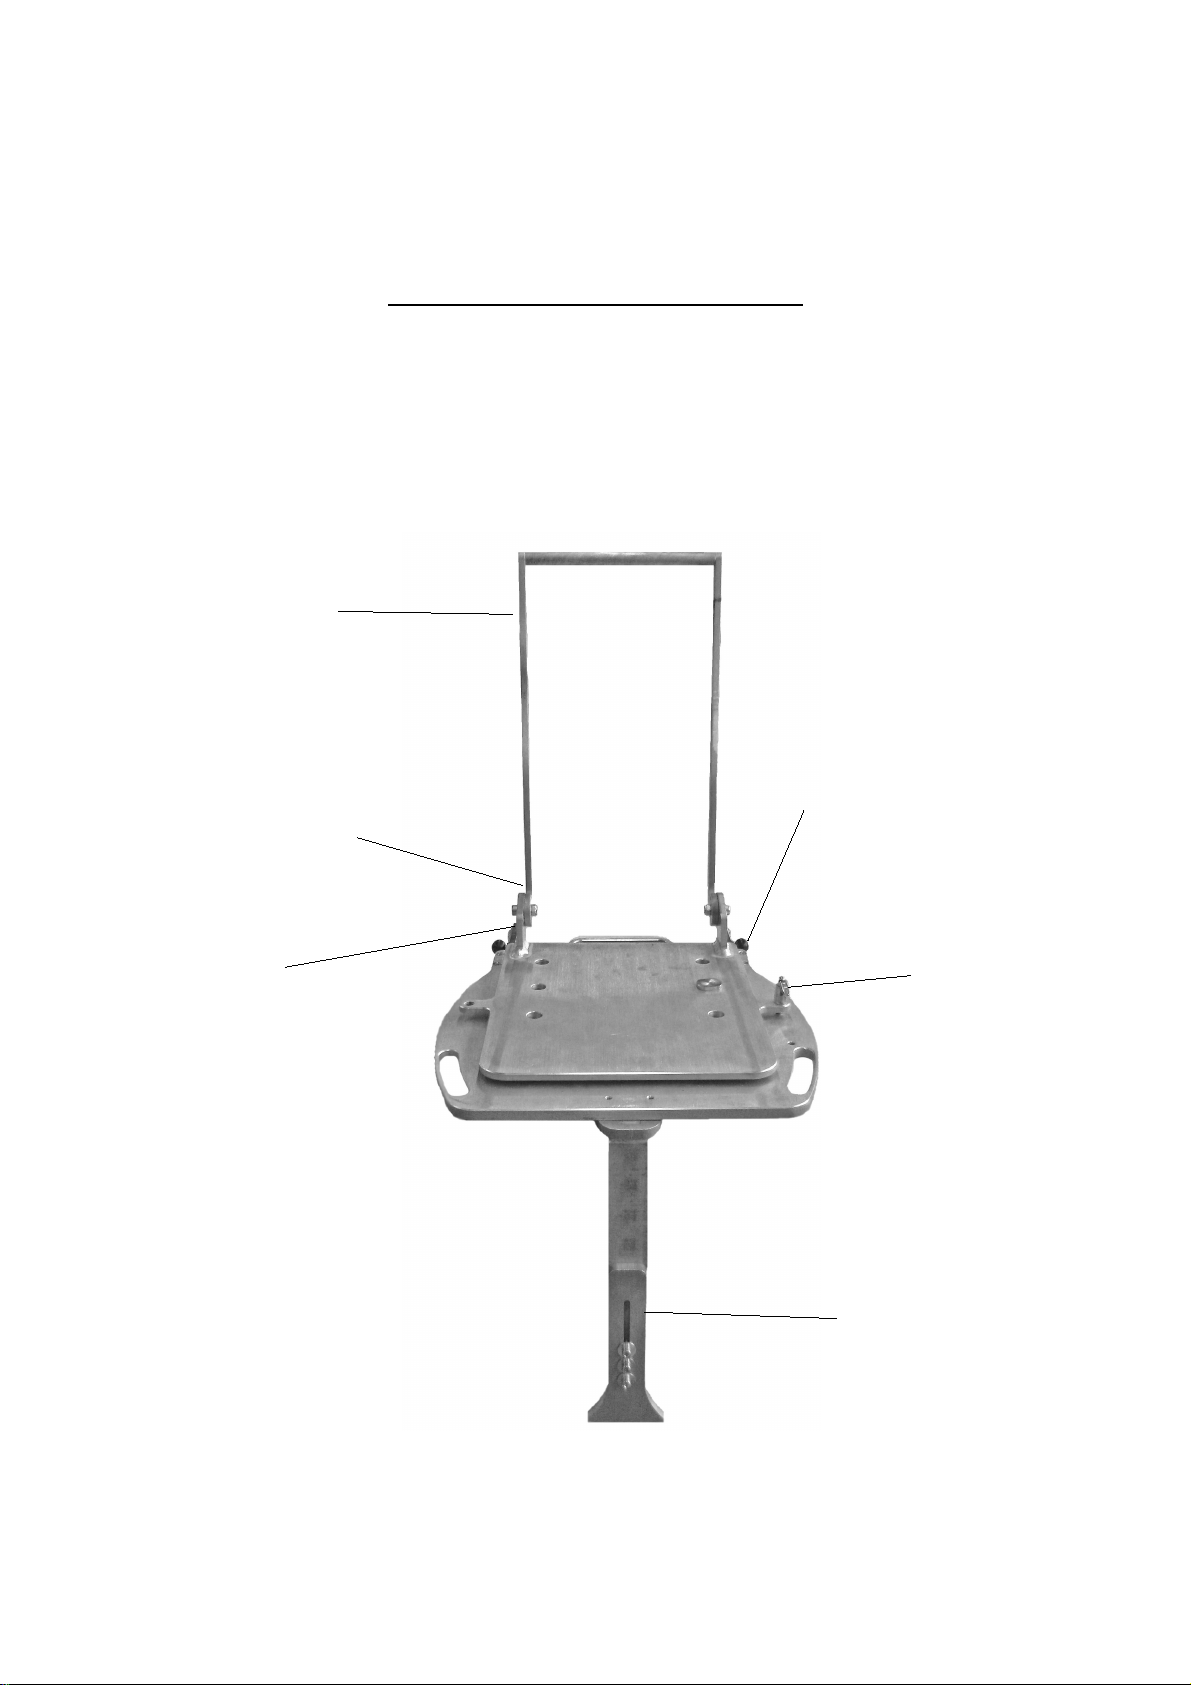
footwell brace
ISOFIX connection
backrest
back angle
adjust ent
indexing
plunger
hole for ounting
the seat

4
SAFETY ARRANGEMENTS
Attention (this sy bol eans that isusage can cause a high
risk of death or injury.)
The following car seats are not suitable for the use with the ISO-TURN:
•car seats without ISOFIX connection
•car seats which are fixed sideways or backwards
•car seats which are less than 40c deep
•car seats with a pronounced bulge on the seat which can lead to an unstable attach ent
•car seats with an two-point seat belt
What you should be aware of before using the ISO-TURN
Please transport your child with the five-point seat belt of the Carrot/Carrot II and with the three-point seat
belt of the car. A odification of the product is your responsibility. We are not responsible for any da age in
case of a incorrect odification. Only the acco panying person should handle the product. Just for the use in
vehicles which are equipped with a three-point seat belt. Please pay attention when installing that no part of
the ISO-TURN can be wedged by a ovable seat or in the door if you use it the nor al way.
An insufficiently fixed ISO-TURN can cause a high risk of death or injury. Use only for specified children
and only with the above-described car seats. We reco end the space behind the front passenger.
Regular checks are necessary if you drive on bad roads as well as before and after a ride.
The instruction anual always have to be attached to the product. Do not forget this if you let it to other-
+persons.
Make sure that the ISOFIX connection of the ISO-TURN is properly locked with the car seat. This applies
also if you travel without a child in the car seat or there is no car seat on the turntable. Without the
adjust ent the turntable could injure in ates in case of an accident.
Do not use a car seat without a ISOFIX connection to guarantee the safe of the patient.
Secure your baggage that you do not get injured in the event of an accident.
Please do not leave your child unattended in the car.
When you should not use the ISO-TURN
Please do not use the ISO-TURN if it not fixed correctly as described in the instruction anual and also if
the ISO-TURN is not fir ly locked even after fitting. Do not use this product without an ISOFIX connection
of the car seat. Do not use other seat belts or for s than those that are described in the instruction anual. To
ensure safety please do not use the product any longer if it was involved in an accident. If the ISO-TURN is
fixed on the front passenger seat and i pede you actuating the gear shift and the handbrake you should not
use it. Do not use seat belts that are da aged, e.g. by cigarettes burns.
What also should be noticed
The ISOFIX connections can not be solved easily. But you should still pay attention that nobody handle it
i properly. If you have any further questions regarding to the use of this product or the repair work please
do not hesitate to contact your dealer.
So e cars have in the foot rest area an integrated storage shelf. If the foot well brace should stand on such a
shelf the stability in a crash situation is reduced. Please contact your dealer. We will give hi a solution for
this proble .

5
Use of the ISO-TURN
RULES how to fix:
.Fix the Carrot/Carrot II on the ISO-TURN
At first please solve and re ove the adjust ent screws of the
Carrot/Carrot II. Now put the car safety seat on to the turntable
so that the back of the seat is between the holders of the back
angel adjust ent. Please ount the Carrot/Carrot II on the ISO-
TURN with the bolts that keep the seat and the back of the car
safety seat together. The screws should be fir ly tighten on
both sides of the seat. After that please screw the cla p lever
for the back angle adjust ent in to the designated holes.
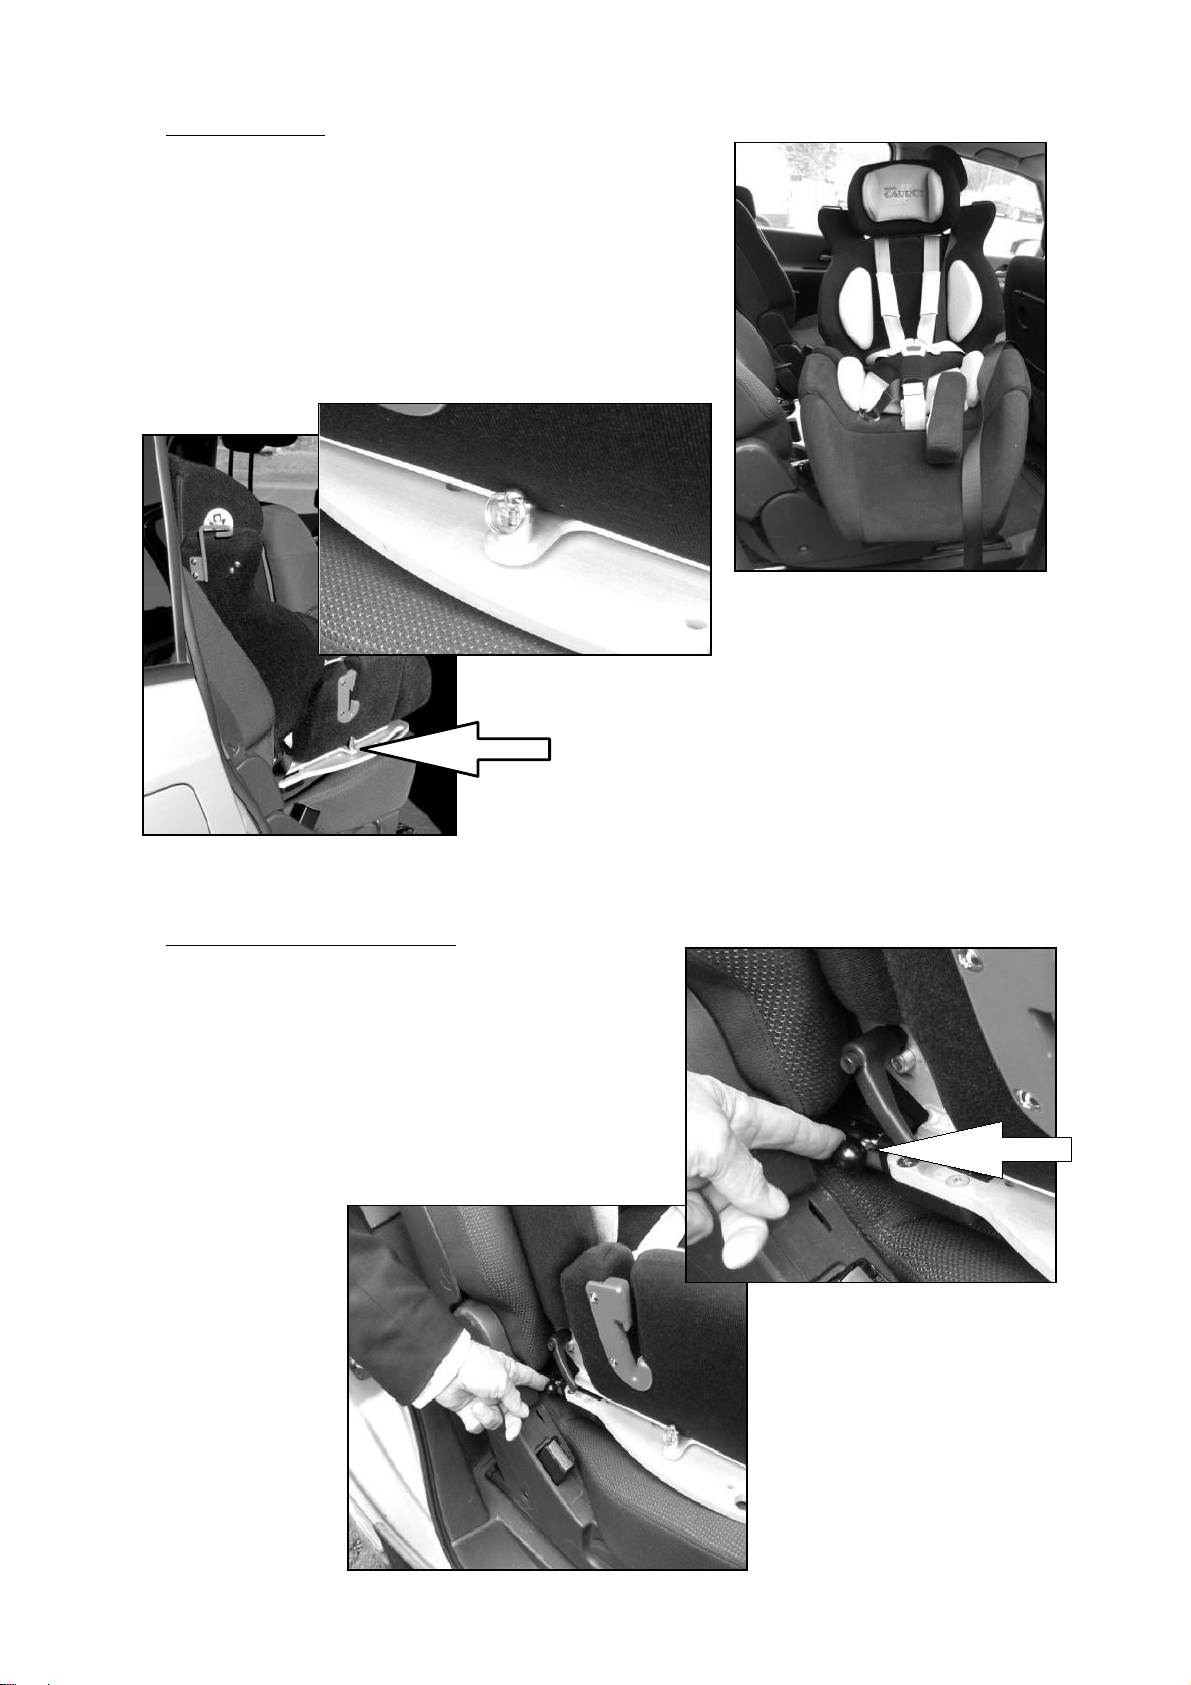
2.Proper fix on to the car seat with the ISOFIX connection
Now place the ISO-TURN with the attached Carrot/Carrot
II on to the car seat. Please note that the ISOFIX
connection of the ISO-TURN and of the vehicle are the
sa e hight. Just after that you can insert the ISO-TURN
into the ISOFIX connection of the car seat until it clicks
hearable into the right place.
6
3.Back angel adjustment
The back of the ISO-TURN and of the Carrot/Carrot II can be fitted to the back of the car seat if you
solve the cla p lever at the back angle adjust ent. Please push the back fra e of the ISO-TURN
according to the inclination of the car seat. Now fix it again with the previously dissolved cla p
lever. Make sure that the cla p lever is fir ly applied. After that you can adjust the back of the
Carrot/Carrot II to the car seat.
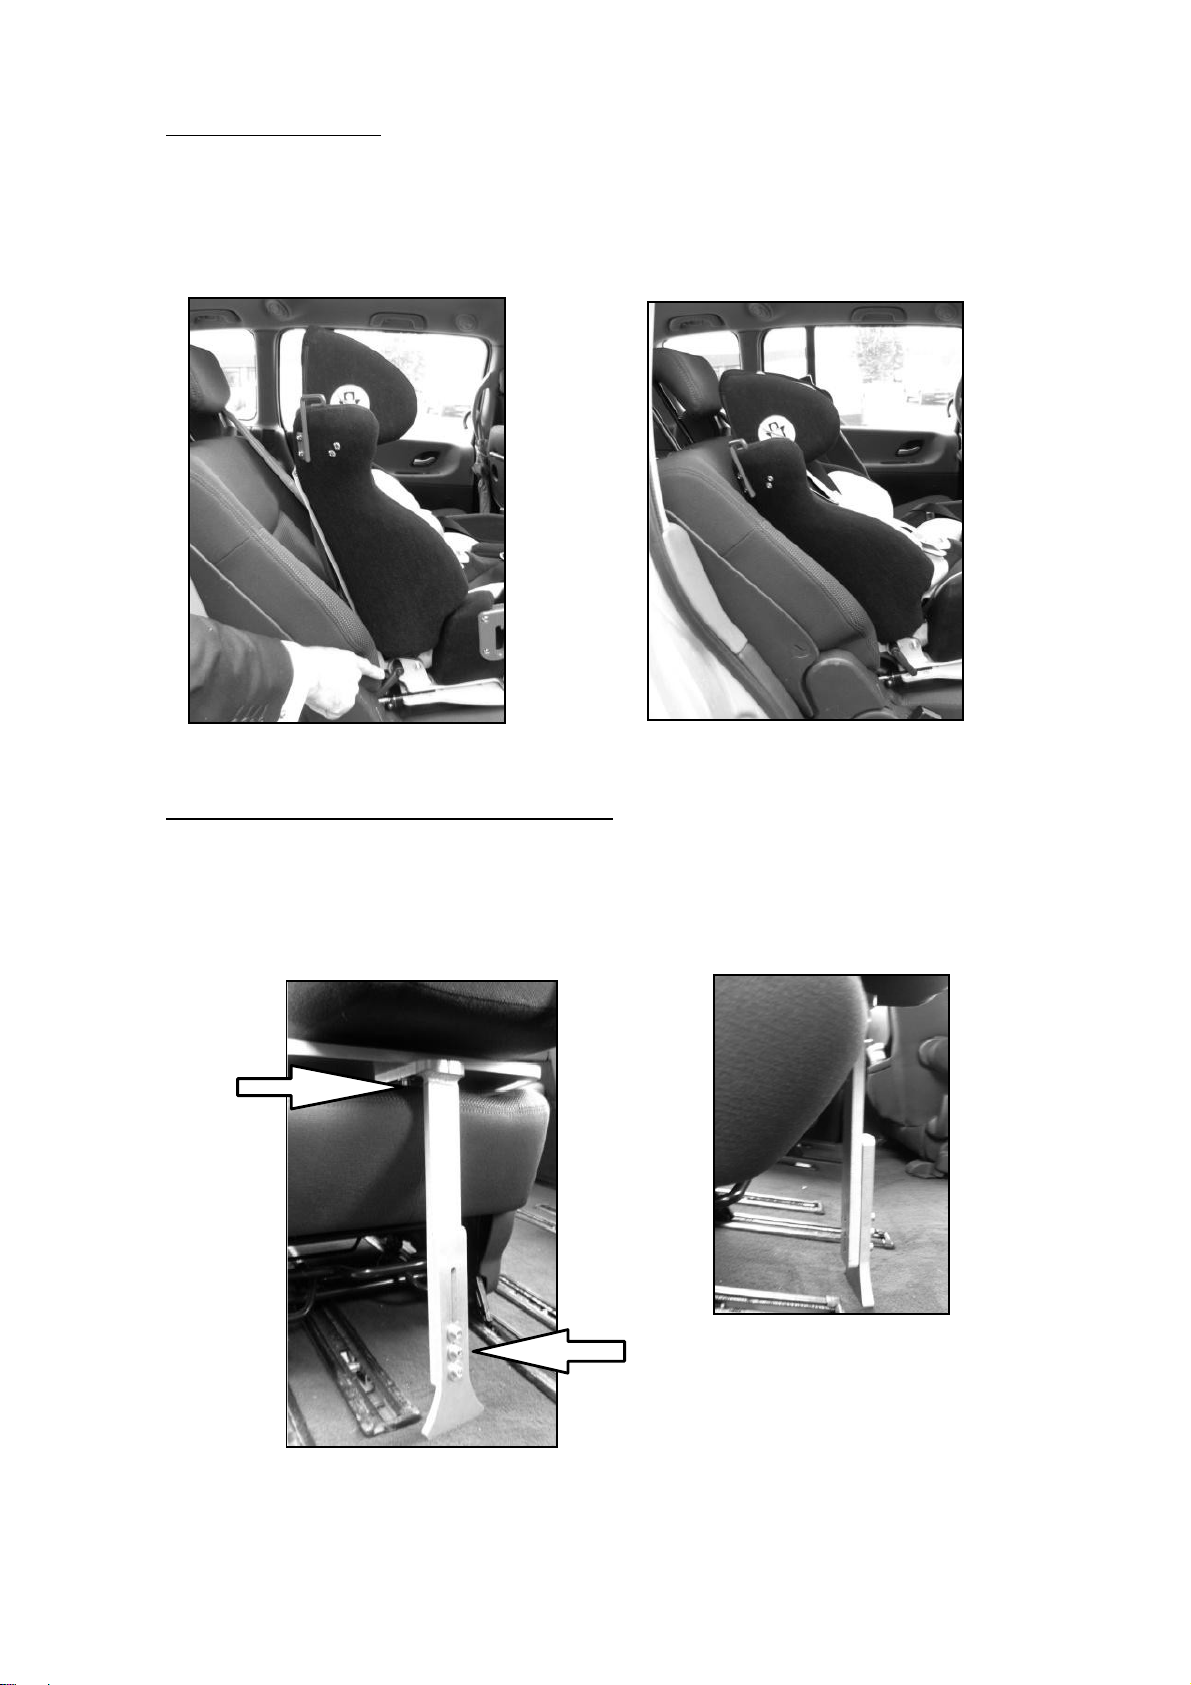
4.Adjustment of the footwell brace to the footwell
First of all loose the screws of the footwell brace on the underneath of the ISO-TURN. Afterwards
you can adapt the brace to the depth of the car's seat. Then tighten the screws fir ly. Now loosen the
three screws on the footwell brace to cease the height. Leave the brace glide to the car floor and then
tighten the bolts fir ly.
7
5.Spinning process
In order to turn the ISO-TURN the indexing plunger have
to be unlocked. The indexing plunger is located at the top
of the rotation plate, drag it upward to unlock. Now you
can turn the Carrot/Carrot II with the ISO-TURN in the
direction of the car door to exit it. After that you can fix
the turntable with the indexing plunger in the desired
position. You should ake sure that the indexing plunger
snaps into the right position.
6.How to remove the ISO-TURN
You have to unlock the ISOFIX connection to
re ove the turntable. Unlock of the ISO-TURN by
pushing the black balls in the driving direction on
both sides, push the ISO-TURN so e illi eters
back to loose the ISOFIX hooks out of the ounting
link, lift it up and than pull the turntable. Now you
can re ove the Carrot/Carrot II with the ISO-TURN
fro the vehicle.

8
Garantie
1.During the warranty period the product is guaranteed in case of da age caused by a defect of the aterials.
2.The length of warranty is li ited to one year after acquiring the product.
3.The warranty do not cover following cases:
✗incorrect and i proper use
✗unauthorized change of the product
✗da age caused by accidents
✗The warranty card is without the na e and sta p of the dealer where you bought the product.
✗If you are not able to provide the warranty card.
Maintenance service: If a proble occurs during the warranty period please contact your dealer where
you have purchased this product. You have to sub it the warranty card.
CAUTION: The warranty card will not be replaced. Keep it well.
WARRANTY CARD
odel ISO-TURN turntable with ISOFIX connection
client address
na e phone
Date of purchase
dealer Medifab Ltd
32 Detroit Drive, Rolleston 7675, New Zealand
New Zealand Head Oce
32 Detroit Drive,
Rolleston 7675
Call 0800 543 343
Australian Head Oce
26 Pardoe Street,
East Devonport, TAS 7310
Call 1300 543 343
solutions@medifab.com
medifab.com
Your enthusiastic distributor is
This manual suits for next models
1
Table of contents
Other Medifab Car Seat manuals


