Medifab Carrot 3000 User manual
Therapist and Carer manual
Please Read Before Use
Carrot 3000 Car Seat
Medifab Ltd
Australia: 26 Pardoe Street, Devonport, TAS 7310 New Zealand: 32 Detroit Drive, Rolleston 7675
Call: 1300 543 343 (AU) 0800 543 343 (NZ)
www.medifab.com [email protected]

The Child Restraint System for Special Needs
Read carefully all the instructions before use.
Instruction Manual
When not in use,
store in the pocket
on the back for
future use.
CARROT-Ⅲ
!

1
Carrot-Ⅲ“ Special Needs Restraint ” is designed to give extra support to
children who have difficulty in sitting correctly in conventional seats. Always
consult your doctor to make sure that this restraint system is suitable for your
child, and read all the instructions in this manual before use.
Universal restrained system for children: Approval according the ECE R44 /
04 by the Kraftfahrtbundesamt (Number of approval: 44R – 04301283).
EU conformity declaration for medical products (according the addendum II,
V, VI and VIII of the EU guideline concerning medical products 93 / 42 /
EWG).
We declare hereby that the car seat Carrot-Ⅲconforms with the equivalent
rules of the medical product and the guideline 93 / 42 EWG. The production of
the Carrot-Ⅲis controlled by a quality management according ISO 9100.
Warnings
Safety Information
Important Notes
Certification
Features
Installation
Standard Installation
Functions
Head Section
Head-Support adjustment
Forward / Backward Position Adjustment
Head Pillow Position Adjustment
-----------------------------------
-----------------------------------
-----------------------------------
-----------------------------------
-----------------------------------
-----------------------------------
-----------------------------------
-----------------------------------
-----------------------------------
-----------------------------------
-----------------------------------
-----------------------------------
3
5
5
6
7
9
9
10
10
10
10
10
Table of Contents

Shoulder Section
Harness Strap Adjustment
ComfortPads
Shoulder Protector Wing
Adjusting Shoulder Width
Chest Section
Adjusting Chest-Support
Fastening / Releasing Harness Buckle
Backrest Section
Adjusting Backrest Height
Backrest Extensions (50 mm / 100 mm)
Seat Section
Adjusting Seat Length
Seat Extensions (50 mm / 100 mm)
Rodded Seat Extension-Long
Rodded Seat Extension-Short
Adjusting Seat Depth
Foot Rest (Short / Medium / Long)
Supporting Table
Seat Angle Adjuster Mat (Triangle Mat)
Pads and Cushions / Standard Accessories
Securing Your Child
Care and Maintenance
Cover Removal
Cleaning the Cover, Pillow and Pads
A Click Sound of the Harness Buckle
The Harness and the Straps
Product Dimensions
Warranty
LIMITED ONE-YEAR WARRANTY
WARRANTY LIMITATIONS
LIMITATION OF DAMAGES
LIMITED ONE-YEAR WARRANTY
11
11
11
12
12
13
13
13
14
14
14
15
15
15
15
15
16
16
16
16
17
18
21
21
21
21
21
22
23
23
23
23
24
-----------------------------------
-----------------------------------
-----------------------------------
-----------------------------------
-----------------------------------
-----------------------------------
-----------------------------------
-----------------------------------
-----------------------------------
-----------------------------------
-----------------------------------
-----------------------------------
-----------------------------------
-----------------------------------
-----------------------------------
-----------------------------------
-----------------------------------
-----------------------------------
-----------------------------------
-----------------------------------
-----------------------------------
-----------------------------------
-----------------------------------
-----------------------------------
-----------------------------------
-----------------------------------
-----------------------------------
-----------------------------------
-----------------------------------
-----------------------------------
-----------------------------------
-----------------------------------
-----------------------------------
2
Table of Contents

・ Use only with children who weigh between 15 kg and 36 kg
(
ClassⅡ&
Ⅲ) . It has been tested successfully outside the ECE R44/04 with a 10
kg dummy and a 49 kg dummy. The legal situation in several countries
(like in Germany) allows to transport children with less than 15 kg and
young patients between 36 and 50 kg. In most countries, you need a
written document of a doctor, which says that it belongs to the special
needs of this special patient to use this seat.
・ Use forward-facing position only.
・ Do never change anything on the construction of the Carrot-Ⅲ, unless
this is specially authorized in this instruction manual.
・ Adjust the belts provided with this child seat so they fit snugly around
your child. A snug strap should not allow any slack or twist. It does not
press on the child’s flesh or push the child’s body into an unnatural
position.
・ Secure this child seat with the upper and lower fixing straps to the
vehicle’s seat, and always use vehicle’s lap shoulder (3-point) safety
belts as well.
・ Fasten the harness (5-point) of the child seat as well as the
vehicle's lap shoulder (3-point) safety belt to secure your child in a firm
position.
・ Follow all the instructions on this child seat and in this instruction
manual.
・ Use this child seat only with the vehicles provided with lap shoulder
(3-point) safety belts approved by ECE regulation No.16 or other
equivalent standards.
・ The rigid items and plastic parts of the child restraint must be so
located and installed that they are not liable, during everyday use of
the vehicle, to become trapped by a movable seat or in a door of the
vehicle.
・ To prevent injury due to hidden damage, discontinue use of a child seat
that has been in a moderate or severe crash.
・ This child seat must not be used without the cover.
・ The child seat cover should not be replaced with any other than the
one recommended by the manufacturer.
3
WARNING !
DEATH or SERIOUS INJURY can occur:
!

! WARNING !
DEATH or SERIOUS INJURY can occur:
4
・ When not in use, this instruction manual should be stored in the
pocket on the back.
・ This child seat must not be used in the home, in boats, or other non-
certified applications.
・ Back seat of vehicle is the safest location for a properly installed
child seat. Please study and ensure your child’s safety and consult
your vehicle owner’s manual.
・ Secure this child seat even when it is not occupied. In a crash, an
unsecured child seat may injure vehicle occupants.
・ When using in a vehicle with airbags, refer to your vehicle’s owner’s
manual for child seat installation instructions and precautions.
・ Never use the adjuster strap to lift or carry this child seat. Doing so
could cause damage to harness adjuster and webbing. Always carry
this child seat by its shell.
・ Do not take apart or attempt to take apart the harness and the
straps from the child seat. Never remove the buckles and / or the
buckle tongues from the harness or the straps. They cannot be
reattached after removal. If reassembled incorrectly, the child seat
may not perform as intended.
・ The primary protection for occupants of a vehicle in a collision is the
body of the vehicle itself ; a child seat will not protect a child when a
vehicle is seriously impacted. However, correctly installed, a child
seat will substantially improve chances for survival in most crashes.
Make sure all users fully understand the correct ways to use this
child seat in a vehicle.

Safety Information
・ Verify child seat is securely installed / fixed to car seat with provided upper
and lower fixing straps, and harness is properly adjusted around child each
time child seat is used.
・ Adjust harness to fit clothes the child is wearing. Remove bulky coats and /
or jackets before putting child in child seat.
・ Cover child seat when vehicle is parked in direct sunlight. Parts of child seat
could become hot enough to burn a child.
・ Store child seat in a safe place when it is not being used. Avoid placing heavy
objects on top of it.
・ Do not leave children alone in a vehicle, even for a short time.
・ Do not, except as described in this manual, attempt to disassemble any part
of the child seat or change the way its harness or vehicle’s seat belts are
used.
・ Do not leave loose objects, e.g. books, bags, etc., in the back of a vehicle. In
the event of a sudden stop, loose objects will keep moving, potentially
causing serious injuries.
・ Do not leave folding vehicle seats unlatched. In the event of a sudden stop, a
loose seat back could prevent child seat from protecting the child as well as
it should.
・ Do not use anything to raise child seat off vehicle seat except as described in
this manual. In a crash, child seat could slide and may not adequately
protect the child.
Important Notes
5
6
Safety Information
This child seat system conforms to European Safety Standard, ECE R44 / 04
(ClassⅡ&Ⅲ).
Certification
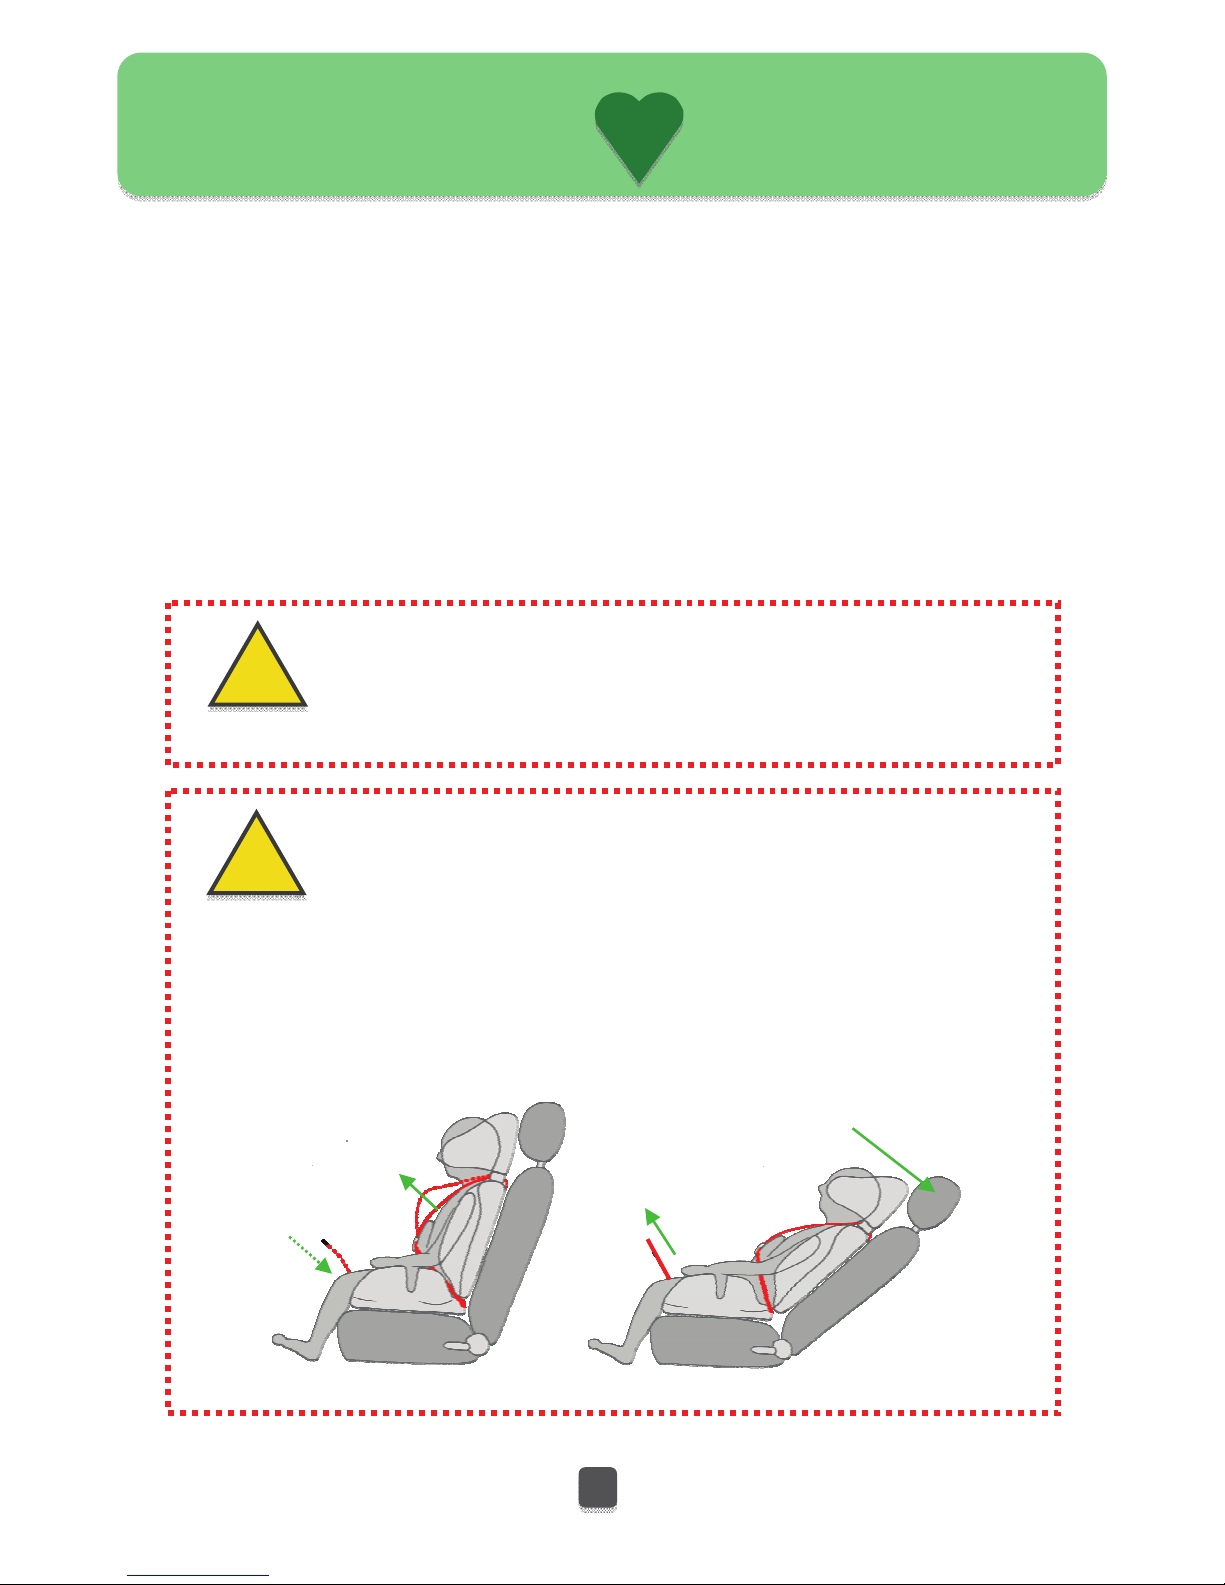
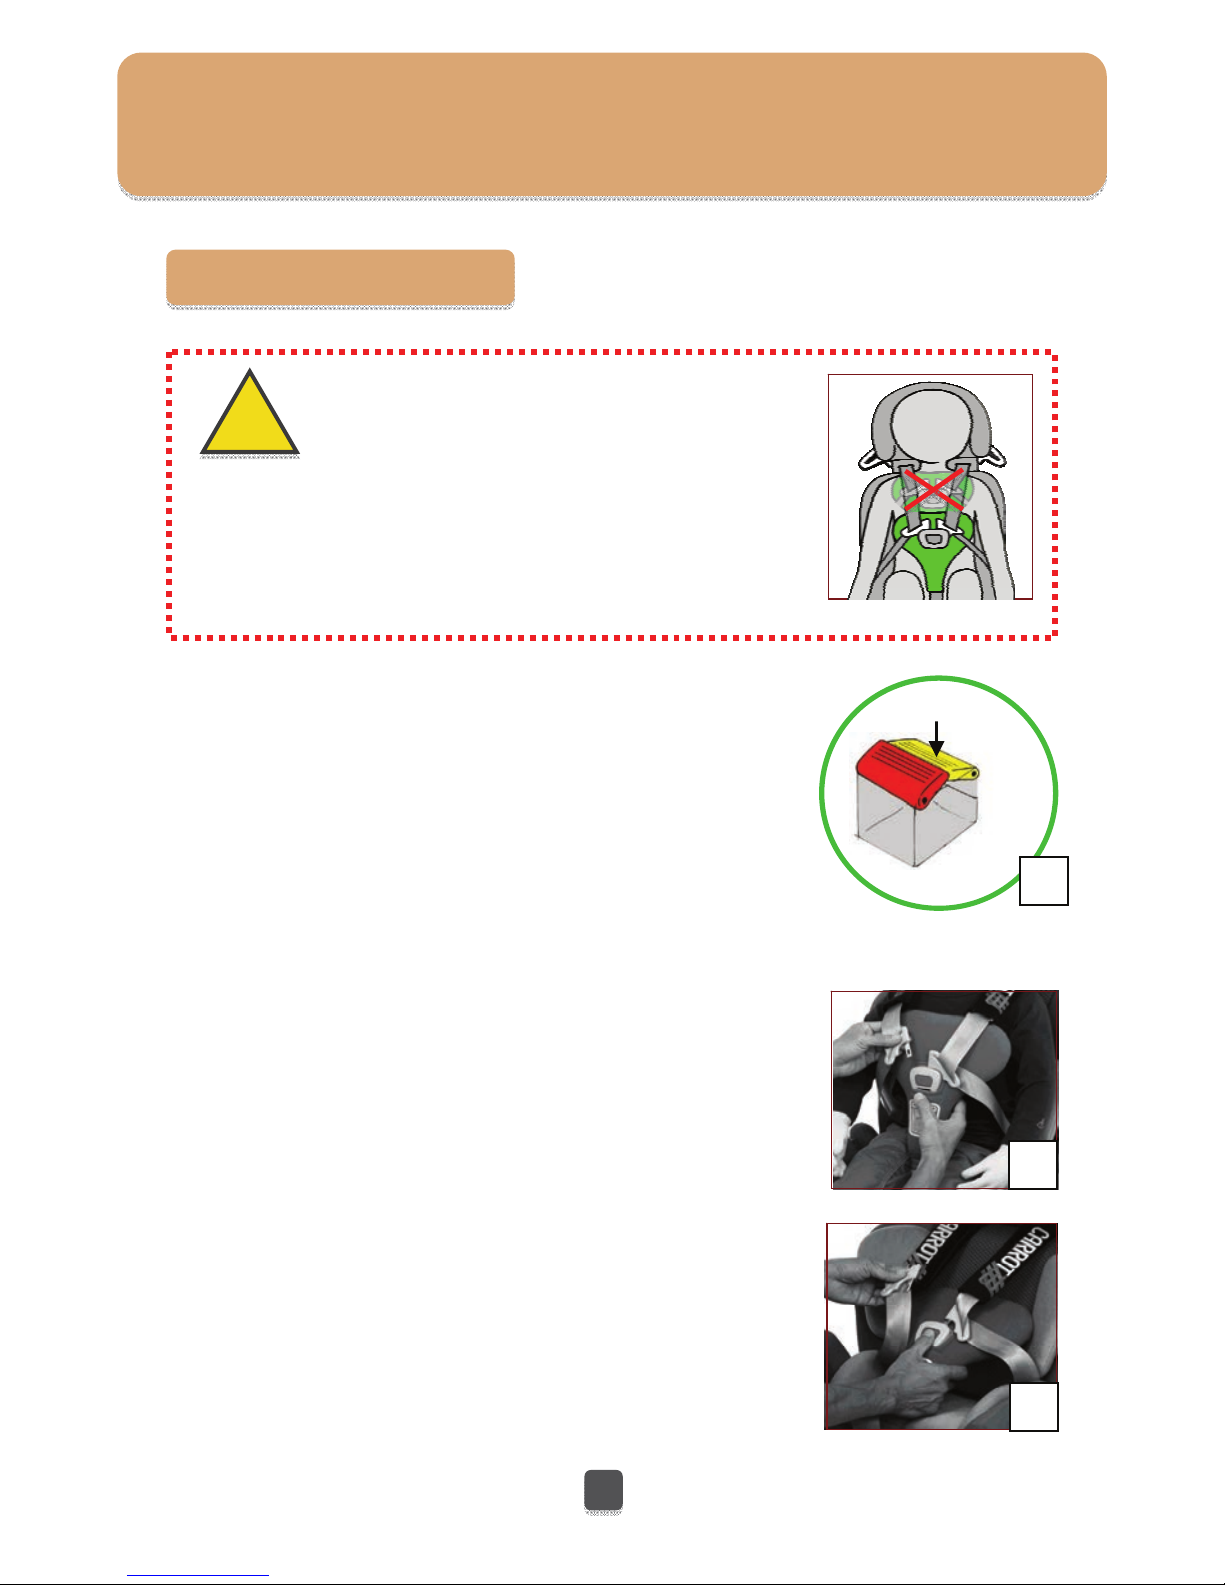
WARNING!
! This child seat must be used forward-facing position only.
When you recline the back, you must release and loosen the harness
straps first, then after reclining the back, re-tighten the harness again.
Reclining the back without loosening the harness may cause pushing
and / or choking your child body.
WARNING !
!
reclining
loosen
Re-tighten
・ Do not allow children to play with this or any child seat.
・ This child seat is recommended to be used in the upright position.

Optional Accessory
(Rodded Seat Extension L)
※
Not included in
Standard Set
with a 50 ㎜ extension
with a 50 ㎜ extension
Features
7
Backrest Height
Seat Length
Head-Support Fixing Strap
Lower Fixing Strap
Vehiele’
Belt Path
Shoulder
Strap
Hole
Harness Straps
Backrest
Harness Buckle
Harness Adjuster Strap
Seat
Harness Yoke
300 ㎜
250 ㎜
325 ㎜
275 ㎜
350 ㎜
300 ㎜
375 ㎜
325 ㎜
400 ㎜
350 ㎜
425 ㎜
375 ㎜
with a 100 ㎜ extension
with a 100 ㎜ extension
Chest-Su
pp
ort Ad
j
uster Stra
p
Seat Extension Release Stra
p
Backrest
Release
Strap
s
Head-Su
pp
ort

8
with 150+50 ㎜ Extensions
with a 50 ㎜ Extension
with 150+100 ㎜ Extensions
with a 100 ㎜ Extension
with a 150 ㎜ Extension
Shoulder Width
Adjuster Button
Comfort Cushion
Seat Balance
Cushion
Seat Depth Adjuster Knob
Shoulder Protector Wing
(O
p
tional Accessor
y
)
Backrest
Harness Yoke
Lap Belt Guide
Instruction Manual
(in pocket)
450 ㎜
250(285) ㎜
475 ㎜
275(310) ㎜
500 ㎜
300(335) ㎜
525 ㎜
325(360) ㎜
550 ㎜
350(385) ㎜
575 ㎜
375(410) ㎜
Head Pillow
Body
Balance
Pads
Chest-Support
Comfort Pads
Backrest
Release
Strap
9
Installation
Standard Installation
Image of Typical
Installation
・ When you install child seat to the passenger seat, in order to avoid
potential impact by airbag, move the passenger seat backward as deep as
possible.
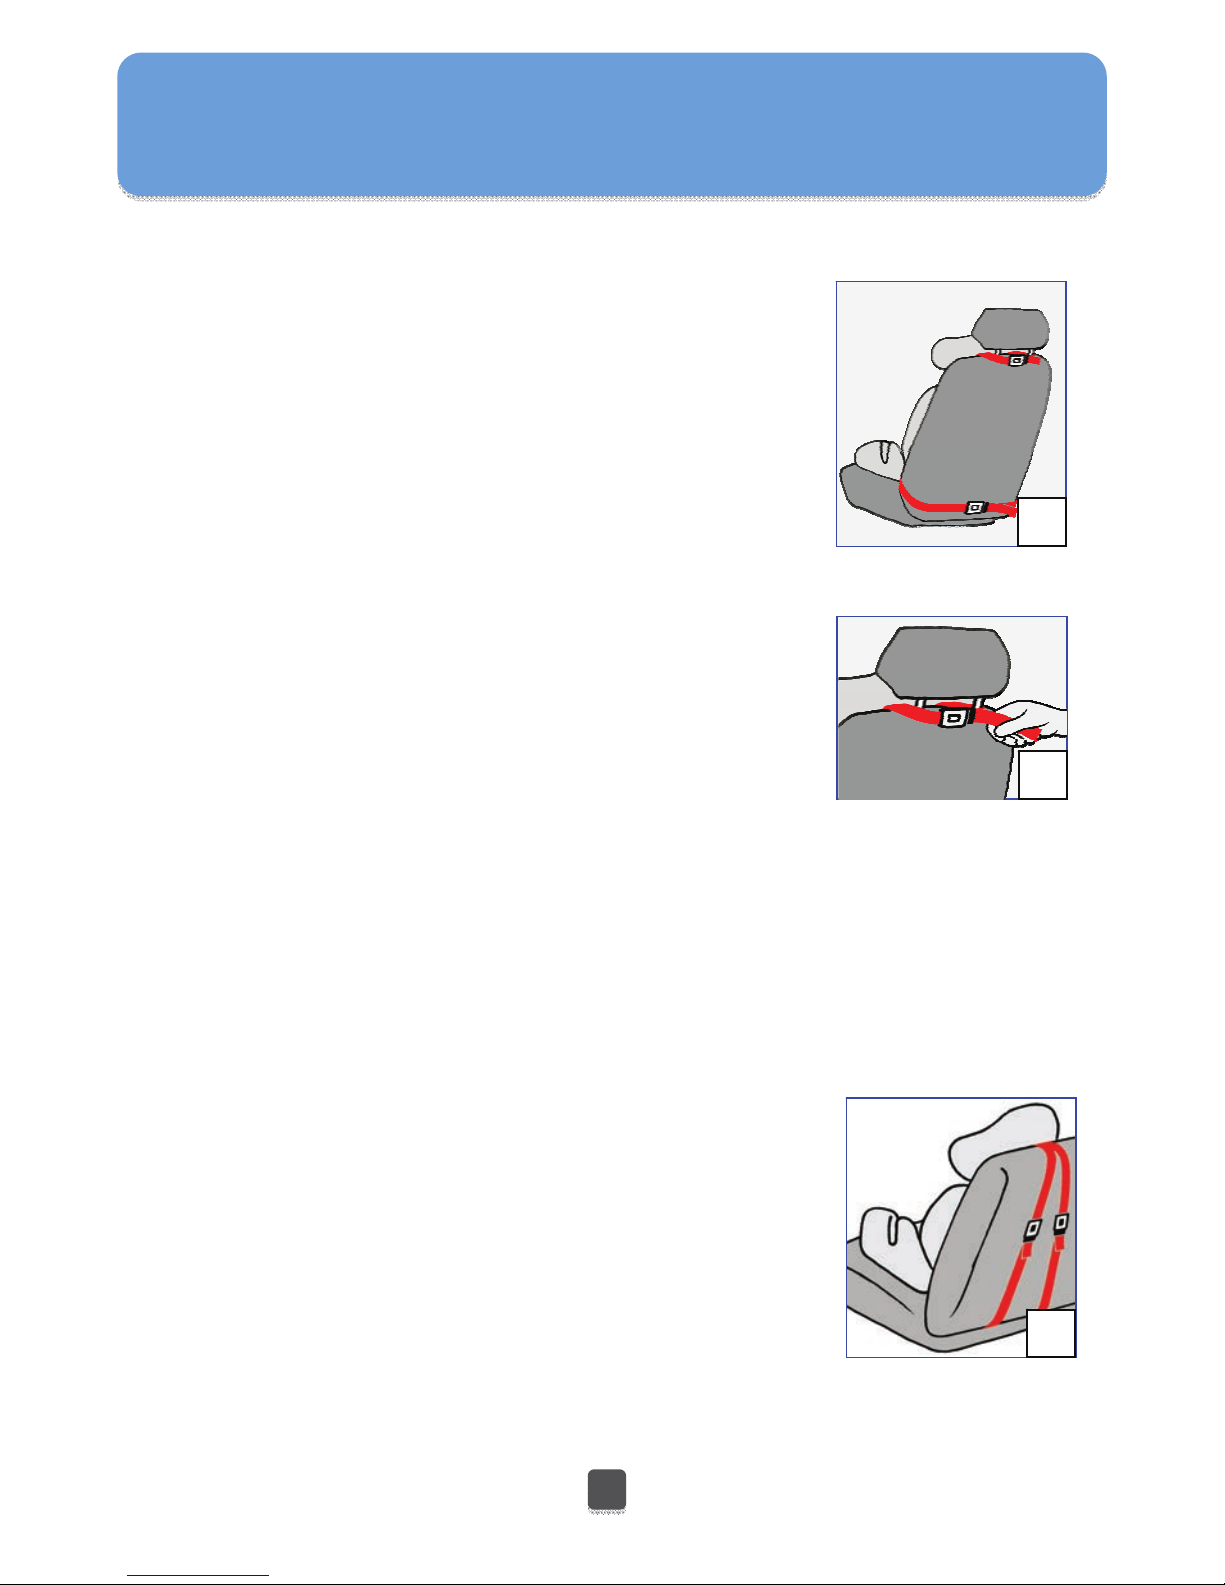
Fixing Strap Installation
1. Installation using fixing straps provided at the
upper and lower parts of the child seat.
2. Secure the Head-Support to the vehicle’s headrest
using the Head-Support fixing strap, and the child
seat main body to the vehicle’s seat using the lower
fixing strap.
3. Attach the buckles, and push the child seat firmly
into the vehicle seat while pulling both adjuster
straps tight to remove all slack, and verify the child
seat is secure (Fig. A and B).
4. Verify all connectors are secure and the child seat is
secure.
・ When you install child seat to the bench-seat, you may
find that the fixing strap is too short to fix it sideway
around. If this is the case you may fix child seat by
using the strap vertically (Fig. C).
・ When you find difficulty in securing the child seat,
please contact the distributor or the retailer whom you
purchased this child seat from for consulting.
A
B
C
10
Functions
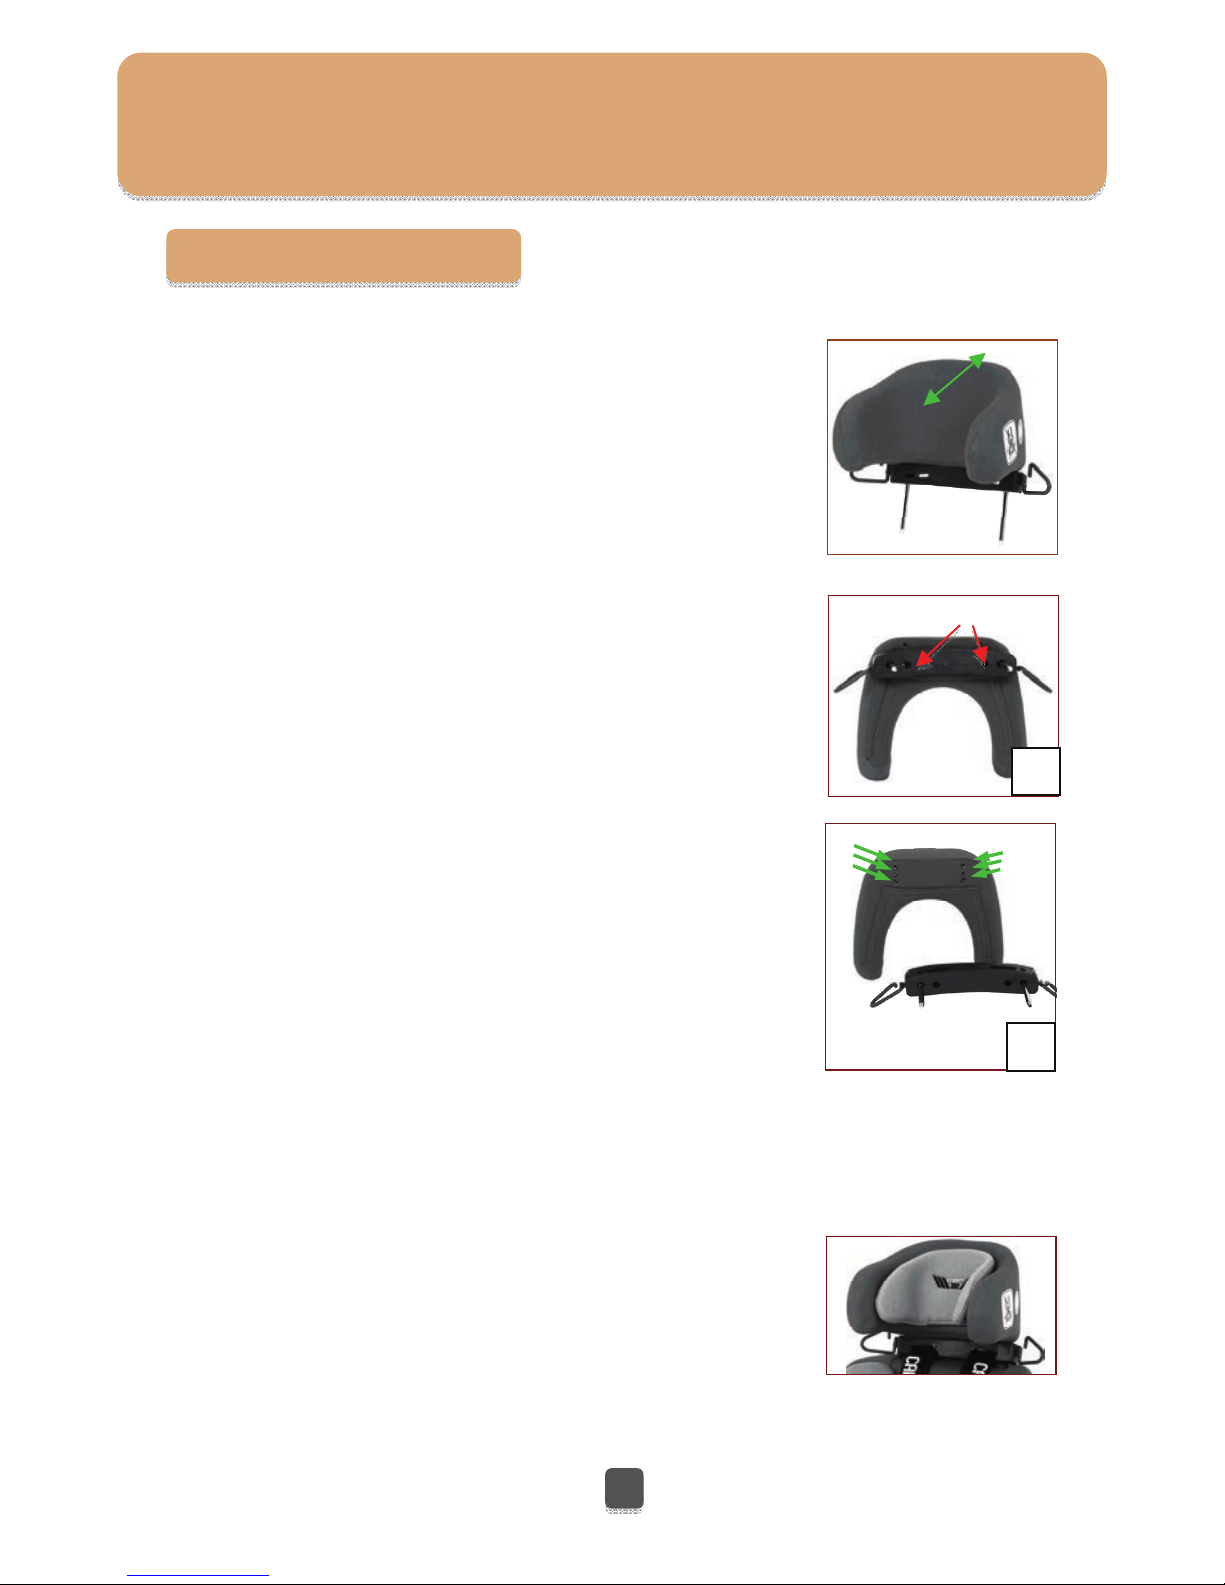
HeadSection
Head-Support Depth can be adjusted forward or
backward by 15 mm (0.6") increments to provide a
better fit and added protection for the occupant.
To Adjust ;
Head Pillow Position Adjustment
Head Pillow can easily be adjusted to the most favorable
position to the user.
Pull out the Head-Support from the main body, and
remove screws on each side at the bottom (Fig. A).
Move the Head-Support to selected position (Fig. B), and
reinsert the screws.
* Factory Setting at center position
Head-Support Depth Adjustment
IMPORTANT :
Adjustment of the Head-Support position (forward /
backward)requires fixing tools. Contact and ask the
distributor for adjustment and assistance.
A
B
B
A
B

ShoulderSection
1. To tighten harness strap, simply pull the harness
adjuster strap.
2. To loosen the harness strap press and hold the
harness adjuster release lever (in Red), while pulling
the shoulder harness strap to loosen the harness
strap (Fig. A).
Harness Strap Adjustment
Comfort Pads
You can adjust Comfort Pads to the favorable position
by moving Velcro tape attached to the back of the
Head-Support.
11
Harness Strap
Press & hold
Harness Strap
Release Lever
Shoulder
Harness
Strap
Harness
Adjuster Strap A
NOTE : Do not pull the comfort pad on
the harness strap as it is fixed on the
back. Pull and loosen the harness strap
only.
Functions

12
Shoulder Protector Wing Optional Accessory
Sideway extension adjustment of Shoulder Protector
Wing is available by Max.100 mm, 50 mm each rightward
and leftward respectively (five positions / 10 mm each).
Press and hold the shoulder width adjuster button (in
Yellow)on the back, while pulling the wing outward to
desirable position, where the body of child is secure and
comfortable.
Adjusting Shoulder Width
IMPORTANT :
When your child becomes big enough to use the Shoulder Protector Wings, you
may purchase「Shoulder Protector Wing」for a larger child.
You must contact and ask the distributor for the installation and adjustment of
the set.
Functions
13
ChestSection
Top level of the Chest-Support must be lower than
throat area. Positioning the Chest-Support too high
may risk your child choked.
!
Adjusting Chest-Support
While pushing down the Chest-Support Height Adjuster
lever (in Yellow)on the front of the child seat, adjust the
height of Chest-Support to the appropriate position (Fig.
A).
Fastening / Releasing Harness Buckle
1. Hold the harness buckle with one hand. Use the
other hand to insert buckle tongues into the harness
buckle (Fig. B). Proper connection is confirmed
with a positive click after inserting each buckle
tongue.
2. Brace the rear of the harness buckle with one hand.
Press the release button and slide both tongues to
remove from the buckle (Fig. C).
WARNING !
Functions
Press & hold
Chest-Support Adjuster
Release Lever
A
B
C

BackrestSection
IMPORTANT :
・ Height of the Shoulder Harness Strap moves with
the height of the Backrest.
・ Level of the Shoulder Harness Strap must be at or
above the Child’s shoulders, parallel to level ground.
Backrest Extensions (50 mm / 100 mm)
Backrest Extensions (50 mm / 100 mm) are provided to
fill the space exposed between the backrest and the seat
when you extend to the Backrest.
Release locking by pulling the Backrest Release Strap
on the back of the child seat, and while pulling the
Strap, adjust height of the Backrest.
Adjusting Backrest Height
14
Optional Accessory
Functions
15
SeatSection
Rodded Seat Extension-Long
Legs shall be stretched out, and lower limbs are to be
supported as well.
Rodded Seat Extension-Short
Knees are bent, and supporting up to femora.
Adjusting Seat Length
Release locking by pulling the Seat Extension Release
Strap on the front of the child seat, and while pulling
the Strap, adjust position of the Rodded Seat Extension.
When a child sits with knees bent, adjust the total seat
length slightly shorter than the length from pelvis to
rear knee of your child.
Optional Accessory
Optional Accessory
Seat Extensions
(50 mm / 100 mm)
Seat Extensions (50 mm / 100 mm) are provided to fill the
space exposed around the metal rods when you extend
the Rodded Seat Extension and / or the Foot Rest.
Optional Accessory
Functions

Functions
16
Supporting Table
Seat Angle Adjuster Mat
(Triangle Mat)
Use to increase and adjust the height and the angle of
front area of the child seat for better secure and
stability of child’s seating.
Supporting Table is provided when we can expect better
secure of the child’s upper limb by using it.
Optional Accessory
Optional Accessory
Foot Rest
Optional Accessory
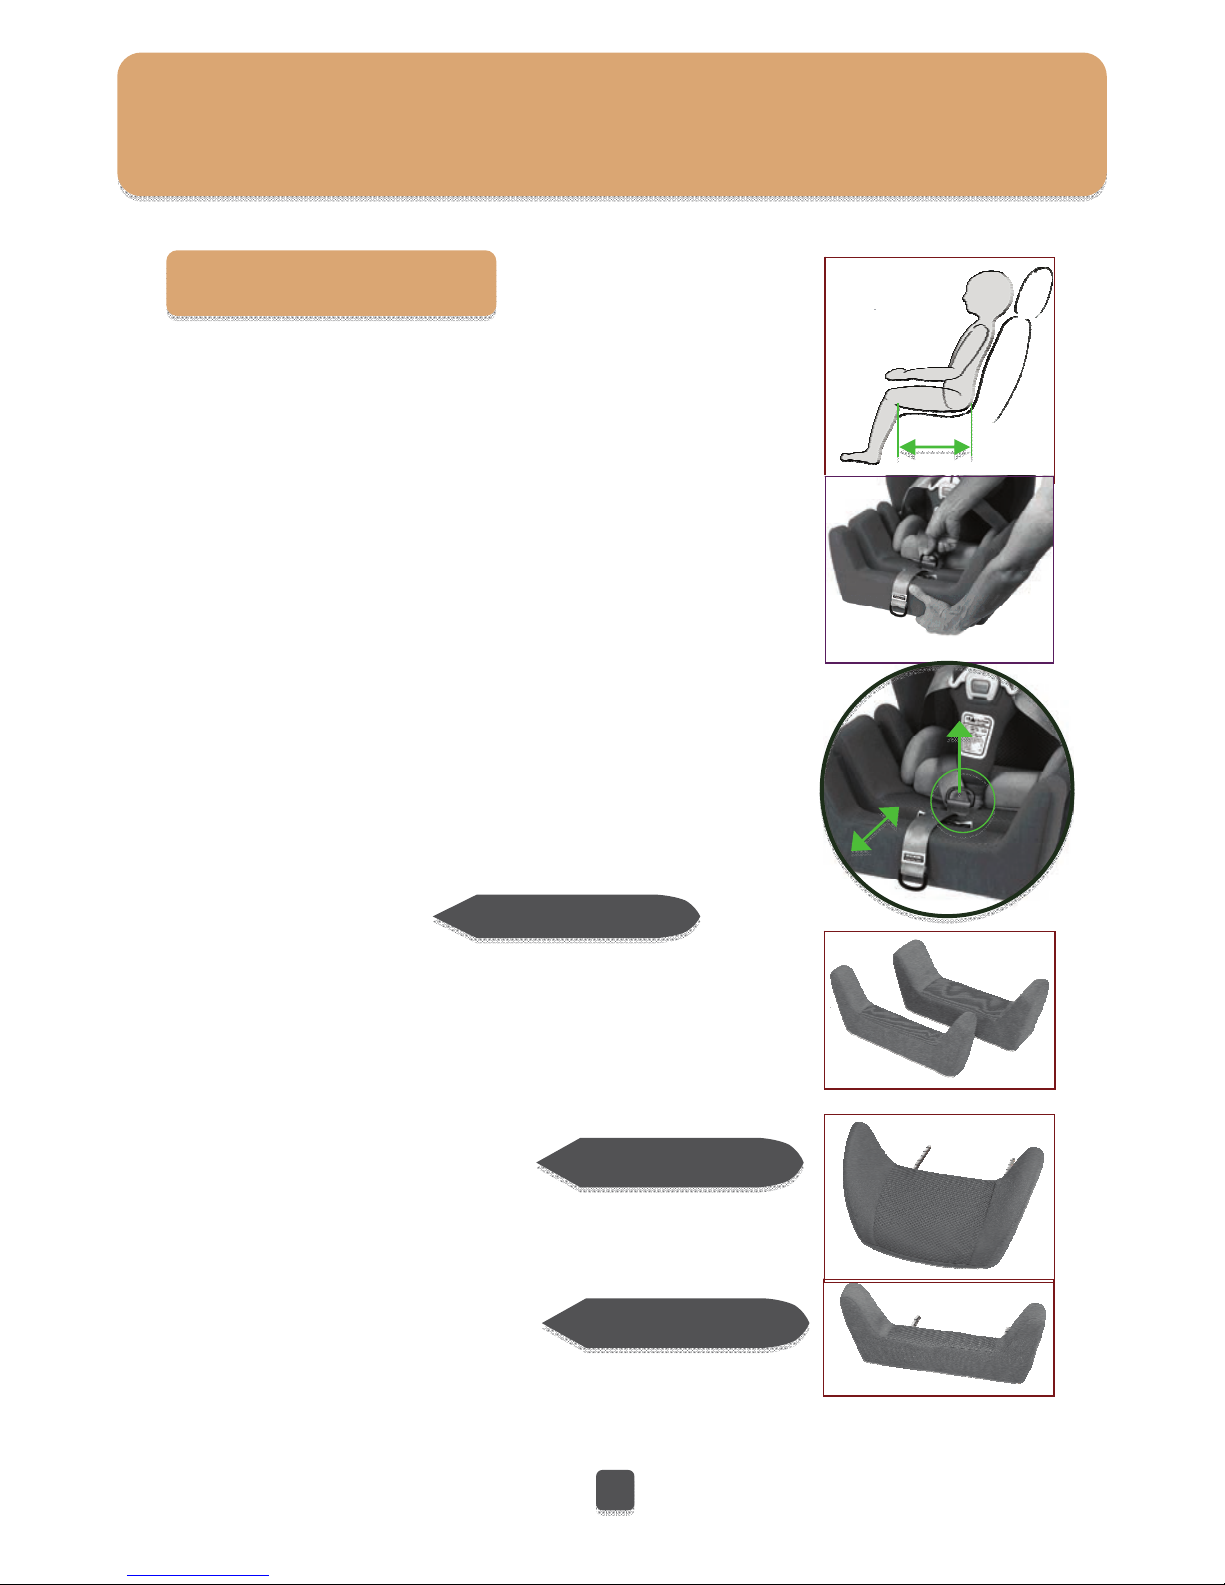
Adjusting Seat Depth
Seat depth can be adjusted by max. 35mm by changing
position of Seat Depth Adjuster Knob.
Ask the distributor for adjustment and assistance.
(Short / Medium
/
Long)
Three sizes of Foot Rest are provided to choose most
appropriate one for your child. Release locking by
pulling the Seat Extension Release Strap on the front
of the child seat, and while pulling the Strap, adjust
position of the Foot Rest. Vertical length of the Foot
Rest is also adjustable by a spanner wrench.
A
sk the distributor for adjustment and assistance.

Following Pads and Cushions are provided as standard accessories.
Attaching and Adjusting these pads and cushions can easily be done by Velcro
for comfortable positioning to the child’s body seating.
Head Pillow
Use to realize most comfortable and secure head position in the Head-Support.
Body Balance Pads
Use to realize most stable secure of the child’s body balance in the child seat.
Seat Balance Pads
Use to realize most stable secure of the child’s body balance in the child seat.
Comfort Cushion
Use to realize most comfortable position in the child seat and prevent the
child’s pelvis from slipping forward.
Pads and Cushions / Standard Accessories
17
Head Pillow
Seat Balance Pads
Body Balance Pads
Comfort Cushion
Functions

Securing Your Child
18
Once the child seat has been installed in the vehicle and
adjustments have been made, follow these instructions to
secure the child.
・ Loosen the harness by pressing the harness strap release
lever (in Red) on the front of the child seat, then pull the
shoulder straps forward (Fig. A).
・ Unfasten the harness buckle by pressing the release button
and sliding the tongues out (Fig. B).
・ Move the harness straps to the side of the child seat (Fig. C).
・ Place the child in the child seat (Fig. D).
・ Position the harness straps around the child and fasten the
harness buckle. Proper connection is confirmed with a
positive click after inserting each buckle tongue (Fig. E).
・ Gently pull up on the harness straps to tighten the lap
section, which should fit low on the child’s body (Fig. F).
・ Slowly pull the harness adjuster strap to tighten the
harness around the child (Fig. F).
・ Verify that the harness (5-point) is not twisted and child is
properly secured.
・ After you secured child with the harness (5-point) of the
child seat, fasten vehicle's lap shoulder (3-point) safety
belt over the child seat routing through the belt path on
the the shoulder and the lap belt guides (red plastic parts)
at both sides of the child seat (Fig. G). Proper connection is
confirmed with a positive click sound after inserting the
buckle tongue of the vehicle's lap shoulder (3-point) safety
belt into the buckle of the vehicle's seat.
・ The child's hip should be positioned as deep as possible
to firmly secure.
・ Verify that the vehicle's lap shoulder (3-point) safety belt is
not twisted or sagging, properly routed through the belt
path and the belt guides of the child seat. It is necessary
that the buckle of the vehicle's seat should be
positioned lower than the belt guides of the child seat
to firmly secure the child.
A
B
C
D
E
F
G
This manual suits for next models
1
Table of contents
Other Medifab Car Seat manuals


Popular Car Seat manuals by other brands


Inglesina
Inglesina Huggy Multifix instruction manual

H-Germany
H-Germany HEYNER SafeUpFix L instruction manual

GMG Products
GMG Products Yepp mini installation instructions

Silver Cross
Silver Cross Balance i-Size manual

Fisher-Price
Fisher-Price Safe Voyage Grow-with-Me FP3000C manual

Britax
Britax Marathon E9L06 Replacement instructions


