Edwards & Co AVERY FA0062 User manual

INSTRUCTION
MANUAL
AVERY Car Seat Capsule
Keep for future reference.
To reduce the risk of serious injury or death, read this owner’s
manual prior to installing and using this car seat.
Suitable for 0 to 13 kg.
Certified to European ECE R44/04 in Group 0+ as approved by
Land Transport NZ.
MODEL FA0062

Hey there!
Firstly, thanks for choosing Edwards & Co - it truly means a lot to us
that you have chosen one of our car seats to keep your family safe.
A lot of time and money is spent ensuring that your car seat is the
safest it can be. But to get the maximum protection from your
car seat it is very important that you read this instruction manual
carefully. In particular, pay attention to the warnings included as
well as the correct installation methods provided. Subtle differences
can make a huge difference when it comes to safety.
We believe in long lasting relationships with our customers, and we’d
love you to keep in touch. You can sign up to our newsletter via our
website newsletter or follow us on Facebook. And remember that if
you need anything we’re a simple phone call or email away.
Thanks again for being part of our community!
Regards
Mark Edwards Warwick Edwards
INTRODUCTION
WEB - edwardsandcobaby.com
FB - facebook.com/edwardsandcobaby/

GENERAL WARNINGS
To reduce the risk of SERIOUS INJURY or DEATH, read this owner’s
manual and your vehicle owner’s manual before installing and using
this car seat. By properly using this car seat and following these
instructions (and the instructions that accompany your vehicle), you
will greatly reduce the risk of serious injury or death to your child in
the event of a collision.
• NEVER LEAVE YOUR CHILD UNATTENDED IN THE CAR SEAT
• NEVER USE THE CAR SEAT IN A PASSENGER SEAT FITTED
WITH AIRBAGS.
• THIS CAR SEAT IS ONLY COMPATIBLE WITH EDWARDS & CO
BASES MODEL PA0100 AND PA0101.
• NEVER use the car seat without fastening it into your vehicle.
• NEVER alter or modify the car seat in any way as this may affect
its performance in the event of a collision.
• The buckle SHOULD ALWAYS be easily accessible. It is important
that your child can be released quickly in the event of an
emergency.
• This car seat is ONLY SUITABLE for cars fitted with a 3-point static
or retractable seat belt that is approved to UN/ECE regulation No.
16 or other equivalent standards.
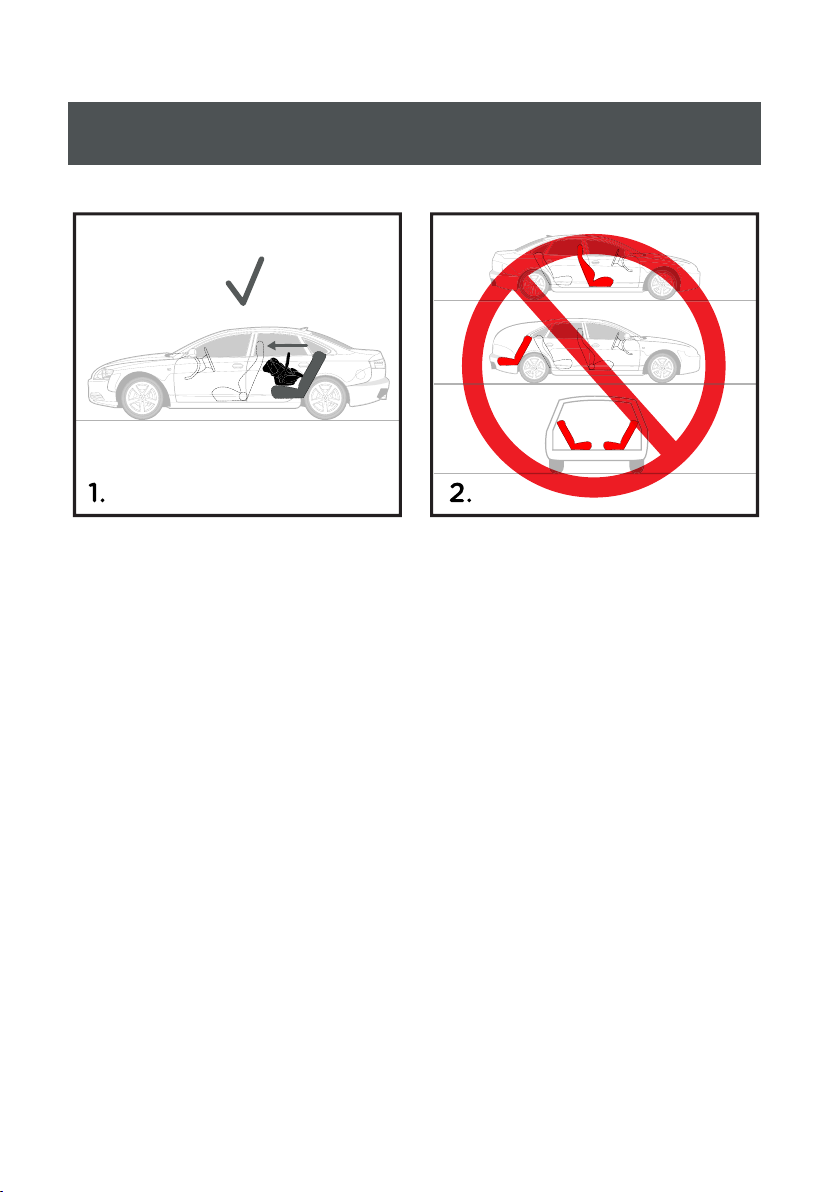
• ONLY FIT to a forward-facing passenger seat. NEVER fit into a
rear-facing or side facing seat.
• The seat is suitable from birth up to 13kg (approximately 12-15
months old) or when the child’s shoulders are above the highest
slots in the backrest, whichever is earlier.
• DISCARD the seat if it is involved in a serious collision EVEN if no
damage is visible.
• The cover and fabrics of the seat are integral to its performance in
the event of a collision. NEVER remove or replace the fabrics of
the seat unless it has been approved by Edwards & Co.
• Fit the harness firmly to the child. A loose restraint or harness is
DANGEROUS.
3

• The car seat is not intended to be a substitute baby cot or bed.
It is only designed to enable safe transportation of children in
motor vehicles. NEVER leave a baby in the restraint for long
periods of time.
• Do not store in areas that may get hot, like in car boots, roof
space or beside shed walls which can get hot in summer. NEVER
place heavy items on top of the seat as this may distort the
plastic.
• The restraint should not be purchased or sold as a second hand
item unless you are sure about it’s history.
• Do not to use this car seat if it is older than 7 years from the
manufacture date (stamped on the underside of the seat by 3
wheels: DD / MM / YY) as the shell and harness can weaken
over time and it’s protection in an accident may be reduced.
• This car seat is only designed to connect to Edwards & Co M
Series strollers specified in the stroller instruction manual.
• The handle MUST be set in the correct position when used in the
car.
4
NOTICE
This is a “Universal” child restraint. It is approved to Regulation No.
44, 04 series of amendments for general use in vehicles and it will
fit most, but not all, car seats.
A correct fit is likely if the vehicle manufacturer has declared in
the vehicle handbook that the vehicle is capable of accepting a
“Universal” child restraint for this age group.
This child restraint has been classifed as “Universal” under more
stringent conditions than those which applied to earlier designs
which do not carry this notice.
If in doubt, contact the child restraint manufacturer or the retailer.
GENERAL WARNINGS

FEATURES OF THE CAR SEAT
5
handle bar
handle release
button
lap belt guide
rocking base
canopy
shoulder belt
routing guides
level indicator
stroller locking
piece
handle locking
indicator
harness adjusting strap
buckle release button
shoulder pads
head support

INSERT CUSHION & WEDGE
Age suitability:
Stage 1. Insert cushion & lumbar wedge - suitable from newborn to
<8kg (approximately 5 months). We recommend using the insert
cushion and lumbar wedge, combined, until baby can hold their head
up unaided or when they reach 8kg in weight, whichever is earlier.
The lumbar wedge sits under the insert cushion as pictured above.
The lumbar wedge helps to provide a flatter recline to support your
newborn’s neck position.
6
The insert cushion and lumbar wedge are designed to provide comfort
to your newborn baby. As your baby grows, these can be adjusted to
adapt to your baby’s growing size.
Lumbar wedge Insert cushion

INSERT CUSHION & WEDGE
7
Stage 2. Insert cushion without
lumbar wedge - suitable from
newborn to <8kg (approximately
5 months). The lumbar wedge can
be removed and insert cushion used
alone once baby can hold their head
unaided or when they reach 8kg in
weight, whichever is earlier.
The insert cushion can be used with
or without the head support bumper
as comfortable for baby.
Stage 3. Fabric shell cover only
- suitable from newborn to <11kg
(approximately 15 months). When
baby’s shoulders are too big for the
insert cushion, and they can hold their
head unaided, it can be removed and
you can use the fabric shell cover only.

ADJUSTING THE HANDLE
To adjust the handle, squeeze and hold both handle release buttons
located in the centre of the handle hinge, rotate the handle then
release the button. The handle will lock into a position when you hear
a CLICK!
There are three positions (as pictured):
1. Handle up. For carrying your child or when fitted into your car
without the car seat capsule base.
2. Forward protection. When fitted to your car with the car seat
capsule base.
3. Ground position. Provides stability when removing your child
from the car seat when placed on the ground.
1. 2. 3.
8

WHERE TO INSTALL THE CAR SEAT
WARNING - This car seat is only suitable for approved vehicles fitted
with a 3 point seat static or retractable seat belt.
WARNING - Only install the car seat in a forward-facing passenger
seat as indicated in Diagram 1 above. A forward-facing passenger
seat is one that faces in the direction of the car’s movement. Do not
install the car seat into a rear-facing or side-facing passenger seat as
pictured in Diagram 2 above.
WARNING- Do not install the car seat in a passenger seat fitted with
airbags.
9

INSTALLING THE SEAT TO YOUR CAR
1. Place the car seat into your vehicle’s passenger seat and face the
car seat towards the rear of the vehicle (rear face).
WARNING - Check the handle is in the ‘Handle up’ position as
pictured in Diagram 1 on page 8.
2. Pull the lap belt as pictured in Diagram 1. (A) over the foot area
of the car seat and through the two lap belt guides as pictured in
Diagram 1. (B).
(continued next page)
10
DIRECT INSTALL METHOD (WITHOUT CAR SEAT CAPSULE BASE)
1. 2.
3.

3. Pull the vehicle’s shoulder belt around the back of the car seat
through the belt route guides as pictured in Diagram 2.
4. Connect the seat belt tongue to the buckle.
5. Tighten the lap belt by pulling hard on the shoulder belt above
the buckle tongue. It can be helpful to rock the car seat from
side to side as you tighten the belt to achieve maximum
tension. A tight fit is achieved when the car seat has little to no
movement when tugged side to side at the point where the car
seat touches the vehicle’s seat back.
6. After installation and tightening, the buckle on the passenger
seat should be facing towards the lap belt guides as pictured in
Diagram 3.
7. Check that the seat belts are flat and not twisted.
WARNING - Always check that the car seat is installed in a level
position as indicated by the level indicator. See the section “Using
the level indicator”.
WARNING – Make sure the car seat is tightly fitted to the vehicle
seat. If the car seat does not feel secure, or does not exactly match
these instructions, go back and re-install it. Only once it is properly
secured is it ready to use.
WARNING – Only install the car seat in a forward-facing passenger
seat.
11
INSTALLING THE SEAT TO YOUR CAR
DIRECT INSTALL METHOD (WITHOUT CAR SEAT CAPSULE BASE)

USING THE LEVEL INDICATOR
• The level indicator is designed to help you install the car seat
at the correct angle on the passenger seat. It is located on the
outside of the seat as pictured in Diagram 1.
• When the car seat is fitted to your vehicle, the level indicator bell
should always fit inside it’s housing as pictured in Diagram 2.
• Adjust the car seat to the proper level to ensure maximum safety
for your child. A tightly rolled towel under the front edge of the
car seat can be used to achieve the correct level.
WARNING – Always check the indicator before and after installing the
car seat.
12
1. 2.

ADJUSTING THE SHOULDER BELT HEIGHT
There are three height slot positions for the shoulder belts. As your
child grows, you will need to adjust the belt slot position according to
your child’s height.
The shoulder belts should be positioned so that they sit level or
just above your child’s shoulders. Diagram 1 shows the correct belt
position.
To adjust the shoulder belt height:
1. Remove the ends of the shoulder belts from the metal splitter
plate behind the car seat as shown in Diagram 2.
2. Pull the belts through to the front of the car seat.
3. Re-insert the belts through the appropriate slots in the car seat
shell and through the layers of cushioning as appropriate.
4. Re-attach the loops on the belts to the metal splitter plate. Make
sure the belt does not twist in any way.
WARNING - Do not allow the harness belts to become
twisted. The belts should be flat against your child’s body.
WARNING - Do not use the car seat if the child’s shoulders are above
the highest slots in the backrest or if the child’s weight exceeds 13kg.
13
1. 2.

SECURING THE HARNESS TO YOUR CHILD
14
Loosening the shoulder belts
1. Loosen the shoulder belts by simultaneously pushing the belt
adjuster button and pulling the shoulder belts towards yourself as
pictured in Diagram 1.
2. Open the harness by pressing the red buckle release button on the
buckle.
3. Place the shoulder belts against the sides of the insert cushion
as pictured in Diagram 2. This step makes it easier to fasten the
harness once baby is in the car seat.
1. 2.

Securing the harness clips
1. Place your child in the car seat. Make sure that your child’s back
and bottom are flat against the car seat. This will maximise
comfort and allow the harness to properly secure your child.
2. Check the height of the shoulder portion of the harness (called the
shoulder belts) according to your child’s height. The shoulder belts
should be level with their shoulders. To adjust the shoulder belt
height see ‘Adjusting the shoulder belt height’.
WARNING - Do not use the car seat if the child’s shoulders are
above the highest slots in the backrest or if the child’s weight
exceeds 13kg.
3. As pictured in Diagram 1, combine the two locking clips together
and insert them into the buckle housing until you hear a CLICK!
When it is connected it should appear as pictured in Diagram 2.
Check that the buckle is secure by pulling the buckle.
(continued next page)
1. 2.
15
SECURING THE HARNESS TO YOUR CHILD

Tightening the shoulder belts
1. Pull the harness adjusting belt as pictured in Diagram 1.
2. A correctly secured harness is pictured in Diagram 2. For proper
tightness, one finger should fit between the shoulder belts and the
child’s shoulders.
WARNING - The shoulder belts should be positioned so that they
sit level or just above your child’s shoulders. See page 13 for more
information.
WARNING - For a proper fit, heavily padded clothing such as jackets
and coats should be removed before securing the harness.
Do not use the car seat if the child’s shoulders are above the highest
slots in the backrest or if the child’s weight exceeds 13kg.
1.
16
SECURING THE HARNESS TO YOUR CHILD
2.

CONNECTING TO YOUR STROLLER
Connecting the car seat
1. Insert the car seat’s locking piece into the stroller receiver.
2. You will hear a CLICK! upon successful connection.
3. Check that both sides have successfully connected.
Removing the car seat
1. Press the first of the release buttons as pictured.
2. Press the second of the release buttons as pictured.
3. Lift the car seat using the handle.
IMPORTANT - This Avery Car Seat Capsule (FA0062) can only be
connected to Edwards & Co M Series strollers, such as the Oscar Mx.
17
press here
press here

WARRANTY
All Edwards & Co products are guaranteed for two years from the
date of purchase against defects in material and workmanship.
If we determine that the product has a manufacturing fault, we will
repair or replace it free of charge to you. The decision to repair
or replace is solely at the discretion of Edwards & Co. Proof of
purchase must be provided.
The warranty is “return to base” and not a free in-home service. This
means the customer is responsible for any inwards freight charge to
return the product to an Edwards & Co representative for warranty
or service.
Our warranty excludes claims resulting from misuse, abnormal use,
overloading, general wear and tear, child outgrowing the product,
not following instructions, transportation damage (including airline
or freight damage), poorly maintained product, dropped goods,
negligence, second-hand product, modified product, colour fading,
mould, damage to inner foam in use or fabric cuts and tears.
The warranty excludes repairs to car seats that have been involved
in a car accident.
Any replacement will not give the right for the warranty period to
be extended.
Edwards & Co does not cover warranty if the product has been pur-
chased second hand or from an unauthorised reseller.
For the complete terms and conditions of our warranty, please visit
our website - www.edwardsandcobaby.com/warranty
18
Edwards & Co
PO Box 35-445
Browns Bay, Auckland 0753
NEW ZEALAND
p: 0800 ED AND CO

CLEANING & CARE
Important information
• NEVER lubricate or oil any part of the seat.
• Only use mild detergents.
• Wipe clean the seat shell, harness and EPS foam lining inside
only.
• NEVER use solvents, harsh detergents or washing up liquids as
these may damage the harness and seat.
• NEVER wring any fabrics.
• Dry thoroughly before storage.
• Store in a well-ventilated area, away from direct sunlight which
could damage or fade your car seat.
• Store in a safe place when it is not being used. Avoid placing
heavy objects on top of it.
• NEVER allow the seat to come into contact with corrosive sub-
stances such as battery acid or petroleum products.
Cleaning the fabric cover:
• Hand wash in warm water only. Drip dry.
• NEVER tumble dry.
To remove the cover from the car seat:
1. Remove the harness by gently feeding it through from the front
to the back of the car seat.
2. Remove the crotch strap, including buckle, by rotating it a
quarter turn and feeding it out through the car seat shell. The
cover should now be free of obstruction.
3. Remove the cover and hand wash it at about 30ºC; dry flat away
from direct heat.
4. To replace, repeat the instructions above in reverse.
WARNING – Ensure the harness is correctly fitted. Please follow the
‘Adjusting the shoulder belt height’ section for more information on
harness fitting. If you are unsure please contact Edwards & Co.
19

www.edwardsandcobaby.com
Other manuals for AVERY FA0062
1
Table of contents
Other Edwards & Co Car Seat manuals

Edwards & Co
Edwards & Co Ed & Co FA005 User manual

Edwards & Co
Edwards & Co sicuro ISOFIX User manual

Edwards & Co
Edwards & Co Capsule 2 Series User manual

Edwards & Co
Edwards & Co Ed & Co multi-fix PA0101 User manual

Edwards & Co
Edwards & Co Avery Base Unit User manual

Edwards & Co
Edwards & Co PA0100 User manual

Edwards & Co
Edwards & Co Ed & Co multi-fix PA0101 User manual