Medifor M115WH57TL User manual
USER MANUAL Rev. 07/20
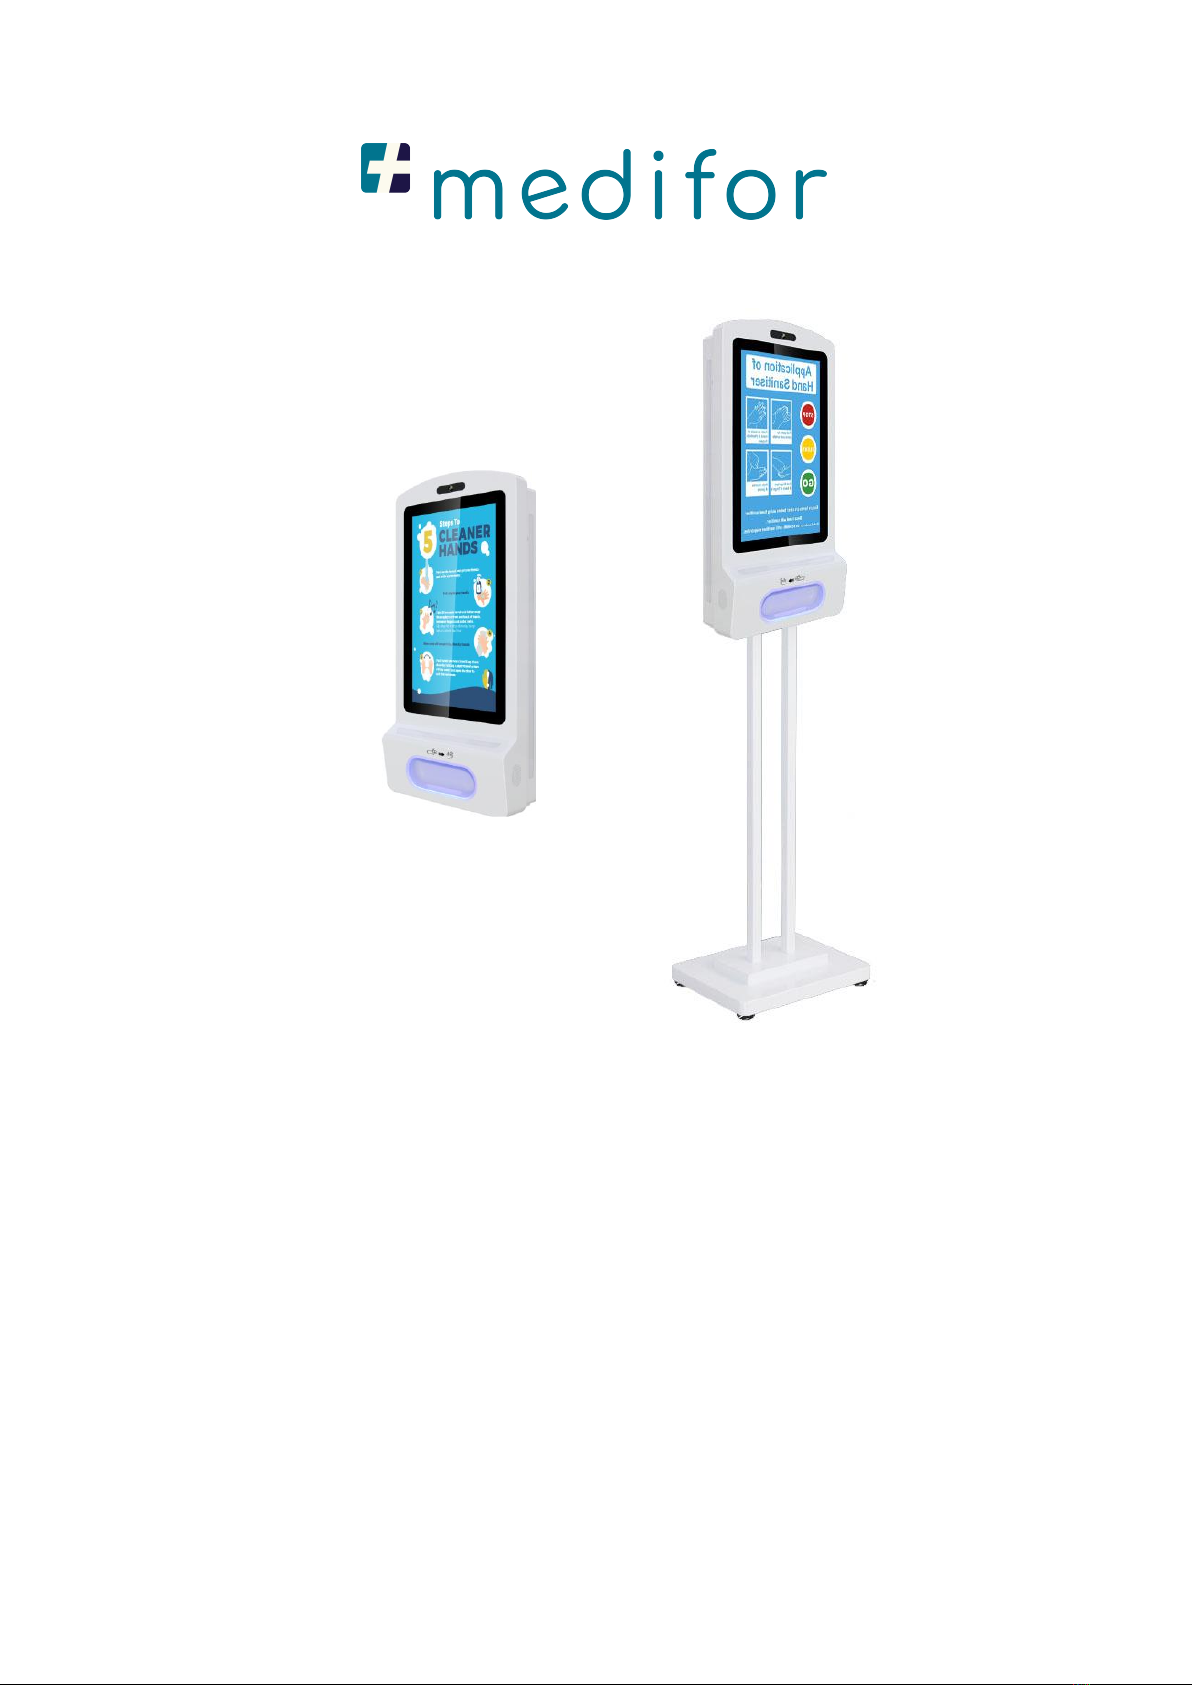
Model: M115WH57TL M115WH83TL
Description: Hand Sanitizing Station with 21.5” Digital Signage
Note: Before using the product, please read the instructions carefully!
Do not attempt to disassemble this product. If the product does not work properly, please
call our Customer Service Department at 1-888-632-3077.
1
Medifor

2
Medifor
Contents
Features................................................................................................................................ 3
Safety Warnings and Precautions ........................................................................................... 4
Assembly and Connection...................................................................................................... 6
Packing List....................................................................................................................................6
Steps for Assembly........................................................................................................................7
Instructions on How to Use .................................................................................................. 10
Remote Control ................................................................................................................... 12
Description of Basic Operations............................................................................................ 13
Power on/Standby ......................................................................................................................13
Interface and Home Screen.........................................................................................................13
Description of Wallpaper Switch.................................................................................................13
File Manager ...............................................................................................................................14
Local Settings ..............................................................................................................................14
Status of Menu bar .....................................................................................................................15
DiViEx APP Introduction……….…………………………………………………………………………………………………16
System requirements..................................................................................................................16
How to upload media files..........................................................................................................16
Settings........................................................................................................................................18
Edit picture..................................................................................................................................18
Music...........................................................................................................................................20
Factory Reset...............................................................................................................................21
Choose System Language............................................................................................................21
Technical Specifications………………………………………………….…………………………………………………………22
Troubleshooting………………………….……………………………………………………………………………………………24
Cleaning and Maintenance………….………………….……..………………….……………………………….……………26
Names and Contents of Toxic and Hazardous Substances or Elements in the Product………….…..27

3
Medifor
Features
◆Embedded with Android 7.1 smart operating system and unique UI design, bringing you a more
convenient operation and better visual experience.
◆High-quality LCD screen as the display, no flicker, low radiation, greatly reducing eye fatigue, eye
protection, high brightness, high contrast, and wide viewing angle; ultra-fast response time greatly
reduces ghosting of fast moving images.
◆Progressive image processing and industry-leading motion compensation technology improve the
flickering and blurring in the edges of motion picture.
◆Dynamic contrast technology can significantly improve the clarity and contrast of various screens.
◆Multi-channel USB interfaces, supporting HD media streaming.
◆Platform and configurations:
Hardware platform: ARM Cortex-A17, 1.8GHz Quad core processor;
Chip: Mali-T76x series GPU;
High capacity memory: DDR3 2GB, inter FLASH/8GB NAND.
◆Support 1080 Full HD videos and pictures; 1080p output;
◆Support Full HD video format:
Video: H.264, MKV, WMV9, MPEG1/2/4, HD DIVX, XDIV, RM/RMVB.
Audio: MP3, WMA, WAV, EAAC+, MP2, dec, Vorbis (Ogg), AC3, FLAC (Lossless audio), APE (Lossless audio),
BSAC;
Pictures: BMP/PNG/GIF/JPEG (4088*4088);
◆Support webpage/Flash playback;
◆Input function:
1) Support remote control;
2) Support USB mouse/keyboard. Using a mouse for set up is recommended;
◆Landscape or portrait orientation;
◆Support USB flash drive and SD card (can extend TF card);
◆Multi languages;
◆Support TTF vector font, distortionless display;
◆Clock display: Built-in clock IC, it could update time information after networking, correct system
time automatically.
◆Support LAN, WIFI and Bluetooth;
◆Combined with CMS Software. Import video, Television images, pictures, animation, text,
documents, web pages, streaming media, database data into one wonderful section program, which also
could be launched to terminals in different places through network, show the great graphics and
real-time information to people at different places.

4
Medifor
Safety Warnings and Precautions
Thank you for purchasing the high-performance multi-functional Digital Hand Sanitizing Station. We
have considered the factors to ensure personal safety in product design and have tested rigorously at
the factory. However, improper installation and use may result in electric shock and fire.
In order to safely use, maximize performance of the unit and extend the life of the product, please
read and follow all instructions carefully before using the product.
Keep the instructions for future reference.
We strongly recommend using a surge protector, or a power strip with internal circuit
breaker to prevent damages to the digital signage.
Symbol Legends:
Warning: May cause personal injury or death
The operation is prohibited
Caution: May cause damage or property loss
The operation must be executed
If any of the following occurs:
Power outage or instable voltage.
Abnormal sound or smell from the unit.
AC power cord is damaged.
Digital Signage is damaged due to drop, knock or impact.
Any liquid or foreign matters fall into the enclosure.
Turn off the Digital Signage immediately, pull out the plug from the power outlet, and ask the
authorized personnel for maintenance timely.
If coal gas or other flammable gas leaks, do not pull out the plug of the LCD Digital Signage or other
electrical appliances; instead, turn off the gas valve immediately, and open the doors and windows quickly.
5
Medifor
⚫Do not use power supply other than AC 110V, 60Hz.
⚫Cut off the power supply before connecting or disconnecting any cables.
⚫Do not place the Digital Signage at any instable positions, or else it may be damaged or cause fire.
⚫Do not place the Digital Signage in the positions such as:
1. The environment subject to direct strong sunlight, moisture, extreme temperature or too
much dust;
2. The environment with flammable or explosive materials;
3. The environment with flammable or corrosive gases;
⚫Do not use damaged or inappropriate power outlets and ensure that the plugs and outlets contact
properly.
⚫Do not let dust or metal deposits adhere to the plugs and outlets.
⚫Do not damage the power cords:
1. Do not modify the power cords;
2. Do not place heavy objects on the power cords;
3. Keep the power cords away from heat source;
4. Do not pull the cord to remove the plug.
⚫Do not connect too many plugs to one outlet in parallel, or else it may cause fire due to excessive
power consumption.
⚫Do not approach the Digital Signage with open flame (e.g. a lighted candle), or else it may cause
electric shock or fire.
⚫Do not put any sharp objects, metal or liquid into the vents or let them touch the signal terminals
to avoid short circuit, product damage, and electric shock.
Do not touch the plugs with wet fingers, or else it will cause electric shock.
Do not use the Digital Signage in stormy weather, especially when there is lightning; instead, please
disconnect the power and antenna plugs to avoid lightning strike.
Do not disassemble the Digital Signage without permission, or else it may cause electric shock or fire.
Please ask qualified technician for repair.
Note:
Contact local dealer if you have questions about the operation, debugging and connection of the unit; if
the unit doesn’t work normally, please cut off the power immediately and consult the dealer. The unit is
class-A product, which may cause radio interference in living environment. In this case, please take
feasible measures, and use power plug as the disconnection device.
WARNING
6
Medifor
⚫Do not let children climb onto the Digital Signage.
⚫Keep the small parts away from children to prevent them from swallowing.
⚫If the Digital Signage won’t be used for a long time, please turn it off and pull out the power plug.
⚫To adjust the position of the Digital Signage, please disconnect all power cords and move slowly to
avoid tip over.
⚫Do not scratch or knock the LCD with hard object, or twist and squeeze the LCD.
⚫Do not turn on the unit immediately when it is moved from a place with low temperature to high
temperature, or else it will cause condensation and malfunction.
⚫Before cleaning the Digital Signage, please pull out the power plug; wipe with soft cloth; do not
use industrial chemicals; prevent foreign matters from entering the machine. Improper cleaning
(such as cleaning solution, water) may damage the product, erase the printed information, and
even cause damage of the components if fluid flows in, resulting in machine failure.
⚫If the unit displays the same screen for a long time or the moving picture has fixed text or icon, it
will leave ghosting on the screen and won’t disappear when the unit is turned off; it is normal and
isn’t covered by the warranty.
⚫The power of the Digital Signage can be cut off by pulling out the plug.
⚫If the LCD screen ruptures and the liquid splashes on the skin, please rinse for 15 minutes with
clean water immediately, and consult your doctor.
⚫Do not apply pressure on the panel.
⚫Use the Digital Signage properly: Use in proper lighting conditions; insufficient lighting or long
time watching will impair your eyesight.
⚫When the plug or coupler is used as disconnection device, it should be easy to operate the device.
⚫Insert the plug into the outlet properly, or else it may cause sparks and fire.
⚫The technical specifications printed herein and on the packaging are subject to change without
prior notice. The Manual may be slightly different from actual operation, and the latter is
applicable.
Assembly and Connection
Packing List
WALL MOUNT FLOORSTAND
Name
Qty
Name
Qty
Power Cord
1
Power Cord
1
Keys
3
Keys
4
6mm Allen Wrench
1
6mm Allen Wrench
1
User Manual
1
User Manual
1
Warranty card, certification
1
Warranty card, certification
1
M4x30 screw
2
Foot
4
M8x25 screw
6
CAUTION

7
Medifor
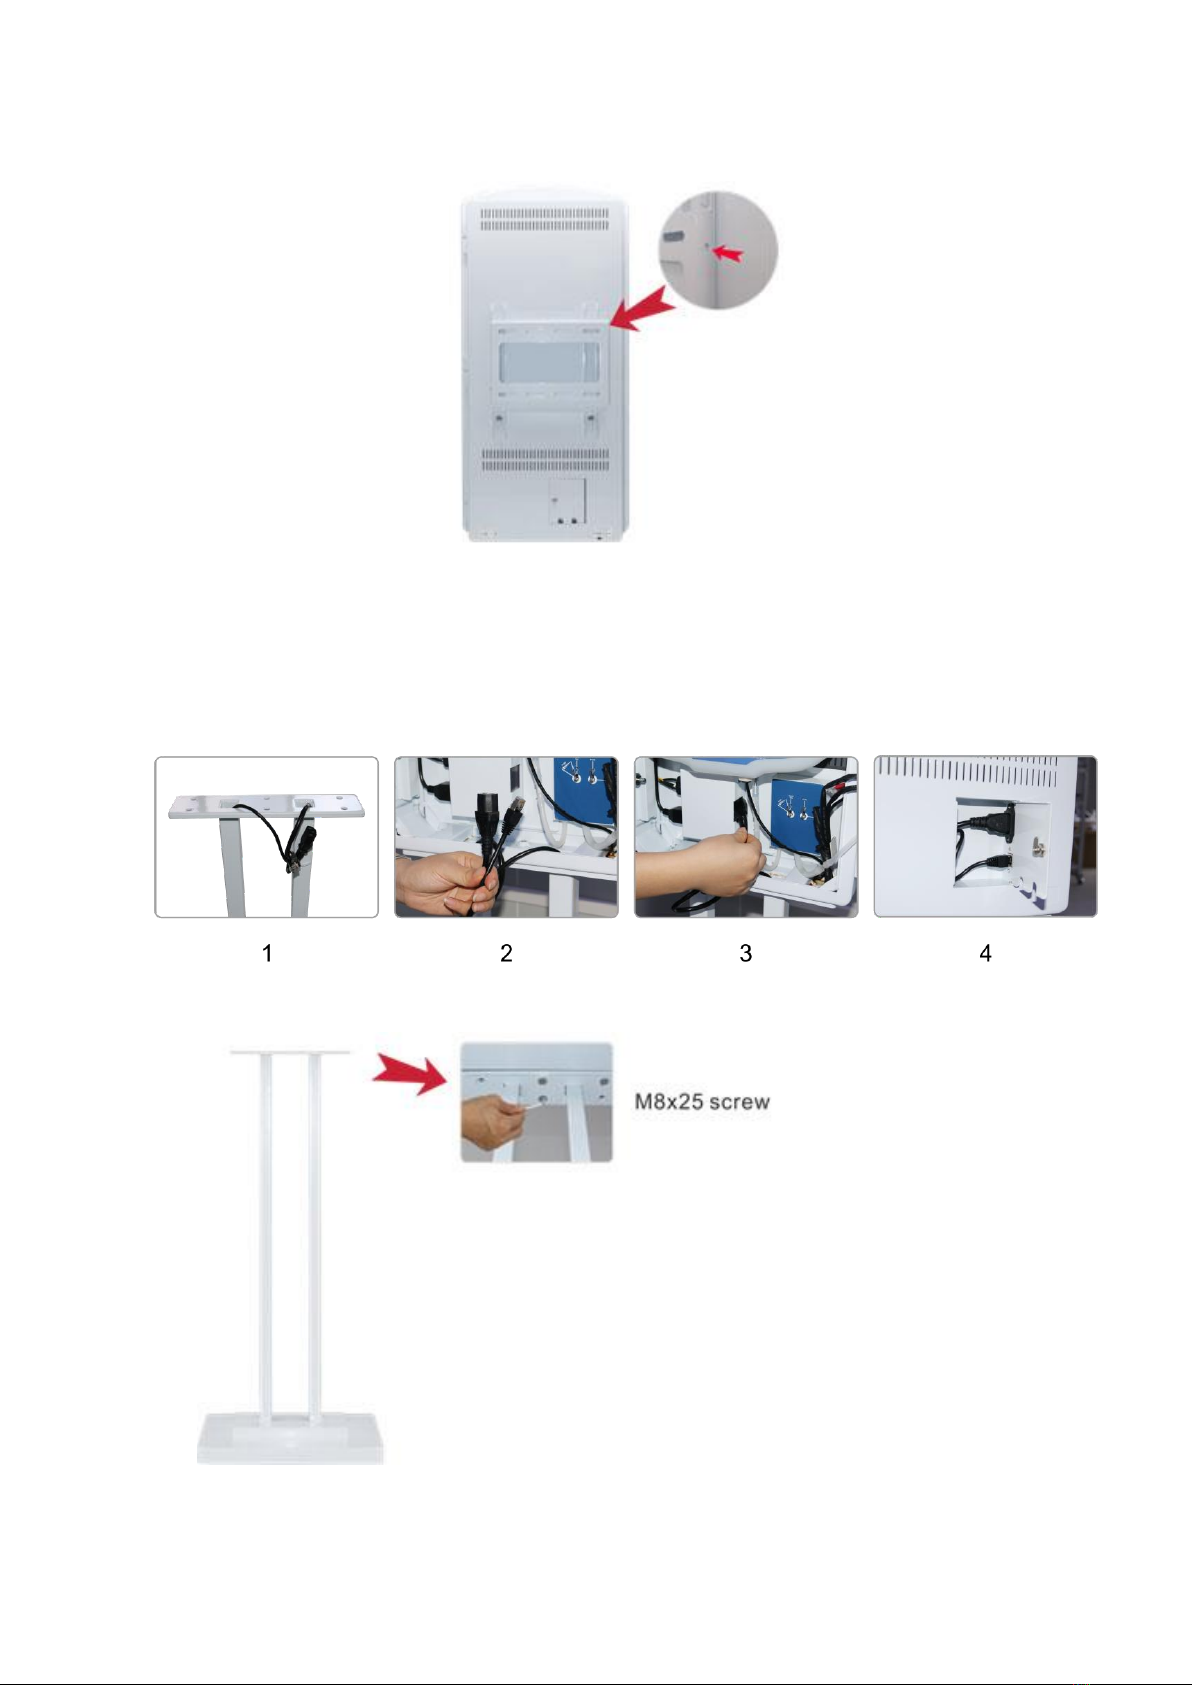
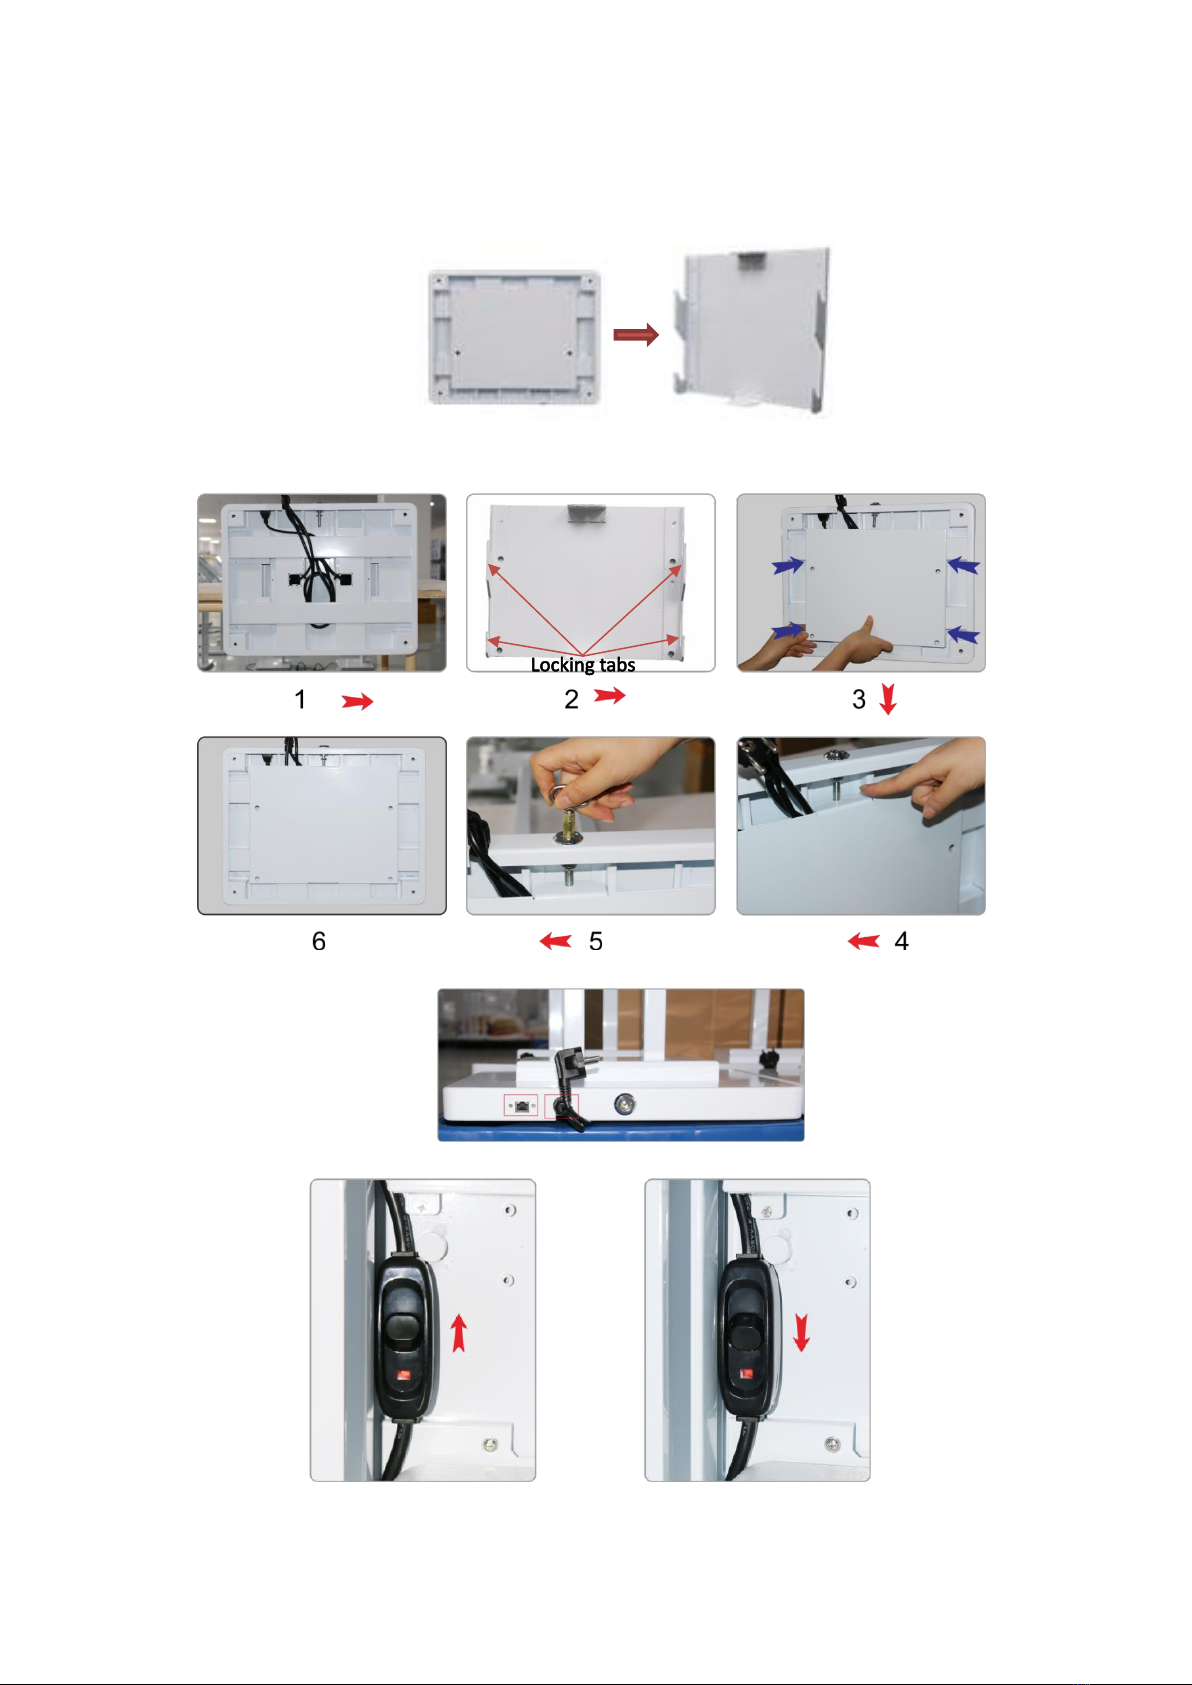
Steps for Assembly (2 people are required)
1. Wall mounting:
1.1. Unscrew the security screw on the side of the bracket and remove the wall mounting plate.
1.2. Mount the included Wall Plate to the desired location on your wall (hardware not included).
Tips: Use wall plate as template and make sure it is level.
1.3. Use the key provided to open the back door. Connect the power cord and ethernet cable (as
needed) to the ports inside and wire them out through the cutouts on the door.
Lock the door with the key.
1.4. Hook the pre-assembled brackets on the back of the hand sanitizing unit onto the mounted wall
plate and make sure it’s stable on the wall.
Wall Mount Plate
8
Medifor
1.5. Replace the security screw to the side of the bracket at the back to secure the hand sanitizing
unit to the wall.
2. Floorstanding:
2.1. Screw (4) feet into the base from the bottom.
2.2. Place the hand sanitizing unit on top of the stand and route the cables through the square
cutouts at the bottom of the sanitizing unit.
2.3. Unlock the unit with provided key and plug in the power cord and ethernet cable to the ports
respectively.
2.4. Assemble the sanitizer unit and the stand with (6) M8 screws. Tighten screws using the enclosed
Allen Wrench.
9
Medifor
2.5. (OPTIONAL) Mount the stand to the ground.
Unlock the mounting bracket at the bottom of the stand. Remove the mounting bracket and use
it as a template to mark the desired location. Securely mount the bracket to the ground.
NOTE: Mounting hardware not included. Select the suitable hardware for the surface.
Place the base on top of the mounted bracket and slide the base onto the bracket. Secure the
unit by locking the base from the side with the key provided.
2.6. Plug the power cable from the base into the outlet.
ON/OFF Switch: Unlock the unit with the key and open the unit. Find the switch and turn it on.

10
Medifor
Instructions on How to Use
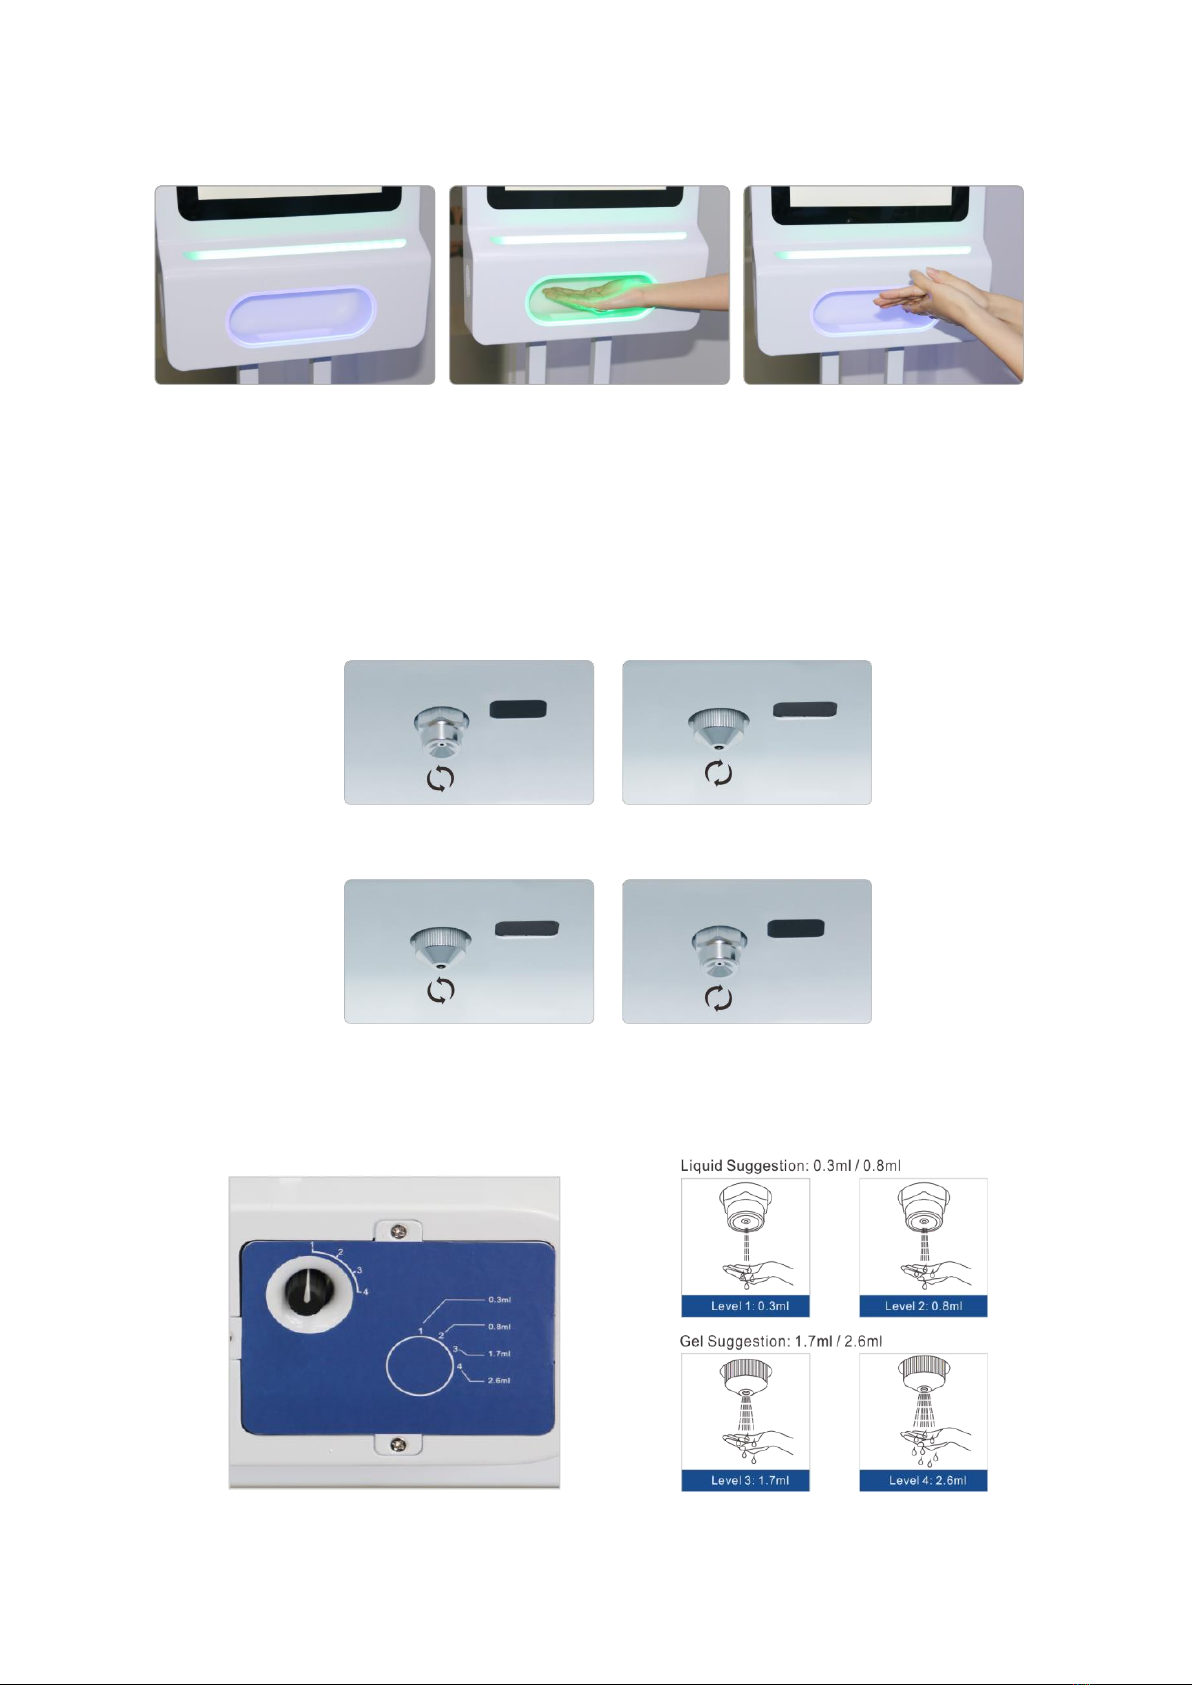
To add/refill sanitizer:
1. Open the door on the back to reveal the hand sanitizer dispensing container inside the unit.
2. Remove the cap on top and carefully fill the same formulation into the container. Replace the cap
and tighten it by turning clockwise.
LED Indicator Light
Supply (Green) Empty (Red)
11
Medifor
The sensor and lights
1 2 3
1. The LED lights are blue when not in use
2. Place hand underneath dispenser. The LED lights will blink green and dispense hand sanitizer.
3. When rubbing your hands outside the dispenser, the LED lights will turn back to blue.
How to replace the dispense Nozzle
Replace the Liquid Dosing Head with Gel Dosing Head: Unscrew the Liquid Dosing Nozzle by hand to
remove it from the dispenser. Screw the Gel Dosing Nozzle clockwise to secure it onto the dispenser.
Replace the Gel Dosing Head with Liquid Dosing Head: Unscrew the Gel Dosing Nozzle by hand to remove
it from the dispenser. Screw the Liquid Dosing Nozzle clockwise to secure it onto the dispenser.
NOTE: After replacing the nozzle, test the dispenser to make sure it works properly.
Adjust the dosing volume of the dispenser:
Turn the nob to the desired dispensing dosage. See the manufacturer suggested dosage below.
12
Medifor
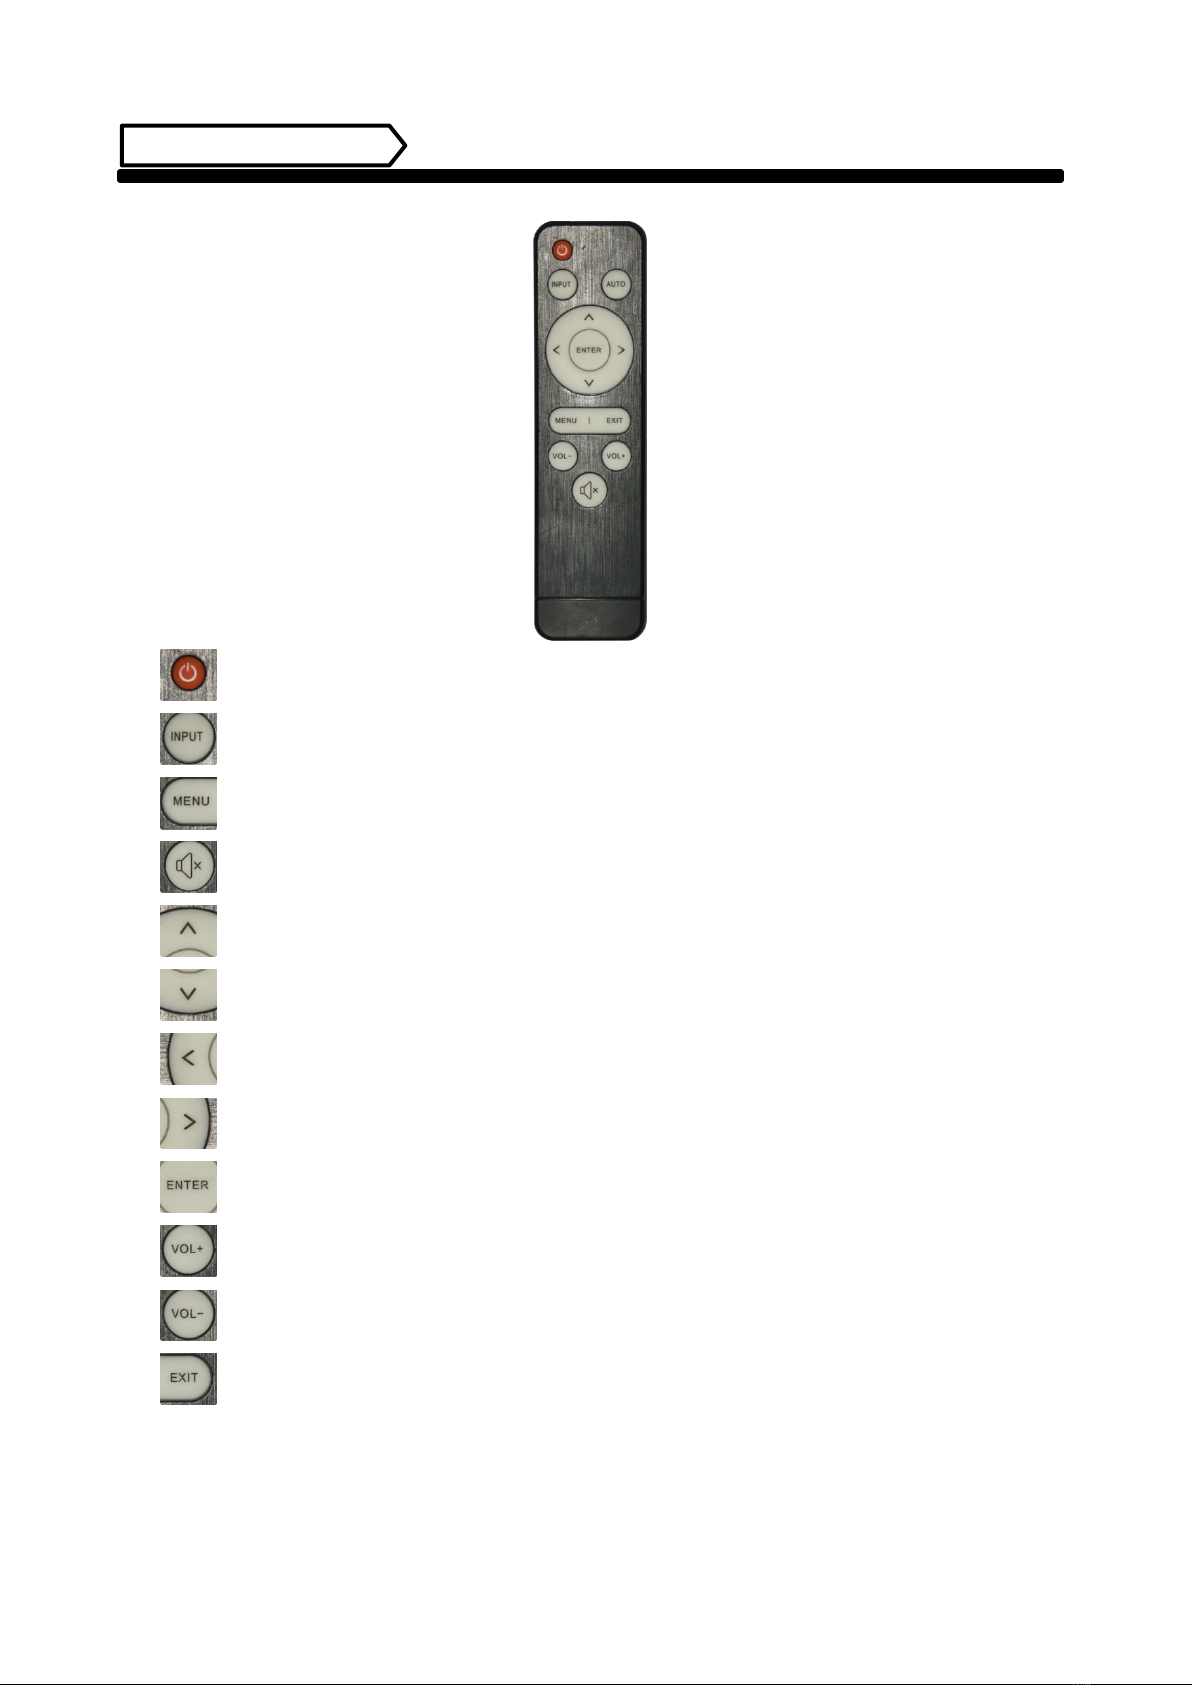
Remote Control
1. Power on/off button.
2. Press this button to return to home screen.
3. Press MENU to organize screens and apps.
4. Mute. Press this button to mute the sound.
5. Upwards Arrow. Move up selection or move the cursor up.
6. Downwards Arrow. Move down selection or move the cursor down.
7. Leftwards Arrow. Move selection to the left or move the cursor left.
8. Rightwards Arrow. Move selection to the right or move the cursor right.
9. Confirm button, select the use menu or setup menu, press this button to confirm
10. Turn volume up
11. Turn volume down.
12. Return to previous page or a level up in an app.
NOTE: Only buttons shown above have functions.
13
Medifor
Description of Basic Operation
Power on/Standby
Insert the power plug into the outlet. If the Digital Signage has the switch button “I”, turn it on.
In power on state, press the “ ” button on the remote control, and the Digital Signage enters standby state.
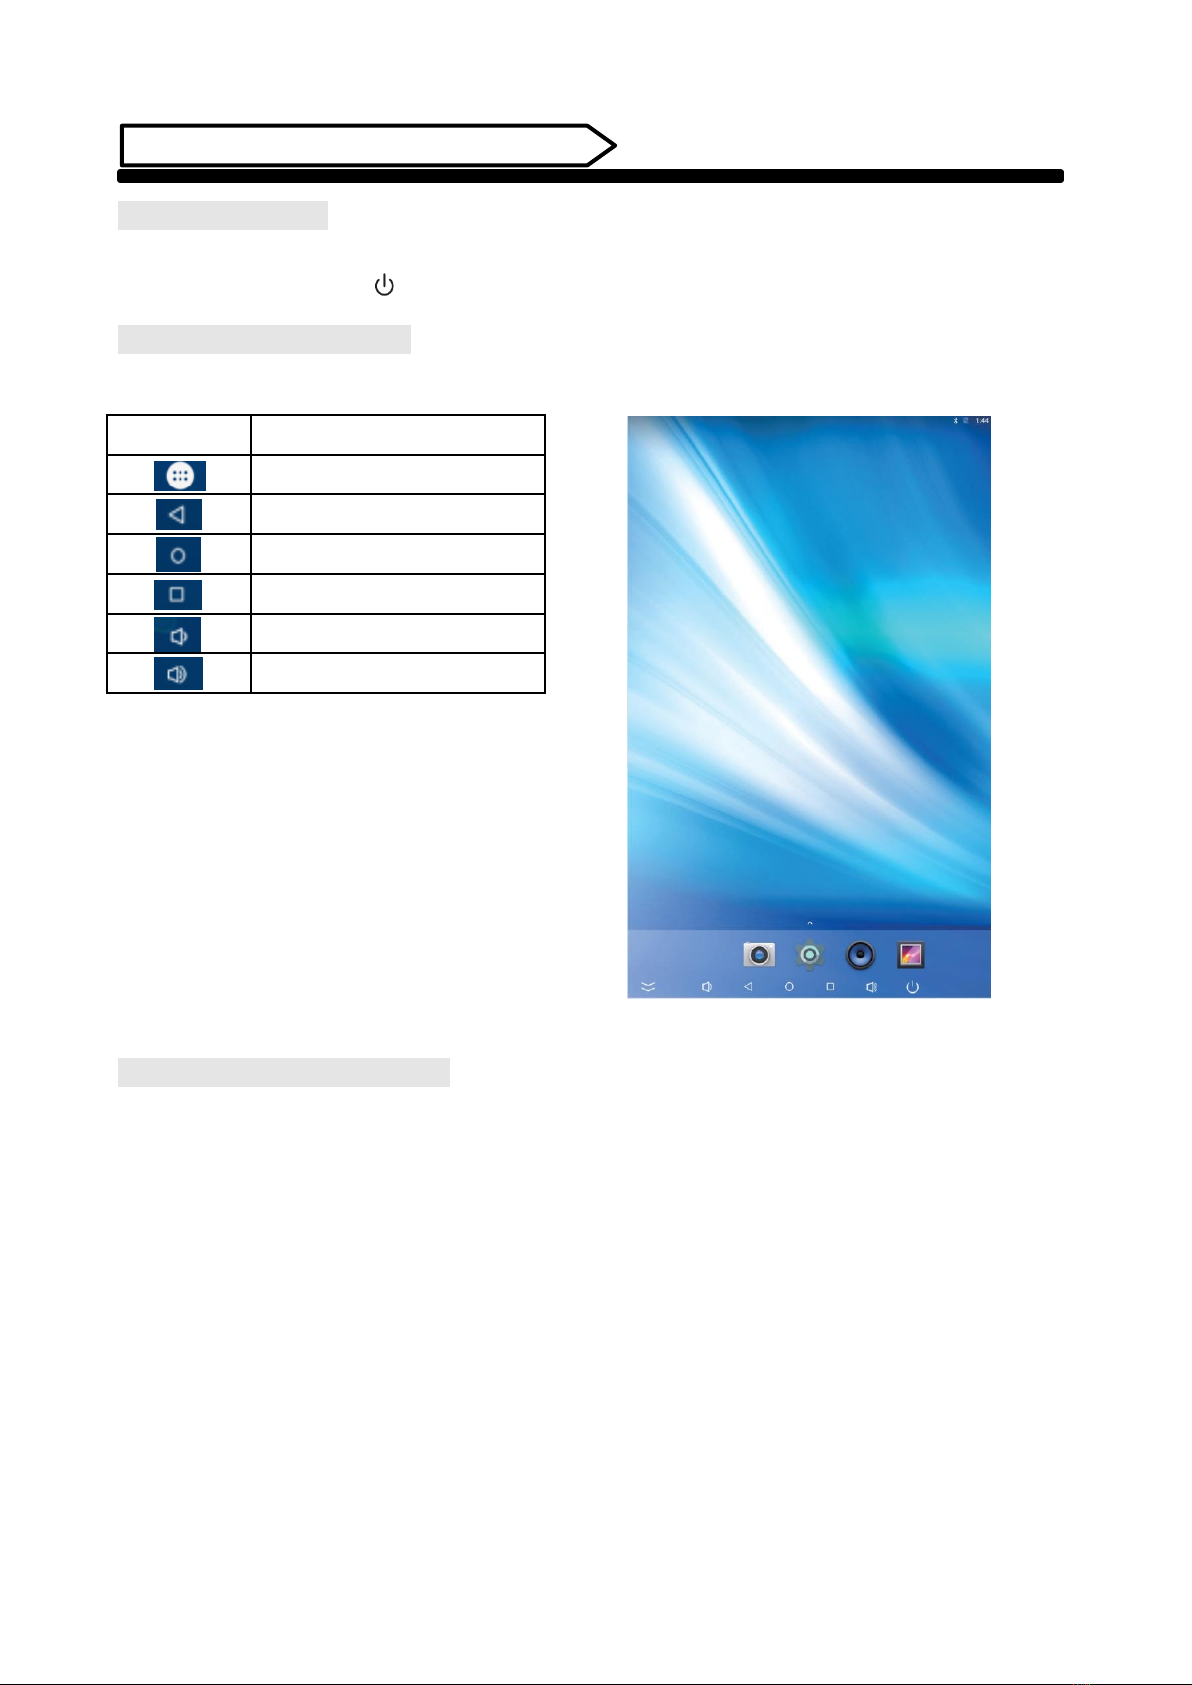
Interface and Home Screen
After power on, the machine will launch home screen, as shown below:
Description of Wallpaper Switch
We suggest using a mouse to change the wallpaper.
Connect a mouse with the digital panel through USB port, then follow the steps below:
1. click “Setting”
2. At the setting menu, click “Display”
3. At the Display setting menu, click “Wallpaper”, then choose a folder.
4. Then select an image you would like to set up as background.
5. Confirm the selection by clicking “Set wallpaper”.
Icon
Function
App Drawer
Back
Home page
Background applications
Sound -
Sound +

14
Medifor
File Manager
1. Click the Main Apps button “ ” in the Home screen to enter the “APPS” menu interface (Fig. 2);
2. Click the “Explorer” icon in the “APPS” menu interface (Fig. 2) and enter “Explorer” menu (Fig. 3);
3. Choose storage in the “Explorer” menu to read the files from different devices.
Fig. 1 Fig. 2 Fig.3
Local Settings
1. Click the “Settings” icon (Fig. 1) and enter “Settings” menu (Fig. 2);
2. Click “Wi-Fi” and choose options then set up the WIFI connection.
Fig. 1 Fig. 2
15
Medifor
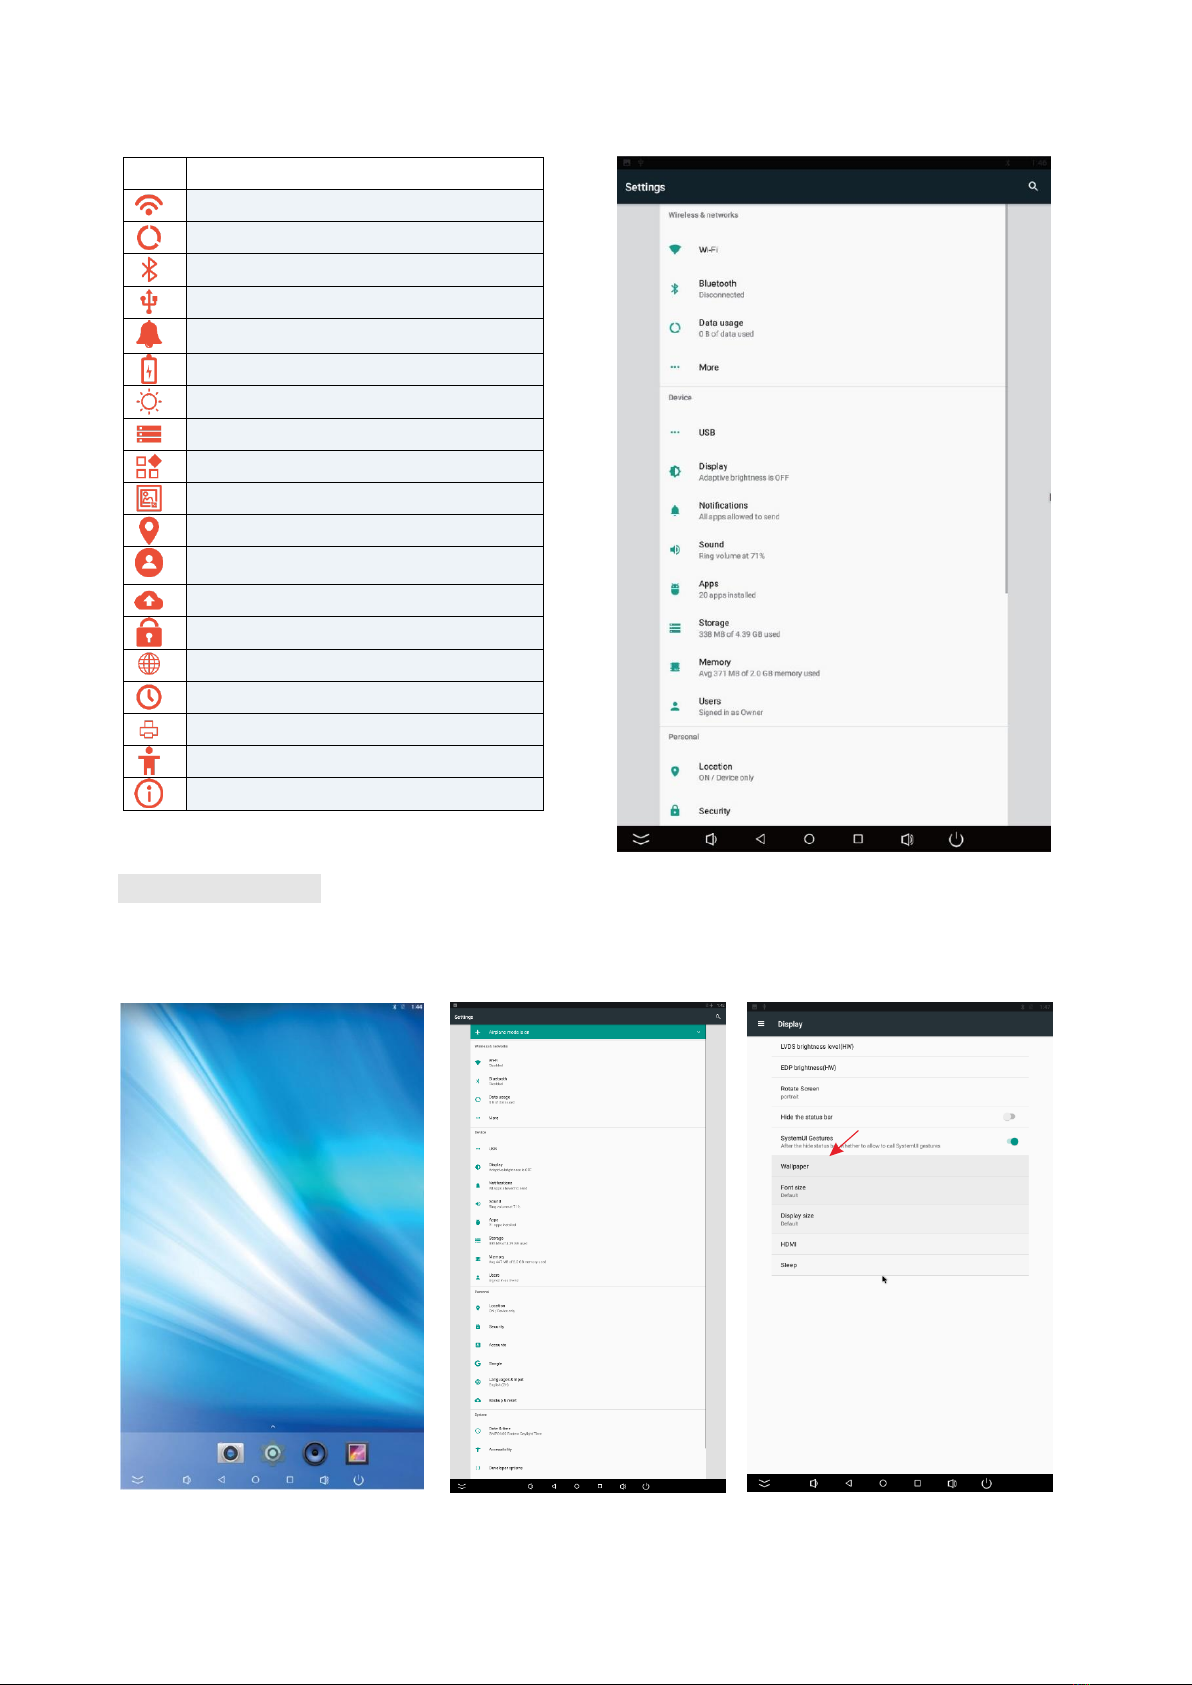
Description of Settings Interface (shown on the right)
Icon
Function
WIFI switch
Data usage
Bluetooth
USB
Sound & notification
Battery saver
Display
Storage
Apps
Screenshot Setting
Location
Accounts
Backup & reset
Security
Language & input
Date & time
Printing
Accessibility
About device
Status of Menu Bar
1. Click the setting
2. At the setting menu click the display menu
3. At the display setting menu unselect the display navigation check box
Fig. 1 Fig. 2 Fig. 3
16
Medifor
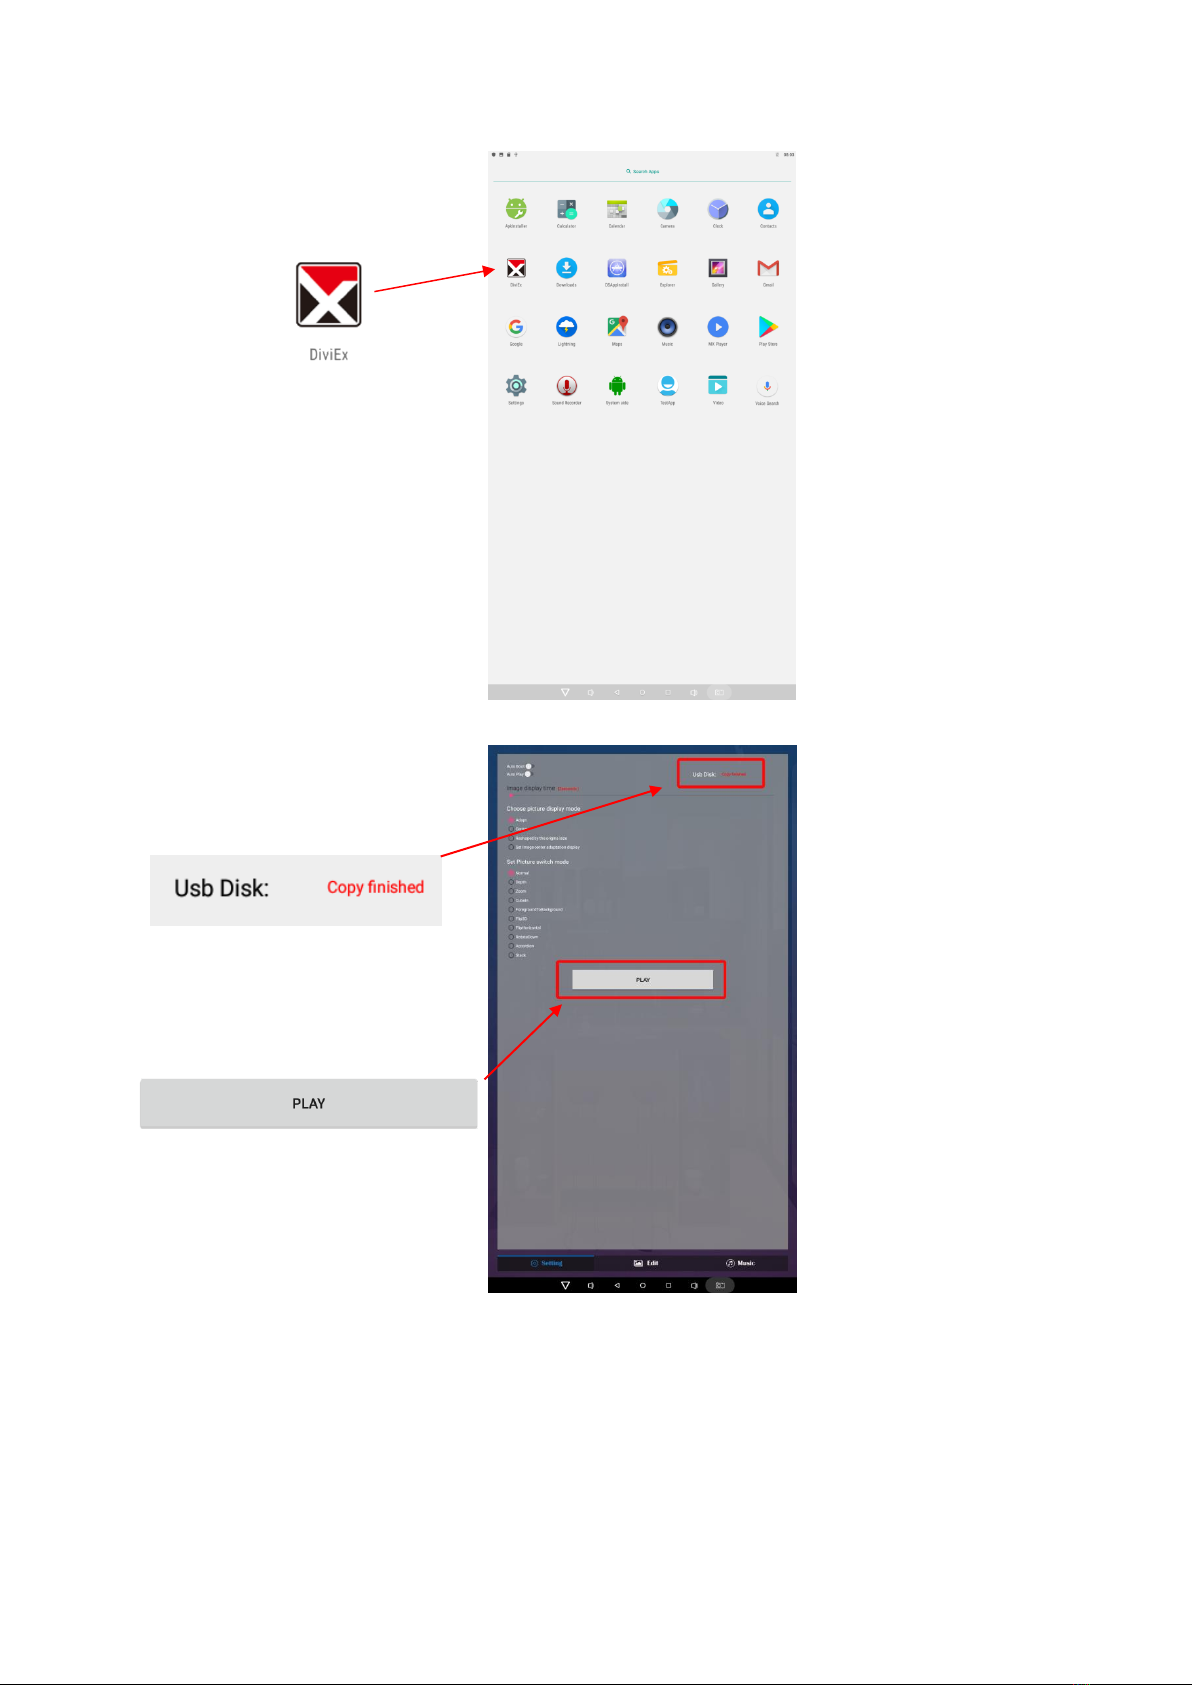
DiViEx APP Introduction
System requirements:
Step 1: Before using the APP, make sure your device meets or exceeds the following system requirements:
CPU
RK3288
RAM
16GB
Operating system
Android 7.1
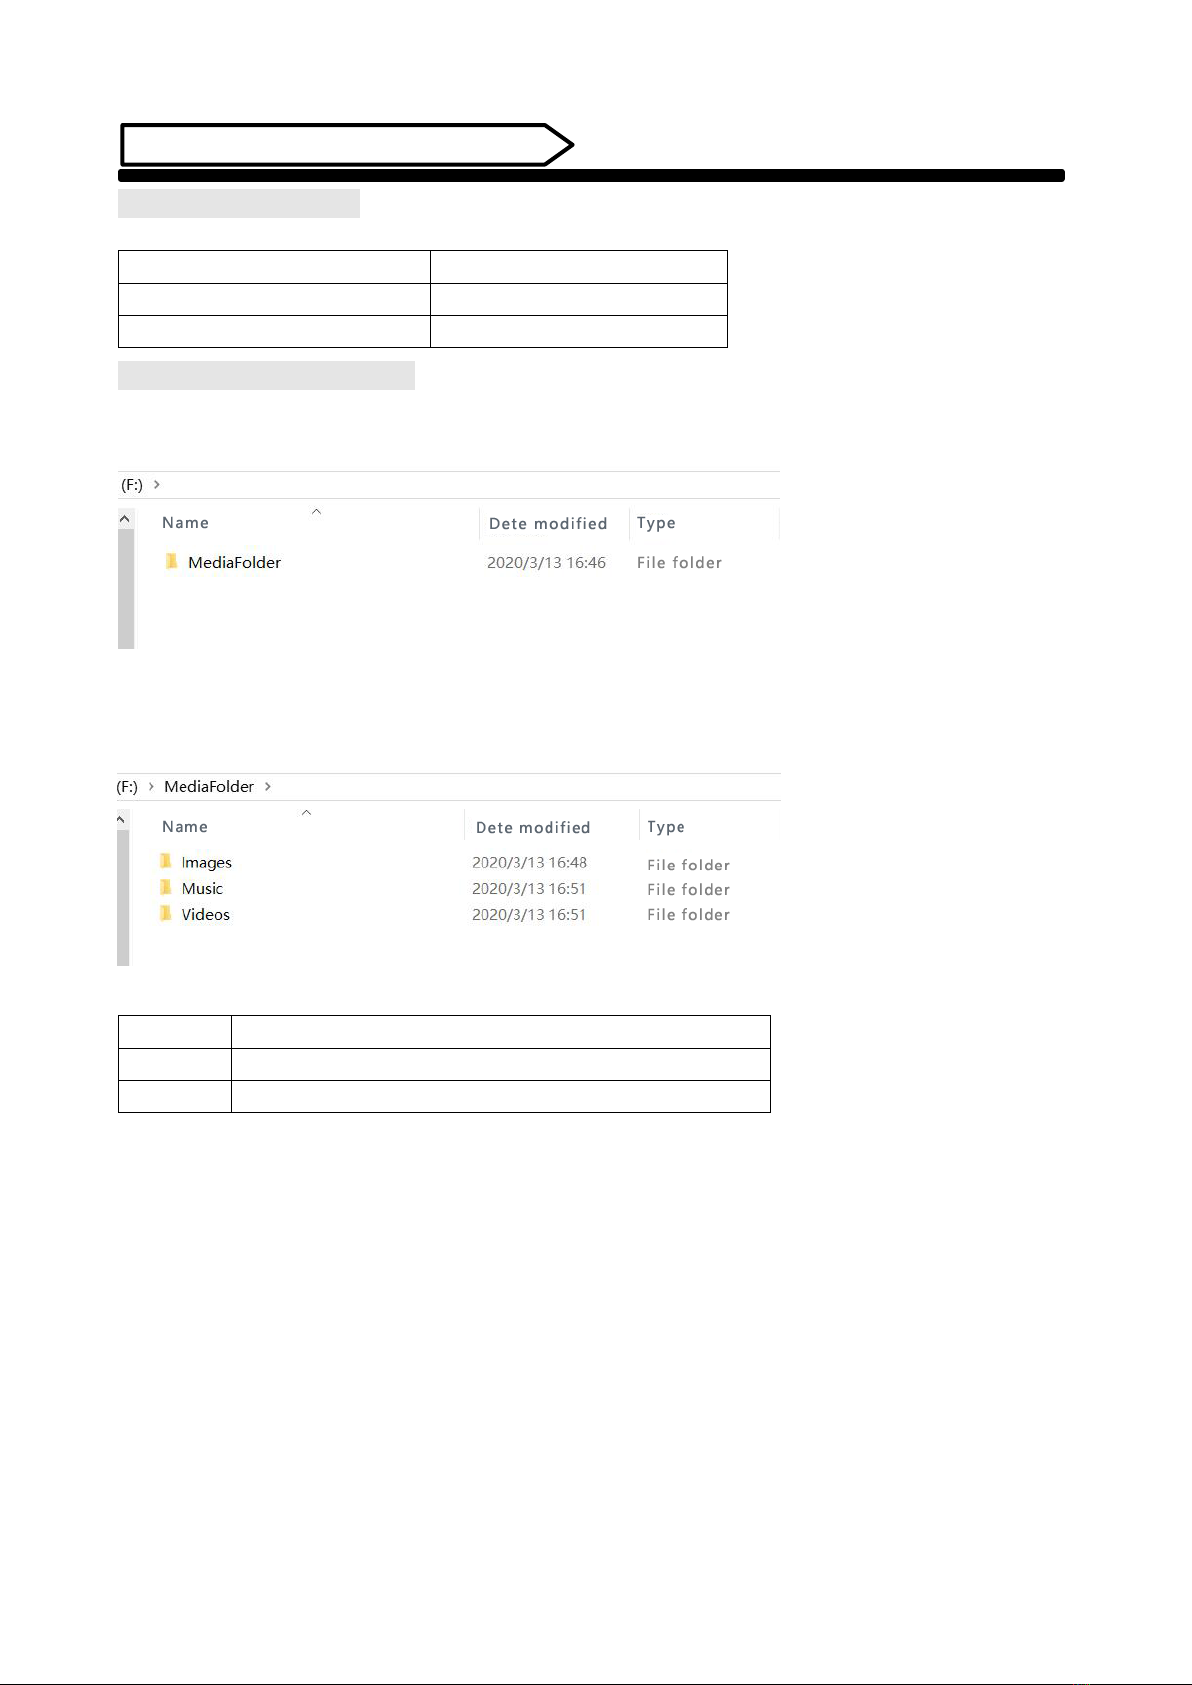
How to upload media files :
Step 2: Plug in your USB drive to the computer. Open the drive in Windows Explorer and create a new folder,
rename it “MediaFolder”. As shown below:
Open "MediaFolder", create 3 subfolders, and change their names to "Images", "Videos", "Music".
Copy the media files to be displayed in the slideshow and paste to the appropriate new folder "Images" or
"Videos". Copy and paste music files to "Music" folder.
Supported Media Format:
Image
JPG/JPEG/BMP/PNG
Video
MPEG1/MPEG2/MPEG4/H.264/H.265/WMV/MKV/TS/flv
Music
AAC/MP3/AMR/OGG/PCM
17
Medifor
Step 3: Plug the USB drive into the device and click the DiViEx APP.
Step 4: When the screen shows “Copy finished” after “Usb Disk:”, the media files are ready to be displayed.
18
Medifor
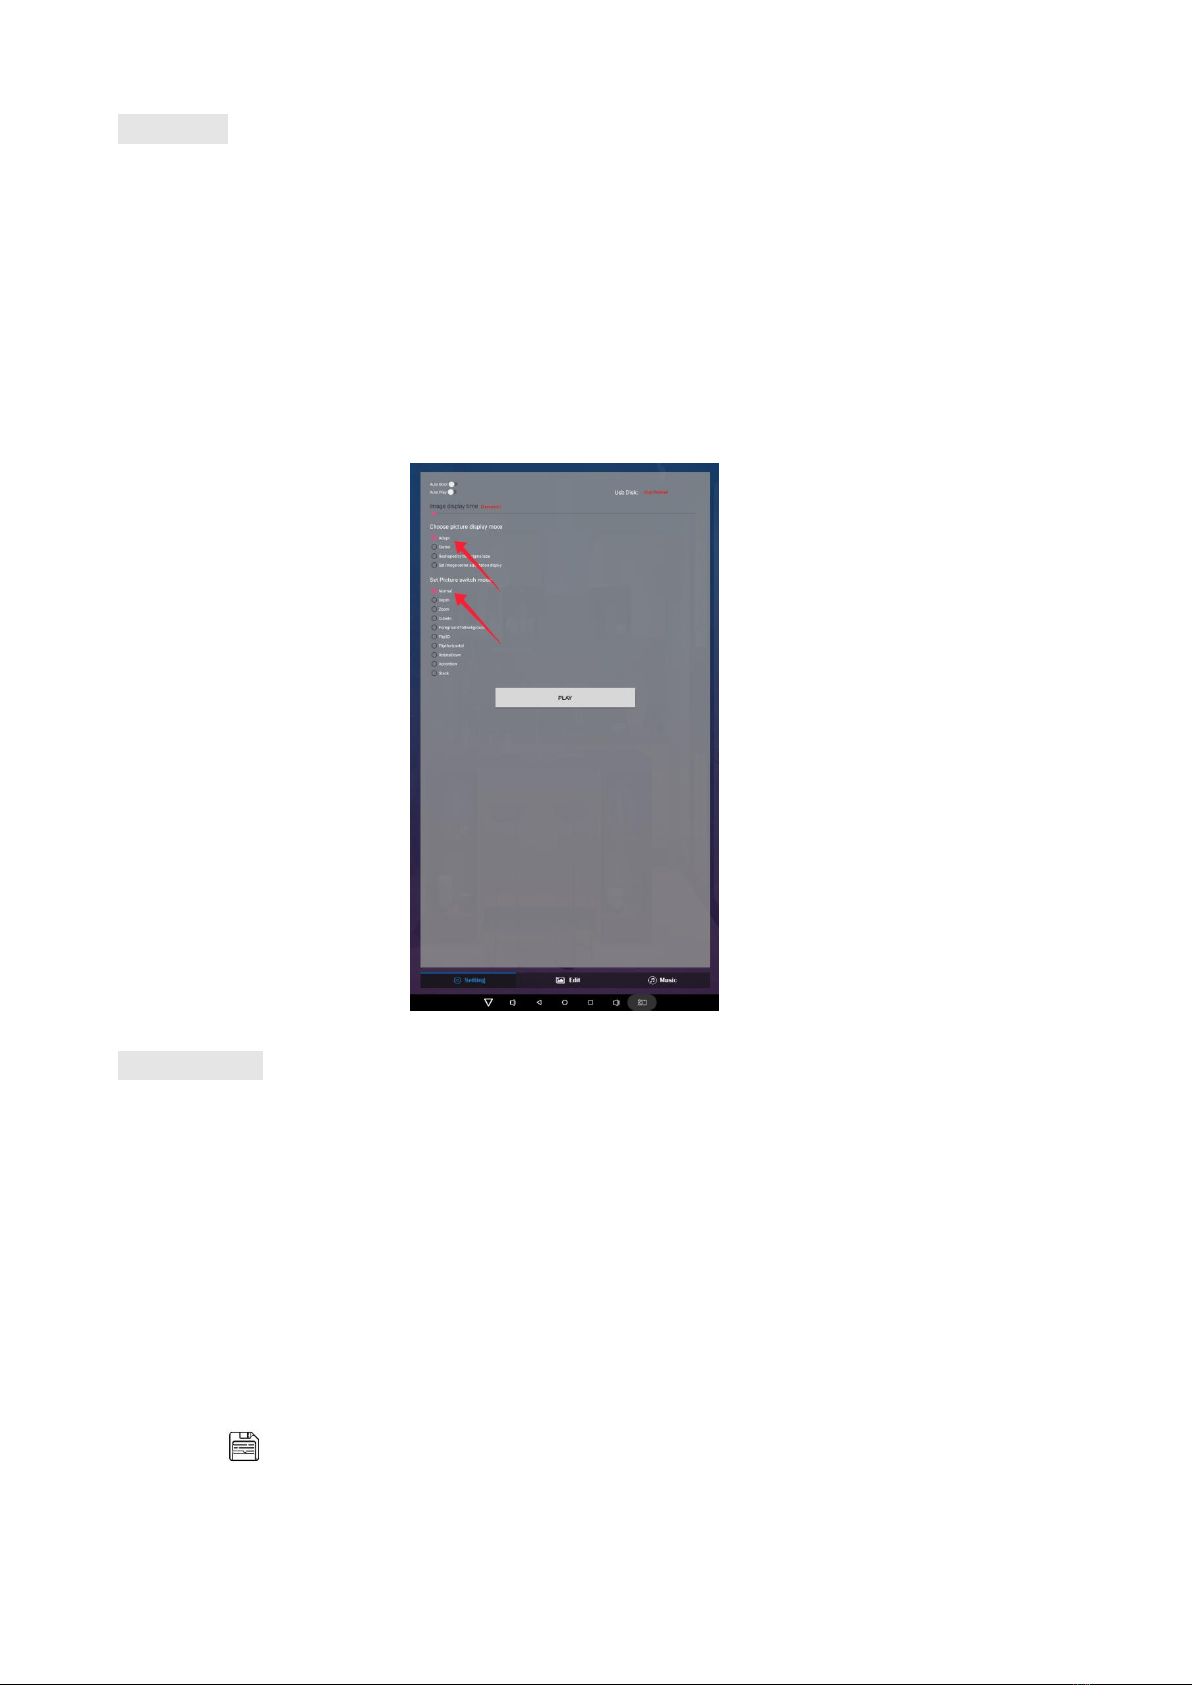
Settings:
1. Set the time each picture is to be shown on the screen by dragging the bar to the desired time.
2. Select how you would like the images to display. Select the desired transition effect between pictures:
⚫Auto Boot
DiViEX APP will automatic open when the digital signage is turned on.
⚫Auto Play
DiViEX APP will automatic play the slidshow when it is opened.
⚫Choose Picture display mode
Check a fit option how you want the pictures to be displayed.
⚫Set Picture switch mode
Choose an animation option to set the fade in and fade out effects.
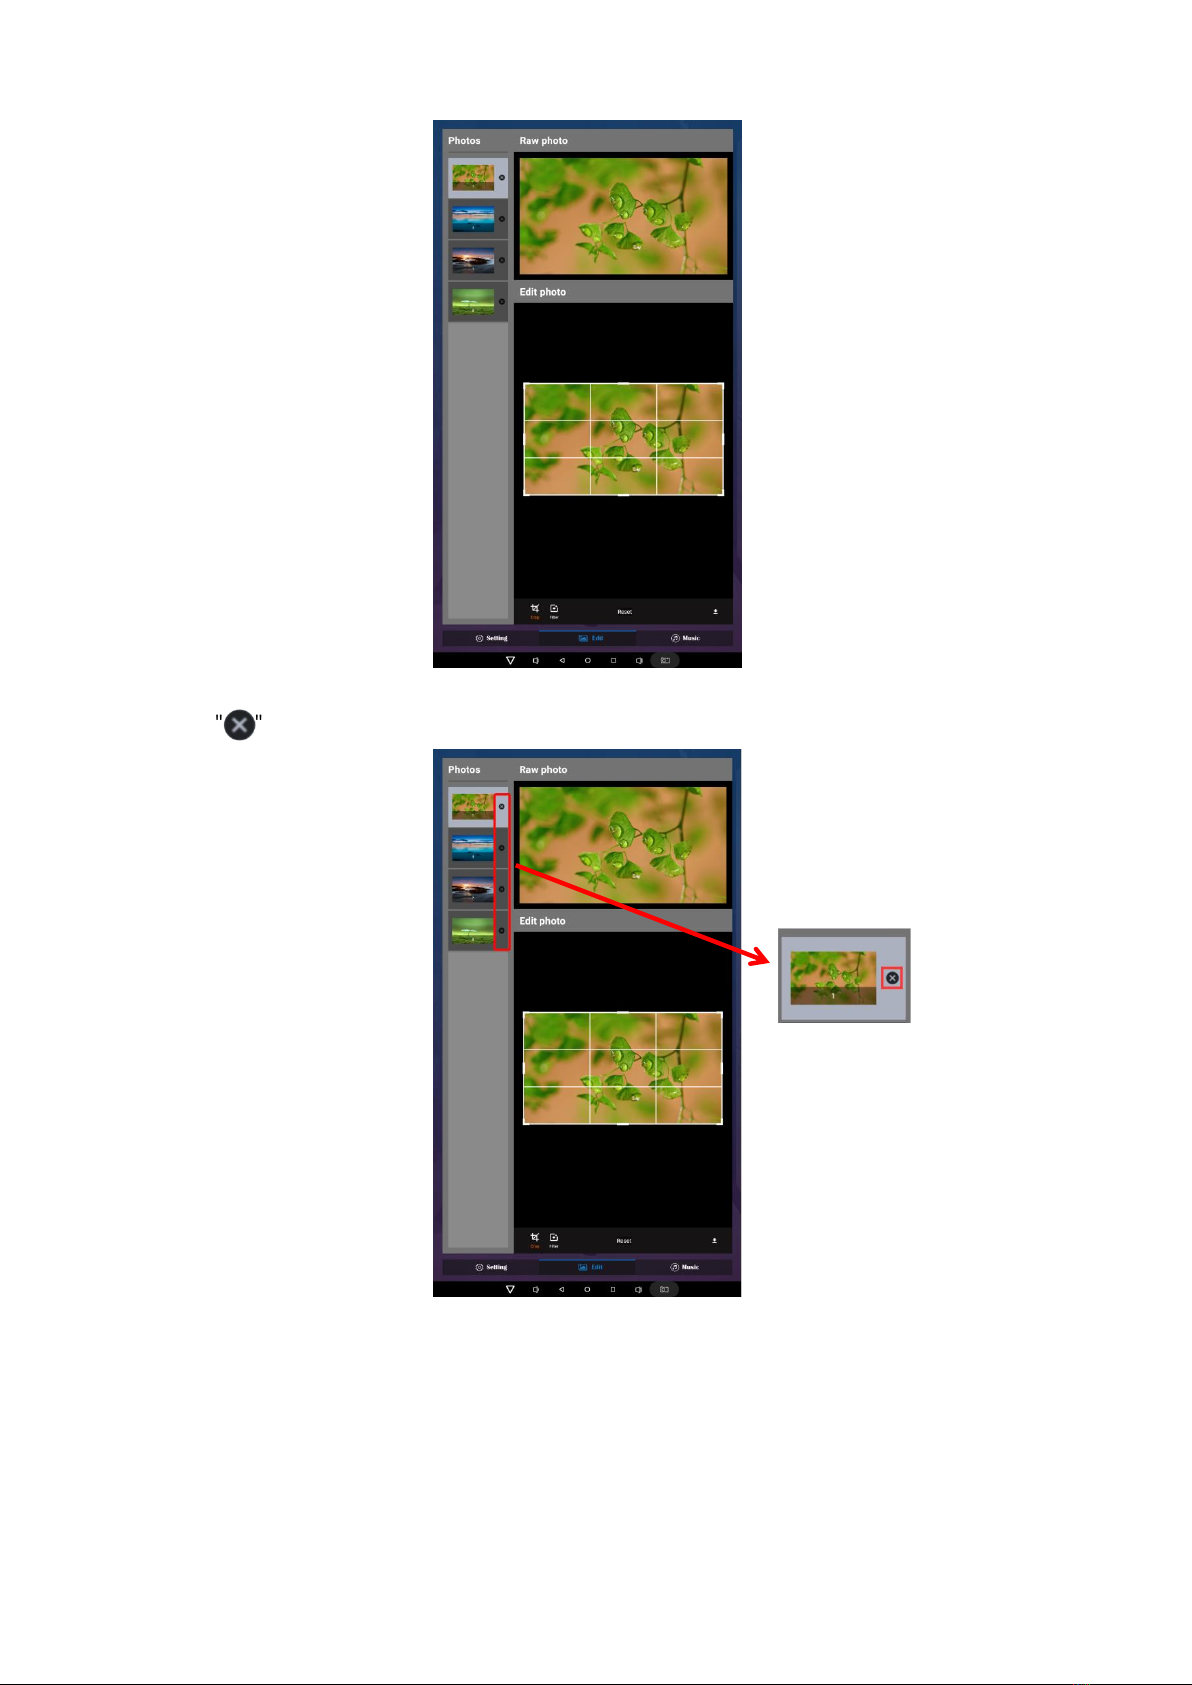
Edit picture:
This function shows all pictures, you can edit all pictures, and remove it.
⚫Crop
There are four corner handles and four border handles to crop the picture. Click and drag a handle to
reshape the image to any size you need.
⚫Filter
You can browse and try different filters in the filter gallery below the image. The APP support the
following filter: AUTO_FIX, BLACK_WHITE, BRIGHTNESS, CONTRAST, CROSS_PROCESS, DOCUMENTARY,
DUE_TONE, FILL_LIGHT, FISH_EYE, FLIP_HORIZONTAL, FILP_VERTICAL, GRAIN, GRAY_SCALE, LOMISH,
NEGATIVE, PSTERIZE, ROTATE, SATURATE, SEPIA, SHARPEN, TEMPERATURE, TINT, VIGNETTE.
⚫Reset
Click “Reset” to remove all the editing you applied to the image.
⚫Save “ ”
Click the icon to save the edited image as a new image.
19
Medifor
⚫Image deletion
Click " " to delete unwanted pictures
20
Medifor
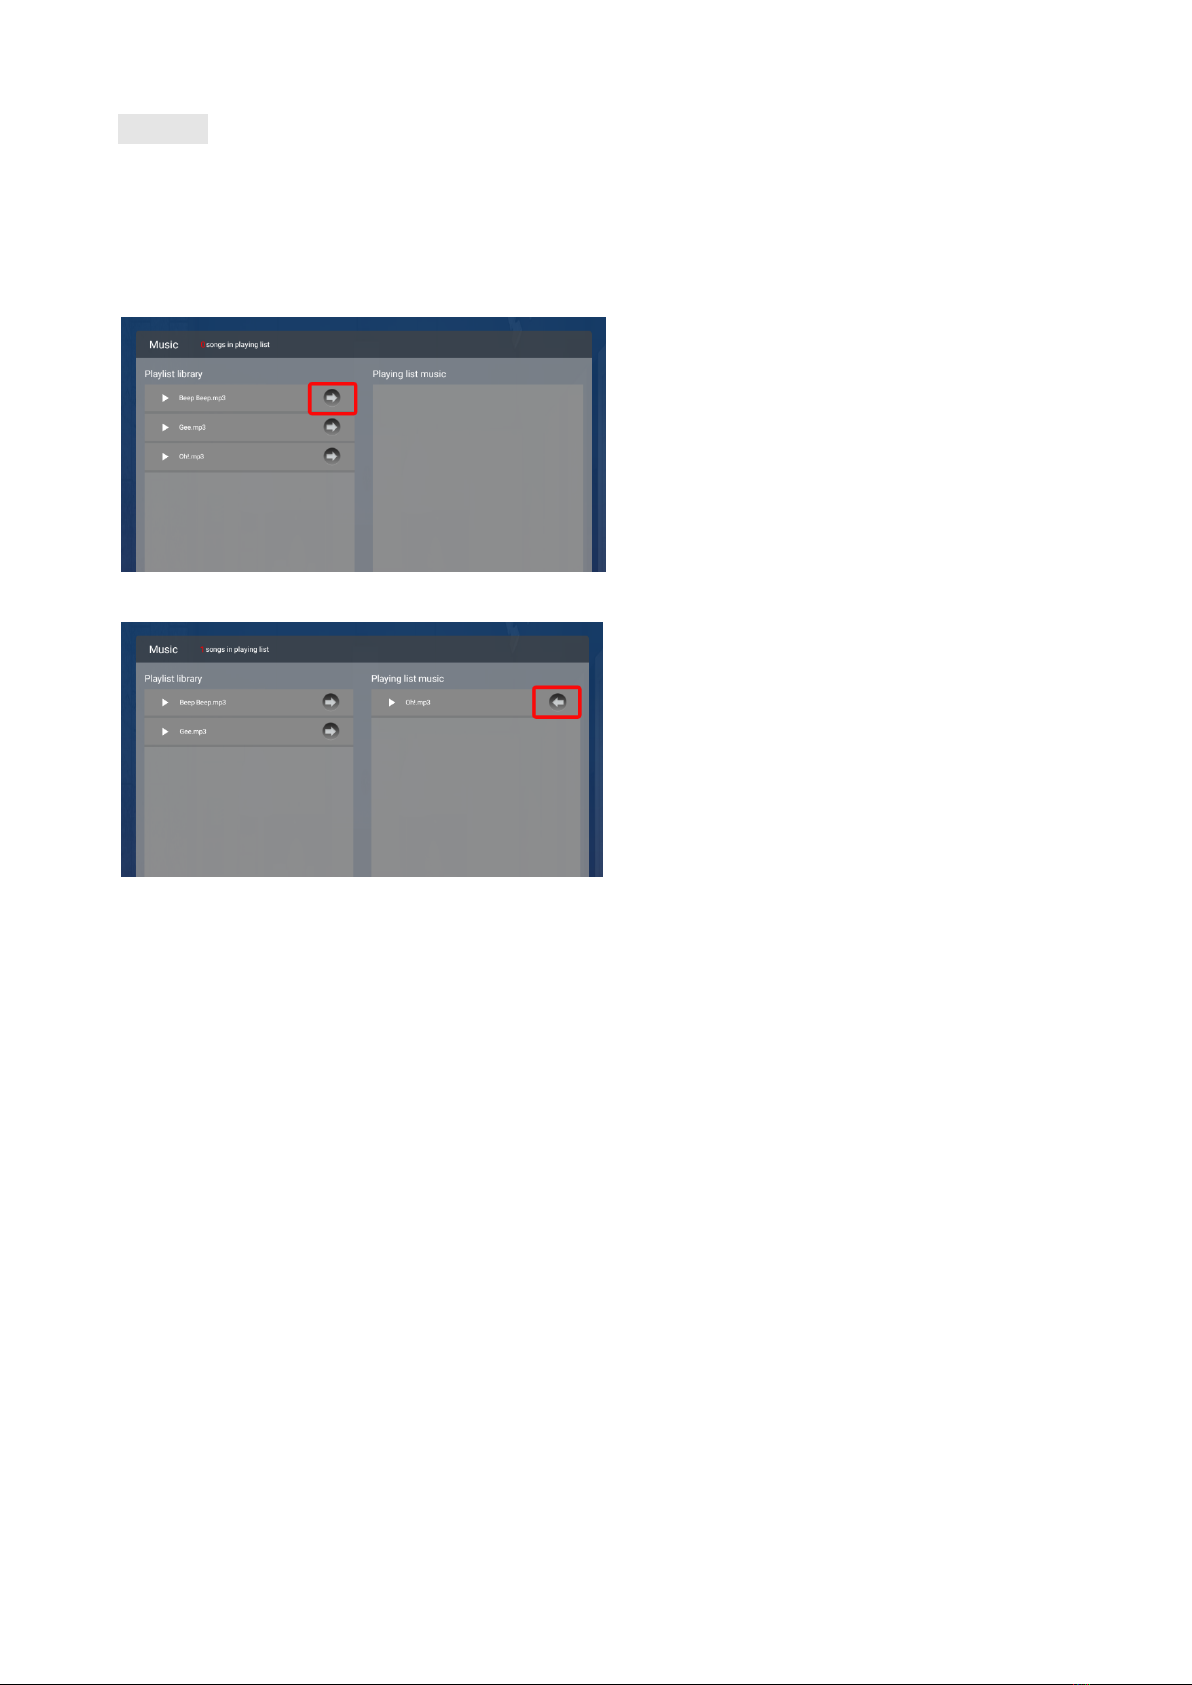
Music:
List all music files in the Playlist library
⚫Add music to “Playing List Music” (Background music) from “Playlist Library”.
Click “right arrow”, music title will show in the “Playlist Music” on the right.
⚫To remove background music from the playlist, click the left arrow in the playlist
This manual suits for next models
1
Table of contents
Popular Accessories manuals by other brands


ML
ML Knightsbridge HBLS Installation & maintenance manual

Solight
Solight PP120USBCW installation manual

Tumi
Tumi 114400 manual

Heat Controller
Heat Controller Flow Controllers Installation, operation & maintenance manual

American Standard
American Standard 7010 installation instructions

Etymotic Research
Etymotic Research ER-15 user guide


