Medion X89730 User manual

GAMING CHAIR
X89730
User Manual

Contents
3
Contents
About these operating instructions ............................................................... 5
Explanation of symbols ......................................................................................5
Proper use ....................................................................................................... 6
Safety information .......................................................................................... 7
Package contents ............................................................................................ 8
Device parts..................................................................................................... 9
Individual parts for armrest assembly ........................................................... 10
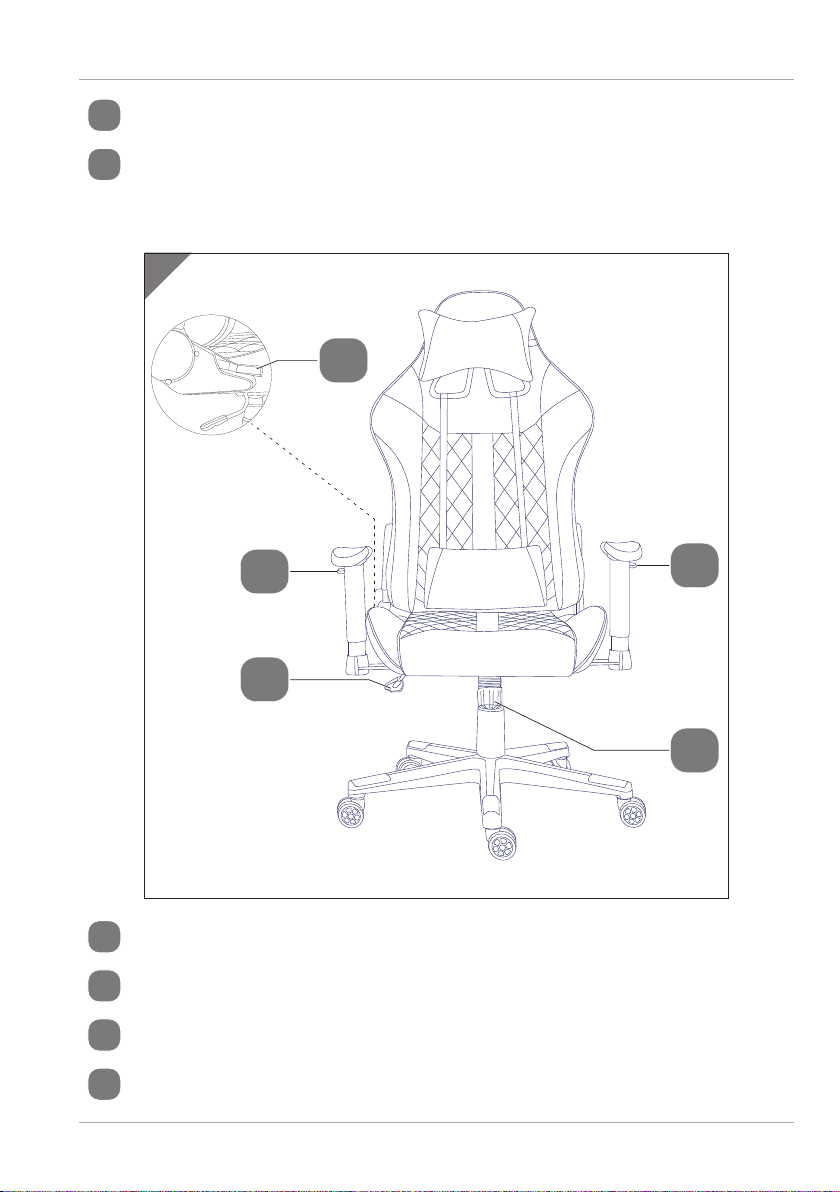
Device overview ................................................................................................. 11
Assembly ........................................................................................................ 12
Operation........................................................................................................ 17
Adjusting the armrest position ........................................................................17
Setting the backrest position........................................................................... 18
Tilting function (release/secure backrest)..................................................... 18
Setting tilt resistance ........................................................................................ 19
Adjusting the seat height ................................................................................ 19
Cleaning and care.......................................................................................... 20
Technical specifications................................................................................. 20
Disposal ......................................................................................................... 20
Service information....................................................................................... 20
Privacy statement .......................................................................................... 21
Legal notice ....................................................................................................22
Warranty Details .............................................................................................23
Repair and Refurbished Goods or Parts Notice............................................ 24

4

About these operating instructions
5
About these operating instructions
Thank you for choosing our product. We hope you enjoy using it.
Read the safety instructions carefully before using the device for the first
time. Note the warnings on the device and in the operating instructions.
Always keep the operating instructions close to hand. If you sell the device
or give it away, please ensure that you also pass on these operating instructions. They
are an essential component of the product.
Explanation of symbols
If a block of text is marked with one of the warning symbols listed below, the hazard
described in that text must be avoided to prevent the potential consequences
described there from occurring.
DANGER!
This signal word indicates a hazard with a high level of risk which, if not avoided, will
result in death or serious injury.
CAUTION!
This signal word indicates a hazard with a low level of risk which, if not avoided, could
result in minor or moderate injury.
This symbol gives you useful additional information on assembly or
operation.
Read the operating instructions and observe them.
• Check list/Provides information concerning an event that may occur
during use
− Instructions to follow
− Safety instructions to follow

Proper use
6
Proper use
The device is only intended for private use and not for industrial/
commercial use.
Please note that no liability will be accepted if the device is used
for an improper purpose:
• The chair is designed for a maximum total load of 120 kg.
• The castors are suited to hard flooring.
− For delicate hard flooring (e.g. cork, laminate, parquetry), use
a commercially available protective mat to prevent damage to
flooring.
− Do not modify the device without our consent.
− Only use replacement parts and accessories supplied or
approved by us.
− Take note of all the information in these operating instructions,
especially the safety information. Any other use is deemed
improper and may cause personal injury or damage to
property.

Safety information
7
Safety information
CAUTION!
Risk of injury!
Improper replacement of parts or work close to the seat height
adjustment mechanism could result in injury.
− Replacement of parts must only be performed by trained staff.
− Do not use the chair as a substitute for a ladder, as a climbing
aid, trestle or similar.
− Do not sit down on the armrests.
− Plastic and metal react to loads and the effects of temperature
by expanding and contracting. Check all screw connections
regularly and tighten them if necessary.
− Do not use the chair if screw connections have become loose or
parts of the chair are damaged or missing.
− Sit down on the seat in such a way that you can lean back
comfortably.
− Do not exert any additional force on the backrest.
− Never have more than one person sitting on the chair.
− Always seat yourself in the centre of the chair to avoid the risk
of tipping.
− Never subject the chair to a load of more than 120 kg.
− In the lying position, never place all your weight on the
backrest alone.
− Only position the chair on an even, non-sloping floor.

Package contents
8
Package contents
DANGER!
Choking and suffocation hazard!
Risk of choking and suffocation from swallowing or inhaling small
parts or plastic wrap.
− Do not store any of the packaging material used (bags,
polystyrene, etc.) within the reach of children.
− Do not allow children to play with the packaging material.
− Packaging material is not a toy!
− Take the product out of the packaging and dispose of all the packaging material.
− Please check your purchase to ensure that all items are included. If anything is
missing, please contact our Service Centre within 14 days of purchase.
− The gaming chair must be checked for damage before each use.
− If there is any damage, please contact our Service Centre.
The following items are supplied with your product:
• Gaming Chair
• Neck & Head Cushion
• Lumbar Support Cushion
• Assembly Tool & Screws
• Instruction Manual & Warranty Certificate

Device parts
9
Device parts
A
A C
D
F
G
J
K
L
M
BEH
I
12
34
2
1N
ABackrest
BBackrest hinges
CSeat
DLumbar support cushion
ESide covers
FNeck & head cushion
GArmrests (not pre-assembled)

Device parts
10
HCross base
ICastors
JTilting mechanism
KGas lift strut
LTelescopic cover
MAllen key
NFastening screws
Individual parts for armrest assembly
B
OPQ R
S T U
OArmrest pads
PArmrest posts
QCovers
RMounting plates
SCheese head screws

Device parts
11
TRound-head screws
UWashers
Device overview
C
3
1
2
1
4
1Button for adjustment of armrest height
2Resistance adjustment
3Lever for adjustment of seat height and tilting function
4Lever for backrest adjustment

Assembly
12
Assembly
We recommend that you ask another person to help you assemble the
chair.
First screw in the screws manually and then tighten them using the tool
supplied.
Insert the 5 castors Ias far
as they will go into the castor
sockets on the underside of the
cross base (see Fig. 1).
Push the gas lift strut Kinto the
centre of the cross base H.
Slide the telescopic cover L
over the gas lift strut.
1
L
K
H
I

Assembly
13
Both the armrests G
must first be assembled
as described below and in
Fig.2 before being mounted
on the gaming chair:
− Place the armrest pad
Otop down on a
stable, even surface.
− Place the armrest post
on the armrest pad
Pwith the height
adjustment button 1
pointing outwards, also
observing the marking
on the front of the
armrest pad.
2
S
U
R
T
O
Q
P
1
Front marking
− Arrange both the device parts O/Pso that the screw holes are aligned
exactly over each other.
− Fasten the armrest post to the armrest pad with 2 round-head screws T.
− Place the cover Qon the armrest post. Move the cover into the correct position
so that the centre of the opening for the mounting plate Rpoints towards the
inside of the armrest.
− Insert the mounting plate into the opening on the cover as shown in Fig.2 and
fasten it to the post of the armrest with 2 washers Uand 2 cheese head screws
each S.

Assembly
14
− Loosen and remove the 8
pre-assembled screws on the
underside of the seat C.
− Using the Allen key, Mfasten
the left and the right armrest
Gto the seat with 2 each of
the previously removed screws
(see Fig.3).
− Attach the tilting mechanism
Jto the underside of the seat
with the opening for the gas
lift strut pointing towards the
backrest A.
3
C
M
G
J
G
− First screw the 4 screws previously removed half-way into the pre-drilled slots.
− Push the seat as far back as possible within the mounting tracks of the tilting
mechanism to increase the stability of the gaming chair.
− Now screw the 4 screws all the way into the slots to fasten the tilting mechanism
onto the seat. (see Fig.3).
− Loosen and remove the pre-
assembled screws for the
backrest hinges B(2 screws
each per side).
− Using the Allen key M, fasten
the right B1 and the left B2
backrest hinge to the seat C
with the screws previously
removed (see Fig.4).
− Put the seat with the opening
for the gas lift strut on the gas
lift strut Kalready fastened
onto the cross base H.
4
B1
B2
M
C
H
K

Assembly
15
− Loosen and remove the pre-
assembled screws on both
sides of the backrest A(2
screws each per side).
− To fasten the backrest
hinges B1 /B2 onto the
backrest, first screw only the
upper screw half-way into
the corresponding drill hole.
− Now tighten all 4 screws
using the Allen key M
(see Fig.5).
5
AA
B2
B1
− Fasten the lower side covers
E3 /E4 onto the backrest
hinges Bon both sides
using the supplied screws
Nand the Allen key M
(see Fig.6).
6
M
N
E3
E4

Assembly
16
− Fasten the upper side
covers E1 /E2 onto
the backrest hinges B
on both sides using the
supplied screws N
and the Allen key M
(see Fig.7).
7
E2
E1
N
M
− Fasten the neck & head
cushion Fand the
lumbar support cushion
Donto the gaming
chair using the fixing
strap attached to the
cushions, as shown in
Fig.8.
8
button up
F
D

Operation
17
Assembly is now complete. Your
new gaming chair is ready for use
(see Fig.9).
9
Operation
Adjusting the armrest position
− Press the button for height
adjustment 1on the respective
armrest Gand move the
armrest into the desired position
(see Fig. 10).
− Release the height adjustment
button as soon as you have reached
the desired position.
− Rotate each armrest pad Oto
the right or left in order to set the
desired armrest angle.
10
G
1
O

Operation
18
Setting the backrest position
CAUTION!
Risk of injury!
When the backrest is under full load in the lying position, the chair
can become unstable and tip over.
− Never put your whole weight on the backrest when in the lying
position.
− Pull the lever for backrest
adjustment 4upwards and
move the backrest into the desired
position (see Fig.11).
− Release the lever for backrest
adjustment as soon as you have
reached the desired position.
11
Tilting function (release/secure backrest)
− Pull the lever on the tilting
mechanism 3outwards, away
from the mechanism, to release the
backrest (see Fig.12).
− Push the lever inwards, towards the
mechanism, to secure the backrest.
12

Operation
19
Setting tilt resistance
− Turn the resistance adjustment
2anticlockwise to increase
the tilt resistance of the backrest
(see Fig.13).
− Turn the resistance adjuster
clockwise to reduce the tilt
resistance of the backrest.
13
Adjusting the seat height
− Pull the lever on the tilting
mechanism 3upwards and
move the seat to the desired height
(see Fig.14).
− Release the lever as soon as you
have reached the desired position.
14

Cleaning and care
20
Cleaning and care
− Remove dust and dirt with a soft, dry or slightly damp cloth. Never under any
circumstances use abrasive cleaning agents containing solvents or hard cleaning
brushes. For very stubborn dirt, use mild detergent if necessary.
− Remove carpet fluff from the castors regularly.
Technical specifications
Weight: approx. 16.8 kg
Max. load in use: 120 kg
Seat height: approx. 45.5–55 cm
(measured from the centre of the seat)
Disposal
PACKAGING
The product has been packaged to protect it from damage in transit. The
packaging is made of materials that can be recycled in an environmentally
friendly manner.
GAMING CHAIR
Dispose of the gaming chair in accordance with your local regulations. Please contact
your local council or waste disposal company for further information.
Service information
Please contact our Customer Service team if your device ever stops working the way
you want or expect it to. There are several ways for you to contact us:
• In our Service-Community, you can meet other users, as well as our staff, and
you can exchange your experiences and pass on your knowledge there.
You can find our Service Community at community.medion.com.
• Alternatively, use our contact form at www.medion.com/contact.
• You can also contact our Service team via our hotline or by post.
Opening times Hotline number
Mon – Fri:
08:30AM to 06:00PM EST
1300 884 987

Privacy statement
21
Service address
MEDION Australia Pty Ltd.
Chatswood, NSW 2067
Australia
You can download this and many other sets of operating
instructions from our service portal at www.medionservice.com.
You can also scan the QR code on the side of the screen to download
the operating instructions onto your mobile device from the service
portal.
Privacy statement
Dear customer,
We wish to inform you that we, MEDION AG, Am Zehnthof 77, D-45307 Essen, Germany
process your personal data as a data controller.
For matters regarding data protection, we are supported by our company data
protection officer who can be contacted at MEDION AG, Datenschutz, Am Zehnthof 77,
warranty processing and associated processes (e.g. repairs) and therefore rely on
processing your data for the sales contract concluded with us.
Your data will be provided to repairers contracted to us for the purpose of warranty
processing and associated processes. We generally store your personal data for a
period of three years in order to fulfil your legal warranty rights.
You have the right to be informed of the personal data concerned as well as the right
to rectification, deletion, restriction of processing, the right to object to processing, as
well as the right to data portability.
In case of access and cancellation rights, restrictions apply according to S 34 and S
35 of BDSG (Federal Data Protection Act) (Art. 23 GDPR). In addition, there is a right
of appeal to a competent data protection supervisory authority (Article 77 GDPR in
conjunction with S 19 BDSG). The state official for data protection and freedom of
information for MEDION AG is Nordrhein Westfalen, PO box 200444, 40212 Düsseldorf,
Germany, www.ldi.nrw.de.
The processing of your data is necessary for warranty processing: it is not possible to
process the warranty without the provision of the required data.
Table of contents
Other Medion Indoor Furnishing manuals
Popular Indoor Furnishing manuals by other brands

Costway
Costway JZ10035 user manual

PATIOJOY
PATIOJOY HW63883 manual

IKEA
IKEA ASPELUND BEDSIDE TABLE 14X14" instructions

Happy Garden
Happy Garden HELMI FAU40 manual

Furniture of America
Furniture of America CM7164C Assembly instructions

Sourcing Solutions
Sourcing Solutions RiverRidge Ellsworth 06-134 Assembly instructions

CABINETS TO GO
CABINETS TO GO Findley & Myers SBA36 Assembly instructions

HULALA HOME
HULALA HOME NSBSD0549 quick start guide

Kvik
Kvik DSH2812 Assembly manual

Wholesale Interiors
Wholesale Interiors BBT 5246B Assembly instructions

Furniture of America
Furniture of America CM7427EK Assembly instructions

TEMPLE & WEBSTER
TEMPLE & WEBSTER SBMETVWH Assembly instructions