Medivators VERISCAN LT User manual

User Manual
Automated Endoscope
Leak Tester
REPROCESSING SYSTEMS
LT

Veriscan®is a registered trademark of Minntech Corporation.
Fujinon®is a registered trademark of Fujinon Corporation.
OLYMPUS®is a registered trademark of Olympus Corporation.
PENTAX®is a registered trademark of Pentax Precision Instrument Corporation.
Storz®is a registered trademark of Karl Stroz.
50096-988 Rev A
© 2009, MINNTECH CORPORATION
All rights reserved. This publication is protected by copyright. Copying, disclosure to
others, or the use of this publication is prohibited without the expresswritten consent
of Minntech Corporation.
Minntech reserves the right to make changes in the specications shown herein
without notice or obligation. Contact your Medivators representative or Medivators
customer service for more information.

USERS MANUAL | 3
Table of Contents
Introduction ................................................................... 5
Using this Manual ....................................................... 5
Product Description .................................................... 5
Product Specications ............................................... 6
Safety ..............................................................................7
Intended Use .............................................................. 7
Electrical Compliance ................................................. 7
Operator Safety ......................................................... 7
General Cautions ....................................................... 7
Guidelines .................................................................. 8
Cleaning and Disinfection ..................................... 8
System Components..................................................... 9
System Features.......................................................... 10
System Setup............................................................... 11
Performing a Leak Test ................................................14
Performing a Screening test ...................................... 17
Testing a Failed Endoscope ....................................... 19
Daily Quality Assurance Test ..................................... 21
Data Access and Management....................................22
Main Menu ............................................................... 22
Printing and Quick Reports ...................................... 26
ProV-LT Data Management Software ...................... 28
Maintenance, Handling and Care............................... 30
Troubleshooting .......................................................... 33
Warranty ....................................................................... 34


USERS MANUAL | 5
Introduction
Using this manual
This manual describes the features of the Medivators Veriscan LT Automated Endoscope Leak Tester, including
system, setup, operation, safety, maintenance and troubleshooting procedures. It is important to follow the provided
instructions to keep the device in proper operating condition, to ensure accurate endoscope leak testing, and to
ensure long product life.
This is not a service manual and does not provide detailed instructions for service beyond general maintenance,
handling and care. Contact the manufacturer’s service representative if you have any questions regarding this
product, its use or operation.
Product Description
Flexible endoscopes are highly vulnerable to damage-causing moisture that enters the endoscope’s sensitive
interior through holes, tears, broken seals, cleaning cap leaks and loose contact pins. Prior to Veriscan LT, leak
detection has always been hampered by testing equipment that lacked precision, and required extraordinary skills
of observation beyond the capabilities of even the most experienced cleaning technician. As a result, undetected
leaks allow moisture to enter the endoscope’s interior through no fault of the technician. These leaks invariably
result in extensive endoscope damage, expensive endoscope repairs, and raise the risk of cross-patient infection
due to pathogens passing into subsequent patients through undetected leaks and moisture invasion.
The Veriscan’s automated endoscope leak testing technology transforms leak testing from a frustrating guessing
game into a simple, highly accurate, repeatable process that can be quickly mastered by cleaning technicians
and nurses. Veriscan’s innovative dry leak testing method accurately detects damage-causing endoscope leaks
without the need of immersing an endoscope in water. The endoscope is dry-leak tested through a process of
pressurizing the endoscope, monitoring the internal pressure level, and identifying if an endoscope leak exists
through a loss of pressure. An endoscope does not have to be placed in a uid-bath and visually observed for air
bubble leaks; the Veriscan’s visual display and printout automatically identify if an endoscope leak is detected.
Carefully review the User Manual to familiarize yourself with Veriscan’s features, operation and testing procedures.
We are condent the Veriscan system will quickly become an invaluable tool for enhancing reprocessing room
efciency, reducing endoscope damage and repair expense due to undetected leaks, and reduce the potential risk
of cross-patient infection.

6| USERS MANUAL
Product Specications
Power Requirement: Universal Power Supply 100-240VAC, 50/60 Hz, .25 Ampere
Fuse Rating: 250V, 1 Ampere, Type S, 3AG style.
Dimensions: 13.125 H x 8.25 W x 19.25 L inches
(33.3 H x 21 W x 48.9 L cm)
Weight: 15.8 lbs. (7.18 kg)
PSI range: 3.500 - 3.999 PSI (comparable to current manual leak testers)
Display: Liquid Crystal Display (LCD) with LED backlight
ProV-LT Data Management
Connectivity Ports: USB communications port
Operating Temperature Range: +10°C (50°F) to + 40°C (104°F)
Storage Temperature Range: +20°C (68°F) to +45°C (113°F)
Humidity: 20% to 80% non-condensing
Electrical Safety Certications: UL Standard 61010-1
CAN/CSA Standard 61010-1
Environmental Rating: Standard
Designed for Use: Indoor Use Only
Warranty Period: One (1) Year

USERS MANUAL | 7
Safety
Intended Use
The Medivators Veriscan system is intended for endoscope leak testing of exible, immersible endoscopes. The
Medivators Veriscan system has been validated by Medivators for use on Olympus, Pentax, Fujinon, and Storz
exible, immersible endoscopes.
Electrical Compliance
The Medivators Veriscan system was tested to stringent electrical certications and safety standards. This device
complies to UL Standard 61010-1 and CAN/CSA Standard 61010-1.
NOTE: This device must always be plugged into an electrical wall outlet that includes an approved Ground
Fault Interrupter (GFI) prior to operation.
Operator Safety
1) Veriscan is to be operated solely by properly trained and qualied personnel, and only used for its intended use.
2) WARNING: To avoid biological contamination and chemical burns, always wear appropriate personal protective
equipment (PPE) including clothing, gloves, and safety glasses when handling used endoscopes.
General Cautions
1) Veriscan users should be properly trained and instructed on the current procedures used to inspect, prepare,
clean, disinfect, rinse, dry, and store endoscopes. Follow recommended standards as referred by ASTM,
ASGE, SGNA and APIC.
2) The Veriscan system is intended to be used in conjunction with the instructions and labeling provided by the
endoscope manufacturer.
3) This is a dry leak test only - Do not place endoscope in water while testing.
4) Veriscan’s leak test parameter settings are pre-set at the factory for highly accurate endoscope leak test
measurements. Parameter settings should not be changed or adjusted, unless specically recommended by
Medivators. Parameter changes should only be performed by trained and qualied personnel.
5) The Veriscan system must be grounded in accordance with applicable electrical and safety regulations.
6) Read all precaution labels on the device before using.
7) Never use the device in a manner not specied or intended by the manufacturer.
8) The Veriscan system uses coin lithium batteries in the internal electronics for retaining memory settings. The
coin lithium batteries contain perchlorate material and if replaced, special handling may apply.
9) The Veriscan’s Quick Connect Tubings are not autoclavable and can only be decontaminated using low
temperature decontamination methods.
10) Inspect Quick Connect Tubings often and replace if damaged or worn.
11) Lubricate Quick Connect Tubing O-ring weekly with silicon oil to ensure a secure connection.
12) Monitor the condition of the desiccant drying crystals on a regular monthly basis. Replace as needed as
determined by comparing the crystals to the Drying Crystals Color Comparison Chart.
13) Monitor the condition of the coalescent lter for oil and particulates on a regular monthly basis. Replace once
yearly, or more if needed.
For service or service-related questions, contact Medivators Technical Support at 1.800.444.4729 or your
authorized Medivators distributor.

8| USERS MANUAL
Guidelines
Endoscope Leak Testing and Pre-cleaning
An effective endoscope leak test and pre-cleaning process is an essential step in the reprocessing of an
endoscope. Always follow the endoscope manufacturer’s instructions and established professional guidelines to
properly leak test and clean an endoscope. If an endoscope leak is detected, the endoscope should be immediately
taken out of service and sent in for repair.
Endoscopes should always be dry leak tested before submersion in uid to prevent additional uid invasion and
internal endoscope contamination. Leak testing detects endoscope leaks within the interior and exterior of an
endoscope.
Cleaning and Disinfection
Professional Guidelines
The following organizations have published recommended guidelines for cleaning and disinfecting endoscopes.
Society of Gastroenterology
Nurses and Associates, Inc.
401 North Michigan Ave.
Chicago, Ill. 60611-4267 USA
Tel: 800.245.7462
Fax: 312.527.6658
www.sgna.org
Association of Professionals in Infection
Control and Epidemiology, Inc.
1275 K. Street NW, Suite 1000
Washington, DC 20005-4006 USA
Tel: 202.789.1890
Fax: 202.789.1899
www.apic.org
American Society for Gastrointestinal Endoscopy
1520 Kensington Rd. Suite 202
Oak Brook, Ill. 60523-2141 USA
Tel: 630.573.0600
Fax: 630.573.0691
www.asge.org
American Society for Testing and Materials
100 Barr Harbor Drive
West Conshohocken, PA 19428-2959 USA
Tel: 610.832.9585
Fax: 610.832.9555
www.astm.org
Association of periOperative Registered Nurses, Inc.
2170 S. Parker Rd., Suite 300
Denver, CO 80231-5711 USA
Tel: 800.755.2676
Fax: 303.750.3462
www.aorn.org
Canadian Society of Gastroenterology
Nurses and Associates
27 Nicholson Dr.
Lakeside, NS B3T 1B3 Canada
Fax: 902.473.4406
www.csgna.com
British Society of Gastroenterology
3 St. Andrews Place
Regents Park, London, NW1 4LB England
Tel: +44.020.7387.3534
ww.bsg.org.uk
Societe Francaise d’Hygiene Hospialiere S.F.H.H.
Hopital de la Croix-Rousse
Unite h’Hygiene Hospitaliere-Epidemiologie
93 Grande Rue de la Croix-Rousse
69317 Lyon Cdx04 France
Tel: 04.72.07.19.83
Fax: 0.4.72.07.19.85
www.sfhh.net

USERS MANUAL | 9
System Components
If any of the components are missing, contact Medivators
Customer Support at 1-800-444-4729
or your authorized distributor.
Veriscan Box
This box contains the following components:
• One (1) Veriscan-LT System
• One (1) Power cord
• One (1) Crystal desiccant bag
• One (1) Silicon Oil
• One (1) ProV-LT Link Database Software
• One (1) Quick Start Guide
• One (1) Veriscan Users Manual
Installation Kit (endoscope specic)
This box contains the following components:
• One (1) Quick connect tubing
• Five (5) printer paper rolls
• One (1) Crystal desiccant bag
• One (1) USB cable

10 | USERS MANUAL
System Features
1. Display Screen
Displays information and test results
2. Control Keypad
Touchpad used to operate Veriscan System
3. Printer
Provides printout of test results
4. Quick Connect Port
Veriscan connector for Quick Connect Tubing
to endoscope
5. Power Switch
Used to turn Veriscan system ON/OFF
6. Power Cord Outlet
Receptacle for AC power cord
7. Power Cord
Provides electrical connection for Veriscan to
AC wall outlet
8. RS232 Port
Not currently used
9. USB Port
Port to connect Veriscan to separate computer
via USB cable
10. Drying Crystals Bulb
Receptacle for desiccant crystals
11. Metal Bulb Receptacle
Removable metal receptacle for securing
drying crystals bulb
12. Receptacle Release Button
Button to release metal bulb receptacle to
provide access to drying crystals bulb
13. Bulb Housing Structure
Housing for securing and linking drying
crystals bulb and metal bulb receptacle to
the device
14. Coalescent Filter Housing
Housing for securing and linking the oil and
particle lter to the device
15. Coalescent Filter
Oil and particle lter removes foreign
substances from air that enters and exits the
endoscope during testing
LT
4
5
2
3
1
69
8
7

USERS MANUAL | 11
System Setup
Installation
• Position Veriscan system on a at, level surface and within six (6) feet/
two (2) meters of the electrical AC wall outlet.
• Veriscan’s electrical requirements can be found under the “Introduction,
Product Specications” section.
Attaching the Power Cord
• WARNING: Exercise caution when plugging in this electrical
device. Risk of electric shock.
• Connect power cord to power cord outlet located on rear of unit. Gently
push cord in until fully inserted. (see gure 1)
• Plug the other end of the power cord into a standard AC wall outlet.
• NOTE: This device must always be plugged into an electrical wall
outlet that includes an approved Ground Fault Interrupter (GFI)
prior to operation.
Powering the Veriscan System “ON”
• Press the power switch located on the back of the unit to turn system
power ‘on’. (see gure 2)
• When Veriscan is turned on, it will automatically perform an initialization
process which includes a series of diagnostic self-tests. When this
process is complete, the display will indicate that the unit is ready for
testing as displayed below:
mm/dd/yy hh:mm
Connect Scope
Press “Start”
Setting the Time and Date
The Veriscan’s internal clock will record the time of all leak test
procedures. To set the clock:
• Press the MENU button on the display keyboard
• Press the arrow down key until Set Date/Time selection is reached
• Press the CONTINUE key to select the Set Date/Time option
• To enter the month, press CONTINUE and then enter the correct month
in the “month = “ area: 1 = January, 2 = February, etc.. If an incorrect
entry is made, press CANCEL to start the process over. Press
CONTINUE when nished.
• To enter the date, press the down arrow key from the “month” row until
the “date” row is reached. Press CONTINUE to reach the date set
area. Enter the date. For single digit numbers, it is not necessary to
enter a “0” before the number (e.g. enter 3 for the 3rd). Press
CONTINUE when nished.
• To enter the year, press the down arrow key from the “date” row until
the “year” row is reached. Press CONTINUE to reach the year set
area. Enter the year as a single digit where 6 = 2006, 70 = 2007, etc.
Press CONTINUE when nished.
Figure 1
Figure 2
Figure 3

12 | USERS MANUAL
• To enter the hour, press the down arrow key from the “year” row until
the “hour” row is reached. Press CONTINUE to reach the hour set
area. Using the 24 hour system, enter the hour (e.g. 5 A.M. = 5,
noon = 12, 2 P.M. = 14, midnight = 24, etc.). Press CONTINUE
when nished.
• To enter the minute, press the down arrow key from the “hour” row until
the “minute” row is reached. Press CONTINUE to reach the minute set
area and enter the minute. For single digit numbers it is not necessary
to enter a “0” before the number (e.g. enter 3 for :03). Press
CONTINUE when nished.
• When the date and time are all set, press CANCEL to return to the
MENU area. Press CANCEL again to return to the main display screen.
Attaching the Quick Connect Tubing
• The Veriscan uses Quick Connect Tubing to attach to Olympus®,
Pentax®, Storz®and Fujinon® exible, immersible endoscopes. Verify
the endoscope name labeled on the Quick Connect Tubing to ensure it
matches the specic endoscope brand being leak tested. If
replacement or additional tubings are needed for connecting other
brands of endoscopes, contact Medivators Customer Support at
1-800-444-4729 or your authorized distributor.
NOTE: Inspect Quick Connect Tubings often and replace if damaged
or worn.
NOTE: Lightly Lubricate Quick Connect Tubing O-ring with silicon oil
weekly to ensure a secure connection.
• Insert the Quick Connect Tubing prong into the quick connect port located
on the side of the Veriscan unit and apply inward pressure until the prong
clicks into place (see gure 3). To remove the tubing, gently push inward on
the quick
connect port’s outer metal housing, until the Quick Connect Tubing
prong is released.
Installing or Replacing the Desiccant Drying Crystals
The drying crystals must be installed before leak testing an endoscope. The
drying crystals ensure that only dry air is introduced into the endoscope during
leak testing.
NOTE: Monitor the condition of the drying crystals on a regular basis.
Replace as needed as determined by comparing the crystals to the
Desiccant Drying Crystals Color Comparison Chart.
CAUTION: Disconnect system power before installing or replacing the
drying crystals.
Step 1: Turn off and unplug the Veriscan system before installing
the drying crystals.
Step 2: Locate a new, unopened crystal desiccant bag. (see gure 4)
Step 3: Carefully position the Veriscan system so that the back of the unit can
be easily accessed with a six (6) inch clearance off of the counter surface. The
recommended method for installing or changing the drying crystals is to extend
the last six inches (6”) out over the end of the counter surface.
System Setup
Figure 4
Figure 5
Figure 6

USERS MANUAL | 13
Step 4: Push the metal housing release button down and hold. (see gure 5)
Step 5: While continuing to hold the button, gently pull down on the metal
bulb housing and rotate it to the left, until it releases down and away from the
machine’s bulb housing structure. Gently lower the bulb housing unit away from
the machine. (see gure 6)
Step 6: Remove the drying crystal bulb from the bulb housing structure by placing
one hand on top of the Veriscan, grasping the dry crystal bulb with the other hand
and pulling downward in a twisting motion (either direction) until the bulb can be
removed from the housing structure. (see gures 7 and 8).
Step 7: Empty and discard any used drying crystals from the bulb, and carefully
pour the entire bag of new crystals into the bulb. (see gure 9). Do not allow
crystals to enter the metal tube located in the center of the bulb.
Step 8: Return the bulb to its original housing by placing one hand on the top
of the unit and grasping the glass bulb with other hand, while inserting the glass
bulb vertically up and into the bulb housing structure until the top of the structure
is reached. This is a reverse of the process described in Step 6. Apply careful
upward pressure while turning the bulb (either direction) to help the bulb pass
through the tight gasket seal and seat to the top of the bulb housing structure.
(see gure 7)
Step 9: Return the metal bulb housing unit to the Veriscan by holding down the
bulb receptacle release button and lifting up on the bulb receptacle over the
drying crystal bulb. This is a reverse of the process described in step 5. Align the
release button with the center of the bulb housing structure and lift until resistance
is felt. While holding the button down, turn the receptacle to the left until it
reaches a slot and can be lifted in an upward direction. (see gure 6)
Step 10: Let go of the release button and turn the metal bulb housing unit until
the receptacle button clicks into place. (see gure 5)
WARNING: THE METAL BULB HOUSING STRUCTURE MUST BE IN PLACE
BEFORE OPERATING THE VERISCAN DEVICE. THE GLASS DRYING
CRYSTAL BULB CAN BECOME DISLODGED DURING LEAK TESTING, AND
LEAK TEST RESULTS WILL BE AFFECTED IF THE METAL BULB HOUSING
IS NOT PROPERLY IN PLACE.
Figure 7
Figure 8
Figure 9
System Setup

14 | USERS MANUAL
Performing a Leak Test
Attaching a exible, immersible endoscope to the Veriscan System
• Ensure the Quick Connect Tube is connected to the Veriscan
system. If not, refer to the System Setup section.
• Check the endoscope cleaning cap to ensure it is securely in place over the
endoscope’s ETO connector. A faulty cleaning cap connection or O-ring seal
onto the endoscope will be detected as an endoscope leak by Veriscan.
• Align Veriscan’s Quick Connect Tubing connector to the pin on the
endoscope’s cleaning cap leak test tting, and then push the connector over
the tting. Rotate the connector until the pin reaches the end of the channel on
the connector. Verify the Quick Connect Tubing connecting the endoscope
to the Veriscan system is not twisted. (see gures 10, 11 and 12)
NOTE: If the connector rotates with difcultly, then verify the o-ring is
properly lubriated.
NOTE: This is a dry leak test only – Do not place or immerse the
endoscope in any type of uid or water while testing.
Performing the Leak Test
The heat of an endoscope can affect leak test measurement accuracy though the
expansion of the soft components of the endoscope. Leak test accuracy is
maximized by identifying if the endoscope was used in a patient procedure
within the last 30 minutes.
If the endoscope was used within the last 30 minutes, then the factory default
“Standard Test” setting should be used.
If the endoscope was not used within the last 30 minutes, then the “Screening
Test” setting should be used. Go to the section labeled “Performing a Screening
Test” for further instructions.
• To begin the leak test, press the START button located on the
Veriscan keypad.
• If optional “OPERATOR ID” screen activated, the following information
will display:
Leak Test Start
Enter Operator ID
Press “Continue”
Enter Operator ID number (maximum 4 digits) and then press CONTINUE.
• If optional “PATIENT ID” screen activated, the following information
will display:
Leak Test Start
Enter Patient ID
Press “Continue”
Enter Patient ID number (maximum 10 digits) and then press CONTINUE.
• The “ENTER SCOPE S/N” screen will now display as:
Leak Test Start
Enter Scope SN
Press “Continue”
Enter last three digits of endoscope’s serial number and then press CONTINUE
(A maximum of 10 digits can be entered).
Figure 10
Figure 11
Figure 12
USERS MANUAL | 15
• The leak test will now automatically begin when Veriscan is operating in the
factory default “STANDARD TEST” mode, and the following information will
be displayed:
Leak Test Start
Please standby...
• If Veriscan is operating in the “MANUAL” mode, the following information will
display: (The manual mode is used for selecting alternative parameter settings,
other than the factory default “STANDARD TEST” settings.)
Select Test Setting
Standard Test 1
Standard Test 2
Standard Test 3
Use the up/down arrow keys to select the desired test, and then press
“CONTINUE” to begin the leak test.
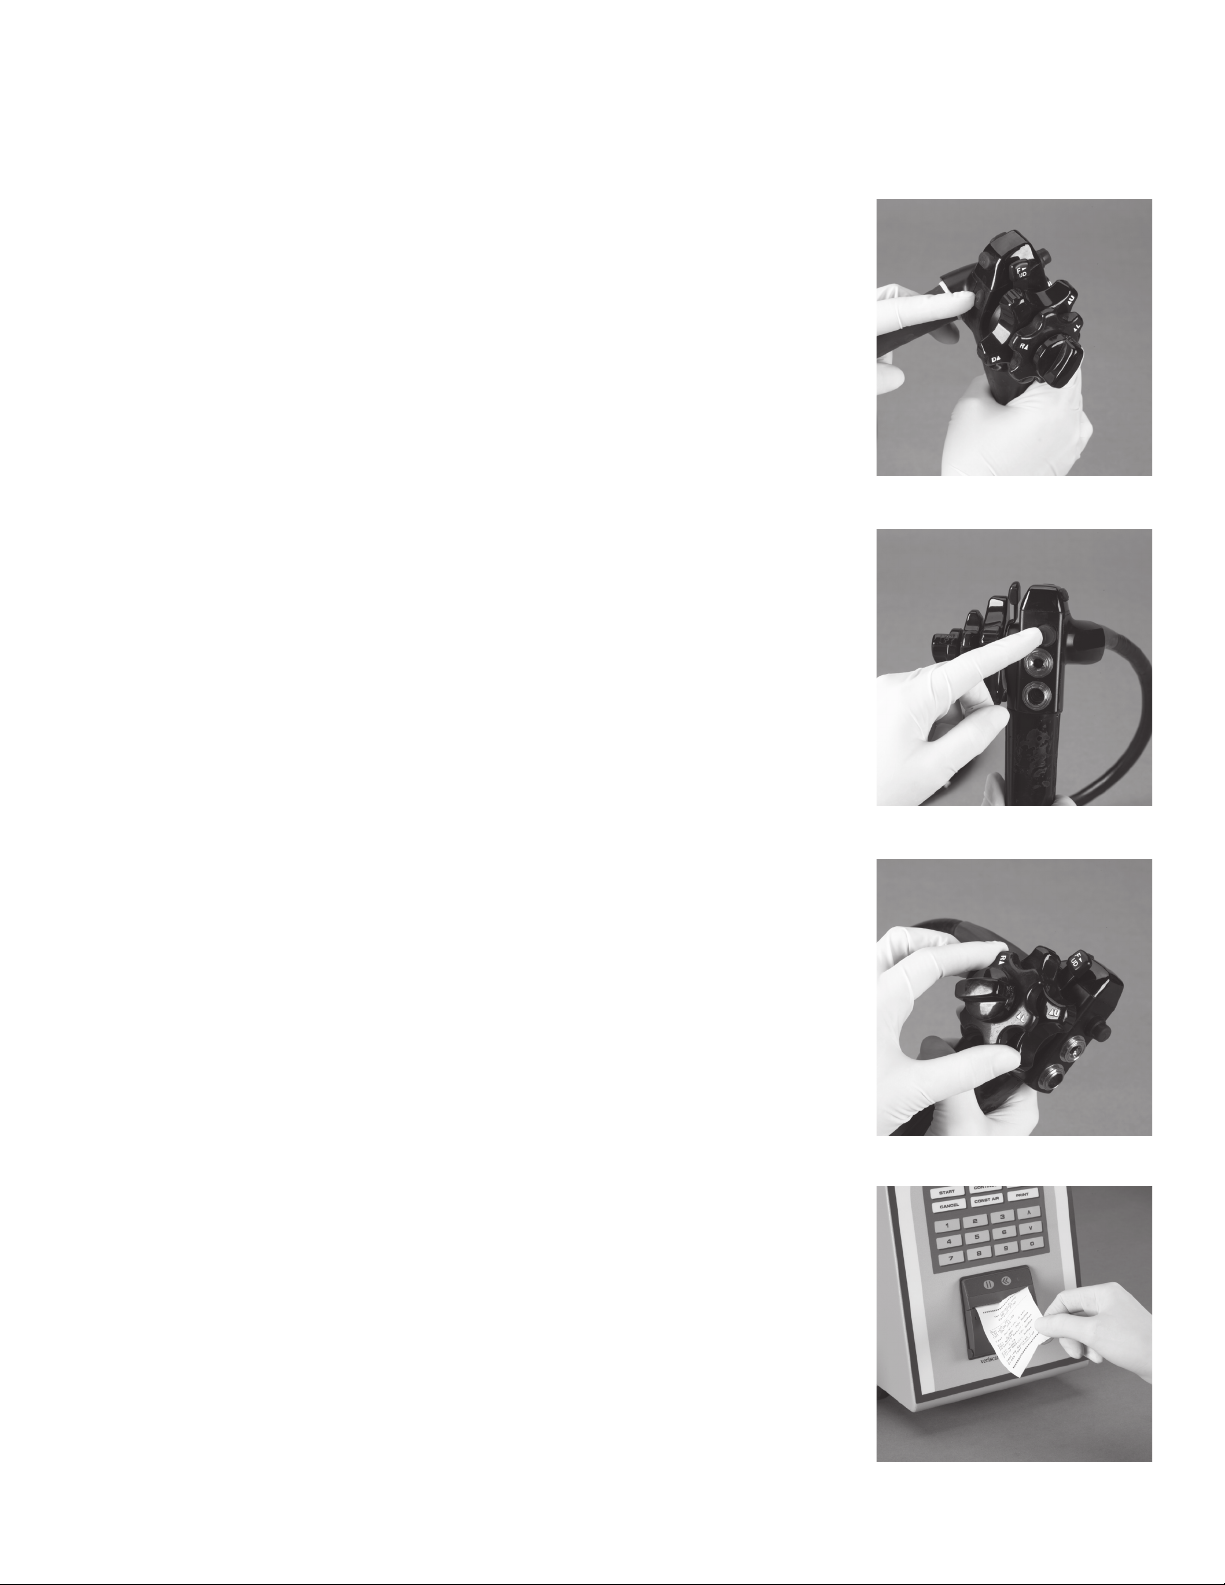
• After a pre-set period of time, an audible tone will sound. The Veriscan will
display the below listed information which prompts the operator to turn all of
the endoscope’s angulation knobs and to press all of the camera buttons. (see
gures 13, 14 and 15). These endoscope areas are common uid invasion
problem spots which can only be accurately leak tested when all knobs and
buttons are activated.
Leak Test
Oper Knobs & Buttons
“Continue” to Ack
Results in 112 Seconds
NOTE: Turn all endoscope angulation knobs and press all camera buttons
when audible tone is heard.
When all knobs and buttons have been manipulated, press the CONTINUE
button on the display keypad and the test will automatically continue.
• The endoscope leak test continues.
• When the endoscope leak test completes, a humidity test is initiated which
veries the condition of the dry air used during the leak test.
• At the completion of the humidity test, an audible tone is heard and the
Veriscan screen displays the PASS or FAIL, test results.
If a PASS result is displayed, then go to “Printing Results”.
If a FAIL result is displayed, then go to “Testing a Failed Endoscope” section.
Printing Results
• Press the PRINT button to print results, or CONTINUE to start a new
endoscope leak test. Tear the printout off by pulling upwards on the printout
towards the tear bar, and tear from one side to the other across the serrated
edge (see gure 16). For directions on how to load printer paper, see the
“Changing Printer Paper” heading located in the Maintenance, Handling &
Care section.
• For other printing options, (e.g., printing quick reports on daily, weekly
and monthly summary activity,) see the Quick Report Printing heading located
in the Data Access and Management section.
Performing a Leak Test
Figure 13
Figure 14
Figure 15
Figure 16

16 | USERS MANUAL
Disconnecting the Endoscope
• Disconnect the Quick Connect Tubing from the endoscope (see gure 17).
The endoscope is now ready for the next step in the manual cleaning process.
Shut Down and Start Up of the Veriscan system
• Shut Down: The Veriscan system should be turned off
at the end of each day. To turn off the machine, toggle the on/off
switch to the right (see gure 18) and the Veriscan display will go blank.
• Start Up: To start the Veriscan system, toggle the on/off switch to the
left. The system will automatically begin a series of diagnostic self-
tests during the initializing process. When initialization is complete,
the display will appear as below indicating that the system is ready
to begin testing endoscopes.
mm/dd/yy hh:mm
Connect Scope
Press “Start”
Performing a Leak Test
Figure 17
Figure 18

USERS MANUAL | 17
Veriscan’s “Screening Test” is an extremely accurate, dry endoscope leak test which is
ideal for evaluating “cold” or stable temperature endoscopes.
Use the “Screening Test” to:
1) Evaluate an endoscope that was not used on a patient within the last 30 minutes.
2) Evaluate a facility’s inventory of endoscopes.
Due to Veriscan’s extreme
leak detection accuracy, it is recommended that all
endoscopes be tested within
a facility when a Veriscan unit is received for the rst
time. A facility can also routinely test endoscopes using the “Screening Test” to
ensure ongoing early endoscope leak detection.
NOTE: The screening test is only to be used on stable temperature endoscopes
which have not been used within the last 30 minutes.
Performing the “Screening Test”
• Press the “Menu” button located on the keypad and the following
information will display:
Main Menu
Stored Runs
Quick Reports
Screening Test
Set Test Parameters
• Use the up/down arrow keys to align the curser with the “Screening Test” and then
press “CONTINUE” followed by “START” to begin the leak test.
• If optional “OPERATOR ID” screen activated, the following information
will display:
Screening Test Start
Enter Operator ID
Press “Continue”
Enter Operator ID number (maximum 4 digits) and then press CONTINUE.
• If optional “PATIENT ID” screen activated, the following information
will display:
Screening Test Start
Enter Patient ID
Press “Continue”
Enter Patient ID number (maximum 10 digits) and then press CONTINUE.
• The “ENTER SCOPE S/N” screen will now display as:
Screening Test Start
Enter Scope SN
Press “Continue”
Enter last three digits of endoscope’s serial number and then press CONTINUE (a
maximum of 10 digits can be entered).
• The leak test will now automatically begin when Veriscan is operating in the
factory default “SCREENING TEST” mode, and the following information will
be displayed:
Leak Test Start
Please standby...
Performing a Screening Test

18 | USERS MANUAL
• If Veriscan is operating in the “MANUAL” mode, the following information will display:
(The manual mode is used for selecting alternative parameter settings, other than the
factory default “SCREENING TEST” settings.)
Select Test Setting
Screen Test 1
Screen Test 2
Screen Test 3
Use the up/down arrow keys to select the desired test, and then press “CONTINUE” to
begin the leak test.
• After a pre-set period of time, an audible tone will sound. The Veriscan will display
the below listed information which prompts the operator to turn all of the endoscope’s
angulation knobs and to press all of the camera buttons. (see gures 13, 14 and 15).
These endoscope areas are common uid invasion problem spots which can only be
accurately leak tested when all knobs and buttons are activated.
Leak Test
Oper Knobs & Buttons
“Continue” to Ack
Results in 112 Seconds
NOTE: Turn all endoscope angulation knobs and press all camera buttons when
audible tone is heard.
When all knobs and buttons have been manipulated, press the CONTINUE button on the
display keypad and the test will automatically continue.
• The endoscope leak test continues.
• When the endoscope leak test completes, a humidity test is initiated which veries the
condition of the dry air used during the leak test.
• At the completion of the humidity test, an audible tone is heard and the Veriscan screen
displays the PASS or FAIL, test results.
If a PASS result is displayed, then go to “PRINTING RESULTS”.
If a FAIL result is displayed, then go to “Testing a Failed Endoscope” section.
Printing Results
• Press the PRINT button to print results, or CONTINUE to start a new
endoscope leak test. Tear the printout off by pulling upwards on the printout
towards the tear bar, and tear from one side to the other across the serrated
edge (see gure 16).
• For other printing options, (e.g., printing quick reports on daily, weekly
and monthly summary activity,) see the Quick Report Printing header located in
the Data Access and Management section.

USERS MANUAL | 19
Testing a Failed Endoscope
Majority of FAIL leak test results are due to true endoscope leaks. On occasion, a FAIL test
result can be traced to other preventable and correctable issues such as:
• Nicks in the endoscope cleaning cap gasket: If the rubber seal or gasket on the inside
of the endoscope cleaning cap is damaged, a false FAIL leak test result can occur. If the
rubber sealing area is not in perfect condition, replace the cleaning cap with a new one.
• ETO valve loose on endoscope cleaning cap: If the ETO valve on the endoscope
cleaning cap is loose, air can escape and cause a false FAIL leak test results. If the
ETO valve is loose, replace the cleaning cap with a new one.
• Quick Connect Tubing: If the Veriscan’s Quick Connect Tubing is damaged due to a small
hole, or worn due to an O-ring leak, a false FAIL leak test result can occur. Always have a
spare Quick Connect Tubing available to test for a tubing leak.
• Screening Test used to test a warm, unstable temperature endoscope: A false FAIL
leak test result can occur if the “Screening Test” was used to leak test an endoscope used on
a patient within the previous 30 minutes. The screening test should only be used on stable
temperature endoscopes which have not been used within the last 30 minutes. Allow the
endoscopes the recommeneded time to cool, and then re-perform the leak test.
Retesting a Failed Endoscope
In the event of a FAIL test result, the endoscope leak test should be rerun as follows:
Retest Endoscope
Remove the Quick Connect Tubing from the endoscope.
Inspect the tubing for wear, damage or holes.
Inspect the O-ring for rips or tears.
Inspect the O-ring for sufcient silicon oil lubrication. The O-ring can tear if dry or not properly
lubricated.
Replace if worn or damaged.
• Remove the cleaning cap from the endoscope. Inspect the cleaning cap, cleaning cap
O-ring, and ETO valve, and replace if worn or damaged.
• Reattached cleaning cap and Quick Connect Tubing, and initiate a new endoscope leak
test by pressing CONTINUE and the START.
Endoscope Fails Again
If the endoscope fails a second time, then:
• Press the CONST AIR button on the keypad and visually observe the endoscope’s distal
end for ination.
1) Endoscope Distal End Inates:
If the distal end of an endoscope inates, then it can be safely submerged for cleaning before
being sent in for repair. The endoscope must be cleaned with a continuous air ow during
the entire cleaning process. The continuous air ow creates a constant internal endoscope
pressure that prevents uid from invading through the leak. Clean the endoscope as follows:
• Verify the CONS AIR button remains on and the endoscope’s distal tip is inated.
• Submerge the endoscope in uid and look for an air bubble leak.
• Hand clean according to your cleaning room protocol for handling endoscopes
with leaks.
• Remove endoscope from uid and dry. Press CANCEL to stop constant air ow.
• Remove endoscope from service.
• Contact endoscope repair company to arrange for endoscope servicing.

20 | USERS MANUAL
2) Endoscope Distal End Does Not Inate:
Do not submerge the endoscope in uid. This is an indication of a large endoscope leak. Press CANCEL to stop
the constant air ow. The endoscope must be hand cleaned before being sent in for repair by following these
steps:
• Do not submerge the endoscope in any uids or in an automated endoscope reprocessor.
• Hand clean the endoscope according to your cleaning room protocol for handling endoscopes with leaks.
• Remove endoscope from service.
• Contact endoscope repair company to arrange for endoscope servicing.
NOTE: DO NOT SUBMERGE ENDOSCOPE IN FLUID
Table of contents
Popular Test Equipment manuals by other brands


Redtech
Redtech TRAILERteck T05 user manual

Venmar
Venmar AVS Constructo 1.0 HRV user guide

Test Instrument Solutions
Test Instrument Solutions SafetyPAT operating manual

Hanna Instruments
Hanna Instruments HI 38078 instruction manual

Kistler
Kistler 5495C Series instruction manual

Waygate Technologies
Waygate Technologies DM5E Basic quick start guide

StoneL
StoneL DeviceNet CK464002A manual

Seica
Seica RAPID 220 Site preparation guide

Kingfisher
Kingfisher KI7400 Series Training manual

Kurth Electronic
Kurth Electronic CCTS-03 operating manual

SMART
SMART KANAAD SBT XTREME 3G Series user manual

Agilent Technologies
Agilent Technologies BERT Serial Getting started