Meeyi Y-670 Operational manual


2
Table of the content
1. Product Brief Introduction...................................................................................................................3
1.1 Brief Introduction........................................................................................................................................... 2
1.2 Features ........................................................................................................................................................... 3
2. Overview of Watch pager........................................................Eroare! Marcaj în document nedefinit.
2.1.Appearance........................................................................................ Eroare! Marcaj în document nedefinit.
2.1.1 Host's apperance.........................................................................Eroare! Marcaj în document nedefinit.
2.1.2 Accessories' appearance(optional).................................................................................................. 4
2.2 Instruction of Buttons.................................................................................................................................. 5
3. Operation Instruction................................................................................................................................ 6
3.1 Turn On/Off..................................................................................................................................................... 6
3.2 Function Setting.............................................................................................................................................. 6
3.2.1Adding/DeletingATransmitter................................................................................................................ 7
3.2.2 DeleteAll Transmitters............................................................................................................................. 8
3.2.3 Pager ID..................................................................................................................................................... 8
3.2.4 Prompt Setting.......................................................................................................................................... 9
3.2.5 Repeat Signal............................................................................................................................................. 9
3.2.6 Reminder On/Off.................................................................................................................................... 10
3.2.7Auto Clear Setting................................................................................................................................... 10
3.2.8 Timing Power...........................................................................................................................................11
3.2.9 Timing Working.......................................................................................................................................11
3.2.10 Mode Setting ......................................................................................................................................... 12
3.2.11 Alarm Setting......................................................................................................................................... 12
3.2.12 Time and Date Setting.......................................................................................................................... 12
3.2.13 Language ...................................................................................... Eroare! Marcaj în document nedefinit.
3.2.14About me....................................................................................... Eroare! Marcaj în document nedefinit.
4. Attention............................................................................................... Eroare! Marcaj în document nedefinit.
5. Technical Parameters.....................................................................Eroare! Marcaj în document nedefinit.
6. Configuration List........................................................................... Eroare! Marcaj în document nedefinit.
7. Common Malfunction and Solutions ............................................................................................ 13
1. Product Brief Introduction
1.1 Brief Introduction
3
The watch pager utilizes high-speed CPU processing & high sensitive wireless receive technology, with highly
anti-interference and stable performance. The lattice screen displays Chinese&English languages. The watch
pager gathers diverse modes like: Restaurant, Hospital, Bank, Factory etc, widely applied in places like western
restaurant, pubs, tea house, coffee shop, leisure club, sauna central, KTV, chess and card room, hospital, clinic,
nursing home, convalescent hospital, bank, school, production line of factory, construction site, hotel guest room,
office, and the residential premises for a calling service.
1.2 Features
1. Lattice screen display, Chinese&English languages optional, humanized menu for handling, easy to learn and
use.
2. With a perpetual calendar, never lose the date and time when power off.
3. Compatible with 999 wireless transmitters, name of transmitter can be edited.
4. Fit with other type of transmitters, function of the buttons can be freely defined.
5. Recently 99 sets of calling information can be surveyed.
6. 10 sets of clock alarm supported, still alarming when power off.
7. Timing into the power saving mode & power on/off.
8. Gathering modes like Restaurant,Hospital,Bank,Factory and etc.
9. Prompt setting with “ Light, Vibrate, Beeps” can be optional.
10. Strong power saving technique.
11. Built-in high capacity rechargeable lithium battery.
12. Compatible with coding 1527 ( Resistance 150K-470K) and 2262(resistance 1.5M-4.7M) the whole series of
signal transmitter.
2. Overview of Watch Pager
2.1.Appearance
2.1.1 Host’s appearance
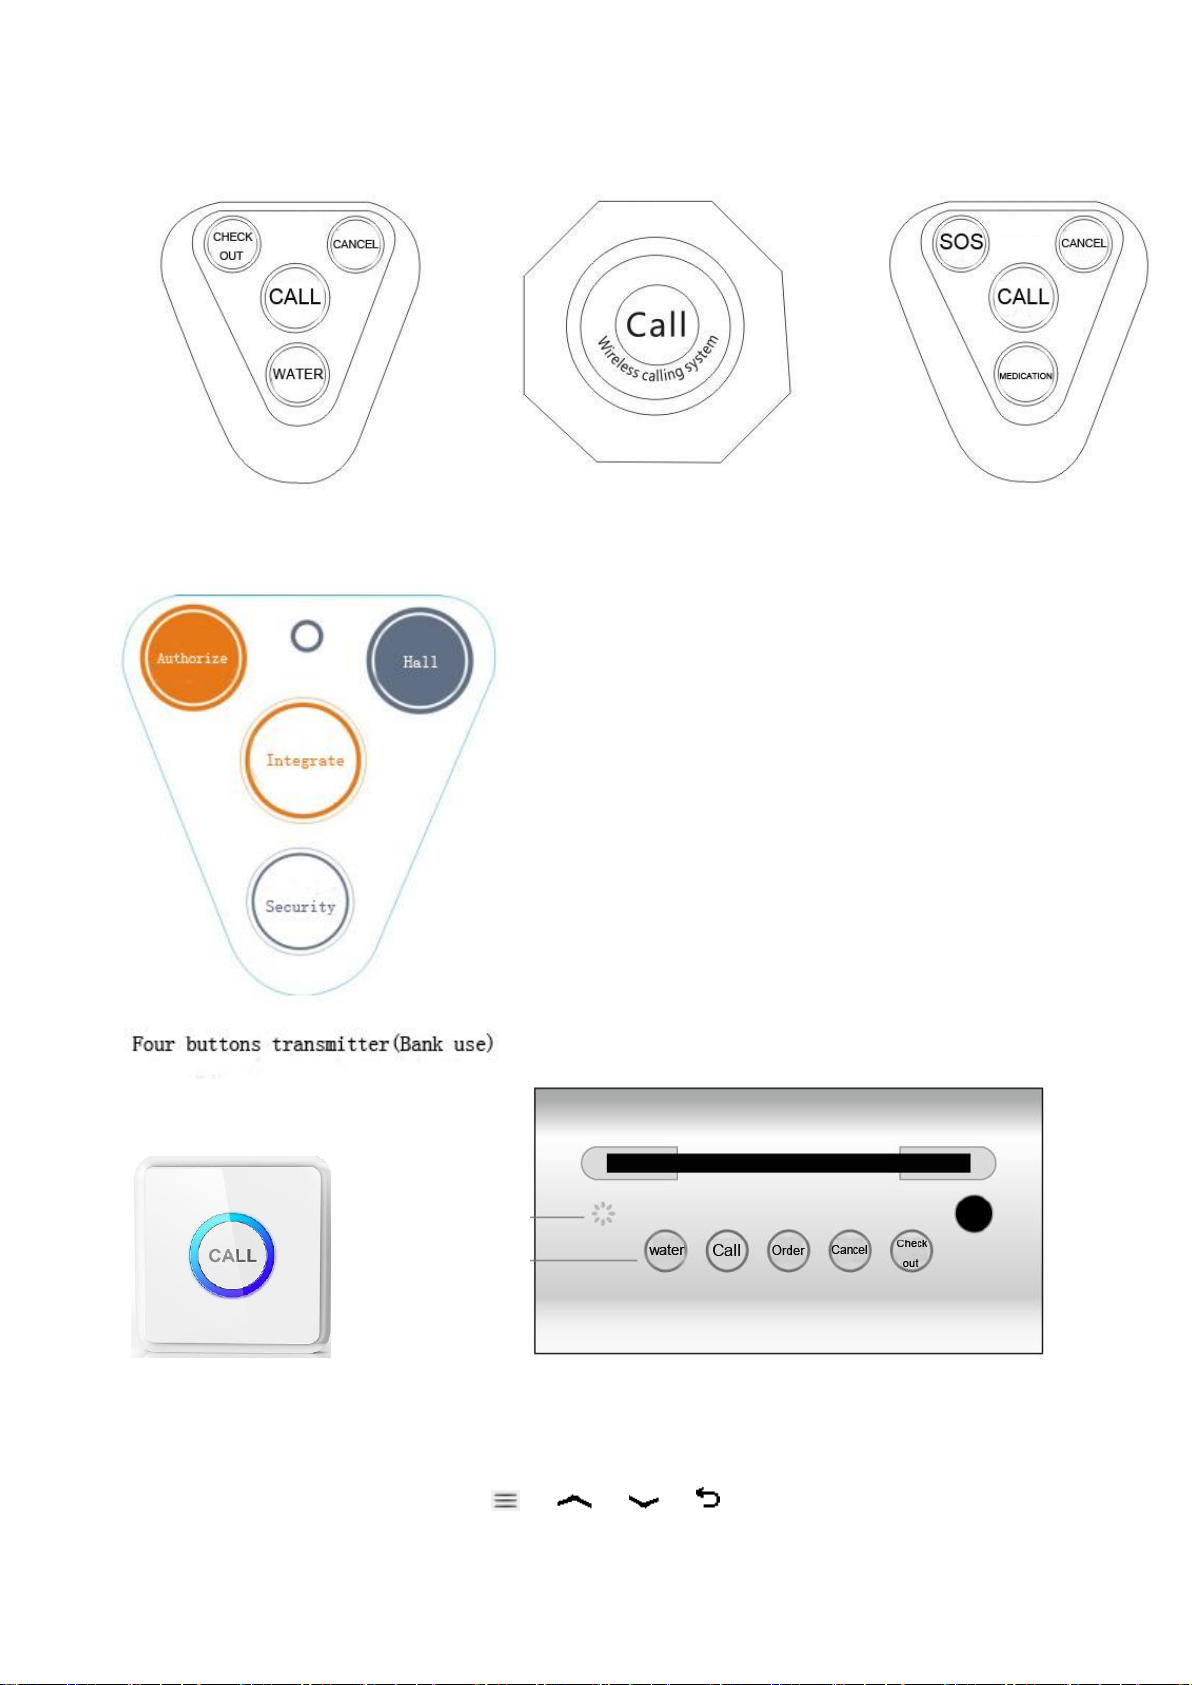
2.1.2 Accessories’ appearance(optional)
4
86 box one button transmitter Dining using five buttons transmitter
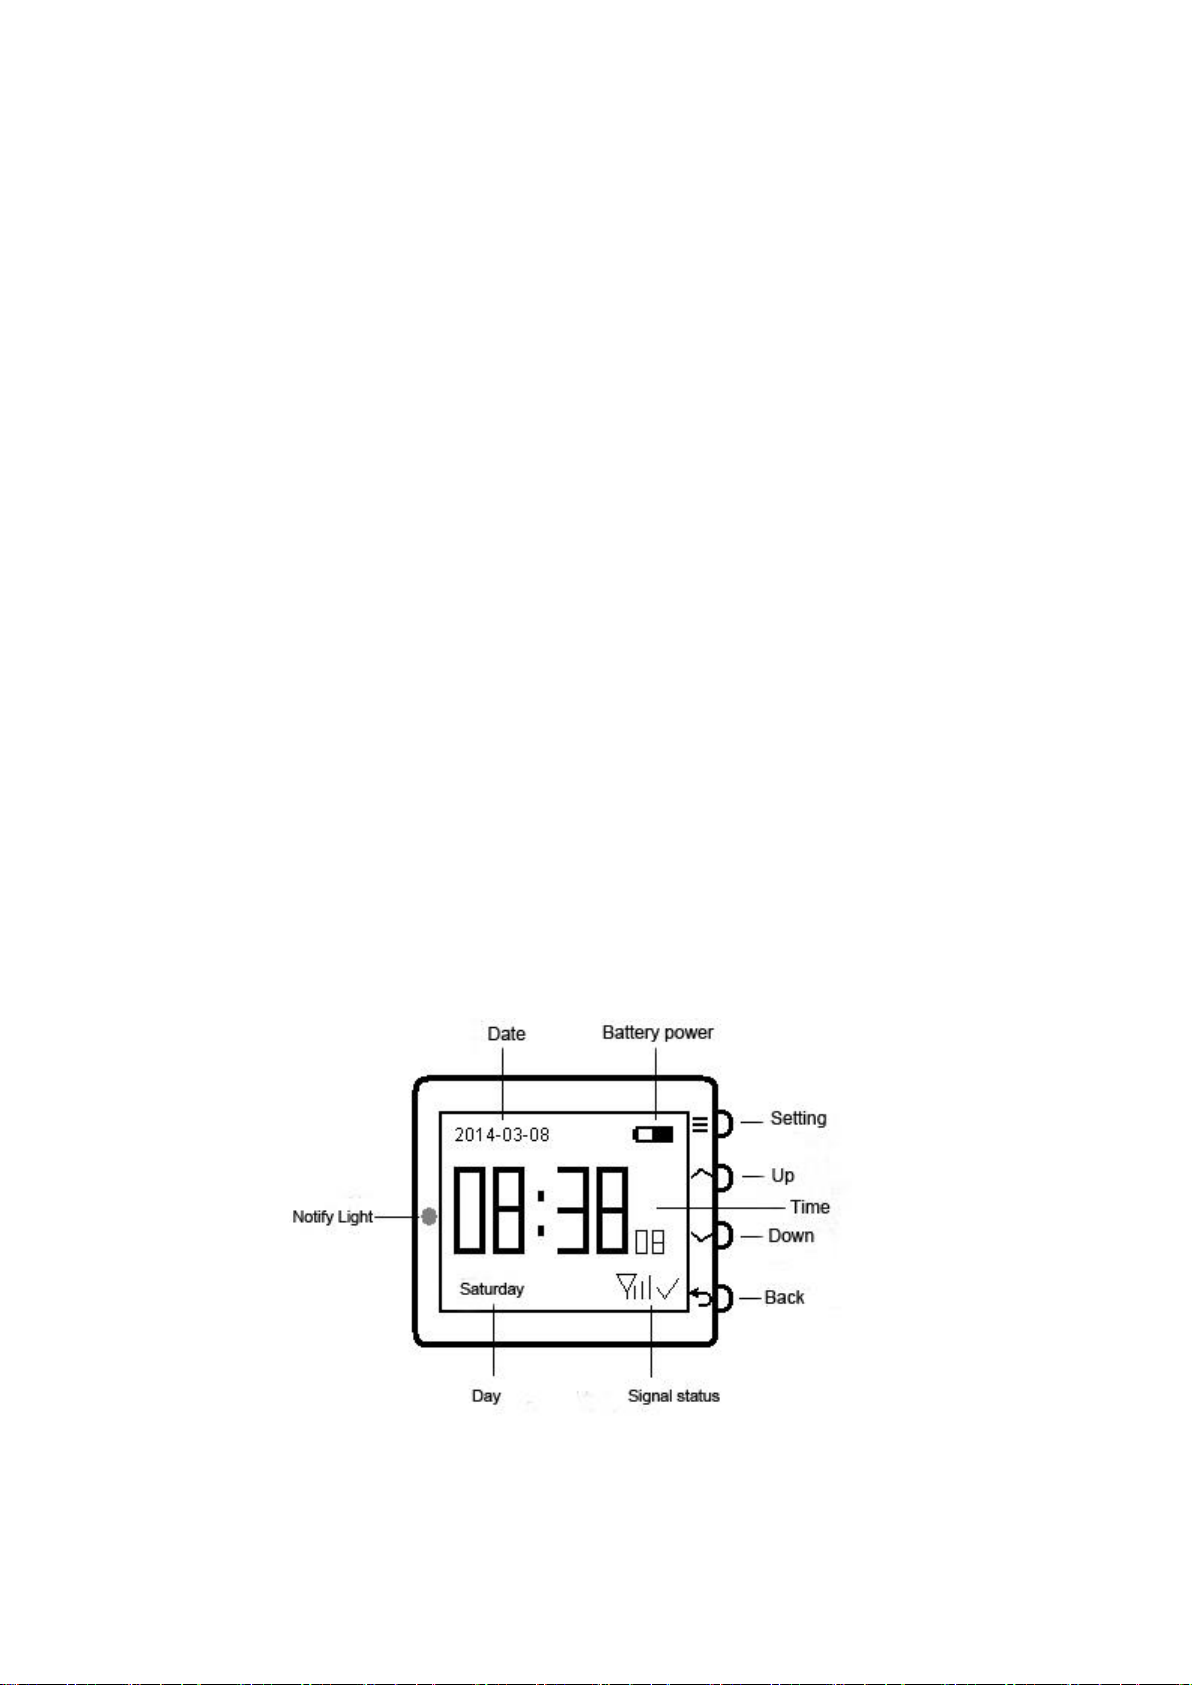
2.2 Instruction of Buttons
One LCD display screen on the host, with 【 】、【 】、【 】、【 】four buttons, one micro USB socket, one
Notify Light.
5
Buttons instruction: press-- means pressing time less than one second
press and hold-- means pressing time above three seconds
【Setting/ 】Press and hold to skip into the setting menu, and press to go to the next menu
【Up/】: Press to skip one step to the last menu, and press and hold to continuously skip.
【Down/ 】: Press to skip one step to the next menu, and press and hold to continuously skip.
【Back/ 】: Press to clear the current calling information. Press and hold to delete all calling information. When
in the setting condition, press to be back to before level menu, press and hold to be back to the origin
interface.
【USB socket 】: Connect the Micro USB plug to charge.
【Notify Light】: Light a twinkle green when there is a call; light turns yellow when charging; light turns green
when fully charged; Light turns red when it with a low power.
3. Operation Instruction
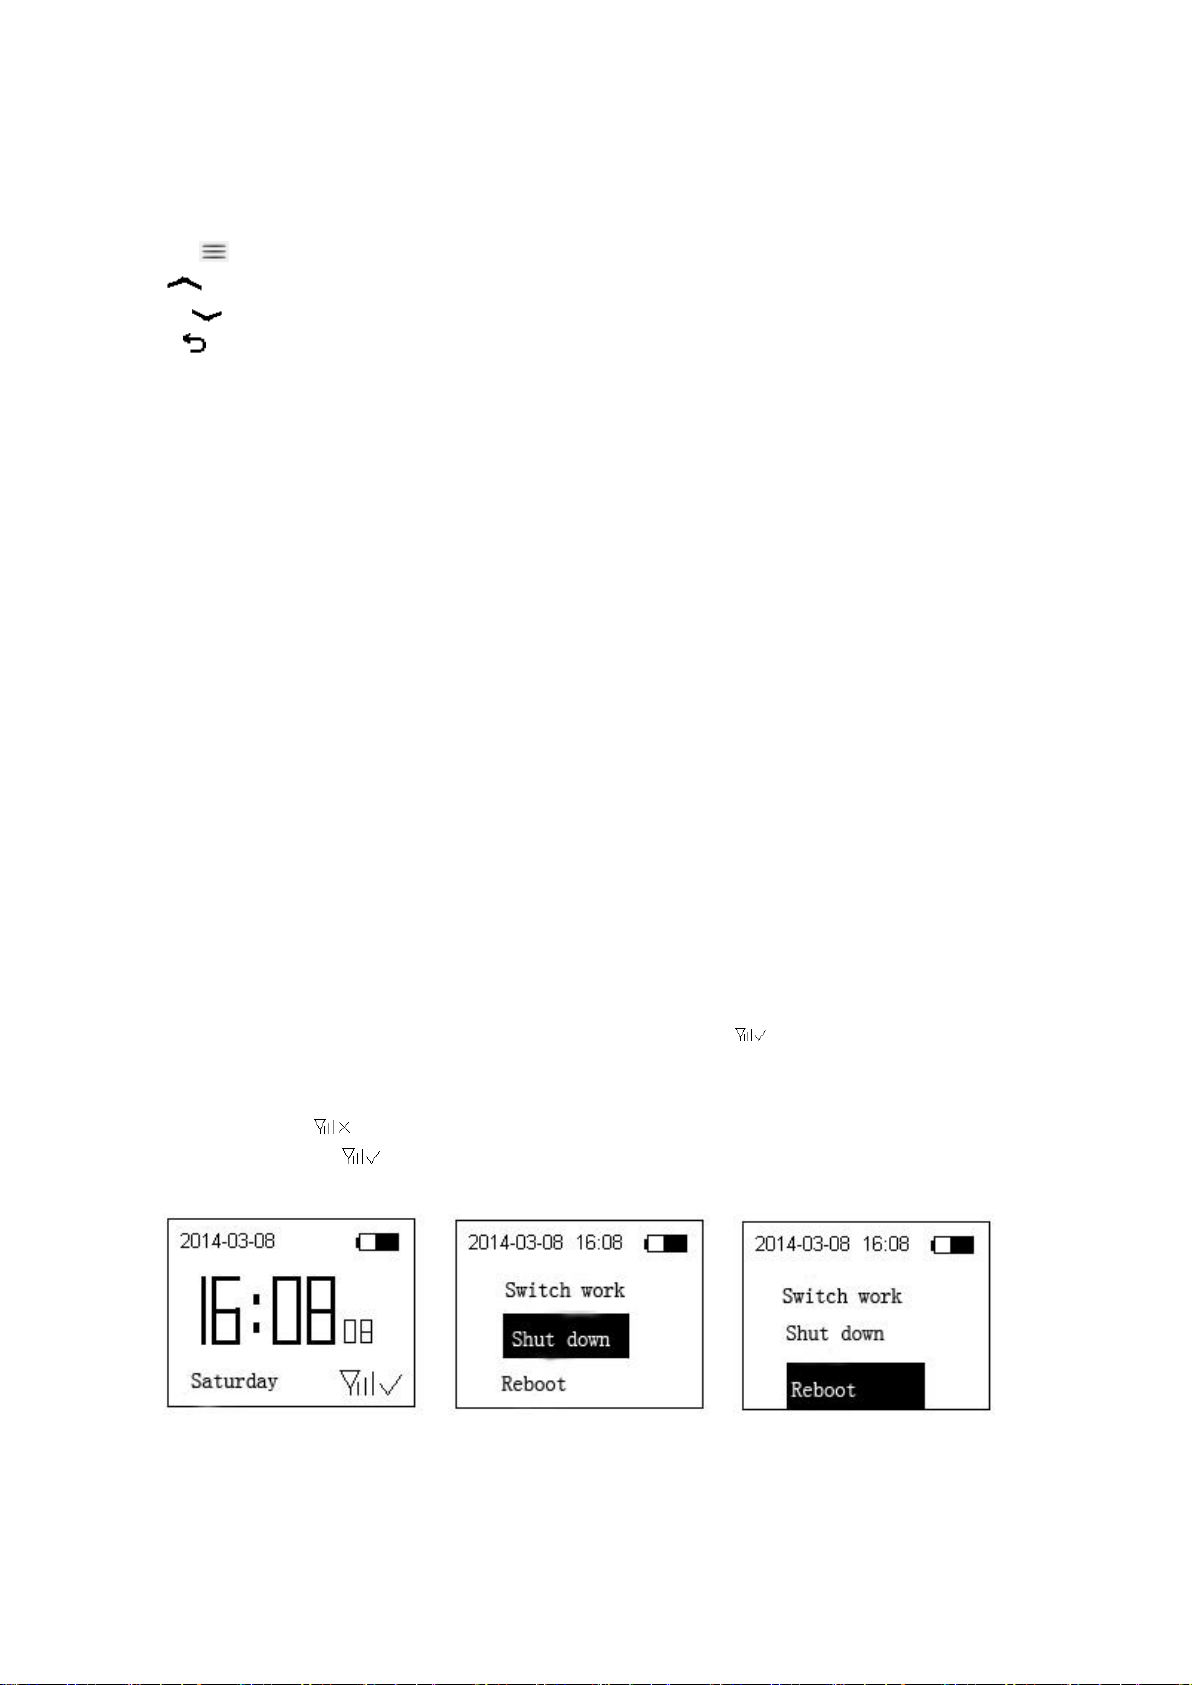
3.1 Turn on/off
1.Turn on: When it is in the power off state which without any screen display, press the 【back】button for 3s
until the LCD screen lighting, then it turned on and showing the current time.As the picture 3-1 shows.
2.Turn off: Press and hold the【back】button for 3s when it is turn on, press the【up/down】button and move
to the turn off line, then press the setting button to achieve but not lose the date and time. Presetting alarm
and timing power are still available.
3.Reboot: Press and hold the 【back】button for 3s when it is turn on, press the 【up/down】button and move
to the reboot line, as the picture 3-3 shows, then press the setting button to achieve.
4.Switch signal working ( energy saving): When the watch indicate a , this shows can be normally receive
the calling signal. You can switch it to off work in order to save energy and disturb avoiding, by pressing
the 【back】button with 3s, as the picture 3-4 shows, then press the 【setting】button to achieve. The
screen indicates when switch off the signal. Use the same handle method to switch on the signal, the
screen will indicate .
Picture 3-1 Picture 3-2 Picture3-3

6
Picture 3-4
3.2 Function Setting
In standby status, press and hold the【setting】button to enter into the system setting menu, press the
【up/down】button to choose, as picture 3-5 -- 3-18 shows, press 【setting】button into the next level
menu, press 【back】button to return back the before level menu, press and hold the 【back】button
or without any handling for 60s then it will return back to the origin interface.
Picture 3-5 Picture 3-6 Picture3-7
Picture 3-8 Picture 3-9 Picture 3-10
Picture 3-11 Picture 3-12 Picture 3-13
7
Picture 3-14 Picture 3-15 Picture 3-16
Picture 3-17 Picture 3-18
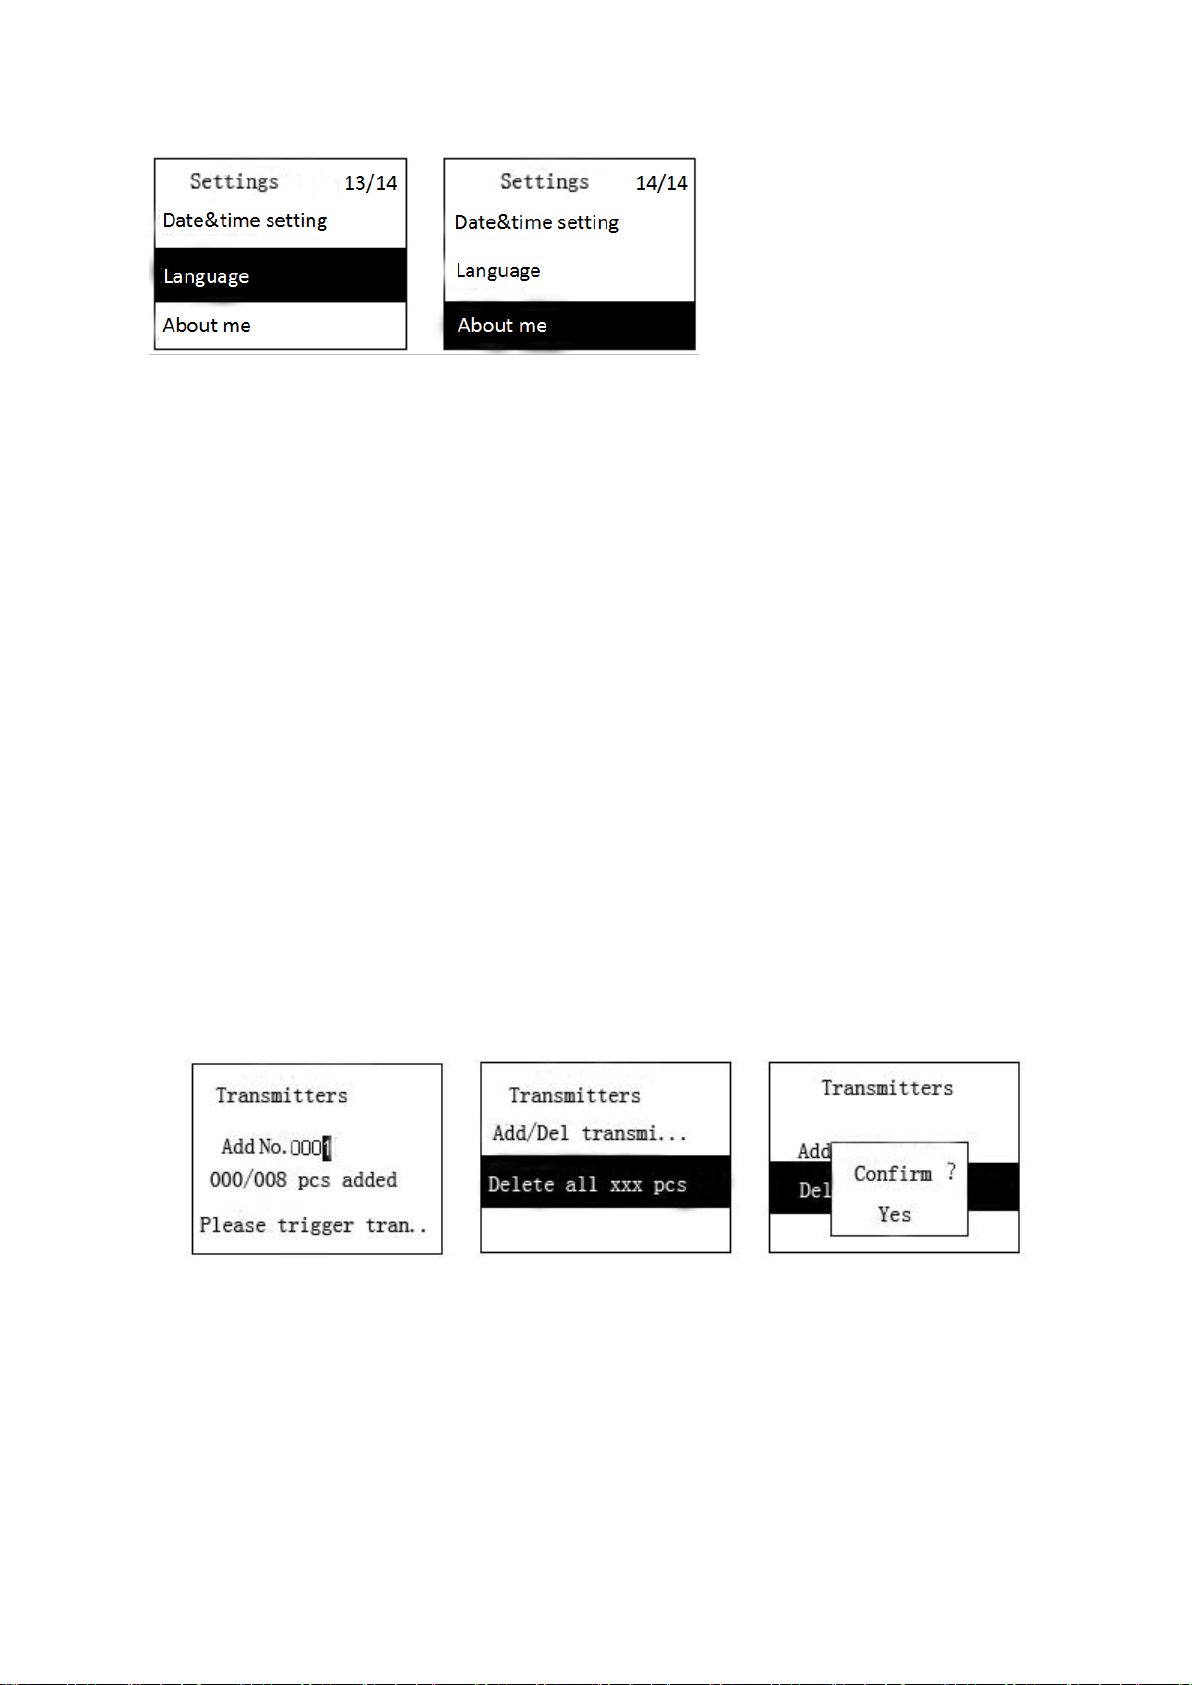
3.2.1Adding/ Deleting ATransmitter
In standby status, press and hold the 【setting】button to enter into the system setting menu, as the
picture 3-5 shows, press the 【setting】button twice, into the transmitter adding interface, same to
picture 3-19, 0001 indicate the no. of the zones, users can press the 【up/down】button to choose the
no. of zones needs to add, press and hold the【setting】button to skip the position, each position can
select 0-9, A-Z and -,_ or blank, for example, can be settle as 8886 zone, N_88 zone, 2-N8 zone,
8-6A zone,N8 zone and etc.
Each zone can add one or more transmitters (max 999 pcs). After setting the no. of zone, the screen
displays “please trigger transmitter” in the bottom, then trigger any button of the transmitter, when
the watch received the signal, it will beep, indicating adding the transmitter successfully, and screen
will display a no. Increase, (the ahead no. represent the adding quantity for current zone,the after
no.represent the adding quantity for all of the zones). During the adding, an automatic quantity
increases for the no. means had adding a wrong transmitter which belongs to the other people, you
can shortly press the 【setting】button to delete the wrong transmitters just had been added, press to
reduce one piece, until all wrong ones are deleted clearly and zero is displayed.
Picture 3-19 Picture 3-20 Picture 3-21
3.2.2 DeleteAll Transmitters
It has two ways to delete all the transmitters, one is for a compulsive all clear ( Please reference to the chapter of
compulsive all clear), the other way is pressing the 【setting】button for one time to get into the system setting
menu when in the standby status, as the picture 3-20 shows, press the 【setting】button, as picture 3-20 shows,
press the 【up/down】button to move on the delete all xxx pcs line, this line showing you the total quantity of
added transmitters, then press the 【setting】button, it will appear “ confirm ? Yes” press again the 【setting】

8
button to delete all transmitters, (ATT: can not be recover once delete, be careful), press the 【back】button to
cancel.
3.2.3 Keys Function Setting
It need to reset the keys function of transmitters when a difference between the watch displaying function and
button function on the transmitter, after the customer finish adding the transmitters. In standby status, press the
【setting】button and into the system setting menu, same as picture 3-5, then press the 【up/down】button and
move to the keys function setting, same as picture 3-6, then press into it, firstly set the no. of zone, press the
【up/down】button to adjust the numerical value, long pressing the 【setting】button to skip position, same as
picture 3-19.
After setting the zone no., press twice of the 【setting】button and into the keys function setting, as picture 3-23
shows, when it screening “water”, please trigger your wanted button for water function, the watch sound a “di”
and screen a “ setting successfully” indicate the add is ok, then press the 【up/down】button to reset the other
function “call,check out, order, service, cancel” ( For hospital mode will be “Medication,Call,SOS, Needle,
Service,Cancel”) buttons, trigger the related buttons when you have a need.
You can use the same method to setting the keys function of other zones, if need to be a same setting for all the
zones, you can copy a finished zone setting details to the other ones, same as picture 3-23, press the 【setting】
button, move to the line “ copy no.0001 to all”, same as picture 3-24, press the 【setting】button again, when a
dialog box appear, press the【setting】button to confirm or press the【back】button to cancel. (You must firstly
add the transmitters then for the keys function setting)
Picture 3-22 Picture 3-23 Picture 3-24
3.2.4 Pager ID
After finishing the setting, users can allocate numbers for different demand (01-99 optional). In the standby
state, long press 【setting】once to enter the system setting menu, as shown in picture 3-5. Then press【up/down】
to move to “Pager ID”, like picture 3-6. Next press【setting】to enter the menu, and press【up/down】to adjust
the numeral value, as shown in 3-25. After that press 【back】to quit.
Picture 3-25
9
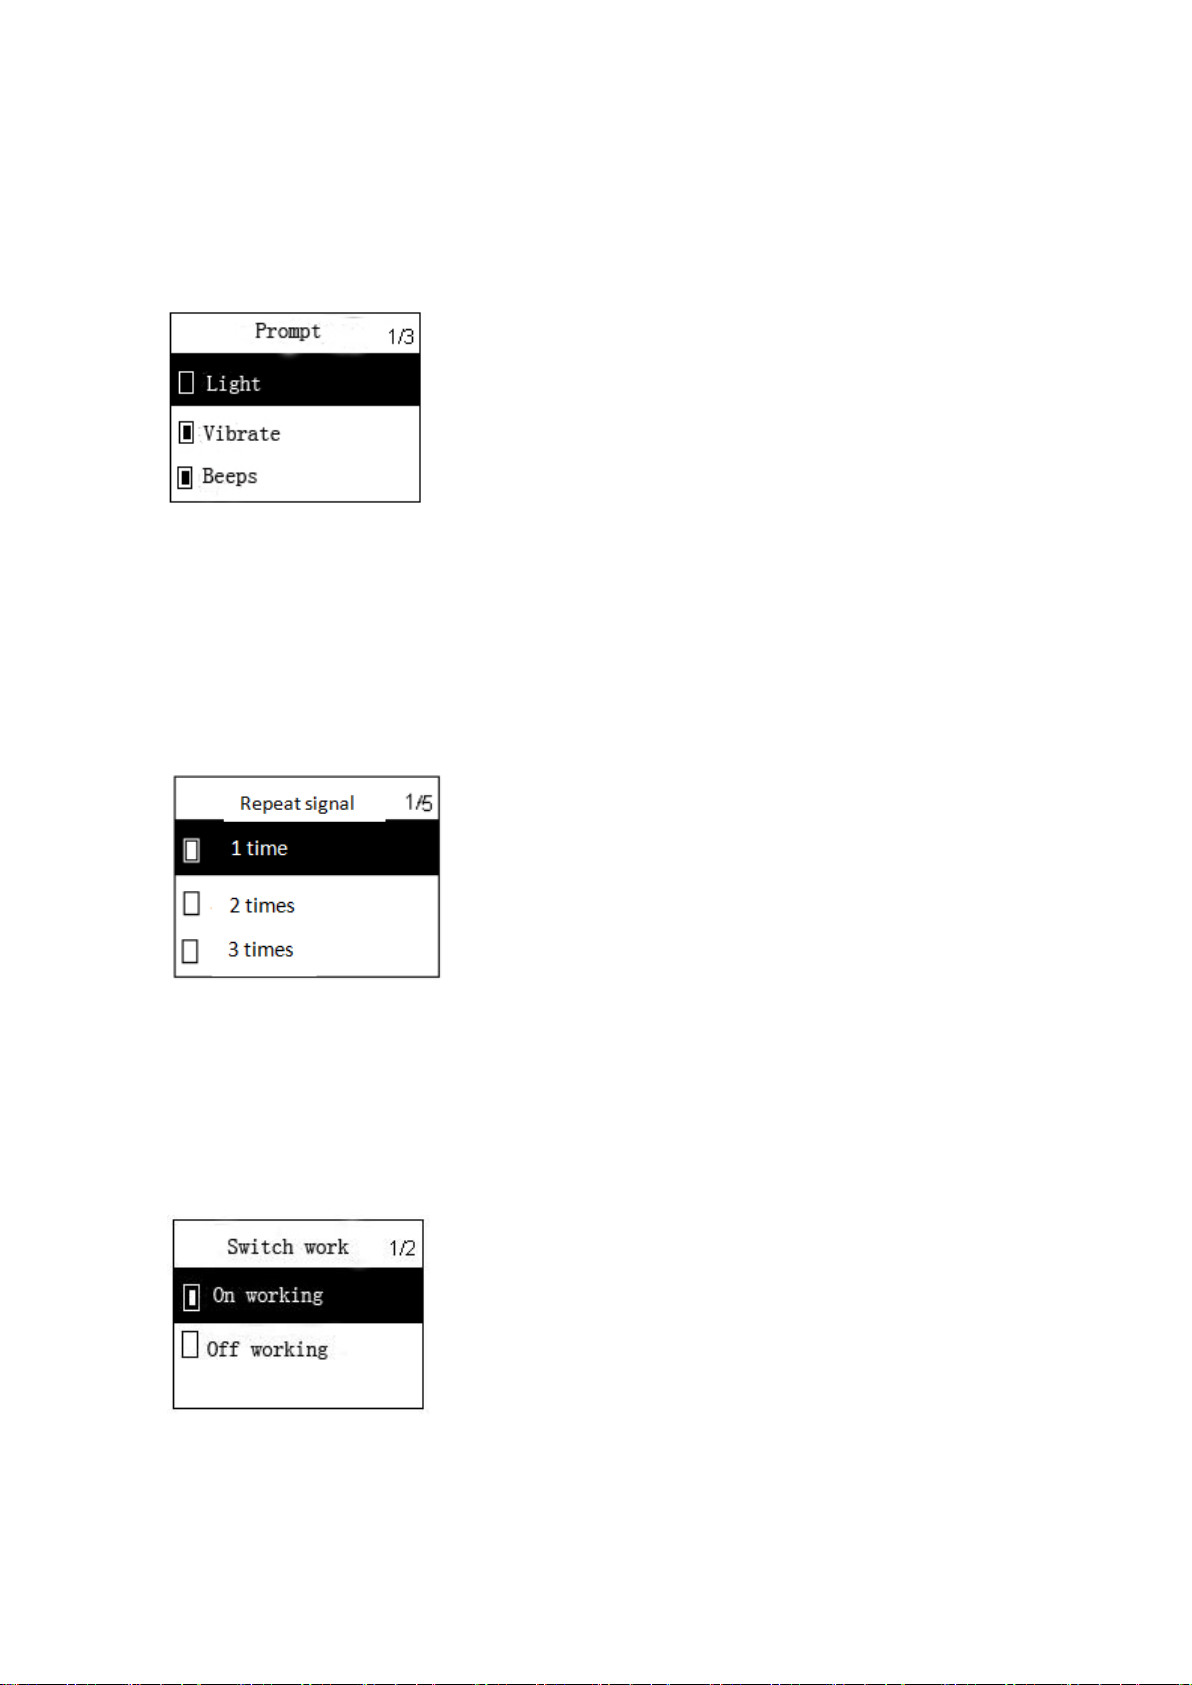
3.2.5 Prompt setting
When buttons are triggered or transmitters send signal, the host has three modes to prompt: Light, Vibrate
and Beeps. Users can choose one or more of them. When the host is in standby status, long press【setting】once to
enter the system setting menu, like picture 3-5. Then press【up/down】to move to the “prompt setting”, like
picture 3-8. Next short press 【setting】to enter the menu, like picture 3-26. Press the 【up/down】to move to
diverse prompt modes, short press 【setting】to choose one of them, then press 【back】to quit.
Picture 3-26
3.2.6 Repeat signal
When buttons are triggered or transmitters send signal, the number of playing prompts can be selected as
needed, such as 1 time, 2 times, 3 times, 4 times or 5 times; users can choose one of them. In the standby mode,
long press 【setting】once to enter the system setting menu, as shown in picture 3-5, then press 【up and down】
to move to Repeat signal, as shown in picture 3-9, then press 【setting】to enter the setting menu of repeat time, as
shown in picture 3-27. Press 【up and down】to move to different kinds of prompts, short press 【setting】to
choose them, then press 【back】to quit.
Picture 3-27
3.2.7 Signal setting
Users can not only set the timing automatic switch to receive the signal but also manually turn on/off the
signal receiving function to avoid being disturbed and to achieve power saving. In standby status, long press the
【setting】once to enter the system setting menu, as picture 3-5. Press 【up/down】to move to “switch working”,
like picture 3-10; then press the 【setting】to enter the “switch working” menu, as shown in picture 3-28. Press
【up/down】to turn on/off switch working, and press the【setting】button to confirm, then press【back】to quit.
Picture 3-28
3.2.8Auto clear setting
Users can delete call records as needed. In the standby state, long press 【setting】once to enter the system
setting menu, as picture 3-5; then press 【up/down】to move to “switch working”, like picture 3-11. Next press
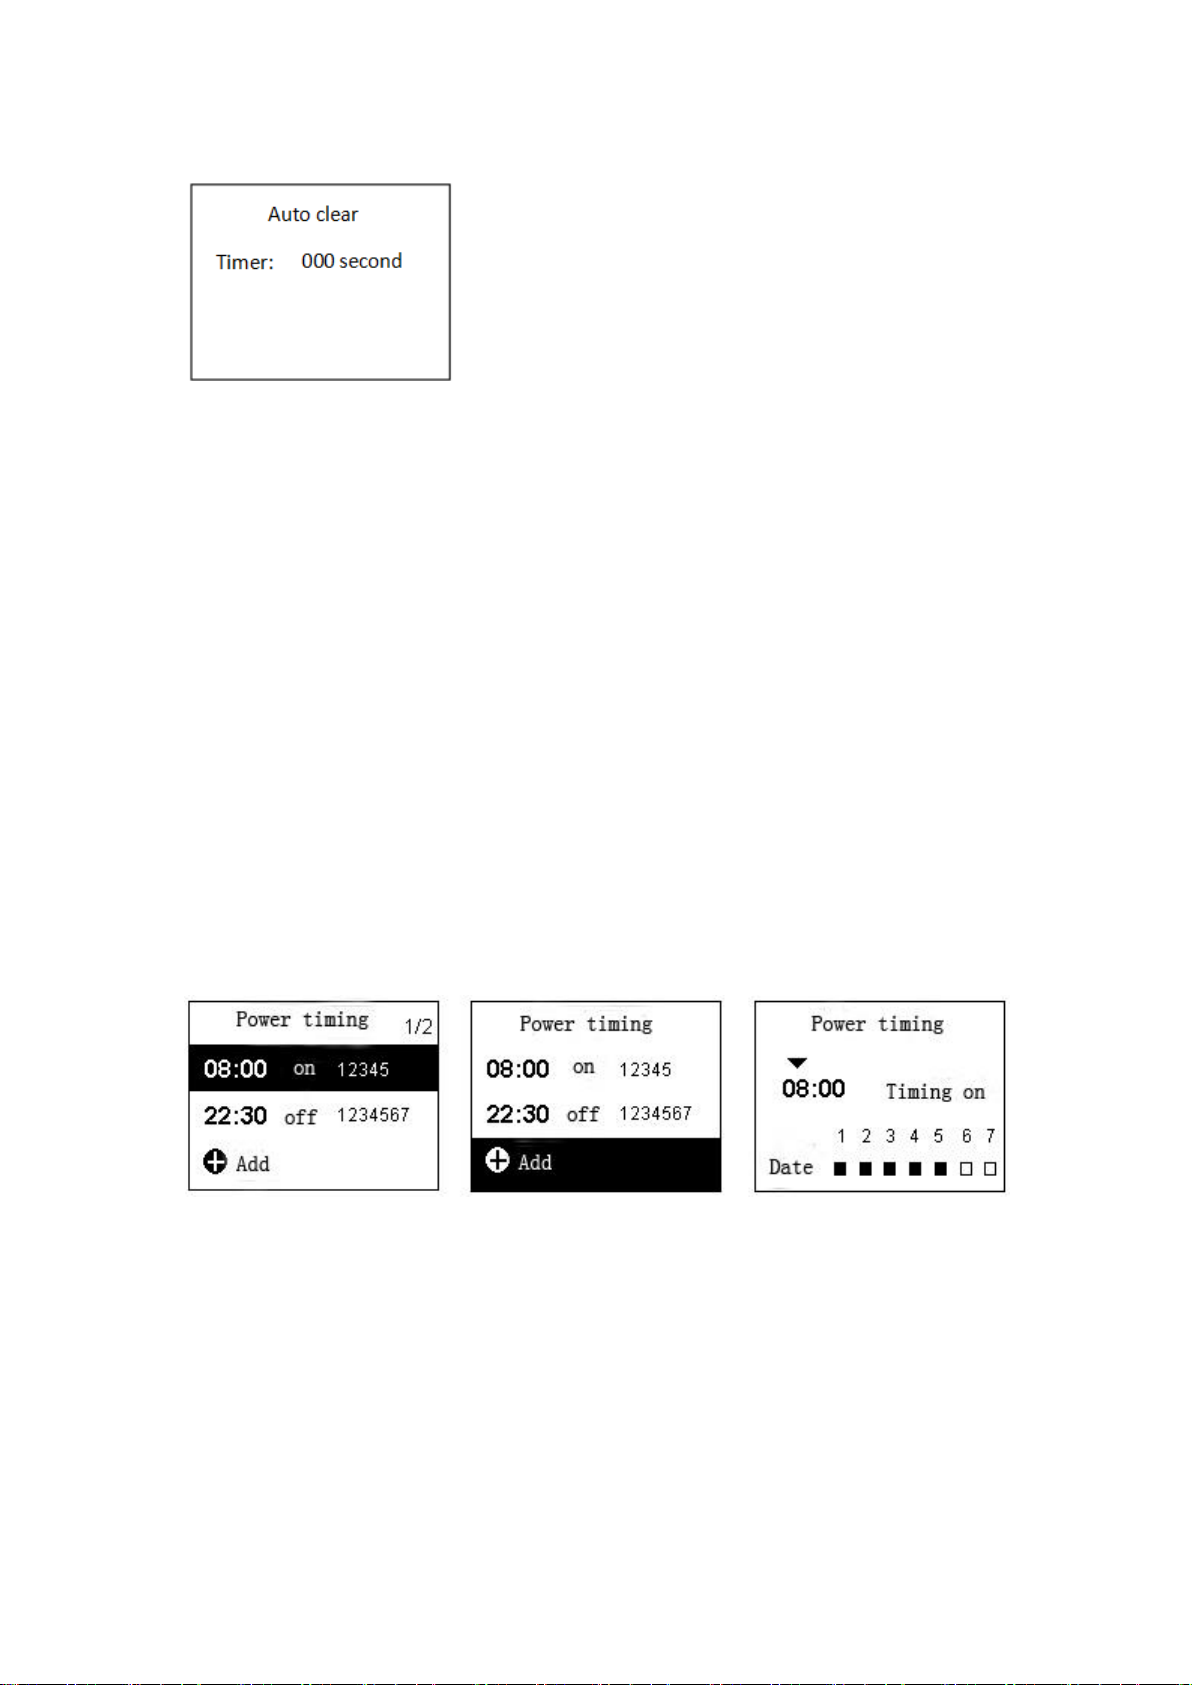
10
【setting】to enter switch working menu, like picture 3-29. Press 【up/down】to set the time of auto clearing, and
“000 second” means that the call records won’t be deleted automatically. After that, press 【back】to quit.
Picture 3-29
3.2.9 Time switch
Users can set the time switch for 10 sets at most to achieve intellectualized power control. In the standby
state, long press 【setting】once to enter the system setting menu, as shown in picture 3-5, then press
【up/down】to move to the “ Power timing”, as shown in picture 3-12. Next press 【setting】to enter power
timing menu, like picture 3-30.
1.Add time switch
As shown in picture 3-30, after pressing【up/down】to move to “add”, press 【setting】to set the time and
valid weeks; as shown in picture 3-32, press the 【setting】to move to set hours, minutes, weeks and to
choose timing on or timing off, press 【up/down】to adjust the numerical value. Users can set 10 sets of
timing at most. After setting, press 【back】to quit.
2.Edit time switch
As shown in picture 3-27, press【up/down】to move to the set which need to be edited, press the【setting】
to set time and valid weeks. As shown in picture 3-32, press 【setting】to set hours,minutes,weeks and to
choose timing on or timing off, and press 【up/down】to adjust the numerical value. After setting, press
【back】to quit.
3.Delete time switch
As picture 3-27, press 【up/down】to move to the set which need to be deleted, and long press 【setting】
to delete the selected set.
Picture 3-30 Picture 3-31 Picture 3-32
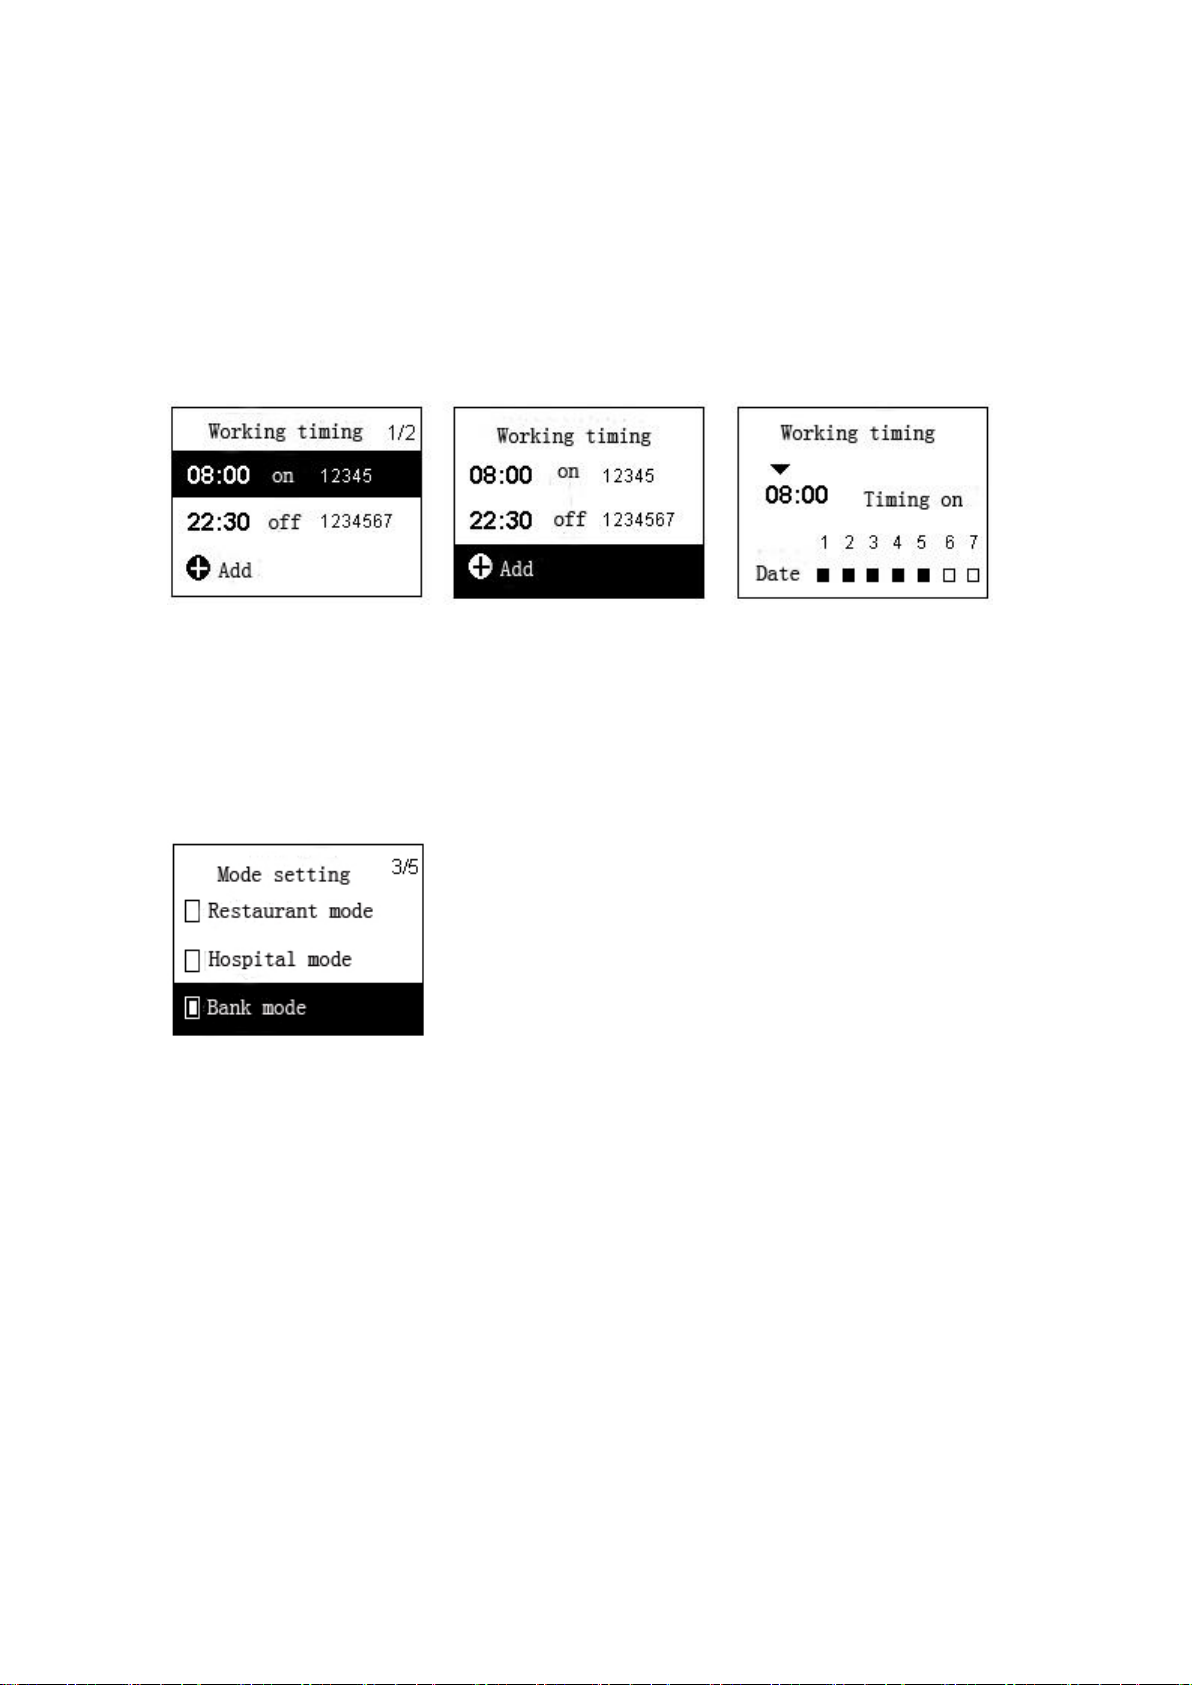
3.2.10 Signal receiving setting
Users can turn off the signal receiving function to avoid being disturbed and to achieve power saving. The
watch pager can set at most 10 sets of working timing to achieve intellectualized signal receiving control. In
standby status, long press 【setting】once to enter the system setting menu, as picture 3-5. Press 【up/down】to
move to “working timing”, like picture 3-13; then press the 【setting】to enter the “working timing” menu, as
shown in picture 3-33.
1. Add working timing
As picture 3-33, press【up/down】to move to the “add”, and press 【setting】to set time and valid weeks.
As picture 3-35, press the【setting】to move to hours, minutes, weeks,and to choose timing on or timing off,
and press 【up/down】to adjust the numerical value. Users can set 10 sets of timing at most.After setting,
11
press 【back】to quit.
2. Edit working timing
As picture 3-33, press 【up/down】to move to the set which need to be edited, press the 【setting】to set
time and valid weeks.As shown in picture 3-35, press 【setting】to set hours,minutes,weeks and to choose
timing on or timing off, and press 【up/down】to adjust the numerical value.After setting, press 【back】
to quit.
3. Delete working timing
As picture 3-33, press 【up/down】to move to the set which need to be deleted, and long press 【setting】
to delete the selected set.
Picture 3-33 Picture 3-34 Picture 3-35
3.2.11 Mode setting
The watch pager can be used in restaurants, hospitals, banks, factories and etc. Users can choose one of them
as needed. In standby status, press 【setting】to enter system setting menu, as shown in picture 3-5; then press
【up/down】to move to “mode setting”, as picture 3-14. Next press 【setting】enter the mode setting menu, as
picture 3-36. After that, press 【up/down】to move to “Restaurant mode”, “Hospital mode”, “Bank mode”,
“factory mode” or other modes, press 【setting】to choose one of them. Finally press 【back】to quit.
Picture 3-36
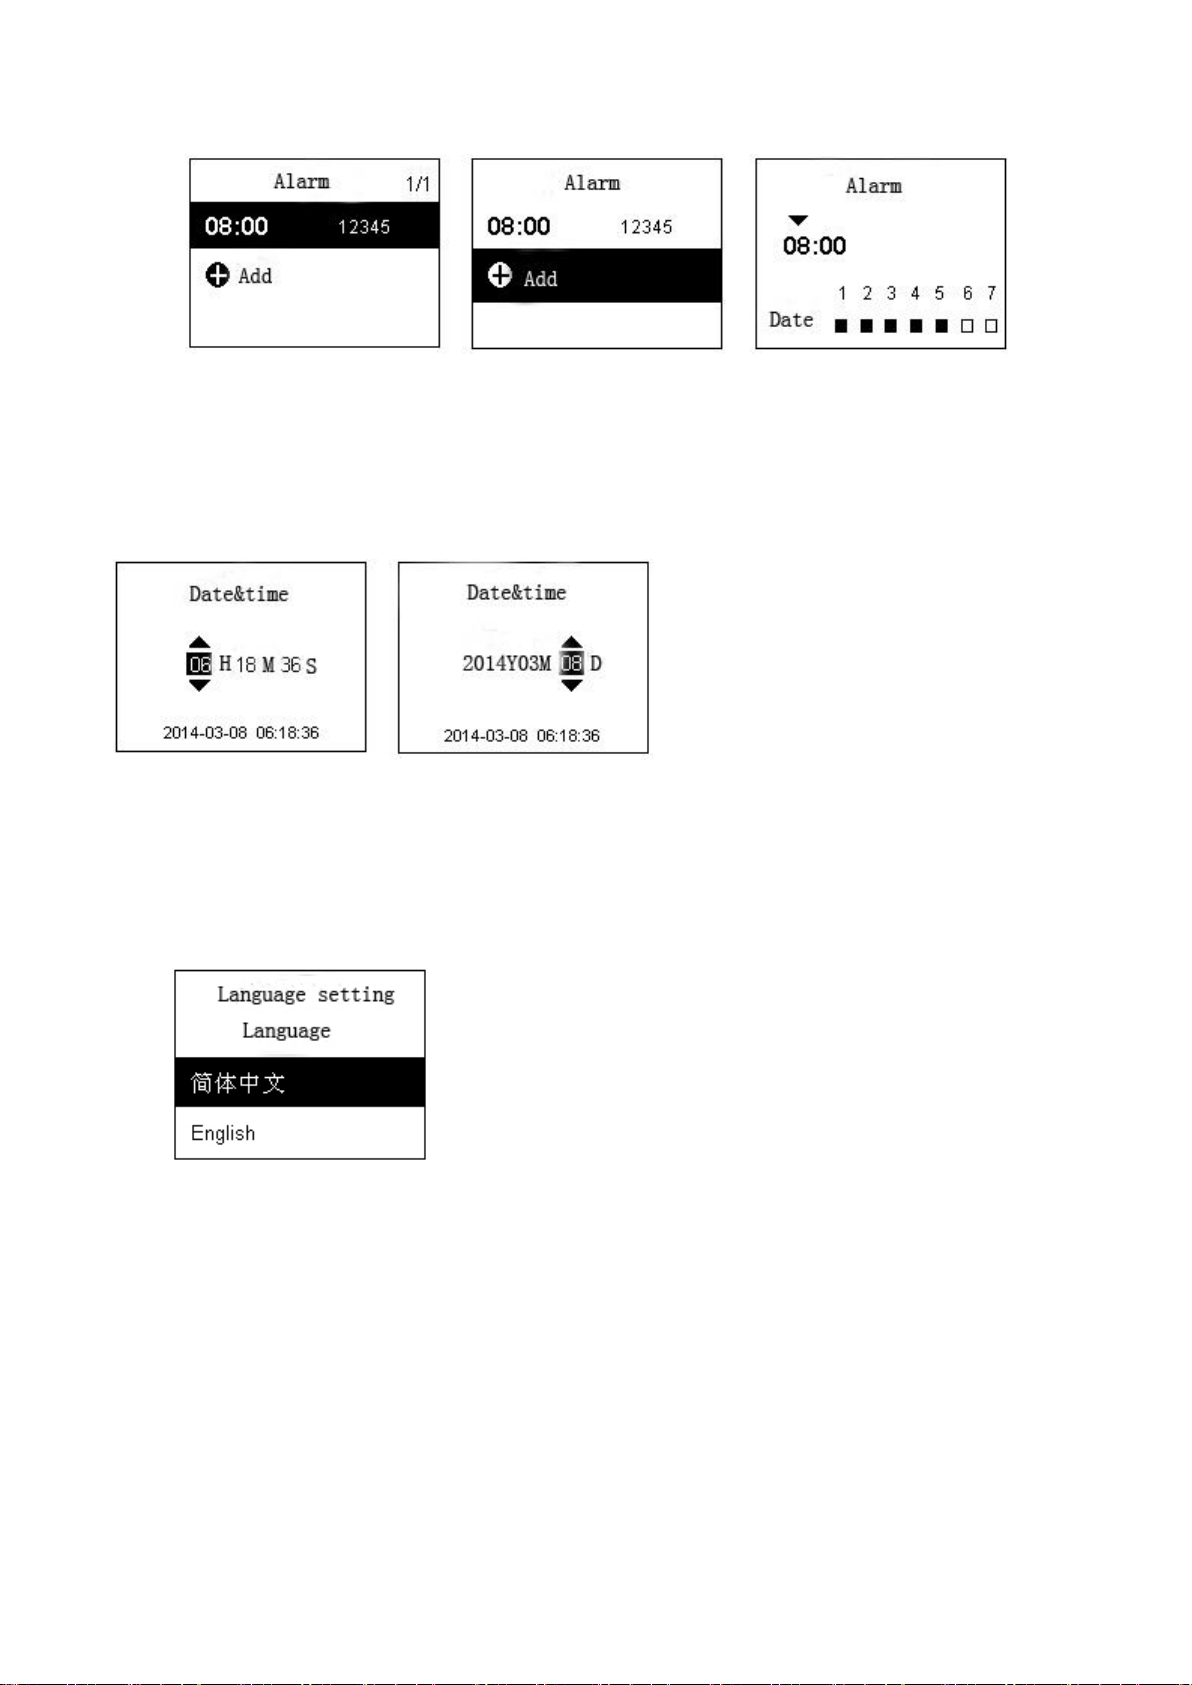
3.2.12Alarm setting
Users can set 10 sets of alarm clock at most. The alarm clock will still work when power off. In standby
status, long press 【setting】to enter the system setting menu, as picture 3-5; then press 【up/down】button to
move to “alarm setting”, as picture 3-15. Next, press 【setting】to enter the alarm setting menu, same as picture
3-37.
1. Add alarm
As picture 3-37, press 【up/down】to move to “add”, press 【setting】to set the time and valid days; as
picture 3-39, press 【setting】to move to hours,minutes,and the weeks and press 【up/down】to adjust the
numerical value. After that, press 【back】to quit. Users can set 10 sets of alarm clock at most.
2. Edit alarm
As picture 3-37, press 【up/down】to move to the set which need to be edited, press 【setting】to set the
time and valid weeks.As shown in picture 3-39, press 【setting】to move to hours, minutes,and weeks, and
press 【up/down】to adjust the numerical value. After that, press 【back】to quit.
3. Delete alarm
As shown in picture 3-37, press 【up/down】to move to the set which need to be deleted, long press
12
【setting】to delete it.
Picture 3-37 Picture 3-38 Picture 3-39
3.2.13 Date&time setting
Users can set the current date and time. When in standby status, long press【setting】to enter the system
setting menu, as picture 3-5. Then press 【up/down】to move to “date&time setting”, as picture 3-16. Next press
【setting】to enter the setting menu, as picture 3-40, and adjust the time with 【up/down】, at the same time press
【setting】to move to minutes, seconds, year, month and day, just as shown in picture 3-41.
Picture 3-40 Picture 3-41
3.2.14 Language setting
The product has Simplified Chinese/English to choose. Users can choose one of them as needed. In standby
status, long press【setting】to enter system setting menu, as shown in picture 3-5. Then press【up/down】to move
to “language”, as picture 3-17. Next press 【setting】to enter language setting menu, as picture 3-42. Press
【up/down】to move to “简体中文/English”, and press 【setting】to choose one of them.
Picture 3-42
3.2.15About me
Users can see the version information of the product and the customer service number of the manufacturer. In
standby status, long press【setting】once to enter the system setting menu, as picture 3-5. Then press【up/down】
to move to “About me”, as picture 3-18. Next press 【setting】to check the related information, as picture 3-43.
V1.0.0 is the version no., 140331 is the issuing date, and 4008-888-888 is the customer service number. After that,
press 【back】to quit.

13
Picture 3-43
3.3 ClockAlarm tone
The watch pager can set at most 10 sets of alarm (for setup method please refer to 3.2.5) to satisfy diverse
needs of users. When the time arrives at the set time and valid weeks, the watch will ring the buzzer, and the
screen will flicker for 1 minutes, as picture 3-39. When the alarm is working, users can press any buttons to stop
the alarm. The clock alarm will still work when power off.
4. Attentions
1.When the watch is in setting state, it cannot receive calls.
2.All the calling records will be deleted once the watch is power off.
3.When the watch is in calling state, short press【back】will only delete the current appeared calling record rather
than delete the added transmitters.
5. Technical parameters
1: Working voltage: built-in 3.7V rechargeable lithium battery, USB-5V to charge
2.Working current:<3mA
3.Standby current:<20uA
4.Receiving frequency: 433MHz
5.Receiving distance: 100 meters (open area)
6.Working temperature:-20℃--55℃
7.External size: 50×45×15mm (not including the watch strap)
6. Configuration listing
1. Watch Pager one pcs
2. USB Charger one pcs
3. User Manual one pcs
Users can choose to add one/ more button transmitters as needed. If users choose the transmitters from other
manufacturers, the key function of transmitters will need to be redefined( Setup method please refer to 3.2.2).
7 Common problems and solutions
Problems
Reasons
Solutions
1.The watch pager doesn’t respond
when pressing the transmitter buttons
1. Transmitters haven’t
been added successfully
2.The pager is short of
power
3.The signal receiving
function has been turned
off
1.Add a transmitter successfully
(please refer to 3.2.1Transmitter
adding)
2.Replace a new battery for the
watch pager
3 Switch on the signal working
(reference to 3.1.4Signal setting)

14
2. The watch pager need to send
signal nearby
The transmitter is short
of power
Replace the battery for the
transmitter
3. No vibration/buzzing/screen light
when receiving calls
There is no relevant
setting
Enter the prompt setting menu to
finish the related setting (Please
refer to 3.2.5)
4.The transmitter from other
manufacturers doesn’t match the
button
Key function of
transmitters doesn’t
match that of buttons
Reset the key function of transmitter
(Please refer to3.2.2 Keys function
setting)
5.Automatically power off
1. Short of power
2. A timing power off
has been set
1. Get charged
2. Delete the timing power off if
unnecessary (please refer to 3.2.6 )
Table of contents


