Mega Cocina MCGDSK12 User manual

ESTA UNIDAD ES SOLO PARA USO DOMESTICO PARA TOMACORRIENTES DE 120V.
Este electrodoméstico tiene enchufe polarizado (una de las clavijas del enchufe es más ancha que
la otra) para minimizar el riesgo de una descarga eléctrica. Este enchufe debe ser insertado en el
tomacorriente polarizado de una sola manera. Si el enchufe no entra por completo en el tomacorriente,
intente insertarlo al revés. Si aún no entra por completo, póngase en contacto con un electricista cali-
cado. No intente modicar la característica de seguridad en este enchufe.
THIS UNIT IS FOR HOUSEHOLD USE ONLY FOR 120V
To reduce the risk of shock, this appliance has a polarized plug (one blade is wider than the other.) This
plug ts polarized outlets only one way. If the plug does not fully insert in the outlet, reverse the plug.If
it still fails to t, contact a qualied electrician. Do not attempt to defeat this safety feature.
REF.: MCGDSK12
Save theSe inStructionS
Guarde eStaS inStruccioneS
12-INCH
ELECTRIC SKILLET
SARTÉN ELÉCTRICO
DE 12 PULGADAS


12 INCH ELECTRIC SKILLET
Parts Description................................................................................. 5
General Information ............................................................................ 7
Safety.................................................................................................... 9
Before Use.......................................................................................... 13
Assembly............................................................................................ 15
Use...................................................................................................... 17
Care and Cleaning............................................................................. 21
.................................................................................... 23
FAQ ..................................................................................................... 24
CONTENIDO
Descripción de las Partes................................................................. 25
Información General.......................................................................... 27
Seguridad........................................................................................... 29
Antes de Usar .................................................................................... 35
Ensamblaje......................................................................................... 37
Uso...................................................................................................... 39
Cuidado y Limpieza........................................................................... 43
............................................................................... 45
Preguntas Frecuentes....................................................................... 46
CONTENTS

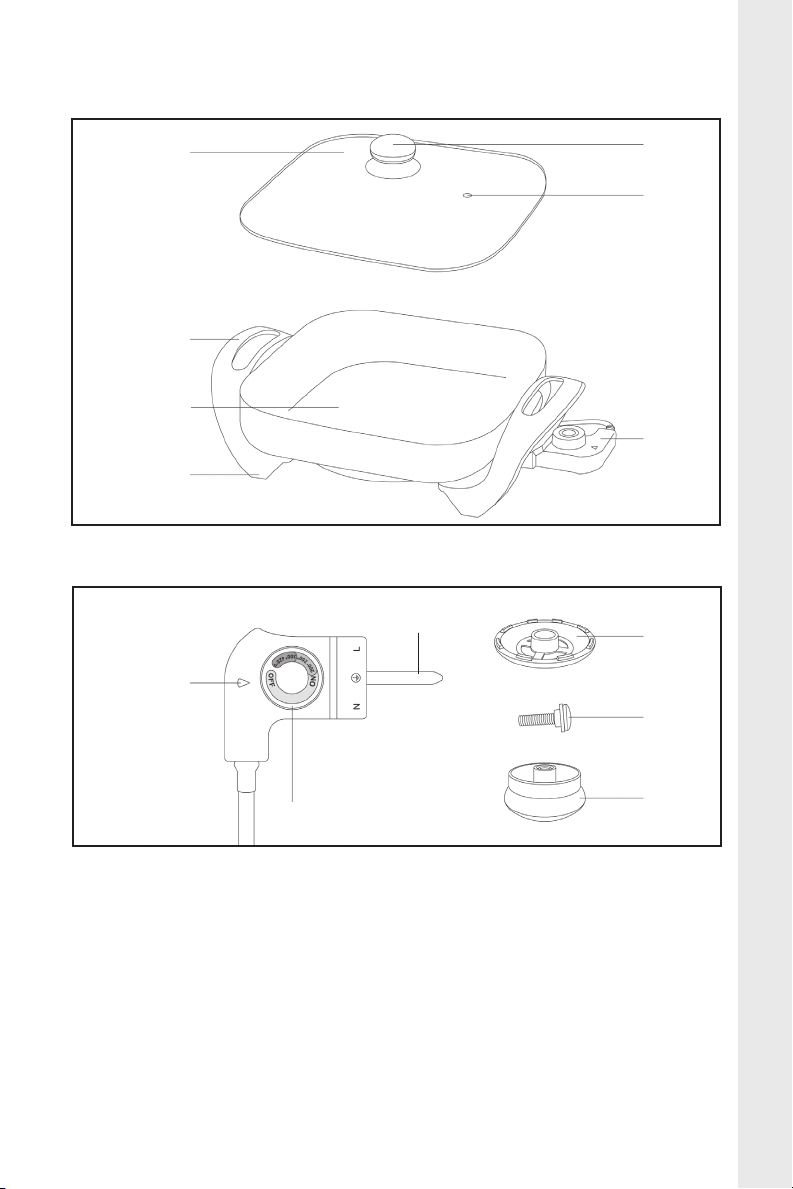
12 INCH ELECTRIC SKILLET PARTS DESCRIPTION
PARTS DESCRIPTION
1. Tempered Glass Lid (1)
2. Lid Handle (1)
3. Steam Vent (1)
4. Cool Touch Handles (2)
5. Aluminium Pan / Base Unit
with Non-Stick Coating (1)
6. Non-Slip Rubber Feet (4)
7. Temperature Control Probe (1)
8. Power Indicator Light (1)
9. Temperature Control Knob (1)
10. Lid Handle Base Plate (1)
11. Screw with Rubber Washer (1)
12. Lid Handle (1)
12
3
4
5
6
7
7
8
9
10
11
12
A
B
5


GENERAL INFORMATION
USER MANUAL
Inside this user manual you will nd information on how to use and main-
tain your 12-Inch Electric Skillet properly, including but not limited to, safety
instructions and precautions, assembly and use instructions, and frequently
asked questions. Please store this user manual in an easily-accessible
location for future reference. Words in italic small caps refer to settings on
the temperature control knob (e.g., on and oFF).
INTENDED USE
Your 12-Inch Electric Skillet has been designed for food preparation as
described in this user manual. DO NOT use this appliance for any other
purpose. This product is intended for household use only.
SAFE HANDLING
For your safety, the 12-Inch Electric Skillet should be handled with care, like all
powerful eléctrical appliances. Refer to the relevant guidelines in this user man-
ual to protect you and your family from misuse that could cause injury. NEVER
misuse your electric skillet and only use it for its intended household use.
It must be understood by the end user that common sense and caution are
attributes which cannot be built into the appliance, but must be supplied by
the end user, such as:
• ALWAYS insert the probe into the electric skillet so that the two ter-
minal pins on the skillet are rmly inserted into the respective slots
of the temperature control probe.
• ALWAYS switch the temperature control knob to oFF and unplug the
power cord after cooking or when not in use. Ensure all parts have
cooled before assembling, disassembling, or cleaning the appliance.
• ALWAYS move the electric skillet by its handles; it is recommended to
use heat-resistant gloves or oven mitts with the handles and glass lid.
• NEVER use the electric skillet on or near a hot gas or electric burner,
or in or near a heated oven.
• NEVER immerse the cord, plug, probe, or the base unit in water or
any other liquid.
7
12 INCH ELECTRIC SKILLET GENERAL INFORMATION


12 INCH ELECTRIC SKILLET SAFETY
9
THIS PRODUCT IS INTENDED
FOR HOUSEHOLD USE ONLY
IMPORTANT SAFETY INSTRUCTIONS
Danger of personal injury or damage to electric skillet due to
improper use.
Read and understand all safety precautions. Failure to follow all instructions
described in this user guide may result in electric shock, re or serious personal
injury. The warnings, cautions, and instructions discussed in this user guide
cannot cover all possible conditions and situations that may occur. It must be
understood by the user that common sense and caution are attributes which
cannot be built into the appliance, but must be supplied by the user.
ELECTRIC POWER
Before using the appliance for the rst time, check if the voltage of the
appliance corresponds to the voltage in your home. If an electric circuit is
overloaded with other appliances, the 12-Inch Electric Skillet may not operate
properly. The 12-Inch Electric Skillet should be operated on a separate electri-
cal circuit from other operating appliances.
Danger of personal injury or damage to electric skillet due to
improper use.
To reduce the risk of re, electric shock, or serious personal injury, please
read all instructions before using the 12-Inch Electric Skillet.
When using your 12-Inch Electric Skillet, basic safety precautions should
be observed, including the following:
1. READ ALL INSTRUCTIONS BEFORE USE.
2. DO NOT use this appliance for purposes other than its intended use.
3. This appliance is intended for household use only. DO NOT use the
appliance outdoors or for any other purpose, such as deep frying foods.
4. DO NOT use the appliance with a damaged electrical outlet.
!WARNING
!CAUTION
NL
!WARNING
!CAUTION
NL

12 INCH ELECTRIC SKILLET
SAFETY
10
5. DO NOT begin operating this appliance until it is properly assem-
bled; assemble the lid handle and rmly insert the temperature con-
trol probe before plugging the unit into an electrical outlet.
6. DO NOT attempt to modify the temperature control probe of the elec-
tric skillet; doing so may result in personal injury.
7. ALWAYS place the appliance on a level and stable surface.
8. DO NOT place the electric skillet on or near a hot gas or electric
burner, or in or near a heated oven.
9. DO NOT let the power supply cord hang over the edge of a table or
counter, or touch hot surfaces.
10. Before using for the rst time, check if the voltage indicator on the
base of the appliance corresponds to the voltage in your home.
11. While in use, leave about 6-8 inches of open space all around the
exterior of the electric skillet.
12. DO NOT touch hot surfaces; ALWAYS use the handle or knobs with
heat-resistant gloves, dishcloth, or oven mitts.
13. Oversized foods must not be inserted into the appliance as they may
create a re hazard or risk of electric shock.
14. Use extreme caution when moving the appliance containing hot oil
or other hot liquids.
15. NEVER use an unauthorized attachment; the use of attachments
or accessories not recommended or sold by the manufacturer may
result in re, electric shock or injury.
16. DO NOT leave the appliance unattended while it is in use.
17. Close supervision is necessary when any appliance is used near
incapacitated persons, children or pets.
18. Keep the appliance out of the reach of children and pets. This
appliance is not intended for use by children or incapacitated
persons.
19. To disconnect the electric skillet from the electrical outlet, ensure
the appliance is switched off, by verifying that the temperature con-

12 INCH ELECTRIC SKILLET SAFETY
11
trol knob is turned to the oFF position, and then unplug the cord
from the electrical outlet. DO NOT pull on the power cord.
20. ALWAYS unplug the unit from the electrical outlet when not in use.
21. To protect against electric shock, DO NOT plug or unplug the appli-
ance into or from the electrical outlet with a wet hand.
22. DO NOT put any stress on the power cord where it connects to the
appliance, as the power cord could fray and break.
23. ALWAYS ensure the appliance is unplugged from the electrical out-
let, and all parts have cooled before assembling, disassembling,
relocating or cleaning the unit.
24. To protect against electric shock, DO NOT expose or immerse the base
unit, power cord or plug of this appliance in water or any other liquid.
25. DO NOT operate the appliance if it has a damaged or cut power cord
or plug, if the wires are exposed, if the unit malfunctions, if the unit is
dropped or damaged, or if the base unit is dropped in or exposed to
water.
26. DO NOT store any materials in this skillet when it is not in use.
27. This appliance has no user serviceable parts. DO NOT attempt to
examine or repair this appliance yourself.
SAVE THESE INSTRUCTIONS FOR FUTURE REFERENCE
SAFETY WARNINGS
Although the appliance is easy to operate, the warnings below must be
followed for your safety:
• DO NOT place the appliance near a heat source.
• DO NOT use the appliance on an unstable surface.
• DO NOT unplug the appliance by pulling on the power supply cord.
• The appliance must be unplugged and cooled before any cleaning.
• DO NOT immerse the temperature control probe, plug, or any por-
tion of the electric skillet base in water or any other liquid.
• If the appliance appears to be faulty, it must be unplugged, and
then contact the manufacturer.

12 INCH ELECTRIC SKILLET
SAFETY
12
SAFETY AND PROTECTIVE EQUIPMENT
Polarized Plug
The electric skillet has a polarized plug (as
shown in Figure C, one blade is wider than the
other). To reduce the risk of electric shock, this
plug is intended to t into a polarized outlet only
one way. If the plug does not t fully into the out-
let, reverse the plug. If it still does not t, contact
a qualied electrician. DO NOT attempt to modify the plug in any way. Addi-
tionally, if the polarized plug ts loosely into the electrical outlet or if the electri-
cal outlet feels warm, DO NOT use the respective outlet.
Danger of personal injury or damage to electric skillet due to
improper use.
A short power supply cord is provided to reduce the risk of becoming entangled
in or tripping over a longer cord. An extension cord is not recommended for
use with this product, but if necessary, the marked electrical rating must be at
least as great as that of the product. Arrange the extension cord so that it will
not drape over the countertop or tabletop where it can be tripped over or pulled.
Temperature Control Probe Power Cord
For your safety, the electric skillet utilizes a power cord with two terminal
slots, which must be rmly connected to the respective probe slot and
terminal pins on the skillet before plugging the unit into an electrical outlet.
DO NOT attempt to modify any part of the power cord; doing so may result
in personal injury.
!WARNING
!CAUTION
NL
C

12 INCH ELECTRIC SKILLET BEFORE USE
13
BEFORE USE
Danger of personal injury or damage to electric skillet due to
improper use.
To reduce the risk of re, electric shock, or serious personal injury, DO
NOT immerse the temperature control probe or the electric skillet in water
or any other liquid.
1. Before using the appliance for the rst time, carefully unpack and
remove all packaging materials.
2. Assemble the lid handle and wash the lid using warm, soapy water.
DO NOT use abrasive cleaners or scouring pads to clean any part of
the product.
3. Wipe the skillet with a soft, damp cloth or paper towel. DO NOT im-
merse the skillet or the temperature control probe in water or any
other liquid. Dry the surface of the skillet and lid with a clean soft
cloth or paper towel before assembling the electric skillet.
4. After assembling the electric skillet for the rst time, lightly brush the
cooking surface with vegetable oil. Heat the skillet, uncovered, to
300°F and then, immediately turn the temperature control knob to
oFF and then allow the skillet to cool completely. Wipe away any
excess oil.
Helpful Tip: Due to manufacturing processes, some slight smoke and/or odor
may be detected during initial use of the electric skillet. This is normal with many
heating appliances and it will not recur after a few uses.
!WARNING
!CAUTION
NL


12 INCH ELECTRIC SKILLET ASSEMBLY
15
ASSEMBLY
Risk of personal injury or damage to electric skillet due to improper
handling.
Ensure the temperature control probe is unplugged from the electrical
outlet before handling, assembling or disassembling the electric skillet.
Secure the lid handle to the glass lid before using.
The 12-Inch Electric Skillet comes preassembled with the exception of the
following:
1. Tempered Glass Lid
2. Temperature Control Probe
TEMPERED GLASS LID ASSEMBLY
Risk of personal injury or damage to electric skillet due to improper
handling.
Over-tightening the screw may result in stripping the screw or cracking the
lid and/or lid handle.
1. Remove the lid handle, base plate and screw (with rubber washer at-
tached) from its packaging. The handle set is prepackaged in a man-
ner that differs from nal assembly; refer to Figures B, D and E for
additional information. Carefully separate the lid handle from the base
plate. The screw with the rubber washer is prepackaged inside the lid
handle. Remember to reverse the base plate prior to nal assembly.
HELPFUL TIP: If the rubber washer is not preassembled to the screw,
gently slide the washer onto the screw so the larger end of the washer is
ush against the head of the screw.
Prepackaged Handle Set Base Plate Lid Handle
Screw with
Rubber Washer
D
!WARNING
!CAUTION
NL
!WARNING
!CAUTION
NL

12 INCH ELECTRIC SKILLET
ASSEMBLY
16
2. Insert the screw with rubber
washer through the center of
the lid on the caved interior side.
Ensure the lip of the washer
is inserted through the hole.
The base of the rubber washer
should be ush against the tem-
pered glass lid.
3. Place the base plate over the
center of the lid on the raised exterior side. Then, placing the lid
handle over the base plate, rotate the handle clockwise onto the
screw and tighten.
TEMPERATURE CONTROL PROBE ASSEMBLY
As shown in Figure F, insert the probe into the electric skillet so that the
two terminal pins on the skillet are rmly inserted into the respective slots
of the temperature control probe (as shown in Figure G).
E
Lid Handle
Base Plate
Lid
Rubber Washer
Screw
Electric Skillet
Temperature Control Probe
F
G
12 INCH ELECTRIC SKILLET USE
17
USE
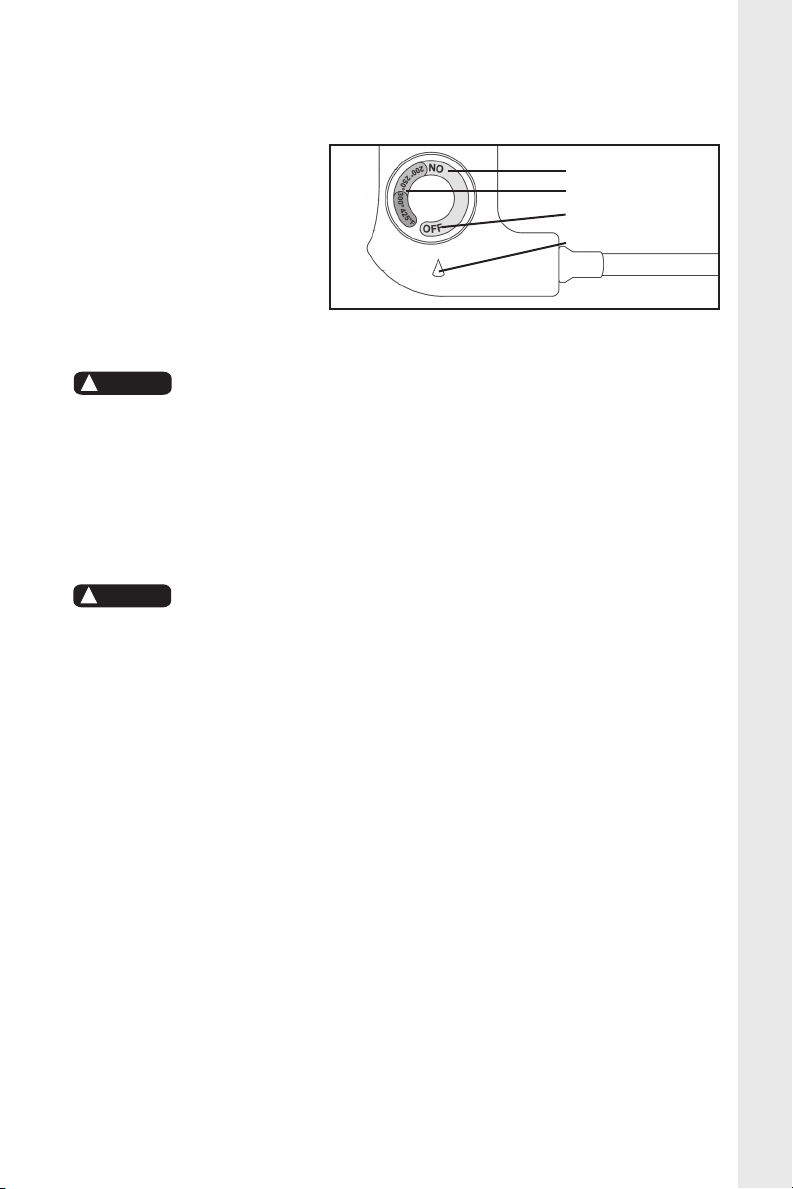
CONTROL PANEL
a. on
b. Temperature Range:
200°F to 450°F
c. oFF
d. Power Indicator Light
OPERATION
Danger of personal injury or damage to electric skillet due to
improper use.
To reduce the risk of re, electric shock, or serious personal injury, DO
NOT immerse the temperature control probe or the electric skillet in water
or any other liquid.
Risk of personal injury due to improper handling.
Use caution when removing the temperature control probe from the skillet.
The electric skillet may still be hot even after it is turned off.
1. Before using, make sure the temperature control probe is removed
and the electric skillet is wiped with a soft, damp cloth.
2. Place the electric skillet on a dry, level and heat-resistant surface.
Leave about 6-8 inches of open space all around the exterior of the
electric skillet.
Helpful Tip: If you plan to use the electric skillet for an extended period of
time, it is recommended to place a heatresistant pad or trivet under the skillet
beforehand to prevent possible damage to the countertop or table surface.
3. Insert the probe into the electric skillet so the two terminal pins on
the skillet are rmly inserted into the respective slots of the tem-
perature control probe.
4. Plug the power supply cord into the electrical outlet.
a
b
c
d
!WARNING
!CAUTION
NL
!WARNING
!CAUTION
NL

12 INCH ELECTRIC SKILLET
USE
18
5. Remove the lid and preheat the electric skillet by turning the tem-
perature control knob to the desired temperature. Adjust the cook-
ing temperature slightly up or down to achieve the results you
prefer. The power indicator light turns off when the selected tem-
perature is reached.
Helpful Tip: To preserve the nonstick coating of the aluminium
pan, apply a light coating of cooking oil over the cooking surface.
If heating oil, ALWAYS remove the lid. If the cooking oil smokes,
immediately turn the temperature control knob to oFF and allow
the unit to cool.
6. Cook the desired food in the electric skillet. When adding food, the
power indicator light will activate briey as the overall cooking tem-
perature is reduced.
Helpful Tip: To pan-fry, select either vegetable or peanut oil. DO NOT use
more than 1 cup of oil. Butter and olive oil should only be used to saute
foods on a lower temperature setting. The electric skillet is not designed
to deep fry foods.
7. While cooking, the power indicator light will turn on and off, indicat-
ing that the desired temperature is being maintained by the electric
skillet; this is normal. The power indicator light will activate when you
adjust or reset the temperature.
Helpful Tip: Only use nylon or heat-resistant plastic cooking utensils,
as metal utensils may scratch the non-stick cooking surface of the
aluminium pan.
8. A steam vent is integrated into the glass lid. The steam vent allows
steam to escape while cooking with the lid in place.
Helpful Tip: Escaping steam can be hot; use extreme caution when re-
moving or lifting the glass lid from the electric skillet or when returning the
glass lid back onto the skillet. It is recommended to use oven mitts when
handling a hot glass lid.
9. Turn the temperature control knob to the oFF position when cook-
ing is complete. Unplug the power supply cord from the electrical
12 INCH ELECTRIC SKILLET USE
19
outlet rst, and then disconnect the temperature control probe from
the electric skillet.
10. When moving or relocating the electric skillet, ALWAYS use the handles.
Helpful Tip: For added safety, use heat-resistant gloves, dishcloth, or
oven mitts. Use extreme caution when moving the appliance containing
hot oil or other hot liquids.
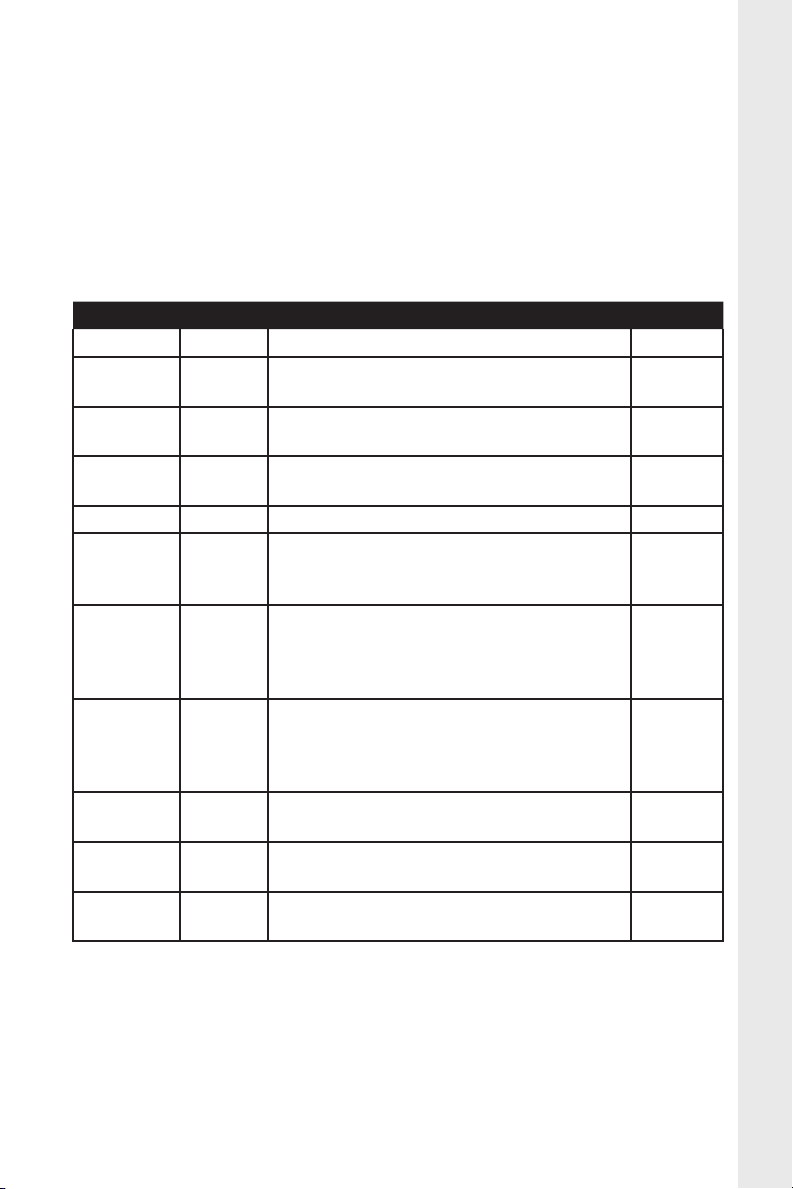
TEMPERATURE GUIDE
FOOD AMOUNT DIRECTIONS TEMP.
Burgers 1/4 lb. 3 to 9 minutes per side (medium) 300°F
Steak 1” thick,
boneless
9 to 12 minutes per side 300°F
Chicken boneless
breasts
6 to 7 minutes per side 300°F
French
Toast
3 to 5 minutes per side 325°F
Pancakes 1 to 3 minutes per side 300°F
Fried Eggs 1 to 6
eggs
Melt 1 to 2 tsp. butter or margarine in the skillet
2 to 3 minutes for the rst side
1 to 2 minutes for the second side.
300°F
Poached
Eggs
1 to 6
eggs
Pour 2 cups water and 1 tsp. cider vinegar in
skillet, heat mixture to boiling, then break each
egg into a bowl; slip them into water and cover
with glass lid, cook 2 to 3 minutes
300°F
Scrambled
Eggs
Melt 1 to 2 tablespoons butter or margarine in
the skillet, add eggs and stir gently while cook-
ing, until eggs are set and cooked.
3 to 4 minutes
300°F
Bacon 5 minutes for the rst side,
1 to 3 minutes for the second side
300°F
Sausage
Links
8 to 10 minutes 300°F
Sausage
Patties
6 minutes for the rst side,
5 to 6 minutes for the second side
300°F
NOTE: The cooking temperatures listed in this user manual are estimates.
Adjust the cooking temperature slightly up or down to achieve the results
you prefer.

Table of contents
Languages:
Other Mega Cocina Kitchen Appliance manuals


