Megamoto MM-B105 User manual

READ%ALL%OF%THE%INSTRUCTIONS%BEFORE%REMOVING%BIKE%FROM%THE%STEEL%
SHIPPING%CRATE%AND%ASSEMBLING%THE%BIKE.%MAKE%SURE%YOU%UNDERSTAND%THE%
INSTRUCTIONS%BEFORE%YOU%BEGIN.
1
MM-B80/105 ASSEMBLY
INSTRUCTIONS
For%instructional%videos%visit:%megamotousa.com
e%
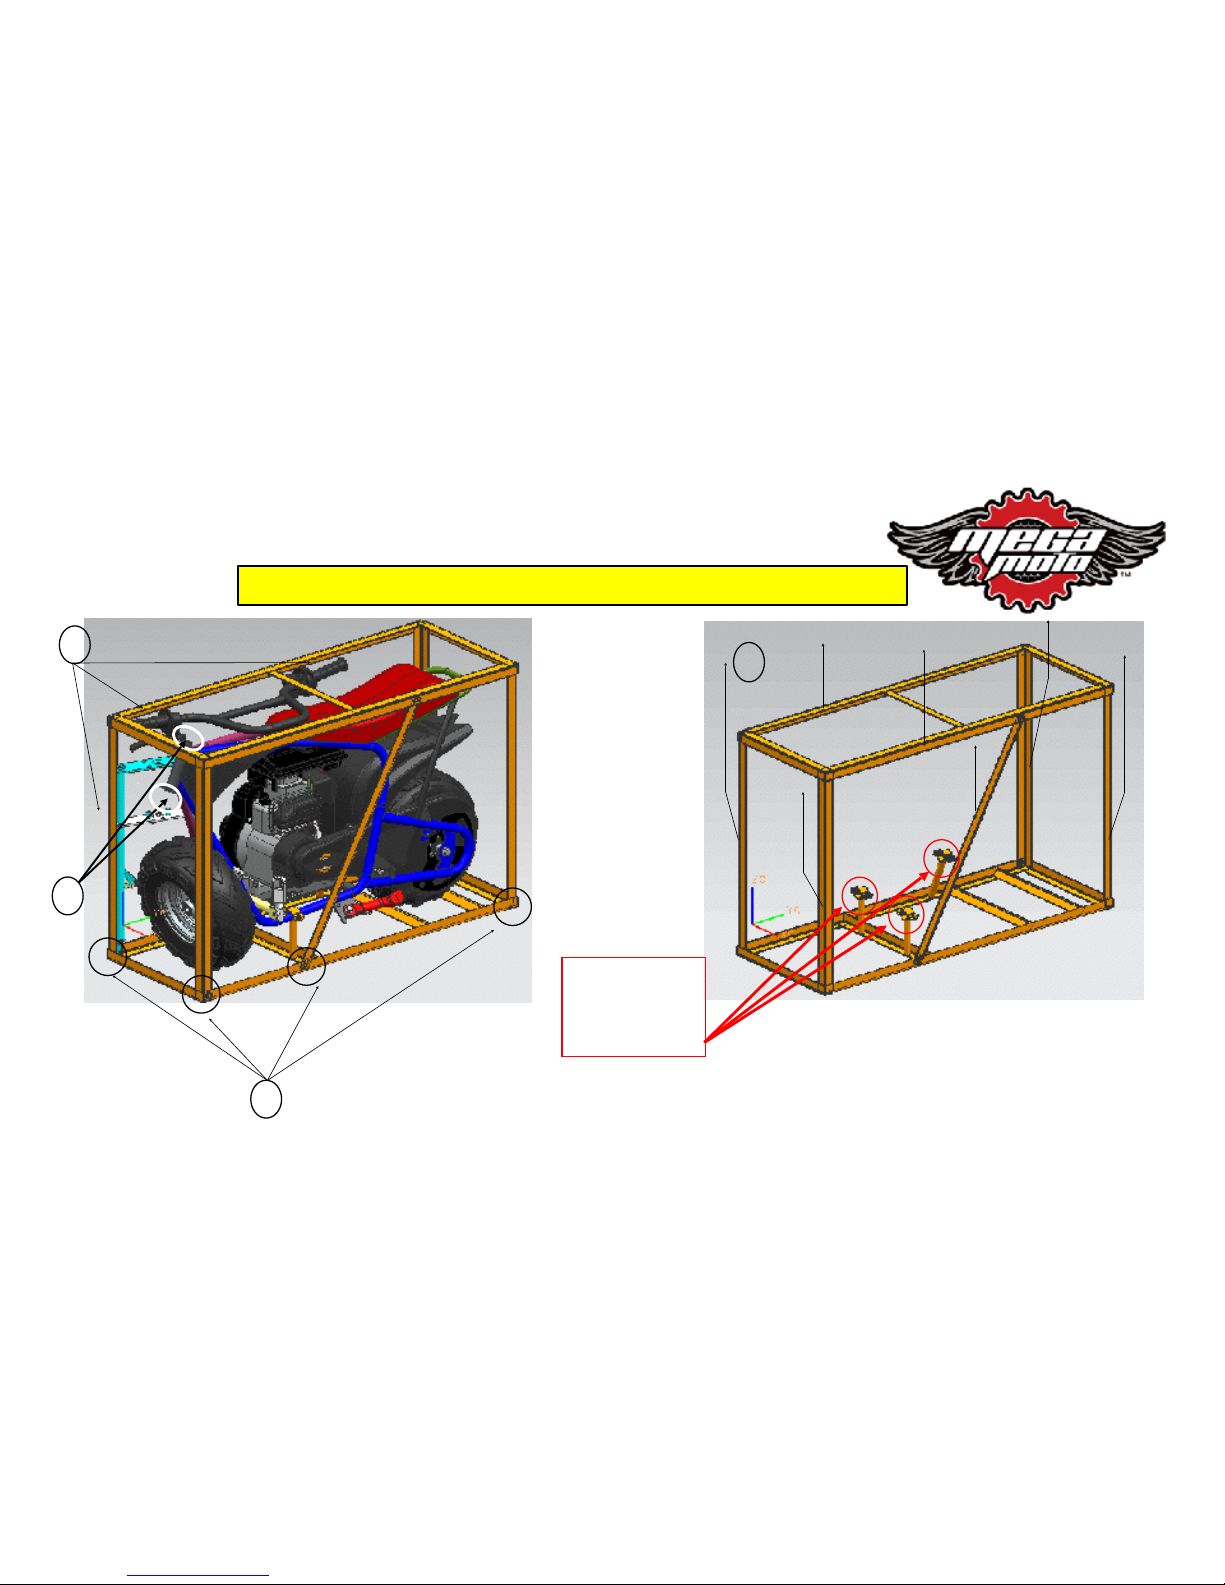
After%you%have%removed%bike%
in%the%steel%crate%from%the%
cardboard%box:%
1) Cut%the%ties%that%
secure%the%handlebar%
and%front%fork%to%the%
steel%packing%frame%
2) Remove%the%bolt%and%
nut%that%secures%the%
mini%bike%steering%
head%to%the%top%steel%
shipping%crate%
3) Loosen%and%remove%
the%%6%bolts%and%nuts%
that%secure%the%upper%
steel%crate%and%vertical%
supports%to%the%crate%
base.%NOTE:&Do%not%
loosen%the%3%supports%
on%the%bottom%of%the%
steel%shipping%crate%
that%attach%to%the%mini%
bike%frame.%
4) Lift%off%the%upper%steel%
crate%with%the%vertical%
supports%and%discard.
1
2
3
MM-B80/105 ASSEMBLY INSTRUCTIONS
2
UNPACKING
WEAR&PROTECTIVE&GLOVES&WHEN&HANDLING&THE&STEEL&CRATE
4
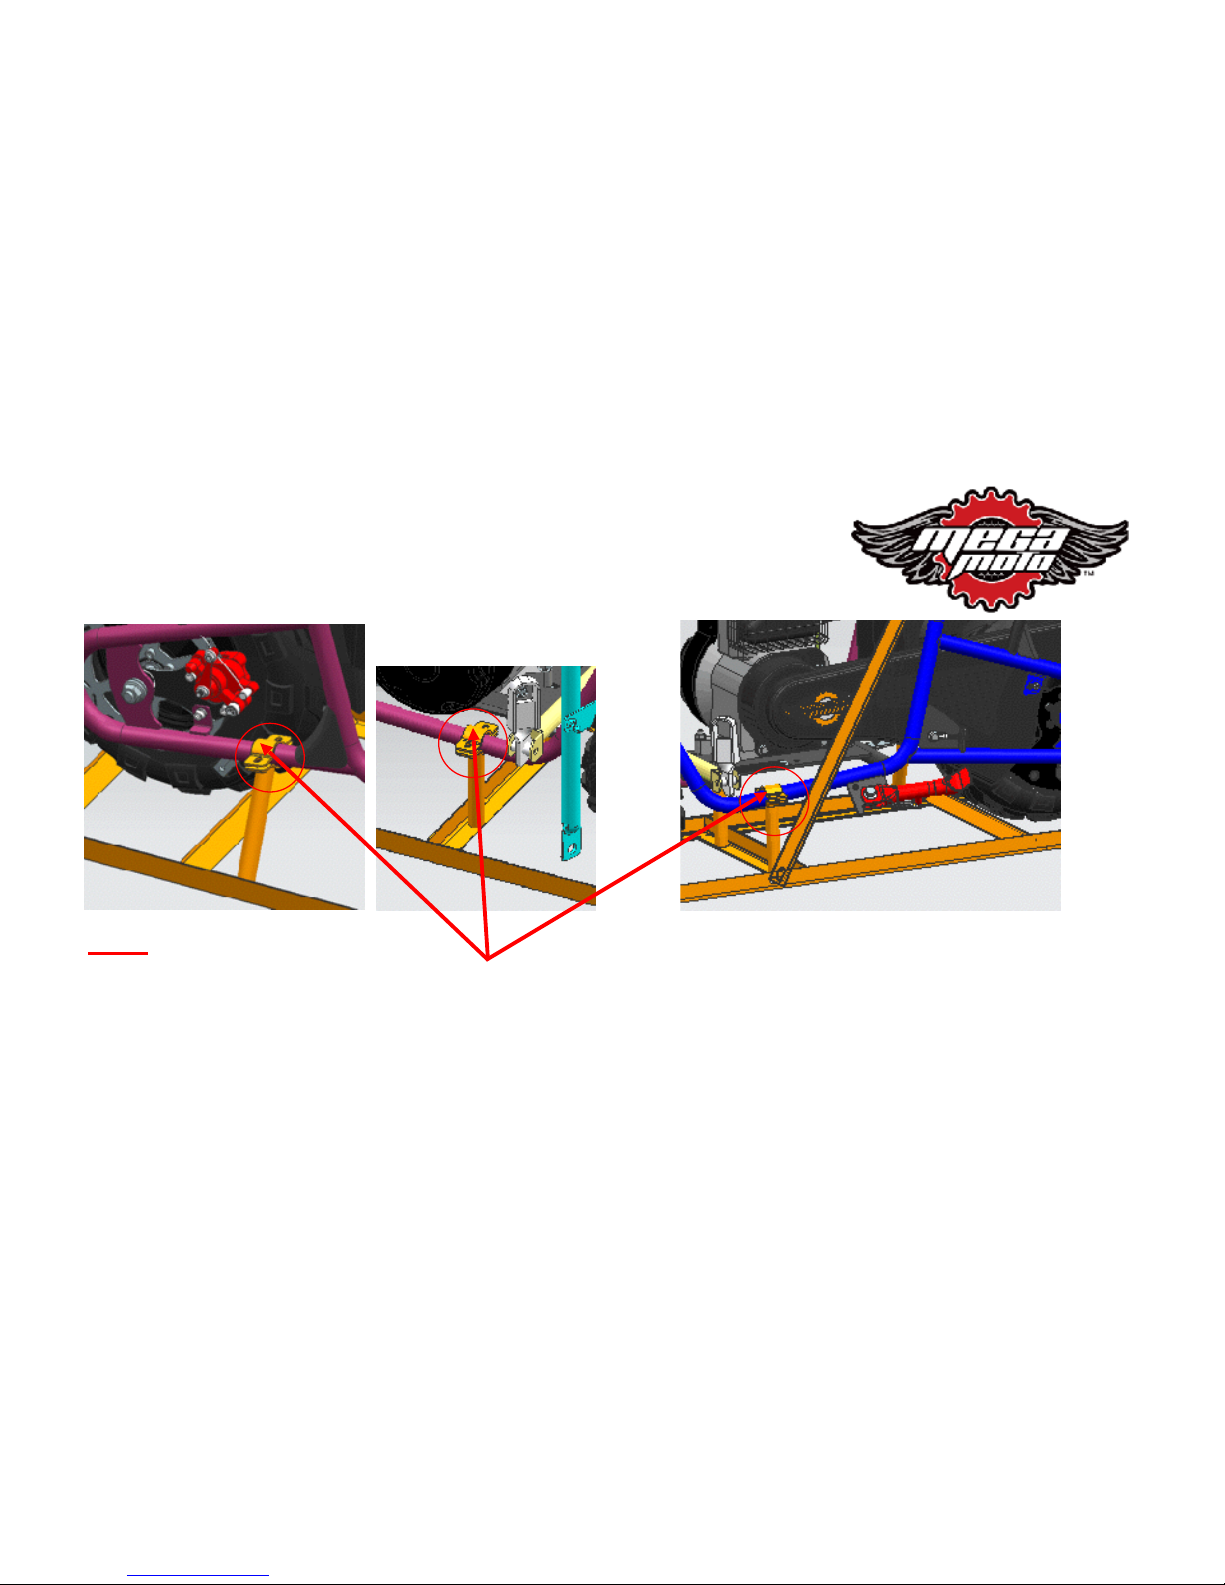
LEAVING%THE%BIKE%ATTACHED%TO%THESE%THREE%BRACKETS%WILL%MAKE%THE%FRONT%FORK%AND%FRONT%
WHEEL%ASSEMBLY%MUCH%EASIER.%WHEN%ASSEMBLY%IS%COMPLETE%AND%OIL%HAS%BEEN%ADDED%TO%THE%
ENGINE,%THEN%YOU%CAN%UNBOLT%THE%THREE%BRACKETS%AND%REMOVE%THE%SHIPPING%CRATE%BASE%AND%
DISCARD%IT.
RIGHT%SIDE%OF%BIKE%NEAR%REAR%WHEEL
RIGHT%SIDE%OF%BIKE%NEAR%THE%
FOOTPEG
LEFT%SIDE%OF%BIKE%NEAR%THE%FOOTPEG
MM-B80/105 ASSEMBLY INSTRUCTIONS
3
UNPACKING
NOTE:

MM-B80/105 ASSEMBLY INSTRUCTIONS !
FRONT&FORK&AND&HANDLEBAR&HARDWARE NUMBER&PLATE&AND&RIGHT&
GUSSETT FRONT&FENDER FRONT&WHEEL
1
2
3
4
5
6
7
8
9
10
11
12
13
14
15
1) STEERING&PIVOT&BOLT&(1PC)&
2) STEERING&PIVOT&NUT&(1PC)&
3) HANDLEBAR&CLAMP&BOLTS&
(4PCS)&
4) UPPER&HANDLEBAR&CLAMPS&
(2PCS)&
5) LOWER&HANDLEBAR&CLAMPS&
(2PCS)&
6) HANDLEBAR&CLAMP&NUTS&
(4PCS)
7)&&&&&FRONT&NUMBER&PLATE&(1PC)&
8)&&&&&RIGHT&GUSSET&PLATE&(1PC)&
9) &&SCREWS&(M6)&(6PCS)&
10) &&PLASTIC&WASHERS&(6PCS)&
11) &&FRONT&FENDER&
12) &&AXLE&BOLT&(1PC)&
13) &&AXLE&NUT&(1PC)&
14) &&AXLE&SPACER&(2PCS)&
15) &&FRONT&WHEEL/TIRE&ASSEMBLY&(1PC)&&&&
PARTS:
4
NOTE:%It%is%advisable%to%gather%the%parts%as%shown%so%they%
are%easy%to%locate%during%assembly.%%
Wear&protective&gloves&and&eyewear&whenever&working&on&your&mini&bike.
Oil%is%not%provided%with%the%mini%bike.%12oz%of%10W30%Motor%Oil%is%needed.
MM-B80/105 ASSEMBLY INSTRUCTIONS
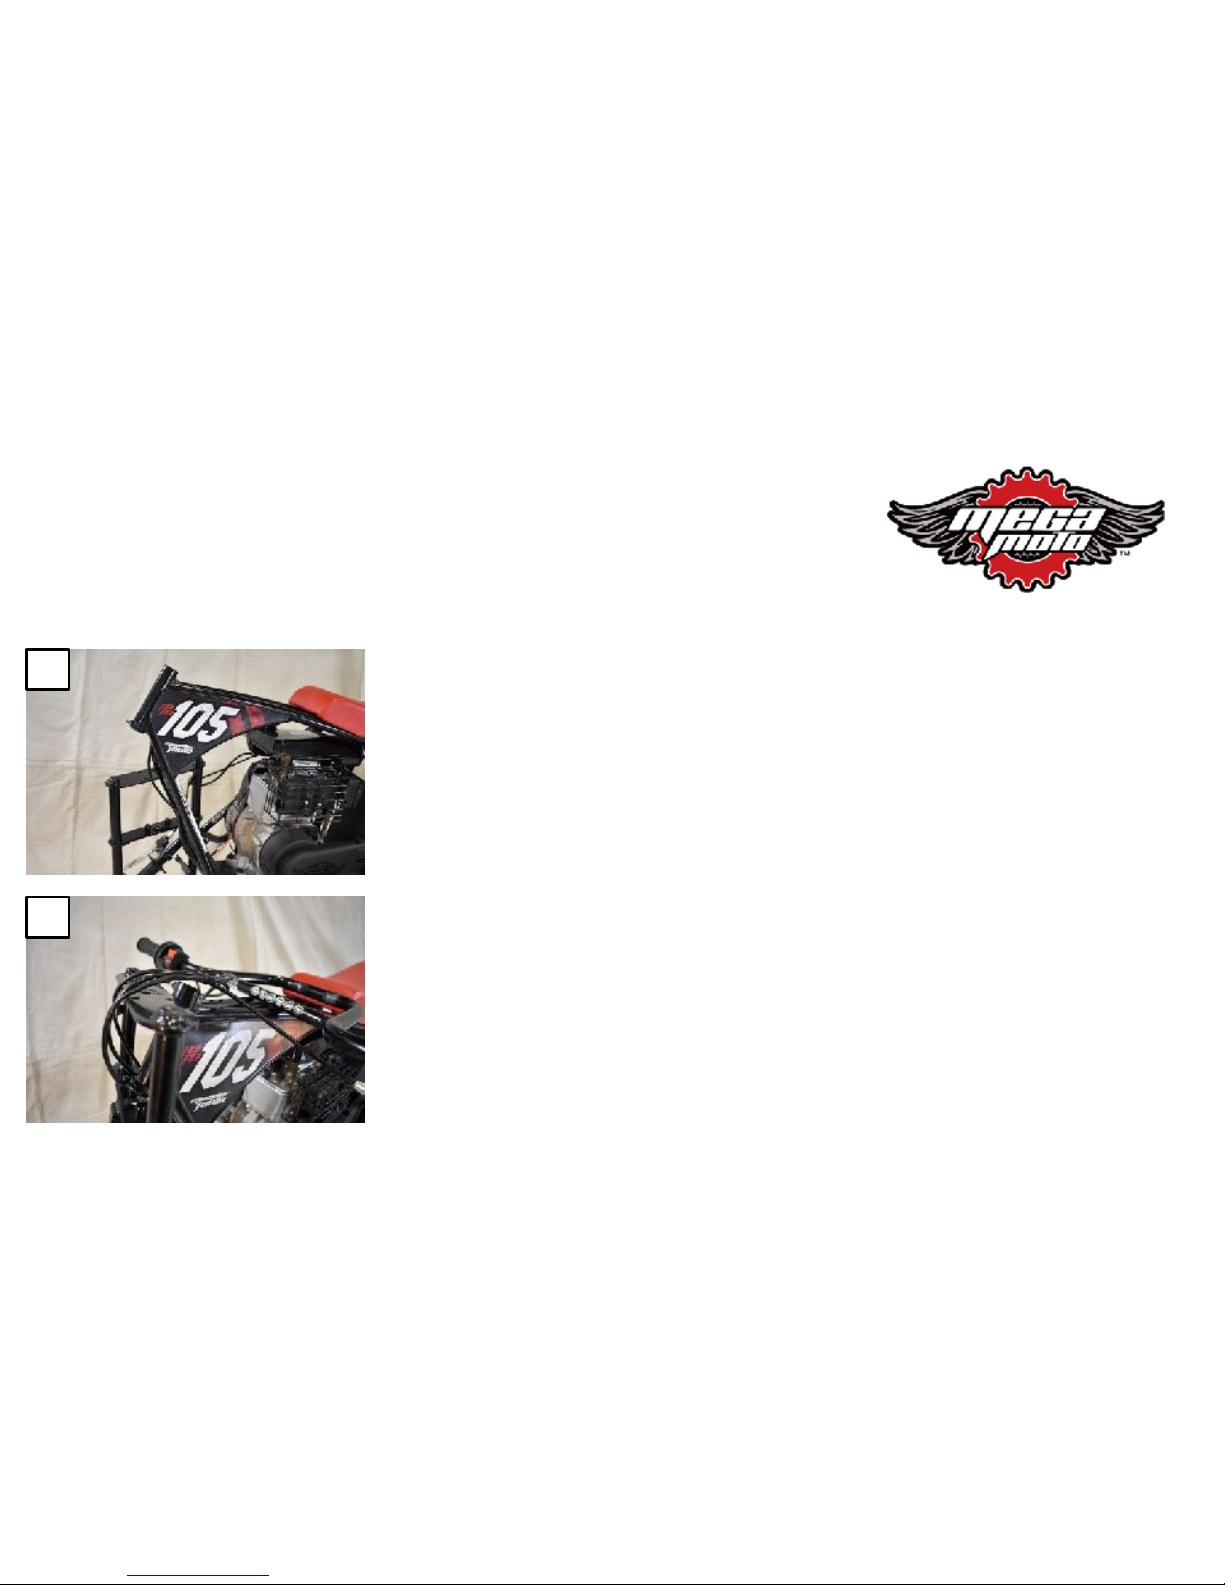
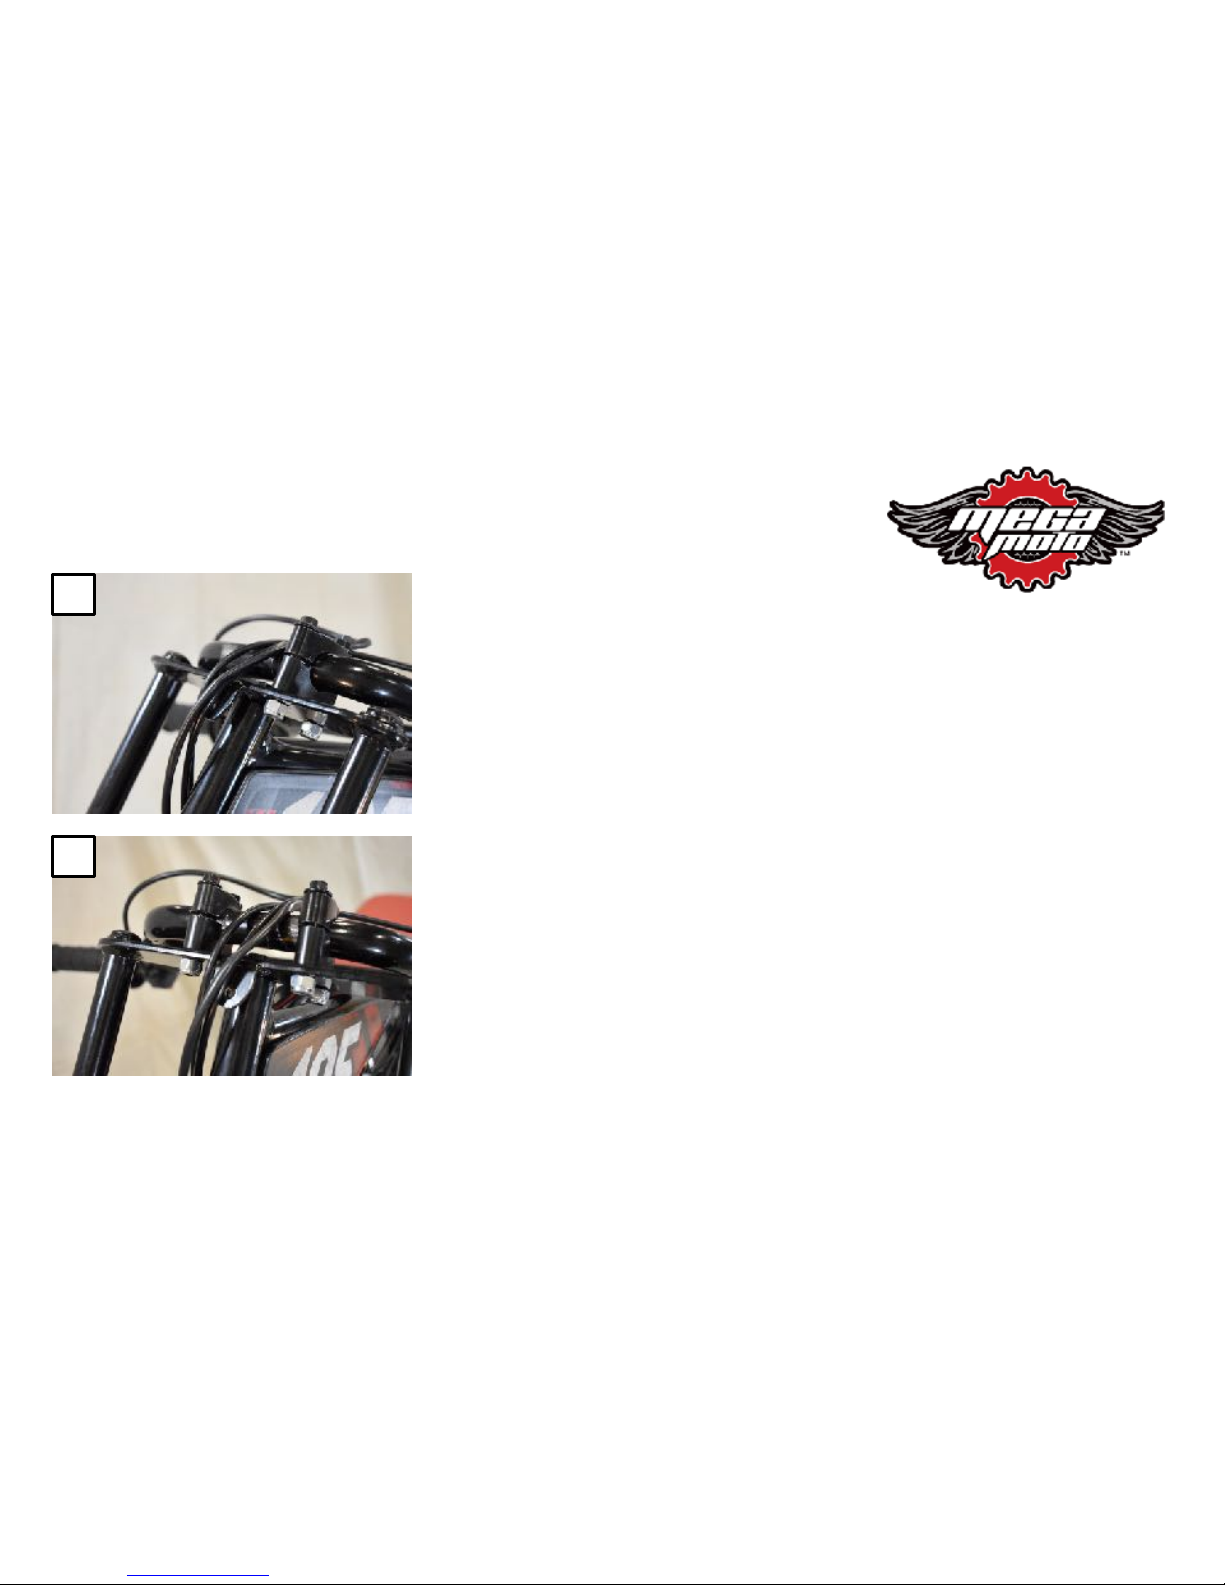
FRONT%FORK
1)%%%With%the%upper%part%of%the%steel%shipping%crate%removed,%the%
forks%and%handlebar%are%resting%on%the%right%side%of%the%bike.%The%
bike%should%still%be%attached%to%the%base%of%the%shipping%crate.%
2)%%%Without%twisting%the%wires%and%cables,%lift%up%the%handlebar%
and%front%fork%placing%the%handlebar%on%the%top%of%the%bike%
frame%and%resting%the%fork%on%the%steering%head%as%shown%in%the%
photo.%Rest%the%handlebar%on%the%frame%with%the%handles%
toward%the%front%of%the%bike,%the%brake%lever%should%be%facing%
down.%Make%sure%the%wires%and%cables%are%not%twisted.
5
2
1

MM-B80/105 ASSEMBLY INSTRUCTIONS
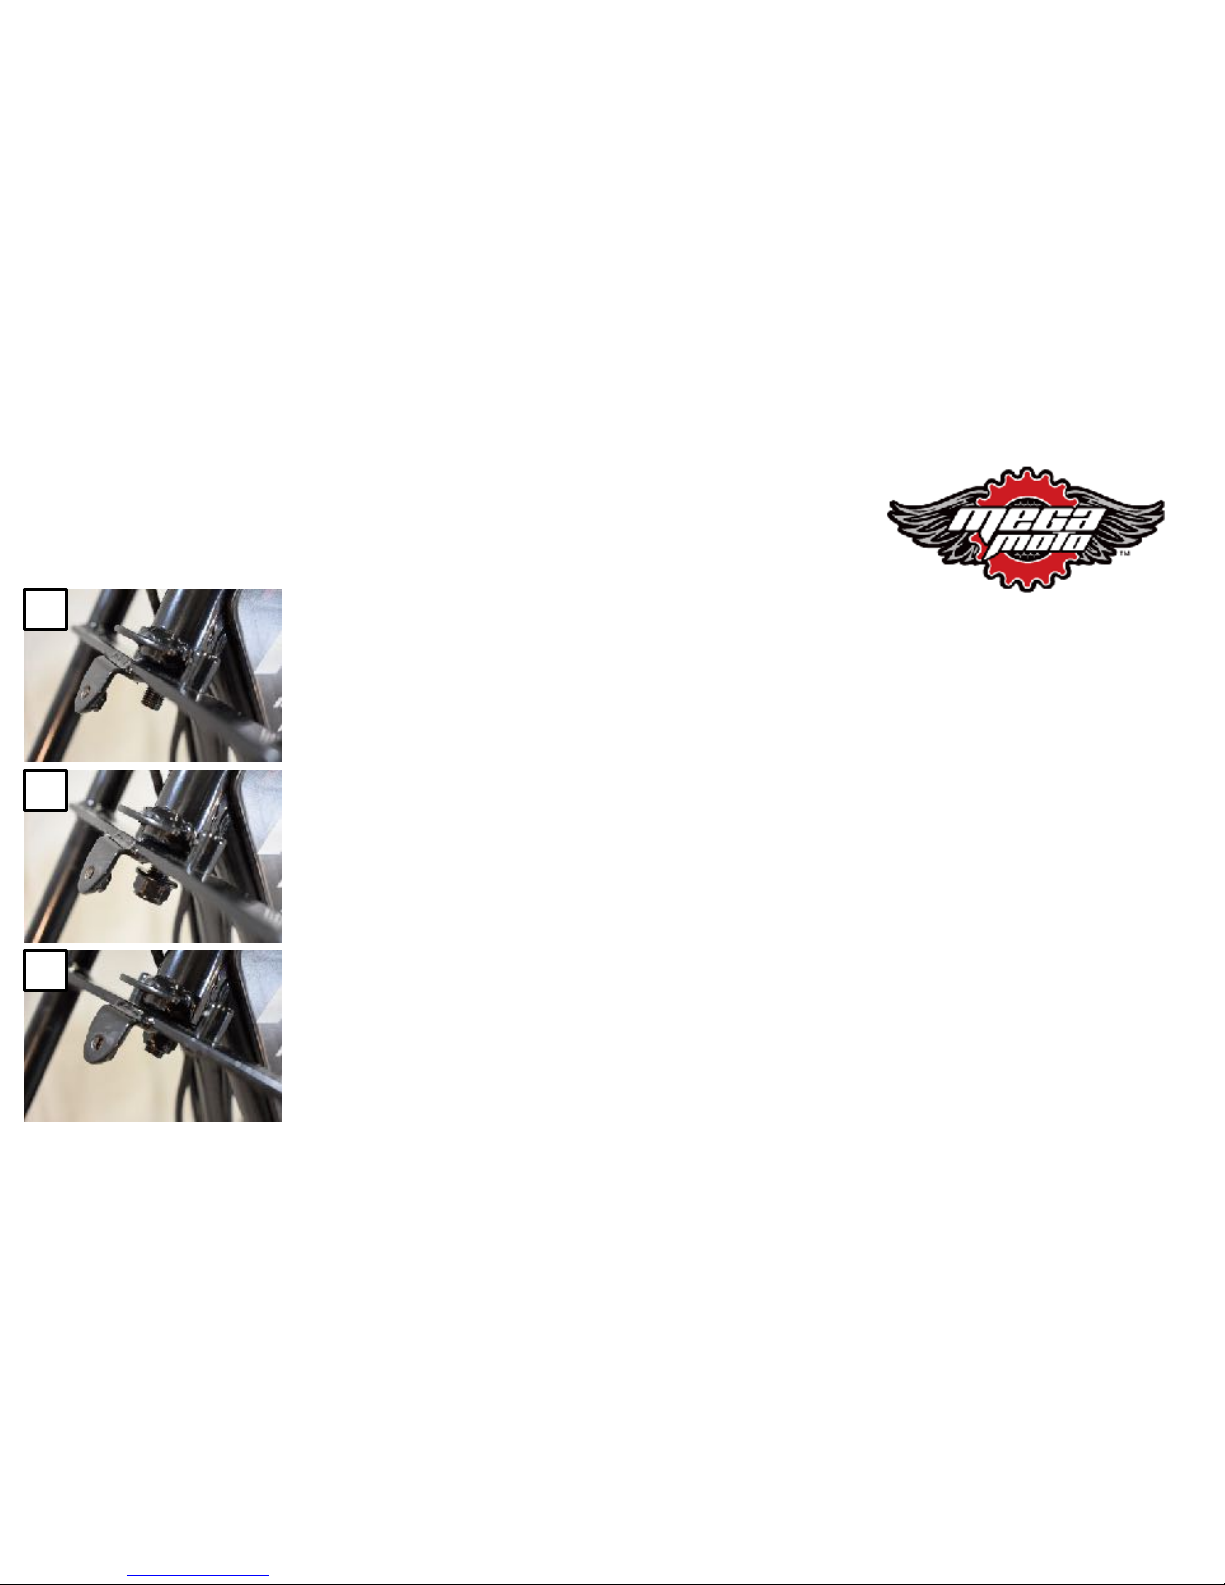
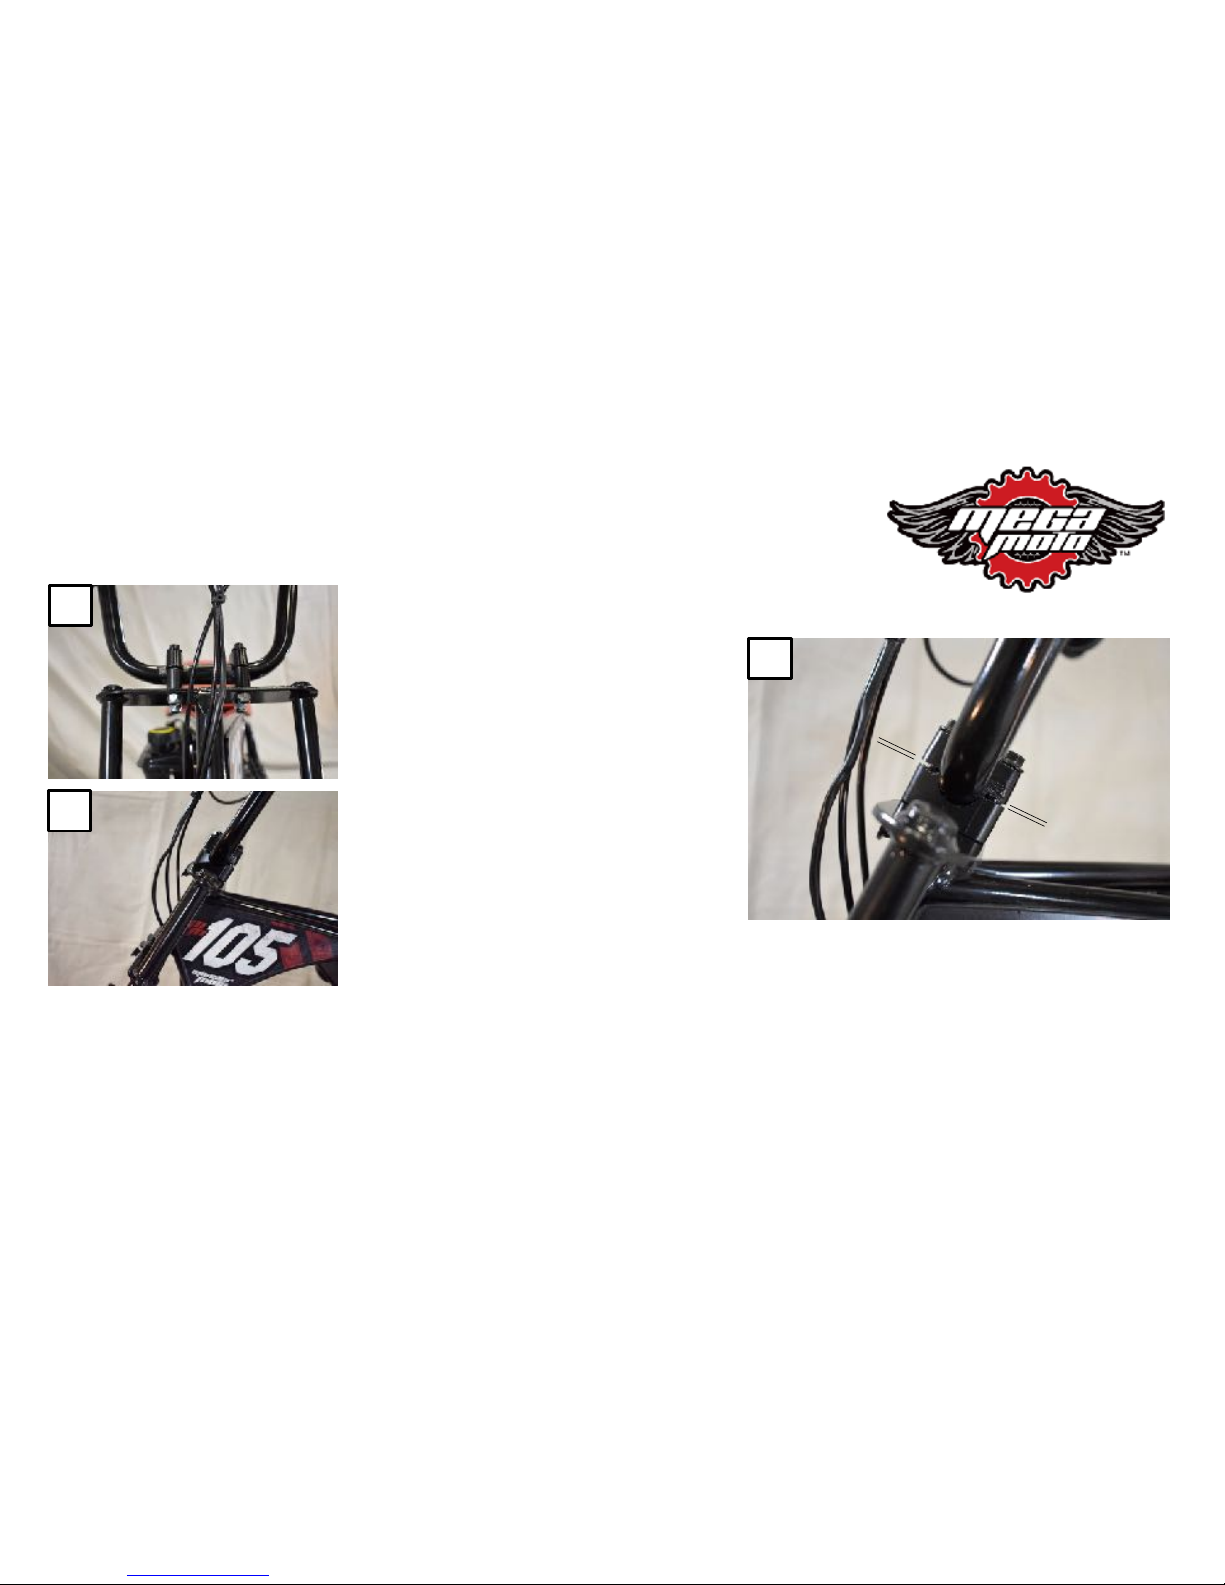
3)%%%Make%sure%the%number%plate%tabs%on%the%forks%
are%facing%forward%and%slide%the%lower%fork%plate%
under%the%steering%head.%Make%sure%the%steering%
stop%pins%are%behind%the%steering%stop%as%shown.
Steering%Head
Steering%stop%pins
Steering%stop
Number%Plate%Tab
Lower%Fork%Plate
6
FRONT%FORK
3

4)%%%While%keeping%the%steering%stop%pins%
behind%the%steering%stop,%move%the%upper%
fork%plate%back%and%over%the%steering%
head.%
5)%%%Line%up%the%hole%in%the%upper%fork%
plate%with%the%hole%in%the%steering%head.
MM-B80/105 ASSEMBLY INSTRUCTIONS
7
6)%%%Insert%the%steering%bolt%through%the%top%
fork%plate%and%into%the%steering%head.
FRONT%FORK
6
4
5
MM-B80/105 ASSEMBLY INSTRUCTIONS
8
7)%%%Push%the%steering%bolt%all%the%way%
through%the%steering%head%and%the%lower%
fork%plate
8)%%%Install%the%nut%on%the%steering%bolt%as%
shown%in%the%photo.
9)%%%Tighten%the%nut%securely,%(39N.m/
20ft.lbs.)
FRONT%FORK
9
8
7

9
MM-B80/105 ASSEMBLY INSTRUCTIONS
FRONT%FORK
NOTE:&Make%sure%the%wires%and%cables%do%
not%pinch%between%the%frame%and%the%lower%
fork%plate%or%the%steering%stop%pin%and%the%
frame%when%the%handlebar%is%turned%to%the%
right,%(as%seated%on%the%bike).%If%they%do,%
simply%twist%the%cable%tie,%wires,%and%cables%
toward%the%rear,%away%from%the%lower%fork%
plate.

MM-B80/105 ASSEMBLY INSTRUCTIONS
10
HANDLEBAR
10)%%%Rotate%the%lower%portion%of%the%handlebar%
forward%and%under%the%grips%and%lever%portion%of%
the%handlebar%and%rest%the%handlebar%on%the%top%
fork%plate%and%frame%as%shown.%The%brake%lever%
should%be%facing%up%and%the%cables%should%not%be%
twisted.
11)%%%Locate%the%2%upper%and%2%lower%
handlebar%clamps.
Lower%
Clamp%2pcs
Upper%
Clamp%
2pcs
12)%%%Place%one%lower%handlebar%
clamp%under%the%handlebar%as%
shown%and%align%the%holes%in%the%
clamp%with%the%holes%in%the%upper%
fork%plate.
12
10

HANDLEBAR
MM-B80/105 ASSEMBLY INSTRUCTIONS
11
13)%%%Place%the%upper%handlebar%clamp%as%
shown.
14)%%%Insert%the%2%handlebar%clamp%bolts%
through%the%holes%in%the%upper%and%lower%
clamps%and%the%holes%in%the%upper%fork%
plate%as%shown.
14
13
12
MM-B80/105 ASSEMBLY INSTRUCTIONS
HANDLEBAR
15)%%%Install%the%nuts%on%the%handlebar%
clamp%bolts%as%shown.%Do%Not%tighten.
16)%%%Install%the%clamps,%bolts,%and%nuts%
on%the%other%side%(as%in%steps%12%through%
15).
16
15
MM-B80/105 ASSEMBLY INSTRUCTIONS
13
HANDLEBAR
17)%%%Center%the%handlebar%on%the%
two%clamps.
18)%%%Angle%the%handlebar%to%
align%with%the%angle%of%the%
forks.%This%is%a%good%initial%
setting,%you%can%adjust%the%
handlebars%at%a%different%angle%
if%you%prefer. 19)%%%Tighten%the%handlebar%clamps%so%that%
the%space%between%the%upper%and%lower%
clamps%at%the%front%of%the%clamps%is%equal%to%
the%space%at%the%back%of%the%clamps.%Tighten%
securely%(26N.m/19ft.lbs.)
19
18
17

14
MM-B80/105 ASSEMBLY INSTRUCTIONS
FRONT%FENDER
20)%%%With%the%Mega%Moto%logo%facing%forward,%
place%the%front%fender%over%the%mounting%
brackets%on%the%front%forks
21)%%%Align%the%holes%in%the%
fender%with%the%threaded%holes%
in%the%mounting%brackets.%
22)%%%Insert%the%Philips%head%screw%through%the%
plastic%washer,%the%fender%and%into%the%threaded%
hole%of%the%mounting%bracket%and%hand%tighten.%
Have%all%4%screws%and%washers%installed%by%hand%
before%tightening%with%a%screwdriver.%%
22
21
20
15
MM-B80/105 ASSEMBLY INSTRUCTIONS
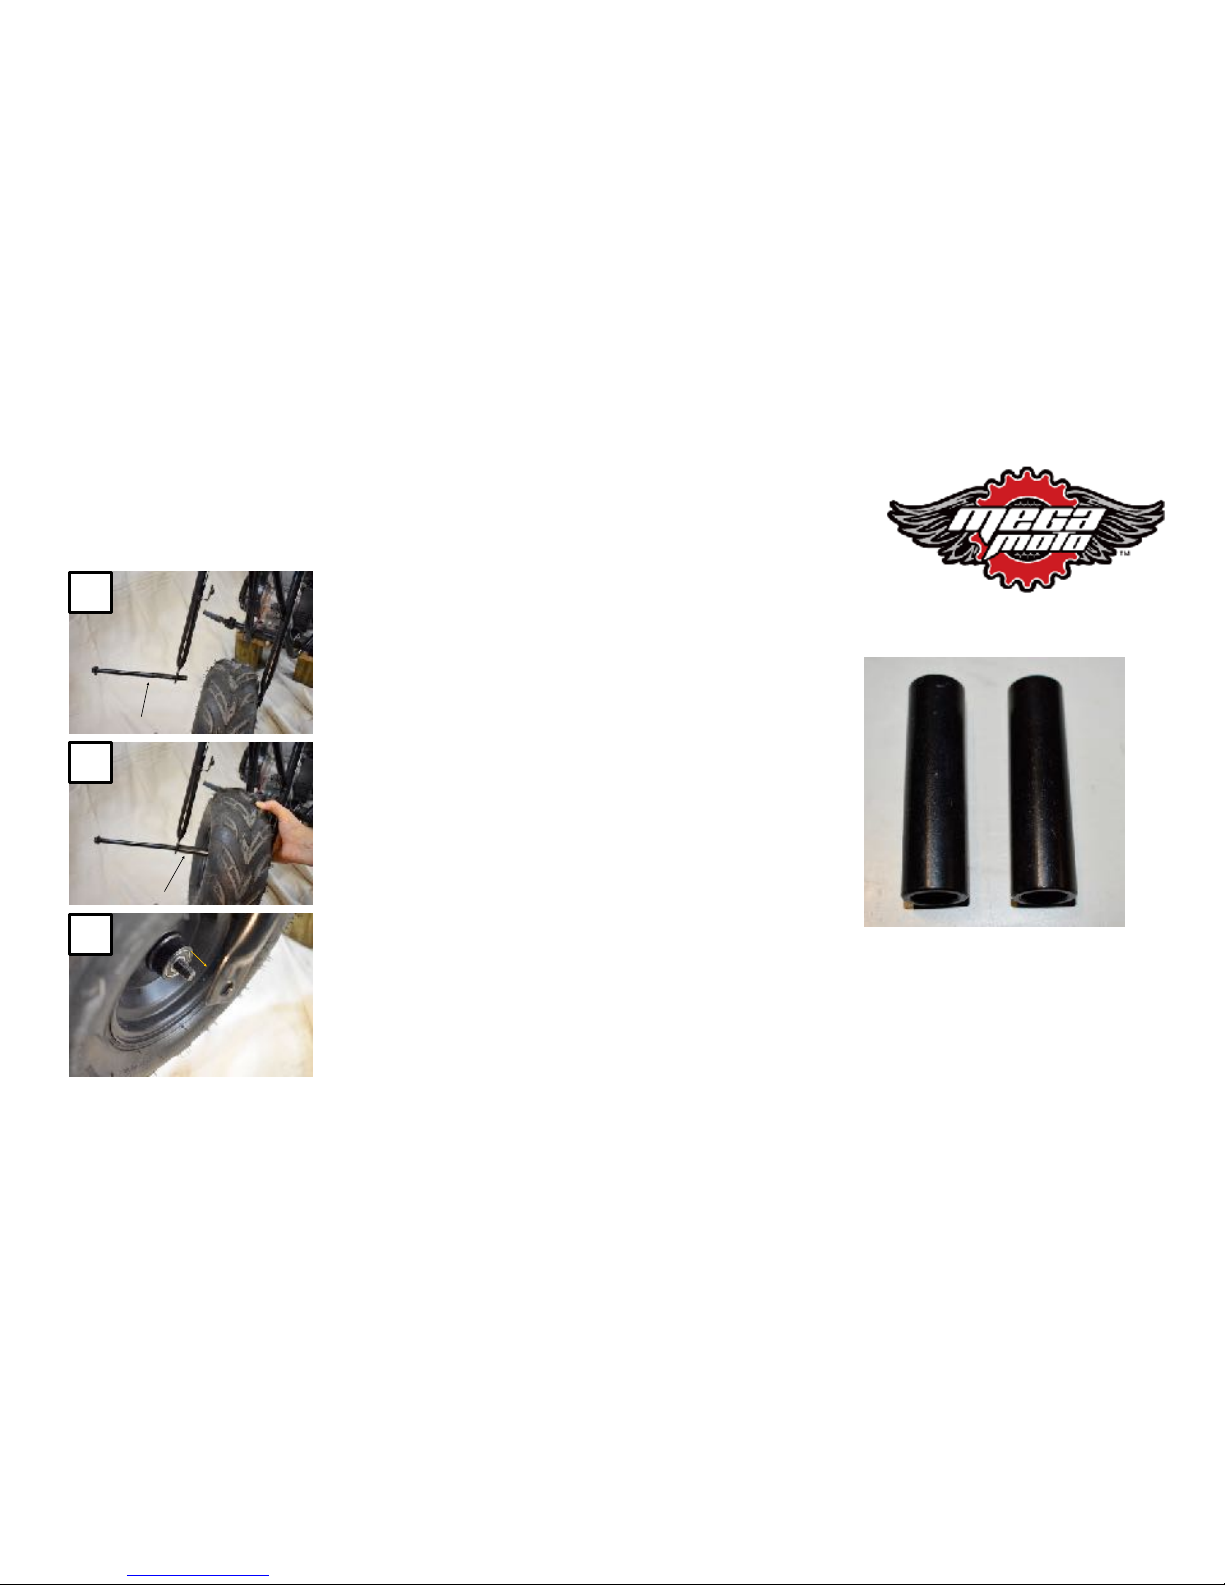
FRONT%WHEEL
23)%%%Insert%the%front%axle%bolt%through%the%right%fork,%(as%
seated%on%the%bike),%so%that%only%an%inch%or%2%of%the%bolt%
is%through.%
24)%%%Place%1%axle%spacer%on%the%bolt,%position%the%wheel%
between%the%forks%with%the%tread%as%shown,%and%insert%
the%axle%bolt%through%the%wheel.
25)%Push%the%axle%bolt%through%the%other%side%of%the%
wheel%so%that%only%about%an%inch%of%it%extends%past%the%
wheel%bearing.
Axle%spacers
25
24
23

16
MM-B80/105 ASSEMBLY INSTRUCTIONS
FRONT%WHEEL
26)%Place%the%second%axle%spacer%
on%the%axle%where%it%extends%from%
the%wheel.
27)%%%Align%the%spacer%and%the%hole%
in%the%fork%and%push%the%axle%bolt%
all%the%way%through.
28)%%Install%the%nut%on%the%axle%and%
tighten%securely.%(54N.m/40ft.lbs.)
28
27
26

17
MM-B80/105 ASSEMBLY INSTRUCTIONS
FRONT%NUMBER%PLATE%AND%GUSSET%COVER
29)%%%Place%the%number%plate%over%the%
number%plate%tabs%on%the%front%fork,%
align%the%holes%in%the%number%plate%
with%the%threaded%holes%of%the%tabs%and%
insert%a%screw%with%a%plastic%washer%
through%the%top%hole%and%hand%tighten.%
Install%the%screw%and%washer%in%the%
lower%hole.%Tighten%the%upper%and%
lower%screws%with%a%screwdriver
30)%%%Align%the%tabs%on%the%right%
side%gusset%cover%with%the%
rubber%mounting%holes%in%the%
frame.
31)%%%Press%the%gusset%cover%
tabs%into%the%rubber%mounting%
holes.
NOTE:&Keep%the%bike%secured%
to%the%steel%crate%base%when%
you%proceed%to%the%next%step%
of%adding%oil%to%the%engine
31
30
29

18
MM-B80/105 ASSEMBLY INSTRUCTIONS
ADD&OIL
32)%BEFORE&YOU&START&THE&BIKE&YOU&MUST&ADD&
12oz.&OF&10W30&MOTOR&OIL&TO&THE&ENGINE.&&
The%bike%should%be%on%the%steel%shipping%crate%base%
so%that%it%is%vertical.%Add%oil%into%the%oil%filler%neck%on%
the%front%of%the%engine.%
NOTE:&Whenever%checking%the%engine%oil%level,%the%
bike%should%be%on%level%ground%and%held%vertical%on%
its%two%wheels,%not%resting%on%the%side%stand%as%the%
proper%oil%level%will%not%be%indicated%on%the%dipstick.%
33)%After%adding%oil,%place%the%dipstick%squarely%in%the%filler%hole%
but%do%not%screw%it%in.%Pull%out%the%dipstick%and%see%where%the%oil%
level%is%on%the%dipstick.%Add%as%needed.%Replace%the%dipstick%and%
tighten%.
Proper%Oil%Level
Oil%is%not%provided%with%the%mini%bike.%12oz%of%10W30%Motor%Oil%is%needed.
32
33

19
&&&&&&&&&&&&&&&&WEAR&PROTECTIVE&GLOVES&
34)%%Unbolt%the%3%clamps%that%secure%the%mini%bike%to%the%steel%
crate%base,%roll%the%bike%off%the%base%and%discard%the%base.%
MM-B80/105 ASSEMBLY INSTRUCTIONS
ADD&OIL

20
MM-B80/105 ASSEMBLY INSTRUCTIONS
STARTING%THE%MINIBIKE
35)%After%adding%
fuel%to%the%fuel%
tank,%push%the%
fuel%lever%forward%
to%start%fuel%flow%
into%the%
carburetor
36)%Move%the%
choke%lever%to%the%
right,%“START”%
position.
37)%Press%small%red%
button%on%the%Engine%
Stop%Switch%so%that%the%
small%button%is%pushed%in%
and%the%larger%red%button%
sticks%out.%This%is%the%
“RUN”%position.
38)%Let%the%bike%sit%for%a%
minute%to%give%time%for%
the%fuel%to%fill%the%
carburetor,%then%pull%
firmly%on%the%pull%starter%
to%start%the%bike.
BE&SURE&TO&OIL&THE&CENTRIFUGAL&CLUTCH&BEFORE&AND&AFTER&
EACH&RIDE&AS&INSTRUCTED&IN&YOUR&OWNER’S&MANUAL.
38
37
35
36
This manual suits for next models
1
Table of contents
Other Megamoto Motorcycle manuals


