Megavoice LifeLight User manual

LIFELIGHT
SOLAR AUDIO DEVICE
USER MANUAL
TABLE OF CONTENTS
Easy Start 1
Turning the LifeLight On/Off 1
The LCD Screen 1
Volume 1
Selecting Playback Channels 2
Navigating During Playback 2
Playback Screen 2
File Playback Information 3
Fast Reverse/Fast Forward 3
Pausing/Bookmarking 3
Loading Audio Files 4
Supported File Types 4
Radio 5
Radio Screen 5
Conguration File 5
Speed Control 5
Speed Control Screen 6
Lantern 6
Reading Light 7
LED Torch 7
Hanging Hook 7
Silicon Connectors Cover 7
Using the MicroSD Card 7
Charging/Communication Modes 8
Earphones and Speaker 9
AM/FM Antenna Jacks 9
Resetting Device Defaults 9
Full Device Reset 9
The Menu System 10
The Menu System Screens 10
Charging Instructions 12
Charging Screen 12
Battery Care 13
Problems With the LifeLight 13
Warnings 13
Reset Button 13

1/13
EASY START
Press and hold until the device chimes and the LCD screen turns on. Playback will automatically begin.
or
TURNING THE LIFELIGHT ON/OFF
Press on for 2 seconds to turn the device On (the LCD screen will turn On and the device will chime). A welcome
screen will display and audio playback/radio will begin immediately.
Press on for 2 seconds to turn the device Off.
The device will chime again, the shutdown screen will display and the LCD screen will turn Off.
The device will remember its last mode and playback position/band & frequency when turned off.
THE LCD SCREEN
This LifeLight is unique and provides complete information and control via the LCD screen with an interactive menu
system.
The screen has a backlight, which is activated when the device is turned On, turned Off, or when is pressed. The
backlight turns off automatically after 30 seconds of keypad inactivity.
The information on the screen is always current as modes, content and settings change.
For more detail, see illustrations of various screens throughout this manual.
VOLUME
Click or to decrease or increase volume by one level.
The rst click automatically displays the volume adjustment screen.
Press and hold will continue to decrease/increase until the minimum (00) or maximum (10) is reached. When the
volume is set to minimum or maximum a chime is played.
The volume will remain set at this level even after the device is turned off and restarted.
After 1 second of inactivity, the volume screen will timeout and return to the previous screen.
Separate volume levels are maintained for audio playback and radio.

2/13
SELECTING PLAYBACK CHANNELS
The device supports up to 3 Channels for onboard memory and up to 2 Channels for microSD.
For both memory sources, there should be at least one of Channels 001 and 002 containing audio content.
When in playback mode, a 2-second press on will navigate to the last playback position of the other Channel (if
present).
Channel 000 (optional/onboard only) is typically reserved for a device introduction and/or audible user manual. If a
Channel 000 is present, playback will always begin from it when the Device is rst turned on (or after the Device is
reset).
When in playback from onboard or microSD memory, a 2-second press on and together will navigate to the
last playback position in Channel 000 (if present) of onboard memory.
From Radio Mode, a 2-second press on will resume playback at the prior position in onboard memory.
NAVIGATING DURING PLAYBACK
Each Channel is subdivided into one or more Sections, containing one or more Books, containing one or more
Chapters.
Click to skip to the next Section within the current Channel.
Click or to skip backward or forward one Book. A 2-second press will skip 5 Books at a time. Press and hold will
continue until the button is released or the beginning/end of the Section is reached.
Click or to skip backward or forward one Chapter (le). A 2-second press will skip 5 Chapters at a time. Press
and hold will continue until the button is released or the beginning/end of the Book is reached.
Click or to jump backward or forward 20 seconds in the current le. Press and hold will perform a fast rewind/
fast forward (in 10-second increments ) until the button is released or the beginning/end of the le is reached.
To quickly return to the start of a Channel, while in Pause Mode press for 2 seconds.
Actual time may vary.
While in audio playback mode, the Playback screen is displayed.
During “press and hold”, a scale will be displayed on the bottom line of the screen showing the current playback position
within the total play time of the current le. See FAST REVERSE/FAST FORWARD for more details.
PLAYBACK SCREEN
Playback
indicator:
currently playing
Onboard memory
is current source
AM/PM (or blank
when 24-hour)
microSD is loaded
Clock
Charge indicator:
Blinking when
active, static
when full, blank
when not
connected to
power source

3/13
Icon representing
type of file
information
Audio device is
connected
Not connected
for charging
Battery capacity
indicator: four
bars = 81%-100%
Paused
microSD memory
is current source
Current file
information
FILE PLAYBACK INFORMATION
Available audio le metadata tags are displayed for each le in the following way:
• Track info: + ID3 Track Name
- If Track Name is blank or missing, + Filename.extension
• Album Info: + ID3 Album Name
- If ID3 Album Name is blank or missing, the eld is skipped
• Artist info: + ID3 Artist Name
- If ID3 Artist Name is blank or missing, the eld is skipped
• If ID3 metadata is completely missing
- The device will display only + Filename.extension
• If any tag text is longer than the screen area , it scrolls from right to left
- The eld will show for 3 seconds before scrolling begins
- Once scrolling has nished the next eld is displayed
Any tag text longer than 44 characters will be truncated.
Typically about 13 characters.
FAST REVERSE/FAST FORWARD
Total playback
time
Current playback
position
Current position
indicator
Fast reverse
is being executed
Fast forward
is being executed
During playback, a continuous press on or will fast reverse/fast forward through the current le.
The device will overlay the bottom row of the screen with the current and total playback times in HH:MM:SS format.
The current playback position relative to the total is illustrated by a bar on the scale. As the scan occurs the playback
position is updated accordingly. Once you release the or buttons, the scale will linger for a few seconds but is
then hidden when the le information is redisplayed.
PAUSING/BOOKMARKING
While in audio playback mode, click to pause playback. The icon is displayed.
To resume, click again. The icon is displayed.

4/13
LOADING AUDIO FILES
The recommended method for loading audio to LifeLight is with a Windows application named SaberCopy. SaberCopy
is free to use and may be downloaded from our web site here:
https://megavoice.com/audio-tools/sabercopy-loading-system-for-audio-bibles/
Please download the installation le and user guide for reference. The installation is a typical Windows installation and
takes about 10 seconds.
Once installed, the simplest method for loading is to open the template project for LifeLight as it is already congured
with the recommended settings. (see section “Template Projects” in the user guide)
All you need to do is to specify the audio folder you wish to load on the “Files in Project” tab. SaberCopy will check
your audio against folder and le rules dened for LifeLight on the “Target Device” tab.
To access the onboard memory of the LifeLight and update the contents, a special SLS USB cable must be used. These
cables are only available from MegaVoice.
For assistance, please contact us at:
https://megavoice.com/support
SUPPORTED FILE TYPES
File Type Limitations Unsupported
APE
Bit rate: Fast/Normal compression (800Kbps-1000Kbps)
Sampling rate: 8KHz-48KHz
Bit depth: 16bit
“Insane” (ultra-high) compression setting
FLAC
Bit rate: L0 - L8 (1000Kbps-1200Kbps)
Sampling rate: 8KHz-48KHz
Bit depth: 16bit
MP3 Bit rate: 8kbps - 320kbps
Sampling rate: 8KHz-48KHz
OGG Bit rate: Q0 - Q10 (20kbps-499kbps)
Sampling rate: 8KHz-48KHz
WAV
IMA-ADPCM
Bit rate: 32kbps - 384kbps
Sampling rate: 8KHz-48KHz
Bit depth: 16bit
MS-ADPCM
Bit rate: 32kbps - 384kbps
Sampling rate: 8KHz-48KHz
Bit depth: 16bit
PCM
Bit rate: 128kbps - 1536kbps
Sampling rate: 8KHz-48KHz
Bit depth: 16bit
WMA Bit rate: 5kbps - 384kbps
Sampling rate: 8KHz-48KHz
WMA lossless or WMA PRO
For both onboard and microSD memory, the device automatically bookmarks the last le played and the position
within that le when the mode is changed or the device is turned off.
The Pause function is only available during audio playback.
If the device is left paused for more than 15 minutes it will turn itself off.

5/13
CONFIGURATION FILE
Default Device and radio settings can be controlled by a conguration le stored in the root folder of the Device.
The SET.TXT le can be used to congure startup mode, default radio band, assign frequencies to the programmable
buttons, and more.
To download a sample le including instructions please use the link below:
https://megavoice.com/downloads/set.txt.zip
SPEED CONTROL
A click on will emit a chime and place the Device in speed control mode, allowing you to adjust the audio playback
speed.
While in speed control mode, the speed control adjustment screen is displayed.
A click on or will adjust playback speed by one level. Press and hold will decrease/increase until the minimum
(-8) or maximum (+8) speed is reached.
RADIO
When in playback mode, a 2-second press on will put the Device in radio mode (Device will chime). The radio will
begin to play from the last band used and the last frequency set.
If already in Radio mode, a click on will cycle through the available bands: FM and AM. While in Radio Mode, a
2-second press on will resume Playback Mode from the last position in onboard memory (Device chimes again).
While in Radio mode the Radio screen is displayed.
Click or to decrease/increase the frequency by a pre-set value for the current band. A 2-second press will scan
for the previous/next station of the current band. The frequency display will update as it changes.
When the scan reaches the beginning/end of the band’s frequency range the Device will chime. An additional click will
loop and continue the scan from the beginning/end respectively. To stop an active scan , click on .
The buttons may be pre-programmed with individual default frequencies per band. A click on each will
tune the radio to the setting for that button. A 2-second press will set (or reset) that button to the current frequency.
When the frequency is tuned to one of the programmable buttons ( ), that button’s symbol will be displayed on
the bottom right of the screen.
See Radio Band Spacing Screen for details.
FM: 64.0-108.0 MHz, AM: 520-1720 kHz
While scanning is active, you cannot change mode or turn the Device off.
RADIO SCREEN
Current band:
FM or AM
AM/PM (or blank
when 24-hour)
microSD is loaded
Clock Current frequency
Battery capacity
indicator: four
bars = 81%-100%
When current
frequency is
tuned to one of 3
programmable
buttons, the
button image
shows here
Unit of frequency
measurement
6/13
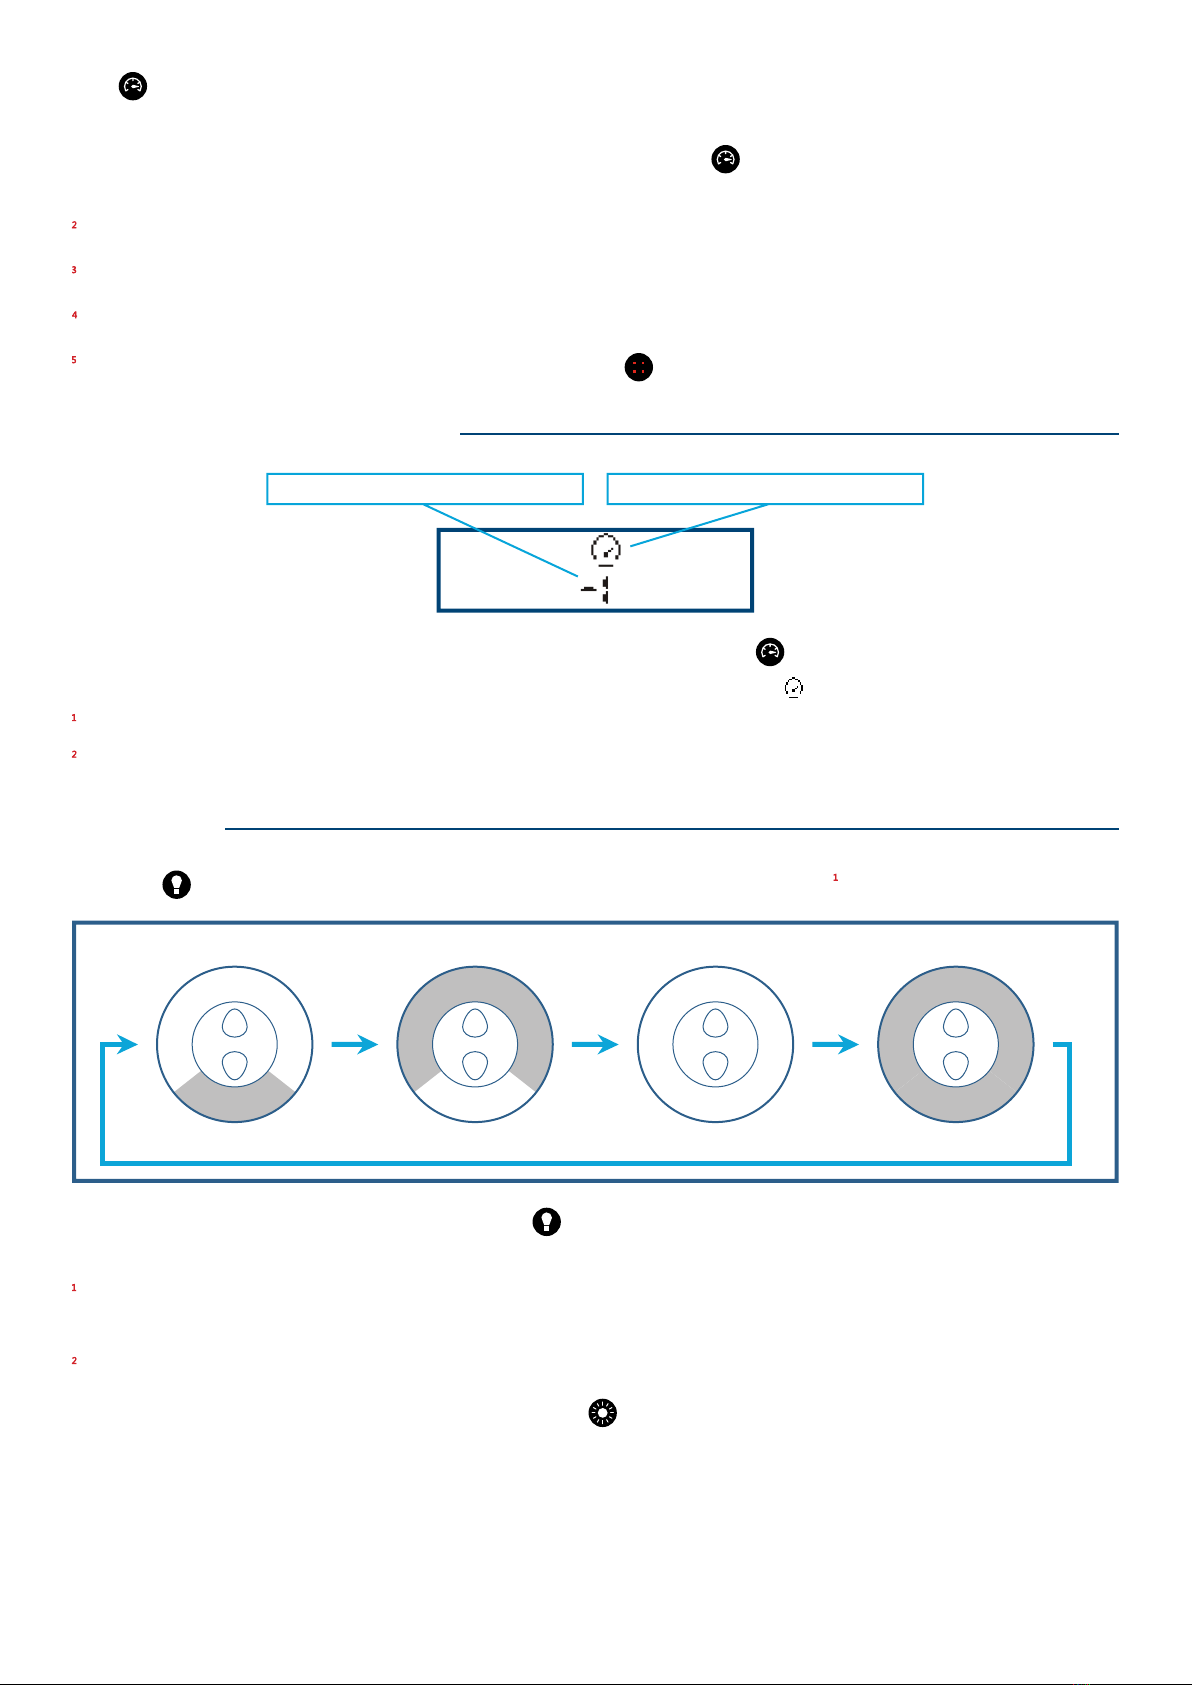
SPEED CONTROL SCREEN
Click again to exit and save the setting. Pressing any other button will exit speed control mode without saving
changes.
To reset the speed to normal (+0), enter speed control mode, then press again for 2 seconds. The Device will return
to playback mode at normal speed.
The Speed setting persists when changing modes or after turning the device off.
The Speed setting applies to both onboard and microSD playback.
The Speed Control button is only active during audio playback and may be set while playback is active or paused.
Speed Control may also be set via the Settings Menu. A click on will also save a speed setting change.
Current speed setting: from -8 to +8 Identifies Speed settings screen
• This is the screen that is displayed when entering Speed Control Mode from playback.
• The same screen is accessible from the Device’s Settings Menu by selecting the icon.
Speed Control only works correctly with MP3, WAV and WMA type audio les!
Due to an IC limitation, when Speed Control is active, only the left channel (stereo) is audible.
LANTERN
A click on will turn on the Lantern on Low intensity according to the following loop :
Back
Front
Back
Front
Back
Front
Back
Front
Whether the Lantern is on/off, a 2-seconds press on will cause both Back and Front sides to continuously blink in
High intensity. An additional 2-seconds press will turn both Back and Front sides off.
The loop will continue according to the Lantern’s current position in the loop (e.g., if the Lantern’s Back side is on, a click
will turn the Back side off and Front side on).
The Lantern may be used while other functions are active or device is off.
When either or both sides of the Lantern are on, a click on will change the Lantern’s light intensity as follows:
Low > Medium > High

7/13
LED TORCH
READING LIGHT
HANGING HOOK
Use to control the LED Torch and its intensity. Each click will change the intensity as follows:
Low > Medium > High > OFF
Press and hold to turn on the Torch in High intensity. The Torch will stay on until the button is released.
The Torch may be used while other functions are active or device is off.
Use to control the Reading Light and its intensity. Each click will change the intensity as follows:
Ultra-Low > Low > Medium > High > OFF
When the Reading Light is on, a 2-seconds press on will turn off the Reading Light.
The Reading Light may be used while other functions are active or device is off.
You may hang the Device using its Hanging Hook to various objects such as strings, coat hangers, etc.
The Hanging Hook can rotate 360° and while the device is suspended, it may be used normally.
SILICON CONNECTORS COVER
Open the Silicon Connectors Cover from the tab on the bottom to uncover the device’s connectors .
In order to keep the connectors exposed, the Silicon Connectors Cover must be held against the device.
The Silicon Connectors Cover can be closed by returning it to its place and pressing it in.
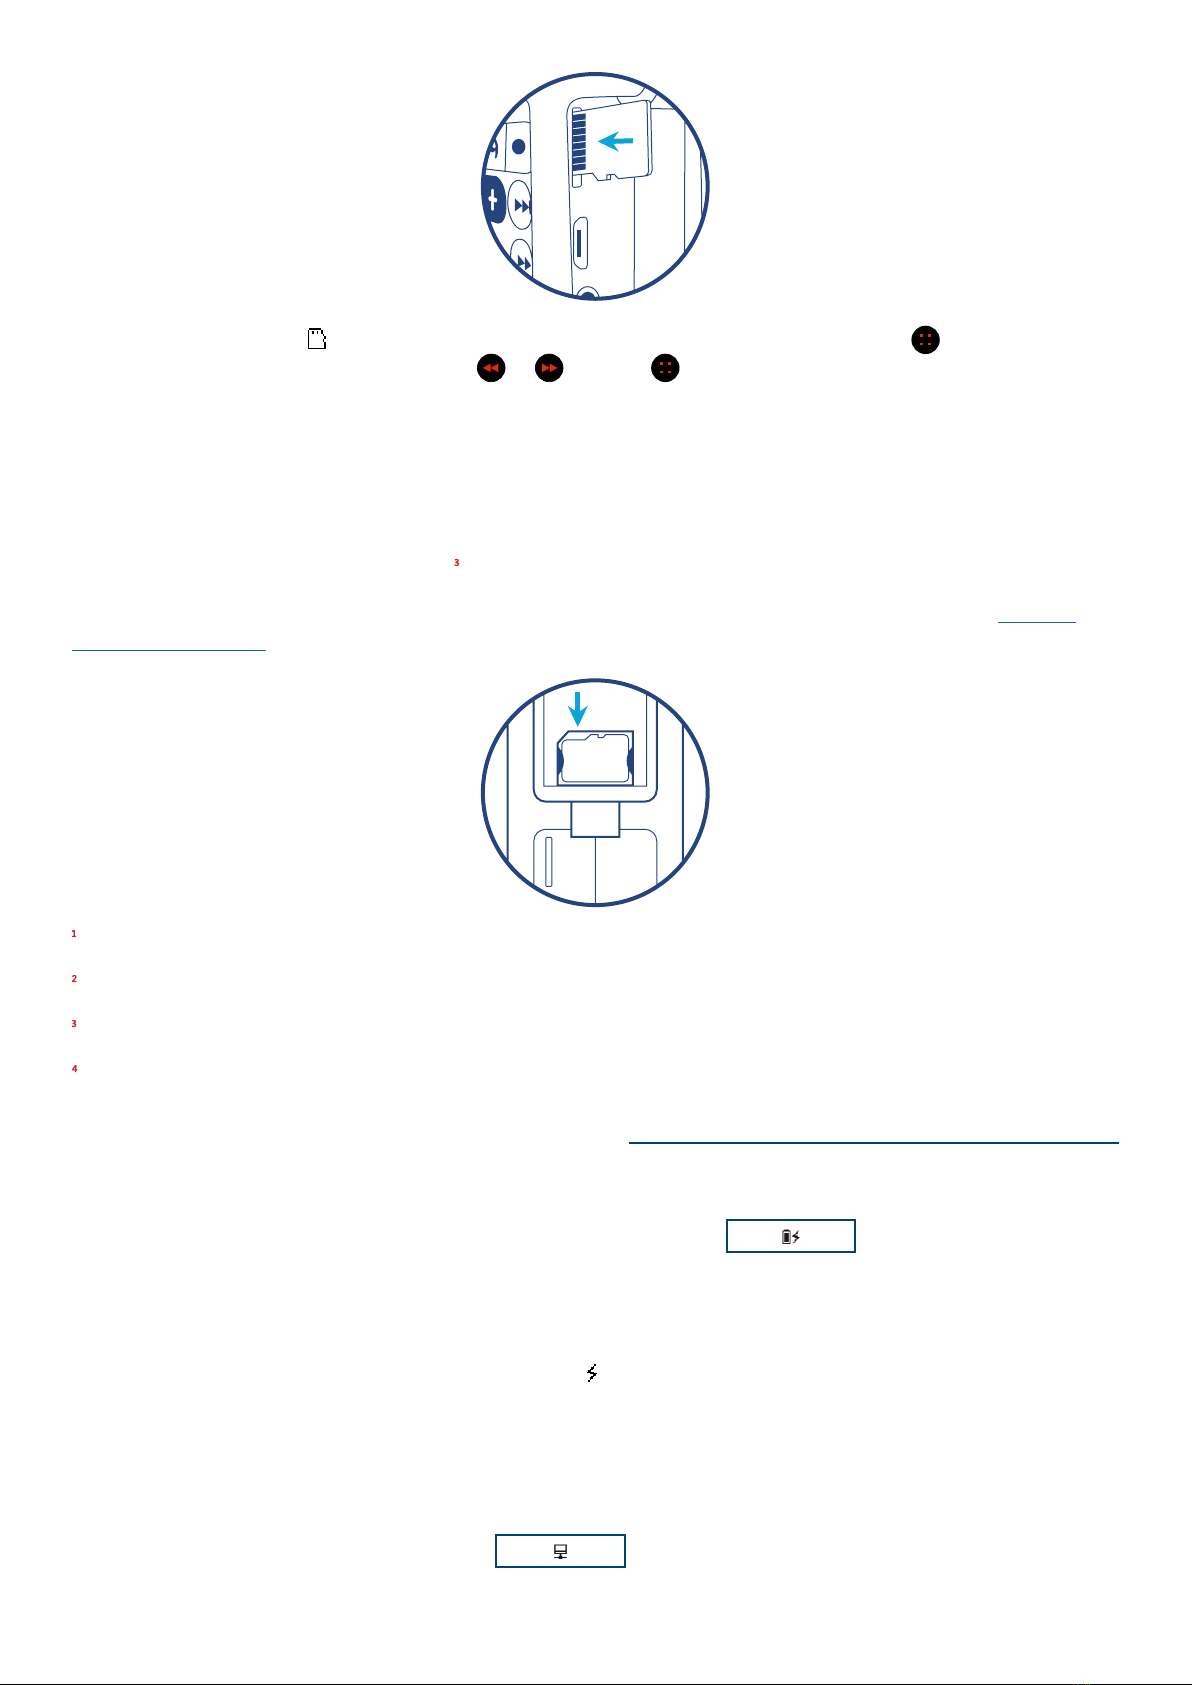
USING THE MICROSD CARD
The device can also play audio from a properly structured microSD card. With the device facing you, insert the card
with the brass contacts showing until it locks in place.
Gently
pull the
Hanging
Hook
8/13
CHARGING/COMMUNICATION MODES
When the device is off and a charge-only cable is connected:
• The device will enter charging mode and the charge screen is displayed.
• When the cable is disconnected, charging stops and the device remains off.
When the device is on and a charge-only cable is connected:
• The current function will continue uninterrupted but the icon is displayed.
• The icon will blink while charging and stop blinking once fully charged.
• When the cable is disconnected, the icon is hidden, charging will cease and the current function continues.
When the device is off and a data-only or SLS cable is connected:
• The computer connection screen is displayed.
• Access to the onboard memory and/or microSD is possible.
Once a card is loaded, the icon appears on the screen. To change to microSD playback, click to display the Main
Menu. Navigate to the microSD symbol using or and click again. Playback will now begin from the card.
To remove a card, gently push it in. The reader will unlock and push it out so you can remove it. If the device was in
playback mode from the card when removed, it will display “No microSD” and enter Menu Mode. If any other function
was active, it will continue with no change.
You can view, format and prepare a microSD card while loaded in the device’s card reader when the device is
connected to a Computer using a USB to micro-USB cable. You may also do the same with the card loaded in a
microSD adaptor connected to a Computer.
Up to 2 microSD cards can be stored on the bottom side of the Silicon Connectors Cover, please see the “SILICON
CONNECTORS COVER” section on how to open and close the Silicon Connectors Cover.
Whenever a microSD card is inserted or removed a chime is played.
Content on a microSD card must be encrypted to work on this device. Contact your sales representative for details.
The write speed of a card adaptor connected directly to a computer is signicantly faster than the internal card reader.
Some ID3 tags may not be displayed for content on microSD.
MicroSD
Card
x2

9/13
• When the cable is disconnected, the device remains off.
When the device is on and a data-only or SLS cable is connected:
• The current function will continue uninterrupted but the charge icon is displayed.
• The icon will blink while charging and stop blinking once fully charged.
• When the cable is disconnected, the icon is hidden, charging will cease and the current function continues.
Changing to Computer Communication mode is essential to allow programming of the device and/or Firmware update.
Whenever any USB cable is connected or disconnected a chime will be played.
EARPHONES AND SPEAKER
AM/FM ANTENNA JACKS
RESETTING DEVICE DEFAULTS
FULL DEVICE RESET
Insert earphone or speaker plug into the 3.5mm stereo audio jack under the micro-USB port. When an audio device is
connected, the internal speaker will turn off. When disconnected, speaker will turn back on, and the device will enter
Pause Mode.
The volume levels operate as written under the “VOLUME” section.
While an audio device is connected, the icon is displayed on the screen.
When an audio device is removed during audio playback, the device enters Pause Mode.
Some earphones with built-in controls may not work properly.
There are two 3.5mm antenna jacks, one for AM radio and another for FM radio . Using the correct antenna,
these jacks can be used to increase the reception of the AM/FM radio.
The device’s default settings may be reset at any time and at the following levels:
• Onboard Playback: all onboard bookmarks
• microSD Playback: all microSD bookmarks
• Radio - per band: last frequency, programmable buttons, frequency spacing
• Speed Control: reset speed to normal (0)
• Full reset: all the above + reset volume to normal (6)
The Main Menu offers a sub-menu of mode reset screens. From the sub-menu, choose the mode reset icon for
each of the above.
To perform a full reset of the device do the following:
• Click to enter the Main Menu.
• Press and hold and together for 2 seconds.
• The full reset menu is displayed: Highlight and select the conrmation icon .
• The conrmation menu is displayed: Highlight and select the tick icon .
• “Device Reset Successful!” is displayed.

10/13
THE MENU SYSTEM
The device provides an interactive menu system that works together with the LCD screen. The menu is controlled by
the buttons illustrated below. For convenience, they are accented in red on the keypad.
Menu mode and the Main Menu may be activated at any time by a click on . Navigation among menu items is by a
click on either (move left) or (move right).
Movement among a menu’s items can loop to reduce button clicks. For example, a click on while highlighting the
last (right-most) icon will move to the rst (left most) icon in the menu.
Once a menu item is highlighted (background is dark), selection is made by a click on .
In each menu screen, the icon is always the rst option. Selecting will always return to the previous screen.
For any screen where a setting change can be made, use to exit that screen and save the change immediately. You
may also click to exit, but without saving any changes.
THE MENU SYSTEM SCREENS
Main Menu
Onboard playback
Return to previous
mode (selected)
Player settings
menu
Radio mode microSD playback
Device Settings Menu
Mode Reset Screen
Radio settings
Return to previous
menu
Speed Control
settings
Mode reset
(selected)
Clock settings Firmware details
Cancel and return
to previous menu
When highlighted, use volume up/down
to select the mode for reset
Highlight and click Menu button to
confirm selected mode reset
• Select the mode icon using or .
• Once selected, use or to change the mode for reset.
• Then select the conrm icon and click .
• A conrmation message for the mode that is reset is displayed.
11/13
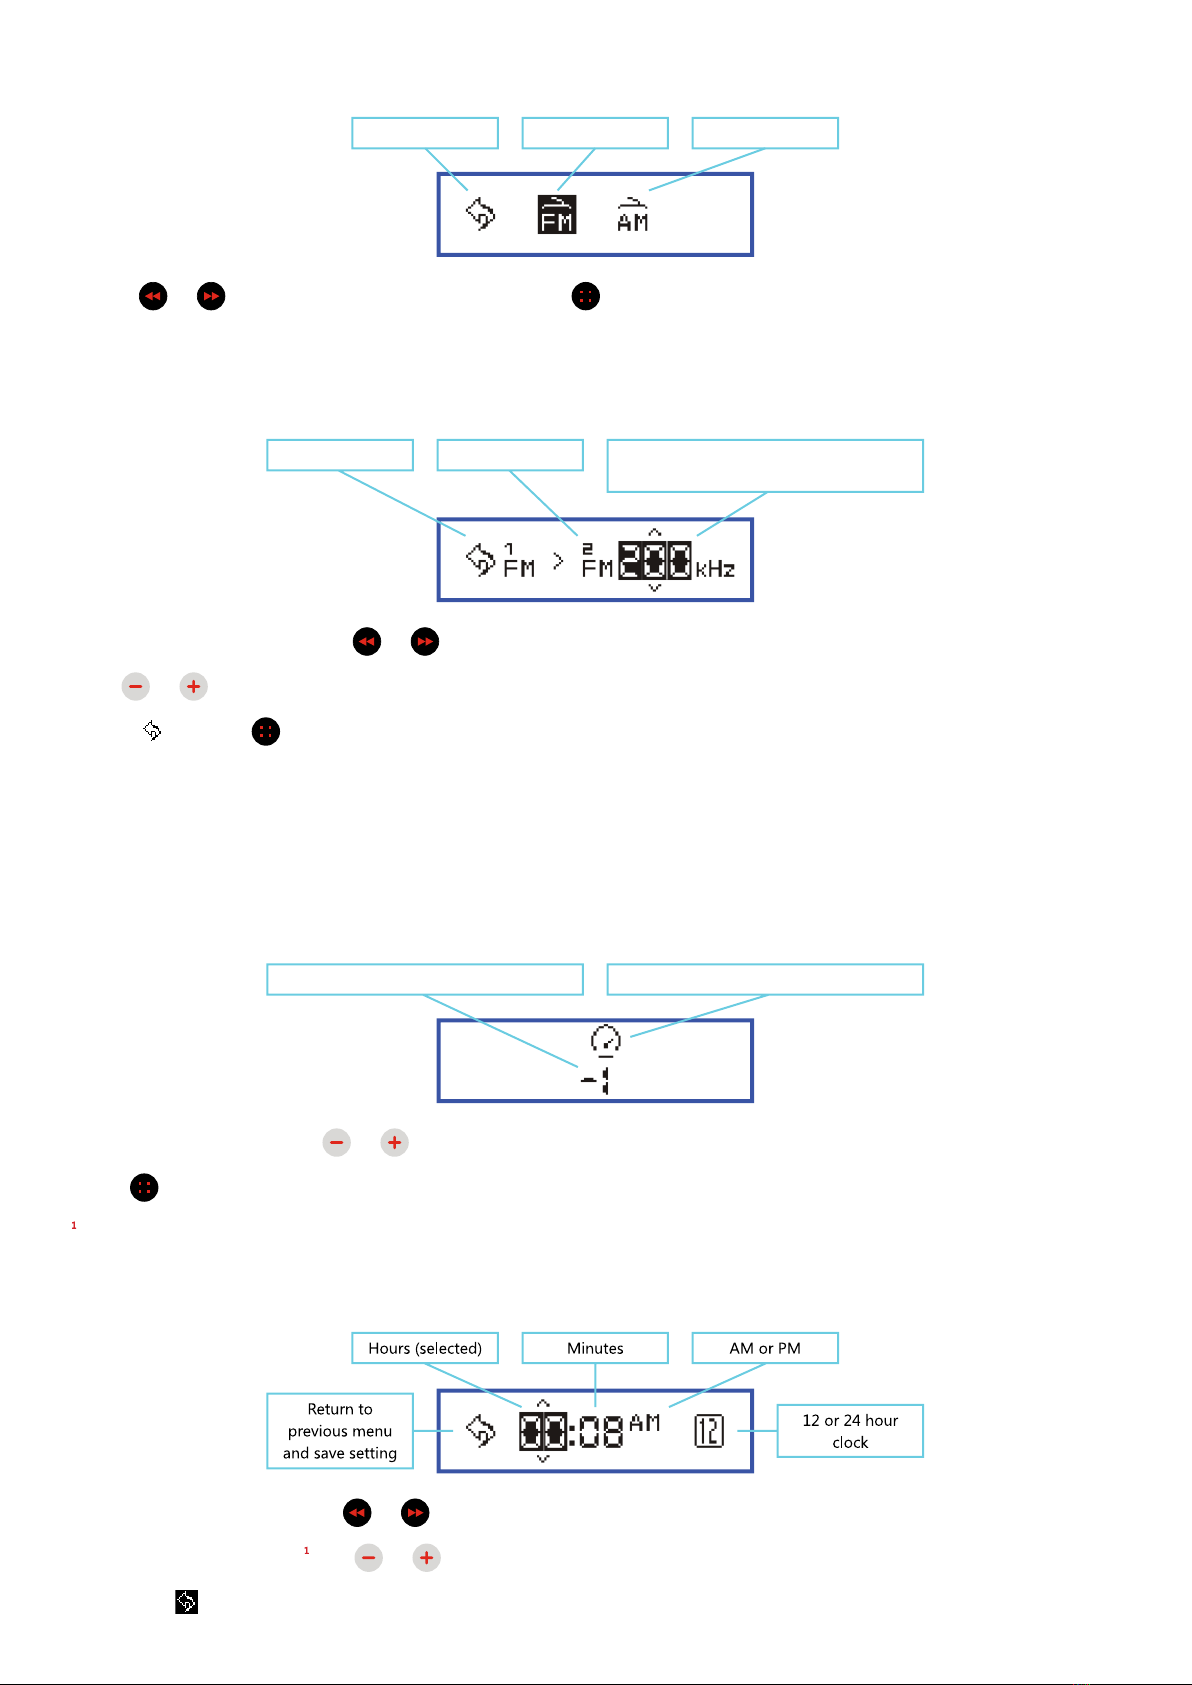
Radio Settings Screen (for band spacing)
Radio Band Spacing Screen
Speed Control Settings Screen
Clock Settings Screen
Previous menu AM bandFM band (selected)
• Using or navigate to the band desired and click .
• The individual spacing menu will display for the band selected.
Previous menu FM band identified Spacing value (selected): available values
change using volume up/down
• Select the spacing value using or .
• Use or to adjust spacing value.
• Select and click to save the setting.
• Once the spacing value is set, scanning within that band will skip by the value specied.
• This menu is typical for all radio bands. The spacing options for each band are as follows:
FM: 100, 200 kHz AM: 1, 5, 9, 10 kHz
Current speed setting: from -8 to +8 Identifies Speed settings screen
• Adjust speed setting using or .
• Click to exit and save the setting.
Speed Control only works correctly with MP3, WAV and WMA type audio les!
• Select the item desired using or .
• Once the item is selected , use or to adjust the value.
• Select the icon to exit. If changes were made, they will be saved and take effect immediately.

12/13
Firmware Details Screen
Player model Date of firmware Firmware revision
• For customer support reasons, the device will display its current rmware release.
• This screen will time-out automatically after 2 seconds.
• To verify that your device has the most recent rmware update and that you have the current user manual, please
visit: https://megavoice.com/audio-bible/lifelight
The symbols will appear above and below the item to indicate that the buttons are active.
If the hardware reset button is ever used, or new rmware is ashed, the time is reset to 00:00 and device will default to
12-hour AM/PM mode.
Tip for setting the clock:
• Note the current time on a clock you wish to match
• Set the device time to 1 minute after the current time
• Highlight the back button
• Wait until the time on your clock changes to match
• Immediately click to exit the clock screen
• The setting is now changed
• Exit the Menu system
CHARGING INSTRUCTIONS
With proper care, the device’s Lithium-Ion battery should perform well for several years. When shipped, the battery
is only partially charged. Please fully charge the battery before the rst use following one of the charging methods
below:
For fastest charge, connect any standard “USB” charger (regulated 5VDC, minimum 300mA) to the micro-USB port
under the Silicon Connectors Cover of the device until the charging icon stops blinking .
Plug the device into any standard computer USB port using a “USB to micro-USB” cable until the charging icon
stops blinking .
For solar charging, place the device with the solar panel facing bright sunlight for at least a full day . When solar
charging, there is no charge indication.
Actual charge time will vary according to the power source and current battery capacity.
While charging, the icon will appear next to the battery capacity icon in the top right corner of the screen and blink.
CHARGING SCREEN
If the device is off when connected for charging, the following screen will be displayed:
If the backlight turns off while on this screen, a 2-second press on will turn the backlight on. An additional
2-second press can turn the device on and operate normally while connected to an external power source.
13/13
BATTERY CARE
PROBLEMS WITH THE LIFELIGHT
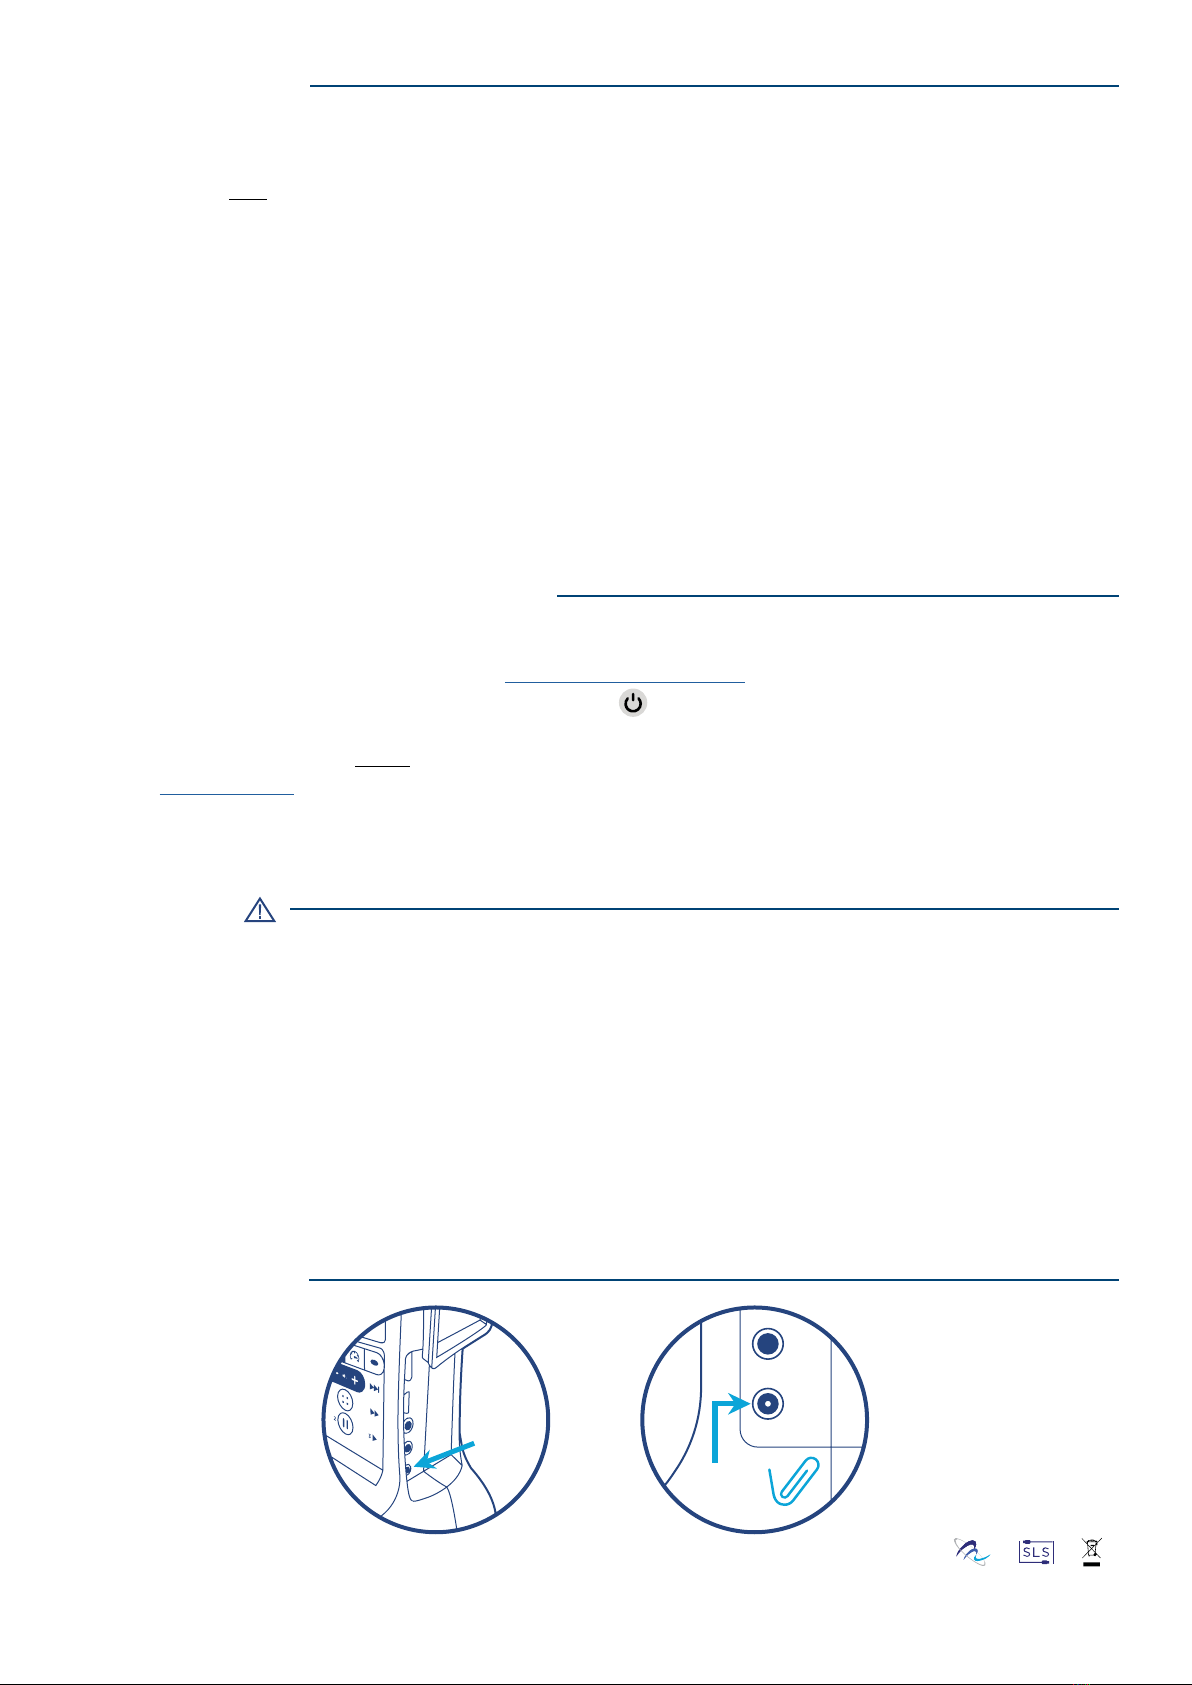
RESET BUTTON
WARNINGS
• Avoid completely depleting the battery as this will shorten its overall lifetime and takes much longer to fully charge
afterwards.
• If sunlight is the only means available for charging, it is recommended to leave the device in direct light often to keep
the battery at least partially charged.
• When using electric chargers, make sure of the following:
◦ Voltage must be 5V DC! Lower voltage may not charge the unit properly while a higher voltage could damage it.
◦ Maintain standard micro-USB connectivity/polarity – do NOT use an adaptor!
◦ Maintain a stable power supply. An unstable power supply can cause surges that can damage the electronics.
• When not in use and whenever possible, keep the device in a cool place, which will also help to preserve battery life.
• Before stowing the device for prolonged periods, make sure the battery is at least partially charged.
• If stored for extended periods, it is recommended to recharge the device at least every 6 months, in order to prevent
the battery from losing its ability to recharge.
• Should the battery become defective and unable to accept a charge, it is still possible to operate the device using a
USB cable connected to a computer or an electric charger. If sunlight is the only source for power/charging, please
replace the battery.
If the unit will not turn on, please try the following:
1. Make sure the battery is charged according to CHARGING INSTRUCTIONS.
2. If the battery is OK, force a reboot of the device by holding for about 10 seconds. The device should restart
automatically.
3. If #2 fails, reset the device by gently inserting the end of a paper clip for a few seconds into the bottom Jack (see
under “RESET BUTTON” section) under the Silicon Connectors Cover. This is the same as disconnecting/reconnecting
the battery. The device should restart automatically.
4. If none of the above succeeded, please contact your sales representative for support.
• Care must be taken to set the volume at the lowest level that can be heard comfortably. Prolonged exposure to loud
sound can cause gradual hearing loss.
• DO NOT expose the device or battery to re or extreme heat.
• Stop using the device if you observe abnormal heat, odor, discoloration, leakage or deformation, especially near
battery. Refer to a qualied technician for service.
• If the battery is removed from the device, handle it with care. Keep the exposed battery out of reach of children. DO
NOT burn, puncture, disassemble, or modify battery.
• If battery leaks, dispose of it carefully in accordance with all local laws. Wash any skin or clothing exposed to battery
liquid and avoid swallowing or contact with eyes. In the case of swallowing or contact with eyes, seek medical care
immediately.
MV - LifeLight - UM - Book - Eng - 2023.05.11-1.0.0
© 2023 MegaVoice Ltd. Made in China
Reset
Other manuals for LifeLight
3
Table of contents
Other Megavoice Lantern manuals

Popular Lantern manuals by other brands


Gama Sonic
Gama Sonic GS-179 instruction manual

StreamLight
StreamLight The Siege operating instructions

Lumena
Lumena PROSOLAR OLYMPIA user manual

MULTILINE
MULTILINE SCORE spots 05.870 Series Mounting instruction

Chalmit
Chalmit NexLED Installation, operation and maintenance instructions

Schmitz
Schmitz FACTORY TC-L manual

Visual Comfort & Co.
Visual Comfort & Co. CHO2153 Assembly instructions

Sunmaster
Sunmaster SQUARE ROOT SQRT670CX instruction manual

MELINERA
MELINERA 275714 Operation and safety notes

Fanelite
Fanelite KN-8940LA user manual

Primus
Primus PTL 2245 user manual

NORTHCLIFFE
NORTHCLIFFE Barat LED1x1300 C101 T840 PC/PC OP IC Ex User instruction