MEI Cashflow SC Series User manual

Technical Support 1-800-345-8172 CASHFLOW SC66 Page-1
www.meiglobal.com Part # 252053040 Y1
Mars Inc. 2002 Printed in USA.
MEI is a trademark of Mars, Inc. Information is subject to change without notice. MEI has made every effort to ensure that the
information in this document is accurate. However, we cannot be held responsible for any errors or omissions.
Cashflow SC66 Install Guide

Technical Support 1-800-345-8172 CASHFLOW SC66 Page-2
www.meiglobal.com Part # 252053040 Y1
TABLE OF CONTENTS
OVERVIEW
Model Number ........................................................................................................ 3
Serial Number......................................................................................................... 3
Features................................................................................................................ 4,5
Main Components of the SC66 Bill Acceptor .................................................... 6
Specifications .......................................................................................................... 6
Input Voltage ........................................................................................................... 6
INSTALLATION AND REMOVAL OF COMPONENTS
Installing the Chassis ............................................................................................. 7
Inserting and Removing the Cashbox.................................................................. 8
Inserting and Removing the Acceptor Module Unit .......................................... 8
Installing a Bill Entry Guide ................................................................................. 9
Installing Locks on the Cashbox ........................................................................ 10
HARNESSINGAND CONNECTORS
EBDS Interface Pin Out...................................................................................... 11
RS232 Interface Pin Out ..................................................................................... 11
MAINTENANCE
Cleaning and Clearing the Front Sensor Area ................................................. 12
Diagnostic Codes ................................................................................................. 13
SC66 Dimension Drawings ................................................................................. 14

Technical Support 1-800-345-8172 CASHFLOW SC66 Page-3
www.meiglobal.com Part # 252053040 Y1
OVERVIEW
Serial Number
WW Y L CC #####
Configuration Code
Manufacturing Location
Year Manufactured
Week Manufactured
Sequential Production Number
Model Number
SC66 XX X
“P” Prom Unit
00- OEM Configurable (No Harness)
02- OEM Proprietary
04- Opto Isolated EBDS
07- RS232 EBDS
“ ” Flash Unit

Technical Support 1-800-345-8172 CASHFLOW SC66 Page-4
www.meiglobal.com Part # 252053040 Y1
OVERVIEW

Technical Support 1-800-345-8172 CASHFLOW SC66 Page-5
www.meiglobal.com Part # 252053040 Y1
Features
LIGHT BAR
LENSED RECEIVER
CUSTOM BAR-CODE READER
100 MHZ DSP PROCESSOR
EARLY BILL PICK-UP
SMOOTH SEALED BILL PATH
DIRECT ROLLER DRIVE
RIDGES MATE WITH ACCEPTOR
INTERNAL DIRECT ROLLER DRIVE ELEVATOR
SHORT BILL PATH
DURABLE WELDED PLASTIC EXTERIOR
RECESSED PLASTIC GEARS
DUAL LOCK CAPABILITY
COMMON ACCEPTOR MODULES
PC STYLE EDGE CONNECTOR INTERFACE CARDS
ACCEPTOR RELEASE LATCH
BILL PATH RELEASE
DISPUTE RESOLUTION WINDOW
BILL ENTRY GUIDE & POWER MOUNTING
CONFIGURATION BUTTON
DIAGNOSTIC LEDS
USB SERVICE PORT
ACCEPTOR USER INTERFACE
FLEXIBLE HANDLE
PASSIVE CASHBOX LATCHES
OVERVIEW

Technical Support 1-800-345-8172 CASHFLOW SC66 Page-6
www.meiglobal.com Part # 252053040 Y1
Parts of the Cashflow SC66 Bill Acceptor
The SC66 consists of three main components
Cashbox/LRC Acceptor Module Chassis
OVERVIEW
The Acceptor Module and Cashbox are interchangeable with other identical SC66 models.
Bill Entry Guides for the SC66
Not all bill entry guides fit in every machine. Your choice regarding bill entry guides will depend
on machine specifications. Below are two bill entry guides that we currently manufacture. For
customers who prefer to tool their own bill entry guide, please contact our technical department.
Specifications Input Voltage
Power consumption: +12-28 VDC
Standby: 10 Watts
Acceptance: Peak 30 Watts
Stacking: Peak 70 Watts
Universal Bill Entry Guide
Platform Bill Entry Guide

Technical Support 1-800-345-8172 CASHFLOW SC66 Page-7
www.meiglobal.com Part # 252053040 Y1
INSTALLATION
ALWAYS POWER DOWN MACHINE PRIOR TO INSTALLATION.
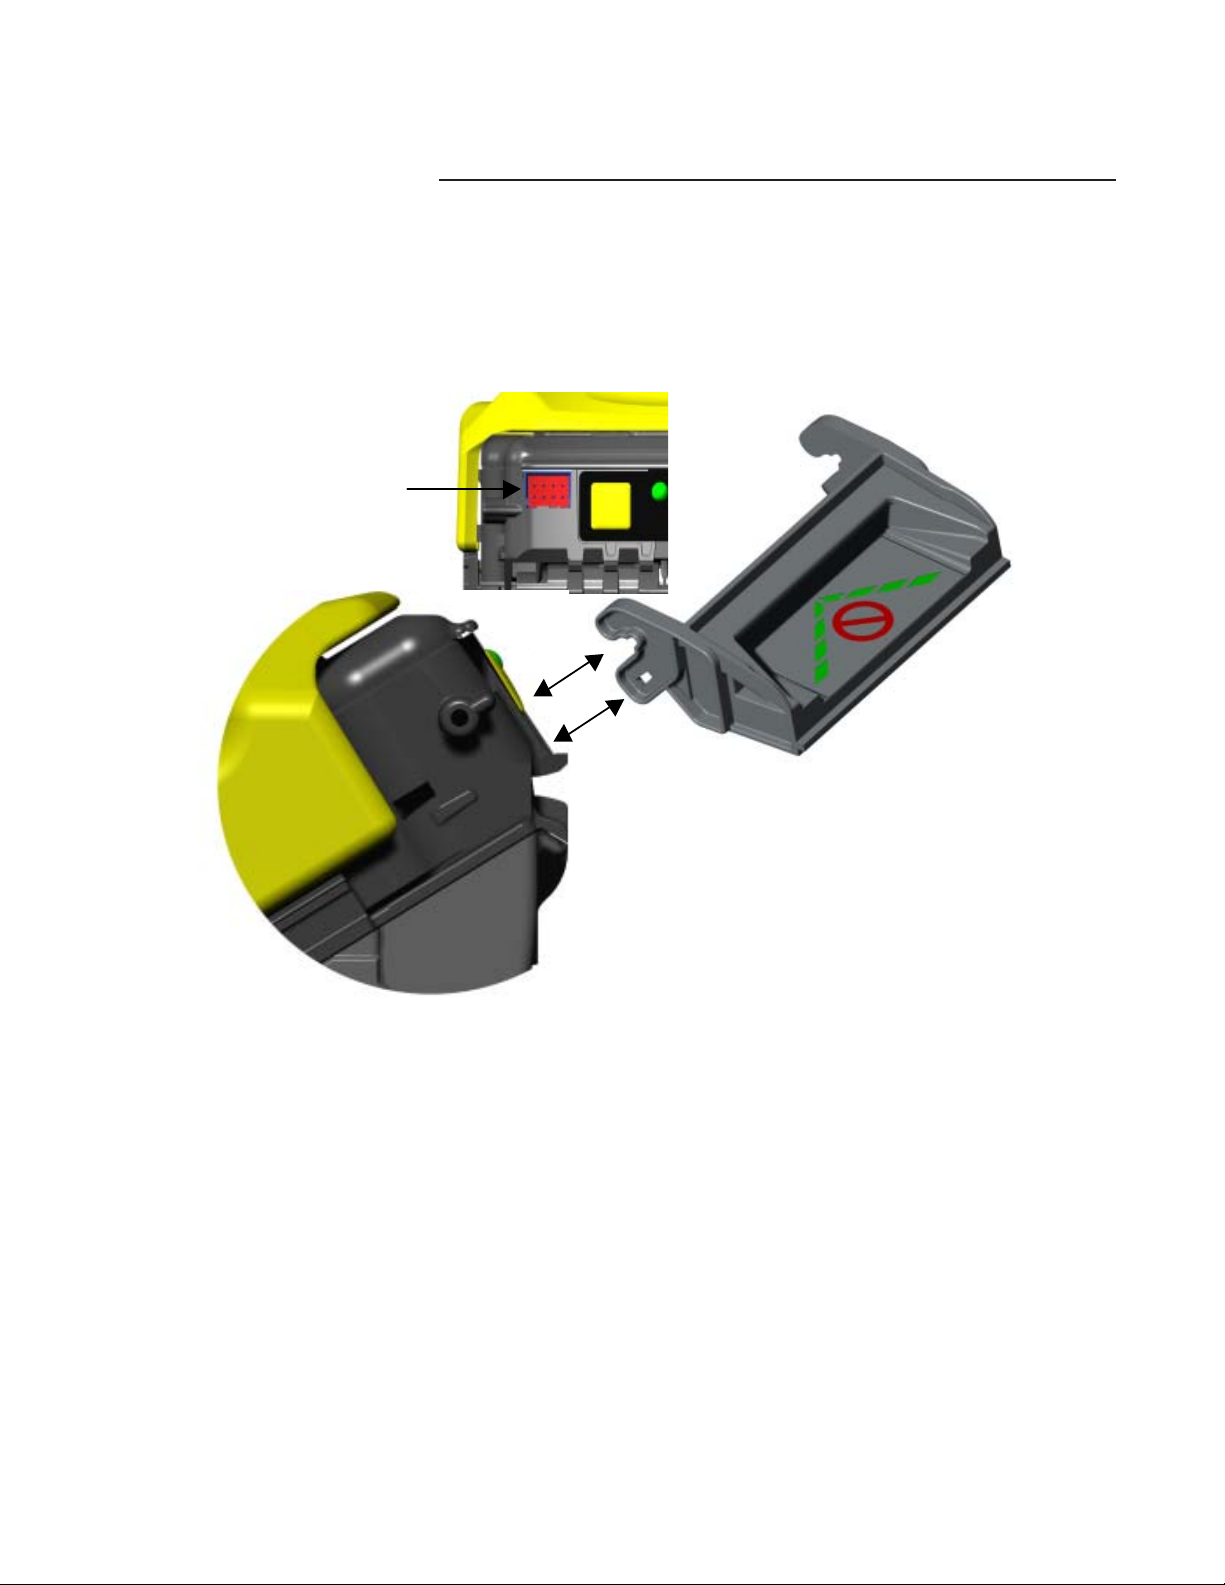
The cashbox does not lock to the chassis. When you remove the unit from the container or when
the unit is not installed in the machine, you must never carry the bill acceptor by the handle of
the cashbox. The cashbox may release causing the rest of the unit to fall and damage the chassis.
Installing The Chassis
•A custom connector will come screwed to the back of the
Chassis (see Interface Manual 002850103 for more details).
Connect the adapter from the chassis to the machine. Always
dress all harness wires to avoid interference with any equip-
ment operation.
Note: If you have a custom set-up. You will need to contact our
technical support group for assistance.
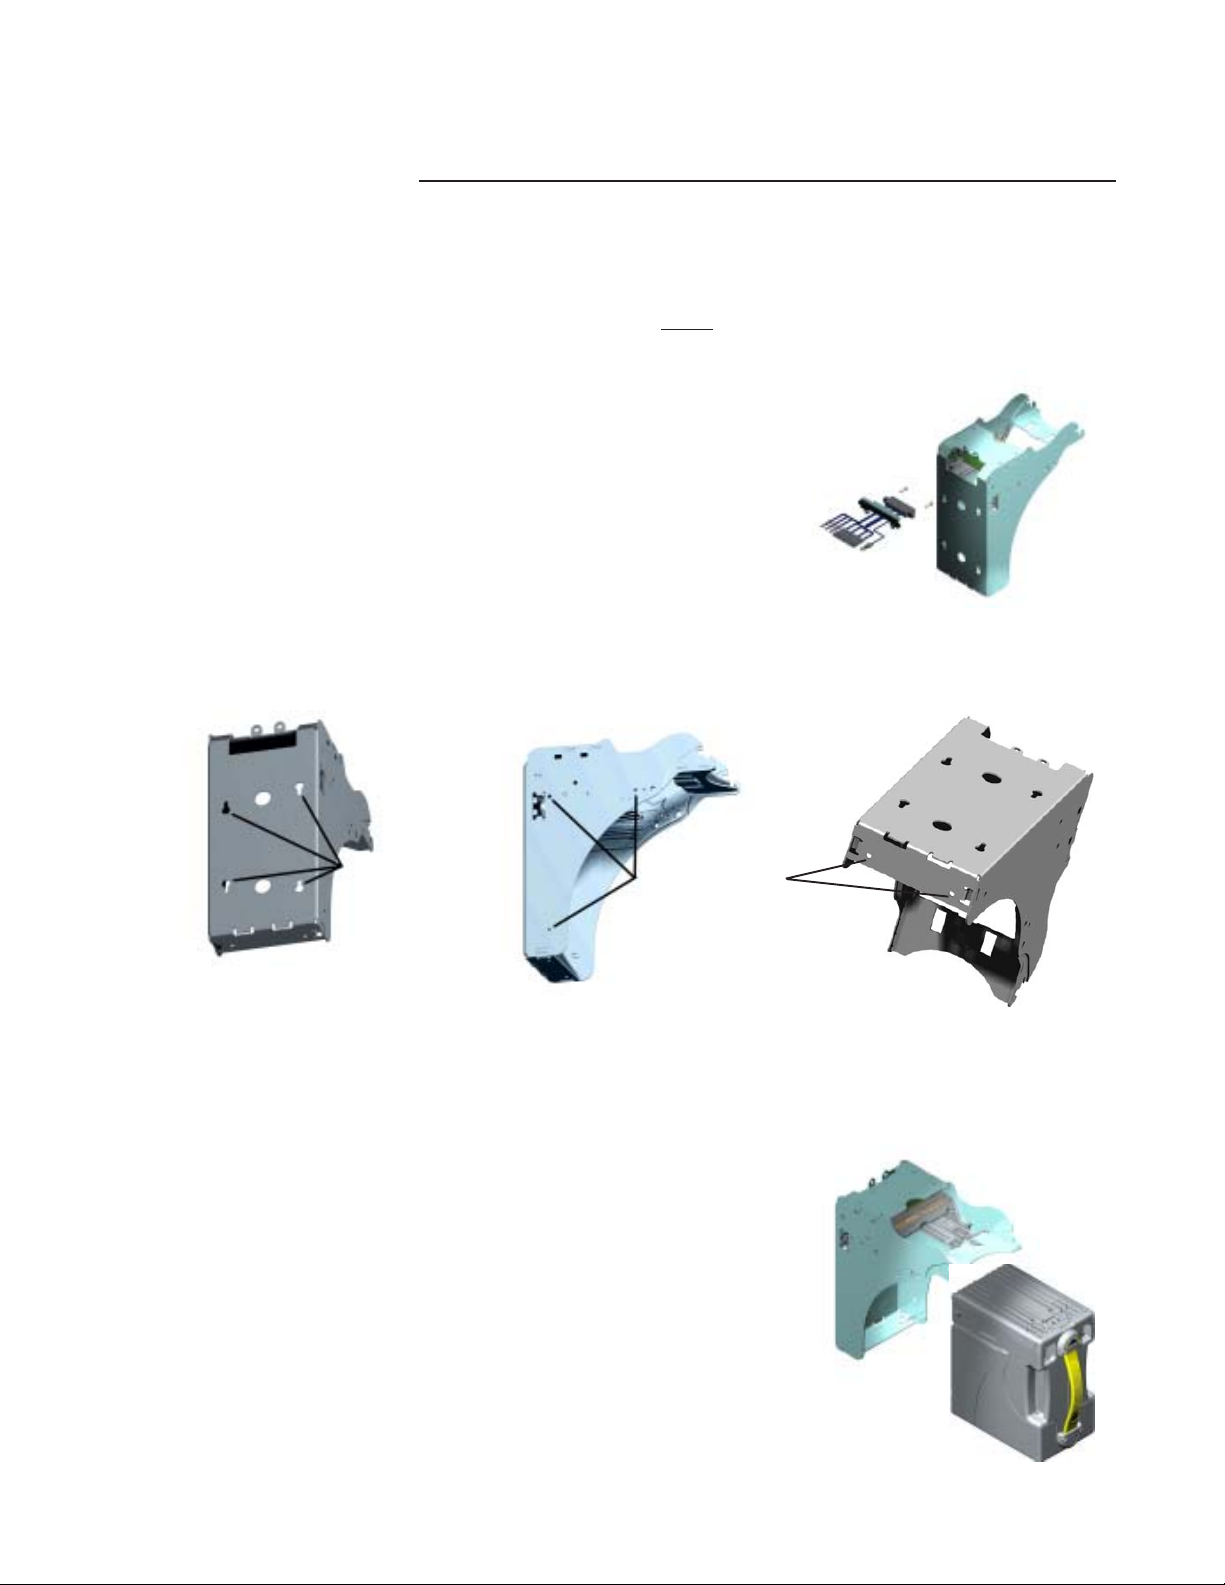
•Once the connections are made, you will need to line up
the chassis mounting holes with the machine mounting holes.
There are 12 mounting holes. Three on each side of the chassis,
four located on the back and two on the bottom. M4 screws
must be used. Screws must not exceed a 6mm depth through the
mounting plate. Otherwise they may interfere with the
removable cashbox.
Installing The Cashbox
•With the chassis mounted securely to the machine, you may
now insert the cashbox into the chassis. The cashbox has slots
on both sides that will guide it into the chassis. When you insert
the cashbox, you will feel some resistance from the two springs
inside the chassis. Make sure to insert the cashbox all the way in
so that the rear of the cashbox is flush against the chassis wall.
Bottom
Mounting Holes
(use M4 screws)
Mounting Holes
(use M4 screws)
Back Side

Technical Support 1-800-345-8172 CASHFLOW SC66 Page-8
www.meiglobal.com Part # 252053040 Y1
INSTALLATION
Removing the Cashbox
Inserting And Removing the Acceptor Module
•Insert the Acceptor Module so that the release lever locks into place.
•To remove the unit, pull upwards on the release lever
located on the front of the Acceptor Module and pull
away from the chassis.
•When the bill acceptor is installed in a machine, you just need to grab the yellow strap on the
cashbox and pull firmly to release it. The
cashbox does not lock on to the Chassis.
• To remove the cashbox when the unit is not
installed, grab on to the yellow handle and
place your thumb on the chassis were indicated
in this diagram. Placing your thumb at this
location will give you sufficient leverage to
remove the cashbox.
Place Thumb Here

Technical Support 1-800-345-8172 CASHFLOW SC66 Page-9
www.meiglobal.com Part # 252053040 Y1
INSTALLATION
Eight pin harness connector
Installing The Bill Entry Guide
•To install the bill entry guide, just slide onto the Acceptor Module until it locks into place.
No screws are required. If the bill entry guide has lights, you will have to first connect the har-
ness from the bill entry guide to the eight pin connector located on the left hand side of the face
of the Acceptor Module.
Acceptor Module
Bill Entry Guide

Technical Support 1-800-345-8172 CASHFLOW SC66 Page-10
www.meiglobal.com Part # 252053040 Y1
The cashbox may be fitted with either one or two security locks. The product is designed to
accept locks from a range of manufacturers including: -
Medeco
Kaba
Abiloy
VSR
Miwa
Duo
Standard 5/8" and 1-1/8" formats are supported. There is a significant variety of lock designs,
and spacer washers may be required for some lock types. Two locking hasps are shipped with
every cashbox. Contact MEI for cashbox lock specifications.
Locks vary greatly in price, security, keying policies, etc. The customer is responsible for selecting
a lock with performance that is fit for the intended purpose. MEI does not test or endorse any
specific brand of lock for security characteristics.
When only one lock is used, the remaining blank hole does not give access to the contents of the
cashbox. However, some regulatory authorities may require a blanking plug be fitted. Contact
MEI for assistance in obtaining a suitable plug.
When two locks are installed, they must rotate in opposite directions. See the figure below.
Unlock
Unlock
INSTALLATION
Top View of Cashbox

Technical Support 1-800-345-8172 CASHFLOW SC66 Page-11
www.meiglobal.com Part # 252053040 Y1
HARNESSINGAND CONNECTORS
Cashflow SC66 bill acceptors with an EBDS Interface will have a harness that terminates with a
12 Pin Connector.
Note: Some SC66 units will come with harness termination connectors that are “OEM-Specific.” Please refer to the
host machine manual for pinout and connector information.
RS232 EBDS version
Connector Pin # Wire Color Signal P2 pinSee 4.1
1White 10
2Gray 12
3Red ————
4Yellow 11
5Blue Ground2D & H
6Pink RS232 EBDS RXD1L
7Black Power - 22 & B
8Purple Led Supply 9
9Brown ————
10 Orange ————
11 Green Power + 1 & A
12 Tan RS232 EBDS TXD1K
NOTES: 1RXD refers to input to Bill Acceptor. TXD is an output.
2Pins 7 and 5 are tied with a loop of wire in back of the 12pin connector.
Opto Isolated EBDS version
Connector Pin # Wire Color Signal P2 pinSee 4.1
1White Aux A 14
2Gray Led - 12
3Red V opt 7
4Yellow V ret 3
5Blue Ground2D & H
6Pink Isolated Reset 6
7Black Aux B 15
8Purple Led + 8
9Brown Isolated TXD 4
10 Orange Isolated RXD 5
11 Green Power + 1 & A
12 Tan Power - 2 & B
NOTES: 1RXD refers to input to Bill Acceptor. TXD is an output.
2Pins 12 and 5 are tied with a loop of wire in back of the 12pin connector.

Technical Support 1-800-345-8172 CASHFLOW SC66 Page-12
www.meiglobal.com Part # 252053040 Y1
Periodic maintenance can improve the performance and extend the working life of a bill accep-
tor. Additional attention may be required if the bill acceptor becomes inoperable due to a
jammed object or acceptance rates fall below normal.
Cleaning And Clearing The Bill Path and Sensor Area.
Note: You must remove the Acceptor Module from the chassis to open the front sensor area. Forcing the bill path open
without removing the Acceptor Module from the chassis will damage the connector board located at the rear of the
Acceptor Module.
•Release the Acceptor Module from its normal operating position.
•Open the Acceptor Module unit by pressing up on the yellow cap.
•Clear the bill path area of any foreign objects.
•Clean bill path and sensor areas as needed.
For stubborn dirt, a small amount of mild non-abrasive soap may be applied to a damp cloth.
Make sure no streaks or residual from the cleaning product remain on the bill path.
Note: Never use a petroleum-based product to clean this device! Petroleum based products will damage the bill
path.
Calibration
The SC66 series bill acceptor does not require any calibration in the field. Thus, the unit has no
switch settings or calibration mode that allows a user to perform a calibration. If, for any reason,
the unit requires calibration, it may only be done by one of our trained technicians.
MAINTENANCE

Technical Support 1-800-345-8172 CASHFLOW SC66 Page-13
www.meiglobal.com Part # 252053040 Y1
MAINTENANCE
Diagnostic Codes
The chart below indicates the 15 color-coded combinations of diagnostic LEDs on the bill
acceptor. For each color, there is a solid indicator and four flashing combinations. If multiple
failure conditions occur, the most severe condition will be displayed.
Red conditions - Hard Fault. One of the bill acceptor components needs to be replaced.
Yellow condtions - Soft Fault The operator can correct the issue at the machine.
Green conditions - No Fault No problem with the bill acceptor.
Note: By opening the machine door, you will disable the primary interface. The 10-second delay allows you to see
a normal condition on the unit prior to the MMI display update.

Technical Support 1-800-345-8172 CASHFLOW SC66 Page-14
www.meiglobal.com Part # 252053040 Y1
MAINTENANCE
Other manuals for Cashflow SC Series
1
This manual suits for next models
1
Table of contents