MeiTrack ASUF101 User manual

ASUF101 & ASUF102 Bluetooth Ultrasonic Fuel Level Sensor User Guide
ASUF101 & ASUF102 Bluetooth Ultrasonic
Fuel Level Sensor User Guide

ASUF101 & ASUF102 Bluetooth Ultrasonic Fuel Level Sensor User Guide
Copyright © Meitrack Group 2021. All rights reserved. - 2 -
Change History
File Name ASUF101 & ASUF102 Bluetooth Ultrasonic Fuel Level Sensor User Guide
Project Vehicle trackers and MDVRs Creation Date
Update Date
2021-11-15
Subproject Accessory User Guide Total Pages 14
Version V1.1 Confidential External Documentation

ASUF101 & ASUF102 Bluetooth Ultrasonic Fuel Level Sensor User Guide
Copyright © Meitrack Group 2021. All rights reserved. - 3 -
Contents
1 Copyright and Disclaimer........................................................................................................................................... - 4 -
2 Product Introduction ................................................................................................................................................. - 4 -
2.1 Product Functions......................................................................................................................................... - 4 -
2.2 Product Specifications .................................................................................................................................. - 4 -
2.3 Cable Definition ............................................................................................................................................ - 5 -
2.4 LED Indicator................................................................................................................................................. - 5 -
3 Product Materials ...................................................................................................................................................... - 5 -
4 Installation................................................................................................................................................................. - 6 -
4.1 Installing the Sensor ..................................................................................................................................... - 7 -
4.1.1 Downloading the FuelGuard App......................................................................................................... - 7 -
4.1.2 Checking the Fuel Level of the Fuel Tank ............................................................................................. - 7 -
4.1.3 Confirming the Installation Location of the Probe ............................................................................... - 7 -
4.1.4 Fastening the Sensor............................................................................................................................ - 9 -
4.2 Device Connection...................................................................................................................................... - 10 -
4.2.1 Connecting a Sensor to a Device........................................................................................................ - 10 -
4.2.2 Configuring the Sensor ...................................................................................................................... - 12 -
5 Using the MS03 Tracking Platform........................................................................................................................... - 13 -
5.1 Querying Reports........................................................................................................................................ - 13 -
5.1.1 Querying Historical Data .................................................................................................................... - 13 -
5.1.2 Querying Sensor Reports ................................................................................................................... - 13 -
ASUF101 & ASUF102 Bluetooth Ultrasonic Fuel Level Sensor User Guide
Copyright © Meitrack Group 2021. All rights reserved. - 4 -
1Copyright and Disclaimer
Copyright © 2021 MEITRACK. All rights reserved.
, and are trademarks that belong to Meitrack Group and its subsidiary.
The user manual may be changed without notice.
Without prior written consent of Meitrack Group, this user manual, or any part thereof, may not be reproduced for any
purpose whatsoever, or transmitted in any form, either electronically or mechanically, including photocopying and
recording.
Meitrack Group shall not be liable for direct, indirect, special, incidental, or consequential damages (including but not
limited to economic losses, personal injuries, and loss of assets and property) caused by the use, inability, or illegality
to use the product or documentation.
2Product Introduction
The new generation of the Bluetooth all-in-one ultrasonic fuel level sensor uses the ultrasonic reflection feature to
detect the fuel level without drilling holes. With a plastic outer case, the device is resistant to strong acids, corrosion,
shock, and high temperatures (300°C to 400°C). It is equipped with an internal low-power Bluetooth module, a RS232
serial port, and an analog port to output the fuel level.
2.1 Product Functions
Measure the fuel level of a vehicle.
Detect a high fuel level alert.
Detect a low fuel level alert.
Detect a fuel filling alert and a fuel theft alert.
2.2 Product Specifications
Item Specifications
Operating voltage 9–36 V DC
Power consumption 80 mA/12 V DC
Dimension 39 mm x 19.5 mm (Diameter x Height)
Operating temperature -40°C to 80°C
Storage temperature -40°C to 80°C
Operating humidity 0%–95%
Measuring range ASUF101: 3–100 cm
ASUF102: 3–250 cm
Maximum tank thickness 12 mm
Fuel tank supported Regular or irregular metal, steel, aluminum alloy, and plastic fuel tank
Measuring accuracy ±0.5%
Measuring resolution 0.1 mm
Water resistance rating IP68
Interface RS232 serial port and analog port (0–5 V)
Users can select one port to connect a tracker.

ASUF101 & ASUF102 Bluetooth Ultrasonic Fuel Level Sensor User Guide
Copyright © Meitrack Group 2021. All rights reserved. - 5 -
Bluetooth Bluetooth 5.0. Users can log in to the FuelGuard app to configure fuel
tank parameters and check the status of the fuel level sensor.
2.3 Cable Definition
Cable Color Definition Description
Red Positive charge of the power
(9–36 V DC)
If it is connected to the vehicle battery, a fuse is required.
Black Power GND or RS232 GND It is connected to some servers.
Yellow RS232-Tx: signal output It is connected to RS232-Rx of a vehicle tracker or a MDVR.
White RS232-Rx: signal receiving It is connected to RS232-Tx of a vehicle tracker or a MDVR.
Green Analog output (0–5 V) It is connected to the fuel level sensor interface of a vehicle
tracker or a MDVR.
2.4 LED Indicator
LED Indicator Status
LED Indicator Color Description
Red (Blink) No fuel level signal is detected, or the signal strength is weak.
Green (Steady on) A fuel level signal is stable, and this place can be used to install the sensor.
Yellow (Steady on) The firmware is being upgraded.
3Product Materials
Standard Accessory Quantity Picture Description
Probe (integrated type) 1
Probe diameter: 39 mm
Probe height: 19.5 mm
Outer case material: engineering plastics
Connector: water-resistant 5-pin gold-plated
aviation plug

ASUF101 & ASUF102 Bluetooth Ultrasonic Fuel Level Sensor User Guide
Copyright © Meitrack Group 2021. All rights reserved. - 6 -
9-meter extension cable 1
Extension cable
Sandpaper 2
Used to clean the bottom of the fuel tank.
304 stainless steel cable
tie 1
Used to fasten the probe.
Silicone grease 2
It is applied on the surface of the probe to exclude
air.
Rubber pad 4
Used to stick on to the probe.
8-pin to 4-pin cable 1
Connect device cables through the RS232 port.
Cable tie hoop 1
Adjust the stainless steel cable tie.
Thin cable tie 10
Used to fasten the extension cable.
Optional accessories:
Optional Accessory Quantity Picture Description
AB glue 1
Used to fix the probe on to the fuel tank. (Please
purchase it by yourself because we cannot deliver
it to you.)
4Installation
Users can perform the following operations to install the sensor:
1. Select a proper place to install the sensor.
ASUF101 & ASUF102 Bluetooth Ultrasonic Fuel Level Sensor User Guide
Copyright © Meitrack Group 2021. All rights reserved. - 7 -
2. Install the sensor.
3. Connect the sensor to a vehicle tracker or a MDVR.
For details about how to install the sensor, see the following instructions.
4.1 Installing the Sensor
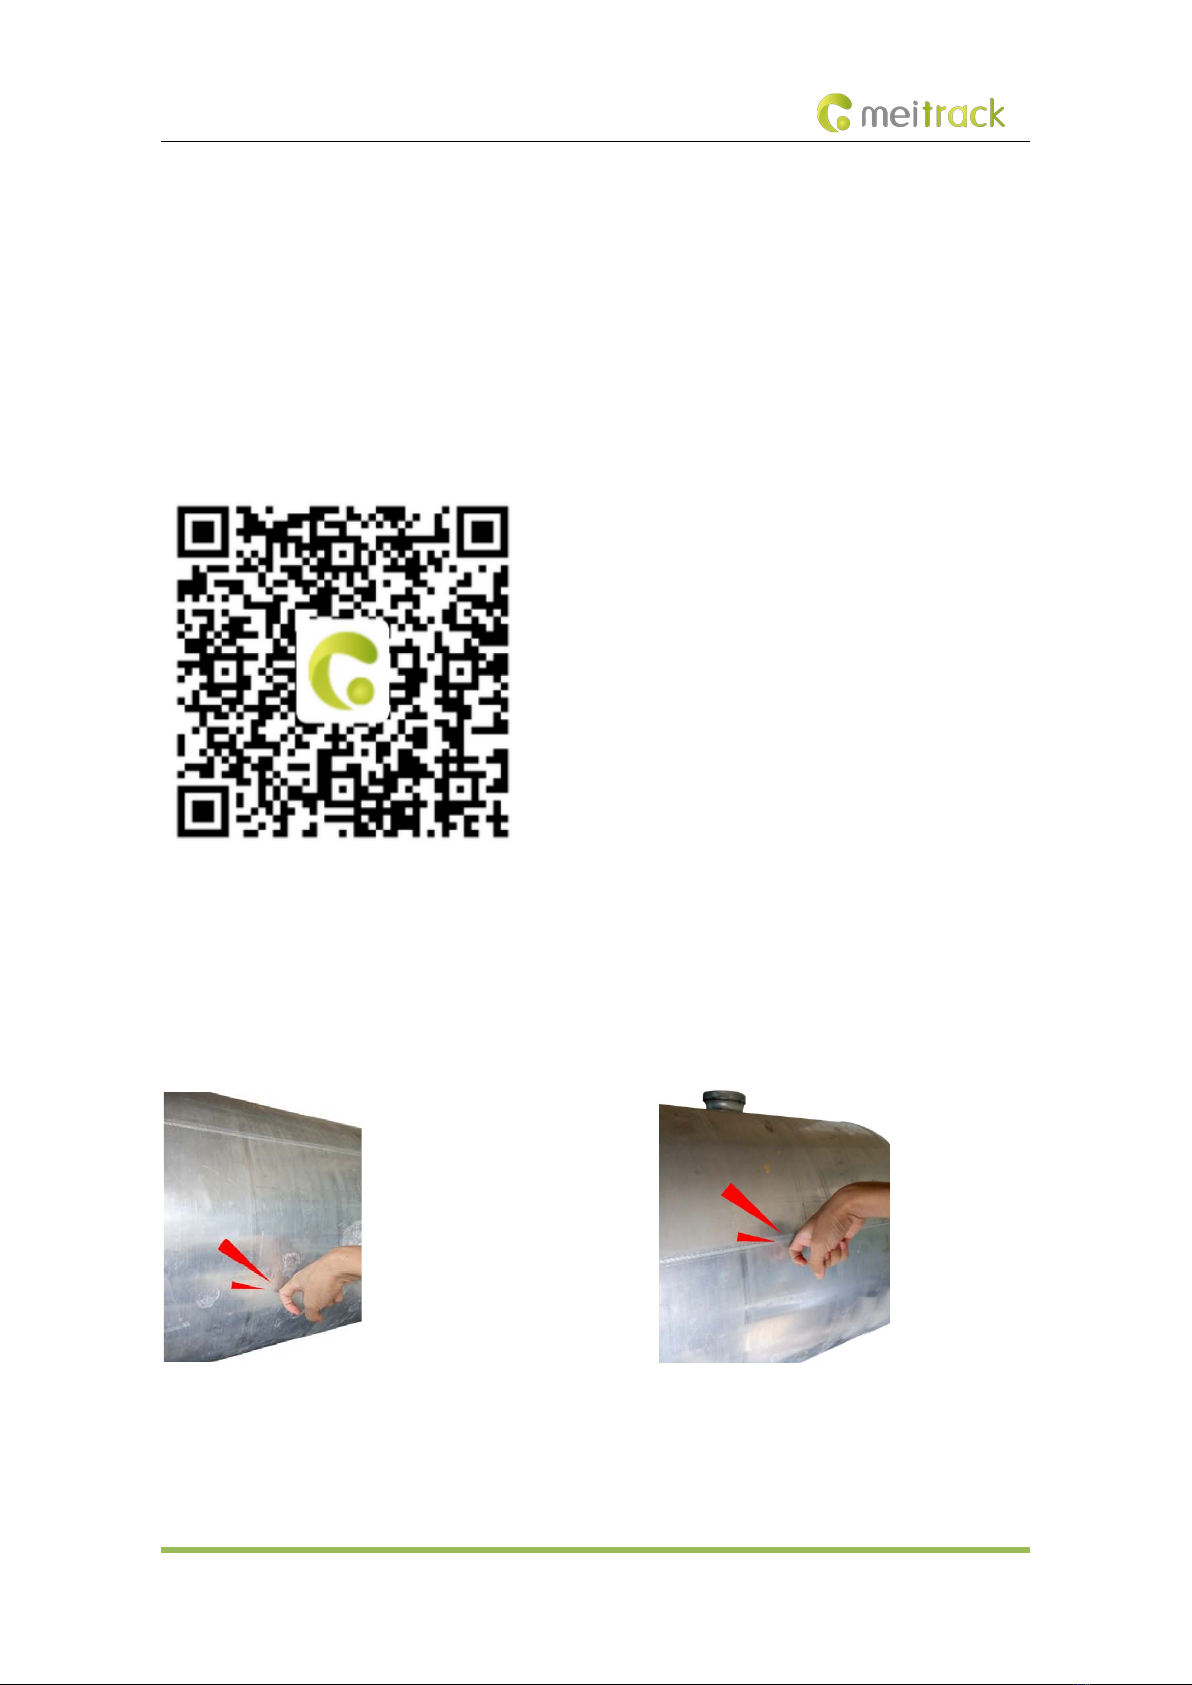
4.1.1 Downloading the FuelGuard App
On the FuelGuard app, users can check parameters of the sensor before it is installed, so as to select a proper place to
install the probe. The app supports the Android system only. Users can download the app by scanning the following QR
code:
4.1.2 Checking the Fuel Level of the Fuel Tank
Prior to the installation, keep the fuel tank at least half full and park the vehicle on level ground. Knock the fuel tank to
determine the fuel level.
When there is fuel in the fuel tank, you can hear a muffled sound. When there is no fuel in the fuel tank, it sounds clear.
At the meantime, you can open the fuel tank and check the fuel level. You can use any of the preceding ways to
determine whether the fuel tank is half full and estimate the fuel level.
4.1.3 Confirming the Installation Location of the Probe
When sticking the probe, keep it away from the fuel inlet and float. As shown in the following figure on the left, the
yellow area is suitable to install the probe. If the fuel tank is cylindrical, choose the area that is closest to the ground
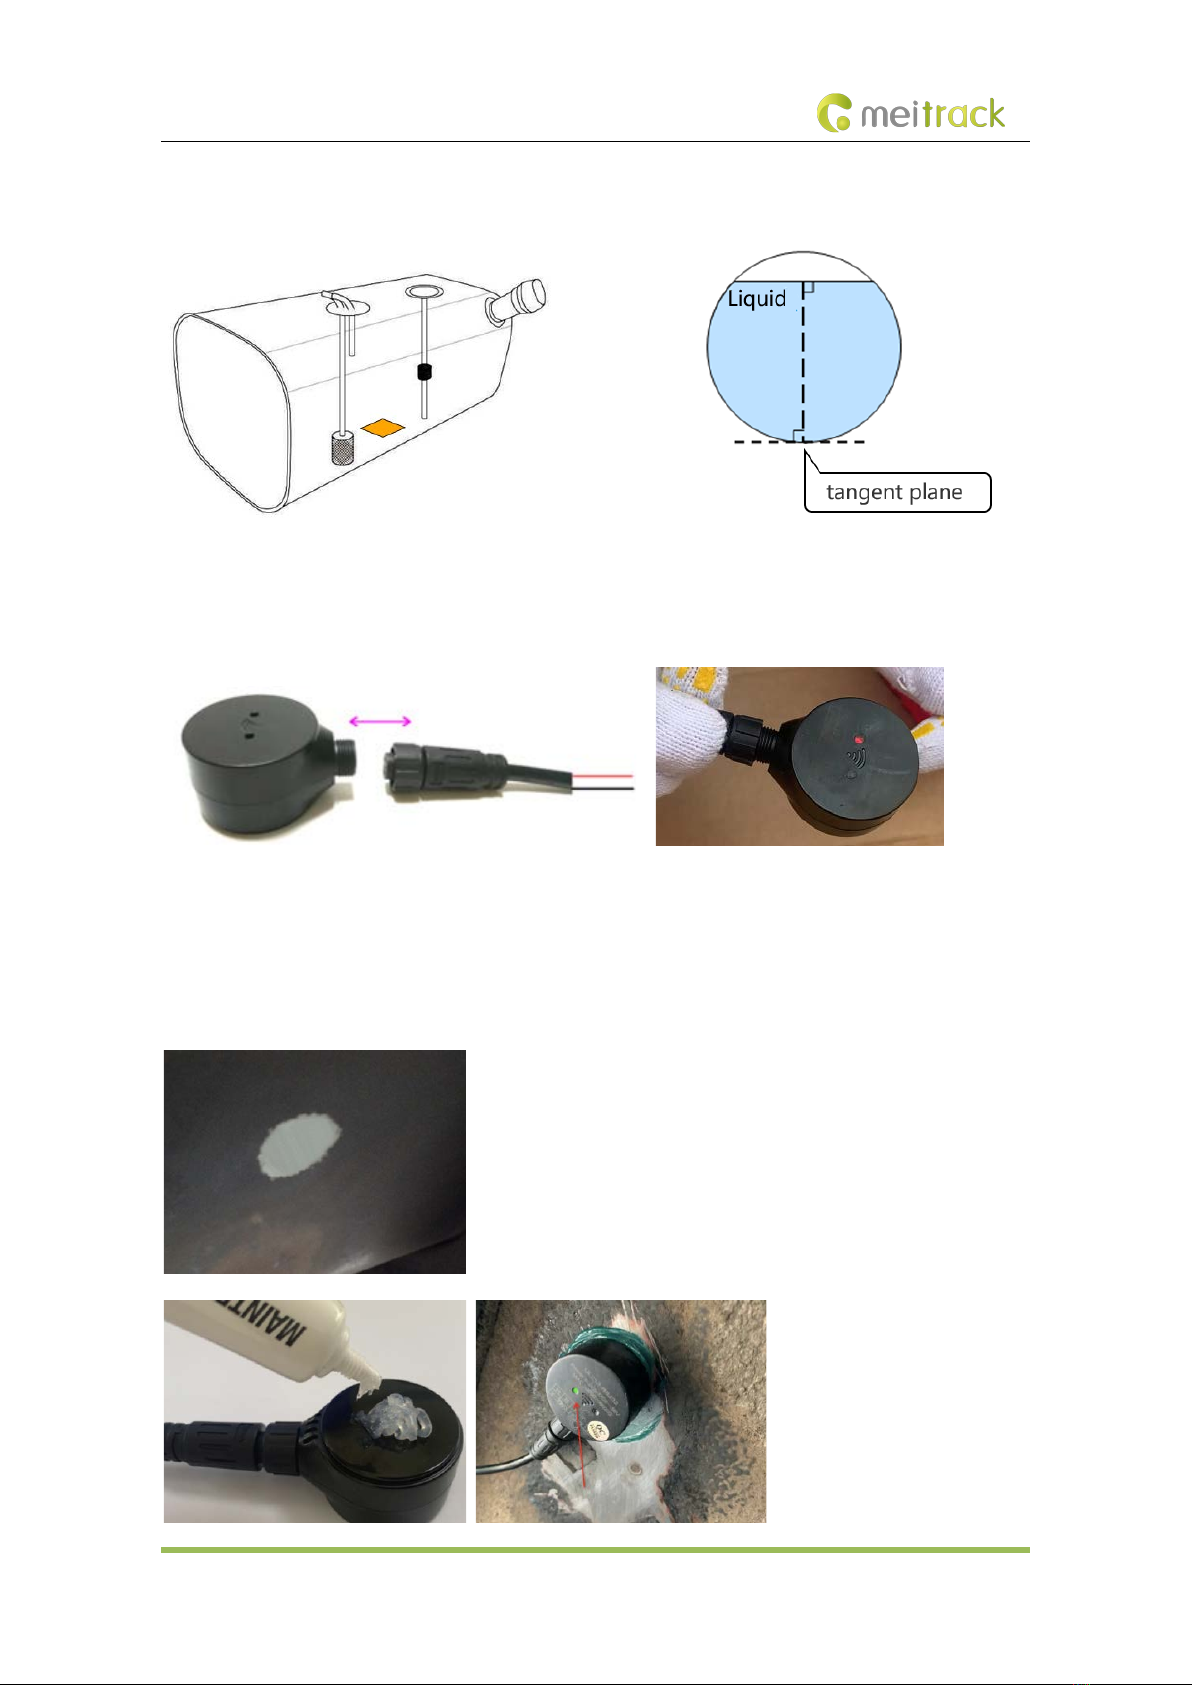
ASUF101 & ASUF102 Bluetooth Ultrasonic Fuel Level Sensor User Guide
Copyright © Meitrack Group 2021. All rights reserved. - 8 -
such as the section shown in the following figure on the right. Clean up the dirt and oil stain in the probe installation
area, and keep the area dry.
123
Connect the probe to the extension cable, arrange the extension cable in the cab, and connect the red wire of the
extension cable to vehicle battery's anode (9–36 V) and the black wire of the extension cable to its cathode (that is,
GND wire). After the power is supplied, the LED indicator becomes red, as shown in the following figure.
Clean up the silicone grease on the fuel tank and probe, and keep the probe installation location dry. If the bottom of
the fuel tank is covered with paint, use the putty knife or screwdriver to scrape paint. Then use the sandpaper to polish
the installation location until the tank metal is exposed. Apply the silicone grease to the probe surface and test the
installation location again. After that, keep the installation location clean and dry. As shown in the following figure, the
diameter of the polished area is 3.5 cm.

ASUF101 & ASUF102 Bluetooth Ultrasonic Fuel Level Sensor User Guide
Copyright © Meitrack Group 2021. All rights reserved. - 9 -
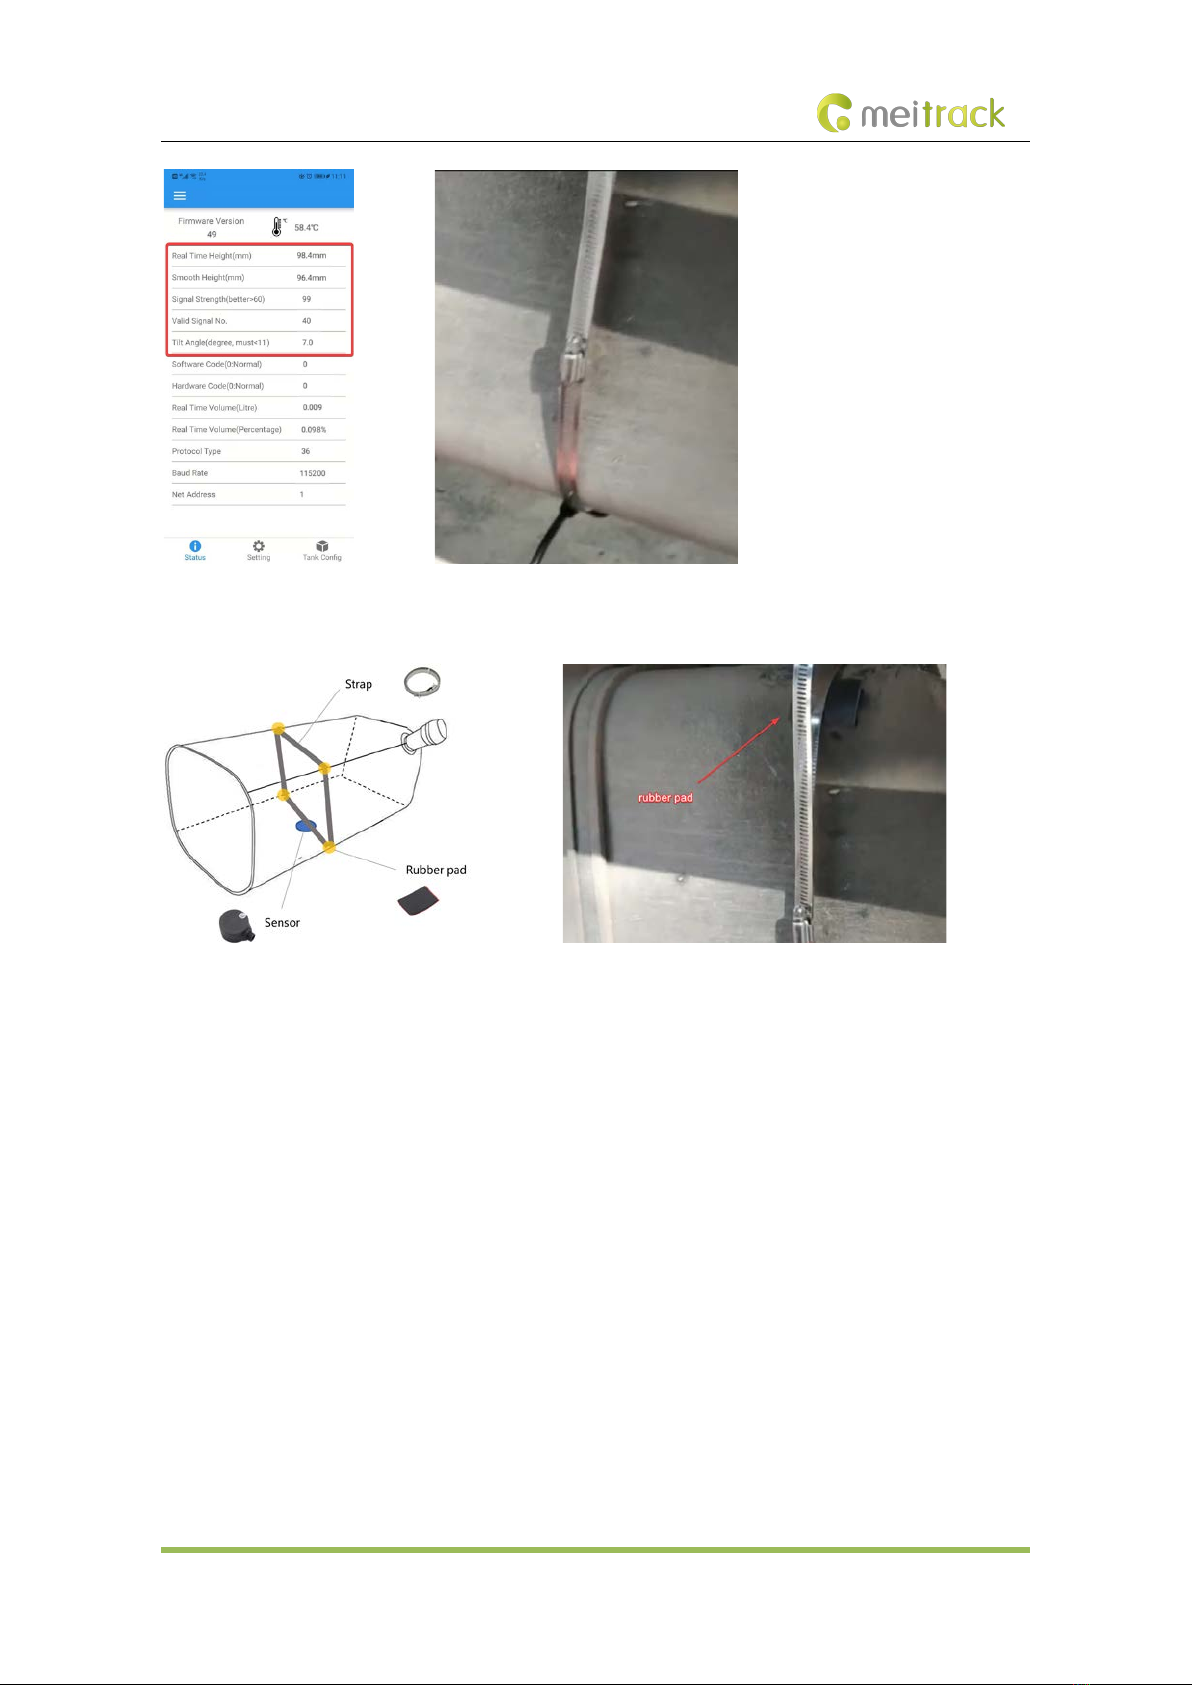
After the power is supplied, the red LED indicator of the probe blinks. Enable the Bluetooth and app "UL212 Fuel" on
your phone, and search and connect related device. Place the probe on to the clean area and check the status in real
time on the app. If you want to select a proper installation location, meet the following conditions:
(1) The LED indicator of the device is green.
(2) On the app, the real-time fuel level and smooth fuel level are stable.
(3) On the app, the signal strength is greater than 30 or is stable. (Maximum value: 99)
(4) On the app, the number of available signals is stable. (Greater than 30. Maximum value: 40.)
(5) On the app, the inclination angle is less than 11 degrees. (Preferred value: 1–5 degrees)
4.1.4 Fastening the Sensor
(1) Clean and wipe the probe and installation location to keep them clean and dry.
(2) Appy a proper amount of AB glue to the probe, evenly stir it for 20–30 seconds, and stick the probe on the marked
location.
(3) Check whether the data on the app is stable. When the data is stable, use the 304 stainless steel cable tie to fasten
the probe.
ASUF101 & ASUF102 Bluetooth Ultrasonic Fuel Level Sensor User Guide
Copyright © Meitrack Group 2021. All rights reserved. - 10 -
(4) When the cable tie is about to tighten, stick the rubber pad on to a corner of the fuel tank to prevent the fuel tank
from damaging. Then fasten the cable tie by using the cable tie hoop.
4.2 Device Connection
4.2.1 Connecting a Sensor to a Device
The ultrasonic fuel level sensor can read fuel parameters through the RS232 port or analog port. You can select one as
required.
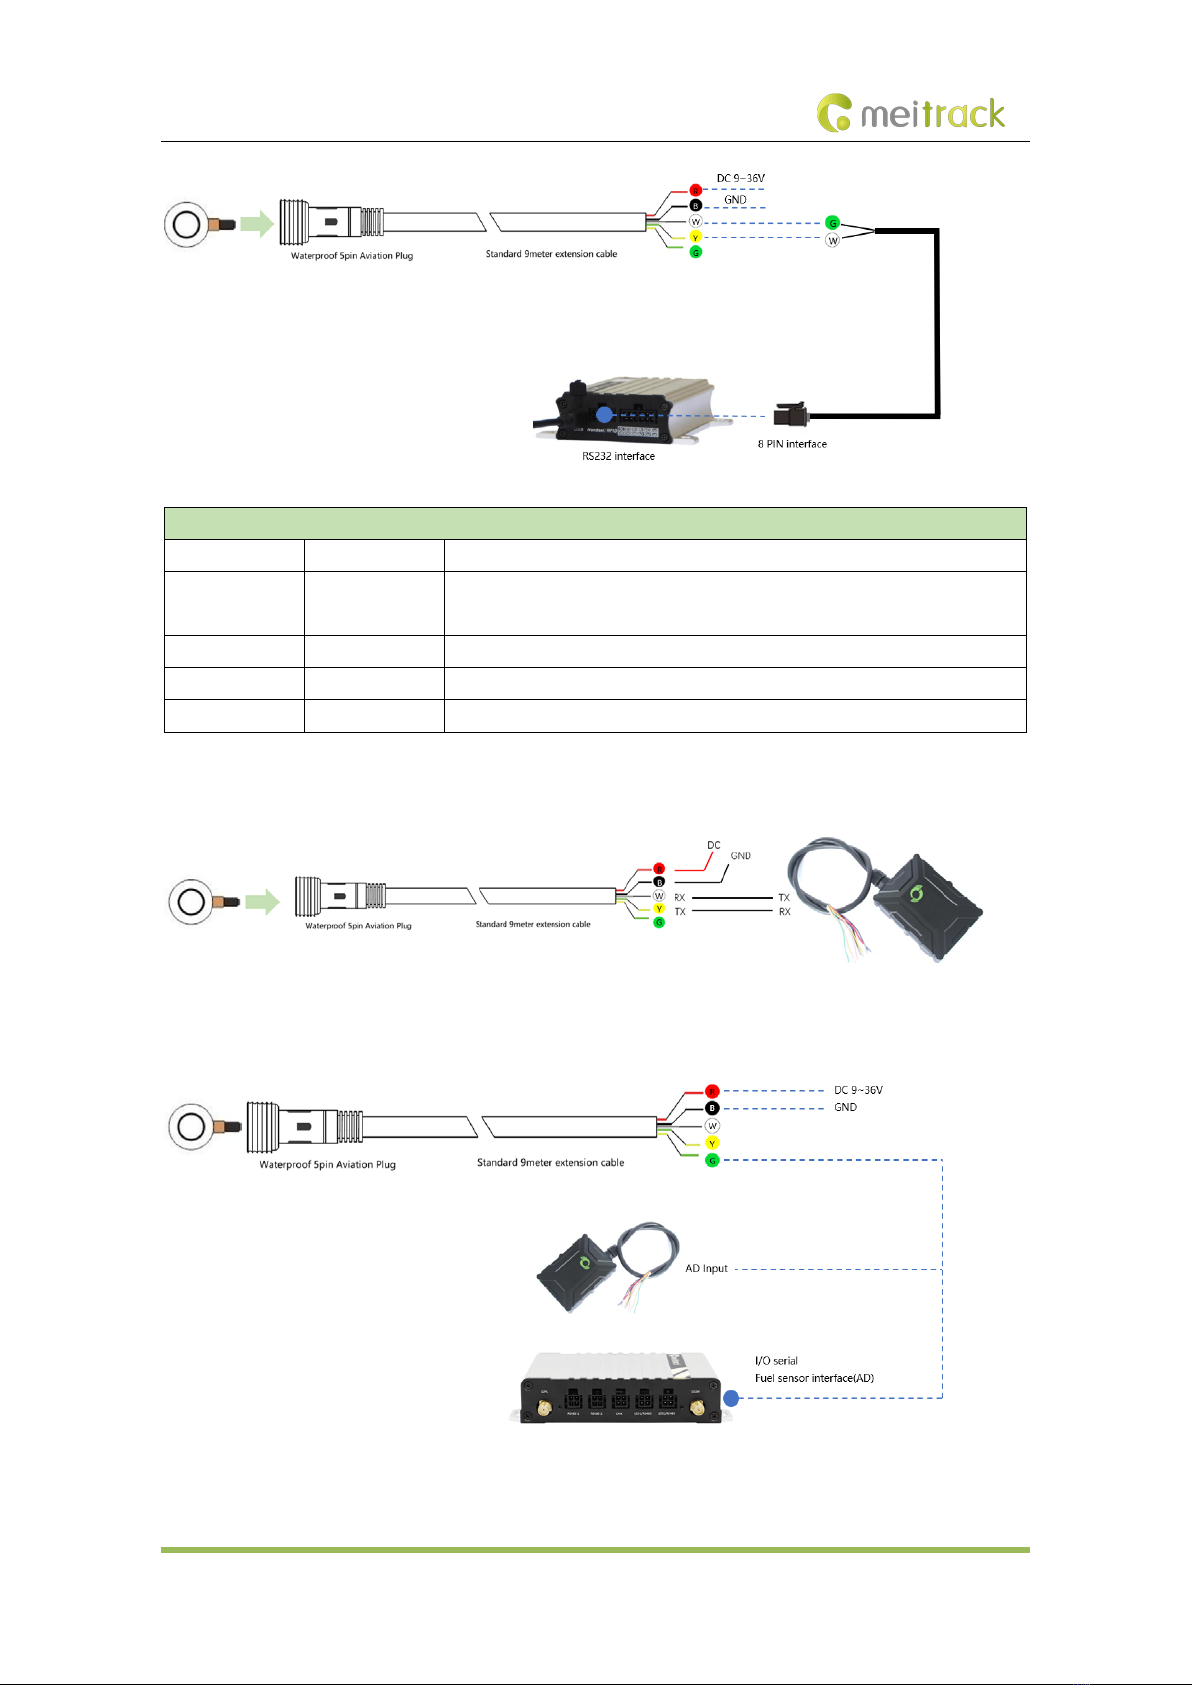
1. Connect the sensor to a device through the RS232 port and then read the fuel level.
(1) If the RS232 port of the device is a jack, cut the 4-pin connector and remain the 8-pin connector before the
installation. You can connect the sensor to the device as follows:
ASUF101 & ASUF102 Bluetooth Ultrasonic Fuel Level Sensor User Guide
Copyright © Meitrack Group 2021. All rights reserved. - 11 -
Definition of the 4-Pin to 8-Pin Cable
No. Cable Color Description
1 Red Power output
Output voltage: 5 V
2 Black Ground wire
3 Green Rx, connected to the Rx interface of the device.
4 White Tx, connected to the Tx interface of the device.
(2) If the RS232 port of the device includes cables (such as the T366 tracker), connect the sensor to the device as
follows:
2. Connect the sensor to a device through the analog port and then read the fuel level.
ASUF101 & ASUF102 Bluetooth Ultrasonic Fuel Level Sensor User Guide
Copyright © Meitrack Group 2021. All rights reserved. - 12 -
4.2.2 Configuring the Sensor
After the device is connected to the sensor, you can use any of the following ways to configure parameters of the sensor.
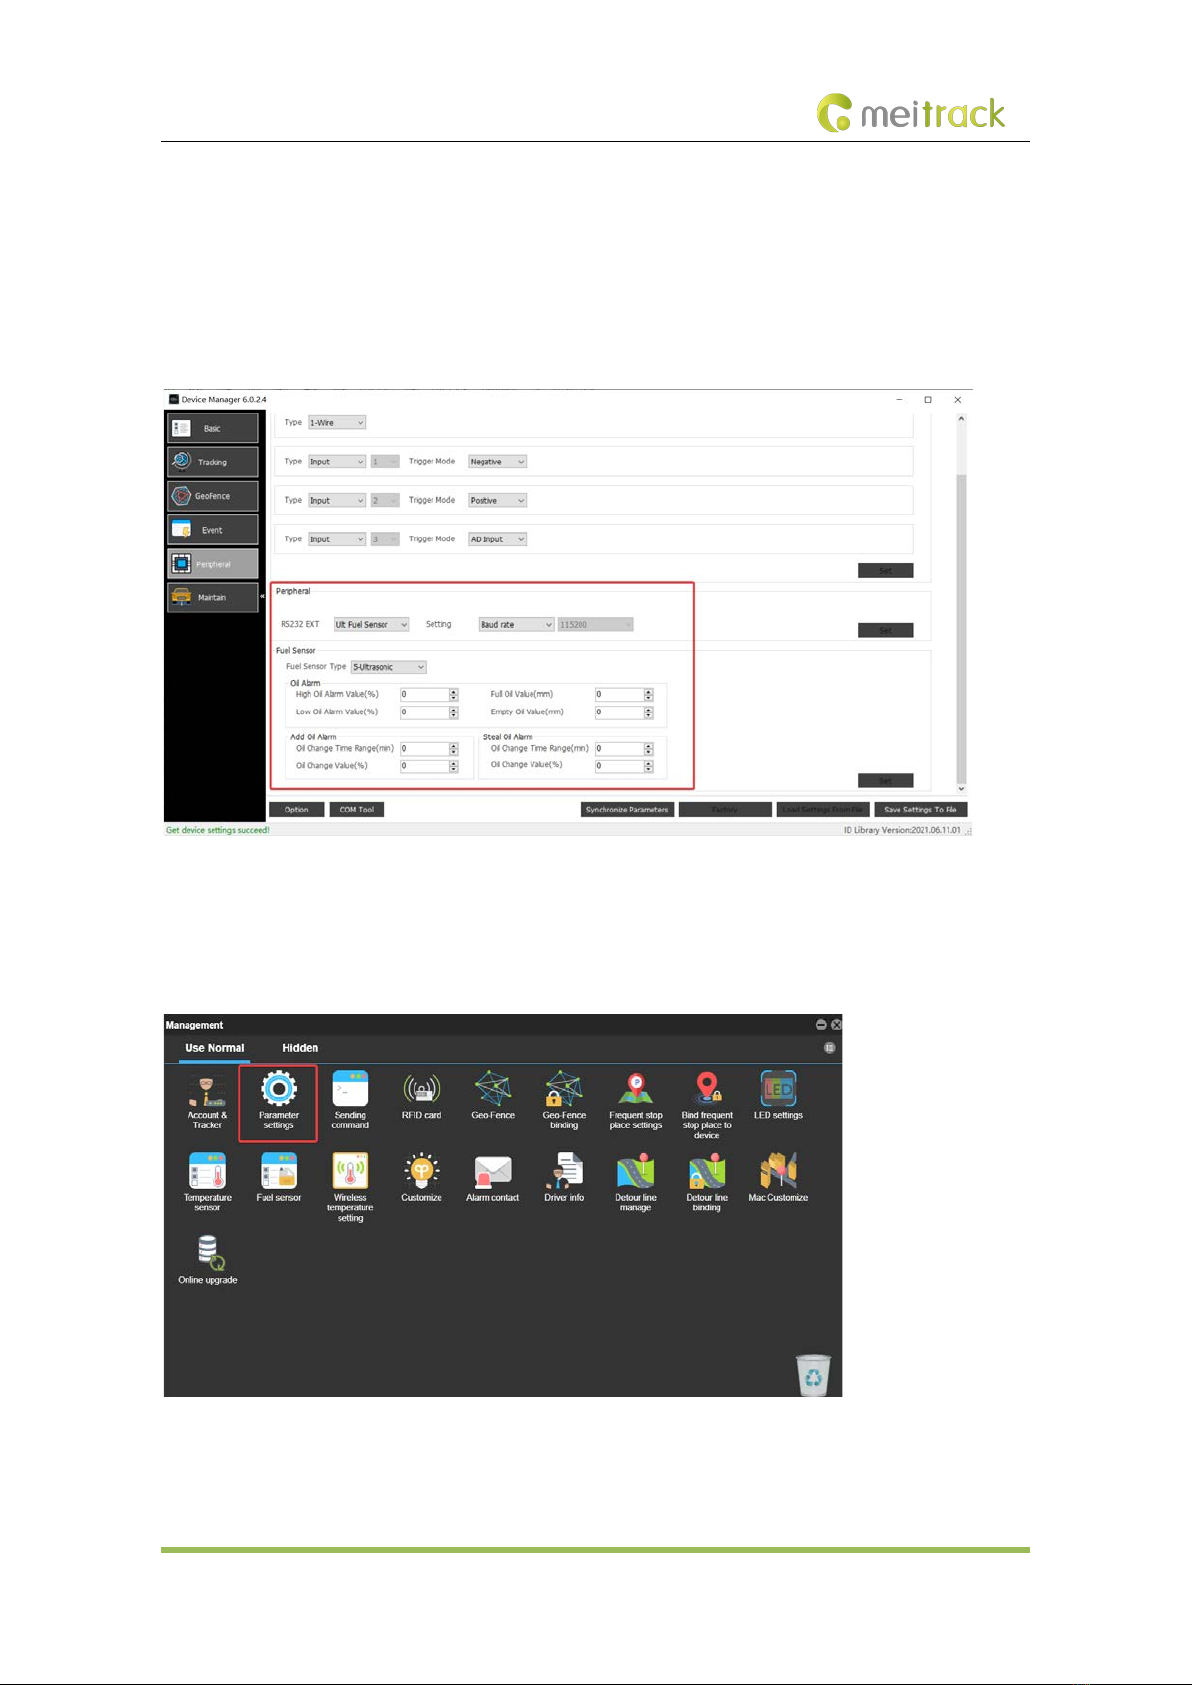
(1) Configure the sensor by Meitrack Manager.
Turn on a vehicle tracker or a MDVR, connect it to a computer, and run Meitrack Manager. As shown in the
following figure, set Fuel Sensor Type to 5-Ultrasonic, and set other parameters as required. Click Set to save the
configurations.
(2) Configure the sensor by the MS03 tracking system.
Please ensure that the device is online. On the MS03, choose Management. On the Management window, select
Parameter settings from Use Normal. On the page that is displayed, select a device in the left navigation pane,
click Sensor param, and then set related parameters.

ASUF101 & ASUF102 Bluetooth Ultrasonic Fuel Level Sensor User Guide
Copyright © Meitrack Group 2021. All rights reserved. - 13 -
5Using the MS03 Tracking Platform
5.1 Querying Reports
On the MS03 platform, you can choose Reports to check the fuel data.
5.1.1 Querying Historical Data
1. On the MS03, choose Reports.
2. On the Reports window, select Historical data from Use Normal. The Historical data window is displayed.
3. Select a device, set the query time, and click . The results will be displayed, as shown in the following figure.
5.1.2 Querying Sensor Reports
On the Reports window, choose Sensor report from Use Normal.

ASUF101 & ASUF102 Bluetooth Ultrasonic Fuel Level Sensor User Guide
Copyright © Meitrack Group 2021. All rights reserved. - 14 -
If you have any questions, do not hesitate to email us at info@meitrack.com.
This manual suits for next models
1
Table of contents
Other MeiTrack Accessories manuals


