MeiTrack K211G User manual
MEITRACK K211G GPS Smart Lock User Guide
MEITRACK K211G GPS Smart Lock
User Guide
Applicable Model: K211G

MEITRACK K211G GPS Smart Lock User Guide
Copyright © 2018 Meitrack Group All rights reserved. - 2 -
Change History
File Name MEITRACK K211G GPS Smart Lock User Guide
Project K211G Creation Date 2018-11-27
Subproject User Guide Total Pages 16
Version 1.0 Confidential External Documentation

MEITRACK K211G GPS Smart Lock User Guide
Copyright © 2018 Meitrack Group All rights reserved. - 3 -
Contents
1 Copyright and Disclaimer........................................................................................................................................... - 4 -
2 Product Introduction ................................................................................................................................................. - 4 -
2.1 Product Features........................................................................................................................................... - 4 -
2.1.1 LoRa Communication (Optional).......................................................................................................... - 4 -
2.1.2 Locking or Unlocking the K211G .......................................................................................................... - 5 -
2.1.3 Dual SIM Cards..................................................................................................................................... - 6 -
2.1.4 Magnetic Charging ............................................................................................................................... - 7 -
3 Product Functions...................................................................................................................................................... - 7 -
3.1 Position Tracking........................................................................................................................................... - 7 -
3.2 Alerts ............................................................................................................................................................ - 7 -
3.3 Other Functions ............................................................................................................................................ - 8 -
4 Product Specifications ............................................................................................................................................... - 8 -
5 Main Device and Accessories .................................................................................................................................... - 9 -
6 First Use ..................................................................................................................................................................... - 9 -
6.1 Installing a SIM Card ..................................................................................................................................... - 9 -
6.2 Turning on the K211G ................................................................................................................................. - 10 -
6.3 LED Indicator............................................................................................................................................... - 10 -
6.4 Device Configuration .................................................................................................................................. - 11 -
6.4.1 Installing the USB Driver .................................................................................................................... - 11 -
6.4.2 Configuring Device Parameters by Meitrack Manager....................................................................... - 11 -
6.5 Binding or Unbinding the T399G ................................................................................................................ - 12 -
6.5.1 Binding the T399G ............................................................................................................................. - 12 -
6.5.2 Unbinding the T399G......................................................................................................................... - 13 -
6.6 Common SMS Commands .......................................................................................................................... - 13 -
6.6.1 Setting GPRS Parameters – A21 ......................................................................................................... - 13 -
6.6.2 Authorizing an RFID Card – D10......................................................................................................... - 13 -
6.6.3 Authorizing RFID Cards in Batches – D11........................................................................................... - 14 -
6.6.4 Setting the SMS Time Zone – B35 ...................................................................................................... - 14 -
6.6.5 Locking or Unlocking the K211G – D82 .............................................................................................. - 14 -
6.6.6 Selecting a Locking Method – D83..................................................................................................... - 15 -
7 Using the Platform................................................................................................................................................... - 15 -
7.1 MS03 Tracking System ................................................................................................................................ - 15 -
7.2 Authorizing RFID Cards in Batches by MS03 ............................................................................................... - 15 -
8 Device Installation ................................................................................................................................................... - 16 -
MEITRACK K211G GPS Smart Lock User Guide
Copyright © 2018 Meitrack Group All rights reserved. - 4 -
1Copyright and Disclaimer
Copyright © 2018 MEITRACK. All rights reserved.
, and are trademarks that belong to Meitrack Group and its subsidiary.
The user manual may be changed without notice.
Without prior written consent of Meitrack Group, this user manual, or any part thereof, may not be reproduced for
any purpose whatsoever, or transmitted in any form, either electronically or mechanically, including photocopying
and recording.
Meitrack Group shall not be liable for direct, indirect, special, incidental, or consequential damages (including but
not limited to economic losses, personal injuries, and loss of assets and property) caused by the use, inability, or
illegality to use the product or documentation.
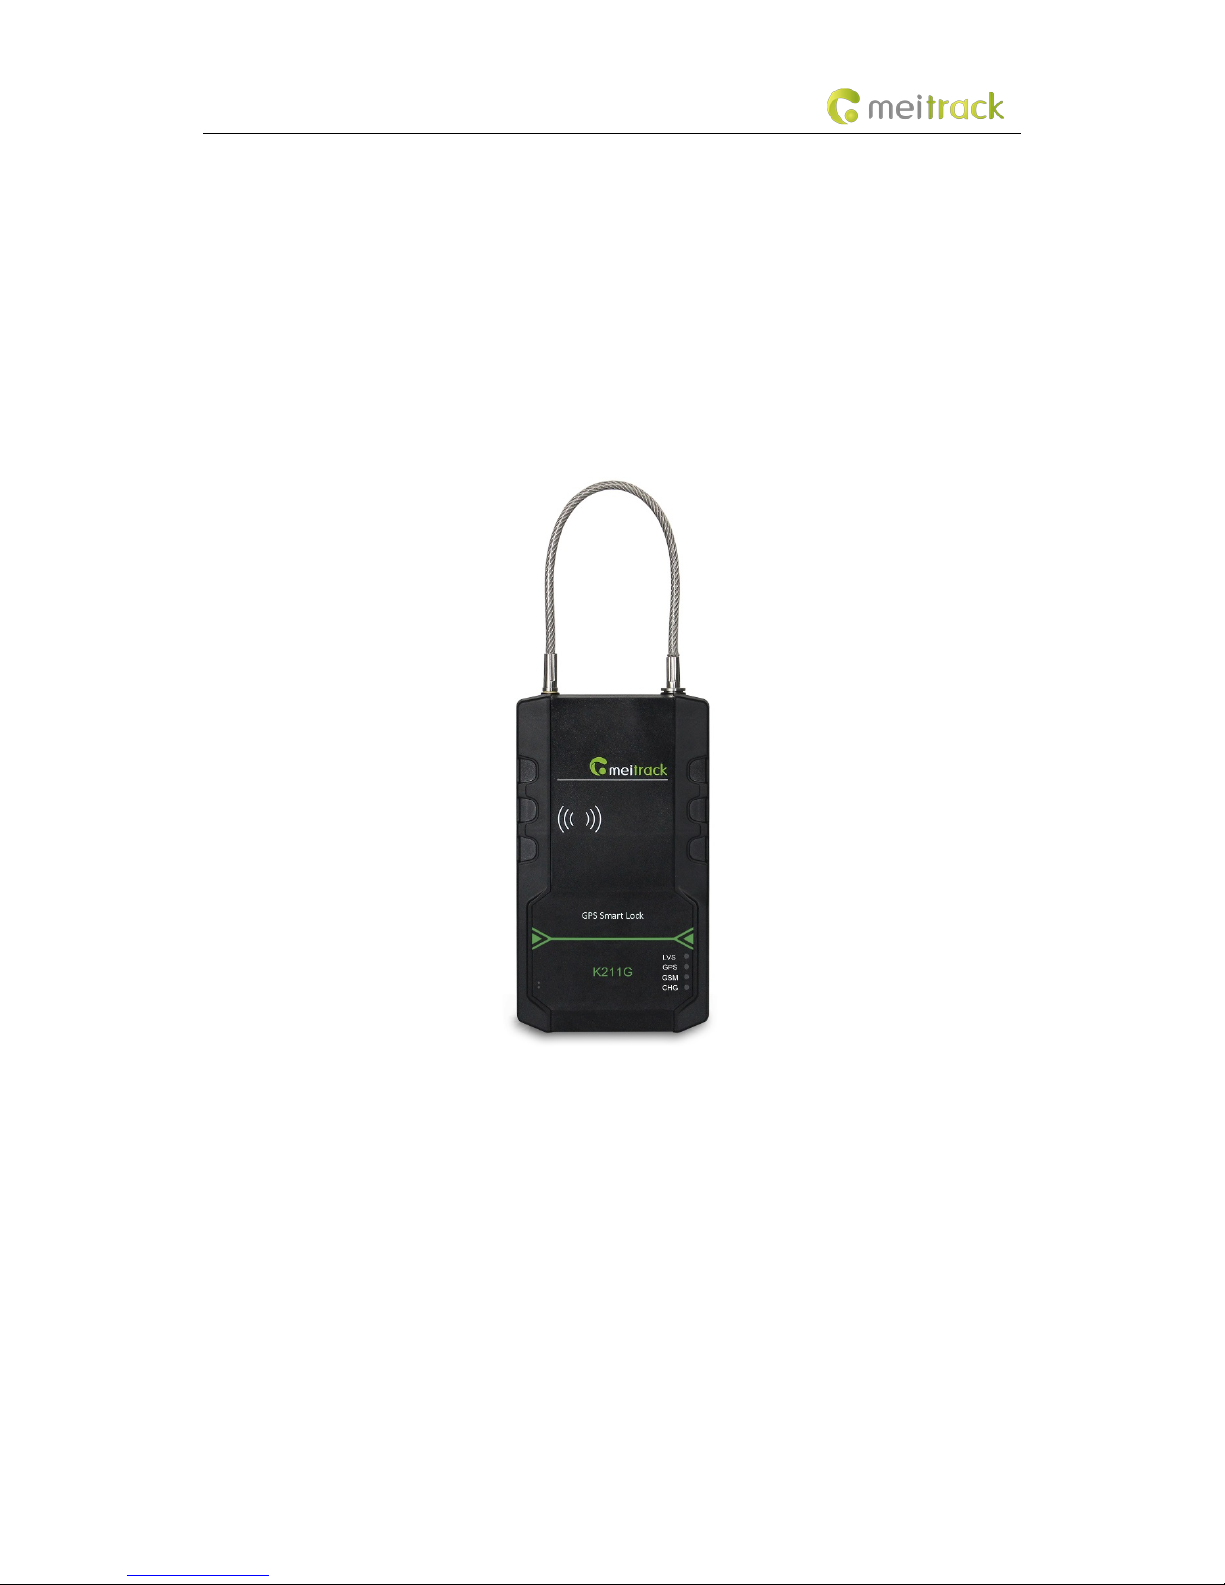
2Product Introduction
The K211G is a GPS smart lock that supports Long Range (LoRa) and GPRS communication. Its main functions include
real-time lock status monitoring, anti-tamper alert, anti-cut alert, swiping an RFID card to lock or unlock the device,
and super long standby time. There is no button on the outer case of the device, and the IP67 water resistance rating
makes the device withstand harsh environments. It is specially designed for door lock management in various land
and sea transportation such as box trucks, trailers and containers.
2.1 Product Features
2.1.1 LoRa Communication (Optional)
This function is used for communication between the K211G and the T399G vehicle tracker. After the LoRa
connection is successful, the K211G will send information such as lock status information and battery power to the
T399G via LoRa. To establish LoRa communication between the K211G and the T399G, the two devices must be
bound each other. For details about how to bind the T399G to the K211G, see the section 6.5 "Binding or Unbinding
the T399G."
LoRa connection process:
T399G and K211G communication features:
Start the two
devices and connect
them to a PC.
Start Meitrack
Manager and bind
the T399G.
The LoRa connection
will be established
automatically after
the two devices are
bound.
The LoRa connection
is established
successfully if the
LVS LED indicator
blinks.
The K211G can be connected to the
T399G via LoRa to upload data.
One T399G tracker can be connected
to at most 30 K211G devices at the
same time.

MEITRACK K211G GPS Smart Lock User Guide
Copyright © 2018 Meitrack Group All rights reserved. - 5 -
Communication diagram
K211G Working Mode Status
LoRa connected The GPS and GSM modules of the K211G enter the sleep
mode, and its lock status information and alerts will be
uploaded to the server through the T399G.
LoRa
disconnected
Deep sleep mode (send heartbeat
packets once every one hour)
After the K211G is started properly, if no event is triggered,
the K211G will enter the deep sleep mode after five minutes
(default time). The wakeup conditions include vibration,
swiping RFID cards and sending heartbeat packets.
Sleep mode disabled Report data at the preset interval.
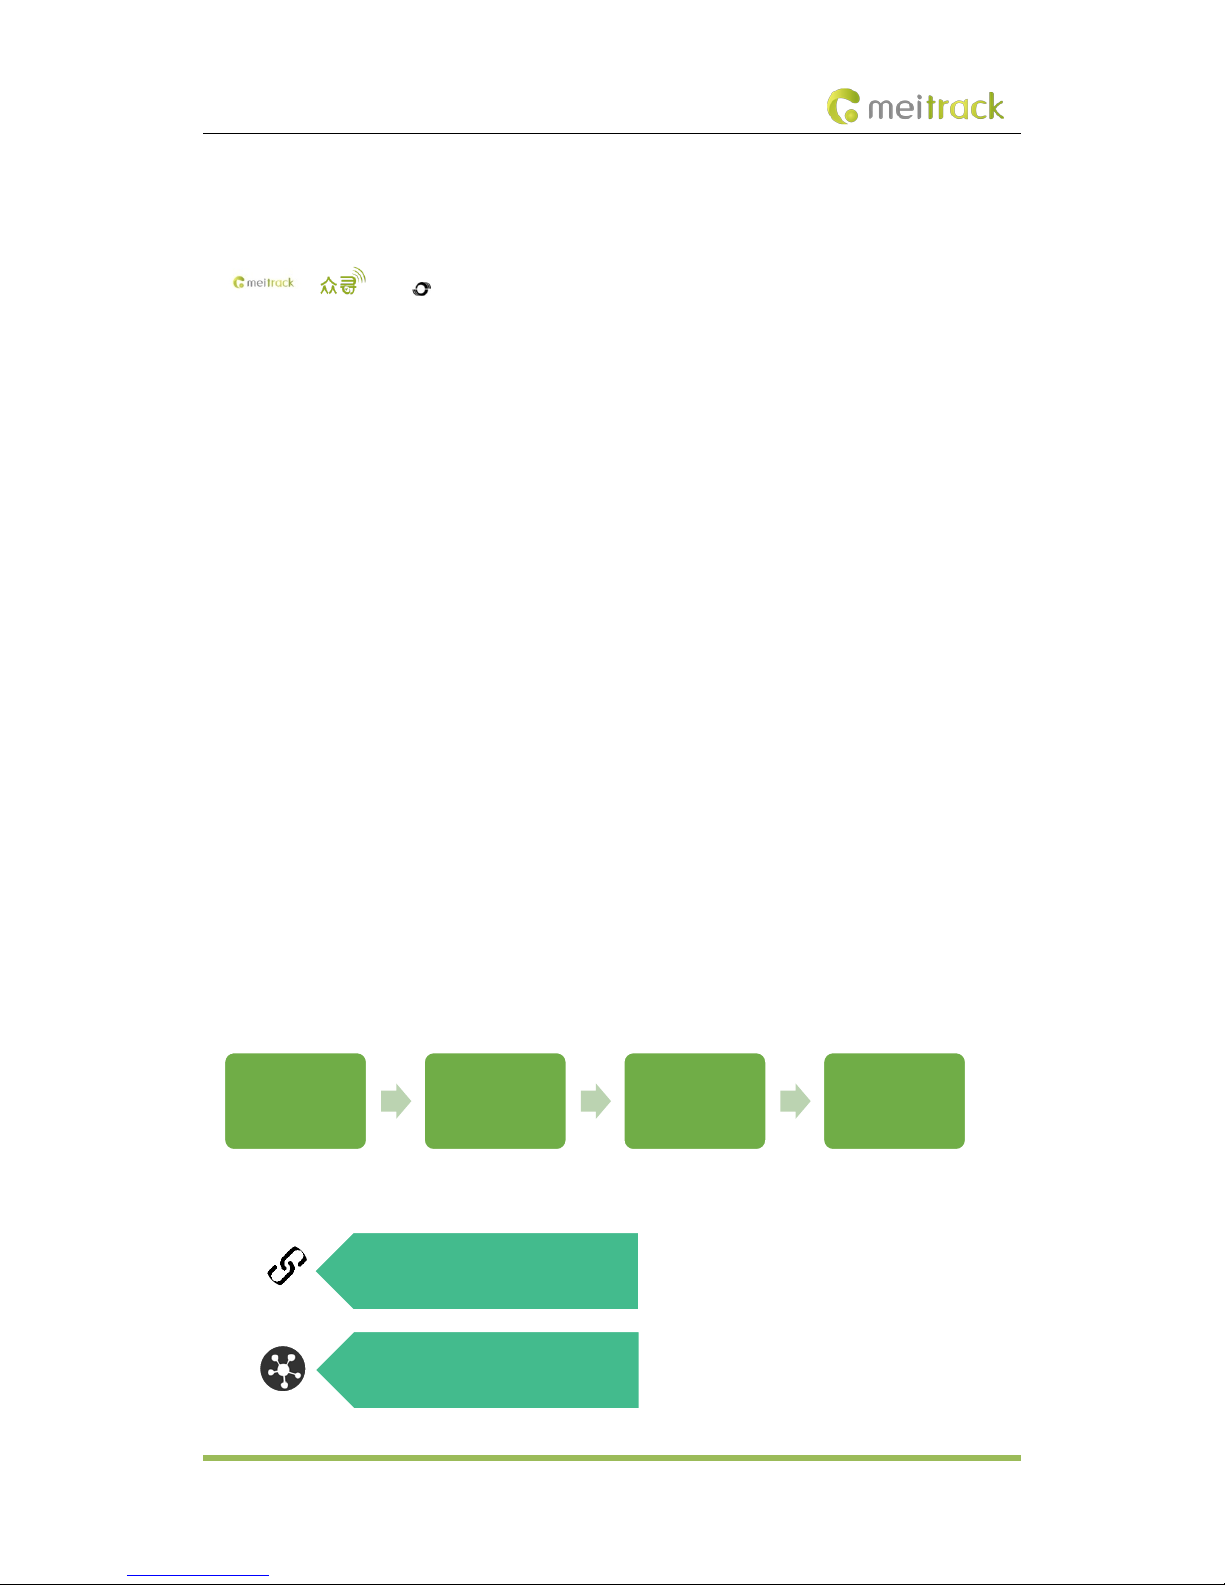
2.1.2 Locking or Unlocking the K211G
Locking or Unlocking by Swiping RFID Cards
The function is used to lock or unlock the K211G by swiping authorized RFID cards. When you swipe an RFID card,
the K211G will automatically detect and record the unlocking time, location and RFID card number, and these data
will be sent to the server.
Operation process: Put the authorized RFID card on the K211G's card swiping area. When the K211G detects this
action, the buzzer will beep and the LVS LED indicator will be steady on, indicating that the K211G is unlocked. In this
way, the last step for you is to pull out the lock rope. (To lock the K211G, you only need to swipe the RFID card once.
Then the buzzer will beep and the LVS LED indicator will be off, indicating that the K211G is locked.)
MEITRACK K211G GPS Smart Lock User Guide
Copyright © 2018 Meitrack Group All rights reserved. - 6 -
Swiping an RFID card:
Note: In the locking or unlocking state, if you swipe an unauthorized RFID card, the buzzer will beep twice. If you
swipe an authorized RFID card, the buzzer will beep once. After the K211G is unlocked, if you do not pull out the lock
rope within one minute, the K211G will be locked automatically.
Locking or Unlocking by Commands
Command Description How to Send
D82
This command is used to lock or
unlock the K211G.
Send the command by SMS or GPRS. For details about
the SMS command format, see the section 6.6.5
"Locking or Unlocking the K211G – D82."
D83 This command is used to select a
locking method: auto lo
cking or
locking by swiping RFID cards.
Send the command by SMS or GPRS. For details about
the SMS command format, see the section 6.6.6
"Selecting a Locking Method – D83."
2.1.3 Dual SIM Cards
The K211G can be installed with two Micro SIM cards and supports the dual SIM single standby mode. The device will
automatically select a SIM card to register the network. SIM1 (on the right) will be selected by default. If SIM1 fails
to register the network, SIM2 (on the left) will be selected to do this. (Please ensure that at least one SIM card can
be used normally.)

MEITRACK K211G GPS Smart Lock User Guide
Copyright © 2018 Meitrack Group All rights reserved. - 7 -
2.1.4 Magnetic Charging
You can use the magnetic charging cable to charge the K211G. The device allows for a maximum charging current of
2 A, and it will take a total of 7.5–8 hours to charge the device fully.
3Product Functions
3.1 Position Tracking
GPS + LBS positioning
Real-time location query
Tracking by time interval
Tracking by distance
Tracking by mobile phone
Speeding alert
Cornering report
Geo-fence
3.2 Alerts
Alert Description
Outer case removal/open alert An alert will be generated when the K211G's outer case
is removed or the back cover is opened.
Lock tamper alert An alert will be generated when the lock rope is cut off.
T399G disconnected alert
(LoRa communication is
required)
An alert will be
generated when the K211G is
disconnected from the T399G.
Unlocking alert An alert will be generated when you swipe an authorized
RFID card to unlock the K211G.
Locking alert An alert will be generated when you swipe an authorized
RFID card to lock the K211G.
Unlocking failure alert An alert will be generated when the K211G fails to be
unlocked by swiping an authorized RFID card.
Locking failure alert An alert will be generated when the K211G fails to be
locked by swiping an authorized RFID card.

MEITRACK K211G GPS Smart Lock User Guide
Copyright © 2018 Meitrack Group All rights reserved. - 8 -
3.3 Other Functions
Function Description
Binding and unbinding Enter the IMEI number of the T399G on Meitrack Manager software to
bind the T399G to the K211G.
LoRa communication (optional) Report lock status information of the K211G via LoRa.
Deep sleep mode The K211G can be woken up by vibration, swiping RFID cards and
sending heartbeat packets. If no event is triggered, the K211G will enter
the deep sleep mode after five minutes (default time).
Dual SIM cards The K211G can be installed with two Micro SIM cards and supports the
dual SIM single standby mode.
OTA update Online OTA firmware update
Remote unlocking or locking by
commands
The D82 command is used to lock or unlock the K211G. You can send
this command by SMS or MS03 platform.
4Product Specifications
Item Description
Dimension 112 mm x 195 mm x 37 mm
Lock rope length 350 mm (The length can be customized as needed.)
Weight 800g
Power supply DC 9–14 V; 2 A
Material The outer case of the device adopts PC materials.
Backup battery 14000 mAh/3.7 V
Power consumption Current in standby (sleep) mode: 9 mA
Current in normal working mode: 95 mA
Charging time 7.5–8 hours
Operating temperature -20°C to 55°C
Operating humidity 5%–95 %
Working hour Power-saving mode: 78 days
Normal working mode: 150 hours
Charging Magnetic charging (DC 9 V; 2 A; fast charging)
Water resistance rating IP67
Frequency
band
K211G-E UMTS: 900/2100 MHz; GSM: 900/1800 MHz
K211G-A UMTS: 850/1900 MHz; GSM: 850/900/1800/1900 MHz
K211G-T UMTS: 850/2100 MHz; GSM: 850/900/1800/1900 MHz
GPS antenna Built-in GPS antenna
GPS sensitivity -161 dB
Positioning accuracy 2.5 meters
LoRa communication distance
(optional)
At most 20 meters (obtained from actual tests in trucks' containers)

MEITRACK K211G GPS Smart Lock User Guide
Copyright © 2018 Meitrack Group All rights reserved. - 9 -
LoRa working frequency
(optional)
137–1020 MHz (433 MHz by default)
LoRa antenna (optional) Built-in spring antenna
RFID module frequency 125 KHz
Memory 8 MB
SIM card installation Flip the card slot cover to install Micro SIM cards; dual SIM cards
5Main Device and Accessories
6First Use
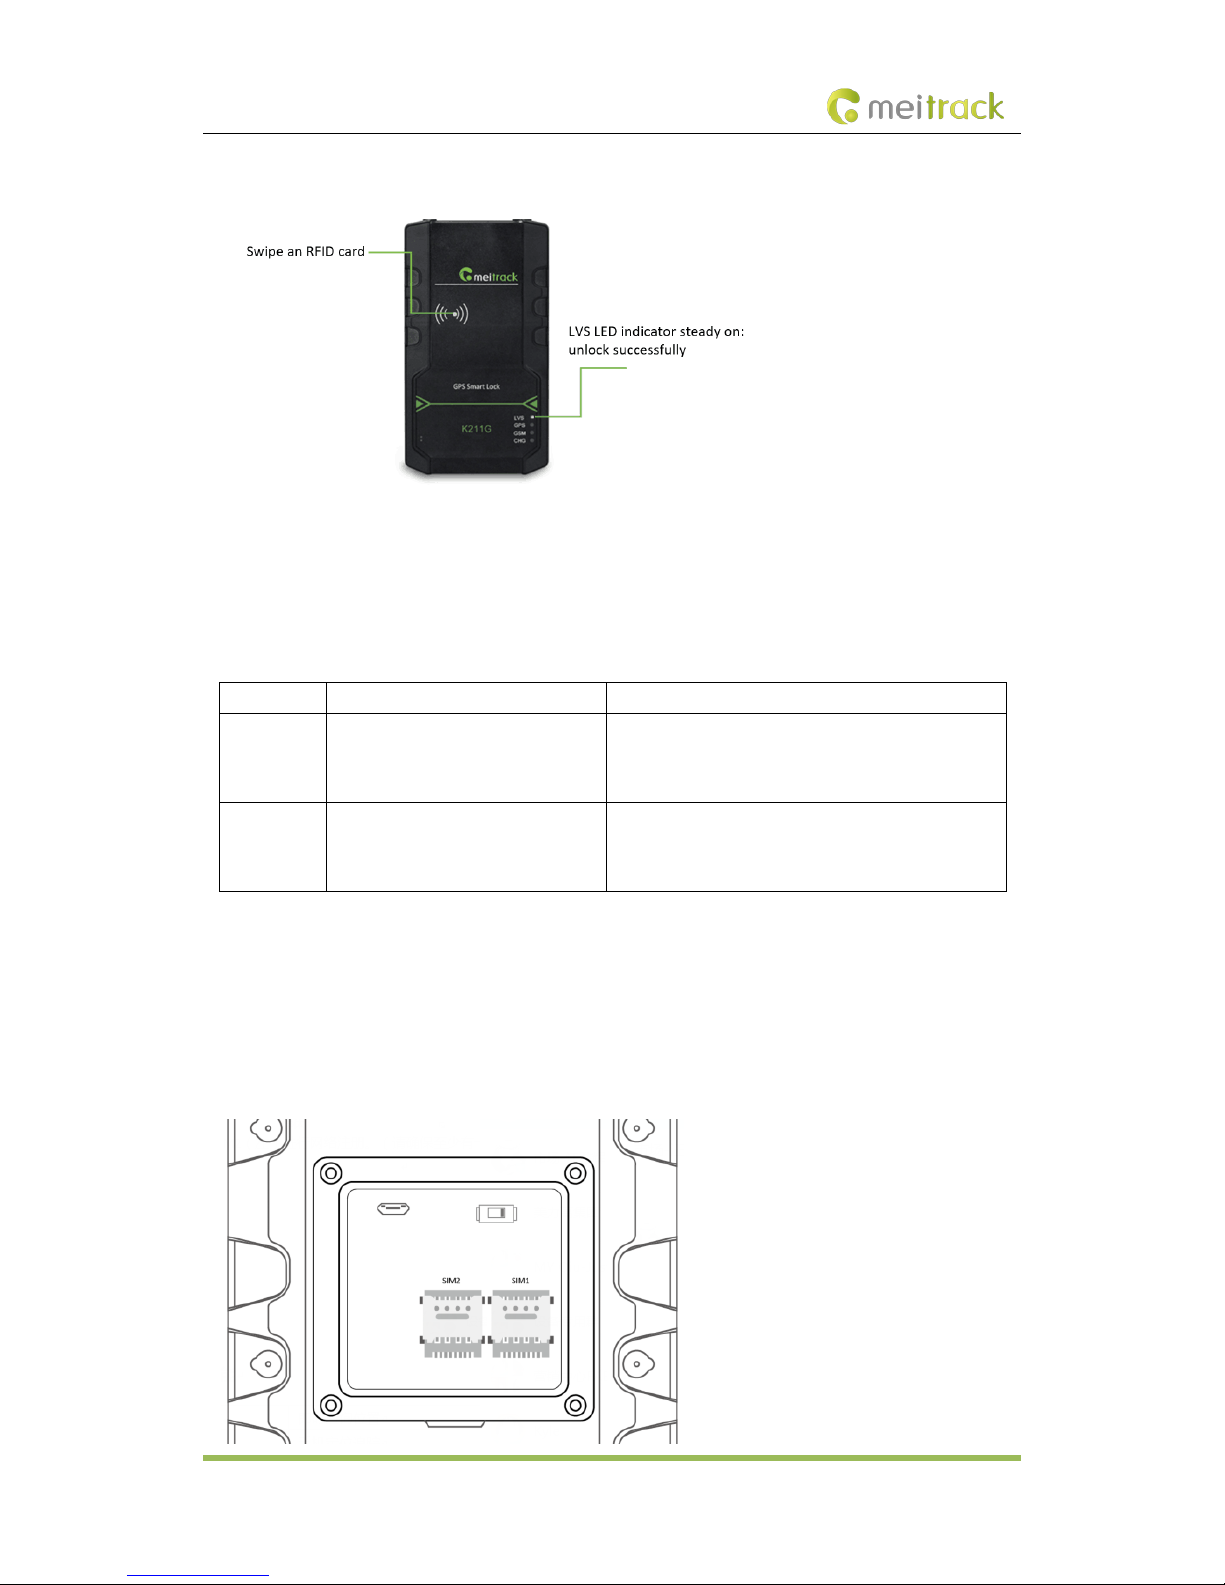
6.1 Installing a SIM Card
Remove the four screws from the cover and take the cover out.
Insert a SIM card into one of the card slots (SIM1: right; SIM2: left).
GPS smart lock with
the battery Lock rope (35 cm) RFID card (optional) Power adapter USB cable (optional)
MEITRACK K211G GPS Smart Lock User Guide
Copyright © 2018 Meitrack Group All rights reserved. - 10 -
6.2 Turning on the K211G
Push the power switch to the leftmost position. Then the GPS and GSM LED indicators will blink fast, indicating that
the device is turned on.
6.3 LED Indicator
LVS LED Indicator (Green)
Steady off The K211G is locked or is not connected to the T399G.
Steady on The K211G is unlocked.
Blink fast (0.2 seconds on and 4.8
seconds off)
The K211G is connected to the T399G.
GPS LED Indicator (Blue)
Blink fast (once every 0.1 seconds) The K211G is being initialized, or the battery power is low.
Blink fast (0.1 seconds on and 2.9
seconds off)
A GPS signal is received.
Blink slowly (1 second on and 2
seconds off)
No GPS signal is received.
GSM LED Indicator (Green)
Steady on There is an incoming call, or the subscriber you dialed is busy now.
Blink fast (once every 0.1 seconds) The K211G is being initialized.

MEITRACK K211G GPS Smart Lock User Guide
Copyright © 2018 Meitrack Group All rights reserved. - 11 -
Blink fast (0.1 seconds on and 2.9
seconds off)
A GSM signal is received.
Blink slowly (1 second on and 2
seconds off)
No GSM signal is received.
CHG LED Indicator (Red)
Steady off The external power supply is disconnected.
Steady on The K211G is charging.
6.4 Device Configuration
6.4.1 Installing the USB Driver
Install the USB driver on a computer with 64-bit Windows system.
After the installation is finished, connect the K211G to the computer by USB cable. If Prolific USB-to-Serial Comm
Port (COM3) is displayed on the Device Manager page, the driver is installed successfully.
Note: Before connecting the K211G to the computer by USB cable, turn on the K211G first. Otherwise, it cannot be
detected by Meitrack Manager.
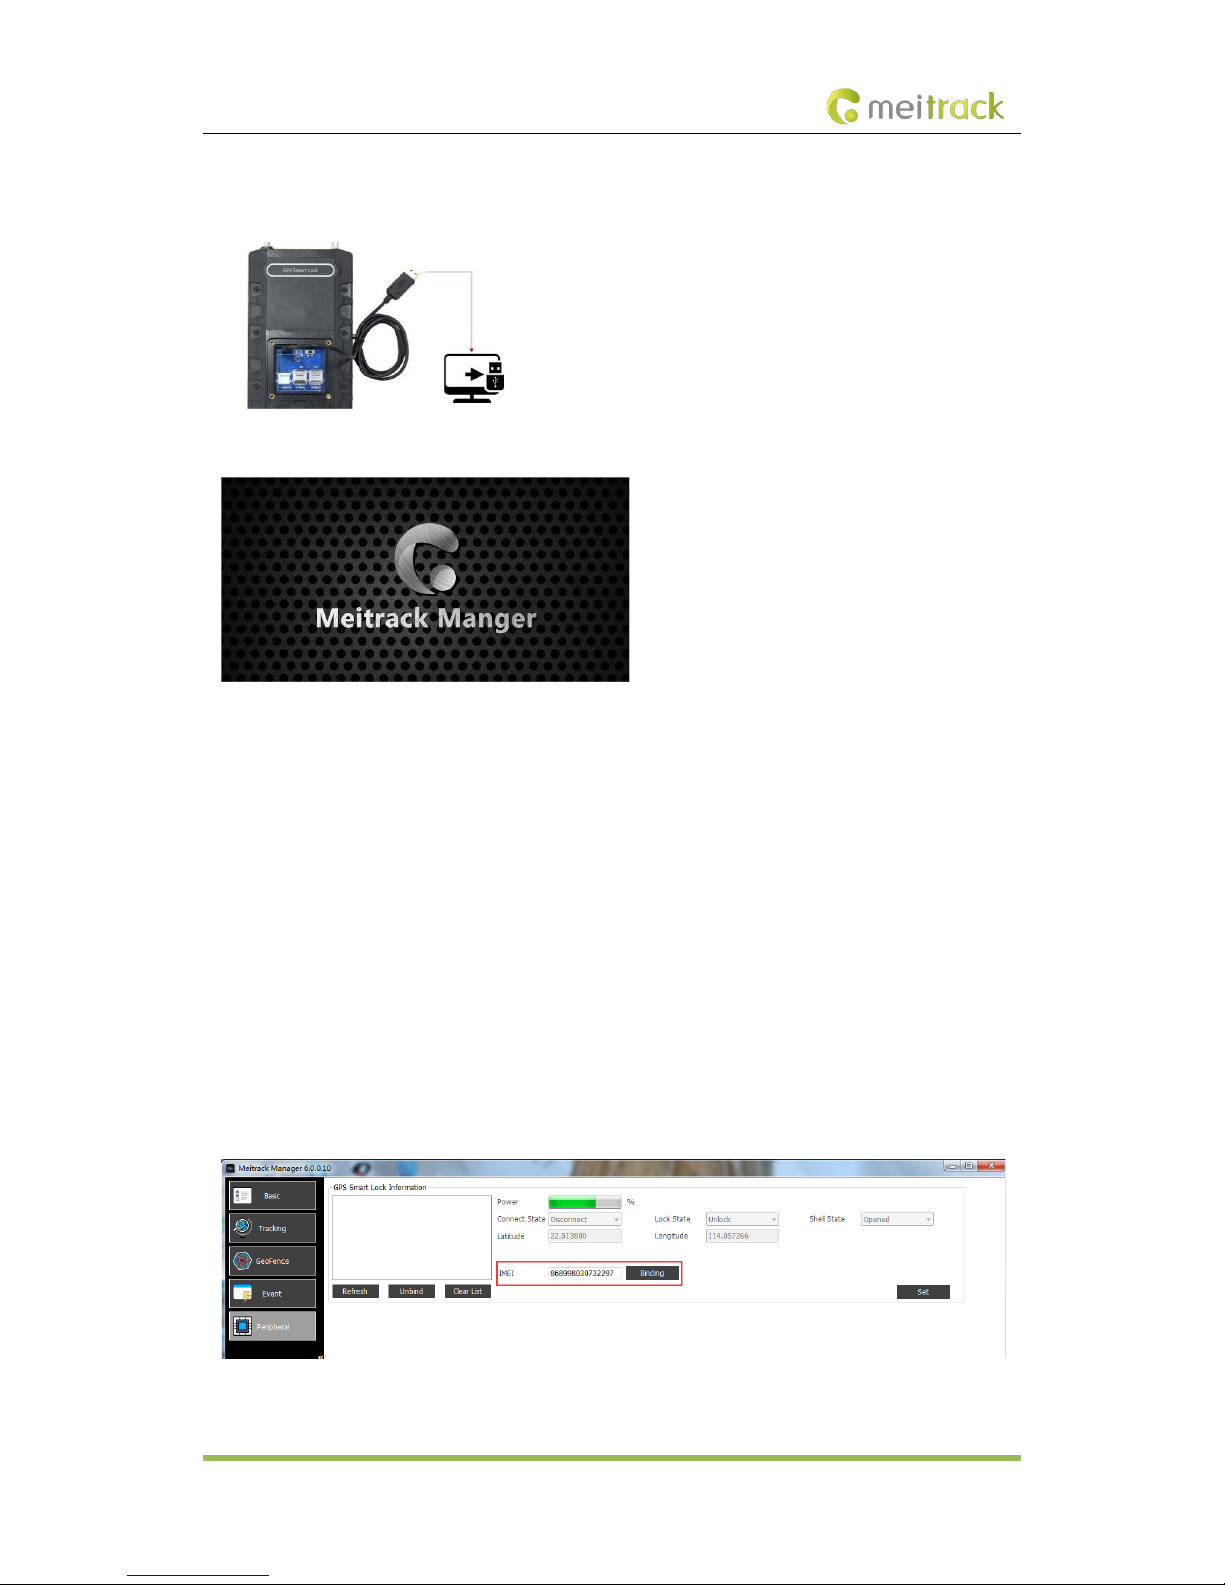
6.4.2 Configuring Device Parameters by Meitrack Manager
This section describes how to use Meitrack Manager to configure the K211G on a computer.
MEITRACK K211G GPS Smart Lock User Guide
Copyright © 2018 Meitrack Group All rights reserved. - 12 -
Operation steps:
1. Install the USB driver and Meitrack Manager.
2. Connect the device to a computer by using the USB cable.
3. Run Meitrack Manager (6.0.0.9 version or later), then the following dialog box will appear:
4. Turn on the device, then Meitrack Manager will automatically detect the device model and the parameter page
will appear accordingly.
For details about Meitrack Manager, see the MEITRACK Manager User Guide.
6.5 Binding or Unbinding the T399G
6.5.1 Binding the T399G
To make the K211G and T399G communicate with each other via LoRa, bind the two devices. An IMEI number is the
default binding information.
Perform the following steps to bind the T399G:
1. Go to the Peripheral page of Meitrack Manager.
2. Enter the IMEI number of the T399G.
3. Click Binding.
4. Click Set.
After the binding is successful, the IMEI number of the T399G will displayed on the GPS Smart Lock Information area.
Note: To establish LoRa communication between the K211G and the T399G, the two devices must be bound each
other. Please connect the T399G to the computer, and then repeat the above operations to bind the K211G.
MEITRACK K211G GPS Smart Lock User Guide
Copyright © 2018 Meitrack Group All rights reserved. - 13 -
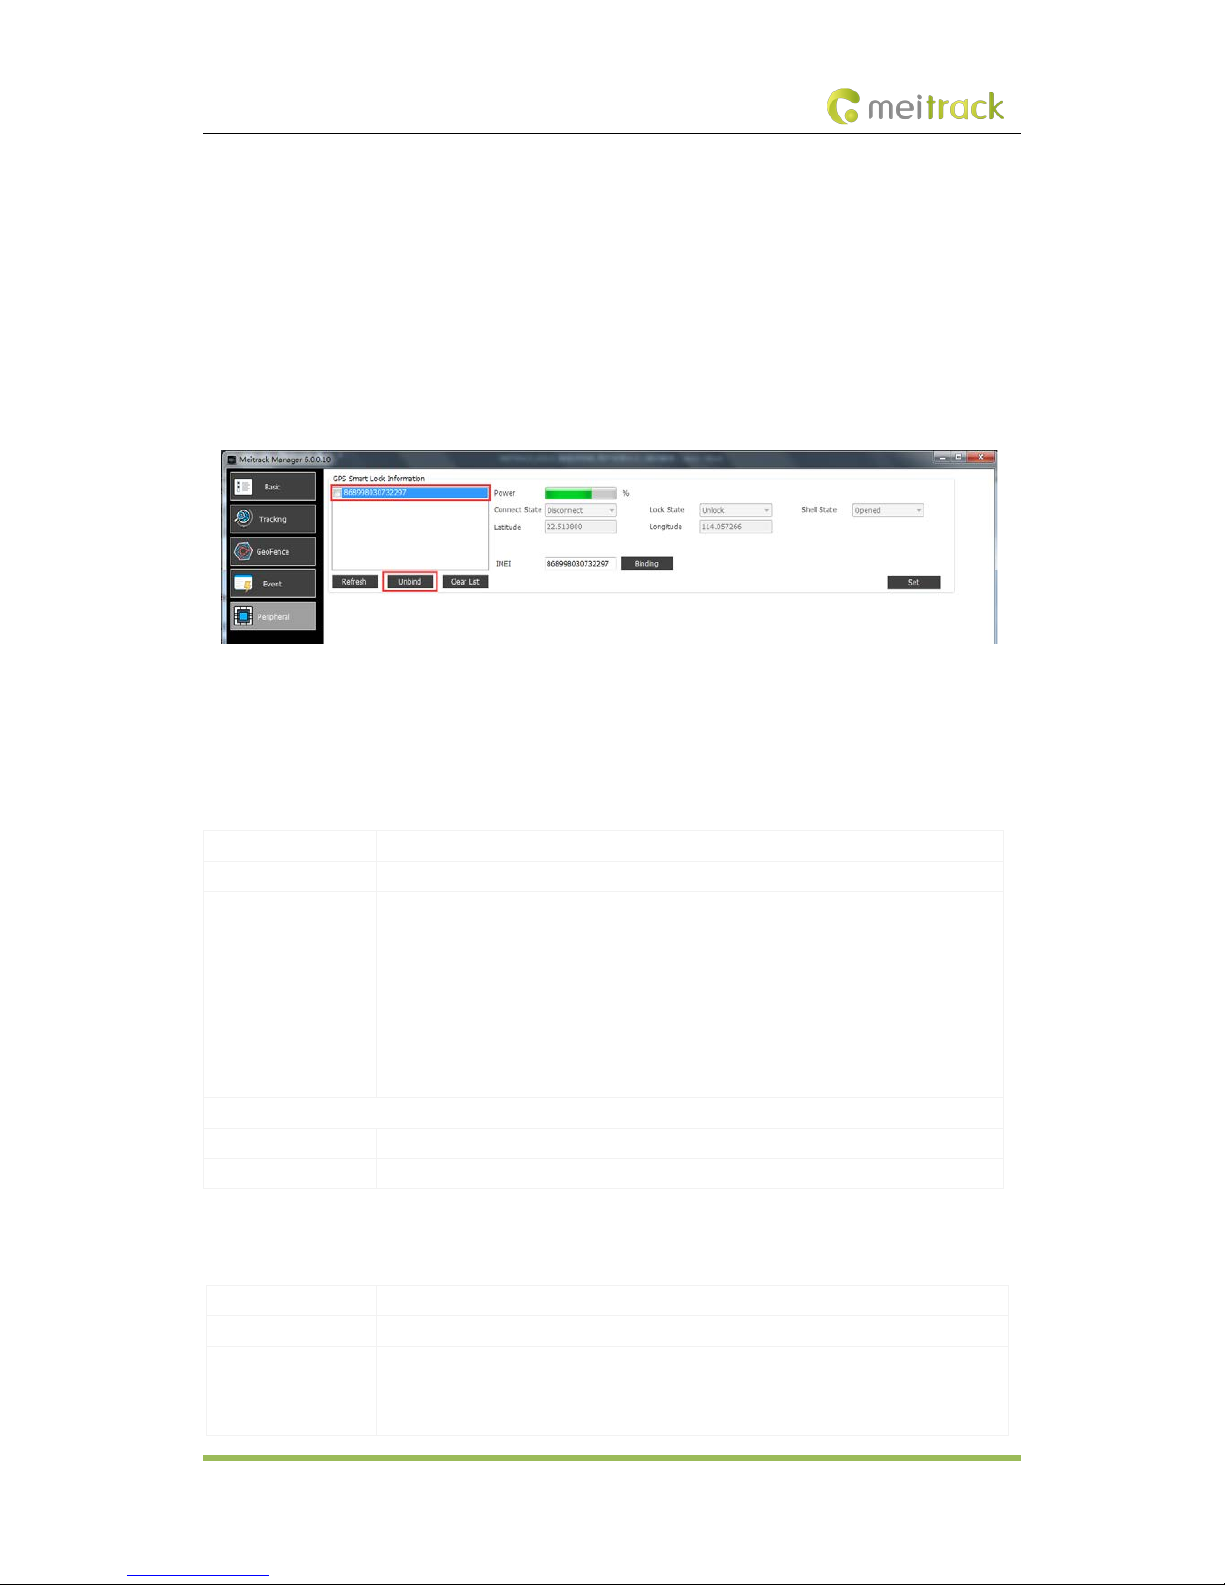
6.5.2 Unbinding the T399G
This operation is used to disconnect the communication between the K211G and the T399G. After the unbinding is
successful, the GPS positioning and GSM communication functions of the K211G will be enabled automatically. Lock
status information will be uploaded to the server through the K211G.
Perform the following steps to unbind the T399G:
1. Go to the Peripheral page of Meitrack Manager.
2. Select the IMEI number to be unbound.
3. Click Unbind.
4. Click Set.
Note: The binding and unbinding functions are only available for the K211G with a LoRa module.
6.6 Common SMS Commands
6.6.1 Setting GPRS Parameters – A21
SMS Sending 0000,A21,Connection mode,IP address,Port,APN,APN user name,APN password
SMS Reply IMEI,A21,OK
Description Connection mode = 0: function disabled.
Connection mode = 1: function enabled; use the TCP/IP reporting mode.
Connection mode = 2: function enabled; use the UDP reporting mode.
IP address: IP address or domain name. A maximum of 32 bytes are supported.
Port: a maximum of 5 digits.
APN/APN user name/APN password: a maximum of 32 bytes respectively.
If no user name and password are required, leave them blank.
Example
SMS Sending 0000,A21,1,server.meigps.com,8800 ,CMNET,,
SMS Reply 353358017784062,A21,OK
6.6.2 Authorizing an RFID Card – D10
SMS Sending 0000,D10,RFID(1),RFID(2),…,RFID(n)
SMS Reply IMEI,D10,OK
Description RFID(n): indicates the authorized RFID card number. The value ranges from 1 to
4294967295. Decimal.
A maximum of 50 RFID cards can be authorized at a time.

MEITRACK K211G GPS Smart Lock User Guide
Copyright © 2018 Meitrack Group All rights reserved. - 14 -
Example
SMS Sending 0000,D10,00000001
SMS Reply 353358017784062,D10,OK
6.6.3 Authorizing RFID Cards in Batches – D11
SMS Sending 0000,D11,RFID card start number,n
SMS Reply IMEI,D11,OK
Description RFID card start number: The value ranges from 1 to 4294967295. Decimal.
n: indicates the number of RFID cards to be authorized in batches. Decimal. The parameter
value ranges from 1 to 128.
Example
SMS Sending 0000,D11,00000001,128
SMS Reply 353358017784062,D11,OK
6.6.4 Setting the SMS Time Zone – B35
SMS Sending 0000,B35,SMS minute
SMS Reply B35,OK
Description The default time zone of the device is GMT 0. You can run the B35 command to change
the time zone of an SMS report to the local time zone. The time zone of an SMS report is
different from that of a GPRS data packet.
When SMS minute is 0, the time zone is GMT 0.
When SMS minute is a value ranging from -720 to 780, set time zones.
Example
SMS Sending 0000,B35,480
SMS Reply 353358017784062,B35,OK
6.6.5 Locking or Unlocking the K211G – D82
SMS Sending 0000,D82,X
SMS Reply D82,OK
Description When Xis 0, the K211G is locked.
When Xis 1, the K211G is unlocked.
If the command does not contain the parameter X, the lock status will be read. X = 0:
Locking; X = 1: Unlocking; X = 2: Lock tampering; X = 3: Lock abnormal; X = 4: Parameter
e r ro r.
Example
SMS Sending 0000,D82,0
SMS Reply 868998030003608,D82,OK

MEITRACK K211G GPS Smart Lock User Guide
Copyright © 2018 Meitrack Group All rights reserved. - 15 -
6.6.6 Selecting a Locking Method – D83
SMS Sending 0000,D83,X
SMS Reply D83,OK
Description When Xis 0, the K211G is locked automatically.
When Xis 1, the K211G is locked by swiping RFID cards.
The auto locking method is selected by default. If the command does not contain the
parameter X, the locking method will be read.
Example
SMS Sending 0000,D83,0
SMS Reply 868998030003608,D83,OK
7Using the Platform
7.1 MS03 Tracking System
Visit http://ms03.trackingmate.com, enter the user name and password, and log in to the MS03. (Purchase the login
account from your provider.)
For more information about how to add a device, see the MEITRACK GPS Tracking System MS03 User Guide (chapter
4 "Getting Started").
The MS03 supports the following functions:
Track by time interval or distance.
Query historical trips.
Set polygonal geo-fences.
Bind driver and vehicle information.
View various reports.
Send commands in batches.
Support OTA updates.
For details, see the MEITRACK GPS Tracking System MS03 User Guide.
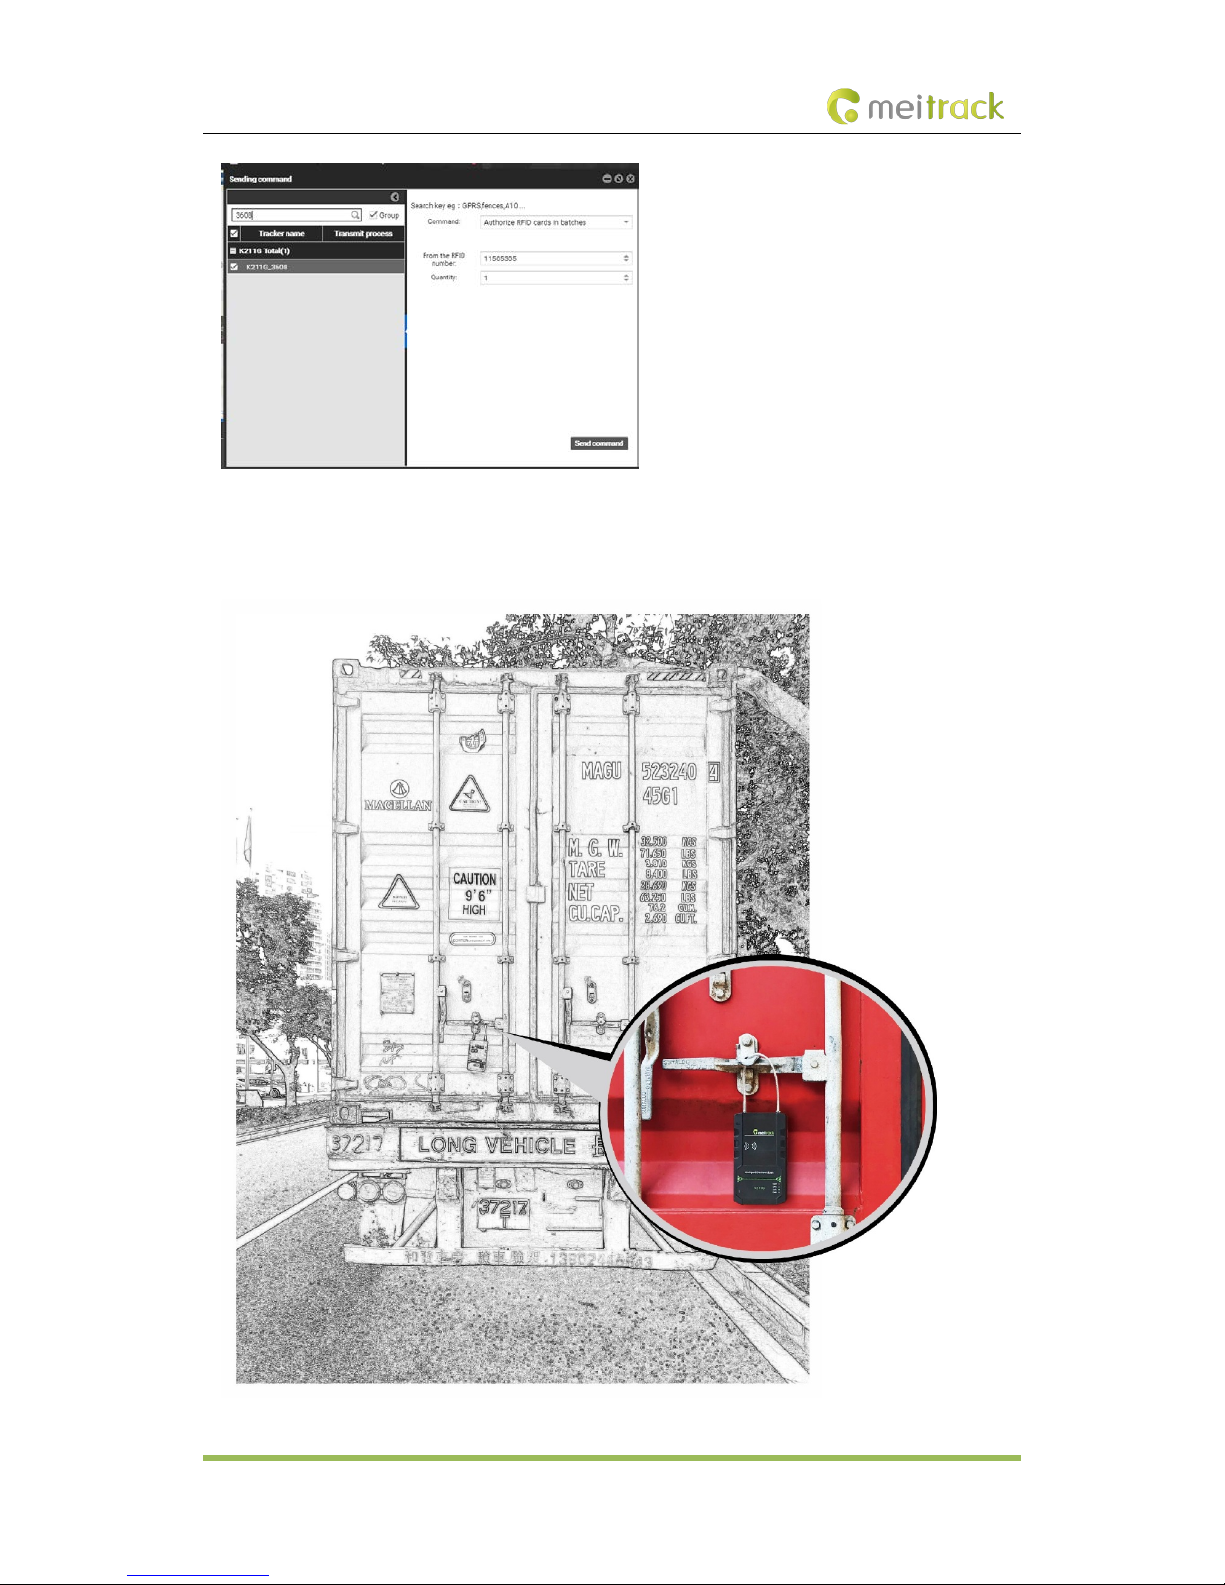
7.2 Authorizing RFID Cards in Batches by MS03
1. On the main interface of the MS03, choose Management.
2. On the Management window that is displayed, select Sending command from Use Normal.
3. On the Sending command window that is displayed, set Command to Authorize RFID cards in batches, enter the
RFID card start number and the number of cards, and click Send command.
If only one RFID card needs to be authorized, the number of cards is 1. After the RFID cards are authorized successfully,
you can swipe these cards to unlock and lock the K211G and record operator information.
MEITRACK K211G GPS Smart Lock User Guide
Copyright © 2018 Meitrack Group All rights reserved. - 16 -
8Device Installation
Table of contents
Other MeiTrack Lock manuals


 KB(2) Programming manual")


