Meizu MZ-03 User manual

Portable MediaPlayer
Portable MediaPlayer
(Mz-03)
User's Manual

Welcome to visitMeizu's website!
The Meizu's homepage provides theoverview of companyand products, other
related information, andanswers to commonquestions. Firmware andsoftware
updates are alsoavailable as wellas the mostrecent information aboutyour
Meizu product.
In order forcustomers who purchasedthe product toreceive specialized services,
we recommend thatthey accomplish customerregistration at Meizu'swebsite.
You mayget useful informationfrom "User's Forum"and FAQ.Register your ID
and get anyappropriate online customersupport.
Welcome
Thank you forpurchasing the product.
Please read themanual carefully beforeuse.
We recommend youto keep itfor future reference.
Getting Started
1
3

5
TableofContents
TableofContents
7
8
9
10-11
12
13
14-16
17-19
20
21
22-23
24
Important Cautions
Copyright Notice
Product Features
Package Contents /Parts and Names
Protection Film onthe Player
TouchKeypad
LCD Display
1. Getting Started
2. Basic Operation
Connecting Mini Player
Using for theFirst Time
Installation CD
Downloading from thePC
Saving Files &Disconnecting to Your PC
25-27
28-29
30-31
32-33
34-35
36-37
38-39
40-43
44-45
46-47
48
49
50-51
Using Buttons /Menu Controls
Using Browser /Listening to Music
Update the MusicLibrary / Sortingthe Music Library
Playback Mode /Sound Effect
DNSe Sound Effect/ Equalizer
Volume Restriction/Displaying Lyrics
Photo Library /Slideshow Settings
Converting Video Files
Play Video /Video Settings
Listening to FMRadio / UpdateList of RadioStations
Delecting the SavedChannels
Listening to theSaved FM Radio
Edit External FMStation Lists/ Listento External FMStation Lists
3. Quick Start
Getting Started
1
4

7
6
Important Cautions
TableofContents
52-53
54
55
56-57
58-64
65-67
68-70
71
72
73
74
FM Recording /Voice Recorder
Play Recorded Files
E-book
Games & Tools
4. Menu
5. Guide toFirmware Upgrade
6.Additional Information
DetailedFeaturesbyMenu
Upgrade Firmware
Format
Handling Instructions
Precautions for Usingthe Product
Trouble Shooting
Product Specifications
Getting Started
1
Initialize OS tothe Original FactorySettings
When it is notable to turn onand disable connecting theplayer to your PCafter resets,
please click and holdthe Next key ( ) for about 8seconds to initialize theOS to the
original factory settings.All data will bedeleted in the player.
TurnOn /Auto Power Off
To power on the player, you will press and holdthe Power On/Off button
until you see the screen displays with MEIZU. Click it again to start play.
When there is no buttonoperation for about 3 minutes while the player is
stopped, it is automatically turned off. To power off theplayer, press and
hold the Power On/Off button until it finishs with shutting down procedure.
Reset Mini Player
When it is deadcaused by improper operation,you have to resetyour
mini player. Disconnectit to a USBcable or ACAdapter, pressand hold
on the Enter keyfor over 10sec untilthe screen display goesoff.
Then you can restartit for proper function.
Sliding Touch Operation Errors
When the player isstarted up, system willcheck power level oftouch
keypad first. Do notput your fingers ontouch keypad during thesystem
checking, otherwise it willpossibly cause checking errorand losing
control. Please restart itfor proper function.
Update Music Library
After finish copying themusic, using Main Menu-Music-UpdateMusic Library on theplayer
before your listening musicso that you canorganize and assort themby artist, album or
genre. Otherwise, you canonly browse the newcopied songs fromAll Songs on theplayer.
Long Click
9
8
Product Features
Copyright Notice
This product is theregistered trademark of MeizuTechnologyCo., Ltd.
Meizu Technology Co., Ltd, hasthe exclusive copyright forthis User Manual.
It is prohibited todistribute this User Manualin part or inwhole without permission.
The various examples, drawingsand pictures and includedin this User Manual
are subject to changewithout prior notice whennew product enhancements
become available.
Do not change ormodify the product withoutpermission or authority ofmanufacturer.
It may cause undesirableoperations, permanent damages orharmful interferences.
Windows 2000, Windows XPand Windows Media Playerare the registered
trademarks of Microsoft Corp.
CE, FCC, CCC
Meizu Limited, Has thecopyright for the productsoftware.
It is prohibited todistribute or commercially usethem without written
permission from Meizu Limited.
Stylish and Luxurious Designwith High Portability
Mini Player has asuper mini size withhigh portability,and boasts a stylishand luxurious
design with aluminum surface.
Large & VibrantLCD with Dynamic GUI;Human User Sliding-touch Keypads
2.4 Inch 260,000 ColorQVGA 320*240TFT-LCD
Professional DNSe Sound Effects, Variousand Adjustable EQmodes
Including: User adjustable POP, Classical, Rock, Jazz,Live, Bass Booster,User.
Supports WMA, 355KbpsWMAVBR, OGG,FLAC, WAV, MP3Playback
Movie Player(AVIvideo files), Game, Calculator, Calendar and Stopwatch
Real-time Clock Setting
Photo Album +Slide Show: JPG, BMP, GIF Formats
Music library,playlist Setting, Easier andFaster to search music
Plays Up to 20Hours (Based on ourcompany's test)
High Speed USB2.0 UltraFast Data Transfer
High Capacity USB FlashStorage for Removable Disk
FM Radio with FMEQ and FM RecordingReservation
Built-in Microphone Supports HighQuality Recording
Synchronized Song Lyricsdisplay and ID3 supported
Text reader(TXT)
Multiple Language Supported
Resume Function
Power saving function:Auto Power OFF andsleep timer
Hold key Function
Firmware upgradable
Getting Started
1
General
Copyrights/Trademarks
Certifications

11
PackageContents
Earphones
Mini Player Main Body
User'sManual
USBCable
Installation CD
Strap
PartsandNames
2. Front Side
LCD Window
Earphone
NEXT
PREVIOUS
POWER/PLAY/STOP
USB Port
HOLD
3. Right Side
1. Top
4. Bottom Side
MENU
Strap
Note: Design and specificationsare subject to changewithout notice.
User's Manual
Carrying Pouch
Sliding-touch
Keypad
ENTER
MIC
Getting Started
1
10
Cleaning Cloth
13
1. While HOLD islocked, any operation willbe invalid.
2. Toofast operation will beeasy to cause error.
3. Slide your fingeron the touch keypadup and down toreach the desired operation.
4. Click Enter keyor the center keypadto enter the submenu interface or excutean operation.
5. Clicking Menu keyto go back tothe previous menu interfaceor cancel an operation.
6. Click Next keyto enter the submenu interface.
TouchKeypad
Touch keypadis an important partof the player,including sliding touch controland key
operations, which used forcontrolling operations of allkinds of functions ofthe player.
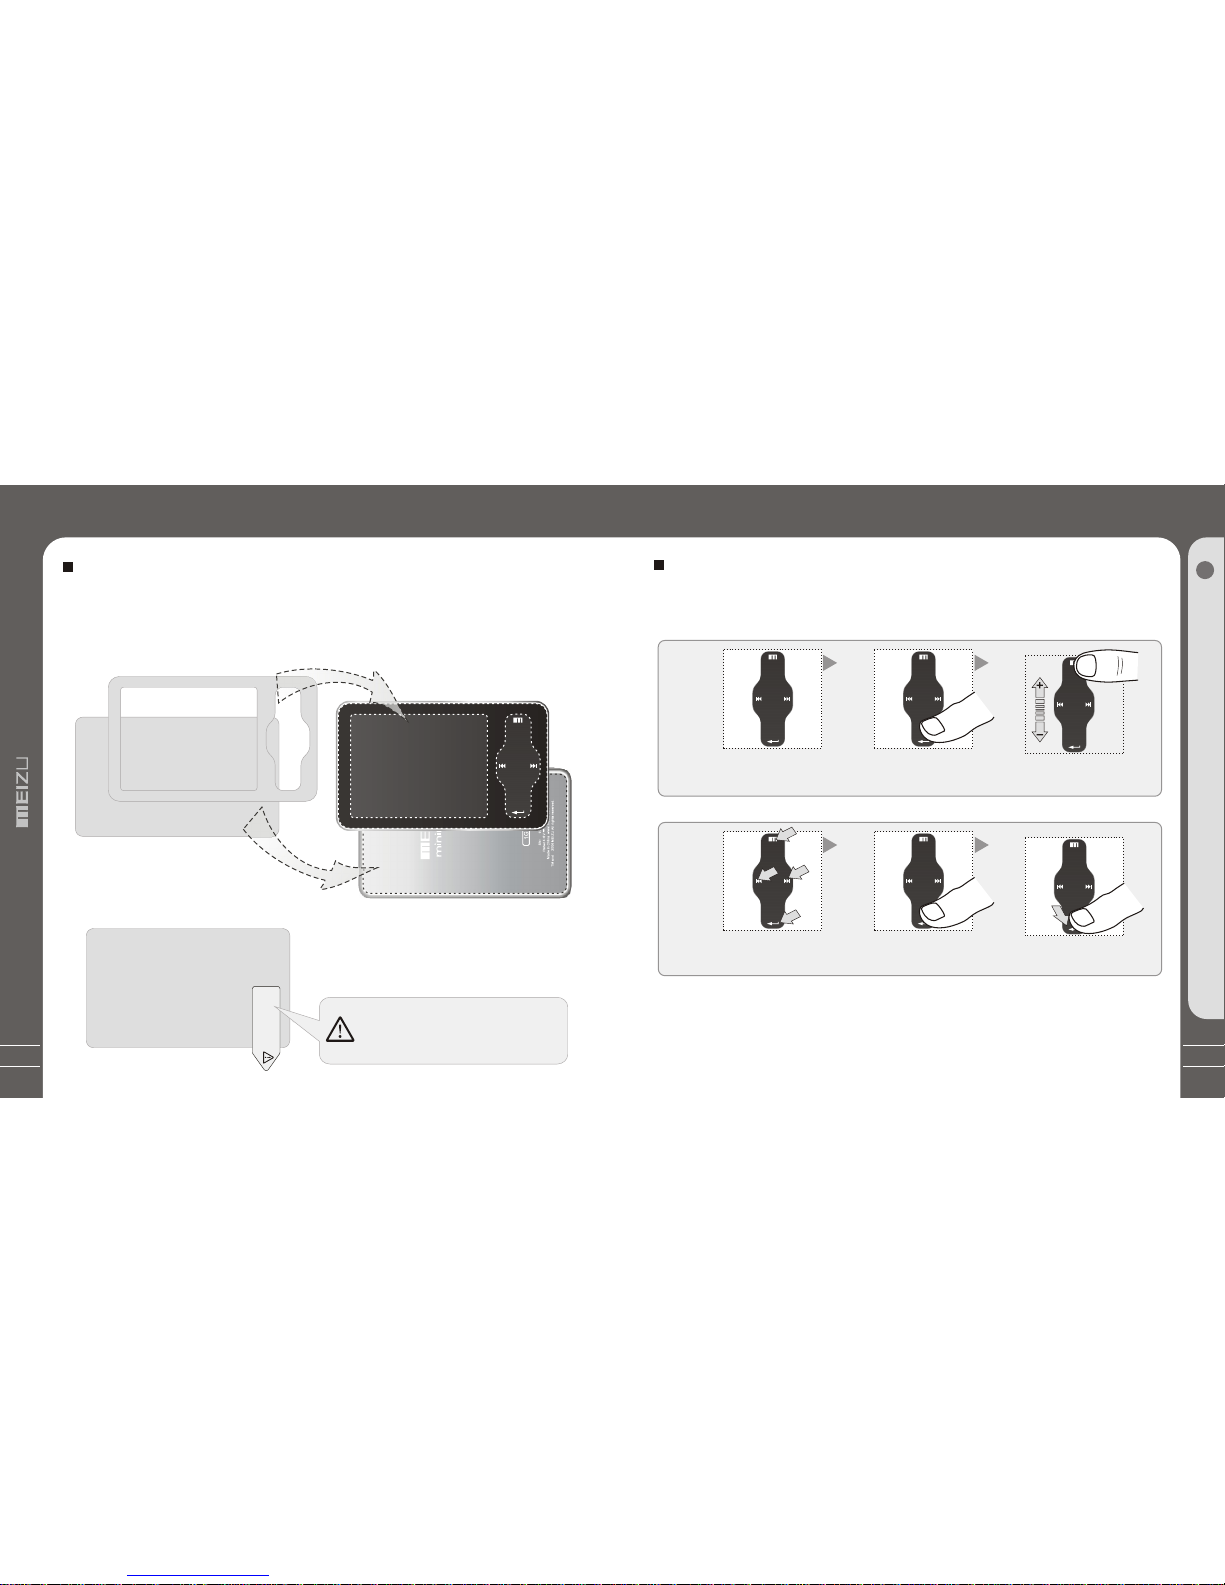
Protection Film onthe Front Panel
ProtectionFilmonthePlayer TouchKeypad
Getting Started
1
Sliding touch keypad:
Touch keypad Lay your finger onone Sliding lightly onkeypad
end of keypad
Clicking Key:
Key positions Lay yourfinger on key Presslightly
positions of keypad
MN V1
The surfaceof player iseasy to becontacted withother objectsduring use.Toprotect
the player from scratches,the front andrear plate surfaces of theplayer are attached
the transparentprotection films.The filmsare featuringhigh light transmittance, anti-
reflection andabrasion-resistance. Please keep thefilms on theplayer, donot remove it.
Do not remove theprotection film!
The surfaces of theplayer are
attached with the protectionfilms
before leaving factory.
There is second layerof film covering the
protection film on theback of player.
Please tear it outbefore use.
Please peel off the labelpaster with the Mask
The front and rear surfacesof the player have
been attached high-performance transparent
protection films. Do not peelthem off!
Please peeloff the label paster withthe Mask
The front andrear surfaces of theplayer have
been attachedtransparent protection films.
Do not peelthem off!
12

15
LCDDisplay
1. Play Music
Video Name
Play Status
Elapsed Time
2. Video Playback
5 6
45
LCD Display
Play Status
Track Number
Song Total
Song Info
Elapsed Time
Remaining Battery
Power
Volume
Playback Progress
/Status Bar
Remaining Playing
Time
HOLD Repeat Playback
Radom Playback
PlaybackProgress
/Status Bar
Remaining
Playing Time
3. Photo View
PhotoFileInfo
CurrentNumber
BrowsingProgress/
StatusBar
TotalNumbers
LCD Display
Getting Started
1
In the playbackmode, the playbackprogress bar showsthe elapsed and
remaining time ofcurrent song. Slideyour finger ontouch keypad upand
down to adjustthe volume.Click Enterkey, thesliding bar willdisplay a
diamond object inthe bar.It shows thecurrent playback position.Slide your
finger on touchkeypad up anddown to moveplayback position forwardor
backward. Click Enterkey again, itshows the song'sdetailed information.
Click the keyonce again andreturn to normalplayback mode.
14
Song info orlyrics

17
Click
Long Click
+
5. MIC Record
LoadingtheBattery
4. FM Radio
RemainingBattery
Power
Saved Channel
ChannelFrequency
MONO/STEREO
Station Name
Station Signal Volume
RemainBattery
Power
RecordTime
Record Status
File Content
Record File
TotalAvailableTime
RecordProgress
/StatusBar
HOLD Bit Rate Sampling Rate
Connecting Mini Player
USB Cable
USB port on thePC
USB port on theplayer * Large End
* Small End
Connecting to aComputer
Connect the small endto player, largeend to PC.
1. During PowerOff
Connect it to thecomputer using the USBcable supplied in thepackage during the player
powered off. Itwill be charged usingthe power supply fromthe PC.
Installation CD
Connecting to a computerduring it power off,
it will charge itsbuilt-in battery and appearsas
the left figure.
LCDDisplay Connecting MiniPlayer
Elapsed Time
Channel
16
FM Music Radio
Basic Operation
2

19
Using for theFirst Time
ChargingtheBattery
* Charging the Batterybefore using your player.
* While the playeris connected to thecomputer via USB cable,it will charge itsbuilt-in
battery. Thebattery is fully chargedin about 3 hours.
* Check if theplayer is connected toa high-power USB2.0 port.Some low-power USB
ports available in keyboardsand other USB hubsmay not provide enoughpower to
charge or sync theplayer.
* If the computeris in sleep mode,the player may notbe charged.
The Remaining Battery Chargeicon indicates the remainingtime the battery canbe
used. The morethe battery is used,the fewer the numberof segments in theicon.
Full Charged Partially Discharged Fully Discharged
ToChargethePlayerwithACAdapter
USB port on theplayer
USB Chargeable Cable
Power Supply Jack
1. Connect theAC adapter(not provided) andthe player.
2. During PowerOn
To charge the playerwith ACadapter, USB-DCadapter is required.
Connect the USBend to theplayer and anotherend to thepower supply jack.
The ACadapter for theplayer uses inputvoltage of 100~240Vand 50/60 Hz.
Connect it to thecomputer using the USBcable supplied in thepackage during
the player powered on.It will charge itsbuilt-in battery and appearsas the figure.
In the normal Windowsenvironment, as soon asthe
cable or simple USBjack is connected, themessage
"Searching for new device"appears and USB driveris
installed automatically.For Windows 98SE, putthe
included CD-ROM in yourdisk drive, then followthe
instructions on your PCscreen to install theUSB drive.
ConnectingMiniPlayer Connecting MiniPlayer
Note: While connecting toPC, tracks and operationscannot be applied. Pullingout the
PC connection cable fromthe player before yourlistening to music /viewing a picture
and so on.
2. While connectingthe player andpower
supply, itwill power onautomatically.
The battery isfully charged inabout 3 hours.
18
Basic Operation
2
21
Using for theFirst Time
3S
+
LoadingtheBattery
UsingfortheFirstTime
1. Insertthe installationCD in your computerand installapplicable softwares.
(Detail see to 21 Install Software.)
2.Turn onyour player.
3.Connect theplayer tothe computerusing theUSB cablesupplied.
4. Openup the [Removable Disk](which representsthe memoryof this player)
on My Computer.
5.Transfer the desiredfiles fromPC intoyour playerunder theirspecified directories.
Youcan alsocreate folderfor yourneed, suchas Ebook.
6. Safelydisconnect theUSB cableto the player.
(All keysof the player cannot be operated duringconnecting toPC.)
7. Plug the earphoneto the player.
8. You can now usethe playerto play music, video,view yourfavorite photographs,
listen toFM radioand a lot of other features.
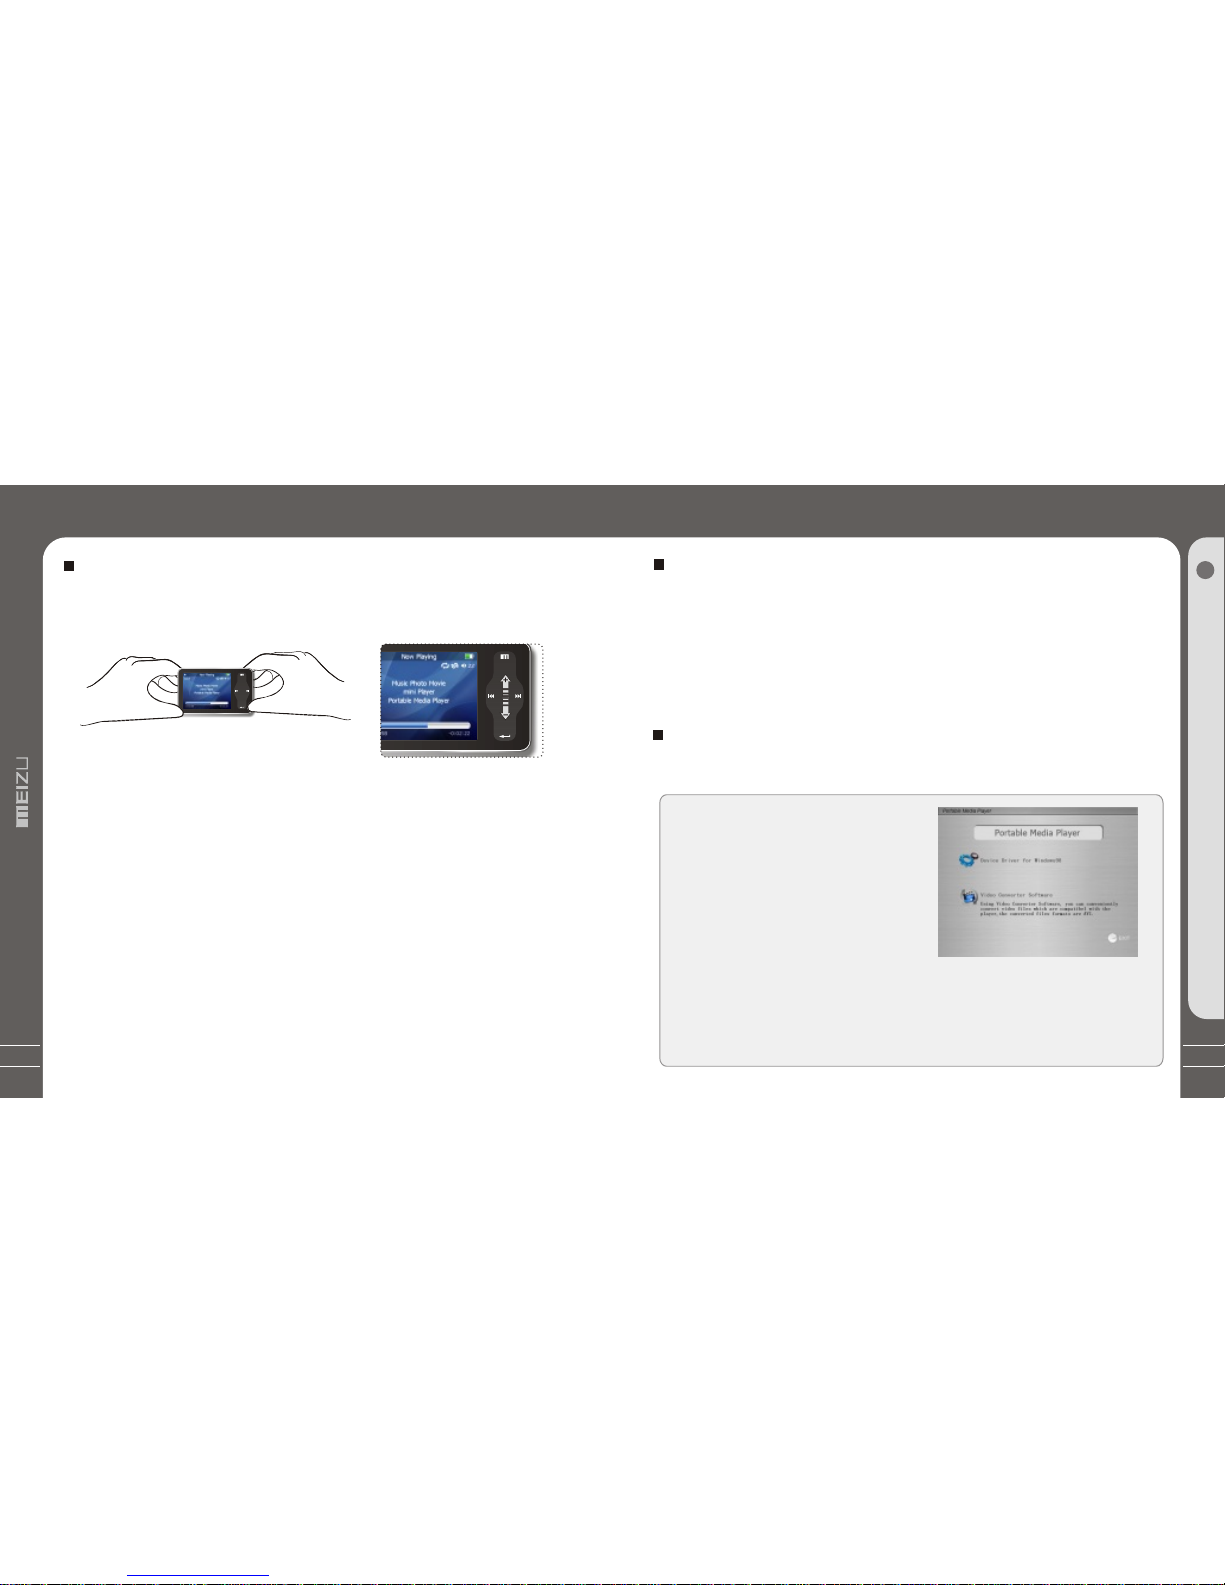
The procedures ofusing for thefirst time
Handling
If you grabthe player aspicture, it is
easier to handlethem.
System Requirement
Pentium 133MHz orHigher
32MB Main Memoryor Higher
40MB Hard DiskSpace or More
CD-ROM Drive
USB Port (2.0)
Windows 98SE/ ME/ 2000 /XP
Insert the installationCD into theCD-ROM drive. Thefollowing screen appears
after inserting theCD.
The installation CDcontains the
following contents:
- Device Driver for Windows98
- Video Converterfor MEIZU MiniPlayer
Video Converting Tools
(Note: Window 98driver is onlyrequired
for OS withwin 98 orlower version.
If you areusing Win2000 orabove, you willnot need toinstall driver.The PC
will automatically recognisethe player whenit is connected.The video
convert tool installationis required forvideo conversion. Wheninstallation is
automatically not started,execute the setup.exein the installationCD, and
then the Managerprogram is automaticallysetup.
Install Software
UsingfortheFirstTime Installation CD
20
Basic Operation
2

23
It appears on your PCas shown inthe
figure as follows(while finishformatting).
Select [Edit] - [Paste].
After finishing copying, itappears the music fileson the Removable Disk.Disconnect
the player to yourPC, then you canstart listening to themusic.
Downloading fromthe PC
Basic Operation
2
When copy files,you should savethe video andphoto files tospecified
directories of theplayer, videofiles into Moviedirectory, photofiles into
Picture directory.Otherwise, they won'tbe identified byMini Player.
Downloading from thePC
MP3 files canbe transferred toplayer using the
following steps.
Select the desired musicto download
to the player fromthe computer. Click the [Edit] -[Copy] Menu.
Double click [My Computer],then [Removable Disk] again.
The player is shownas the
Removable Disk on yourPC.
Downloading fromthe PC
Note: you can alsodrag and drop theselected files
from your PC intothe [Removable Disk] window.
Access from a CDor download music, videoor picture files frominternet and transfer to
your PC hard disk,then transfer them toyour player’s Removable Disk.Takeexample for
copying songs as below,
22

25
1. Power On
Long press the PowerON/OFF
button, the power comeson and
MEIZU logo appears.
Using Buttons
Long Click
Long Click
Click
Press the Power ON/OFFbutton again,
start to play. When there isno button
operation for about 3minutes while the player
is stopped, it isautomatically turned off.
2. Power Off
When youpress andhold thepower
ON/OFF button forabout 3seconds,
the powerturns off.If thePC andthe
player areconnectedvia a USB cable,
you cannotturn thepower off.
3. Playback &Stop
Press ON/OFF briefly, startto play.
Press itagain whilein Playstatus,
the playstops.
Quick Start
3
24
Saving Files andDisconnecting to yourPC
Copy the Filesin the Playerinto your PC
1. With the USBcable, connect the USBports of the playerand your PC.
(It should not usea USB hub. Itis assumed that youconnect to the USBport on
the main board.)
2. Save the musicfiles under the harddisk on your PC.
3. After savedthe files, click theicon on the screenof your PC.
4. It pops themessage as above, thenclick it.
5. It runs 'SafelyRemove Hardware'.
6. Then drawout and disconnect theUSB cable.
To makesure to save thedata on your playersafely and fully, please follow
the above steps accordinglywhen you disconnect theplayer to the PC.
While disconnecting,,it appears thewarning, click OK andfinish it.
Saving Files& Disconnectingto Your PC
27
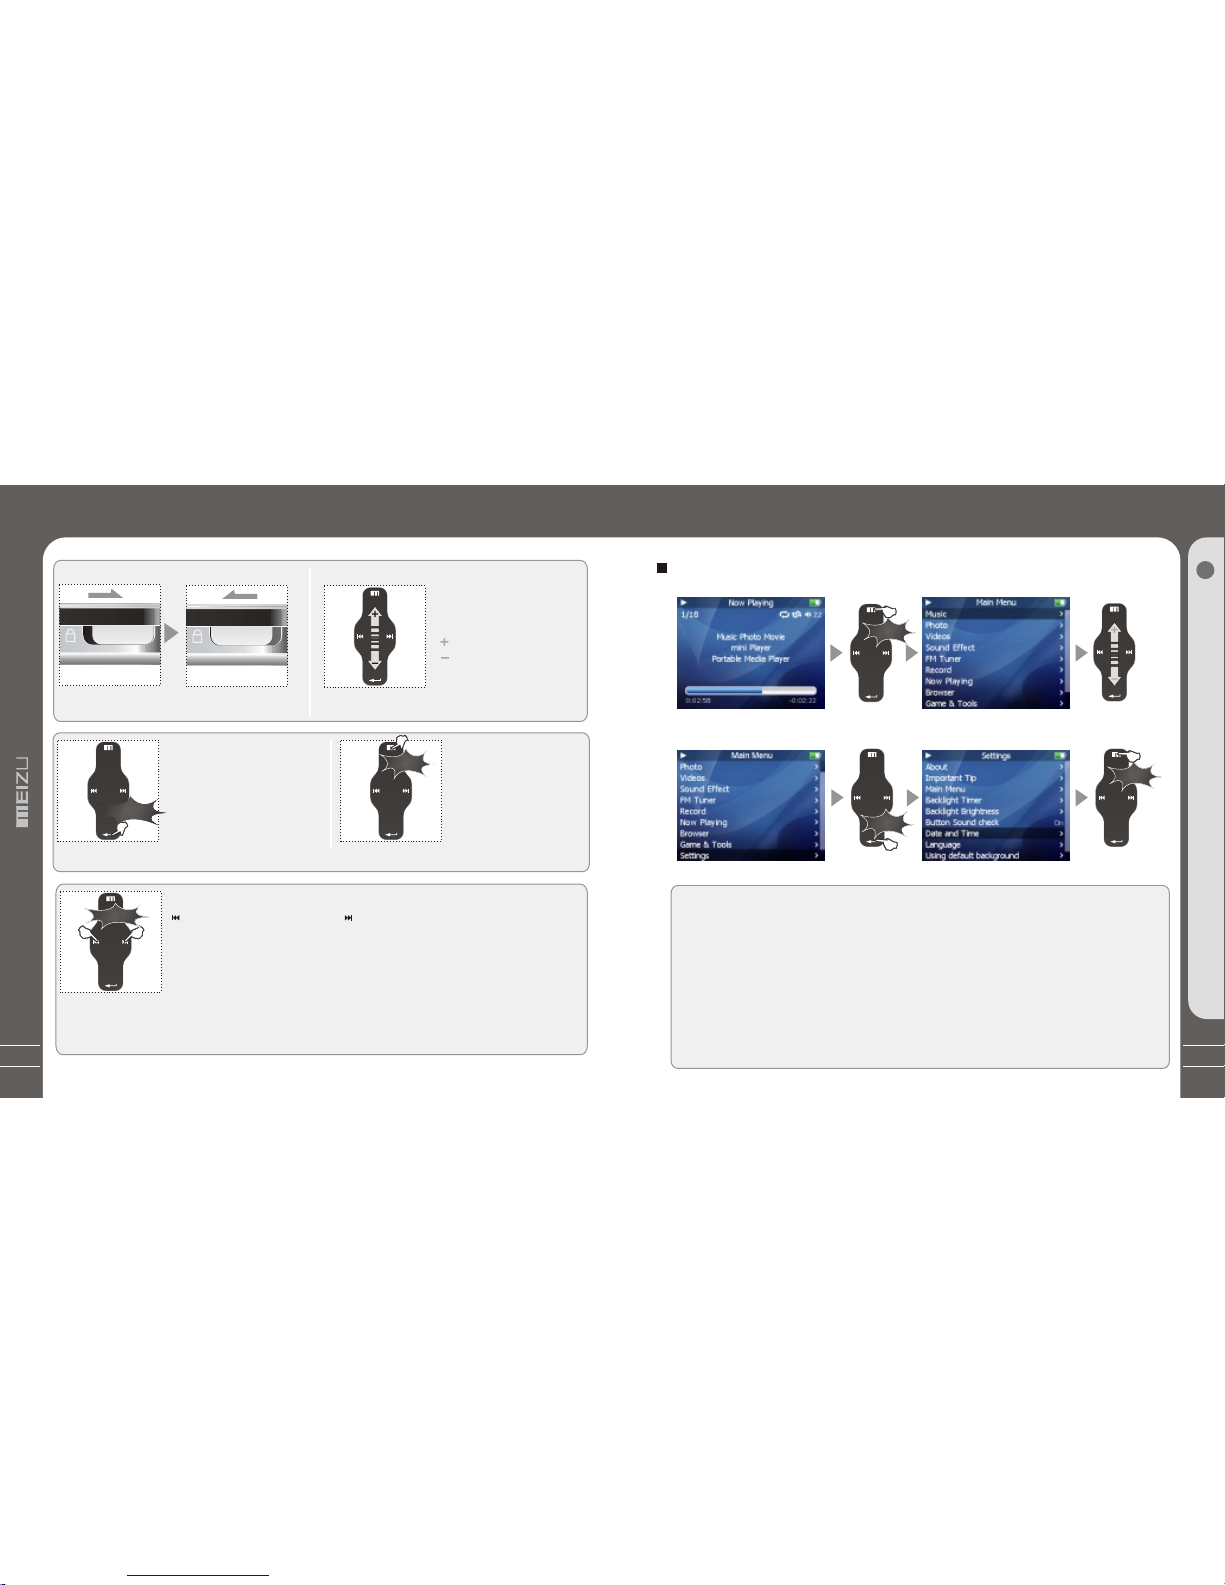
Select the MenuOptions
Click the Menu keyto go back tomain menu, sliding thekeypad up and downto select
the menu options. Clickthe Enter key orNext key,then enter the submenu(submenu is
available when there is">" symbol on theright of menu item).Click the Menu keyto the
upper menu (it willreturn to current playbackinterface, when you operateon top menu).
Adjust the Values
Enter the Settings frommain menu. Sliding onthe keypad up anddown
to adjust the values.Press the Enter keyand the options applied.During the selection,
click the Menu keyand exit.
Menu Controls
Menu Controls
Click
Click
Click
Quick Start
3
Click the Menu key briefly
Click the Enter key briefly
Sliding up and down on
the touch keypad
Click the Menu key toexit
26
9. Toselect music
Toselect previous music To selectnext music
10. Initializing theoperating system inthe player
A. Click and holdthe Next key andthen hold the powerON/OFF button, do
not remove your fingeruntil it appears thegreen screen. Thenit initializes
the OS to theoriginal factory settings.All data will bedeleted.
5.To adjust thevolume
inthe music operation menu,
slidingyourfingeronthe
touchkeypad.
To increase volume
To decrease volume
inthevideooperationmenu,
click theMenukey to increase
By turning Hold ON, allthe keys on the playerwill not function.
It is irrelevant while listeningto music, FM radio andso on.
Using Buttons
Unlock Locked
Long Click
Click
Click
7.Menu
PresstheMenubriefly
toMain Menuormove
totheupperfolder
8.Displayoff onLCD
Long clickMenukey for
6. Reset
If theplayer stops responding,
pleasereboot it:Long click
the Enterkey for over 10-sec
to force shutdown, then press
ON/OFF toturnon the player.
4. Hold
B. Click and holdthe Previous key andthen hold the powerON/OFF button, do notremove
your finger until itappears the green screen.Then it initializesthe OS to theoriginal factory
settings. All datawill be deleted.
thiseffect,clickMenukeyagaintoresumethe display.
volume click the Enterkey to decrease volume.

29
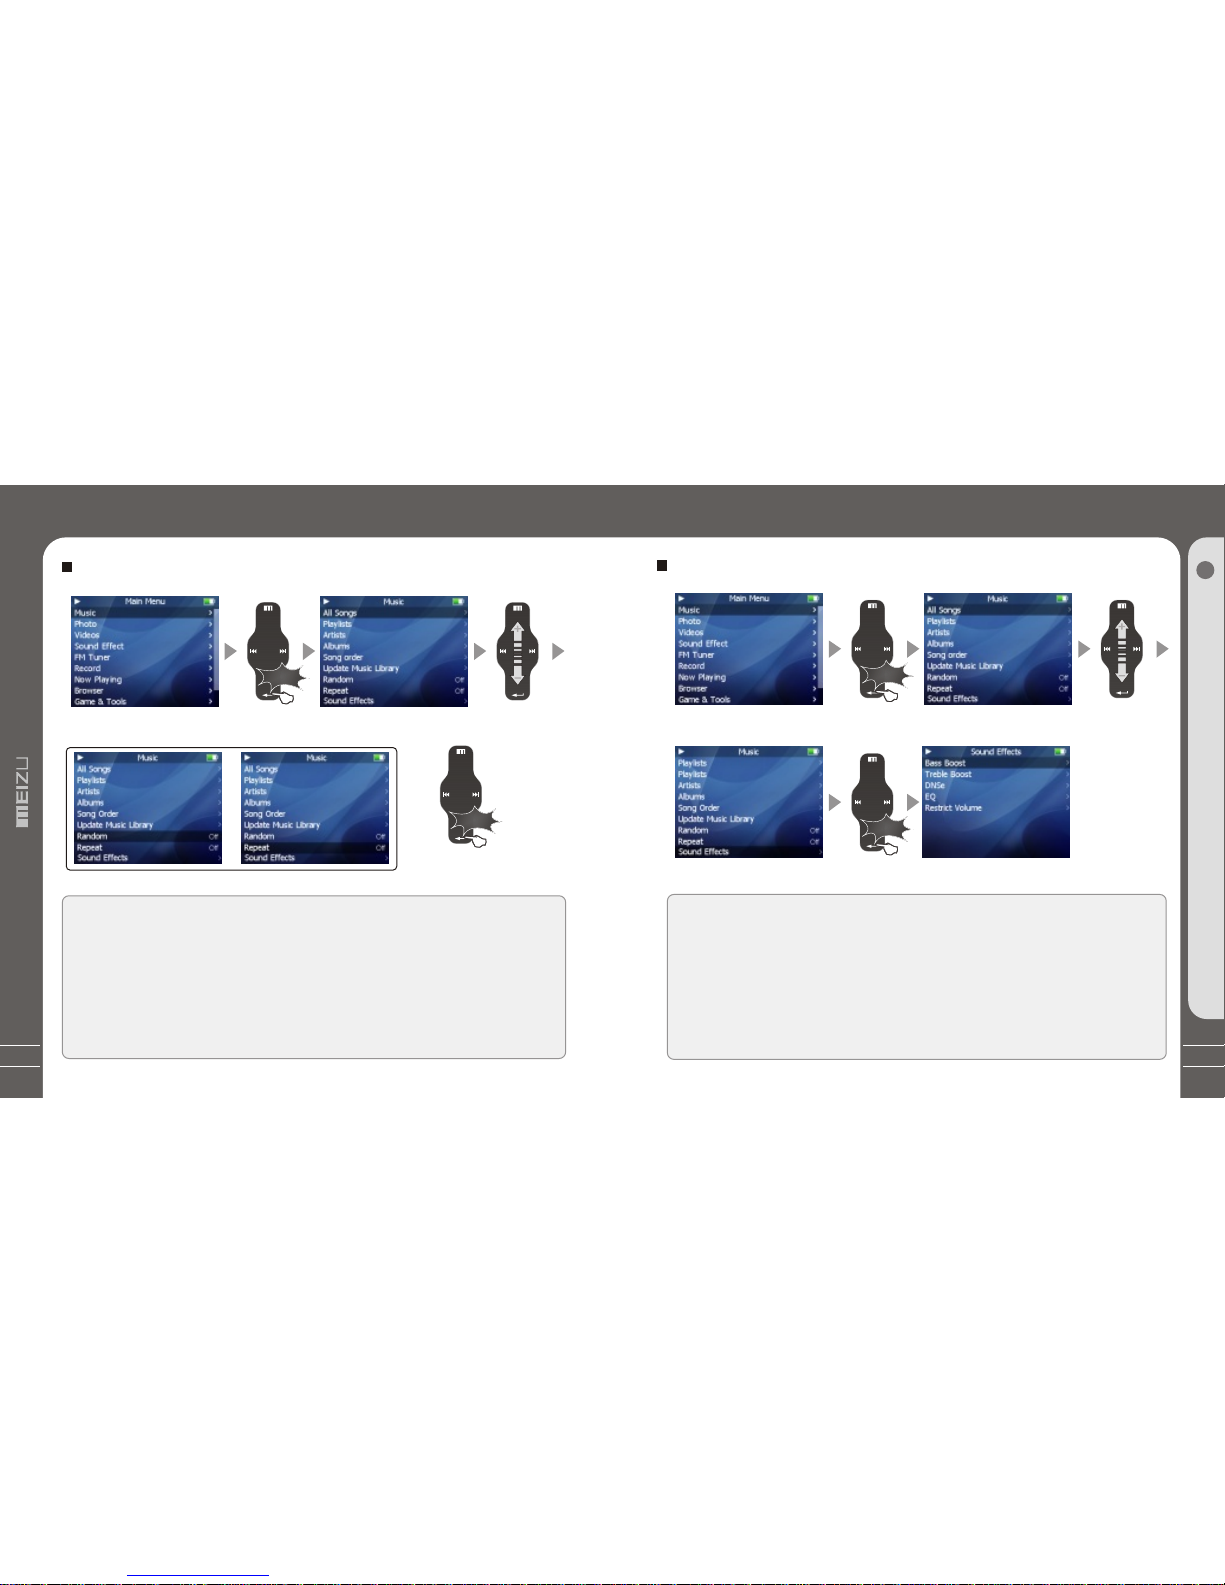
Listening to Music
Youcan convenientlynavigate throughyour musicfiles and listen to them. Select Music
in the mainmenu. Slideup/down tobrowse fora song byArtist,Album, Genre,Rate and
Playlist. Selectthe desiredsong/playlist andclick the Enter key toplay. Click the
Previous/Next keyto previous/nextmusic, slideup and down on thekeypad toadjust
the volume.Youcan convenientlytransfer yourfavorite musicto the player. Itsupports
following audioformat: MP3(VBR): 8Kbps~ 320Kbps WMA (VBR): 8 Kbps ~ 355Kbps
WAV:PCM, MS-ADPCM,IMA-ADPCM OGG: Q1 ~Q10
Note: 1. Ifthe keys cannot function,please checkif the HOLD is on.
2. Continuousplayback time:About 20hrs (MP3/128kbps/volume 20/EQ normal/LCD off)
Long Click
Sliding
Click
Click
ListeningtoMusic
Quick Start
3
28
Open Browser
Click the Menu key, sliding the keypadup and down toselect Browser option.
Click the Enter keyto apply it.
Sliding on the keypadup and down toselect the submenu options.
Click the Menu keyand return to theupper menu or playbackmode.
Play Music
There pops up thefollowing functions after youselect Music folder ora song,
1. Play 2.Add to Current Playlist3. Add toMy Playlist.
Using Browser
Click
Click
Click
Using Browser
Click the Menu key briefly Sliding up and down on
the touch keypad
Click the Enter key briefly Click the Menu key briefly

31
Sorting theMusic Library
Sorting the MusicLibrary
All Songs To listall the songs onthe player.
Playlist
a. Add toMy Playlist. You can add thesongs, Artists,Albums. When a songis selected,
press and hold theEnter key until thehighlight bar starts toflicker, the songis added to My
Playlist. Select an artistor a album, pressand hold the Enterkey until the highlightbar
starts to flicker,the related songs areadded to My Playlist.When the highlight barstops
flickering, the selected songis added.
b. Save Playlist.After finishing adding thesongs, select My Playlist- Save Playlist and
click the Enter keyto apply it. Foldernames are created automaticallyas PLAYLIST1,
PLAYLIST2...
c. Clear ( Delete) Playlist. Select thememoried playlists (for example,PLAYLIST1), then
select Delete Playlist, clickthe Enter key anddelete it.
Artists Assorting by all artistsand unknown artists.
Albums Assorting by all albumsand unknown albums.
Song Order( assort AllSongs only). You can assort thesongs by Title,File name, Artist
andAlbum.
During Main Menu -Music - AllSongs/Playlists/Artists/Albums, press the PowerON/OFF
button, it will startto play the songson the current item.
Click
Quick Start
3
Click the Enter key briefly Sliding up and down on
the touch keypad
30
Selecting Modes
Update the MusicLibrary
After finishing copying themusic files, you canalso organize them byartist, album or
genre using Update theMusic Library function onthe player.
1. Click the mainMenu key and selectMusic mode.
2. Click Enter key- Update the MusicLibrary, thenthe option is applied.During the
updating, it will takeyou a few seconds.
3. When finishes, itreturns back the menuoptions automatically.
Click
Click Click
Click
Click
Update theMusic Library
Click the Enter key briefly
Click the Enter key briefly Click the Menu key toexit
Click the Enter key briefly
33
This is the featureto set the SoundEffect. There arethe following sound fieldeffects:
A. EQ: Pop, Classical,Rock, Jazz, Live, BassBooster, User-defined andLoad Default.
It provides you toadjust the values ofEQ by yourself.
B. Bass Boost You canchoose the value from0~15 to set thebass effect.
C. Treble Boost You canchoose the value from0~3 to set thetreble effect.
D. DNSe You can shoose: DNSe,DNSe Mode, Virtual3D,Phase Corrected Equalizer,
Virual Bass Enhancement,Speaker Type.
E. Volume restriction There are level5~ 40 optional.
Sound Effect
Click
Click
SoundEffect
Quick Start
3
Click the Enter key briefly
Click the Enter key briefly
Sliding up and down on
the touch keypad
32
Random playback
This sets whether ornot to play randomly. Click the Enterkey and select On,the next
playlist is played randomly.
Repeat playback
Click the Repeat optionin the controls window, then click theEnter key and selectOn,
the next playlist isplayed repeatedly.
Playback Mode
Playback Mode
Click
Click
Click the Enter key briefly Sliding up and down on
the touch keypad
Click the Enter key briefly
35
Quick Start
3
34
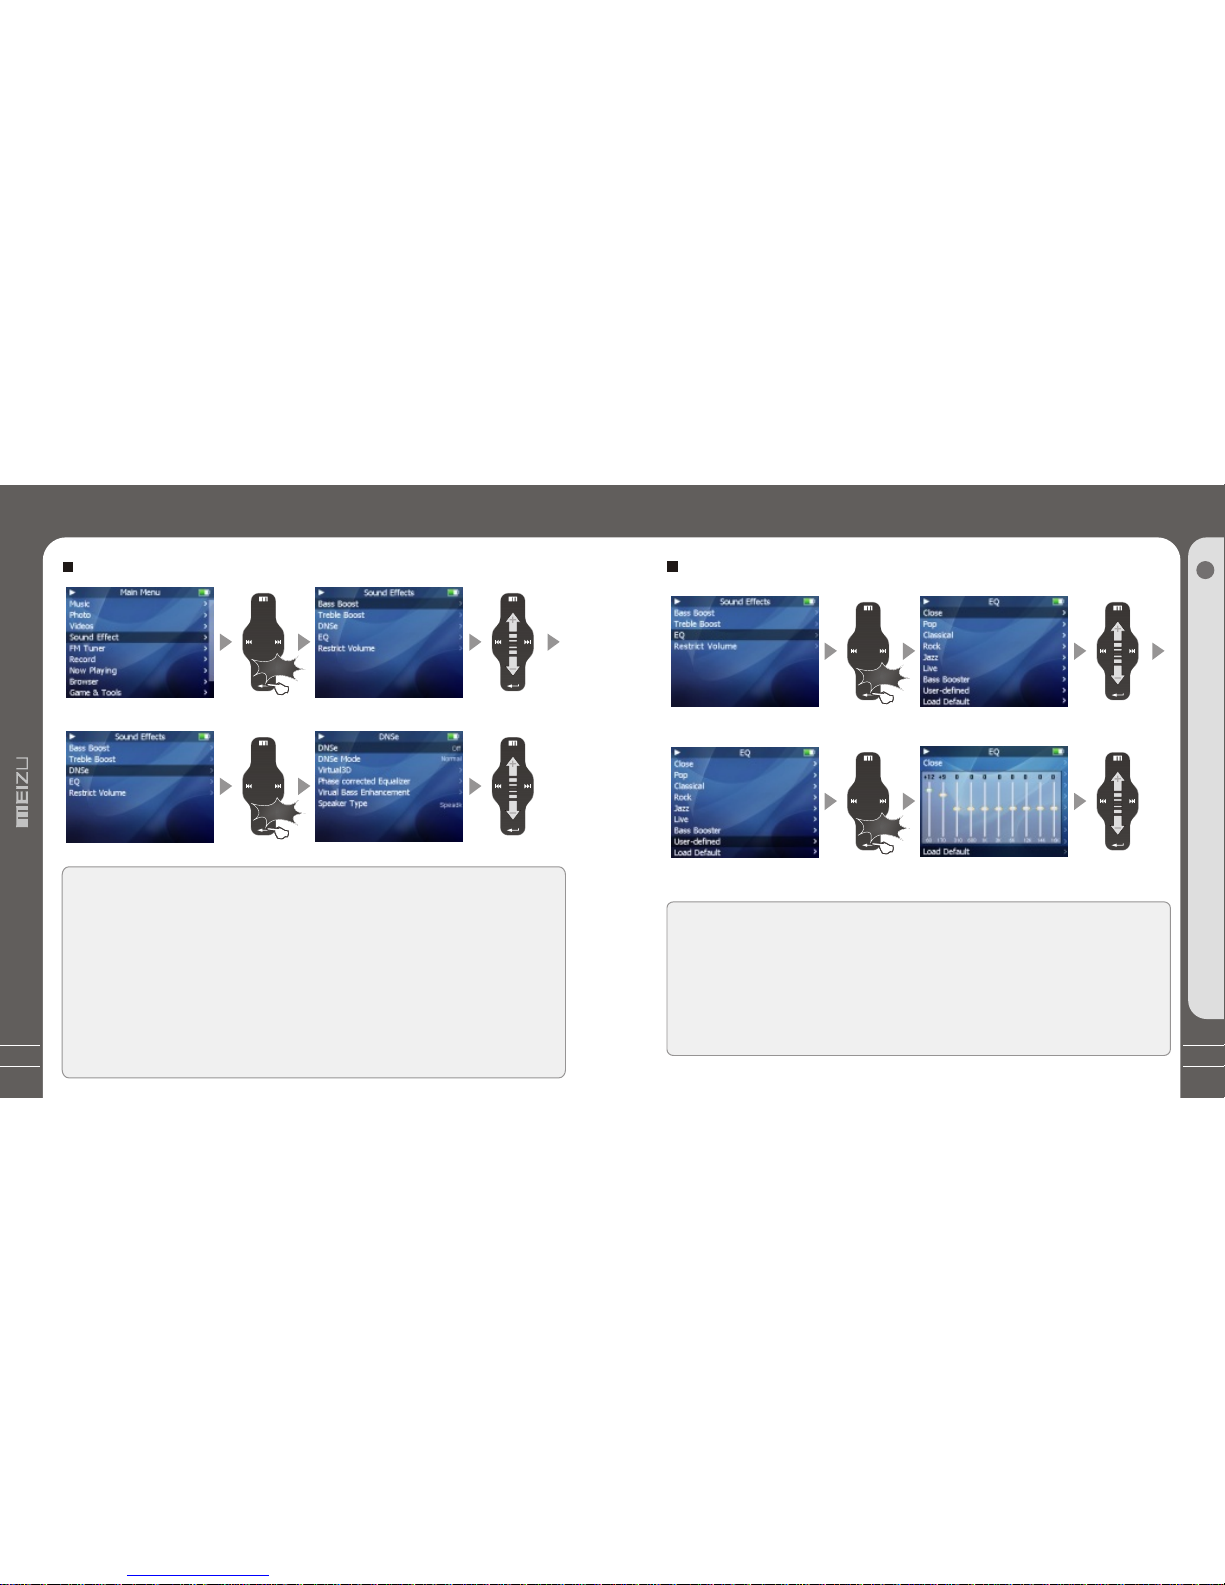
To selectDNSe sound effect
1. During Main Menumode, Select Sound Effect and click theEnter key.
2. Using your figureand sliding on thekeypad up and down,select DNSe effect.
Click the Enter keyand apply it.You canchoose the following options,
A. DNSe To set Close orOpen DNSe sound effect
B. DNSe Mode To setDNSe mode: Normal, Virtual 3D, Natural HeadPhone.
C. Virtual 3D Toset values of Virtual 3D, you canadjust it from 0~9.
D. Phase Corrected Equalizer Toadjust sound effectfrom value 0~9.
E. Virual BassEnhancement To adjust sound effect from value 0~9.
F. SpeakerType To provide Hearphone andSpeaker options.
(The player does nothave a built-in speaker)
DNSe Sound Effect
Click
Click
DNSe SoundEffect
Click the Enter key briefly Sliding up and down on
the touch keypad
Click the Enter key briefly
Select EQ
The player offersvarious EQ:
Pop, Classical, Rock, Jazz,Live, Bass Booster,User
User EQ
You canadjust the User EQ.
Function up and downon the keypad toselect the value andapply it. Click thePrevious
or Next key andmove to differentitems.
Equalizer
Click
Click
Equalizer
Click the Enter key briefly Sliding up and down on
the touch keypad
Click the Enter key briefly Sliding up and down on
the touch keypad

37
Quick Start
3
36
Displaying Lyric
1. Download the lyricsfrom the internet toyour PC. Thelyrics file is theformat
of .Irc.
2. Connect the playerand your PC viaUSB cable.
3. Copy and dragthe MP3 lyric fileson your player.(The lyrics file andmusic file must be
stored in the samefolder, their filenamesmust also be thesame.)
For example, for songnamed my angel.mp3, thematching lyrics file willbe my angel.lrc.
4. Disconnect the playerand your PC.
5. Turn onthe player, clickleft/right key to selectthe favorite song andplay it.
Synchronized song Lyrics
Copy the lyric filesfrom your PC tothe Player.
Insatiable.lrc
Song Title
Song Info
It will display threelines of lyrics on
the screen during playing,the current line
will be highlighted indifferent colour.
Displaying Lyric
insatiable.lrc
To Setthe Volumerestriction
1. During the MainMenu mode, select SoundEffect and clickEnter key.
2. Using your figureand sliding on thekeypad up and down,select Volume Restriction.
3. Click the Enterkey, slideit up and downto adjust and applythe setting.
You canchoose it from 5~ 40 level.
VolumeRestriction
VolumeRestriction
Click the Enter key briefly Sliding up and down on
the touch keypad
Click the Enter key briefly
Click
Click

39
Quick Start
3
38
Slideshow Settings
Click
Click
Click
Click Slide Show Settings toopen followingsub menu:
A. Time perSlide (ImageDelay)
Selects the time eachpicture is displayed on thescreenduringa slideshow.
B. Repeat: Displays each picture repeatedly.
C. Shuffle Photos: Displayseach picture randomly.
D. Auto Rotate: Rotate itautomatically tofit forscreen displayaccording to thesize of
a picture inthe player.
E. Transitions (SlideEffect)
Enables/disables overlapeffectsbetween each image during aslide show.Youcan
choose: Random,PushAcross, Push Down, Wipe Across,Wipe Down, Wipe fromCenter.
Click the Enter key briefly
Click the Enter key briefly
Click the Enter key briefly
Slideshow Settings
Photo Library
Searching for apicture
Function up/down to selectprevious/next image. Click theEnter key to displaythe
selected image in fullscreen.
Viewing a picture
Click left/right key toview previous/next image. Clickthe Enter key, you can select
and set the selectedpicture as Music background,Radio background or Record
background. Click the Menukey to exit, clickthe power ON/OFF buttonto display the
browsing information and progress/statusbar. It supportsJPEG, BMP, GIF formats.
Photo Library
Click
Click
Click
Click the Enter key briefly
Click the Enter key briefly
Sliding up and down on
the touch keypad
Click the Enter key briefly
Photo Library
This manual suits for next models
1
Table of contents


