MELAG Cliniclave 45 User manual

Dear doctor,
We thank you for your confidence demonstrated by the purchase of this MELAG product.
As an owner-run and operated family concern founded in 1951, we have a long history of successful specialization in
hygiene products for practice-based use. Our focus on innovation, quality and the highest standards of operational
reliability has established MELAG as the world’s leading manufacturer in the instrument treatment and hygiene field.
You, our customer are justified in your demand for the best products, quality and reliability. Providing "competence in
hygiene" and "Quality – made in Germany", we guarantee that these demands will be met. Our certified quality
management systems is subject to close monitoring: Our certified quality management systems is subject to close
monitoring: one instrument to this end is our annual multi-day audit conducted in accordance with ISO 13485 and
ISO 9001. This guarantees that all MELAG products are manufactured and tested in accordance with strict quality
criteria.
The MELAG management and team.
User manual
Cliniclave®45
Cliniclave®45 M
Large steam sterilizer
as of software v3.218
EN

General notes
Please read this user manual before you start operation of the device. The manual includes important safety information.
The functionality and value-retention of this device depend on the care accorded to it.
Please store the user manual carefully and in close proximity to the device, e.g. in the bracket on the inside of the floor
unit door. It represents a component of the product.
Validity
This manual is valid for the autoclave Cliniclave 45 and Cliniclave 45 M.
About this manual
Symbols used
Symbol
Explanation
Indicates a dangerous situation, which if not avoided, could entail slight to life-threatening
injuries.
Indicates a dangerous situation which if not avoided could entail damage to the
instruments, the practice equipment or the device.
Draws your attention to important information.
Formatting rules
Symbol
Explanation
Fig. 1/(12)
Reference to a detail in a figure – in the example, to part no. 12 in figure 1.
Settings
Words or phrases appearing on the display of the device are marked as display text.
see Chapter 2
Reference to another text section or a figure within this manual.

Symbols on the device
Symbol
Explanation
Manufacturer of the medical device
Date of manufacture of the medical device
Serial number of the medical device by the manufacturer
Article number of the medical device
Indication of the scale of the chamber volume
Operating temperature of the device
Operating pressure of the device
This User Manual contains important safety information. Failure to comply of the safety
instructions could result in human and material damage.
Please read this user manual carefully before commissioning the device. The manual includes
important safety information. The functionality and value-
retention of this sterilizer depends on the
care accorded to it. Please store this user manual carefully and in close proximity to your
sterilizer. It represents a component of the product.
The symbol of the crossed out waste bin identifies a device that must not be disposed in
domestic waste. The vendor is responsible for appropriate disposal of the device - it must be
delivered to the vendor to be disposed of.
By the designation of an apparatus with this symbol, the manufacturer furthermore declares that
he satisfies all requirements of the law concerning the release, redemption and environmentally
sound disposal of electric and electronic appliances.
MELAG devices are synonymous for long-term quality. When you eventually need to
decommission your MELAG device, we offer a special disposal service. Simply contact your
stockist.
In affixing the CE mark, the manufacturer declares that this medical product fulfils the basic
requirements of the medical products directive. The four-digit number confirms that this is
monitored by an approved certification agency.
In affixing this CE mark, the manufacturer declares that this medical product fulfils the basic
requirements of the pressure device directive. The four-digit number confirms that this is
monitored by an approved certification agency.
This symbol indicates areas subject to the influence of high temperatures. Contact with these
areas can result in burns. This symbol also indicates the possibility of steam egress.
Sign in the door area: "Attention. Hot surfaces."
This symbol draws attention to a raised danger of crushing resulting from the improper closure of
the autoclave door. Please comply with the instructions outlined in the corresponding chapter.

Scope of delivery
Standard scope of delivery
Cliniclave 45 (without floor unit) or Cliniclave 45 M (with floor unit)
User manual
Technical manual
Record of installation and set-up
Declaration of conformity Medical Device Directive
Declaration of conformity Pressure vessel Directive
Warrenty
Slide rail "Standard"
MELAflash CF card
Protective gloves
Carrying handles
Waste water hose (flexible hose)
Open-ended wrench for the validation fitting connection/floor unit rollers
Ring spanner for the validation fitting fastening nuts
Allen key to open the door in an emergency
Grease for door locking mechanism
Filter insert for housing fan
3M Bowie&Dick-Test
Installation package (sent in advance) consisting of
¾" Rubber seal
surface-mounted siphon
¾“ water tap with safety combination
As option
Floor unit (for Cliniclave 45)
Reverse osmosis unit MELAdem 56 (for Cliniclave 45) or MELAdem 56 M (for Cliniclave 45 M)
Leak detector (water stop)
Loading system for effortless loading and unloading

Table of contents
Chapter 1 – Device description....................... 8
Intended Use ................................................................8
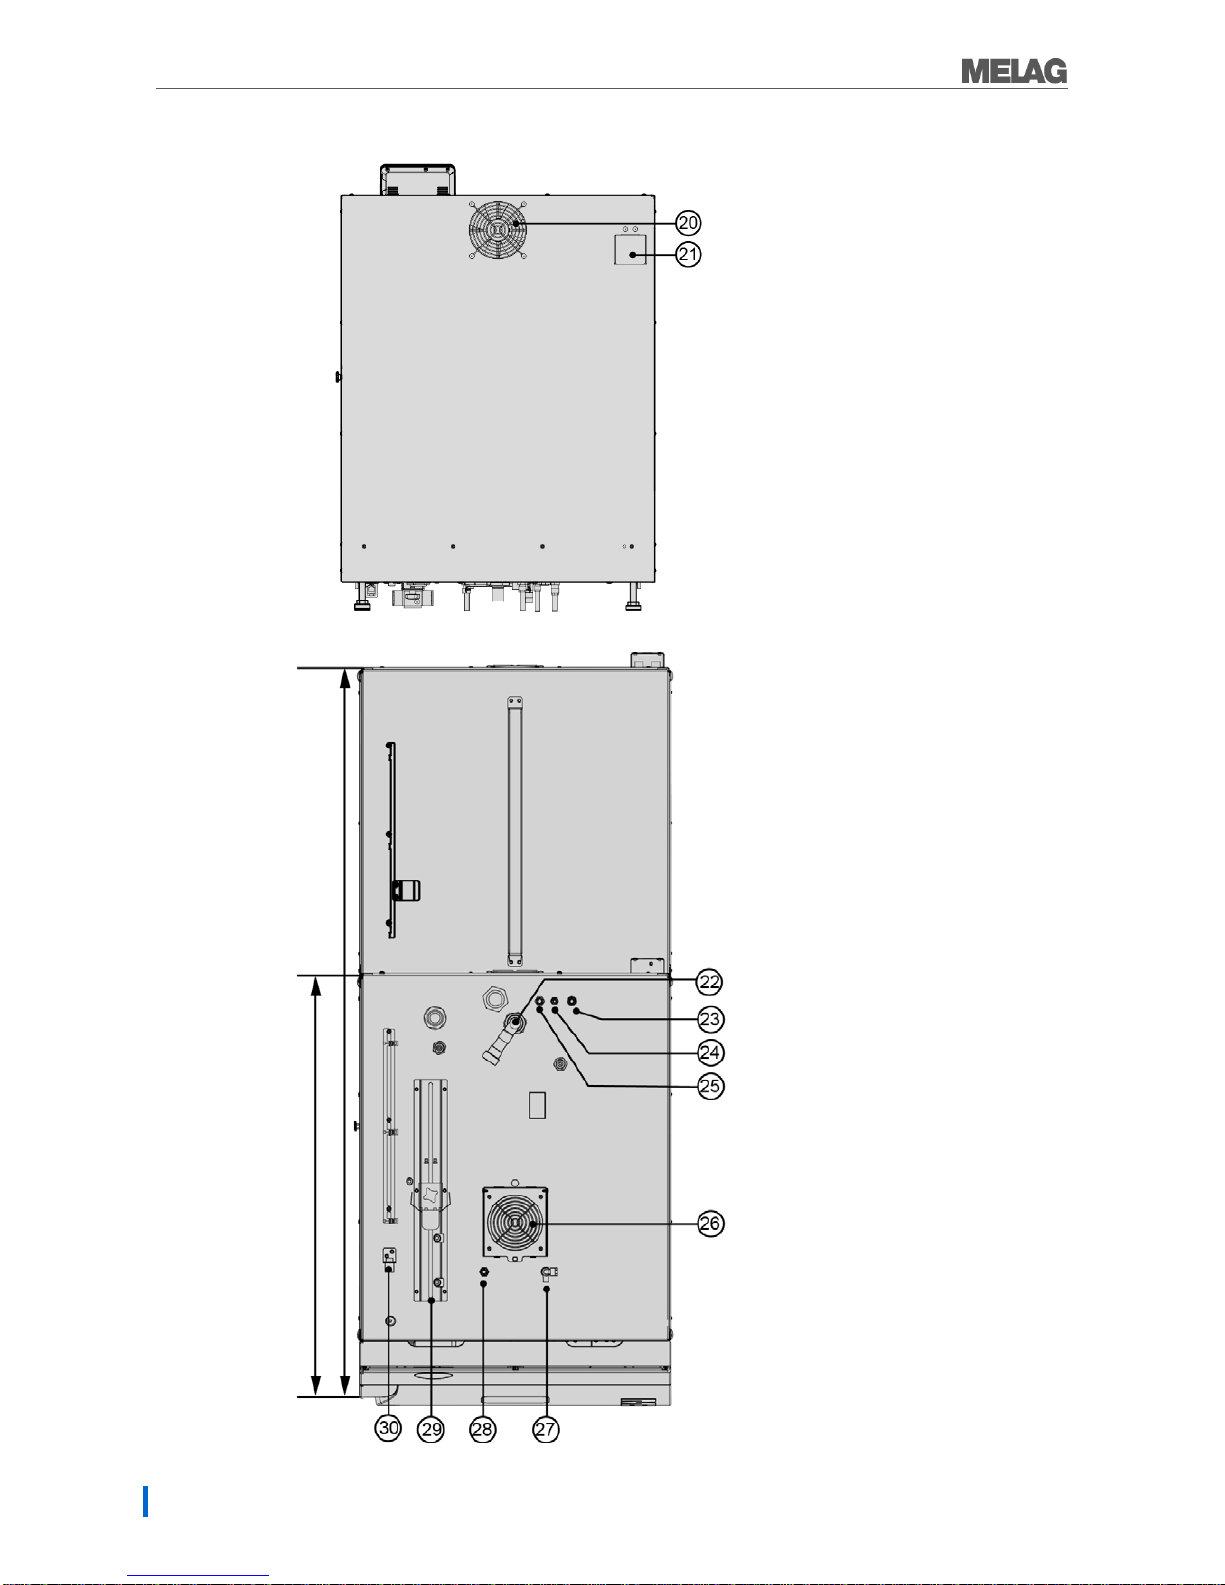
Views of the device.......................................................9
Colour-Touch Display.................................................11
Load mount.................................................................13
Chapter 2 – First steps.................................. 14
Preconditions for commissioning................................14
Record of installation and set-up................................14
Providing feed water...................................................14
Tap water supply ........................................................14
Switch on the autoclave..............................................15
Opening and closing the door.....................................15
Chapter 3 – Loading the steam sterilizer ...... 17
Preparing the sterilization material .............................17
Loading the autoclave ................................................18
Chapter 4 – Sterilizing................................... 22
Important information regarding routine operation......22
Selecting the program ................................................23
Starting the program...................................................25
Sterilization phase is ended........................................26
Drying phase ..............................................................27
Program is ended .......................................................27
Manual program abort ................................................27
The clearance process ...............................................28
Removing the sterilized equipment.............................29
Storing sterile instruments..........................................30
Chapter 5 – Logging ..................................... 31
Batch documentation..................................................31
Output media..............................................................31
Outputting logs immediately and automatically...........35
Subsequent log output................................................36
Determining the log format .........................................37
Finding a log...............................................................39
Reading logs correctly................................................39
Chapter 6 – Settings..................................... 41
Logging.......................................................................41
User administration.....................................................41
Additional drying.........................................................43
Date and time .............................................................43
Light intensity..............................................................44
Volume .......................................................................44
Key tones....................................................................44
Screensaver ...............................................................45
Intelligent drying .........................................................46
Label printer................................................................46
Log printer..................................................................47
Touch sensitivity ........................................................48
Energy-saving mode..................................................49
Chapter 7 – Functional Checks..................... 50
Vacuum test...............................................................50
Bowie & Dick test.......................................................50
Helix test body system MELAcontrol/MELAcontrol
PRO .........................................................................51
Checking the quality of the feed water.......................51
Validation ...................................................................51
Renewed Qualification (revalidation) .........................51
Chapter 8 – Maintenance.............................. 52
Cleaning.....................................................................52
Avoiding staining........................................................53
Greasing the door spindle..........................................53
Changing the filter on the housing fan........................53
Maintenance ..............................................................53
Chapter 9 – Operating Pauses ..................... 54
Frequency of sterilization ...........................................54
Pause times ...............................................................54
Decommissioning.......................................................54
Transport....................................................................54
Emptying the double-jacket steam generator.............55
Recommissioning after relocation..............................55
Chapter 10 – Description of function............. 56
The sterilization procedure.........................................56
Type of the feed water supply....................................56
Internal process monitoring........................................56
Emergency shut-down ...............................................56
Program sequence.....................................................57
Chapter 11 – Malfunctions............................ 58
Before you call customer service ...............................58
Opening the door manually........................................62
Glossary........................................................ 63
Technical Data.............................................. 65
Appendix A – Accessories............................ 67

Safety instructions
6
Safety Instructions
When operating the autoclave, please observe the following safety instructions as well as those contained
in subsequent chapters.
Intended use
The autoclave is suited to highly-demanding sterilization tasks. It can be used to sterilized
instruments with a low inner diameter and transfer instruments - both wrapped or unwrapped -
and large quantities of textiles.
Do not sterilize any thermo-unstable products.
Do not sterilize any fluids in this autoclave.
Power cable and mains socket
Never damage or alter the plug or power cable.
Never operate the autoclave if the plug or power cable are damaged.
Never unplug by pulling on the power cable. Always grip the plug itself.
Double-jacket steam generator
The autoclave remains pressurized for a long time after being switched-off. Check the pressure
display of the manometer below on the front of the autoclave.
Setup, installation and commissioning
The autoclave should only be set-up, installed and commissioned by MELAG authorized persons.
Never operate the autoclave in areas exposed to the danger of explosion.
The connections for electrical provision and water supply and waste water must be set-up by
trained personnel.
Documentation media (computer, CF card reader etc.) must be placed in such a way that they
cannot come into contact with liquids.
Autoclave with floor unit
Move the autoclave with floor unit in the installation location solely for maintenance purposes.
Do not roll the autoclave over any uneven surfaces or thresholds.
Treating and sterilizing textiles and instruments
Follow the manufacturer instructions of your textile articles and instruments regarding their
treatment and sterilization.
Observe the relevant standards and directives applicable to the treatment and sterilization of
textiles and instruments.
Only ever use packaging material and systems which have been cleared by their manufacturer for
steam sterilization.
Program termination
Please observe that depending on the time of the program abort, opening the door following a
program abort can lead to hot steam leaving the chamber.
Depending on the time of the program abort, it is possible that the load is unsterile. Observe the
clear instructions on the autoclave display. It may be necessary to re-pack and re-sterilize the
sterilization material.
Removing the sterilized equipment
Never use force to open the door.
Use protective gloves to remove the tray. Never touch the sterilized equipment, the chamber or
the inside of the door with bare hands. The components are hot.
Check the packaging on the sterilized equipment for damage when removing it from the
autoclave. Should the packaging be damaged, re-pack the sterilization material and re-sterilize it.
Maintenance
Maintenance should only be performed by authorized personnel.
Maintain the specified servicing intervals.

Safety instructions
7
Carrying the autoclave
The autoclave should only ever be carried by four people. In exceptional cases, the Cliniclave 45
can be carried by two persons. In such cases, observe and comply with the corresponding
specifications issued by your respective professional association.
Transport the autoclave with the carrying handles included in the scope of delivery and screw
these on only for transport purposes.
The carrying handles can be stored in the bracket in the floor unit intended for this purpose.
Malfunctions
Upon the incidence of repeated fault messages in the autoclave during operation, turn off the
autoclave.
The autoclave may only be serviced by authorized personnel.

Chapter 1 – Device description
8
Chapter 1 – Device description
Intended Use
The steam sterilizer is designed for application in a medical context, e.g. general practitioners and dental
practices, day hospitals, outpatient surgeries, ambulant healthcare centres, group practices and hospitals.
According to DIN EN 285, this steam sterilizer is a large steam sterilizer. As a universal autoclave, it is
suited to highly-demanding sterilization tasks. It can be used to sterilize large quantities of instruments with
a low inner diameter and transfer instruments – both wrapped or unwrapped – and textiles.
DANGER!
The sterilization of liquids can result in a delay in boiling, which could result in damage to
the autoclave and burns.
Never use this autoclave to sterilize any liquids. It is not licensed for the sterilization of liquids.
WARNING
Failure to observe these provisions can result in damage or can compromise safety.
Only ever use the autoclave for the applications as foreseen in the technical documentation
and only in connection with the devices and components as recommended by MELAG.
As with the preceding instrument treatment and in accordance with §2 MPBetreibV, the
sterilization of instruments and textiles using this steam sterilizer may only be carried out by
competent personnel.
When conducting sterilization procedures, only use instruments, packaging and textiles which
the manufacturer has cleared for steam sterilization.

Chapter 1 – Device description
9
Views of the device
Front side
1.
CF card slot
2.
Colour-Touch Display
3.
LED status bar
4.
Door (swings open left/right)
5.
Opening for door opening in an emergency
6.
Validation fitting*
7.
Power switch (covered, accessible from the
side)
8.
Manometer for pressure display*
9.
Device foot
10.
Ethernet connection
11.
Bracket and clamp for waste water hose
*behind cover
Detailed fore view with an opened service hatch
12.Steam generator level gauge
13.
Reset button overheat control RHK1 (safety
temperature limiter)
14.
Reset button overheat control RHK2
(safety temperature limiter)
15.
Reset button overheat control RHK3
(safety temperature limiter)
16.
Sterile filter
17.
Manometer for pressure display
18.
Opening for emergency activation of the
vacuum pump
19.
Ethernet connection for service

Chapter 1 – Device description
10
Back side
20.
Fan
21.
Pressure and emergency release behind
cover plate
Lower side
22.Waste water connection
23.
Feed water inflow (from water treatment
unit)
24.
Connection of the concentrate duct from
the water treatment unit
25.
Cold water inflow to the water treatment
unit
26.
Fan
27.
Connection for emptying the
air gap
28.
Connection for cleaning/decalcifying the
vacuum pump (only for service
technicians)
29.
Bracket and clamp for waste water hose
30.
Ethernet connection
Fig. 1: Views of the device
Cliniclave 45
Cliniclave 45 M

Chapter 1 – Device description
11
Colour-Touch Display
1. Status bar
2. Menu bar
3. Main area
4. Action bar
Fig. 2: Fore view with Colour-touch display
Symbols in the status bar
Meaning
Programs/Tests
Indicates whether a program/test is running
Immediate output
Indicates whether immediate output is activated/deactivated
Additional drying
Indicates whether additional drying is activated/deactivated
Graphic logs
indicates whether recording of graphic logs is activated/deactivated
Energy-saving mode
Indicates whether the autoclave is currently in energy-saving mode
Service area
Indicates whether a service technician is logged-in to the service
area
Status CF card
Indicates whether a CF card has been inserted and whether a
reading or writing action is in process.
Symbols in the menu bar
Meaning
Programs/Tests
Lists all sterilization programs and tests e.g. vacuum test, Bowie &
Dick-Test etc.
Log output
Here you can display the entire log list or the list of logs from a
restricted time e.g. the day, month etc. You can also delete specific
log types and logs.
Settings
Here you can perform various settings such as date and time, light
intensity etc. It also enables one-time setting of the "standard"
logging settings regarding log output.
Info-/
status window
Displays information regarding the software version and device data
e.g. total number of batches, maintenance counter, log settings, log
memory and further technical values.
Service area
Only for technicians
Help menu
Depending on the window and the operating situation, gives
information regarding operation or the function of the window
currently selected.

Chapter 1 – Device description
12
Symbols in the action bar
Meaning
Door open
Opens the steam sterilizer door
Back
Returns to the previous window
Forwards
Navigates to the next window
Cancel/
Return without
saving
Navigates to the superordinate menu, leaves the window without
saving
Zoom (+)
Displays further details such as further values after a completed
program
Start time pre-
selection
Navigates to the "Start time pre-selection" menu
Delete
deletes logs from the internal log memory / deletes the log printer or
label printer stored as standard
Search
Searches for label printer(s)/log printer(s)
LED status bar
The colour of the status bar on the edge of the display indicates a variety of situations e.g. in standby,
during a program run or during warning or malfunction messages.
LED colour
Meaning
blue
Standby, program running, drying has not yet begun
green
Drying running, program completed successfully
yellow
Upon warnings, during a software update
red
Upon a malfunction message, program not completed successfully

Chapter 1 – Device description
13
Load mount
Mount for 2 instrument baskets or 4 large instrument trays
The mount can accommodate two instrument baskets or four large instrument trays.
The sterilization chamber of Cliniclave 45 holds a single mount of this type, the chamber of Cliniclave 45 M
holds two mounts.
Mount for 6 standard tray cassettes*
The mount can accommodate six standard tray cassettes.
The sterilization chamber of Cliniclave 45 accommodates up to three mounts of this type and the chamber
Cliniclave 45 M up to six mounts.
Mount for 8 dental trays*
The mount can accommodate eight dental trays. The sterilization chamber of Cliniclave 45 accommodates
up to three mounts of this type and the chamber of Cliniclave 45 M up to six mounts.
Mount for 5 dental containers*
The mount can accommodate five dental containers, five standard tray cassettes or five instrument trays.
Up to three mounts of this type can be used per sterilization unit.
* We do not recommend using this mount in the rear half of the Cliniclave 45 M with the loading system
"Standard". In such a case, please use the loading system "Comfort".

Chapter 2 – First steps
14
Chapter 2 – First steps
Preconditions for commissioning
All preconditions for commissioning are listed in the Technical manual under "Setup and Installation".
Record of installation and set-up
The record of installation and set-up is to be completed by the responsible person and a copy be sent to
both MELAG and the stockist as proof of correct set-up, installation and commissioning. This is a
constituent part of any guarantee claim.
Providing feed water
Always use high-quality feed water
Steam sterilization requires distilled or demineralized/de-ionized water. DIN EN 285:2009 recommends
observance of the guide values in accordance with Appendix B, table B.1 when using feed water (see
Technical Manual).
The special construction of the steam generator and the procedure employed to generate the steam
(integrated gas venting) makes higher conductivity values permissible. As a result, the value of 5 µS/cm
recommenced in accordance with DIN EN 285:2009 in table 1 can be exceeded.
At 15 µS/cm, the water treatment unit mixed-bed resin cartridge should be replaced.
Once conductivity has reached 20 µS/cm the display issues a warning message. At this point at the latest,
the mixed-bed resin cartridge should be replaced/the unit should be checked.
Feed water generated in the osmosis procedure using the MELAdem 56/56 M complies
with the requirements placed on feed water.
Feed water supply of the steam sterilizer
Feed water supply is best performed via the water treatment units MELAdem 56 or MELAdem 56 M.
These water treatment units produce optimal feed water for the steam sterilizer.
The vacuum pump and the water treatment units are supplied via the type AB free discharge installed in
the autoclave.
This prevents the water from flowing back into the drinking water supply and corresponds to the full
requirements of DIN EN 1717 (fluid category 5).
Should you wish to use a water treatment unit from another manufacturer, please first
consult with MELAG and observe the installation hints.
Tap water supply
The autoclave vacuum pump and the water treatment unit require tap water for operation.
The vacuum pump and the water treatment unit are supplied via the type AB free discharge installed in the
autoclave. This prevention of water flowing back into the drinking water supply complies with the full
requirements of DIN EN 1717 (fluid category 5).
The used water is disposed via an on-site effluent system.
The intelligent water management system inbuilt in the autoclave control reduces water consumption to a
minimum.

Chapter 2 – First steps
15
Switch on the autoclave
The autoclave is switched-on via the power switch on the right-hand side of the autoclave.
Opening and closing the door
PLEASE NOTE
Entry on the display is only possible when the door is closed.
The autoclave is fitted with a motor-driven automatic door locking mechanism with a thread spindle.
Press the door symbol in the action bar to open the door.
The door is to be left open only whilst loading and unloading the autoclave. Keeping the
door closed saves energy.
If the door is open, the following message will be displayed:

Chapter 2 – First steps
16
To close the door, press it firmly inwards until the automatic door lock engages.
After the door has been closed, the display returns to the program menu.
The door is locked pressure-tight upon program start.
Please observe the following when closing the autoclave door:
Do not exert too little pressure when pushing the door closed.
Hold the door closed for at least three seconds.
Never slam the door.
If your autoclave has a floor unit, ensue that the breaks on the casters are engaged.
DANGER OF CRUSHING
Grasping the door between the inside of the door panel and the door beam brings the risk
of crushed hands should the door swing round.
Always hold the door on the lateral grips intended for this purpose.

Chapter 3 – Loading the steam sterilizer
17
Chapter 3 – Loading the steam sterilizer
Preparing the sterilization material
The most important precondition for the safe disinfection and sterilization of sterilization material is the
correct cleaning and care of the sterilization material in accordance with the manufacturer’s specifications.
The choice of materials, cleaning fluid and treatment procedures used are also of great significance.
PLEASE NOTE
Wherever possible, please ensure the separate sterilization of textiles and instruments in
separate sterilization containers or sterilization packaging. This leads to better drying results.
Treating textiles
Please observe the following points when treating textiles and putting the textiles in sterilization containers:
Observe both the textile manufacturer’s instructions regarding treatment and sterilization as well as
the relevant standards and directives.
Arrange the folds in the textiles parallel to each other.
Stack textiles vertically wherever possible and not too closely together in the sterilization chamber.
This enables the development of flow channels.
Retain the vertical stacking system when packing textiles in the sterilization container.
If textile packages do not remain together, wrap the textiles in sterilization paper.
Only ever sterilize dry textiles.
The textiles must not be permitted to come into direct contact with the sterilization chamber; otherwise
they will become saturated with condensate.
DANGER OF INFECTION!
Steam penetration of the textile package can be restricted and/or will produce poor drying results.
The textiles could not be sterilized.
This could endanger the health of patient and practice team.
Comply with the treatment instructions contained in these instructions.
Treating instruments
Please ensure the following when treating used and brand-new instruments:
Follow both the instrument manufacturer’s instructions regarding treatment and sterilization and
comply with the relevant standards and directives.
Clean the instruments thoroughly e.g. using a Washer-disinfector.
Rinse the instruments after washing and disinfecting, where possible with de-mineralized or distilled
water and then dry the instruments thoroughly with a clean, non-fuzzing cloth.
Use only those care products suitable for steam sterilization. Consult the manufacturer of the care
agents.

Chapter 3 – Loading the steam sterilizer
18
DANGER!
The incorrect treatment of instruments could result in any dirt residue being loosened by the
steam pressure during sterilization. The presence of residual disinfection and cleaning fluids
results in corrosion.
The use of unsuitable care agents e.g. water repellent agents or oils impermeable to steam
could result in unsterile instruments. This represents a danger to the health of both
patients and yourself.
This could result in increased maintenance requirements and a restriction of the autoclave
function.
Comply with the treatment instructions contained in these instructions.
When using ultra-sound devices, care equipment for hand pieces and washing and disinfection devices,
please observe the manufacturer’s treatment instructions.
Loading the autoclave
Only when correctly loaded is effective sterilization and good drying possible.
Ensure the following during loading:
Insert trays or cassettes in the chamber only with their appropriate mount.
Use perforated trays such as those from MELAG. Only in this way can the condensate drain off. The
use of a non-perforated base or half-shell to accept the sterilization material can result in poor drying
results.
Under certain circumstances, the use of paper tray inserts can result in poor drying results.
Packaging
Only ever use packaging materials and systems (sterilization barrier systems) corresponding to the
standard DIN EN IS0 11607-1.
The correct use of suitable packaging is important in achieving successful sterilization results.
You can use re-usable rigid packaging systems such as e.g. standard tray cassettes or soft packaging
such as transparent sterilization packaging, paper bags, sterilization paper, textiles or fleece.
Closed sterilization containers
Please observe the following when using closed sterilization containers for sterilization material:
Use aluminium sterilization containers. Aluminium retains and conducts heat and thus improves
drying.
To guarantee steam penetration and vacuum drying, closed sterilization containers must be fitted with
filters or valves on at least one side (preferably above).
With heavy loads (e.g. orthopaedic instruments) on which a great deal of condensate can
develop, we recommend the use of containers with condensate drains (e.g. from
Wagner).
Wherever possible, please ensure that sterilization containers are stacked on top of those of identical
size, so that the condensate can run down their sides.
MELAG sterilization containers fulfil the requirements for successful sterilization and
drying. They have a perforated lid and are fitted with single-use paper filters.
Ensure that the perforations are not covered when stacking the containers.

Chapter 3 – Loading the steam sterilizer
19
WARNING
The use of unsuitable sterilization containers results in insufficient steam penetration and even
failure of the sterilization. This can also prevent condensate drain-off.
This produces poor drying results. This can result in unsterile instruments and thus
endanger the health of patient and practice team.
WARNING
Incorrect stacking of the sterilization containers can result in the dripping condensate being
unable to drain off to the chamber floor. This would then saturate the sterilization material directly
underneath it.
This produces poor drying results. This can result in unsterile instruments and thus
endanger the health of patient and practice team.
Do not cover the perforations when stacking the sterilization containers.
Soft sterilization packaging
Soft sterilization packaging can be used in both sterilization containers and on trays. Please observe the
following when using soft sterilization packaging e.g. MELAfol®::
Arrange soft sterilization packaging in a perpendicular position and at narrow intervals.
Do not place multiple soft sterilization packages flat on top of each other on a tray or in a container.
If the seal seam tears during sterilization, this could be caused by the choice of undersized packaging.
Should this not be the case, re-pack the instruments and sterilize them again.
Should the seam seal rip during sterilization, extend the sealing pulse on the sealing device or make a
double seam.
Multiple wrapping
The steam sterilizer works with a fractionated vacuum procedure. This permits the use of multiple
packaging.
Mixed loads
Please observe the following when using mixed loads:
Always place textiles at the top.
Place the sterilization containers at the bottom.
Place transparent sterilization packaging and paper bags at the top - except in combination with
textiles. In this case, place them at the bottom.
As far as possible, arrange transparent sterilization packaging on their edge. If this is not possible,
place them with the paper side facing downwards.

Chapter 3 – Loading the steam sterilizer
20
Loading volumes
Table 1: Maximum permissible load quantity.
Loading variation
Load
Instruments
Textiles
max. weight per piece
2 kg
2 kg
Cliniclave 45
max. total weight1
Unwrapped, wrapped
3
load
40 kg
7 kg
max. total weight
Unwrapped load
35 kg
--
Cliniclave 45 M
max. total weight1
Unwrapped, wrapped
3
load
80 kg
14 kg
max. total weight
Unwrapped load
70 kg
--
Loading variations per sterilization unit2
Mount for 2 instrument baskets or 4
large instrument trays
max. 4 large instrument trays, depth 59 cm
max. 2x ½ StU sterilization containers
max. 2x ½-StU instrument baskets
Mount for 6 standard tray
cassettes4
max.18 standard tray cassettes (6 per mount)
Mount for 8 small instrument trays4
max. 24 dental trays, depth 29 cm
(8 per mount)
Mount for dental containers4
max. 15 dental containers (5 per mount)
Without mount
max. sterilization containers (1 StU)
1 The total weight is the sum of the mass of the sterilized equipment, the packaging materials, the containers and
the mount
2 Mounts, trays, standard tray cassettes etc. from MELAG see appendix A
3 The autoclave can sterilize up to 40 kg/80 kg total load weight. The drying was checked for the 35 kg/70 kg load
with dental containers The drying of other large weights of other loads (20-40 kg/40-80 kg wrapped) or other
load configurations must be checked individually and locally; otherwise use additional drying.
4 We do not recommend using this mount in the rear half of the Cliniclave 45 M with the loading system
"standard". In such a case, please use the loading system "comfort".
Other manuals for Cliniclave 45
2
This manual suits for next models
1
Table of contents
Other MELAG Steriliser manuals