Melco N1A/2 User manual

Inhalt Vorder- und Rückseite ......................................................................11
Einschalten........................................................................................14
Verfügbare Geräte und Anschlüsse..................................................15
Importieren von Dateien....................................................................16
Bestätigen der importierten Dateien .................................................17
Vorbereiten des Players ....................................................................18
Wiedergeben von Dateien.................................................................19
Diagrams...........................................................................................1
Power On...........................................................................................4
Available Devices and Ports .............................................................5
Importing Files...................................................................................6
Confirming Imported Files.................................................................7
Preparing Player................................................................................8
Playing Files ......................................................................................9
Contents
Schémas ...........................................................................................21
Allumage ...........................................................................................24
Ports et périphériques disponibles ...................................................25
Importation des fichiers.....................................................................26
Confirmation des fichiers importés...................................................27
Préparation du lecteur.......................................................................28
Lecture de fichiers.............................................................................29
Table des matières

1 2 3 4 5 6 7 8 9 10 11 12 13 14 15
1 2 10 3 4 5 6 7 1089 11 12 13 14 15
Diagrams
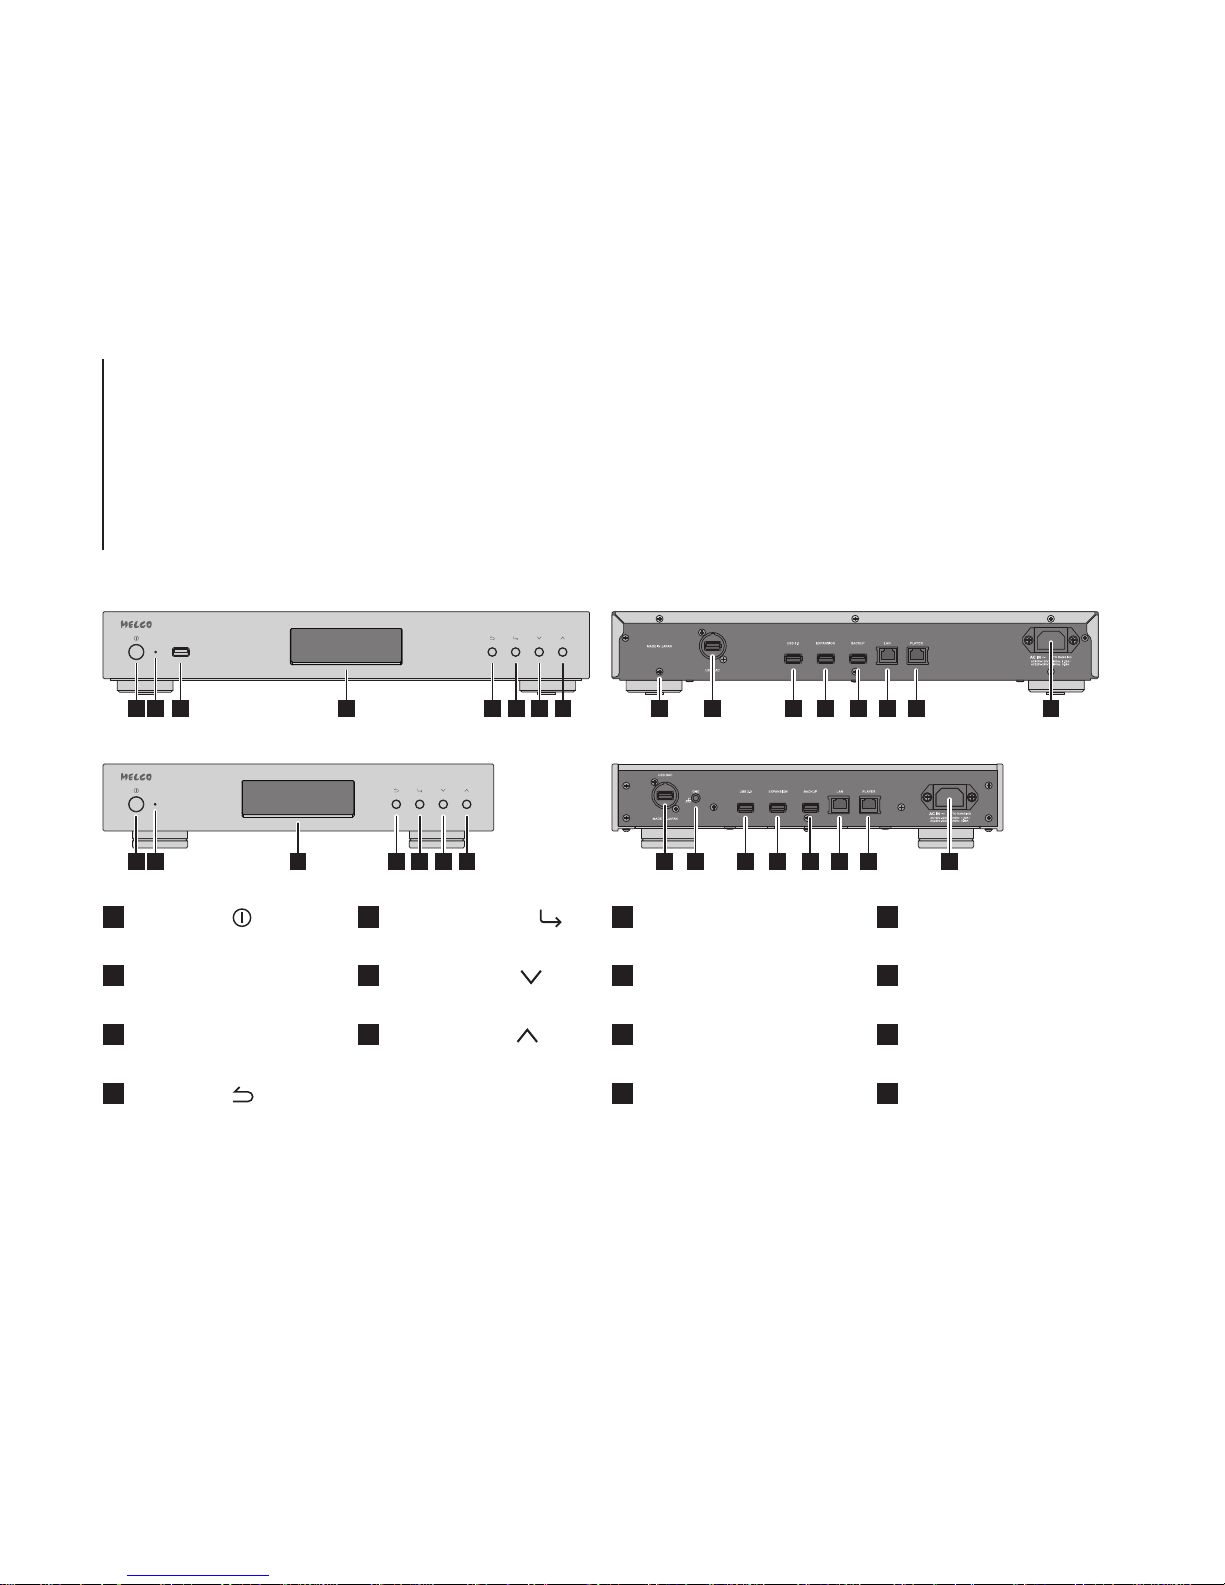
Buttons and Ports
N1A/2
N1Z/2
1Power Button ( )
2Power LED
Display
3
4Back Button ( )
5Menu/Enter Button ( )
9Ground Port
10 USB 3.0 Port
8USB Port for USB-DAC
14 Ethernet Port for Player
15 Power Connector
11 USB Port for Expansion USB
Drive
12 USB Port for Backup USB
Drive
13 Ethernet Port for Router or Hub
7Up Button ( )
6Down Button ( )
1

192.168.10.73 1%
N1-00BA
1 2 3 4 5 6 7 8 9
10
11
12
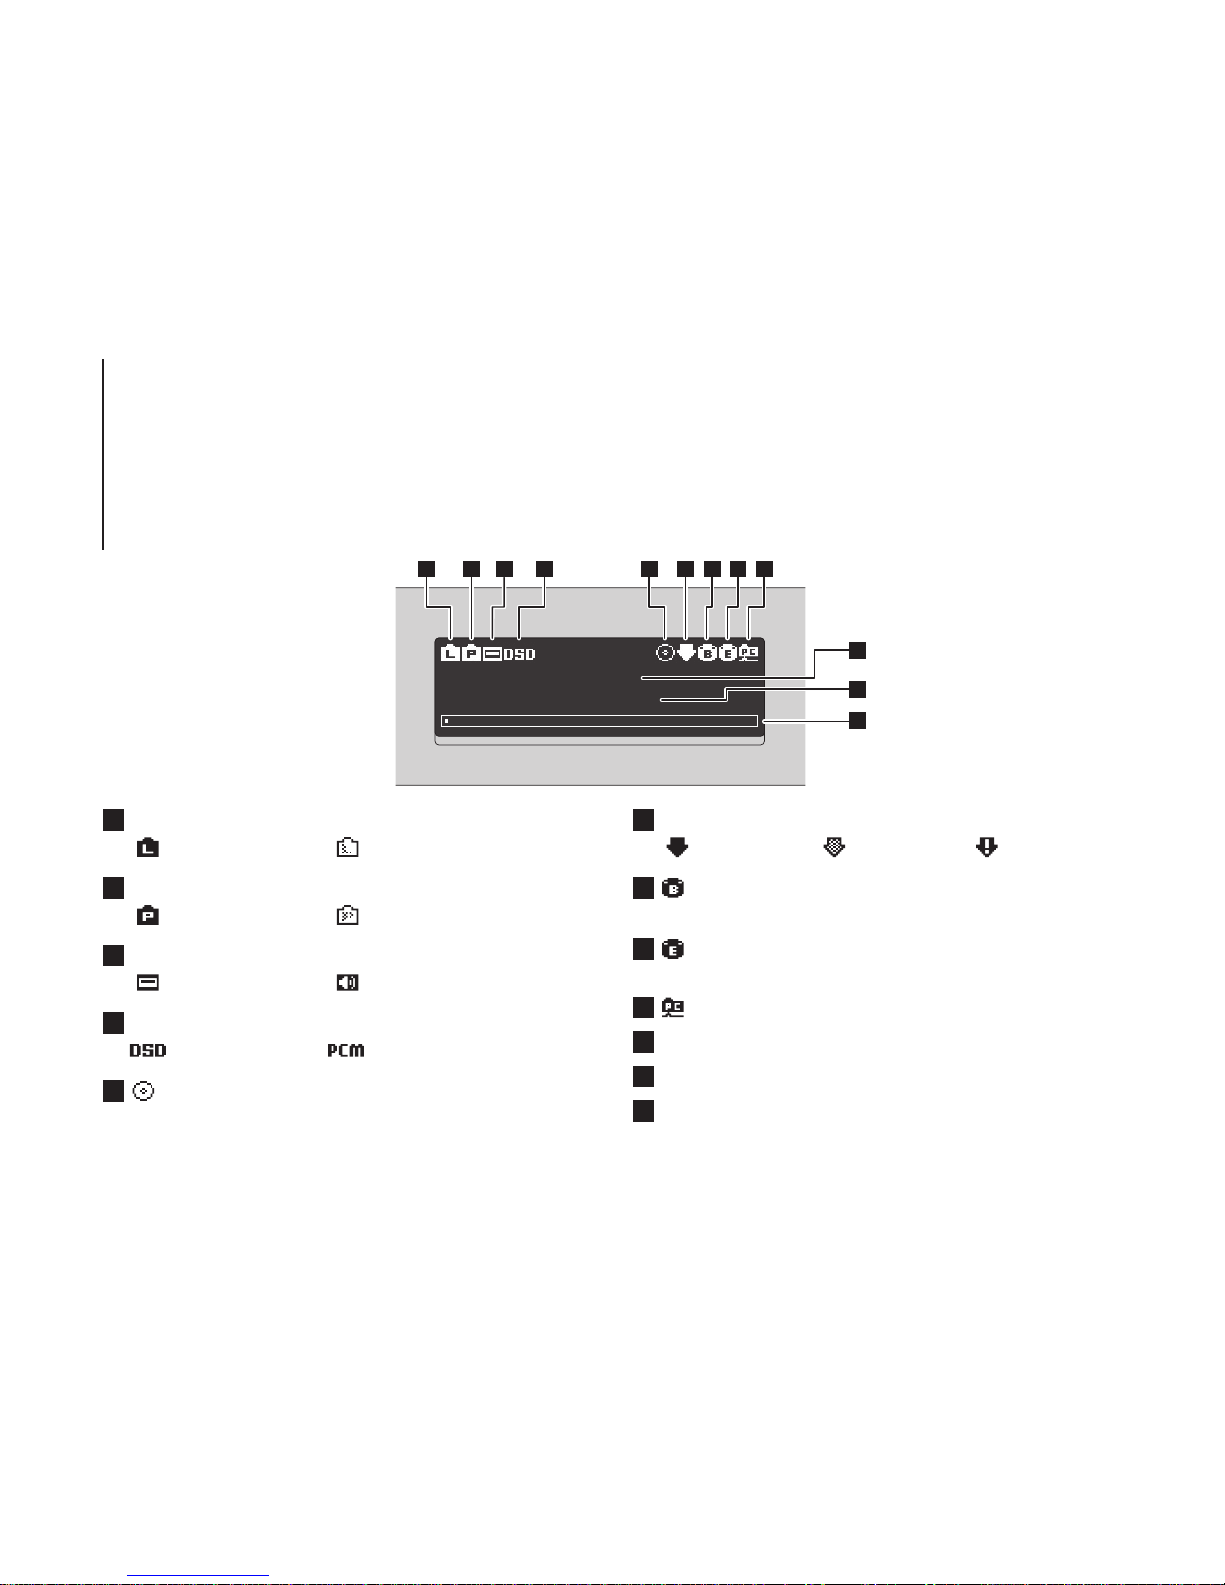
5Status of Connected Optical Drive
(extinguished when disconnecting)
1Status of Connected Router or Hub
Connected Not connected
Connected Not connected
2Status of Connected Player
Status of Connected USB-DAC
3
DSD is configured PCM is configured
4DSD Output Format
6Status of Downloader
Status of Connected Backup USB Drive (lit when detected)
7
8Status of Connected Expansion USB Drive
(lit when detected, flashes when recognizing)
9Status of File Sharing
10 Friendly Name (Hostname)
IP Address
11
12 Usage Capacity of Internal Drive
Diagrams
Display - Home Screen
Connected Playing
Working Disabled Error
2
Status
Display
Backup
Settings
Import from rear USB drive?
OK
Import from rear USB drive?
Cancel
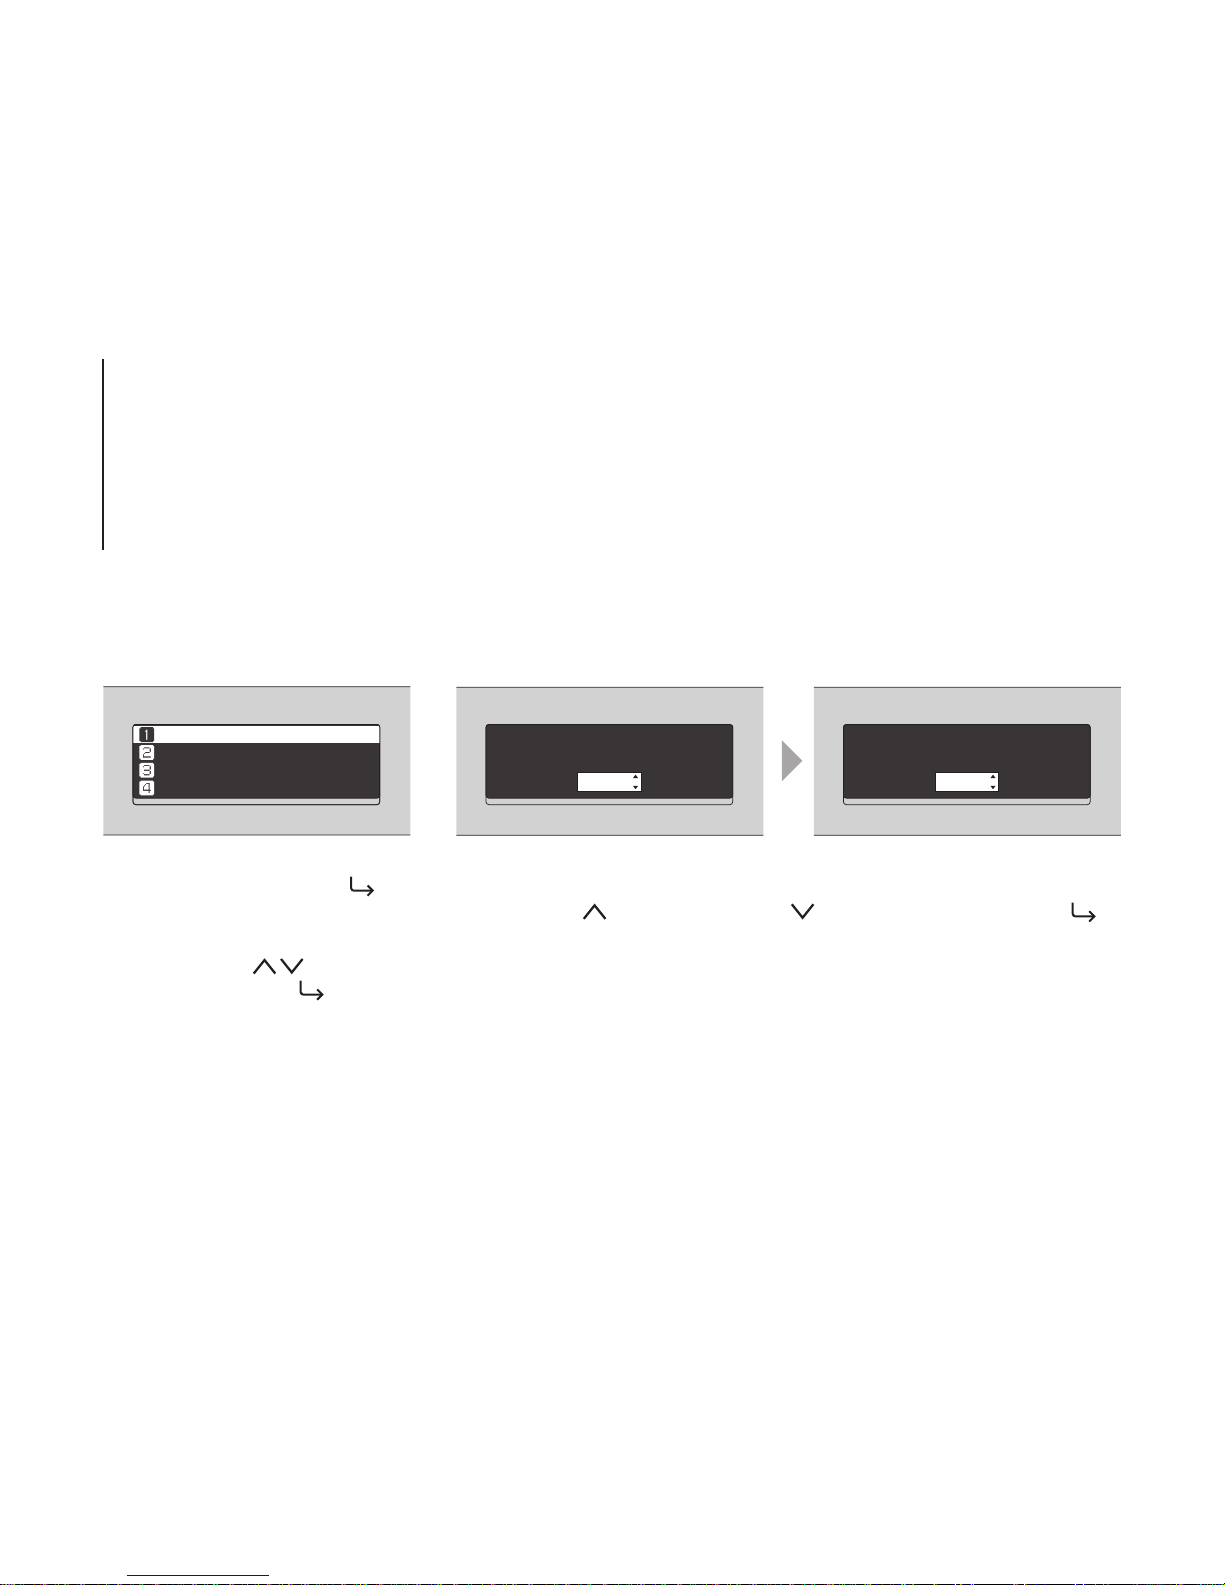
Press the Menu/Enter button ( )
while the home screen is displayed.
Move the cursor by pressing the
Up/Down button ( ) and press
the Menu/Enter button ( ) to make
a selection.
When confirming the operation, the dialog screen will be displayed. Press either
the Up button ( ) or the Down button ( ), then the Menu/Enter button ( )
to make a selection.
Diagrams
Display - Menus and Dialogs
Menu Dialog
3

192.168.10.73 1%
N1-00BA
N1 X.XX
Power On
1 2
3
4
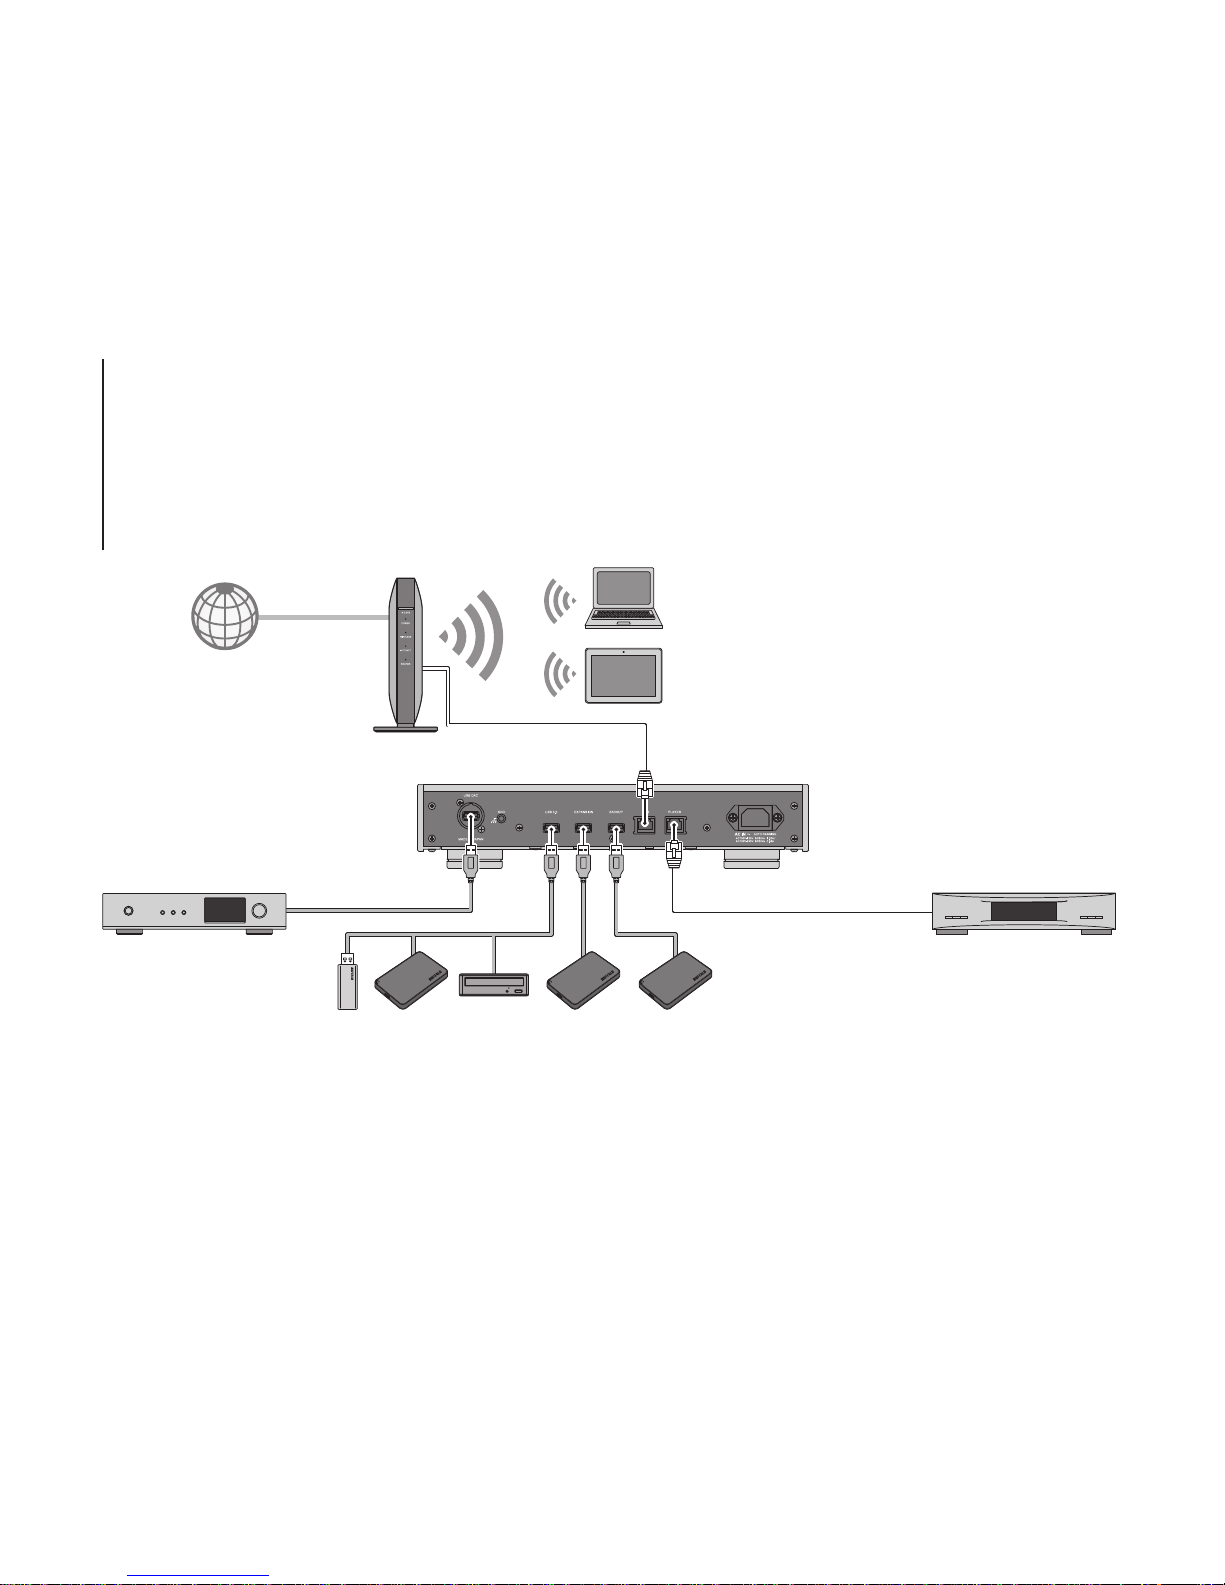
Wireless Router
USB-DAC
Internet
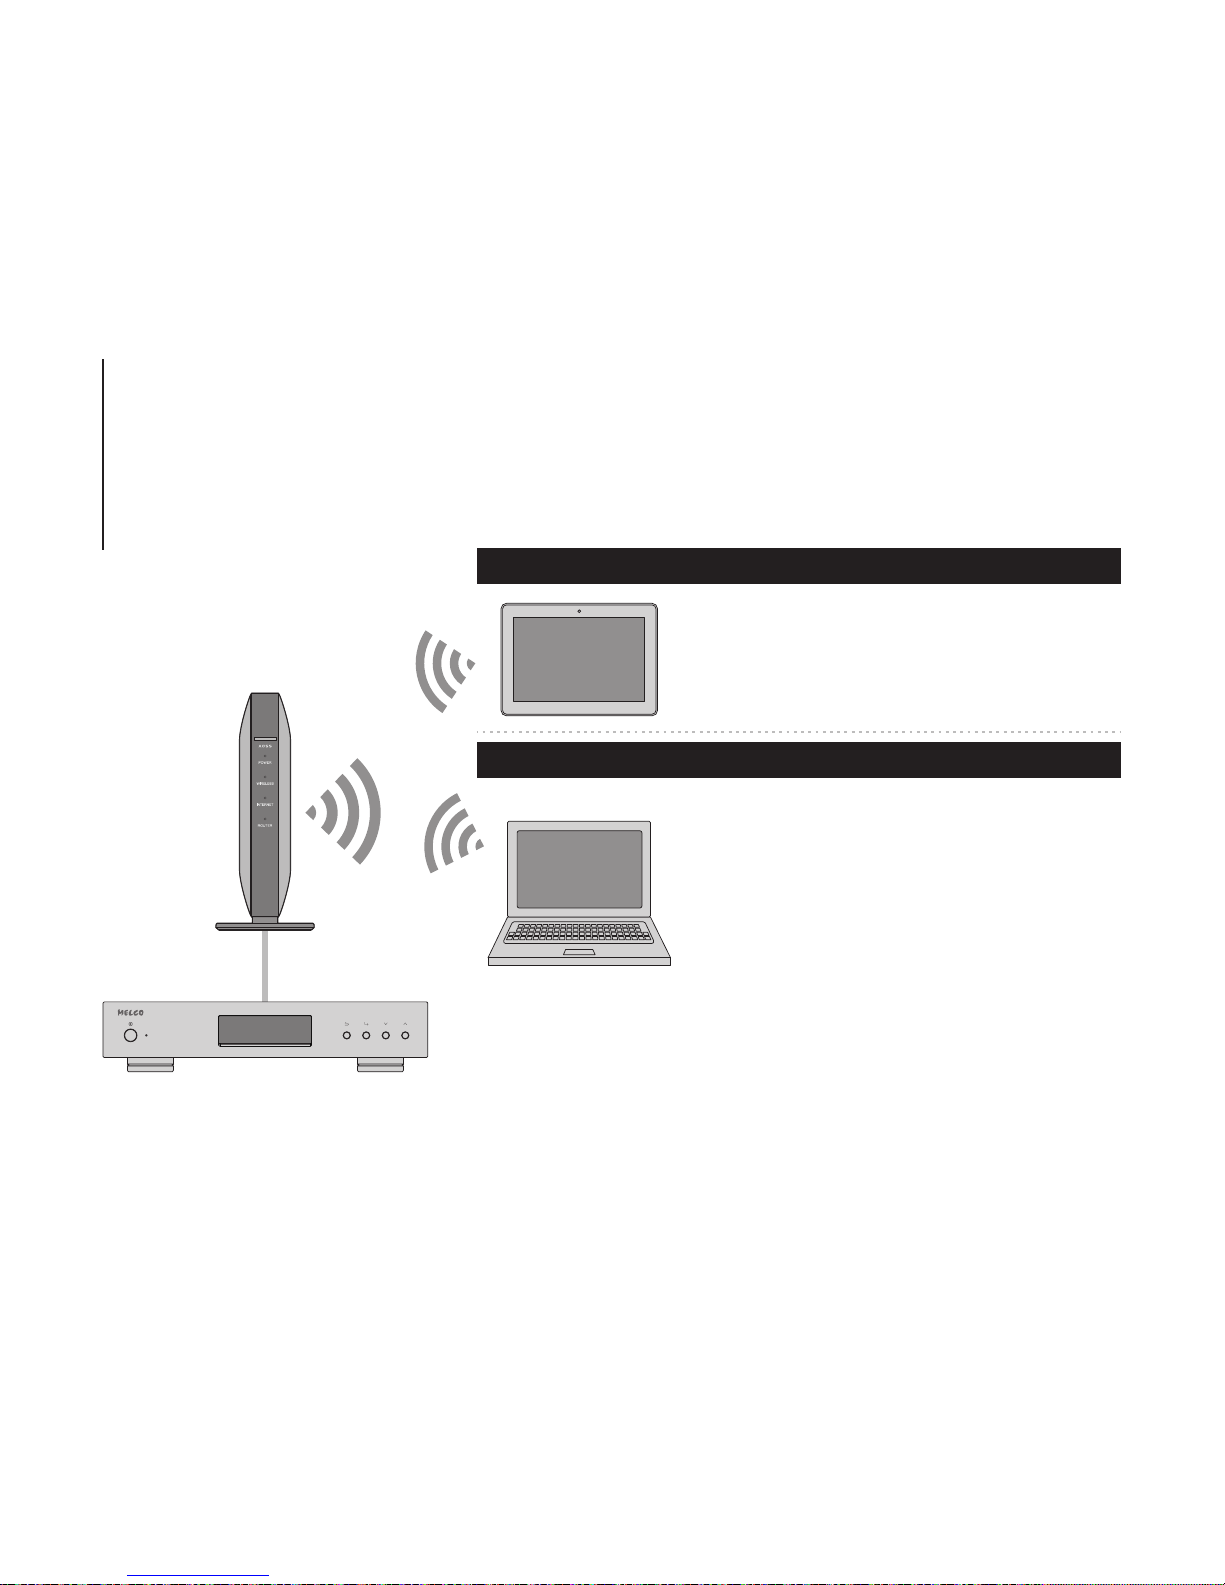
Computers
Available Devices and Ports
Required for downloading music files
from a streaming site, importing files
from the CD, and checking for new
firmware release.
Available as a player.
Available for saving or playing music files.
Tablets and Smartphones
Available for playing music files.
Network Audio Player
Available as a player.
USB Memory Device Available for serving as the import source device, expanding the capacity, or updating the firmware.
USB Drive Available for serving as the import source device, expanding the capacity, or serving as a backup destination.
Optical Drive (CD, DVD, or Blu-ray drive) Available for serving as the import source device and playing a CD via a
USB-DAC.
5

Import from rear USB drive?
OK
Import from CD?
Guitar Song
OK
Finished.
OK
Finished.
OK
Importing Files
For USB Drive
For CD 1Select "OK". 2Press the Menu/Enter button.
2Press the Menu/Enter button.
1Select "OK".
6

Confirming Imported Files
1Enter "\\" and the N1's IP address or friendly
name (hostname) into the address bar of
Windows Explorer, then press the Enter key. For
macOS, click Connect to Server and enter "cifs://"
and the N1's IP address or friendly name
(hostname).
2The "share" folder will be displayed. Double-click
the "share" folder and if the imported files are
displayed, import was finished properly.
You can also import files from the computer to the
displayed window mentioned in the step above.
Install a UPnP/DLNA-compatible app to check
imported files. On a computer, you can also check
the imported files by installing an app and following
the procedure below.
For Tablets and Smartphones
For Computers
7

The N1 has a port that can connect a player device directly. Using this port is recommended for high quality audio playback.
To play music files using a Network Audio Player, refer to the manual of the player before playing. The N1 will be used as a
NAS (network-attached storage) device.
Preparing Player
USB-DAC
After turn it on, you may be able to play music files by changing the
input to USB. You can use other ports than the USB-DAC port, but
only one device will be detected if 2 or more USB-DAC devices are
connected.
After turn it on, you may be able to play music files by changing the
input to music server or network. You can also use another player on
the network rather than the player connected to the player port.
Network Audio Player
8

N1 and USB-DAC
Music Name
Network Audio Player
or
N1
A UPnP/DLNA-compatible controller app is required to play music files. Apps are available for both mobile and PC devices,
depending on the device used. If playing music files on the Network Audio Player, it is best to use an app recommended by
the player manufacturer.
If playing music files on the USB-DAC, it is best to use an app recommended by us. Recommended apps are listed on our
website, although you may use other UPnP/DLNA-compatible apps than our recommended apps.
Playing Files
Select the Player
1Select the Libraries or Files
2Play
3
9

For the detailed information about the N1 or procedures, refer to the
operation manuals. Hardware and software manuals are available at
our website. Connect from the URL or QR code at right.
http://www.melco-audio.com/download/
Operation Manuals Available Online
If you need help or repair services, please send us an email by referring to our website below or call the vendor from whom
you purchased the product.
Additional Support and Service
10
1 2 3 4 5 6 7 8 9 10 11 12 13 14 15
1 2 10 3 4 5 6 7 1089 11 12 13 14 15
Vorder- und Rückseite
Tasten und Anschlüsse
N1A/2
N1Z/2
1Netzschalter ( )
2Strom-LED
Display
3
4Zurück-Taste ( )
5Menü-/Eingabetaste ( )
9Masse-Anschluss
10 USB-3.0-Anschluss
8USB-Anschluss für USB-DAC
14 Ethernet-Anschluss für Player
15 Stromanschluss
11 USB-Anschluss für
USB-Erweiterungslaufwerk
12 USB-Anschluss für
USB-Backup-Laufwerk
13 Ethernet-Anschluss für Router
oder Hub
7Nach oben-Taste ( )
6Nach unten-Taste ( )
11
192.168.10.73 1%
N1-00BA
1 2 3 4 5 6 7 8 9
10
11
12
5Status für angeschlossenes optisches Laufwerk
(LED erlischt beim Trennen des Geräts)
1Status für angeschlossenen Router oder Hub
Verbunden Nicht verbunden
Verbunden Nicht verbunden
2Status für angeschlossenen Player
Status für angeschlossenes USB-DAC
3
DSD ist konfiguriert PCM ist konfiguriert
4DSD-Ausgabeformat
6Status für Downloader
Status für angeschlossenes USB-Backup-Laufwerk
(LED leuchtet, wenn erkannt)
7
8Status für angeschlossenes USB-Erweiterungslaufwerk
(LED leuchtet, wenn erkannt; blinkt bei Erkennungsvorgang)
9Status für Dateifreigabe
10 Anzeigename (Hostname)
IP-Adresse
11
12 Nutzbare Kapazität des internen Laufwerks
Vorder- und Rückseite
Display – Startbildschirm
Verbunden Wiedergabe
In Betrieb Deaktiviert Fehler
12

Status
Anzeige einrichten
Backup
Einstellungen
Import von USB-Festplatte
hinten?
OK
Import von USB-Festplatte
hinten?
Abbrechen
Drücken Sie die Menü-/Eingabetaste
( ), wenn der Startbildschirm
angezeigt wird. Bewegen Sie den
Cursor, indem Sie die Nach
oben-/Nach unten-Taste ( )
betätigen, und drücken Sie die
Menü-/Eingabetaste ( ), um die
gewünschte Auswahl zu treffen.
Wenn Sie den Vorgang bestätigen, wird der Dialogbildschirm angezeigt. Drücken
Sie entweder die Nach oben-Taste ( ) oder die Nach unten-Taste ( ) und
drücken Sie dann die Menü-/Eingabetaste ( ), um eine Auswahl zu treffen.
Vorder- und Rückseite
Display – Menüs und Dialoge
Menü Dialog
13

192.168.10.73 1%
N1-00BA
N1 X.XX
Einschalten
1 2
3
14

Drahtlosrouter
USB-DAC
Internet
Computer
Verfügbare Geräte und Anschlüsse
Erforderlich, um Musikdateien von einer
Streaming-Seite herunterzuladen,
Dateien von einer CD zu importieren und
eine Überprüfung zur Verfügbarkeit einer
neuen Firmware-Version auszuführen.
Als Player verfügbar.
Verfügbar zum Speichern oder Abspielen von Musikdateien.
Tablets und Smartphones
Verfügbar zum Abspielen von Musikdateien.
Netzwerk Musik Player
Als Player verfügbar.
USB-Speichergerät Verfügbar in der Funktion als Gerät für den Quellenimport, zur Erweiterung der Kapazität oder zur
Aktualisierung der Firmware.
USB-Laufwerk Verfügbar in der Funktion als Gerät für den Quellenimport, zur Erweiterung der Kapazität oder als Backup-Ziel.
Optisches Laufwerk (CD-, DVD- oder Blu-Ray-Laufwerk)
Verfügbar in der Funktion als Gerät für den Quellenimport
und zur Wiedergabe einer CD über USB-DAC.
15

Import von USB-Festplatte
hinten?
OK
Importieren von CD?
Guitar Song
OK
Fertig
OK
Fertig
OK
Importieren von Dateien
USB-Laufwerk
CD-Laufwerk 1Wählen Sie "OK". 2Drücken Sie die Menü-/Eingabetaste.
2Drücken Sie die Menü-/Eingabetaste.
1Wählen Sie "OK".
16
Bestätigen der importierten Dateien
1
Geben Sie "\\" und die IP-Adresse oder den
Anzeigenamen (Hostnamen) von N1 in die Adressleiste
von Windows-Explorer ein und drücken Sie die
Eingabetaste. Für macOS: Klicken Sie auf Mit Server
verbinden und geben Sie "cifs://" und die IP-Adresse
oder den Anzeigenamen (Hostnamen) von N1 ein.
2Der "share"-Ordner wird angezeigt.
Doppelklicken Sie auf den "share"-Ordner und
wenn die importierten Dateien angezeigt werden,
wurde der Import erfolgreich abgeschlossen.
Sie können Dateien auch vom Computer in das Fenster
importieren, das im vorherigen Schritt erwähnt wurde.
Installieren Sie eine UPnP/DLNA-kompatible App,
um die importierten Dateien zu prüfen. Auf einem
Computer können Sie die importierten Dateien auch
prüfen, indem Sie eine App installieren und die
nachfolgenden Schritte ausführen.
Tablets und Smartphones:
Computer:
17

Der N1 verfügt über einen Anschluss, an dem ein Player direkt angeschlossen werden kann. Die Nutzung dieses
Anschlusses wird für die Wiedergabe von qualitativ hochwertigem Sound empfohlen. Wenn Sie Musikdateien mit einem
Netzwerk Musik Player abspielen möchten, finden Sie weitere Hinweise im Handbuch zum Player, bevor Sie die Wiedergabe
starten. Der N1 wird als NAS (Network Attached Storage) genutzt.
Vorbereiten des Players
USB-DAC
Nachdem Sie das Gerät einschalten, können Sie Musikdateien
wiedergeben, indem Sie als Eingangskanal "USB" wählen. Sie
können einen anderen Anschluss als den USB-DAC-Anschluss
nutzen. Es wird jedoch nur ein Gerät erkannt, wenn 2 oder mehr
USB-DAC-Geräte verbunden sind.
Nachdem Sie das Gerät einschalten, können Sie Musikdateien
wiedergeben, indem Sie als Eingangskanal einen Musikserver oder
ein Netzwerk auswählen. Sie können statt des Players, der über den
"Player"-Port angeschlossen ist, auch einen anderen Player im
Netzwerk verwenden.
Netzwerk Musik Player
18
Other manuals for N1A/2
1
This manual suits for next models
1
Table of contents
Languages:
Other Melco Storage manuals

Popular Storage manuals by other brands


Archive
Archive Viper 2060S product manual

Roth
Roth EcoDWT plus 3 installation instructions

Western Digital
Western Digital WD Blue 3D NAND SATA SSD user manual

Dell
Dell DR4000 Restore Manager Getting Started With Your System

LaCie
LaCie Hard Drive user manual

Sans Digital
Sans Digital MOBILERAID MR5S1 Quick installation guide

Digital Watchdog
Digital Watchdog Blackjet NAS DW-BJNAS4T quick start guide

Toshiba
Toshiba CanvioDTQ112 user manual

Seagate
Seagate ST9250317AS - Momentus 5400 FDE 250 GB Hard... product manual

Dell
Dell Storage NX3330 owner's manual

HEX
HEX Hixon Assembly guide

NetApp
NetApp H410S Installation and setup instructions