Members Mark G15001-BLACK Guide

PRODUCT #: G15001-BLACK PRODUCT #: G15002-RED
1 YEAR LIMITED WARRANTY
VERSION: OTC.14.2022-AZ
Master No. 211648
Gas Pizza Oven
Start Guide & Safety Instructions
READ AND SAVE MANUAL FOR FUTURE REFERENCE.
ASSEMBLE YOUR GRILL IMMEDIATELY.
Missing or damaged parts claims must be submitted within 30 days of purchase date.
Technicians are available to assist with your product needs. For assembly assistance,
technical questions, missing parts or general help, please contact us toll-free
1-833-454-0864
Mon-Fri 9 AM - 7 PM EST, CLOSED Saturday and Sunday
STOP
DO NOT RETURN PRODUCT TO THE STORE
ANS Z21.89-2017 / CSA 1.18-2017
Outdoor Cooking Specialty Gas Appliance

MODEL G15002-RED : Online purchase only

MEMBER’S MARK GAS PIZZA OVEN 3
WARNINGS & SAFETY INSTRUCTIONS
DANGER
If you smell gas
1. Shut off gas to the pizza oven.
2. Extinguish any open flame.
3. If odor continues, keep away from the pizza oven and immediately call your gas supplier or your fire department.
Failure to follow these instructions could result in fire, explosion or burn hazard, which could cause property damage,
personal injury or death.
Never operate this appliance unattended.
Never operate this appliance within 25 (7.5 m) of
any flammable liquid.
If a fire should occur, keep away from the appliance
and immediately call your fire department. Do not
attempt to extinguish an oil or a grease fire with water.
DANGER
If these instructions are ignored, there is a possibility
of a hazardous fire or explosion which could result in
physical injury, property damage or death.
It is your responsibility to assemble, operate and
maintain your pizza oven properly.
Do not store an LP cylinder under or near this pizza
oven.
IMPORTANT
CALIFORNIA PROPOSITION 65 WARNING
WARNING: This product can expose you to chemicals including lead
and lead compounds, which are known to the State of California to
cause cancer and birth defects or other reproductive harm. For more
information go to www. P65Warnings.ca.gov
• Please read the start guide & safety Instructions carefully.
• The gas pizza oven will get hot. Do not touch the outer shell
while in use.
• This gas pizza oven is for outdoor use only.
• Ensure children and pets are kept at a safe distance and supervised at
all times around the gas pizza oven.

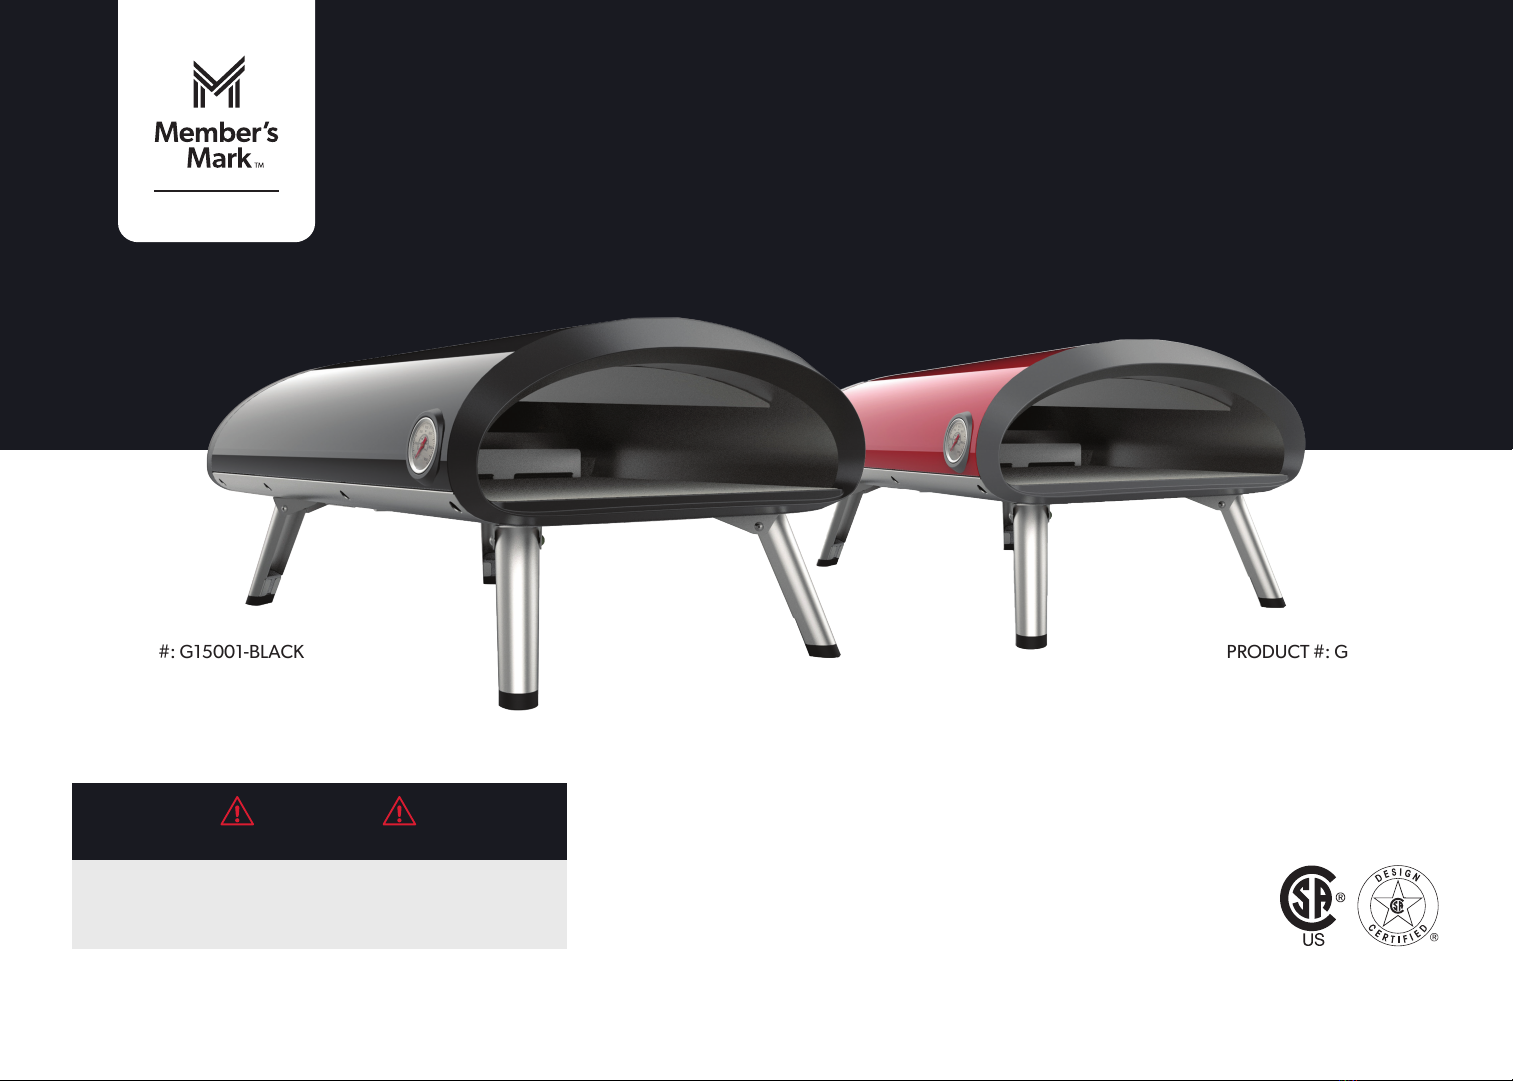
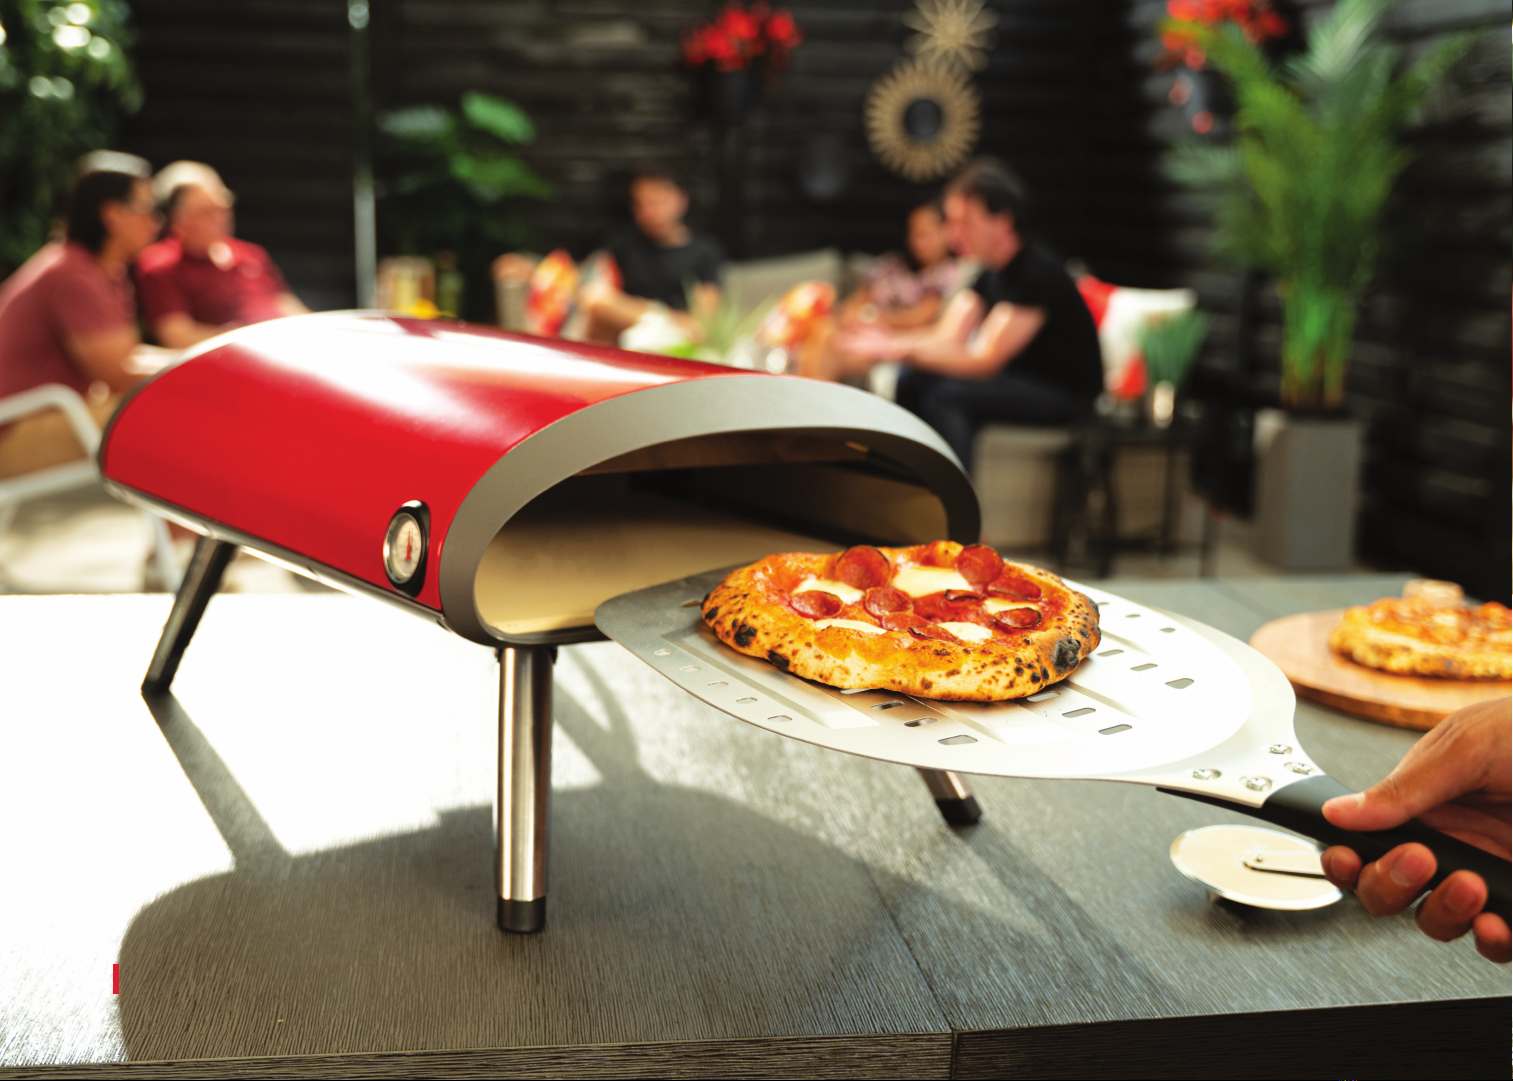
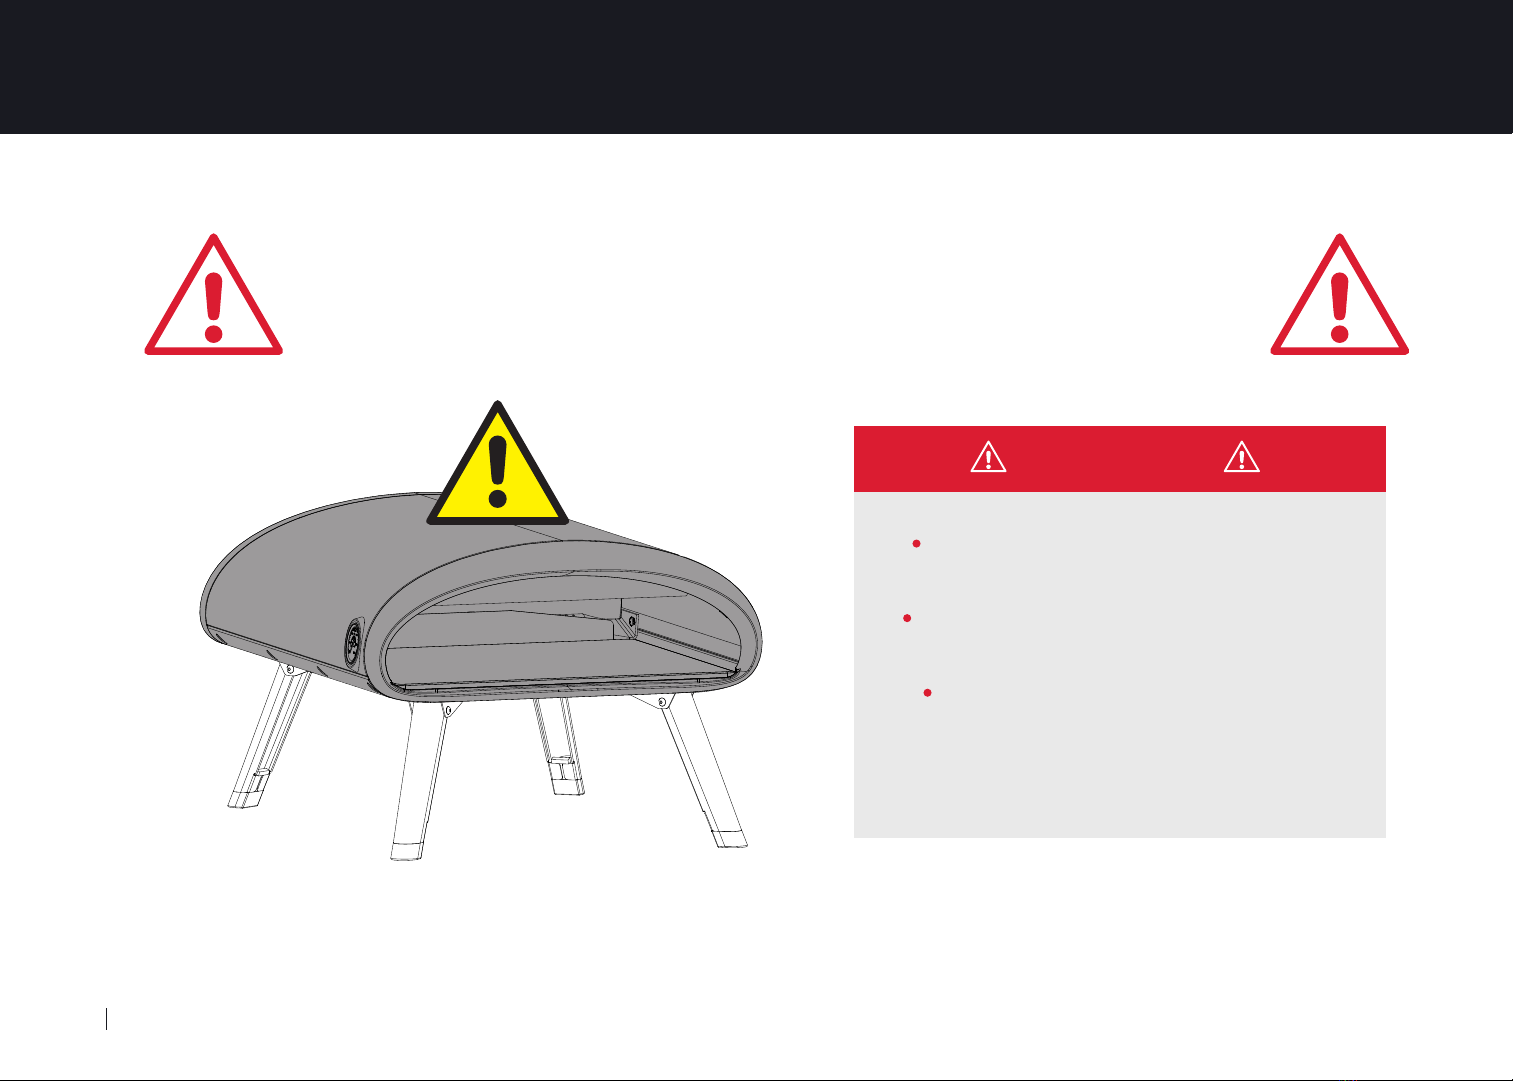
4MEMBER’S MARK GAS PIZZA OVEN
WARNINGS & SAFETY INSTRUCTIONS
This instruction manual contains important information
necessary for the proper assembly and safe use of the
pizza oven.
Read and follow all warnings and instructions before
assembling and using the pizza oven.
Follow all the warnings and instructions when using the
appliance.
Keep this manual for future reference.
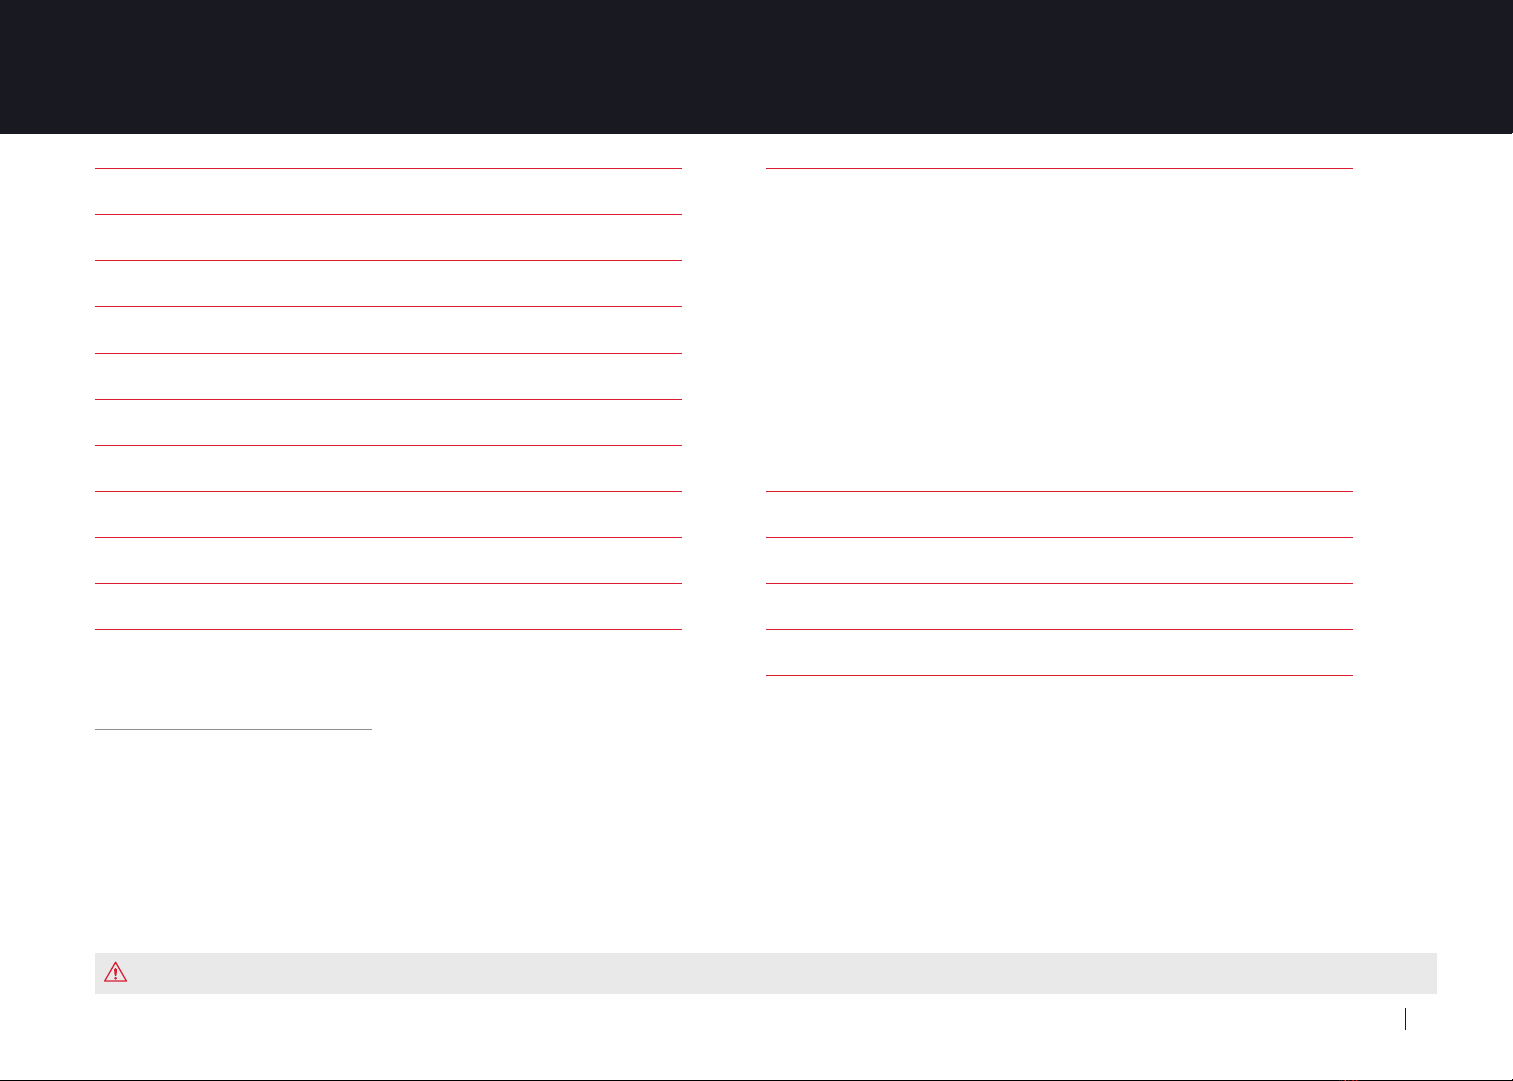
This pizza oven should NOT be used in a building, garage
or any other enclosed area.
The use of alcohol, prescription or non-prescription drugs
may impair an individual’s ability to properly assemble or
safely operate this pizza oven.
DO NOT leave the pizza oven unattended. Keep children
and pets away from the pizza oven at all times.
DO NOT use the pizza oven in high wind.
This pizza oven must be used with liquid propane gas only.
The conversion or attempted use of natural gas in a liquid
propane grill is dangerous and will void your warranty.
DO NOT attempt to attach this pizza oven to the self-
contained propane system of a camper, trailer, motor home or
house.
This appliance is not intended for and should never be used
as a heater.
DO NOT use gasoline, kerosene or alcohol for lighting. The
LP-gas cylinder must be constructed and marked in accordance
with the specications for propane gas cylinder of the U.S.
Department of Transportation (DOT).
DO NOT move pizza oven when in use.
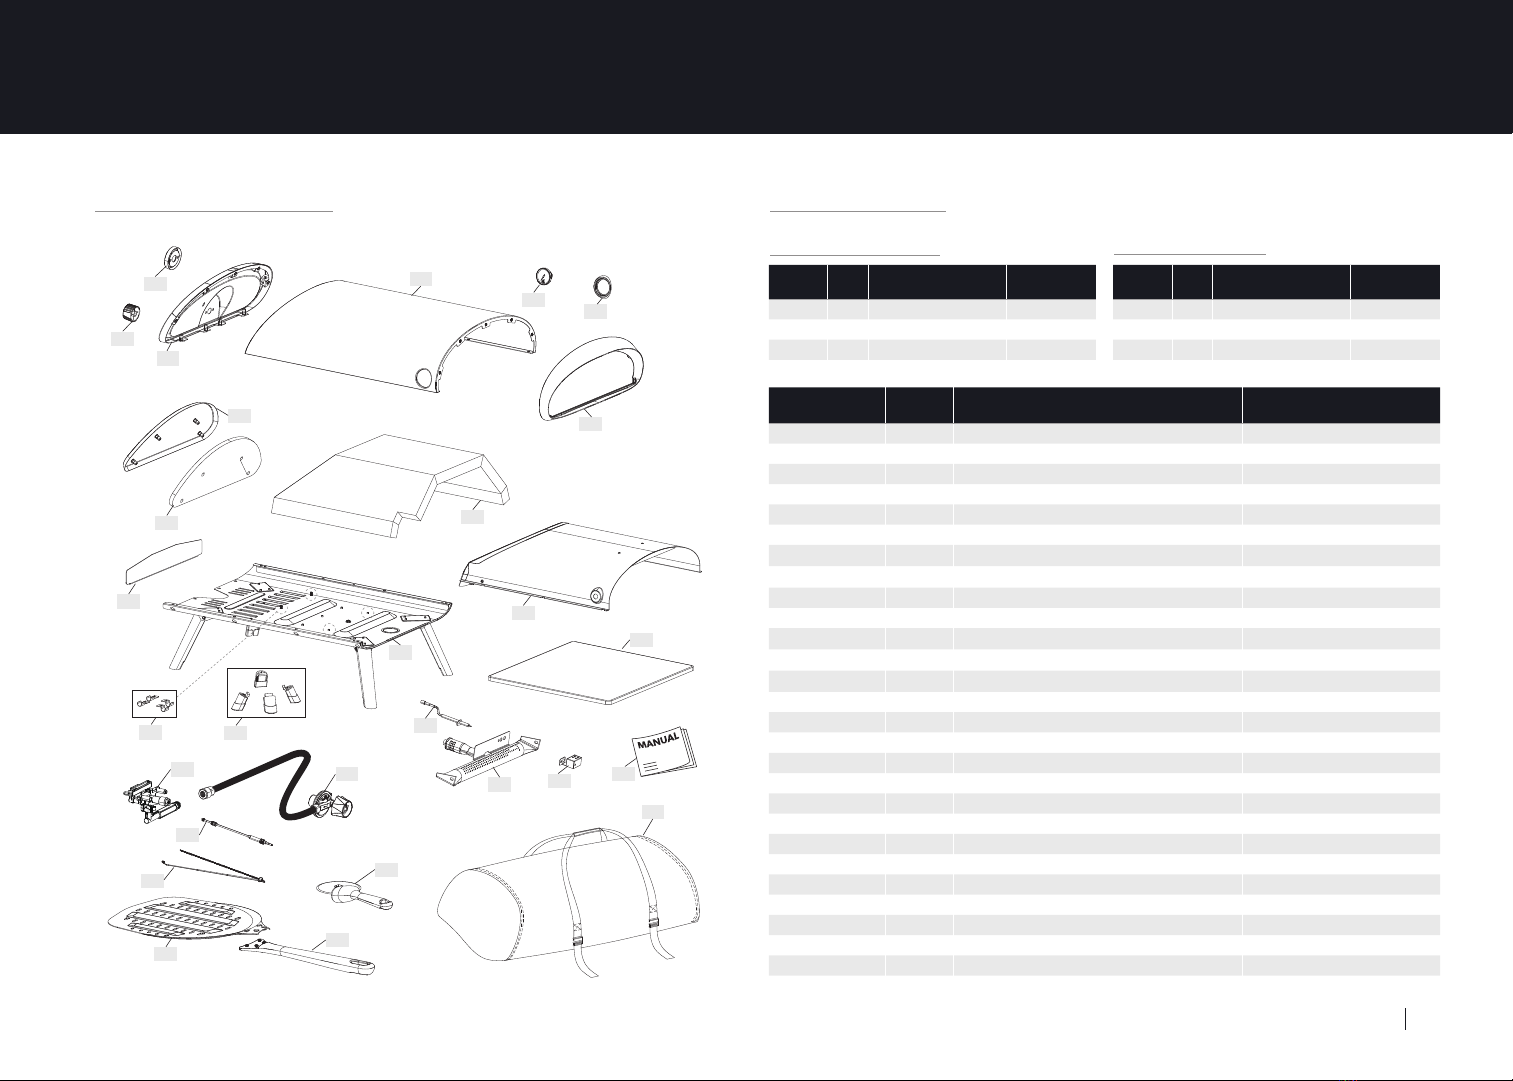
DO NOT use the pizza oven unless a leak test is performed
on all connections.
DO NOT alter the pizza oven in any manner.
DO NOT operate the pizza oven if there is gas leak present.
The use and installation of this product must conform to
local codes. In the absence of local codes, use the National
Fuel Gas Code: ANSI Z223.1/NFPA54, Storage and
Handling of Liquefied Petroleum Gases, ANSI.NFPA 58 or
Natural Gas and Propane Installation Code, CSA C149.1;
Propane Storage and Handling, CSA B149.2.
This pizza oven is not intended to be installed in or on a
boat or recreational vehicle.
Locate the pizza oven away from any combustible or non-
combustible materials or construction by at least 24 inches
(61cm) from the back and sides.
When cooking, have a type BC or ABC re extinguisher
readily available. In the event of a re do not attempt to
extinguish with water. Immediately call the re department.
This pizza oven shall not be used under overhead
unprotected combustible construction.
Keep the fuel supply hose away from any heated surfaces.
This appliance is not intended for commercial use.
THIS GAS PIZZA OVEN IS
FOR OUTDOOR USE ONLY.

MEMBER’S MARK GAS PIZZA OVEN 5
TABLE OF CONTENTS
WARNINGS & SAFETY INSTRUCTIONS 3
EXPLODED DIAGRAM & PARTS LIST 7
SETUP 8
POSITIONING THE PIZZA OVEN 9
LP GAS CYLINDER 10
QCC1 GAS REGULATOR 11
REGULATOR FLOW LIMITING RESET 13
LEAK TEST 14
LIGHTING INSTRUCTIONS 15
TIPS/USING YOUR MEMBER’S MARK®PIZZA OVEN 17
RECIPES
72 Hour pizza dough 19
Same day dough 21
Pizza sauce 23
Classic margherita with oyster mushrooms (vegan) 25
Roasted Chicken, smoked cheddar, caramelized onions 27
Ham, pineapple, mozzarella, spinach 29
CARE & MAINTENANCE 30
STORAGE 32
TROUBLESHOOTING 33
WARRANTY AND SERVICE 35
If the exposure has been severe it may cause death.
CARBON MONOXIDE
Carbon Monoxide is a highly poisonous gas which can be produced when the device isn’t recieving enough ventilation. We therefore recommend
using the pizza oven in a well ventilated area away from direct wind and to never cover the oven mouth.
It is dicult to know if your device is producing Carbon Monoxide as it is an odorless and colorless gas. It can, however cause these symptoms when
you are exposed to it:
• Tightness across the forehead
• Headache
• Weakness
• Dizziness
• Nausea
• Vomiting
• Coma, intermittent convulsions
• Depressed heart action, slowed respiration

6MEMBER’S MARK GAS PIZZA OVEN
WARNING - HOT SURFACE
WARNING : HOT SURFACE
CAUTION
EXTREMELY HOT SURFACE, DO NOT
TOUCH WHEN PIZZA OVEN IS IN USE.
SHADED AREAS BECOME EXTREMELY
HOT WHEN IN USE.
ALWAYS WEAR PROTECTIVE HEAT
RESISTANT GLOVES TO AVOID BURNS.

MEMBER’S MARK GAS PIZZA OVEN 7
EXPLODED PARTS PARTS LISTS
ITEM NO. Q T Y. DESCRIPTION PART NO.
A4 1 Temperature gauge bezel G150-0003-C1
A5 1 Temperature gauge G150-0004-C1
A6 1 Inner wall G150-0200-C1
A7 1 Insulation a G150-0012-C1
A8 1 Insulation b G150-0011-C1
A9 1 Rear baffle plate G150-0010-C1
A10 1 Pizza stone G150-0021-C1
A11 1 Heat shield G150-0016-C1
A12 1 Bottom panel assembly with legs G150-0400-C1
A13 4 Feet G150-0019-C1
A14 4 Match Holder Clip G608-0041-C1
B1 1 Main burner assembly G150-0300-C1
B2 1 Electrode set G150-0014-C1
B3 1Collector box G150-0015-C1
B4 1 Main burner valve G150-0005-C1
B5 1 Thermocouple G150-0006-C1
B6 1 Regulator G150-0007-C1
B7 1 Control knob G150-0009-C1
B8 1 Knob bezel G150-0008-C1
B9 1 Match holder G150-0022-C1
C1 1 Assembly and user manual G150-010801-C1
C2 1 Carry cover G150-0023-C1
C3 1Pizza peel_head G150-0025-C1
C4 1 Pizza peel_handle G150-0026-C1
C5 1 Rolling cutter G150-0024-C1
ITEM
NO. Q T Y. DESCRIPTION PART NO.
A1 1 Top Panel G150-0001-C1
A2 1 Aluminum Front Cap G150-0002-C1
A3 1 Rear Panel G150-0100-C1
ITEM
NO. Q T Y. DESCRIPTION-RED PART NO.
A1 1 Top Panel G150-0001-C2
A2 1 Aluminum Front Cap G150-0002-C2
A3 1 Rear Panel G150-0100-C2
EXPLODED DIAGRAM & PARTS LIST
G15001-BLACK G15002-RED
A3
B8
B7
A5
A4
A1
A2
A7
A8
A11
A6
A10
B1 B3
C5
C3
C4
C2
C1
B2
B6
B4
A14
B5
B9
A12
A13
A9

8MEMBER’S MARK GAS PIZZA OVEN
SETUP
STEP 1
Position the Member’s Mark gas pizza oven
on level, stable, stainless steel, wood, stone or
concrete surface.
Unfold the pizza oven legs and check that the
unit is stable before continuing.
STEP 2
Place the pizza stone ( A10 ) into the pizza oven.
STEP 3
Assemble the pizza peel.
Screwdriver is required
READ ALL WARNINGS AND SAFETY INSTRUCTIONS OUTLINED IN THIS MANUAL BEFORE GETTING STARTED.
Ensure the control knob is set to OFF/“0”.
A10

MEMBER’S MARK GAS PIZZA OVEN 9
POSITIONING THE PIZZA OVEN
NOTE: The use and installation of this product must conform to local codes. In the absence of local codes, use the National Fuel Gas Code: ANSI
Z223.1/NFPA54, Storage and Handling of Liquied Petroleum Gases, ANSI.NFPA 58 or Natural Gas and Propane Installation Code, CSA B149.1; Propane
Storage and Handling, CSA B149.2.
CAUTION: DO NOT touch any hot pizza oven parts.
ATTENTION: Use protective gloves to handle any parts that might
become hot during use.
1. NEVER use this pizza oven inside any building, garage, shed or
breezeway, or inside any boat, trailer or recreational vehicle, to prevent
possible re and to prevent the possibility of carbon monoxide
poisoning or asphyxiation.
2. ALWAYS place the pizza oven on a hard and level surface far away from
combustible materials and structures.
3. DO NOT use this pizza oven under an overhead combustible surface or
covered area (e.g., awning, umbrella, porches or gazebo).
4. ALWAYS place the pizza oven away from any combustible and non-
combustible material or construction by at least 24 inches (61cm) from
back and 24 inches (61cm) from side.
5. NEVER store or use gasoline or other ammable or volatile substances
in the vicinity of this pizza oven or in the vicinity of any other heat-
generating appliance, because of the danger of starting a re.
6. DO NOT obstruct the ow of combustion and ventilation.
24 inches (61cm)
Protective Gloves
24 inches (61cm)

10 MEMBER’S MARK GAS PIZZA OVEN
LP GAS CYLINDER
LP GAS CYLINDER - WARNINGS
LP gas supply cylinder must be constructed and marked
in accordance with the specications for LP gas cylinders of
the Canadian Standard for Cylinders, Spheres and Tubes for
Transportation of Dangerous Goods and Commission, CAN/
CSA-B339; or LP gas Cylinders of the U.S. Department of
Transportation (D.O.T), as applicable.
Always keep the 20 lbs propane tank in upright position.
Keep away from the LP cylinder and the gas hose when in use, to
prevent tripping or tipping over the LP cylinder and Pizza Oven.
If the pizza oven is not in use, the LP cylinder must be closed.
Propane cylinder must not exceed 20 lb (9.1 kg) capacity,
approximately 18¼inches (46.35 cm) high and 12¼inches (31.1 cm)
in diameter. The LPG capacity is approximately 47 lb 10 oz (21.6 kg)
water capacity or as stated by the manufacturer.
Shut-o valve with a correct cylinder valve output as specied
in current standards ANSI Z21.89-2017 • CSA 1.18-2017 Outdoor
Cooking Gas Appliances.
Type-1 mating (CGA 810) compatible with this pizza oven. The
type 1 valve is easily recognized by the large ACME external threads
on the outside of the valve.
Safety relief valve with direct connection to the vapor space of the
cylinder.
UL listed Overll Protection Device (OPD). This OPD safety feature
is identied by a unique triangular hand wheel. Use only LP cylinders
equipped with this type of valve.
A device for vapor withdrawal.
A collar to protect the LP cylinder shut-o valve.
A ring on the bottom of the LP cylinder to secure it to the support
assembly.
Equipped with a dust cap for the cylinder valve outlet, which must
be used whenever the cylinder is not in use.
Cylinders must have a D.O.T. certication (A) and a testing date (B)
that is within ve years of current use.
Do not store a spare LP gas cylinder near or under this appliance.
Never ll the cylinder beyond 80% full and if these warning
instructions are not followed excatly, a re causing death or serious
injury may occur.

MEMBER’S MARK GAS PIZZA OVEN 11
QCC1 GAS REGULATOR
PRESSURE REGULATOR
This Pizza Oven is designed to operate on LP gas at a pressure of 2.74
kPa (11”water column). A regulator preset to this pressure is supplied
with your Pizza Oven. Replacement regulators must be as specied by
Member’s Mark (UL-listed Type 1 (CGA 810) Cylinder connection device as
described in the latest edition of ANSI Z21.81).
NIPPLE
REGULATOR
HAND WHEEL
SAFETY FEATURES
The LP gas cylinder equipped with the new QCC-1 Quick Closing Coupling system, which includes the following safety features required by the Canadian
Standards Steering Committee and the American National Standards Institute ANSI):
• Gas will not ow until a positive connection has been made.
• A thermal element built into the regulator will shut the ow of gas between 240° to 300°F (115° to 149°C).
• When activated, a Flow Limiting Device will restrict the ow of gas to 10 cubic feet per hour. See Regulator Flow Limiting Reset Device Activated (page 13).

12 MEMBER’S MARK GAS PIZZA OVEN
CONNECTING THE LP CYLINDER
1. Position the pizza oven on an elevated, stable surface with the tank positioned beside it, on the ground as shown (see image A).
2. The burner control knob must be OFF/“0”.
3. The LP cylinder must be CLOSED.
4. Connect the Pizza Oven hose and regulator to the LP cylinder.
QCC1 GAS REGULATOR
A
27” (68.5 cm)

MEMBER’S MARK GAS PIZZA OVEN 13
REGULATOR FLOW LIMITING RESET
PRESSURE REGULATOR
If you are experiencing any of the following performance issues with your Member’s Mark Gas Pizza Oven,
• Burners not getting hot enough.
• Low or incomplete burner ames.
• Low gas pressure.
• Burners not staying lit.
FOLLOW THESE REGULATOR RESET INSTRUCTIONS:
1. Ensure the control knob is “0”/ OFF.
2. Ensure the LP cylinder valve is “CLOSED”.
3. Disconnect the regulator from the 20 lb LP cylinder.
4. Push in and turn the control knob counterclockwise to the “MAX”
position. Let stand for 1-2 minutes, allowing all excess gas in the valve
to dissipate.
5. Push in and turn the control knob clockwise, back to the “0” / OFF
position.
6. Reconnect the regulator to the LP cylinder, as shown on page 12. Be
careful not to cross thread the connection. Hand-tighten only.
7. Check all connections. Perform a leak test. See Page 14.
8. Slowly ‘open’ the LP cylinder and wait 5 seconds for the pressure to
stabilize.
9. Push in and slowly turn the control knob counterclockwise to ‘MAX’
position. A ‘click’ will be heard when the ignition is activated. Continue
to HOLD the control knob for 5 SECONDS aer ignition, before
releasing the knob.
NOTE: IF IGNITION FAILS, TURN THE CONTROL KNOB BACK TO “0”/OFF AND REPEAT STEP 9, OR FOLLOW THE MATCH LIGHTING INSTRUCTIONS
ON PAGE 15.
Avoid activating the flow limiting feature by following the proper lighting and shut down procedures and leak testing the system regularly.

14 MEMBER’S MARK GAS PIZZA OVEN
LEAK TEST
LEAK TEST - BEFORE YOU BEGIN
Before each use, clean and inspect the hose and check all the gas connections. lf there is
evidence of abrasion, wear, cuts, or leaks, the hose must be replaced prior to the appliance
being put into operation.
For leak test using the procedure listed below.
1. Make a solution of one part liquid detergent and one part water. You will need a
spray bottle and a brush or rag to apply the solution to the ttings.
2. The Pizza Oven control knob must be set to OFF/“0”.
3. Ensure that the regulator is connected to the LP cylinder.
Hand tighten only.
4. Spray the gas valve, hose and regulator and the top of the LP cylinder to check for
leaks (see image A).
5. Slowly open the LP cylinder counterclockwise. If bubbles are visible (see image
B), immediately turn the gas supply OFF, tighten ttings and test again.
6. If no bubbles appear, proceed with lighting instructions.
WARNING: If the smell of gas is detected at any time, immediately set the
control knob to OFF/“0” and close the LP cylinder and perform a leak test.
A
B

MEMBER’S MARK GAS PIZZA OVEN 15
LIGHTING INSTRUCTIONS
WARNING: Do not look directly into the front of the oven while lighting, as flames may
escape from the oven opening.
BEFORE LIGHTING
1. The burner control knob must be in the OFF/“0” position (see image A).
2. The LP cylinder must be ‘closed.’
LIGHTING
3. Slowly open LP cylinder and wait 30 seconds for pressure to stabilize.
4. Push in, slowly turn counter clockwise to ‘MAX’ position (see image B). A ‘click’ will be
heard when the ignition is activated. Continue to HOLD the control knob for 5 SECONDS
aer ignition before releasing the knob.
5. If the burner does not ignite, turn the control knob to the ‘0’/OFF position,
before repeating step 4. If the burner will not light aer several attempts, follow the Match
Lighting Instructions.
A
B
MATCH LIGHTING
1. The burner control knob must be in the OFF/“0” position, and the LP cylinder open.
2. Locate the extendable match lighting tool. Extend the tool and position a lit match into the
lighting tool (B9).
3. Push in and turn the burner control knob to the ‘MAX’ position.
4. Insert the match lighting tool through the front of the oven, to the burner, until the burner is
lit (see image C).
B9
C
Continue to HOLD the
control knob for 5 SECONDS

16 MEMBER’S MARK GAS PIZZA OVEN
LIGHTING INSTRUCTIONS
SHUT DOWN PROCEDURE
1. Turn the burner control knob (clockwise) to ‘0’/OFF (See image A).
2. Close (clockwise) the LP cylinder (See image B).
3. Disconnect the hose and regulator from the LP cylinder before storing.
CAUTION: The pizza oven will REMAIN HOT for some time.
DO NOT attempt to relocate or store the pizza oven until it has COMPLETELY
COOLED.
SEASONING THE PIZZA OVEN
1. Run the pizza oven for 20 minutes on ‘MAX’, before using.
2. Aer seasoning, ensure the temperature is around 750°F (400°C) before launching the rst
pizza into the center of the pizza stone.
IMPORTANT: Rotate the pizza a 1/4 turn every 15 seconds to avoid burning. DO NOT
leave the pizza oven unattended when in use.
A B

MEMBER’S MARK GAS PIZZA OVEN 17
TIPS FOR BUILDING YOUR PIZZA AND LAUNCHING YOUR PIZZA
• Always lightly our your pizza peel with ‘00’ our and Semolina our before
positioning your pizza dough.
• Place dough on the pizza peel and give it a light shake. Make sure it can slide back
and forth like a hockey puck.
• Ensure that there are no holes in the dough as the sauce can create a ‘glue’ eect
between the dough and pizza peel.
• Do not leave your dough on the peel for a long time before cooking.
• Before adding your toppings, give your peel a shake to ensure that the dough is
moving freely. If not, pick up the dough and add more our to the peel.
• Avoid putting toppings and sauce too close to the edge. You want to avoid sauce
and toppings from falling o in the oven when launching your pizza.
• Keep your toppings light. Heavy ingredients will weigh down your dough and
make it harder to li o of the peel or launch.
• Work quickly when adding toppings. The longer it takes to dress the pizza the
more likely the sauce can seep through the dough and onto your peel creating
problems for launching.
TIPS FOR BEST RESULTS
• Preheat the oven for 20 minutes, before launching your rst pizza.
• Before you begin have everything ready, including; dough balls, semolina our,
toppings, trays, pizza peel and pizza cutter.
• Adding a pizza to the pizza stone will temporarily lower the temperature of the
oven. Always ensure pizza dough is at room temperature, not cold, before
beginning.
• ATTENTION: Avoid are-up res, do not allow the pizza to touch the rear
heat shield.
• Use the temperature gauge on the side of the oven as a reference only, as it will
not provide a precise readout of the pizza stone. Alternatively, an infrared digital
thermometer can be used for more exact temperatures.
TIPS FOR MAKING PIZZA DOUGH
• Your our of choice is critical. ‘00’ our is what is used in Italy and will yield the
best crust possible. If unavailable, you can use a mix of bread our and semolina
our.
• Semolina our can also be used just for the pizza launching process. It doesn’t
char as easily as all-purpose our and a small amount of semolina on your pizza
peel will allow pizza to release easily from the peel without leaving a residue.
• A digital scale will come in handy to keep your recipe consistent and your dough
ball size consistent.
• When bulk fermenting you need an airtight container for best results.
• Always use active dry yeast.
• The best dough will require at least 2-3 days Fermentation.
• Dough is easiest to stretch and slide o the peel at room temperature. If you are
cold proong dough, leave it for at least 3-5 hours at room temperature before
beginning to stretch.
TIPS/USING YOUR MEMBER’S MARK®PIZZA OVEN
• While you get accustomed to the high pizza oven temperatures, use the control
knob to adjust temperatures down slightly until you are comfortable.
• Pizzas will take 60 seconds or less to nish but must be turned frequently to avoid
burning the crust.
• ROTATE THE PIZZA
1/4 TURN EVERY 15 SECONDS

18 MEMBER’S MARK GAS PIZZA OVEN

MEMBER’S MARK GAS PIZZA OVEN 19
72 HOUR PIZZA DOUGH
72HOUR PIZZA DOUGH
YIELD: 6 pizzas (Roughly 10” diameter)
INGREDIENTS:
• 800g Bread our (If unavailable, you can use
a mix of bread our and semolina our)
• 2.84g coarse salt
• 1.42g dry active yeast
• 350ml water, room temperature
METHOD
1. Combine our, salt, yeast in the bowl of a stand mixer using the dough
hook attachment or combine in a regular mixing bowl.
2. Slowly, stir in water to combine.
3. Stop mixing and let stand for 30 minutes. Cover the bowl loosely with
a towel.
4. Knead for 7-10 minutes on medium speed in a mixer (or 10-12 minutes by
hand, until dough is smooth and elastic).
5. Remove dough from mixing bowl, and form into a tight ball on your
counter top. Don’t use any our during this step.
6. Place dough ball in a container with an airtight lid, or seal the container
with plastic wrap. Make sure the bowl is large enough to allow the dough
to double in size.
7. Place container in fridge for 24 hrs.
8. Aer 24 hrs. Remove the dough and portion to 250g each (Deli
containers are handy here, otherwise use small bowls).
9. Place back into the fridge for another 48hrs.
10. Remove the dough from the fridge 2 hours before you want to bake your
pizza’s, and let the dough sit at room temperature.
11. Cover loosely on the counter top and allow to rise and warm before
shaping your pizzas on a oured surface. Use Semolina our, as it does
not char as easily.
Quick Start Video
Scan this QR code.

20 MEMBER’S MARK GAS PIZZA OVEN
This manual suits for next models
1