Members Mark Olympus FRM10475SST Owner's manual

1 | P a g e
Assembly Instructions & User’s Manual
for
Member’s Mark Olympus 4pc Fire Pit Set
Item Number: TBD
Model Number: FRM10475SST
Customer Assistance (spare/replacement parts): 1-888-690-9800
or Email: cs@sunvillahome.com
THIS ASSEMBLY MANUAL CONTAINS IMPORTANT SAFETY INFORMATION.
PLEASE READ AND KEEP FOR FUTURE REFERENCE.

2 | P a g e
Table of Contents
Warning & Danger......................................................................................................................3
......................................................................................................................................................................4
Quality Statement.....................................................................................................................................7
Important Safety Information................................................................................................................7
Before Assembly......................................................................................................................................7
Care & Use.................................................................................................................................................7
Package Contents....................................................................................................................................8
Product Information ................................................................................................................................9
Components..............................................................................................................................................9
Hardware....................................................................................................................................................9
Tools............................................................................................................................................................9
Step 1 –Step 13......................................................................................................................................10
Gas Hookup and Information..............................................................................................................15
Troubleshooting.....................................................................................................................................18
Storage Instructions..............................................................................................................................19
Technical Data........................................................................................................................................19
Warranty Information............................................................................................................................19

3 | P a g e
Warning & Danger
Model# FHWM10337 Fire Pit
Need Assistance? Visit us at: samsclub.com/membersmarkhelp
Installer: Leave this manual with
appliance.
Consumer: Retain this manual for future
reference.
This appliance is a Decorative Gas
Appliance for OUTDOOR USE ONLY and
MUST NOT be used for cooking.
DANGER
FIRE OR EXPLOSION HAZARD
If you smell gas:
●Shut off gas to the appliance.
●Extinguish any open flame.
●If odor continues, leave the area
immediately
●After leaving the area, call your gas
supplier or fire department
Failure to follow these instructions could
result in fire or explosion, which could
cause property damage, personal injury,
or death.
WARNING
Do not store or use gasoline, or other flammable vapors and liquids, in the vicinity of
this or any other appliance. An LP-cylinder not connected for use shall not be stored in
the vicinity of this or any other appliance.
WARNING: For outdoor use only.
Installation and service must be
performed by a qualified installer, service
agency, or the gas supplier.
WARNING:If the information in
this manual is not followed exactly, a
fire or explosion may result causing
property damage, personal injury, or
loss of life.
CARBON MONOXIDE HAZARD
This appliance can produce carbon monoxide which has no odor.
Using it in an enclosed space can kill you.
Never use this appliance in an enclosed space such as a camper,
tent, car or home.
DANGER

4 | P a g e
Need Assistance? Visit us at: samsclub.com/membersmarkhelp
WARNING
HOT! DO NOT TOUCH SEVERE
BURNS MAY RESULT. CLOTHING
IGNITION MAY RESULT.
Glass and other surfaces are hot
during operation and cool-down
●Young children should be carefully
supervised when they are in the area of
the appliance
●Children and adults should be alerted
to the hazards of high surface
temperatures and should stay away to
avoid burns or clothing ignition
●Clothing or other flammable materials
should not be hung from the appliance
or placed on or near the appliance.
CAUTION:Hot while in operation. Do not touch Keep burner area clean
WARNING (CALIFORNIA PROPOSITION 65)
WARNING: Combustion byproducts produced when using this product include
carbon monoxide, a chemical known to the State of California to cause birth defects
or other reproductive harm, and this product can expose you to chemicals including
lead and lead compounds, which are known to the State of California to cause cancer
and birth defects or other reproductive harm. For more information go to
www.P65Warnings.ca.gov
CAUTION
DO NOT DISCARD THIS MANUAL
●Important operating and
maintenance instructions included.
●Read, understand, and follow
these instructions for safe
installation and operation.
WARNING
Improper installation, adjustment,
alteration, service, or maintenance
can cause injury or property
damage. Read the installation and
maintenance instructions
thoroughly before installing or
servicing this equipment.

5 | P a g e
A. Design and Installation Considerations
Place the Fire Pit on a flat and stable surface in an
outdoor location adjacent to the gas supply line or
LP gas supply cylinder. DO NOT locate the appliance
where it will get excessively wet or submerged in water.
B. Tools and Supplies Required
Before beginning the installation, be sure that the
following tools and supplies are at hand.
□Gloves
□Safety Glasses
□Wrench
C. Inspect the Appliance and Components
□Carefully remove all burner components from
packaging.
□Read all instructions before beginning installation.
Follow these instructions carefully during
installation to ensure maximum safety and benefit.
Need Assistance? Visit us at: samsclub.com/membersmarkhelp
WARNING
Do NOT use this appliance if any part of it has
been under water.
Have a qualified service technician inspect the
appliance and replace any part of the control
system and any gas control which has been
under water.
WARNING
The warranty will be voided by, the following
actions:
□Installation and use of any damaged
components.
□Modification of the burner assembly.
□Installation other than as instructed by the
factory.
WARNING
Inspect appliance and components for damage.
Damaged parts may impair safe operation.
□DO NOT install damaged, incomplete, or
substitute components.
Report damaged parts to your dealer.
WARNING
Never leave Fire Pit unattended for any amount of
time.
Never sit on the Fire Pit.
Never use Fire Pit as a storage unit.
WARNING
Asphyxiation Risk
□This gas appliance is for outdoor use in a well-
ventilated space.
□This unit must not be installed inside an
enclosed structure or unvented appliance.
WARNING
1. Glass media may have sharp edges. Wear safety glasses and gloves when handling.
2. Pour the glass media evenly into the burner area (with the exception of the screen-if applicable).
The glass should be 1/2-1”above the burner.
3. Keep away from the unit for the first 20 minutes after igniting your unit for the first time, as glass beads
could pop out and cause injury. Should any glass beads pop out, discard them.

6 | P a g e
Installation and repair should be done by a qualified service person. The appliance should be inspected before use and at least annually
by a qualified service person. More frequent cleaning may be required as necessary.
It is imperative that the control compartment, burners and circulating air passageways of the appliance are kept clean.
*Do not use this fire pit for cooking.
*Do not burn any other materials than are supplied with and intended for use in this fire pit.
*Do not pour water into fire pit.
*The installation of this product must conform to local codes.
* Do not use this appliance if any part has been under water. Immediately call a qualified service technician to inspect the appliance
and to replace any part of the control system and any gas control that has been under water.
*Do not store a spare or disconnected liquid propane cylinder under or near this fire pit.
*After a period of storage, and/or not use, the propane fire pit should be checked for gas leaks and burner obstructions before use.
*Do not operate the propane fire pit if there is gas leak present.
*Never use a flame to check for gas leaks.
* Minimum Clearance from Unit to Combustible Construction: 61”(155.4cm) from the top: 48” (121.9cm) from all sides and back.
* Do not put any other fire pit cover or anything flammable on, or beneath the fire pit.
* The propane fire pit should never be used by children. Children must be supervised when they are anywhere near the appliance.
* Users should be alerted to the hazards of high surface temperatures and keep a safe distance to avoid burning or clothing ignition.
* Pay attention when operating the fire pit. It is hot in use and should never be left unattended. Do not transit fire pit while in
operation.
* Should fire go out while burning, turn the gas valve off. Follow the instruction and wait five minutes before attempting to relight.
* Never use charcoal or any other solid fuel in the fire pit. Never parch clothing or other flammable materials on or near the fire pit.
* Never lean over the open fire pit or place hands or fingers on the upper portion of an operational unit.
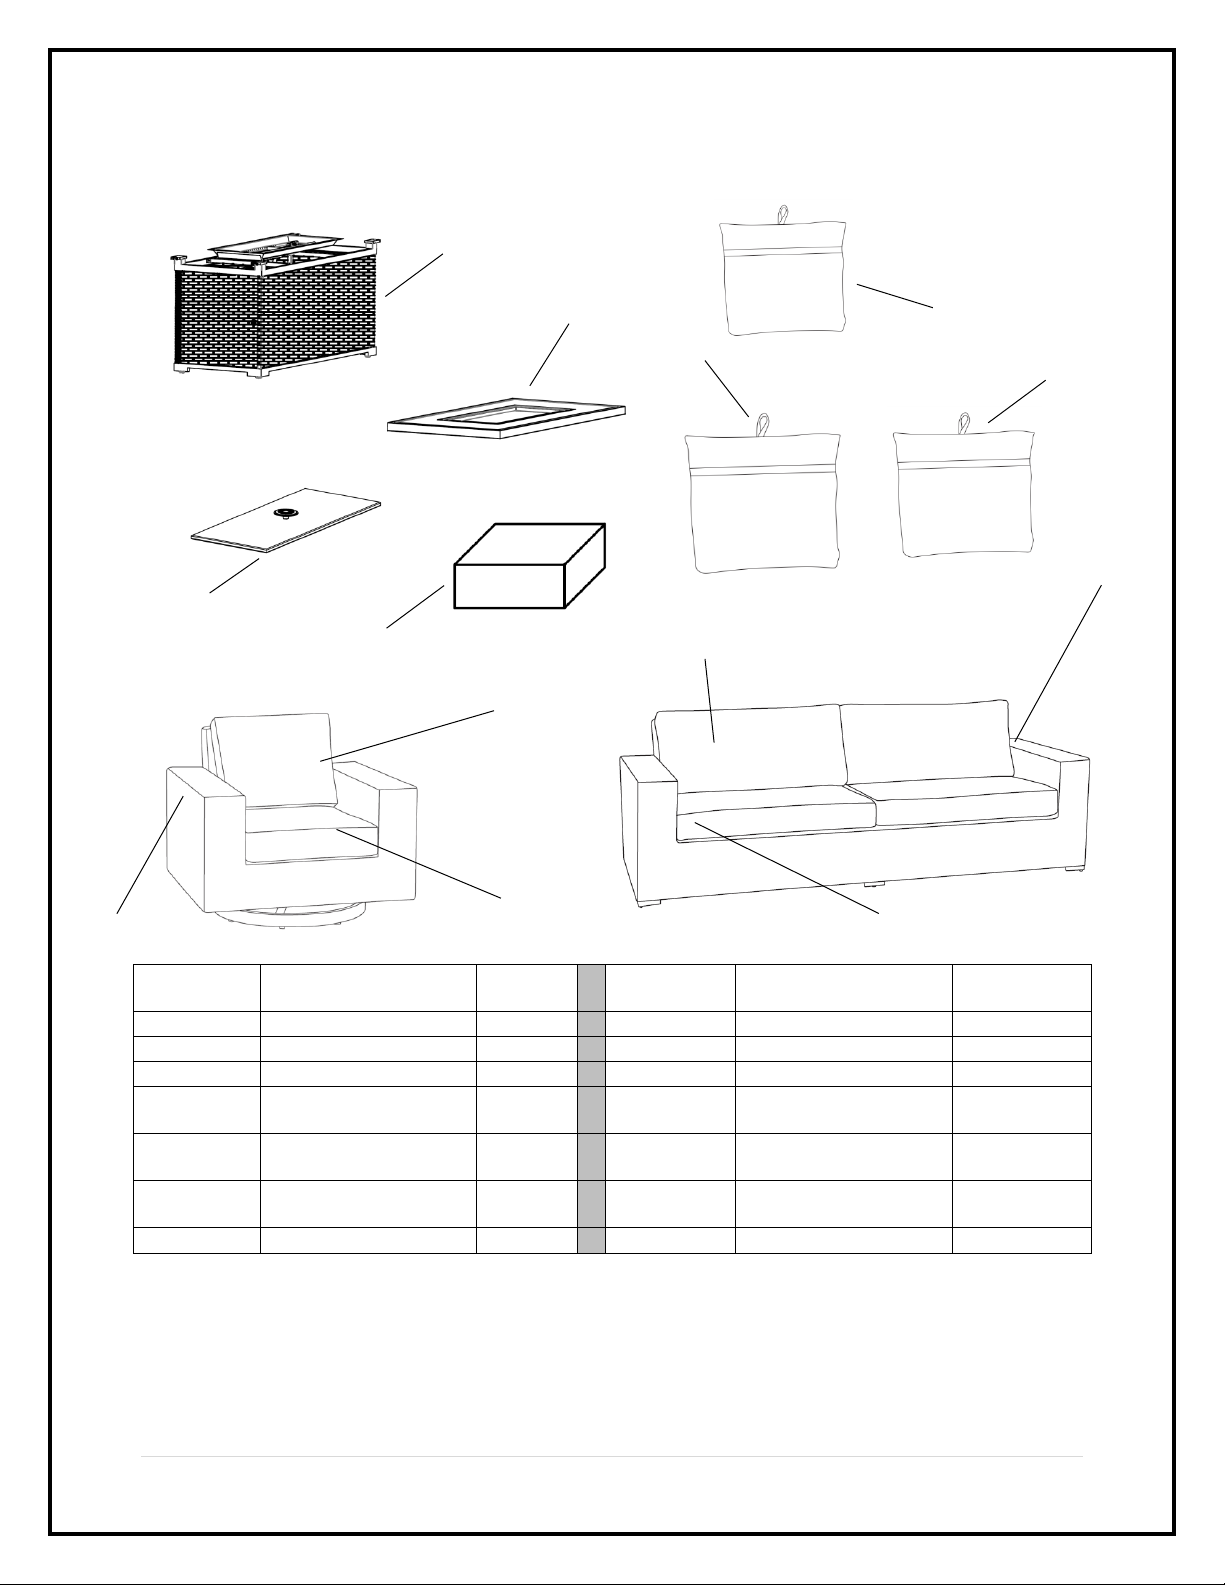
* Keep ventilation openings in cylinder enclosure (FIRE PIT BODY) free and clear of debris.
* Do not rest feet on the fire pit.
* Please take out the battery when not using the fire pit for an extended length of time.
* Do not enlarge valve orifices or burner ports when cleaning the valve or burner. Cylinder supply system must be arranged for vapor
withdrawal.
* LP Tank used must include a collar to protect the cylinder valve.
* Never fill the cylinder beyond 80% full.
* Do not use this fire pit on vehicles or boats. Always operate the appliance on the flat ground outdoors.
* Keep any electrical supply cord and the fuel supply hose away from any heated surfaces.
* Do not use this fire pit unless all parts are in place.
* Keep the appliance area clear and free from combustible materials, gasoline, and other flammable vapors and liquids.
* Inspect the hose before each use of the appliance.
* If there is evidence of excessive abrasion or wear or if the hose is damaged, the hose assembly must be replaced prior to the
appliance being put into operation.
* Locating the hose into pathways where people may trip over it or in areas where the hose may be subject to accidental damaged.
* Prior to each fire table operation, check the hose for evidence of excessive abrasion or wear by looking through the visual check hole.
If the hose is damaged, cracked or cut, it must be replaced before using the gas fire table. The hose assembly can only be replaced with
a hose assembly specified by the manufacturer.
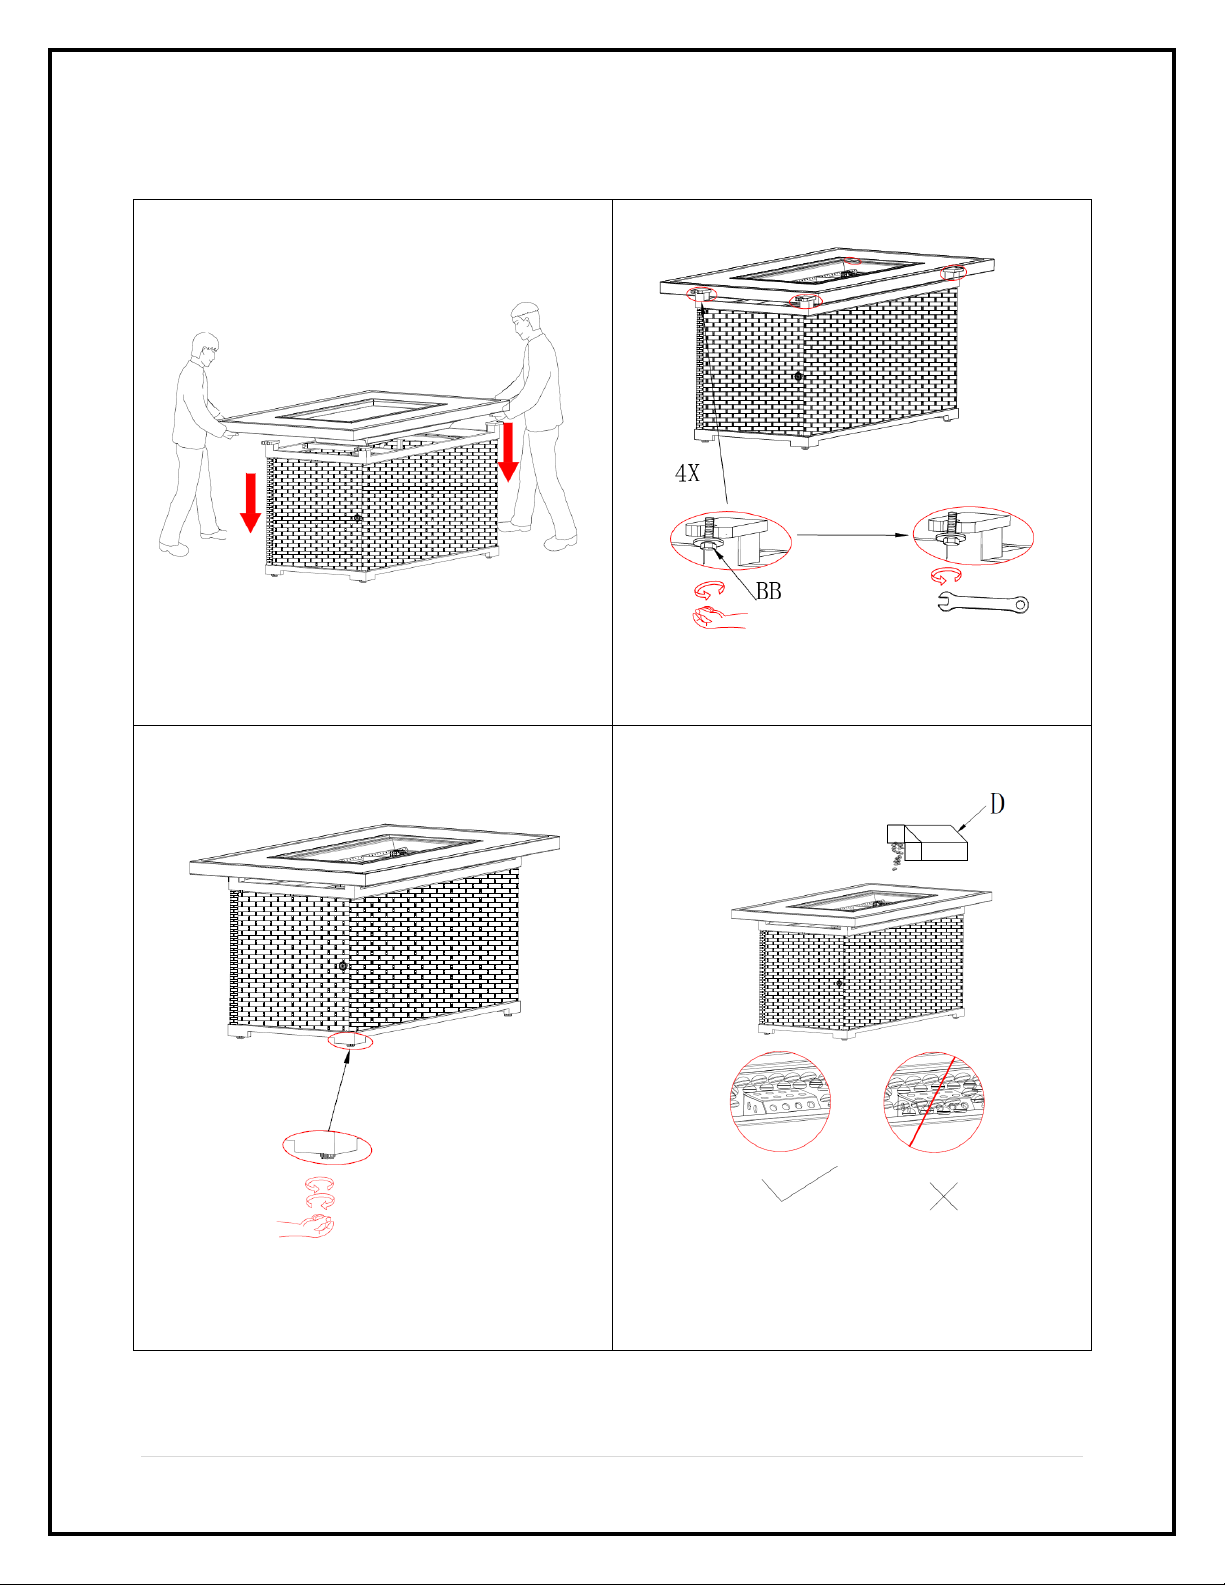
* Before each use, remove the glass beads. Examine the burner and its components. If dirty, clean with a soft brush and soapy water
solution. Also examine the area around the burner. Any dirt or foreign material, such as spider webs or nests in this area, should be
removed. If it is evident that the burner is damaged, the fire table must not be used. The burner assembly can only be replaced with a
burner assembly specified by the manufacturer. Please contact call our customer service department at 1-888-690-9800 for technical
support.
The LP-gas supply cylinder to be used must be:
1) Constructed and marked in accordance with the U.S. Department of Transportation (D.O.T.) Specifications for LP-Gas Cylinders, or
the Standard for Cylinders, Spheres and Tubes for Transportation of Dangerous Goods and Commission, CAN/CSA-B339, as applicable;
2) Provide with a listed overfilling prevention device;
3) Provide with a cylinder connection device compatible with the connection for the appliance.
Need Assistance? Visit us at: samsclub.com/membersmarkhelp
WARNINGS

7 | P a g e
Quality Statement
Important Safety Information
•Please read all instructions carefully before assembling this product.
•Where applicable, and for your safety, assembly by an adult is strongly
recommended.
•Use only vendor-supplied hardware to assemble this item. Using unauthorized
hardware could jeopardize the structural integrity of the item.
•Hardware may loosen overtime. Periodically check that all connections are tight.
Before Assembly
•Remove all parts and hardware from the box. Place all items on a carpeted or
scratch-free work surface, as this will avoid damaging parts during assembly.
•The shipping box can provide an ideal work surface if none is available.
•Use the components and hardware lists below to identify, inventory and separate
each of the hardware and components included.
•To avoid accidentally discarding small components or hardware, do not dispose
of any packaging or contents of the shipping carton until assembly is complete.
•DO NOT USE power tools unless it is explicitly identified in this manual as
required for use during assembly. Power tools can damage the fasteners,
hardware and/or components.
•Do not fully tighten all fasteners / screws until all parts are in place. Failure to
follow these instructions may cause the fasteners / screws to misalign during
assembly.
Care & Use
•Use a soft, clean cloth that will not scratch the surface when cleaning.
•Dust often and use a vacuum cleaner crevice tool to clean between seams.
•Keep furniture at least 60cm/2ft from heat sources to avoid damage.
Need Assistance? Visit us at: samsclub.com/membersmarkhelp

8 | P a g e
Package Contents
Component
Description
Quantity
Component
Description
Quantity
A
Fire Pit Base
1
H
Sofa Back Cushion
2
B
Fire Pit Top
1
I
Sofa Seat Cushion
2
C
Lid
1
J
Sofa Frame
1
D
Glass Beads
1
KF
Furniture Cover for
Fire Pit
1
E
Chair Frame
2
KC
Furniture Cover for
Chair
2
F
Chair Seat Cushion
2
KS
Furniture Cover for
Sofa
1
G
Chair Back Cushion
2
WARNING: Failure to position the parts in accordance with these diagrams or failure
to use only parts specifically approved with this appliance may result in property
damage or personal injury.
Need Assistance? Visit us at: samsclub.com/membersmarkhelp
H
KF
D
R
C
R
B
R
A
R
F
G
E
KS
KC
J
R
I

9 | P a g e
Product Information
Dimensions:
2pc swivel chair: 34''Dx40''Wx32.4''H (86.5cm*102cm*82.5cm)
1pc sofa: 34''Dx98.2''Wx32.4''H (86.5cm*249.5cm*82.5cm)
1pc fire pit: 53.9''Dx27.9''Wx25''H (137cm*71cm*63.5cm)
Weight Capacity:
Chair: Supports up to 250 lbs. (113.4kg.)
Sofa: 250lbs (113.4kg.) per each seat
Components
A
Fire Pit Base
Qty 1
B
Fire Pit Top
Qty 1
C
Lid
Qty 1
D
Glass Beads
Qty 1
Hardware
AA
AAA Battery
Qty: 1
BB
M8x20 Bolt/Φ24x2.0
Qty: 4
Tools
Wrench (Included)
Need Assistance? Visit us at: samsclub.com/membersmarkhelp

10 | P a g e
Step 1 –Step 13
Step 1
Step 2
Step 3
Step 4
Need Assistance? Visit us at: samsclub.com/membersmarkhelp

11 | P a g e
Step 5
Step 6
Step 7
Note: Clamp the
hose when not in
use.

12 | P a g e
Step 8
Step 9
Please recycle old battery properly as hazardous waste.
Need Assistance? Visit us at: samsclub.com/membersmarkhelp

13 | P a g e
Step 10
Turn the tank valve to release gas. Push and hold ignition button to ignite flame.
Adjust control knob to desired flame once flame is lit.
Step 11
Shut the tank valve and adjust control knob to extinguish flame when not in use.
Need Assistance? Visit us at: samsclub.com/membersmarkhelp

14 | P a g e
Step 12
Place lid when unit cools down completely.
Step 13
When furniture is not in use, put covers on them to prevent dust.
Need Assistance? Visit us at: samsclub.com/membersmarkhelp

15 | P a g e
Gas Hookup and Information
A. Fuel
Before making gas connections, ensure the appliance
being installed is compatible with the available gas type.
B. Gas Pressure
Proper input pressures are required for optimum
performance. Gas line sizing requirements need to be
made following NFPA54
Pressure requirements for appliance are shown in table
below. Minimum pressures must be met when other
household gas appliances are operating.
Pressure
Natural gas
Propane
Minimum Inlet Pressure
3.5 in w.c.
25 psi
Maximum Inlet Pressure
10.5 in w.c.
250 psi
The appliance and its individual shutoff valve must be
dis-connected from the gas supply piping system during any
pressures in excess of 1/2 psi /3.5 kpa.
The appliance must be isolated from the gas supply piping
system by closing its individual manual shutoff valve during
any pressure testing of the gas supply piping system at test
pressures equal to or less than 1/2 psi / 3.5 kpa.
C. Gas Connection
Need Assistance? Visit us at: samsclub.com/membersmarkhelp
Note: A listed (and Common wealth of Massachusetts
approved) 3/8 in. T-handle manual shut-off valve and
flexible gas connector are connected to the 3/8 in.
Control valve inlet. If substituting for these
components, please consult local codes for compliance.
WARNING
Fire Risk
Explosion Risk
verify inlet pressures.
●High pressures may cause overfire
condition.
●Low pressures may cause explosion.
●Verify minimum pressures when other
household gas appliances are operating.
Install regulator upstream of valve if line pressure is greater
than 1/2 psi.
A small amount of air will be in the gas supply line. When
first lighting appliance it will take a short time for air to
purge from lines. Subsequent lighting of the unit will not
require such purging. Never allow the ON / OFF valve to
remain in the open position without pressing and
continuing to hold igniter button FIRST.
Note: Have the gas supply installed in accordance with local
building codes, if any. If not, follow ANSI 223.1. Installation should
be done by a qualified installer approved and/or licensed as
required by locality. (in the Common wealth of Massachusetts
installation must be performed by a licensed plumber or gas fitter.
●Incoming gas line should be piped to the 3/8 inch
connection on the manual shutoff valve.
WARNING
Fire Risk
Explosion Risk
●Gas build-up during line purge may
ignite.
●Purge should be performed by qualified
technician.
●Ensure adequate ventilation.
●Ensure there are no ignition sources
such as sparks or open flames.
WARNING
CHECK FOR GAS LEAKS
Fire Risk
Explosion Risk
Asphyxiation Risk
●Check all fittings and connections.
●Do not use open flame
●After the gas line installation is
complete, all connections must be
tightened and checked for leaks with a
commercially available leak-check
solution. Be sure to rinse off all leak
check solution following testing.
Fittings and connections may have loosened during shipping
and handling.

16 | P a g e
FOR LIQUID PROPANE GAS UNITS
*Do not attempt to disconnect the gas regulator or any gas fitting while your fire pit is in operation.
*A dented or rusty liquid propane cylinder may be hazardous and should be checked by your gas supplier prior to
use.
*Do not use a liquid propane cylinder with a damaged valve and any other worn out parts.
*Transit and store the empty gas cylinders carefully and properly.
*If you see, smell or hear the hiss of escaping gas from the liquid propane cylinder;
1. Turn off the gas supply and get away from the gas cylinder and the fire pit at once.
2. Do not attempt to correct the problem yourself.
3. Get to your gas supplier and/or the fire department for help.
Need Assistance? Visit us at: samsclub.com/membersmarkhelp
WARNING
This screen must be clear and free of obstructions
at all times to insure proper operation.
Screen
DO NOT PLACE GLASS
BEADS ON THE SCREEN.
KEEP SCREEN CLEAR.
OPERATION
CAUTION: Children and adults should be alerted to the hazards on high surface temperatures and should stay
away to avoid burns or clothing ignition. Young children should be carefully supervised when they are in the
area of the appliance.
WARNING: Do not use this appliance if any part has been under water. Immediately call a qualified service
technician to inspect the appliance and to replace any part of control system and any gas control, which has
been under water.
SAFETY WARNINGS
1. Never leave the Fire Pit unattended during operation.
2. Clothing or other flammable materials should not be hung from the appliance or placed on or near the
appliance
3. Any guard, barrier, or other protective device removed for servicing the appliance shall be replaced prior to
operating the appliance.
4. Installation and repair should be done by a qualified service person. The appliance should be inspected
before use and at least annually by a qualified service person. More frequent cleaning may be required as
necessary. It is imperative the control compartment, burners and circulating air passageways of the appliance
be kept clean.
5. Inspect the fuel supply connection before each use of the appliance.
6. Temporary storage of this appliance indoors is permissible only if it has been disconnected from its fuel
supply (Natural or L.P. gas line).
WARNING
1. This appliance is hot when operated and can cause severe burns if contacted.
2. Do not burn any solid fuels in this appliance.

17 | P a g e
Note:
●Illustrations reflect typical installations
and are FOR DESIGN PURPOSES ONLY.
●Illustrations / diagrams are not drawn to scale.
Actual installation may vary due to
individual design preference.
Clearance to Combustibles
Need Assistance? Visit us at: samsclub.com/membersmarkhelp
LIGHTING
1. Make sure all labels, packaging and protective films have been removed from flow of the outdoor fireplace.
2. Remove cover and lid from outdoor fireplace before lighting.
3. Check for obstructions of airflow to the burner. Spiders, insects and webs can clog the burner/venturi tube. A clogged burner tube can lead to a fire.
4. Control knob must be in the “ OFF” position (Figure 3)
5. Clear small area of glass rocks away from the igniter cover (Figure 4).
6. Connect LP gas tank per “Installing LP Gas Tank” section.
7. Turn LP gas tank valve to “OPEN”.
8. Push and hold the electronic igniter to create sparks within the electrode, continue to hold.
9. Push in the control knob and turn to the “ON” position, Keep holding down the control knob to allow gas to flow for 20 seconds.
10. After 20 seconds, release and turn control knob counterclockwise to adjust flame to desired height.
11. If ignition does not occur in 20 seconds turn burner control knob to “ OFF” wait 5 minutes, fan with a newspaper or magazine, and repeat lighting
procedure.
12. If igniter does not light burner:
a. Wearing heat-resistant gloves, position a long lit match or long lit butane lighter near the pilot housing.
b. Push and turn control knob to on
c. Remove match/lighter once burner is lit.
13. After lighting, observe the burner flame make sure all ports are lit and flame height matches illustration (figure 3).
14. If you’re having trouble lighting your fire pit, please follow this checklist:
(1)Battery is inserted with the negative side going in first. (2)LP gas tank valve is open. (3)Thermocouple is fully fastened. (4)The control knob
is pushed in for a minimum of 20 seconds.
TURNING OFF
1. Turn LP gas tank valve to “ CLOSED”.
2. Turn control knob to the “ OFF” position. Note: A “poof” sound is normal as the last of the LP gas is burned.
3. Disconnect LP gas tank per “Disconnecting LP Gas Tank” section.
WARNING
Fire Risk
provide adequate clearance
●Around air openings.
●For service access.
Locate appliance away from traffic areas.
Checking for leaks
1. Make 2-3oz of leak detection solution by mixing one part liquid
dishwashing soap with three parts water.
2. Make sure control knobs are in the “ o ” position(Figure 1)
3. Connect LP gas tank;
4. Turn LP gas tank valve to “open”;
5. Spoon several drops of solution or use a squirt bottle, at all “X” locations;
a. If any bubbles appear, turn LP gas tank valve to “CLOSED”, reconnect and
re-rest
b. If you continue to see bubbles after several attempts turn LP gas tank valve
to “CLOSED” and disconnect LP gas tank, per “Disconnecting LP Gas Tank
Contact 888-690-9800 for assistance.
c. If no bubbles appear after one minute, turn LP gas tank valve to “CLOSED”,
wipe away solution proceed.
CAUTION: After lighting-using a fire place tool and heat-resistant gloves,
carefully move the glass beads back to their proper position, being careful to
avoid the flame.

18 | P a g e
Troubleshooting
Problem
Possible Cause
Prevention / Solution
Fire won’t light
No LP in tank.
Check the LP (propane) tank. You may be out of gas.
Or check Natural Gas valve at main.
Plugged burner orifice.
Check the burner orifice for stoppage. Remove
stoppage.
Low flames or
won’t stay lit
Manual shutoff valve (on/off control knob) open or not installed
between LP tank and appliance.
Close LP tank and manual shutoff valves. Open LP
tank valve first, then the manual shutoff valve.
Blue flames
This is a result of normal operation and flames will begin to yellow as
unit is allowed to burn for 16-20 minutes.
Do nothing.
Improper air / fuel mixture related to air shutter position.
Close air shutoff. (for LP, leave1/4” open, natural gas
1/16” open)
Metallic noise
Noise is caused by metal expanding and contracting as it heats up and
cools down, similar to the sound produces by a furnace or heating duct.
This noise does not affect the operation or longevity of the appliance.
Do nothing.
Decorative Beads
cracking or splitting.
Heat and/or abrupt temperature changes.
This is a property of glass and may happen
occasionally. Do nothing. This is completely normal.
Maintenance and Service Tasks
Inspect
Inspect
Burner
Assembly
1
Remove decorative glass and examine burner. Vacuum and
wipe out as needed. Use caution when cleaning these
areas.
2
Inspect for warping and corrosion. Repair as necessary.
3
Check the hose connecting the LP gas cylinder to ensure it
is not damaged. Replace as necessary.
4
Verify air shutter area is clean.
Burner Ignition
and Operation
1
Verify all gas connections are tight and leak-free.
2
Clean burner top, inspect for plugged ports, corrosion. or
deterioration. Replace burner if necessary.
3
Inspect for flame problems.
4
Verify air shutter is clear of dust and debris and is in correct
position for the gas type being used.
5
Inspect orifice for soot, dirt, or corrosion.
6
Verify manifold and inlet pressures. Adjust regulator as
required.
Gas Hose with
Regulator
1
The gas hose with regulator supplied with appliance must
be used for LP installations. The replacement must be those
specified by the appliance manufacturer.
Need Assistance? Visit us at: samsclub.com/membersmarkhelp
Before Storing
1. Turn LP gas tank valve to “CLOSED”.
2. Turn control knob to the “ OFF” position. Note: A
“poof” sound is normal as the last of the gas is
burned.
3. Disconnect LP gas tank per “Disconnecting LP Gas
Tank” section.
4. Clean all surfaces.
CAUTION: NEVER place cover on hot
outdoor fireplace.
5. Lightly coat the burner with cooking oil to prevent
excess rusting.
6. If storing the outdoor fireplace indoors, cover the
outdoor fireplace and store in a cool dry location
away from children and pets.
7. If storing the outdoor fireplace outdoors, cover the
outdoor fireplace with the included cover for
protection from the weather.

19 | P a g e
Storage Instructions
1. Carefully place all components into shipping box and/or provided container tape it shut.
2. When not in use, please store your item in a cool, dry place away from sunlight.
3. Exposing your item to excessive heat or humidity may damage your item.
4. When furniture is not in use, put covers on them to prevent dust.
Technical Data
Fire Pit BTU: 55000
Aluminum: 6063
Steel: Q235
Furniture Cover: 180g (300D) domestic polyester, with PU coating
Warranty Information
This product component has a 3 years guarantee against defects in material and/or workmanship. If you
have any questions regarding the warranty or spare / replacement parts, please call our toll-free number
1-888-690-9800 or email us at cs@sunvillahome.com
NOTE: Please consider recycling all applicable packaging material.
Distributed by Sam’s West Inc.
2101 SE Simple Savings Dr.
Bentonville, Arkansas 72716-0745
Made in China
Need Assistance? Visit us at: samsclub.com/membersmarkhelp
Table of contents
Other Members Mark Outdoor Fireplace manuals
Popular Outdoor Fireplace manuals by other brands

Paloform
Paloform Fold 48-E LP Corten Installation & owner's manual

Astonica
Astonica 40100126 instruction manual

Kingsman Fireplaces
Kingsman Fireplaces Barbara Jean OLT24GMAPT user manual

SNOWJOE
SNOWJOE SUNJOE SJFP35-STN-RM Operator's manual

CC Products
CC Products Bodaway Bowl product manual

BREEO
BREEO Y Series user guide

Red Fire
Red Fire 85098 User instructions

techo-bloc
techo-bloc FOYER Brandon Rectangle Installation guide and owner's manual

Outland Technology
Outland Technology FMPPC2F owner's manual

Endless Summer
Endless Summer GAD860SP Cleaning and care

Landmann
Landmann Fraser Assembly and use instructions

Lee Masonry Products
Lee Masonry Products Southern Tradition installation guide