manuals.online logo
Brands
  1. Home
  2. •
  3. Brands
  4. •
  5. Mercia Garden Products
  6. •
  7. Storage
  8. •
  9. Mercia Garden Products 01SHPCHEST User manual

Mercia Garden Products 01SHPCHEST User manual

01SHPCHEST Please retain product label (Attached to your label) for reference with all future contact. CONTENTS
This building should be
erected by two people.
For ease of assembly, it is
advisable to pilot drill all
screw holes and ensure all
screw heads are countersunk.
WINTER = HIGH MOISTURE = EXPANSION
SUMMER = LOW MOISTURE = CONTRACTION
Drill
2mm bit
x2
NATURAL MOVEMENT OF TIMBER THROUGHOUT THE SEASON
Timber is a natural material and will, during the year pick up moisture in damp periods and dry out during hot spells. There will be constant expansion
and contraction of the timbers which will be particularly noticeable during the dry periods as the boards will shrink, this is why all buildings have
slight tolerances built into them.
BUILDING A BASE
When thinking about where the building and base is going to be constructed: Ensure that there will be access to all sides for maintenance work and
annual treatment.
TYPES OF BASE
- Concrete 75mm laid on top of 75mm hard-core.
- Slabs laid on 50mm of sharp sand.
PLEASE READ INSTRUCTIONS CAREFULLY.
Retain Instructions for future reference
Before you start...
All buildings including the underside of the floor must be treated with a good quality waterproof
preservative or treatment prior to or during assembly, and retreated annually.
Preservative/treatments are available in a choice of colours and is left to the customers preference.
For Assistance Please Contact Customer Care on 01636880514
Whilst all products manufactured at Walton Garden Buildings Limited are made to the highest standards of Safety and in the case of
childrens products independently tested to EN71 level,Walton Garden Buildings Limited cannot accept responsibility for your safety whilst
erecting or using this product.
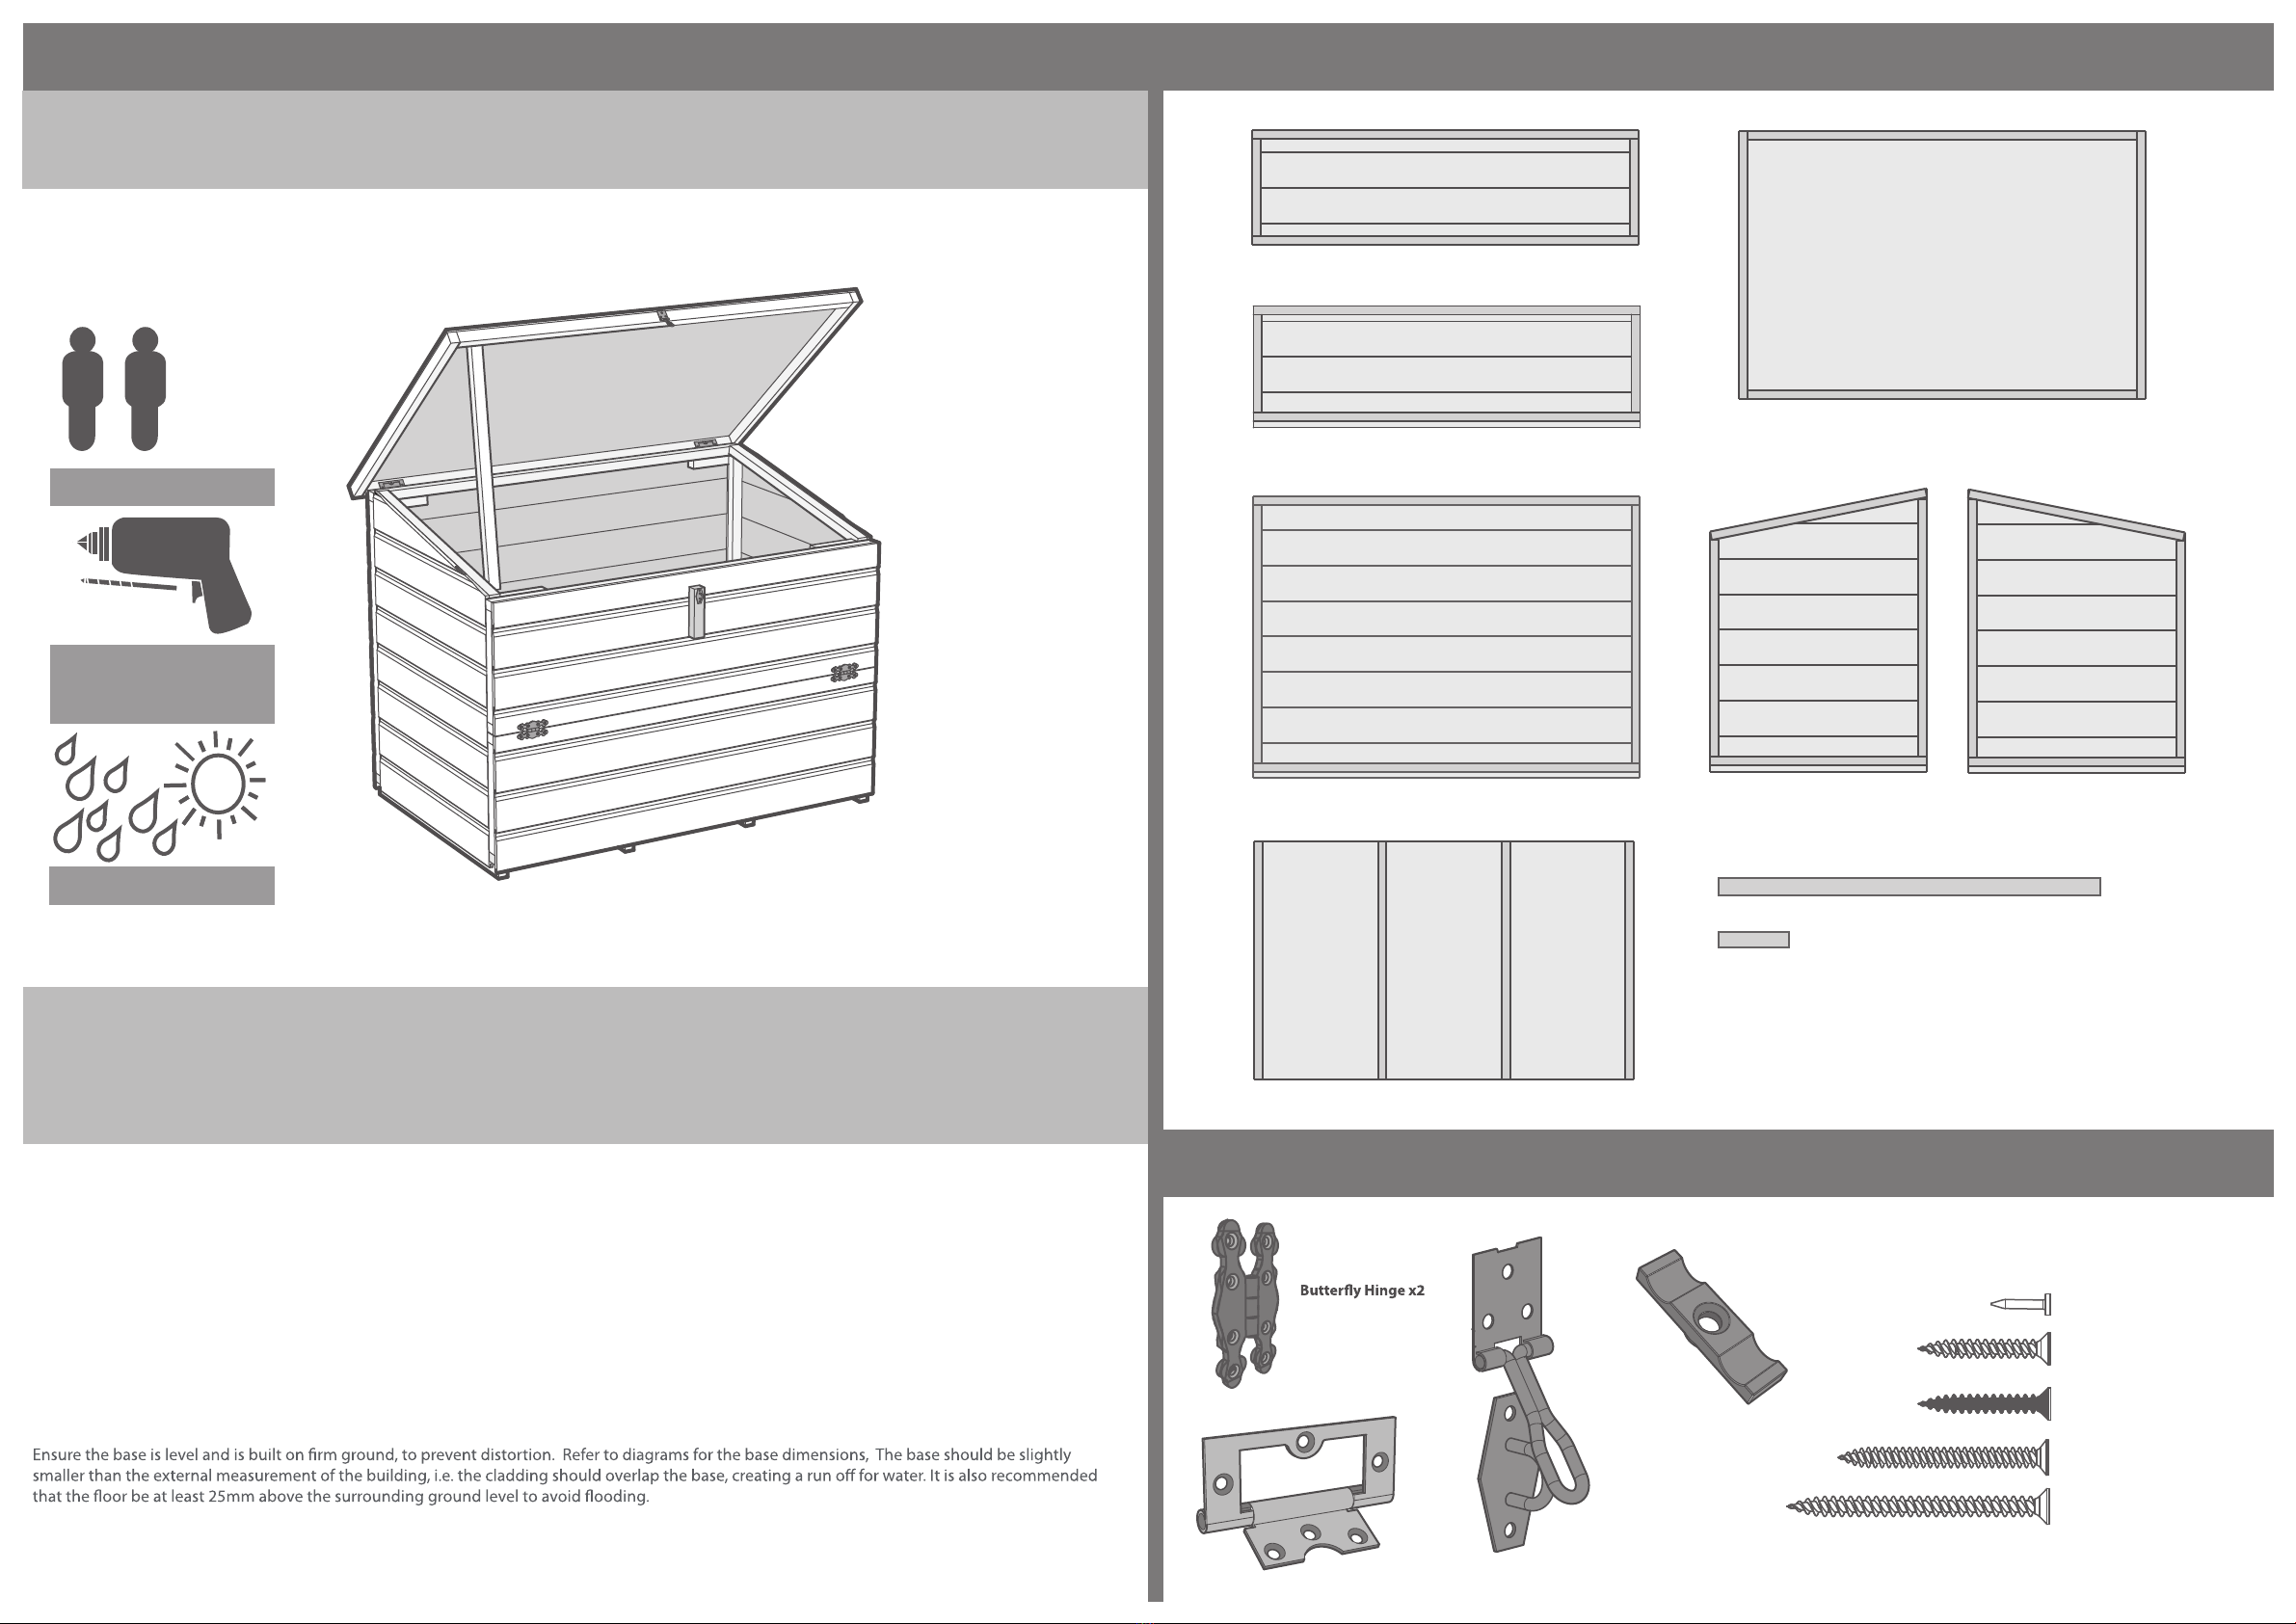
Dimensions
Depth = 773mm
Width = 1224mm
Height = 950mm
Front Top Panel
Front Panel
Lid
Floor Panel
Back Panel Left Side Panel Right Side Panel
Lid Support - 660mm
5x Fixing Block -140mm
Nail Bag & Ironmongery
Flush Hinge x2
Hasp & Staple
Turn Key x2
30mm Screw x15
50mm Screw x25
40mm Screw x15
10mm Felt Tacks x20
30mm Black Screws x25
Assembly
1
Place floor on a firm and
level base, ensure base has
suitable drainage free from
areas where standing water
can collect. (see front page
on base requirements).
Remove transportation
blocks from the bottom of
each panel before beginning
assembly. Each Panel should
have two blocks.
2Fix the Rear and Side
panels to oor using
50mm screws as shown.
Fix side panels to rear
using 3x 50mm screws,
Secure from the back into
the framing.
13 x 50mm screws
3Fix the Front panel to
side panels using 2x
50mm screws per side.
Then Secure to oor
using 2x 50mm screws
ensuring screws are
xed in alignment
with the oor joists.
Attach 2x Fixing
blocks to rear panel
in top corners using 2x
40mm screws secured
from top frame down.
6 x 50mm screws
4 x 40mm screws
4Attach the Front top
panel into place using
the buttery hinges and
8 x 30mm black
screws per hinge.
Ensure there is at
least a 2mm gap
between the front
panels.
Attach the Fixing
blocks to the inside
of each corner on
the front top panel
using 2x 40mm
screws per block.
Fix a Turn key to
each block ensuring
the key overlaps the
side panel framing.
4 x 40mm screws
18 x 30mm black screws
5Fix 2x Flush hinge to inside
framing of lid using 3x
30mm screws.
Ensure hinge is
facing the correct
way (see illustration).
6 x 30mm screws
*Ensure hinges are
tted in alignment with
the xing blocks
attached to the rear
panel.
*
6Place Lid on top of storage
box ensuring sides t in
into the lid and there is
enough space at front to
open and close.
When happy with lid
position screw ush hinges
into rear panel using 3x
40mm screws per hinge.
Ensure screws are attached
to the xing blocks at the
back.
Place felt sheet over top of
lid, ensure there is a 50mm
overhang around the sides
and x with felt tacks as
shown.
6 x 30mm screws
20 x 10mm felt tacks
7Attach Hasp to the center
front of the lid using 3x
30mm black screws.
Fix the Lid Support frame
to either side panel using 1
x 50mm screw.
Ensure support frame has
enough space to move up
and down into position
without interfering with
rest of the structure.
3 x 30mm black screws
1 x 50mm screw
8Fix the Staple to the
remaining Fixing block as
shown in illustration using
2 x 30mm black screws.
Place xing
block against
top front panel
and align in
center,
ensuring the
hasp locks
onto Staple
correctly.
When happy
with position,
x the block to
the front using
2 x 40mm screws.
2 x 30mm black screws
2 x 40mm screws

Other Mercia Garden Products Storage manuals

Mercia Garden Products 01OSBA0307PB-V1 Instruction manual

Mercia Garden Products

Mercia Garden Products 01OSBA0307PB-V1 Instruction manual

Mercia Garden Products 0628POPA0603FGDD3TW-V1 Instruction manual

Mercia Garden Products

Mercia Garden Products 0628POPA0603FGDD3TW-V1 Instruction manual

Popular Storage manuals by other brands

Navisys Technology Touch Disk user manual

Navisys Technology

Navisys Technology Touch Disk user manual

Kinetec Data Capture user manual

Kinetec

Kinetec Data Capture user manual

Pylon Technologies PowerCube-X1 product manual

Pylon Technologies

Pylon Technologies PowerCube-X1 product manual

HP LTO Ultrium Technical reference manual

HP

HP LTO Ultrium Technical reference manual

Microchip Technology AN1003 user manual

Microchip Technology

Microchip Technology AN1003 user manual

Edge DiskGO! Digital Music Player installation guide

Edge

Edge DiskGO! Digital Music Player installation guide

Hama HighSpeed Pro FlashPen Mini Operating	 instruction

Hama

Hama HighSpeed Pro FlashPen Mini Operating instruction

Whynter CHC-123DS instruction manual

Whynter

Whynter CHC-123DS instruction manual

HP P9000 user guide

HP

HP P9000 user guide

Panasonic AJ-PX800G operating instructions

Panasonic

Panasonic AJ-PX800G operating instructions

Asus DS300j user manual

Asus

Asus DS300j user manual

Maxtor BlackArmor user guide

Maxtor

Maxtor BlackArmor user guide

U-Line H-4176 manual

U-Line

U-Line H-4176 manual

Pixii Power Base 600 installation guide

Pixii

Pixii Power Base 600 installation guide

Thermo Scientific Cryo 740 Series Operating and maintenance manual

Thermo Scientific

Thermo Scientific Cryo 740 Series Operating and maintenance manual

Hiddn LapTop1+ user guide

Hiddn

Hiddn LapTop1+ user guide

Western Digital Ultrastar Data60 user guide

Western Digital

Western Digital Ultrastar Data60 user guide

Tower Hobbies EASY TOTE manual

Tower Hobbies

Tower Hobbies EASY TOTE manual

manuals.online logo
manuals.online logoBrands
  • About & Mission
  • Contact us
  • Privacy Policy
  • Terms and Conditions

Copyright 2025 Manuals.Online. All Rights Reserved.