Mersive Solstice Pod User manual
pg 1 | Pod Quickstart Guide | www.mersive.com | © Copyright 2019 Mersive
Solstice Pod Quickstart Guide
The Solstice Pod connects to a meeting-room display and leverages existing WiFi/Ethernet networks to facilitate wireless
content sharing and collaboration. This document provides technology managers with instructions for evaluating,
deploying, and managing one or more Pods.
Looking for Something Else?
•Using Solstice: If you are already in a Solstice-enabled room and looking for information on how to use Solstice to
share content and collaborate, please go to our Quickstart Guide.
•Security Guidelines: For information on deploying Solstice in a security-conscious environment, please refer to the
Solstice Pod Baseline Security Standard (BSS) document.
•Specs and Reference Info: For hardware specifications and a detailed list of configuration options and other
reference info, check out the Solstice Pod Specs and Reference Material.
•Deployment Overview: See all the components of a Solstice deployment and find documentation in our
Deployment Overview.
Table of Contents
Scenario 1: Trying Out the Pod for the First Time
Scenario 2: Your Initial Rollout
Scenario 3: Large-Scale Deployment
Scenario 4: Long-Term Deployment Management
Pod Quickstart Guide
Updated January 25th, 2019
Pod Quickstart Guide
pg 2 | Pod Quickstart Guide | www.mersive.com | © Copyright 2019 Mersive
Scenario 1: Trying Out the Pod for the First Time
If you have a Pod and want to experiment with all the features, follow the steps below. Setting up and trying out the Pod is
straightforward. The way you set up and evaluate your first Pod may be different than how you configure and deploy Pods
throughout your organization depending on your network and use cases. This section will help you get a Pod up and running
quickly so you can test performance and take a first-hand look at end-user features.
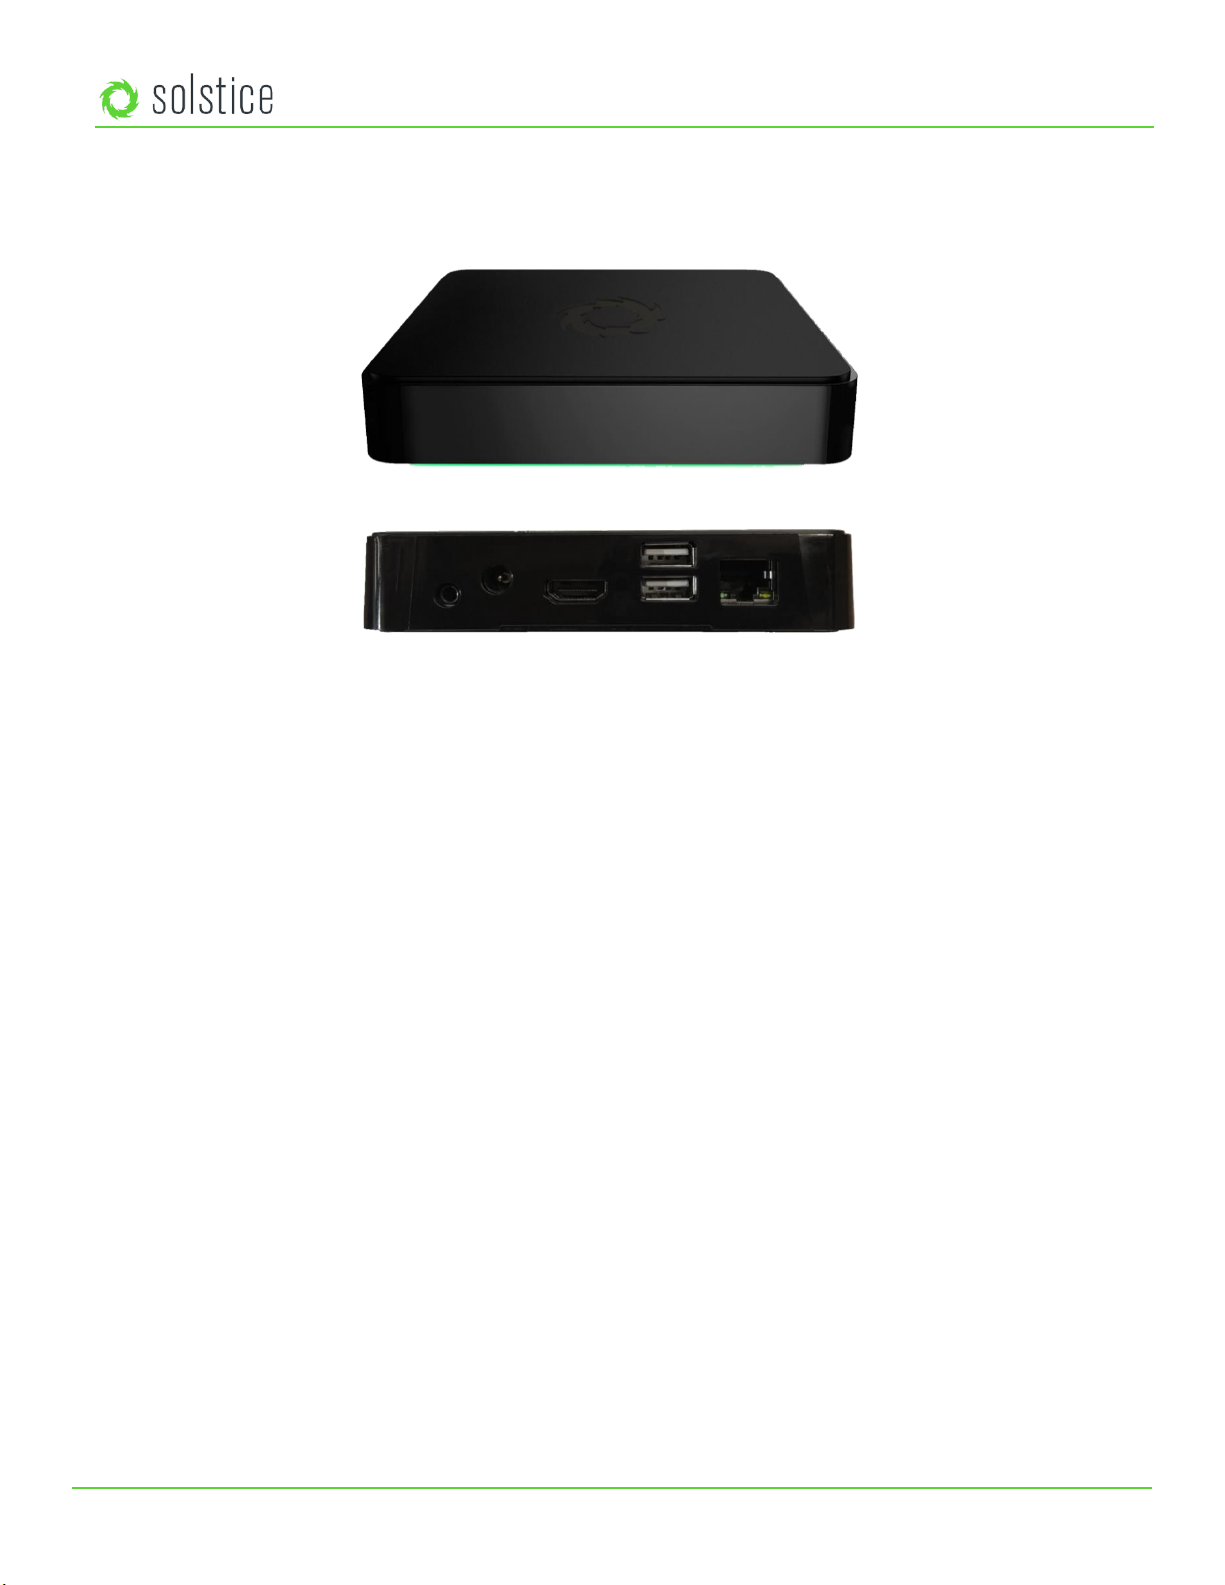
Step 1: Unpack your Pod
The Pod is delivered with an HDMI cable and 12V power supply. Use the HDMI cable to attach the Pod to a display and
power the Pod by connecting the supplied power adaptor to a standard power outlet. Optionally, if you have a touch-
enabled display and would like to try out the Pod’s touch features, connect a USB cable from the Pod to the USB port on the
display.
A green LED bar will illuminate on the front of the Pod once it receives power. The Pod will take a few minutes to boot up
and display the default welcome screen. In this default state, the Pod will display connection instructions on the welcome
screen along with its default name of “SolsticePod”. For your convenience, we ship the Pod with both the wireless access
point enabled and Ethernet ready to support DHCP. You’ll have a chance to change these settings based on your
deployment plans later.
Notice that the welcome screen instructions will display the default “SolsticePod”hotspot network name/SSID. If you’re not
able to connect the Pod to a DHCP-ready Ethernet network (if you are, see Scenario 2), you can evaluate the Pod using the
SolsticePod hotspot network. The standard deployment configuration is to attach the Pod to an existing network via
Ethernet, but the WAP provides a convenient mechanism to evaluate a Pod. Just keep in mind that your devices (and the
Pod) won’t have internet access during your evaluation with the Pod in WAP mode. Features that require internet access,
such as the welcome screen RSS feeds and sharing YouTube videos, won’t be available.
Step 2: Install the Free User App
Once your Pod and display are powered on, it’s time to install the free Solstice app (should also be installed on each user
device) to connect to the Pod. Admin permissions are not required to install the Solstice app. Instructions to get the app and
connect are shown on the Solstice display’s welcome screen.
Important note: The Pod is shipped with the Wireless Access Point (WAP) enabled to make it easy to connect and
evaluate Solstice’s collaboration features. However, WAP mode is not recommended for long-term deployment for
security and performance reasons. For more info on configuring the Pod for deployment, refer to Scenarios 2 and 3.
Pod Quickstart Guide
pg 3 | Pod Quickstart Guide | www.mersive.com | © Copyright 2019 Mersive
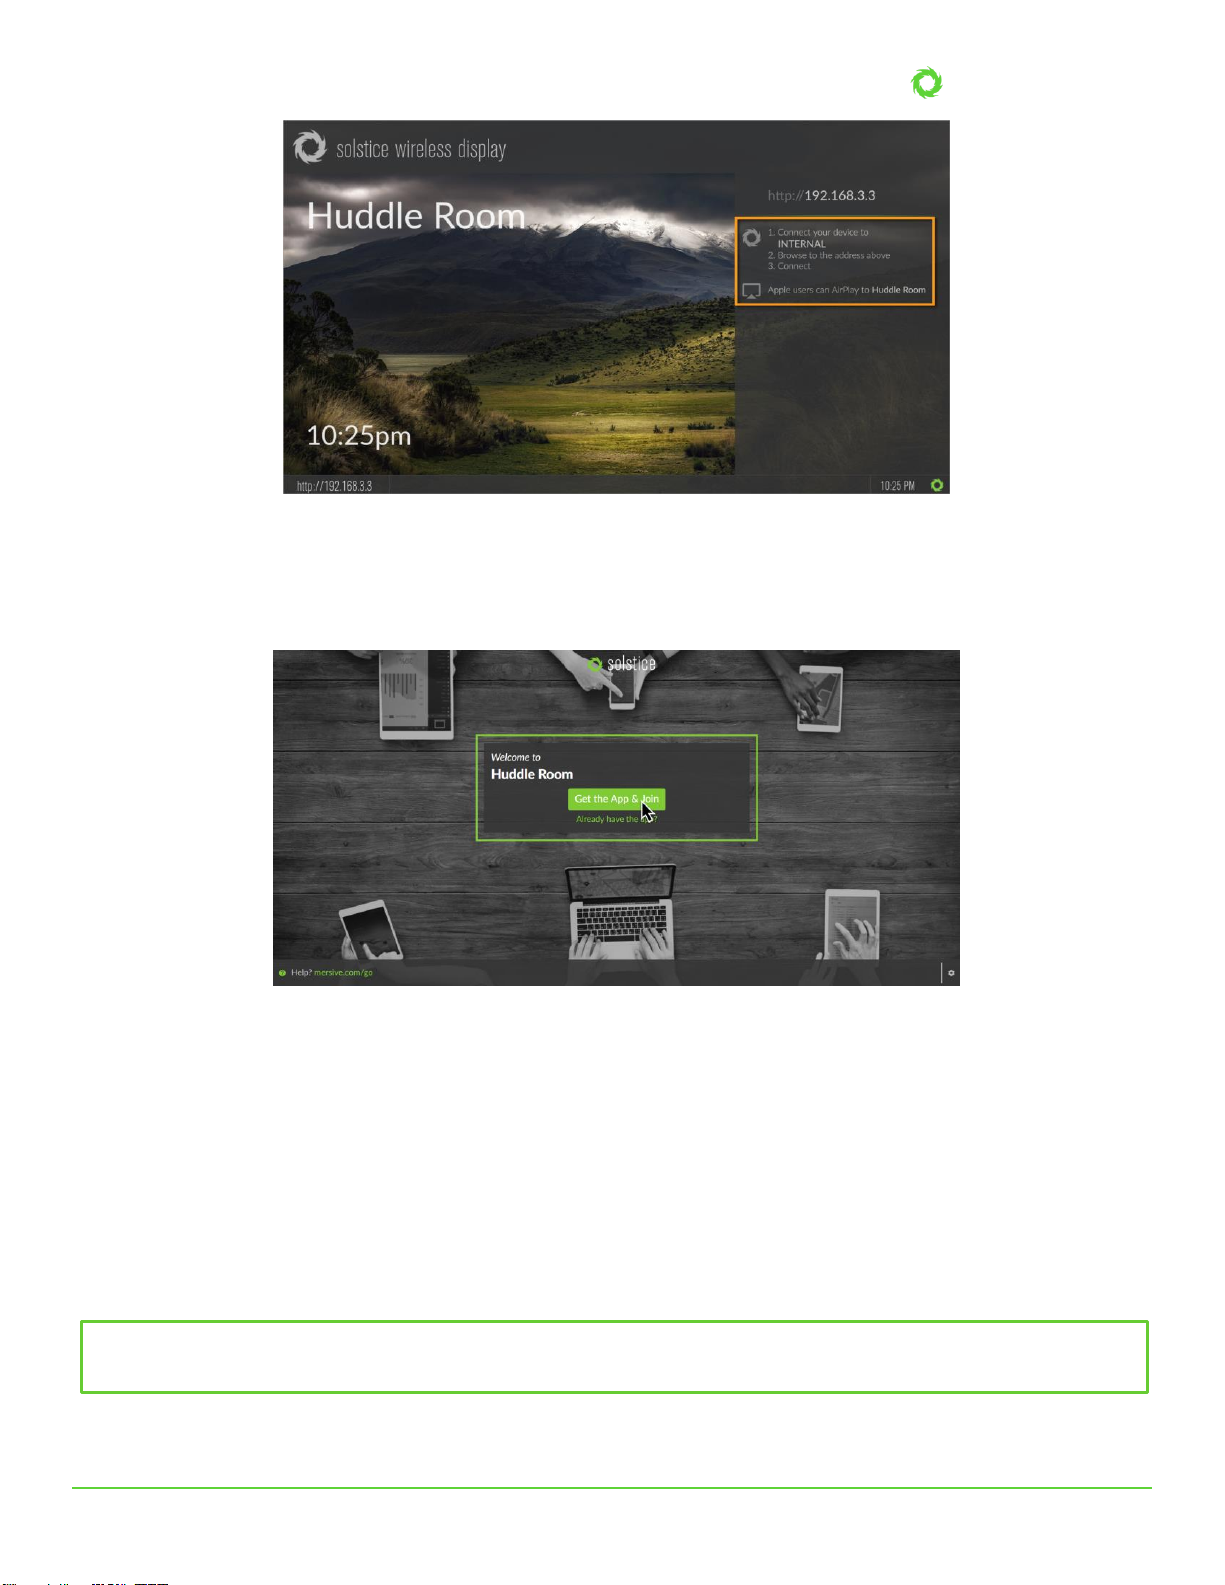
How to Connect to the Solstice Display
1. On the user device, connect to the “SolsticePod” network.
2. Enter the IP Address shown on the display into a browser on your device.
3. Click the Get the App & Join button and run the downloaded app.
Android or iOS devices will be directed to their app stores to download and install the app. However, this requires internet
access which is not available when connected to the Pod’s hotspot network. For this evaluation, these users will need to hop
over to a network that has access to the internet to install the Solstice mobile app. For full rollout and deployment, Pods
should be deployed on internet-enabled networks. See Scenarios 2 and 3in this guide for more information.
Although Solstice users don’t need to download the user app before they walk into the room, we’ve also provided download
links here for convenience.
Windows: download from www.mersive.com/download or directly from the Pod
Mac: download from www.mersive.com/download or directly from the Pod
iOS: https://itunes.apple.com/us/app/solstice-client/id887643816?mt=8
Android: https://play.google.com/store/apps/details?id=com.mersive.solstice.client_v2
Keep in mind your Pod shipped with the most recent apps pre-installed. These will be installed for any user that downloads
Important note: Whether you download the client apps from the Pod or our website, admin rights are never required
to install them.

Pod Quickstart Guide
pg 4 | Pod Quickstart Guide | www.mersive.com | © Copyright 2019 Mersive
the app from that Pod. Each new version of the Pod will carry the corresponding version of the app. If a user connects with
an older version of the Solstice application, they’ll be given the option to upgrade to the latest version. This way, users will
remain up to date and administrators can focus on managing their Pod deployment.
Step 3: Connect to the Pod
Now that you have the user app, let’s connect to the Pod. First, your device must always be on the same network as the Pod
to connect –in this case, the “SolsticePod”hotspot network.
When you launch the Solstice app, you will see the Discovered Displays tab. This tab shows all the Solstice displays on your
network so that you can simply click the appropriate display and connect. For now, the discovery panel is likely to only show
the single Pod you’re evaluating. Click on the SolsticePod display and enter the on-screen PIN if prompted.
If you are unable to see any Pods to connect to, it is likely that you do not have the Solstice Discovery Service (SDS) set up.
For now, you can select the “Enter IP” option and type the IP address visible on the Solstice Pod welcome screen. To learn
more about setting up SDS, see the Make Pods Available for Discovery section in Scenario 2 or refer to the SDS guide.
Regardless of which device you are using to evaluate Solstice, the user interface and experience is nearly identical. This
allows users to freely move between devices when sharing content to the display without needing to navigate a new user
interface.
Step 4: Share from your Solstice App
Once you are connected to the Pod, you can try out several features of Solstice, including:
•Sharing your entire desktop or device screen
•Sharing a specific application window (not supported on all mobile devices)
•Sharing media files (images and videos)
•Arranging, hiding, and otherwise controlling various content posts from your WYSIWYG app interface
•Moderating a session, approving a join request, and previewing a post submission
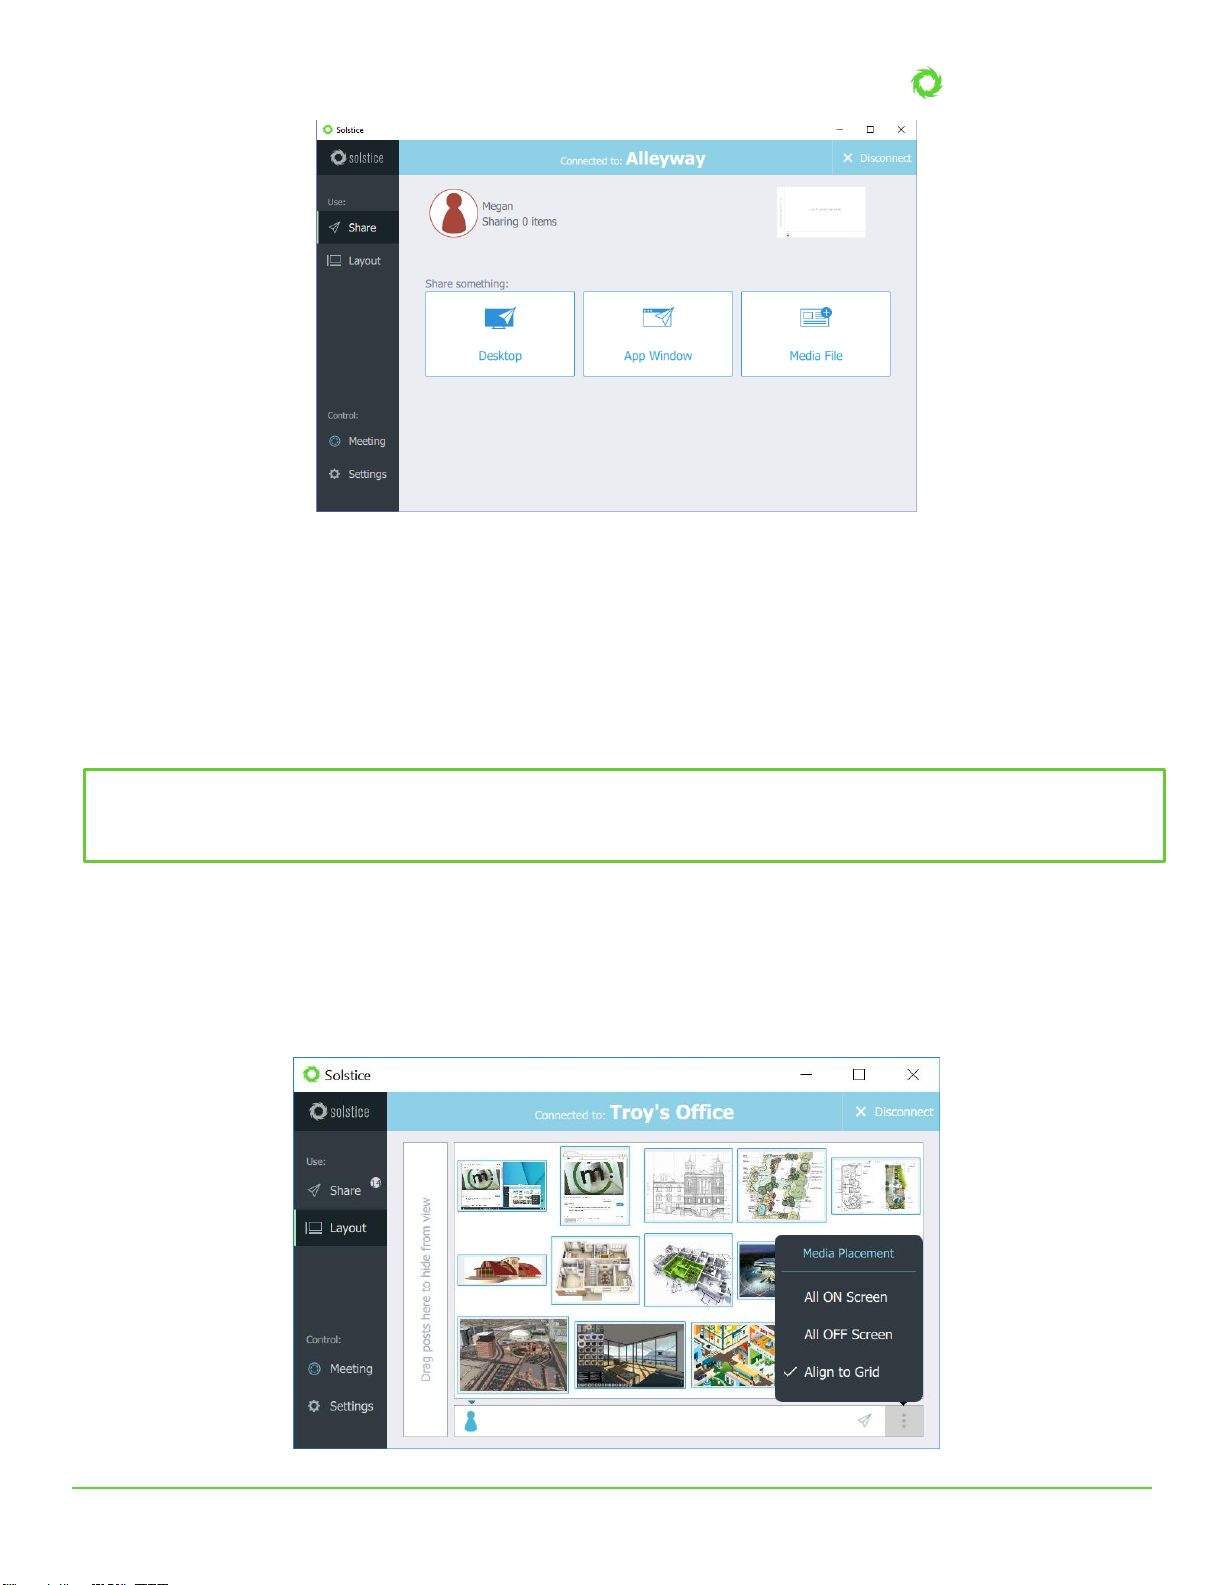
When you connect to a Pod, you’ll be presented with the Share panel. The sharing panel allows you to toggle on/off sharing
various content sources to the screen. From PC-based devices, you can share desktops, application windows, images, and
videos. From mobile devices, you can share the device screen, images, and videos stored on the device, and even images and
videos captured live from the device’s camera.
Pod Quickstart Guide
pg 5 | Pod Quickstart Guide | www.mersive.com | © Copyright 2019 Mersive
Try sharing more than one piece of content to the display using the Share panel. For example, it’s useful to share a couple
different application windows and some media files to see how things work. Try sharing your desktop by using the Desktop
sharing option. Next, open a PowerPoint or PDF document and share by using the App Window option. Now resize the
PowerPoint or PDF to half screen and note the difference between the desktop post and shared app window post on the
display. Lastly, share a dozen images saved locally on your device using the Media File sharing option.
You’ll notice that your posts carry an outline color that matches the user color assigned to you when you connected. If you
have a second device available, connect to the Pod from that device too and share something to see how different users are
represented on the shared display.
Step 5: Control your Posts
By selecting Layout in the grey sidebar menu, you can access Solstice’s intuitive What-You-See-Is-What-You-Get
(WYSIWYG) control interface. Here, every connected user can drag and drop content to reorganize it on the display, drag
posts off the screen into the “on-deck”area on the left-hand side to keep them available in the session but hide them from
view, delete posts, resize posts, and more. Posts are aligned to a grid by default, but you can deselect the Align to Grid
option (as seen in the screenshot below) to enable users to manage content in free-form mode.
Did you know? If you have an iPad, iPhone, or even an OSX device, you can Airplay the device screen directly to the Pod.
Swipe up from the bottom of the screen and click on “SolsticePod” in the AirPlay menu. You’ll see your device mirrored
live on the display.

Pod Quickstart Guide
pg 6 | Pod Quickstart Guide | www.mersive.com | © Copyright 2019 Mersive
You can also access a menu of additional content-specific options by long clicking on an individual shared post. These
options include making the post full screen, deleting it, creating a stack of multiple posts, and accessing info about the post.
Next, go back to the Share panel and share a video by selecting the media file option and navigating to a video saved on your
device to experience the high-quality 1080p playback. Note that a video playback menu also appears over the post on the
Layout panel.
Lastly, you can try out Solstice’s moderator mode by enabling session moderation in the Settings menu of the Solstice client.
For a walkthrough of moderator mode, check out the moderator mode portion of the Solstice user training video or read
more about moderator mode in the Solstice User Guide.
Scenario 2: Your Initial Rollout
In Scenario 1, only the WAP mode was used to demo Solstice’s end-user collaboration features. However, for your initial
rollout, we recommend attaching your Pods to your existing WiFi/Ethernet networks for improved performance, security,
user workflows, and to give users access to the internet while using Solstice. In this section, we’ll cover this and other
important rollout considerations.
Rollout Considerations
There are 4 core considerations for any Solstice deployment:
•How are the Pods attached to your network(s)?
•How do users connect to the Pods?
•How should the Pods be configured, functionally and visually?
•What is the long-term management plan?
By following the steps in this section, we’ll address the options for each of these considerations. However, it’s also
important to think through each rollout consideration within the context of your organization and involve the appropriate
stakeholders, such as the IT department for attaching Pods to your host networks, each step along the way.
Before You Begin
There are a few ways to configure your Solstice Pods that you should be aware of before you begin. Every Solstice Pod can
be configured via the individual Pod’s configuration panel. The Pod’s configuration panel can be accessed locally by
connecting a USB mouse/keyboard to the Pod, or it can be accessed via web browser from a separate device by entering the
Pod’s IP address and clicking the Settings icon in the lower right-hand corner of the quick connect page. Note that the
browser configuration can be password-protected but Pods ship without a password to make the initial configuration easy.
In addition to the Pod’s individual configuration panel, Pods with Enterprise Edition licenses can also be configured via the
Solstice Dashboard software application which provides additional features and capabilities including one-to-many
management. If you have purchased Enterprise Edition licenses and want more information about how to use the
Dashboard for one-to-many management, check out the Dashboard Admin Guide.
The steps below access the local configuration panel via a USB mouse and keyboard connected to the Pod. This method will
work for every Pod individually.
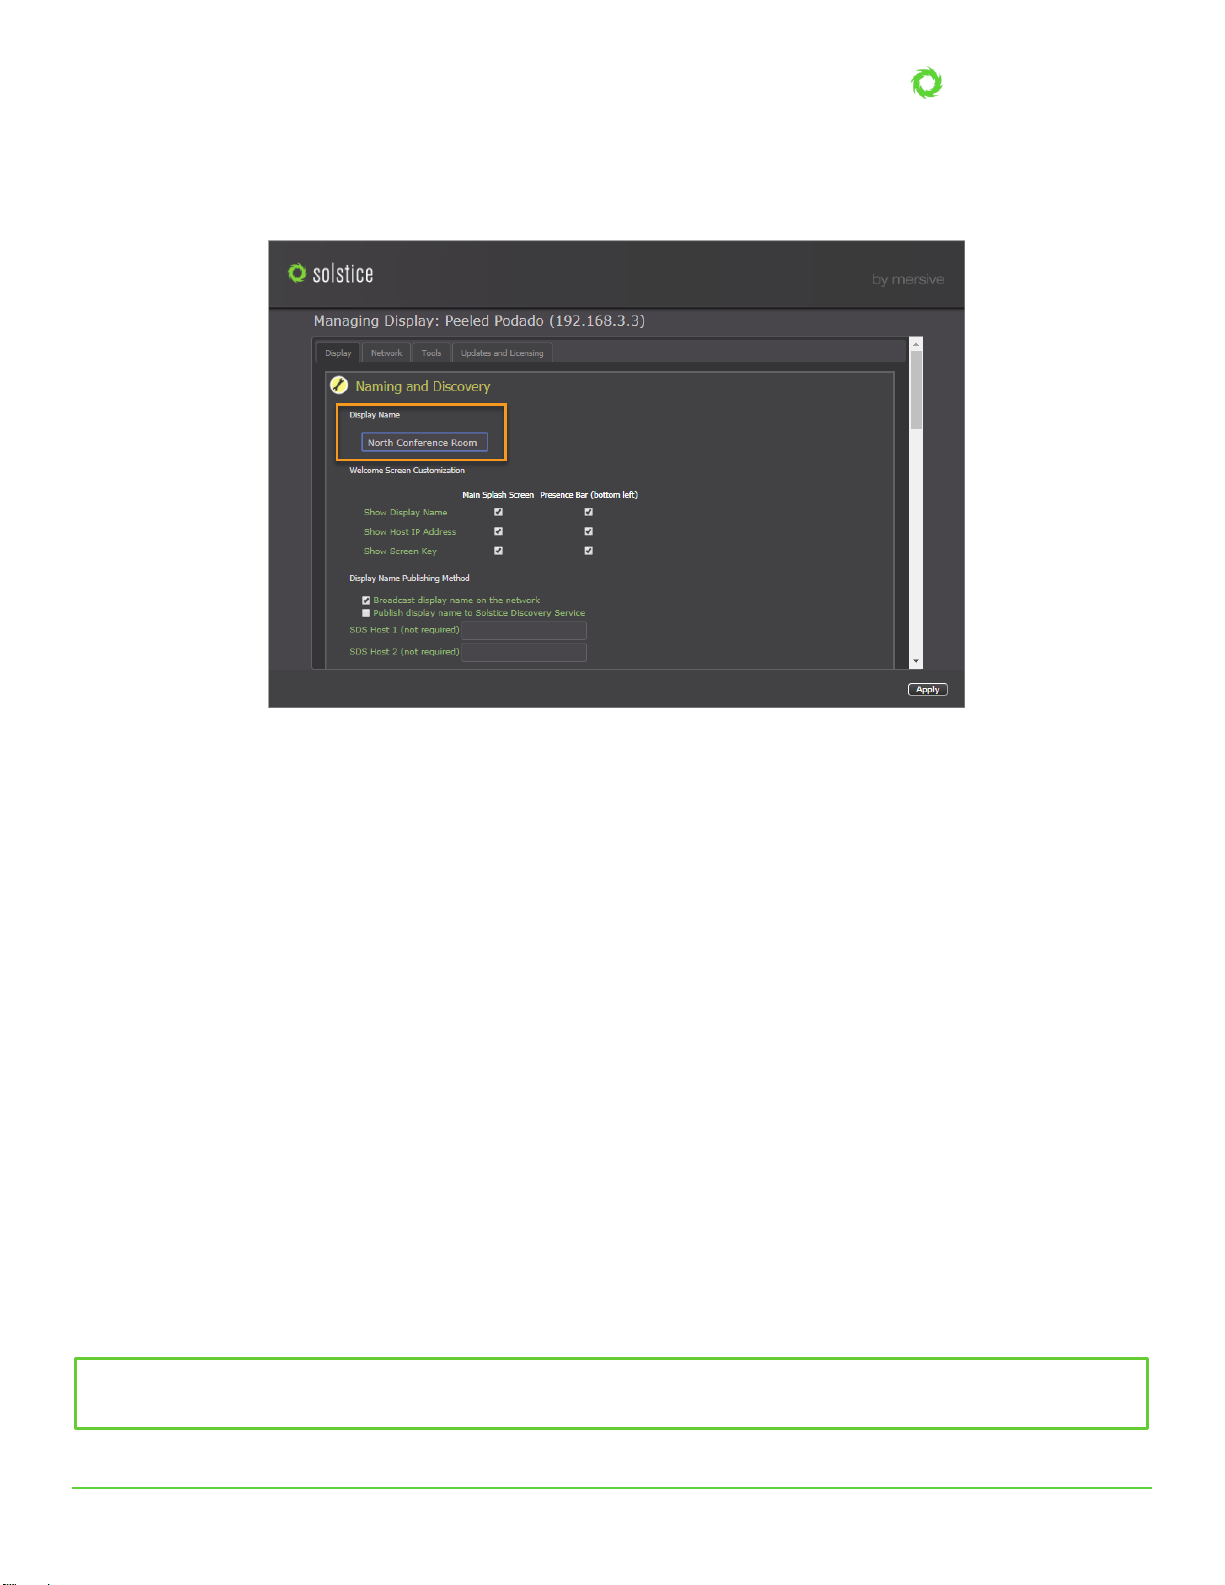
Step 1: Name the Pod
All Pods are shipped with the default name of “SolsticePod”, so we recommend changing the name for identification
purposes. Pods should be named based on the location they will be deployed in, e.g. “Conference Room 201”or “Dave’s
Office”.
Did you know? The Solstice Dashboard allows technology managers to monitor, configure, and update all Solstice hosts
on their network from a single screen.
Pod Quickstart Guide
pg 7 | Pod Quickstart Guide | www.mersive.com | © Copyright 2019 Mersive
To change the Pod name, first access the local configuration panel by attaching a USB mouse and keyboard to the Pod and
clicking the Solstice icon in the lower right-hand corner of the Solstice display interface. Then select System > Configure.
The configuration panel will appear. Under the Display tab, change the Display Name to a descriptive name for your Pod,
then click Apply.
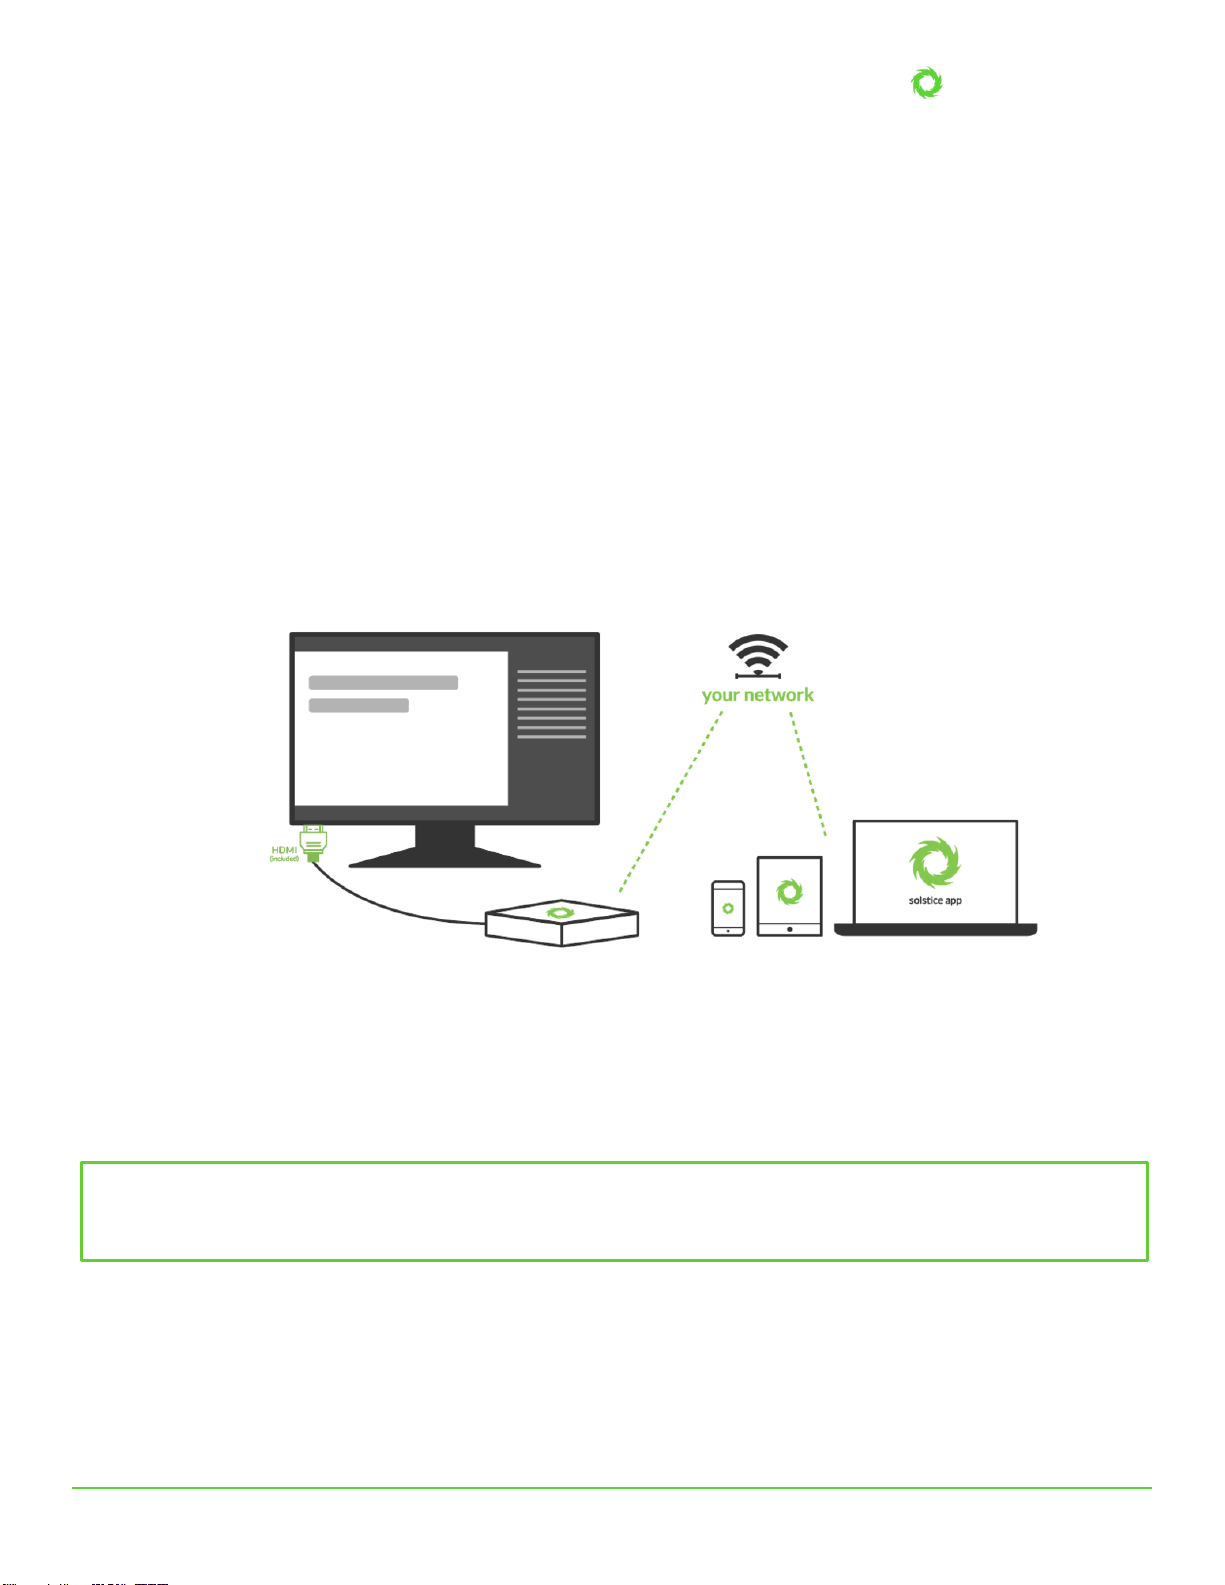
Step 2: Attach the Pod to your Existing Network(s)
The Solstice Pod is designed to attach to existing WiFi/Ethernet networks that users can access to connect and share
content to the Pod. The Pod hardware includes two distinct network interface cards (one Ethernet and one wireless card) to
provide various options for network connection.
•Attach via Ethernet (Recommended). The recommended deployment method is to attach the Pod to the primary
user network via Ethernet. To do so, simply plug a network-connected Ethernet cable into the Ethernet port on the
back of the Pod.
•Attach Wirelessly. Alternatively, the Pod can be attached to the primary network wirelessly if an Ethernet
connection is not available in the deployment space. To attach the Pod wirelessly to the host network, go to the
Network tab of the configuration panel, select the correct network, and enter the network credentials.
•Dual-Networks. Many deployments take advantage of the Pod’s dual-network capabilities to support secure
collaboration between users on separate networks, such as corporate and guest users. Attach the Pod to the
primary network via Ethernet and connect to the secondary/guest network wirelessly. NOTE:The Pod’s two
network interface cards are completely distinct with separate routing tables, enabling seamless collaboration
without compromising the security of either network.
•WAP Mode (Not Recommended). While the Pod’s WAP mode is great for evaluating Solstice’s collaboration
features, it is not recommended for permanent deployments due to performance limitations and potential security
risks.
For more detailed information about the Pod’s network options and to learn about other important network factors such as
opening the necessary network ports, hardening your deployment from a security standpoint, and configuring
static/dynamic IP addresses, please refer to our Network Deployment Guide and Baseline Security Standard (BSS)
documents.
Did you know? The wireless card in a Gen 2i Solstice Pod may use 2.4GHz or 5GHz channels to seamlessly integrate
with your existing network.
Pod Quickstart Guide
pg 8 | Pod Quickstart Guide | www.mersive.com | © Copyright 2019 Mersive
Step 3: Make Pods Available for Connection with Solstice Discovery
Solstice is designed to make it easy and intuitive for users to connect to a Solstice Pod. A user may always connect to a Pod
by typing the Pod’s IP address into a browser window or the Solstice app. However, Solstice “discovery”can streamline the
connection process by listing all Pods available for connection and enabling users to simply click a Pod’s name to connect.
There are three discovery methods that will enable this click-to-connect functionality in your Solstice deployment:
•Broadcast Discovery (default)
By default, each Pod will broadcast its name and IP address on the host network via UDP broadcast packets. While
this usually works great for smaller organizations with simple network configurations, UDP broadcast traffic is
often not allowed on larger, IT-managed networks. Broadcast discovery can be disabled in the Pod’s configuration
panel under the Network tab.
•Solstice Discovery Service (SDS) Application (recommended)
SDS is a light-weight Windows application created for networks that do not allow UDP broadcast packets. Basic
SDS use requires an administrator to associate each Pod with the SDS host’s IP address. This can be done in bulk
very quickly using the Solstice Dashboard (requires Enterprise Edition Pods). Users’SDS host will be set
automatically when they download the Solstice app directly from a Pod, or users can enter the SDS host IP address
in the Settings menu of their Solstice apps (General tab > Solstice Discovery Service Address field).
•Universal SDS Override with DNS Entry
With this option, users will not be required to enter the SDS host IP address in order to leverage the non-broadcast
discovery that SDS provides. For this to work, an administrator must add an SDS DNS entry on the local network.
For more information on adding an SDS DNS entry, refer to the SDS Guide.
For more information on discovery options see the Network Deployment Guide, or jump straight to the SDS Guide.
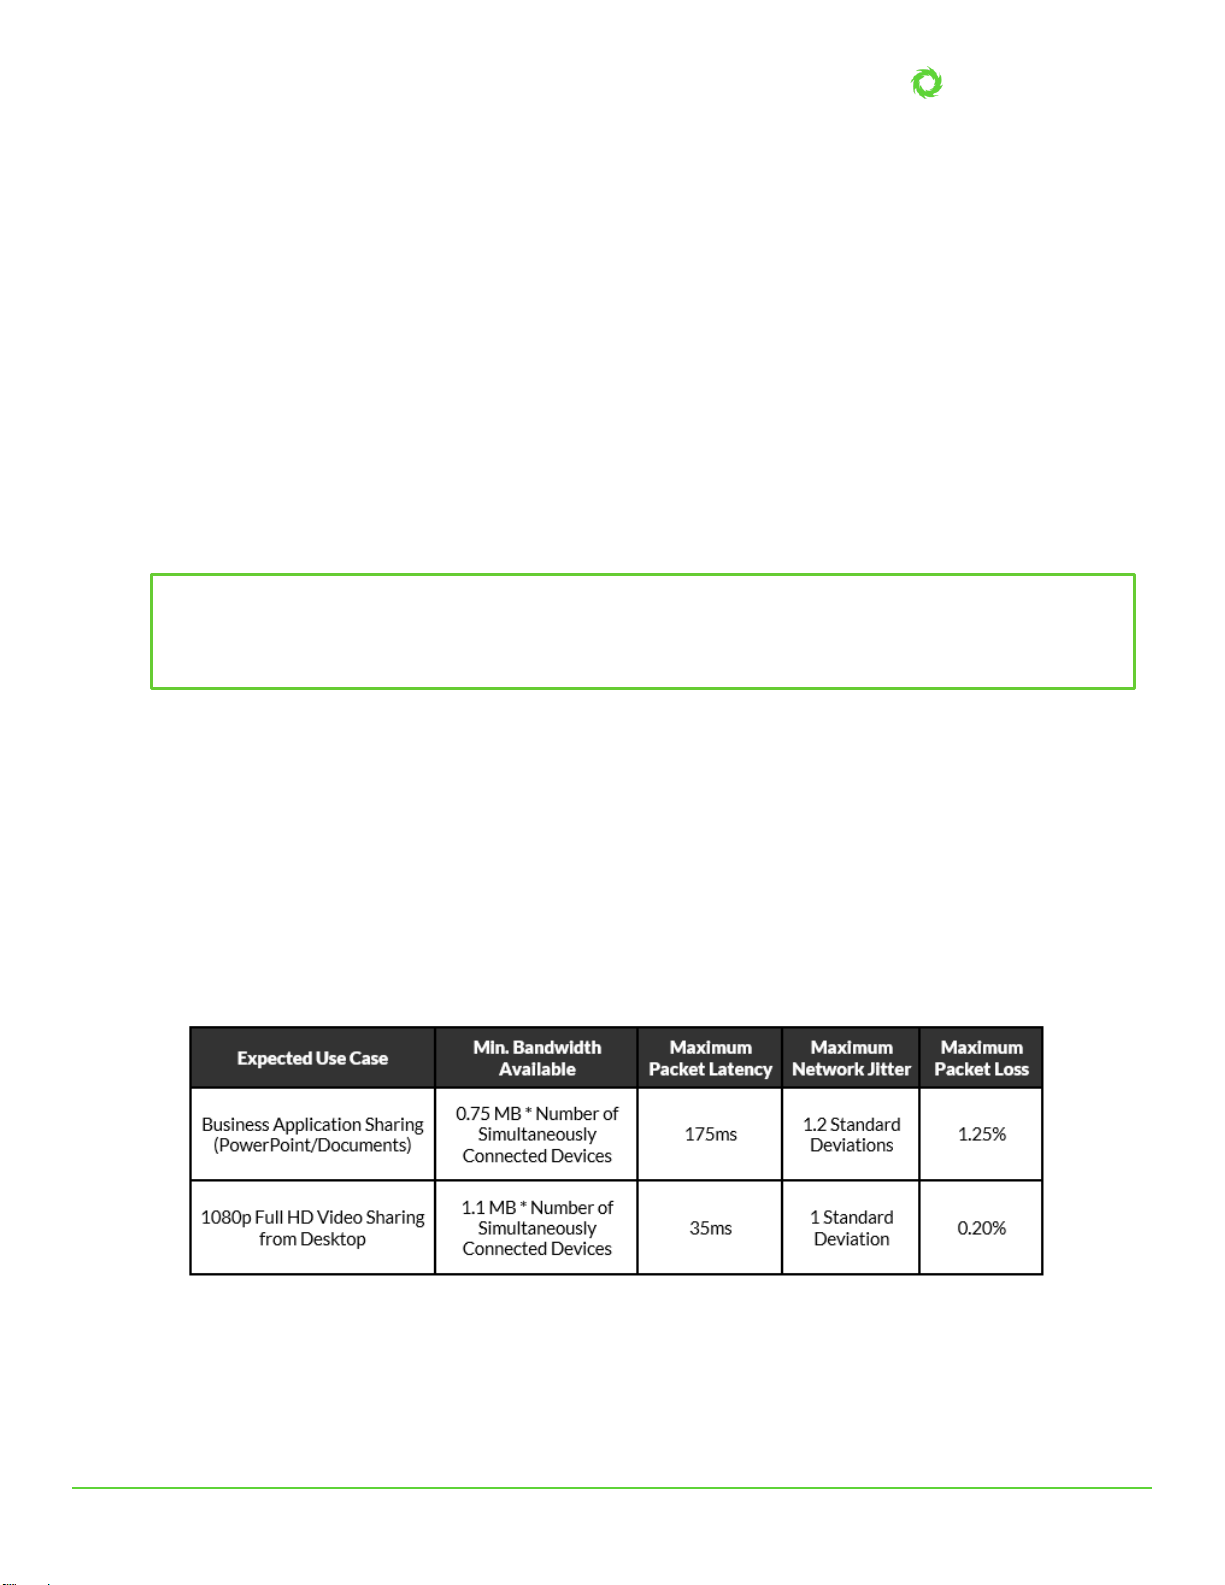
Step 4: Understand and Validate Baseline Network Performance
Solstice has been optimized for high performance across a broad range of network conditions, but administrators should be
aware that, as a live video streaming solution, Solstice’s performance is dependent on the host network. Therefore, the
network should meet the minimum requirements outlined below. These statistics are measured between a Solstice host and
end user device for two common use cases.
To quickly see how well Solstice performs on your network, connect to the Pod from a laptop and share the desktop. The
laptop you use should be representative of those that will be used in production. NOTE: Solstice requirements of user
devices are not intensive by modern standards. However, very old devices with underpowered graphics processing
capabilities may exhibit poor performance when live streaming to Solstice displays.
Notice desktop audio sharing is toggled on by default. Open a video file on the laptop, or navigate to YouTube and choose a
Did you know? The Solstice Discovery Service is a simple but important component of Solstice deployments
on host networks that do not allow UDP broadcast/multicast traffic. It provides the display list and other
information about which displays are in use (or even scheduled) so that the app discovery screen is useful and
easy to use.

Pod Quickstart Guide
pg 9 | Pod Quickstart Guide | www.mersive.com | © Copyright 2019 Mersive
video to play via the web browser. You should experience a smooth viewing experience with synchronous audio. If the video
playback is not smooth or audio is choppy or not synchronized, you may have a network performance issue.
There are additional considerations when it comes to validating network performance, such as ensuring Apple AirPlay
mirroring is configured correctly and fully functional if required for iOS users. To fully evaluate the performance of Solstice
on your network, perform the validation steps in the Network Deployment Guide while monitoring your network with your
preferred tools.
Scenario 3: Large-Scale Deployment
When Solstice is deployed at scale, there are additional considerations for administrators. As a first step to prepare for a
large deployment, we encourage you to schedule your deployment with Mersive so that we can stage resources to support
the on-site deployment team.
In addition, please review the major deployment considerations, which are covered at length in the Network Deployment
Guide. These include:
•Host Network Considerations
•Network Deployment and Configuration
•Required Open Network Ports
•Setting Up Display Discovery
Scenario 4: Long-Term Deployment Management
Solstice is designed as an every-room solution, and large deployments may involve dozens or even hundreds of Pods, so
ongoing, long-term management is important. In this section, we’ll cover the tools and resources available to support long-
term deployments.
The Solstice Dashboard. The Solstice Dashboard is an invaluable tool for monitoring and managing large deployments. We
recommend the technology managers responsible for the Solstice deployment use the Solstice Dashboard as their primary
tool for ongoing management and maintenance of the deployment. This may be the IT team, the AV room-owner, or a third
party such as the AV integrator.
NOTE:In order to use the Dashboard for management of the deployment, the Pods to be managed must have Enterprise
Edition licenses.
Download the Solstice Dashboard here >>
View the Solstice Dashboard guide >>
Solstice Discovery Service (SDS). Solstice Discovery Service (SDS) is an important component for long-term deployments
on managed IT networks. In addition to facilitating the user connection process, SDS is also required for several enterprise
features including Solstice Multi-Room.
Download SDS here >>
View the SDS Guide >>
Solstice Kepler. Solstice Kepler is a cloud-based room monitoring solution which will provide alerts, real-time deployment
status, usage data, and other valuable analytics. Kepler will be an add-on service for Solstice enterprise deployments.
Learn more about Solstice Kepler >>
Solstice OpenControl API. The Solstice OpenControl API exposes much of the management and control functionality found
in the Solstice Dashboard for integration with third-party systems such as room control panels and other workplace
technologies/systems.
View the API guide >>


