Vava VA-LT030 User manual

vava.com
120" ALR Projector
Screen Max
User Manual
VA-LT030

CONTENTS
IMPORTANT SAFETY INSTRUCTIONS
KNOWING YOUR SCREEN
ASSEMBLING YOUR SCREEN
WARRANTY AND SERVICE
00
01
07
17

KNOWING YOUR
SCREEN
1
IMPORTANT SAFETY INSTRUCTIONS
READ AND FOLLOW ALL SAFETY INFORMATION AND
INSTRUCTIONS. KEEP FOR FUTURE REFERENCE.
CAUTION
For optimal projection, safe installation and long-lasting use of the screen,
follow below instructions carefully:
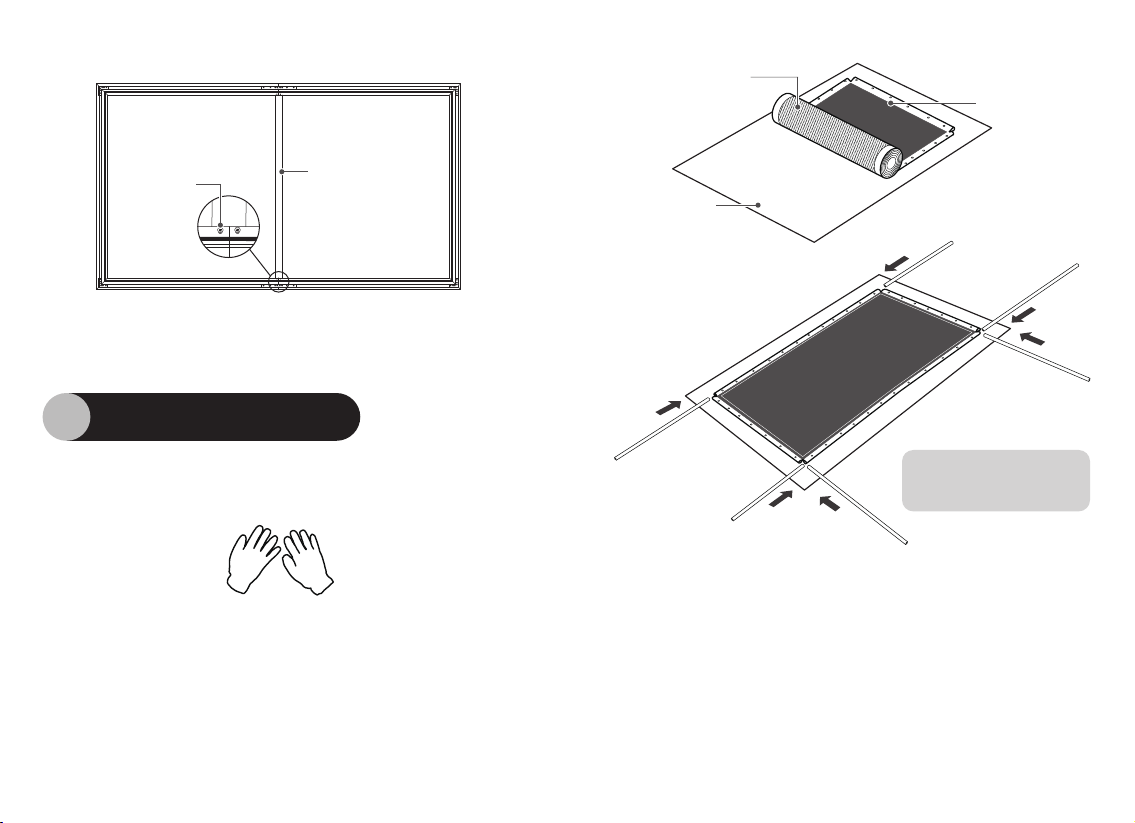
• Always handle the screen on a clean, level surface covered with clean
cloth, film, etc.
• Gently hold and put down the unit to avoid any damage to the screen surface.
• Do not touch the screen surface by hand. Use gloves to avoid fingerprints,
hand sweat, or dust on the screen surface.
• Do not poke the screen surface with any sharp or hard objects to avoid
scratches or tears.
• It is recommended to clean the screen once every two weeks.
• When cleaning, wipe the screen with a soft cloth and lukewarm water. For
general dust, use a soft brush to clean the screen surface (rough towels or
cloth may damage the screen).
• Do not clean with abrasive detergent, solvent or other coarse chemicals to
avoid permanent damage to the screen surface.
• You may notice a slight smell during first-time use, which will dissipate over time.
If the smell is too strong, open a window to ventilate the room.
• Children should be supervised to ensure that they do not play with the screen.
• Please contact your local dealer for repair or maintenance. For any questions
READ AND SAVE THESE INSTRUCTIONS

1
Package Contents
1.2
Expanded Overview
1.1
Exterior Frames *4
ALR Screen *1 Fiberglass
Strips *6
Cross
Screwdriver
*2
Hooks *2
Gloves
(pairs)
*2
*N
Inner Frames *4
1-A
1-C
1-C
1-A
10-A
10-A
10-B 10-C
10-B
1-B
1-B
7- B
7- A
23
6
10 Exterior Frames *2
10
97 8
4 5
Inner Frames *2
11
Support Rod *1 M4*8
Screws *16
Draw
Springs
3
11
11
11
11
16
16
15
15
10
10
10
10 10
10
7
7
7
7
7-A
10-B
10-B
10-A
10-A
10-C
10-C
7
7
1
1
1
1
1
1
1-A 7-B 1-B
7-A
1-C
7-A
1-A
7-B
7-A
1-C
1-B
02 // ALR Screen for UST Projector ALR Screen for UST Projector // 03

Specifications
1.3
04 // ALR Screen for UST Projector ALR Screen for UST Projector // 05
Corner
Protectors*4 Level
Ruler *1
Model
Gain
Viewing Angle
Ambient Light Resistance
Projection Size
Projection Ratio
Screen Size
Screen Weight
VA-LT030
0.6
160°
92%
2676*1514 mm/105.35*59.61 in
16:9
2656×1494 mm/104.57×58.82 in
12 kg / 26.45 lbs
Lower Wall
Brackets *2
Wall Anchors
with Screws *8
(sets)
User Manual *1
Upper Wall
Brackets *2
11 Wall Drilling
Templates *1
12
16 17 Adhesive
Tapes *4
18
13 14
15

ALR Screen for UST Projector // 07
Assemble the Inner Frames
2.1
ASSEMBLING
YOUR SCREEN
2
1. Connect the horizontal frames and fasten the M5*7 screws.
2. Insert the four corner connectors into the horizontal inner frames,
and fix the corners with M5*7 screws as shown below.
Connecting Rod Corner Connector
Horizontal Frames
Push
Vertical Frame
M5*7
Screw
M5*7 Screw
1-A
1-C
1-C
1-B
1-B 1-A

Assemble the Screen
2.2
08 // ALR Screen for UST Projector ALR Screen for UST Projector // 09
2
M4*8 Screw
Support Rod:
Vertical to the
horizontal frames
1. Put on gloves and place a clean cloth (or use the packaging material
for the screen) on a flat, clean and level surface.
2. Unroll the screen, place it face down on the cloth, then insert the
fiberglass strips into the screen sides.
Caution: Handle with care. Avoid any creases on the screen.
3. Put the assembled frames on the back side of the screen.
Note: short-focus anti-light screen is directional and needs to be
well matched with the frames.
3. Install the support rod as shown below.
Black side
face up
Screen side
face down
Clean,
flat cloth
7- B
7-B: Short Fiberglass Strip
7- A
7-A: Long Fiberglass Strip
7- A
7- A
7- B
7- A

10 // ALR Screen for UST Projector ALR Screen for UST Projector // 11
Cloth Screen
4. Fix the screen onto the frame with all the springs in order as
indicated below (corners, short sides, then long sides).
5. Hold the screen upright and ensure that it is taut and flat.
Adjust the springs until no creases observed.
Corner alignment mark
Screen
back side
Screen lower edge mark
(for short-focus anti-light
screen only)
1 2
5
11
12
10
9
6
8
7
34
Fiberglass Strip
Spring Inner Frame
Screen
Note:
After extended use, the screen
may become less taut. Attach the
springs to the innermost groove to
re-flatten it.
up
10
20
30
40
50
60
10
20
30
40
50
60
Hooks
Grooves

Assemble the Outer Frames
2.3 Mount on the Wall
2.4
12 // ALR Screen for UST Projector ALR Screen for UST Projector // 13
1. Place the outer frames against the inner frames, align the four
corners and fix with the included M4*8 screws.
2. Fix the plastic corner protectors onto the four corners.
1. Estimate the wall mount area for the screen. The lower edge of
the screen should be 60-80cm / 23.6-31.5 in above the ground
(as shown below).
2. Measure the distance between the spots where the wall
brackets will be mounted with the included level ruler.
Recommended Distance
23.6-
31.5 in
9.8 in 3.0 in
42.7 in 3.6 in
11.8 in 11.8 in55.1 in
11
11
11
11
10-B
10-C
10-C
10-A
10-A 10-B
11
10-A/10-B: Horizontal Outer Frame 10-C: Vertical Outer Frame
: Corner Protector
Outer Frame
Inner Frame
Screen

14 // ALR Screen for UST Projector ALR Screen for UST Projector // 15
4. Drill holes respectively and install the four wall brackets using
the wall anchors with screws.
Note: Make sure the brackets are level with the level ruler.
3. Make sure the screen is correctly assembled, then wrap the
screen front with the cloth to prevent it from being damaged or
scratched.
: Wall Drilling Templates
: Wall Anchors with Screws
: Upper Wall Brackets
: Lower Wall Brackets
12
13
12
16
15
13
16
15
Cloth
Adhesive Tape

Screen Height Adjustment
2.5
WARRANTY AND SERVICE
We will provide you with after-sales service based on specific local
policies. Please contact your local sales representative or after-sales
team for more details.For any questions or concerns, please email us
9:00 a.m. - 5:00 p.m. PST).
5. Mount the screen onto the wall as shown below.
1) Insert the lower side of the screen into the lower wall bracket,
then push upwards to compress the spring.
2) Insert the upper side of the screen into the upper wall bracket,
then release.
Adjust the upper wall bracket by repositioning the screws and
screwing them into the lower holes (adjustable range: 0 - 50mm).
2
1
16 // ALR Screen for UST Projector ALR Screen for UST Projector // 17

www.vava.com
Made in China
NORTH AMERICA
E-mail: [email protected]
MANUFACTURER
Manufacturer: Shenzhen NearbyExpress Technology Development Co.,Ltd.
Address: Floor 7, Building E, Galaxy World Phase II, Shenzhen, China
Rev_1.0_EN

尺寸:100*145mm
骑马订
材质:封面157克铜版纸 内页105克铜版纸
Other Vava Projector Accessories manuals
Popular Projector Accessories manuals by other brands

Casio
Casio YP-100 - 1 Getting started guide

Sanyo
Sanyo POA-MD18DVI - Projector Terminal Expansion... Replacement guide

Eiki
Eiki PjNET-20 owner's manual

Celexon
Celexon Tripod Screen Ultra-Lightweight operating instructions

WePresent
WePresent WiPG-1600w user manual

Viz-Art Automation
Viz-Art Automation LEADER Mount manual