Tontex CY-100X User manual

Thank you for purchasing the company's products, in order to better
understand this product, please read this manual carefully.
Product Specifications:
Operating voltage range: AC 200~240V 50Hz Range of working temperature:-20℃~+55℃
Relative humidity range:20%~90% Lifting motor power: 280W (MAX)
Touch screen working power:2W Ratio of display on screen:16:9/4:3/16:10
Sensing resolution:26500x14900 Sensing accuracy:< 0.1mm
Dots per second:120dot/sec Transmission interface:USB/RF2.4G
Transmission speed:9600bps Transmission distance:> 5M
Pen sensing height:>10MM Battery for pen:AAA battery
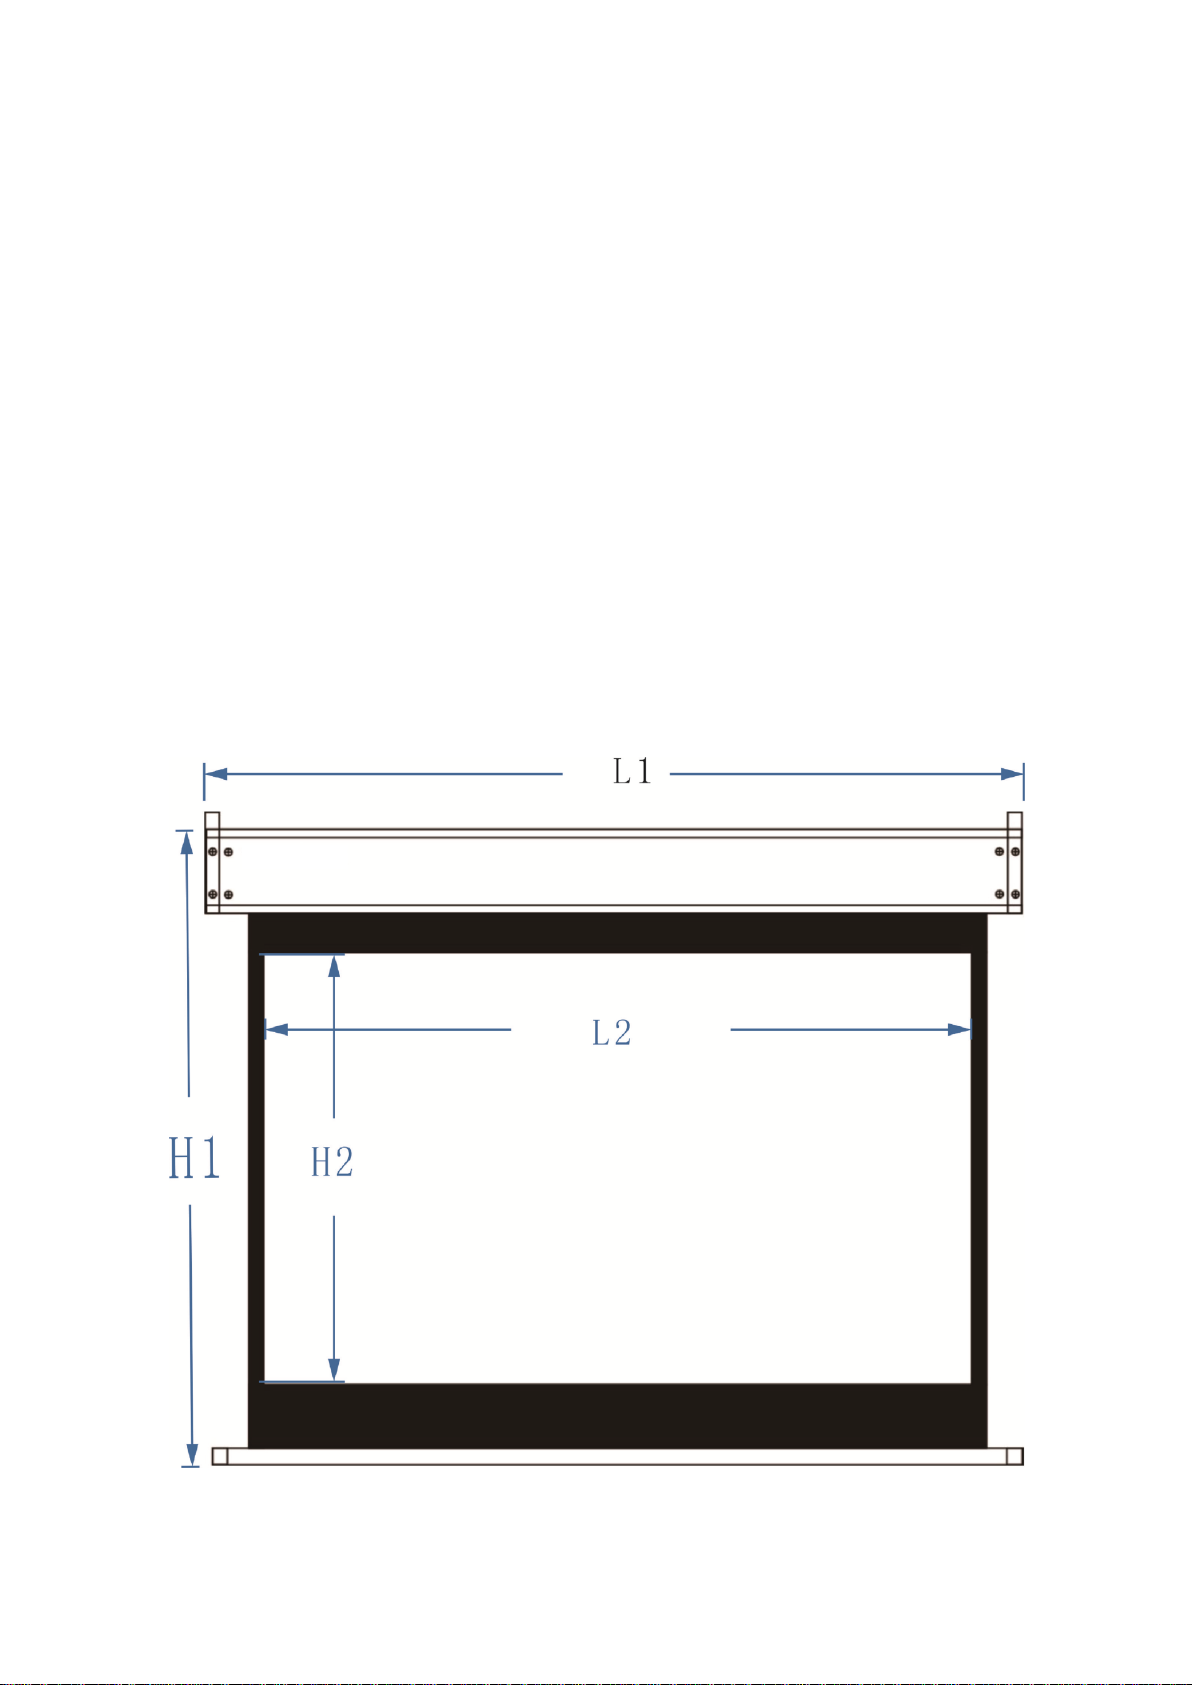
Dimension of product: Find page H1*L1 Dimension of projection: Find page H2*L2
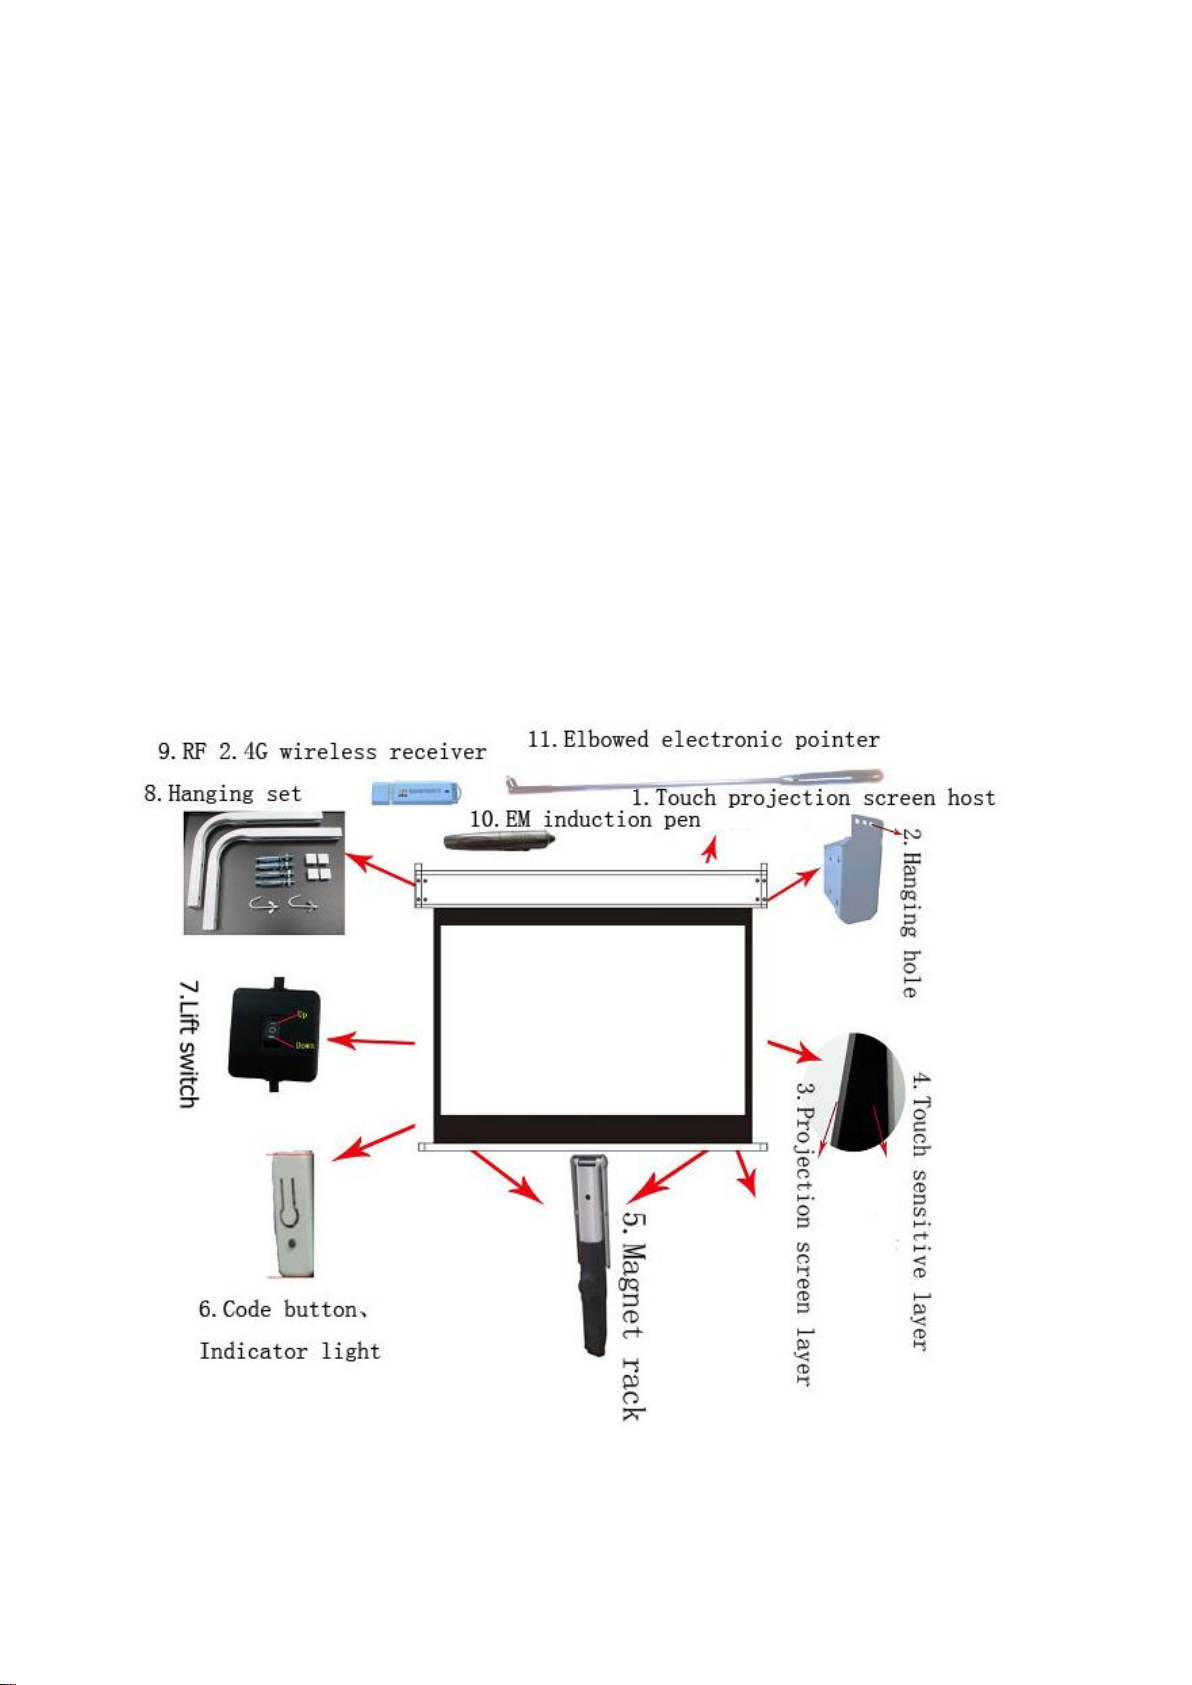
★Schematic diagram:

★Cautions:
1. When the screen is not in use, please rewind the screen back to the shell, the
roll should pay attention to check the screen to ensure that no worms, dust-free and
other foreign matter before rewinding.
2. The operation of the screen can be rolled up and down continuously in 4 minutes,
otherwise will overheat the motor. At this time, the motor will automatically enter
the protection state to stop running. If it needs to be continuously used, it must
wait for the motor to cool (about 10-15 minutes) then use again.
3. In order to ensure the projection effect of this product, please pay attention
to the following operations.
3.1、Please do not touch the screen by hand.
3.2、Please do not scratch the screen with hard objects such as metal.
3.3、Please use a clean cloth or a soft brush to gently remove the foreign matter
on the screen.
★Hanging installation 1(Standard installation method, the overall blackboard
thickness of less than 11CM with this installation method):
1、Touch screen projection installation hole size: Description: screen height must
be sure that each row of personnel can clearly see the contents of the projection screen,
the bottom of the screen is generally 0.8 meters from the ground (when the curtain
is fully expanded, the bottom of the display area should be basically higher than the
sitting staff's head, the height of the screen must be sure that each row of personnel
can clearly see the projection screen content, installation company conference room
and specific environment, according to venue to consider). According to the size of
the following figure set the hanger installation location, hang the touch screen to
put down the screen and then set the magnet bracket position, as shown: (Please pay
attention to the projector installation location)
Hoisting schematic diagram:
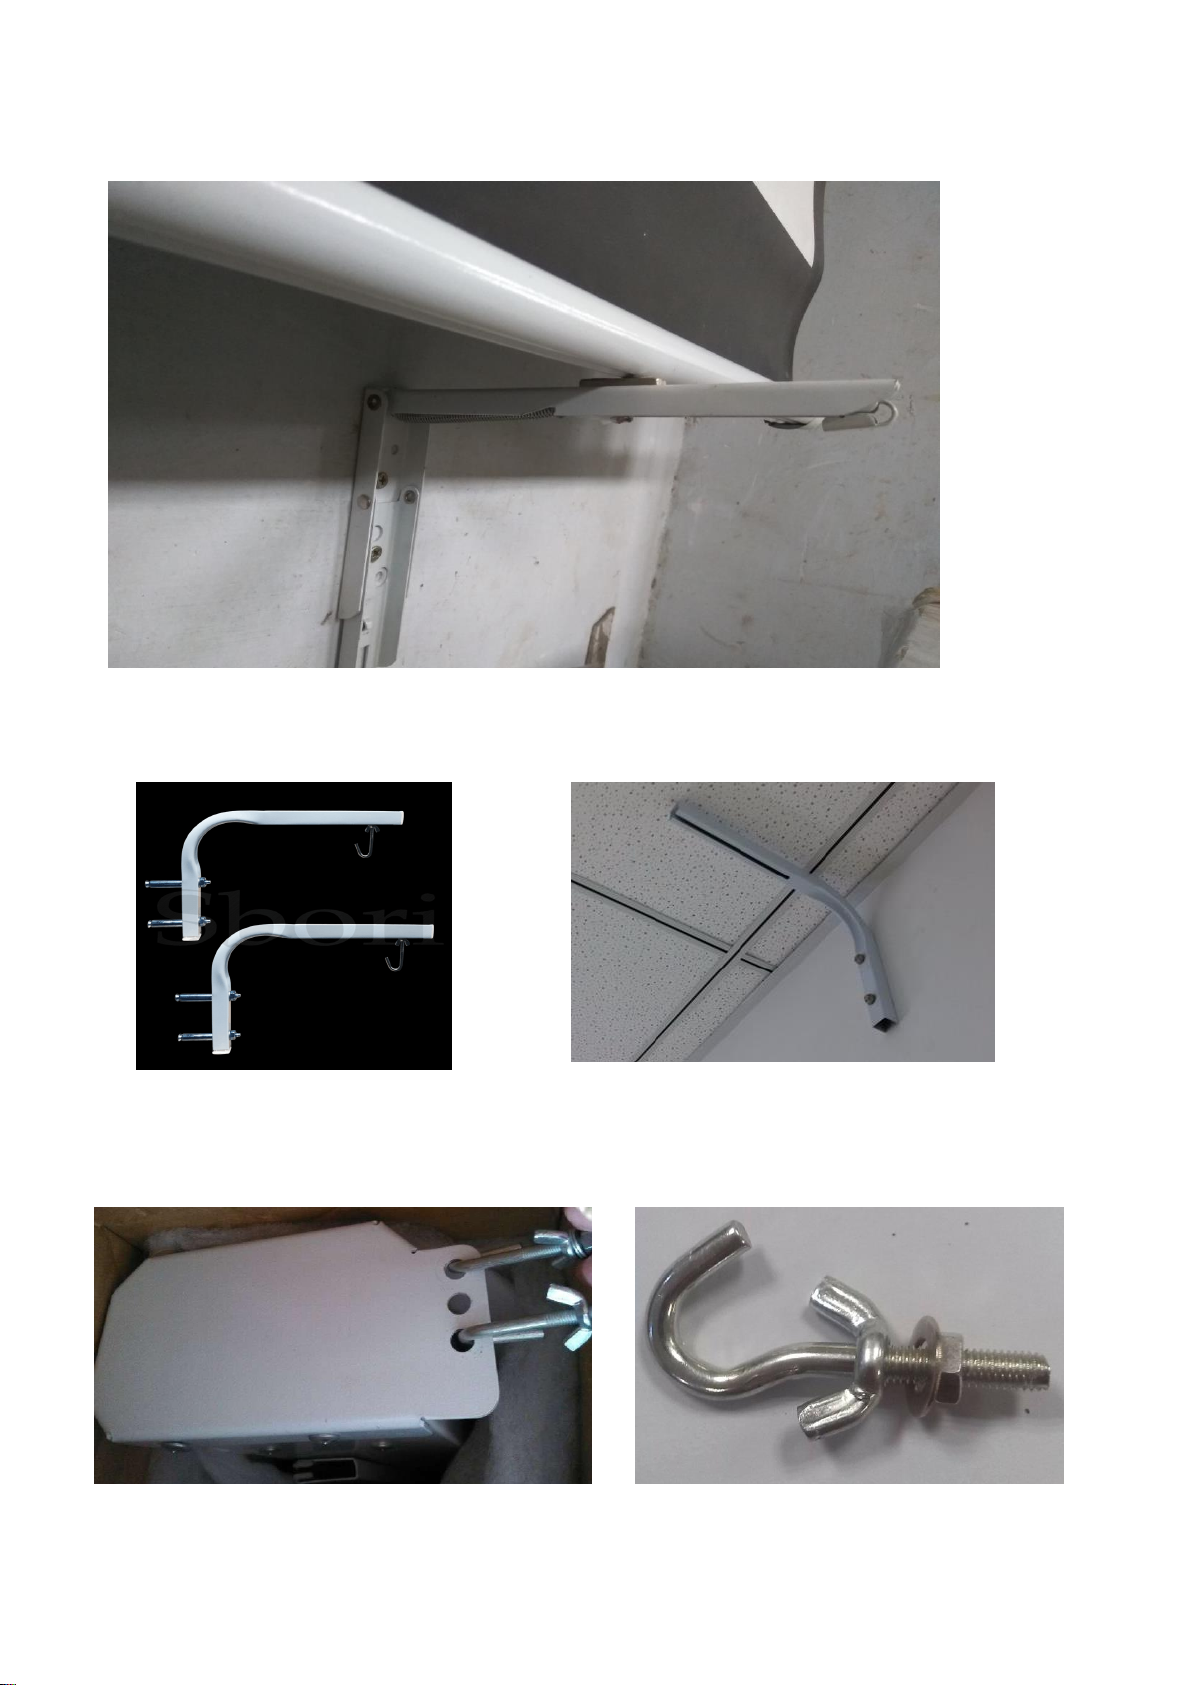
Magnet mounting method:
2、Touch screen projection screen hanger installation icon:
Picture 2:Picture 3:
3、Hanging touch projection screen: First hang the hook hanging in the projection screen
hanging hole,and the position of the four hook screws fixed. As shown:
Picture 4:Picture 5:
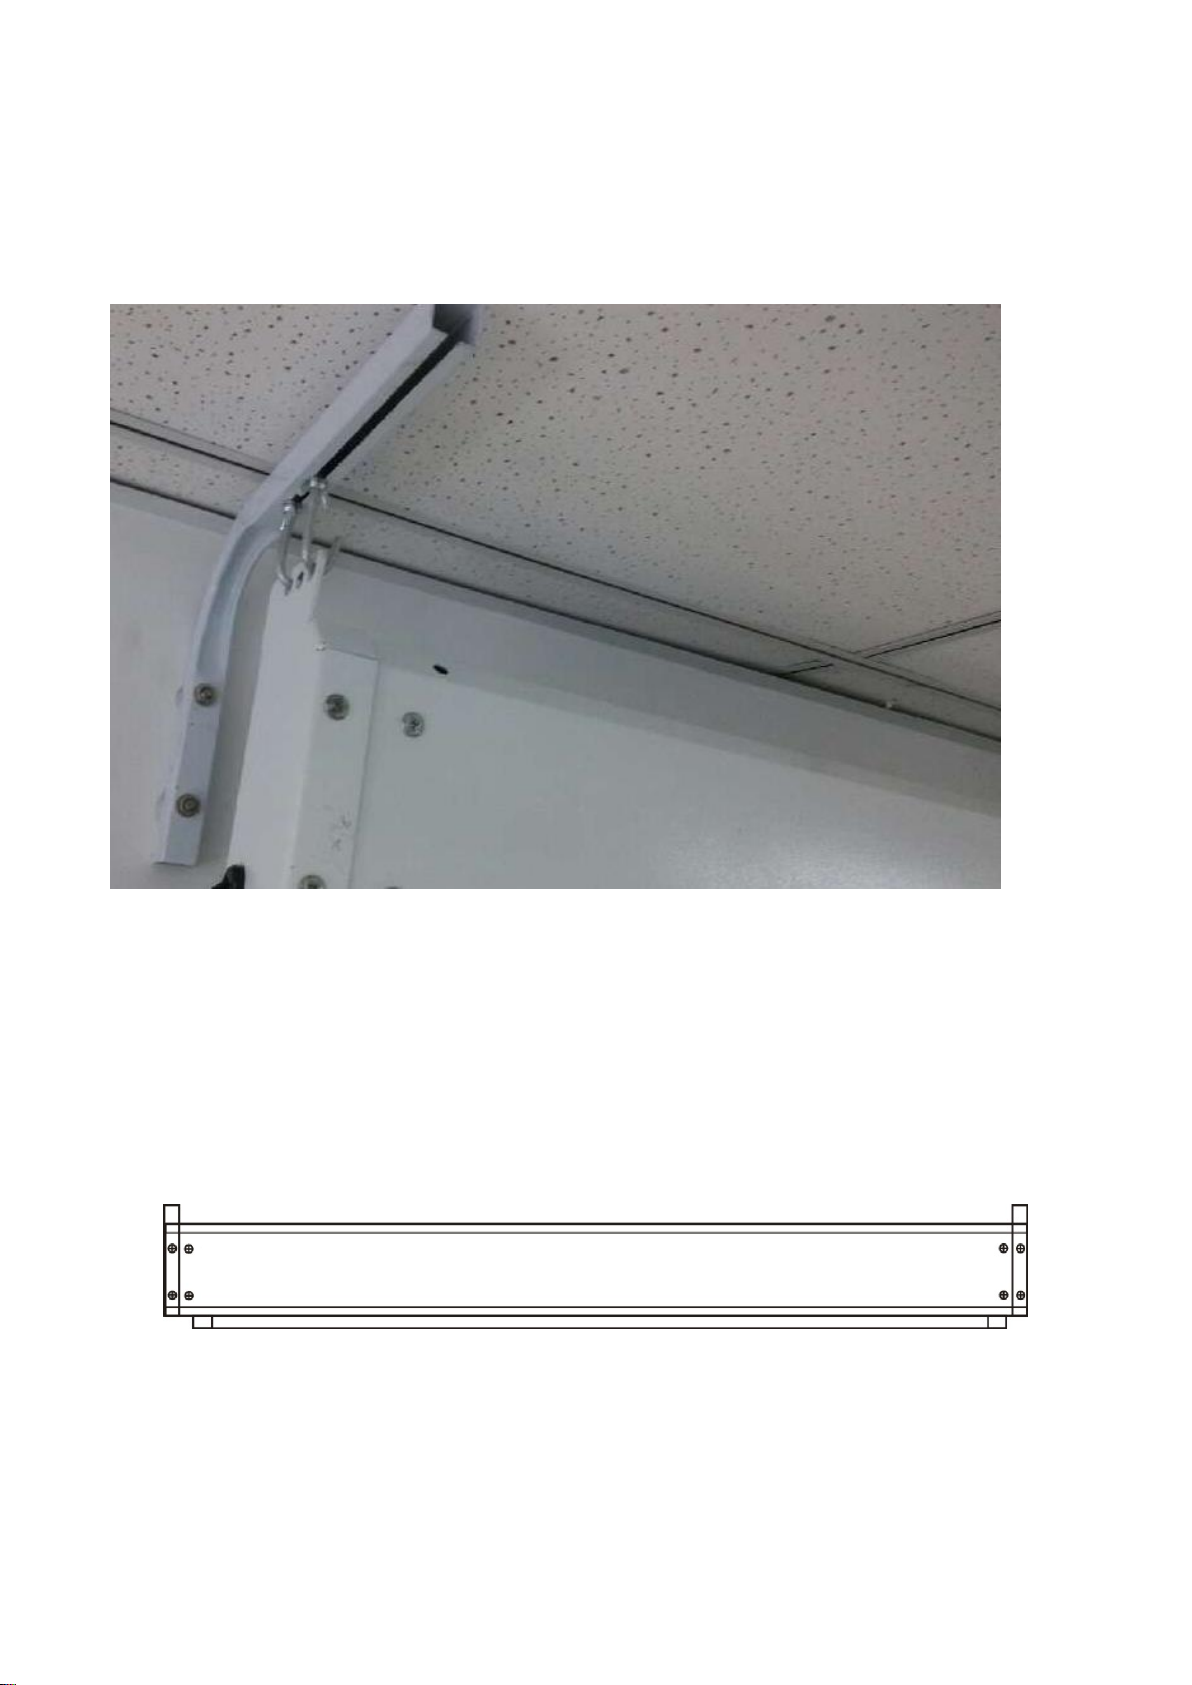
4、Hang the touch projection screen, and adjust the distance between the touch
projection screen and the wall to 120 mm. Tighten the hook screws.
Picture 6:
5、Clean the touch screen projection screen above the host tape, special attention
should be paid, keep the bottoms of the curtain rod and touch layer bar into a free
vertical state to ensure that the projection screen and the touch layer free to lift.
Picture 7:

6、Plug in the power, press the lift switch, down the projection screen and the sensor
layer, please observe whether there is pause problem, if abnormal, please close the
projection screen, after troubleshooting, put down the projection screen and sensor
layer.
Picture 8:
7、Fix the position of the magnet holder according to the position of the axis of the
projection screen. Find the appropriate position on the wall to mark, punch and install
the magnet holder.
Picture 9:

★Hanging installation 2(Blackboard overall thickness of more than 11CM with
this installation method):
1、Touch projection screen installation Punch size: Description: screen height
to determine the method, the screen as the power is on and stretched, the bottom of
the white iron from the bottom of chalkboard slot distance 2CM.(Magnet rack is too
long to draw the curtain, too short the curtain can not stretch)
Hoisting schematic diagram:
Magnet bracket installation schematic diagram:
Please confirm the floor height is
sufficient before using this
installation method.

★Wall-mounted installation(No blackboard recommended this installation
method, no need the L-shaped hanger):
1、No matter what kind of installation, please first according to the measurement
of the installation location, confirm the installation height, distance and projection
of the central location, after the installation location to make the installation of
accessories on the wall hole horizontal position, and use the pencil to make the
horizontal line or mark, and then hit the mounting hole.
Picture 1
Picture 2. Against wall installation example:
with podium the height from the ground is
80cm ,without podium the height from
ground is 100cm

Magnet mounting method:
2、After installing the hole on the wall, install the rubber stopper to insert the
rubber stopper into the wall hole with the hammer. The end of the rubber stopper should
be flat with the wall and can not be exposed. Then, screw the screw head at a distance
of about 5 mm from the wall so as to hang Touch projection screen.
Picture 3

3、Hanging the touch projection screen, please pay attention to whether the solid,
clean the touch screen projection screen above the host tape, special attention should
be paid, keep the bottoms of the curtain rod and touch layer bar into a free vertical
state to ensure that the projection screen and the touch layer free to lift. Plug in
the power, press the lift switch, down the projection screen and the sensor layer,
please observe whether there is pause problem, if abnormal, please close the projection
screen, after troubleshooting, put down the projection screen and sensor layer.
★Touch projection screen
fitboard
software installation:
1、Turn on the computer, projector, put down the touch projection screen (keep the switch
DOWN state), and computer startup is completed. As shown:
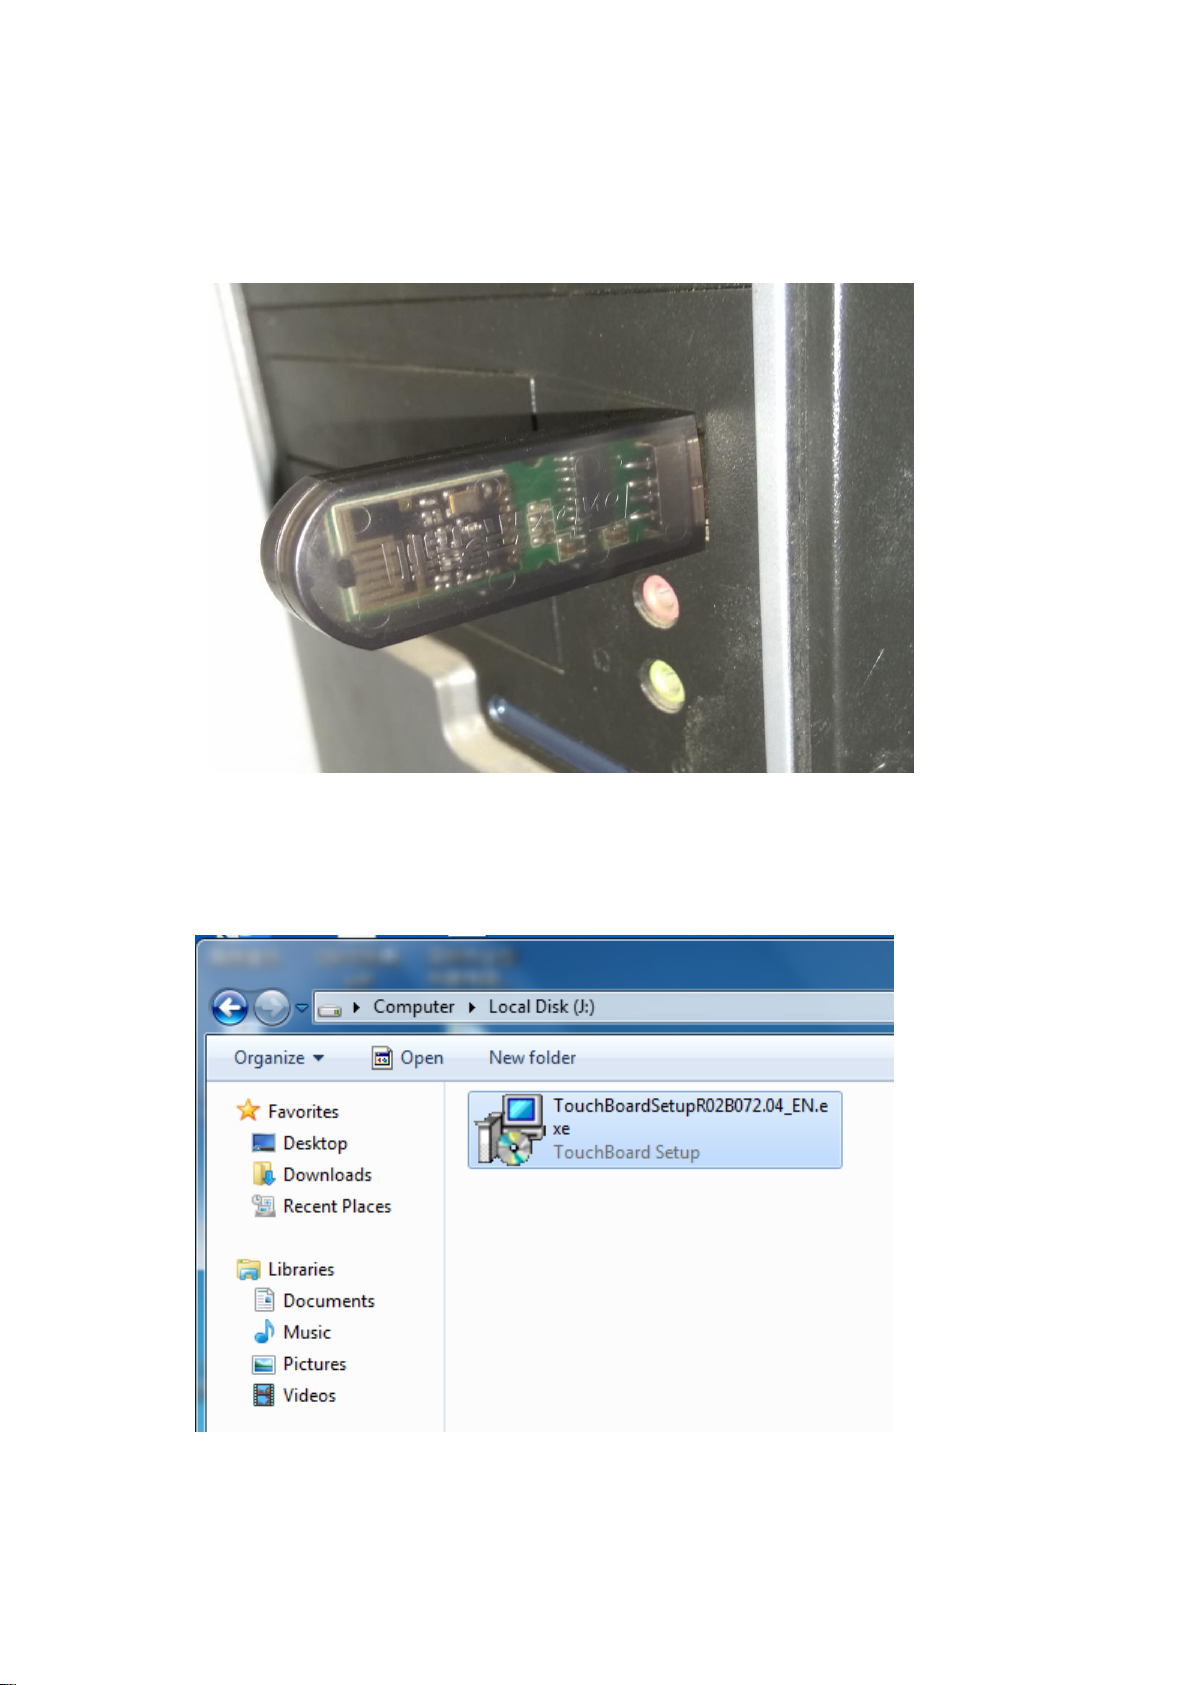
2、Plug in the USB port 2.4G wireless receiver, the receiver blue light on, the receiver as
near as possible from the transmitter short distance, the best less than 2 meters, if the
distance long, please add USB extension cable. As shown:
3、Download the latest version of the software from the company website to the computer,
unzip double-click to run. As shown below

4、Double-click on the above map file to start the installation process. (Installation path
recommended D
drive)
5、After the installation is complete, check Run Touchscreen.exe.

6、Check this icon in the lower right corner of your desktop. (This icon indicates
that the receiver is not working properly)
★2.4G wireless transmitter module match code:
1、Find the code button at the bottom left corner of the touch layer on the launch side, as
shown:
2、Press and hold the key for 4 seconds until the LED shines for three times, release the key
and the code is successful. Use the pen with the AAAbattery installed and click on the touch
screen display area to see if the mouse will move and if the LED light will be on, Normal,
please continue with the following steps. (If the LED does not light, please check whether the
pen battery is installed).

★Coordinate positioning:
1、Move the mouse to the icon , press the right mouse button, select the pop-up
positioning points, the general choice 6 points positioning will be better, press the left mouse
button to confirm, as shown:
2、After selecting 6 points positioning, the screen will display the "+" mark. Click the "+"
center with the electromagnetic pen or electromagnetic pointer for two seconds. After
successful, "+" will move to the next position.

3、Positioning is completed, it will automatically return to the desktop computer, then the
touch projection screen can be normal operation.
4、If the computer is equipped with anti-virus software, please open the more options "allow
this program all operations" and anti-virus software inside the fitboard program installation
directory added to the trust list.
★Common troubleshooting of touch projection screen:
Failure 1: The electromagnetic pen hits no response:
Elimination method:
1、Check whether the lifting switch is in the down position.
2、Whether the electromagnetic pen is equipped with battery or battery is out of
power. Click on the touch layer to see if the LED light on the sensor layer is on.
If it doesn't, please try a new one.

3、Click on the screen to light the LED light on the sensor layer. Please check
if there are the icon at the bottom right of the computer table. If not, please
check whether the receiver is plugged in, and if the receiver is plugged in, please
click on the desktop software
Handstar
pen driver to see if the icon appears at
the bottom right of the computer table.
4、Transmit and receive is normal, click on the screen no response, please push
the firing head of code below long, LED lights flashing three times just let go, if
no flashing again after 1 minute, please use the USB extension cord closer to receiving
head and head of distance, pay special attention to, receiving head can't close to
the projector, the code, please pull the other wireless receiving head, to ensure that
touch the sensor of the projection screen is not affected by other interference.
Failure 2、The elbowed electromagnetic pointer hits no response:
Elimination method:
1、Please determine whether it has been charged.
2、Press the button in the middle of the electromagnetic pointer, press the button on the
top of the electromagnetic pointer to see if the laser light is on. If it is off, please charge it first.
If it is on, click the touch projection screen again to see if it is normal.
3、Turn the electromagnetic pointer page does not respond, unplug the electromagnetic
pointer flip page receiver (black), plug it in again to see if the LED light is flashing, then press
the middle of the electromagnetic pointer that button, then receive the head of the LED The
lamp will go out, indicating that the code is successful, try again in the PPT page function is
normal.
Failure 3、Projection screen can not be normal down
Elimination method:
1、Be sure to carefully check the touch screen before the projection screen has been
cleaned on the host tape, and internal EPE been cleaned, to ensure that the touch projection
screen’s sensing layer and in front of the high-definition screen free sagging.
2、Plug in the power, press the down switch “DOWN”, then do not let go of the lift switch
to observe whether the induction layer and curtain layer are normal down, if abnormal,
please hit the switch on the “UP”, try again after troubleshooting.
3、If it is All-in-one machine (central control) control, press “DOWN” to put down the
screen, if fail, then press “UP” to check the induction layer and the curtain layer whether Can
be put down, if you can put down, that means the downward and upward line reversed. If
there is no response, please check the machine (central control) and the touch screen
projection power supply connection is wrong, please refer to the machine manual.
★Installation dimension drawing:
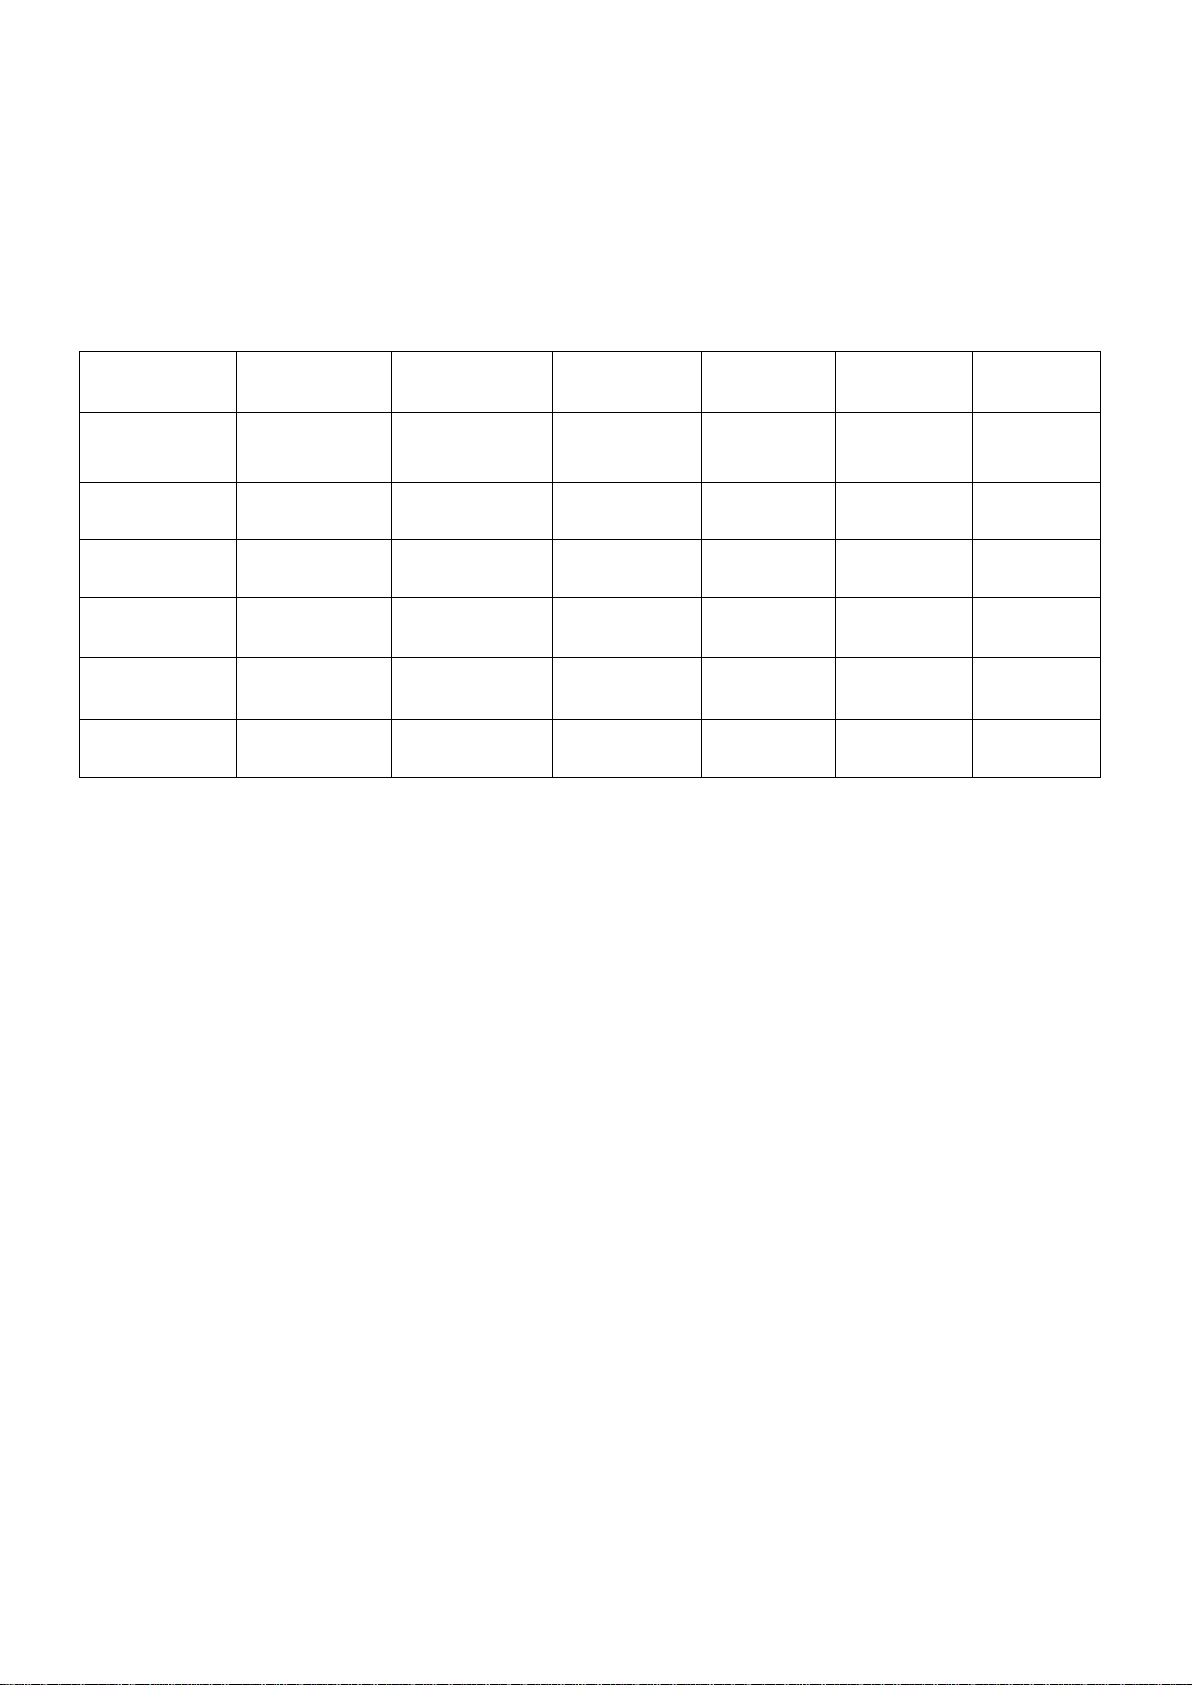
Model
CY-100X
CY-100K
CY-120X
CY-120C
CY-120K
CY-150K
Screen size
100 Inch
100 Inch
120 Inch
120 Inch
120 Inch
150 Inch
H1
1905mm
1726mm
2210mm
1800mm
1995mm
2399mm
H2
1525mm
1346mm
1830mm
1505mm
1615mm
2019mm
L1
2332mm
2454mm
2740mm
2940mm
2885mm
3531mm
L2
2032mm
2154mm
2440mm
2560mm
2585mm
3231mm
Screen ratio
4:3
16:10
4:3
16:9
16:10
16:10

Warranty Card
(The user save)
Warranty Card (copy)
(Please send back)

Please keep this voucher for warranty service.
Model:
Original place:warranty period:
Purchasing date:yy mm dd
Seller name:(Stamp effective)
Seller address:
Seller phone no.:
Seller fax no.:
Buyer name:
Using by:□ personal □company
Contact person:
User phone no.:
User address:
Email:
Please fill in the details carefully when buying
This manual suits for next models
5
Table of contents


