MesMed AC 322/MM 322 PRMO User manual

Instrukcja obsługi Termometr Elektroniczny Douszno-Czołowy
Ear and Forhead Thermometer Manual
D'Instructions Thermométre Frontal/Auriculaire
for
AC 322/ MM 322 PRMO
MM 322 PRIMO Plus / AC 322 Plus
POLSKIENGLISHFRENCH

SPIS TREŚCI:
POLSKI
I.
II.
III.
IV.
V.
VI.
VII.
VIII.
IX.
X.
XI.
XII.
XIII.
XIV.
XV.
XVI.
XVII.
XVIII.
ENGLISH
I.
II.
III.
IV.
V.
VI.
VII.
VIII.
IX.
X.
XI.
XII.
XIII.
XIV.
FRENCH
I.
II.
III.
IV.
V.
VI.
VII.
VIII.
IX.
X.
XI.
XII.
XIII.
Właściwości _ _ _ _ _ _ _ _ _ _ _ _ _ _ _ _ _ _ _ _ _ _ _
Uwaga, przeczytaj zanim włączyszurządzenie! _ _ _ _ _ _ _
Instalacja baterii _ _ _ _ _ _ _ _ _ _ _ _ _ _ _ _ _ _ _ _
Uwagi dotyczące baterii _ _ _ _ _ _ _ _ _ _ _ _ _ _ _ _
Uwagi dotyczące pomiarów _ _ _ _ _ _ _ _ _ _ _ _ _ _
Ważne informacje dotyczące temperatury w uchu _ _ _ _ _ _
Opis urządzenia _ _ _ _ _ _ _ _ _ _ _ _ _ _ _ _ _ _ _ _
Opis ikon na wyświetlaczu _ _ _ _ _ _ _ _ _ _ _ _ _ _
Podświetlanie wyświetlacza _ _ _ _ _ _ _ _ _ _ _ _ _
Zmiany ustawień wyświetlania pomiarów _ _ _ _ _ _
Ustawianie daty i godziny _ _ _ _ _ _ _ _ _ _ _ _ _ _ _
Konserwacja i kalibracja urządzenia _ _ _ _ _ _ _ _ _ _ _
Pomiar temperatury _ _ _ _ _ _ _ _ _ _ _ _ _ _ _ _ _
Funkcja (głosowa) odczytywania wyników pomiaru w
języku polskim._ _ _ _ _ _ _ _ _ _ _ _ _ _ _ _ _
Zapisywanie wyników w pamięci urządzenia _ _ _ _ _ _ _
Resetowanie urządzenia _ _ _ _ _ _ _ _ _ _ _ _ _ _ _ _
Specykacja techniczna _ _ _ _ _ _ _ _ _ _ _ _ _ _ _ _
Rozwiązywanie prostych problemów _ _ _ _ _ _ _ _ _
Safety precautions _ _ _ _ _ _ _ _ _ _ _ _ _ _ _ _ _ _ _
Recommendations _ _ _ _ _ _ _ _ _ _ _ _ _ _ _ _ _ _ _ _
Descriptions _ _ _ _ _ _ _ _ _ _ _ _ _ _ _ _ _ _ _ _ _
Forehead temperature _ _ _ _ _ _ _ _ _ _ _ _ _ _ _ _
Ear temperature _ _ _ _ _ _ _ _ _ _ _ _ _ _ _ _ _ _ _ _ _
Display of the result -‘COLOR CHECK’ FEATURES _ _ _ _ _ _
Switch on/o the thermometer _ _ _ _ _ _ _ _ _ _ _ _
Talking feature _ _ _ _ _ _ _ _ _ _ _ _ _ _ _ _ _ _ _ _ _ _ _ _
Memories _ _ _ _ _ _ _ _ _ _ _ _ _ _ _ _ _ _ _ _ _ _
Setting date and time _ _ _ _ _ _ _ _ _ _ _ _ _ _ _ _ _ _
Maintenance, storage and calibration _ _ _ _ _ _ _ _ _ _
Errors and trouble shooting _ _ _ _ _ _ _ _ _ _ _ _ _ _
Change the batteries _ _ _ _ _ _ _ _ _ _ _ _ _ _ _ _ _ _
Specications _ _ _ _ _ _ _ _ _ _ _ _ _ _ _ _ _ _ _ _ _ _
Precautions d’utilisation _ _ _ _ _ _ _ _ _ _ _ _ _ _ _ _
Description du thermometre _ _ _ _ _ _ _ _ _ _ _ _ _ _
La temperature frontale _ _ _ _ _ _ _ _ _ _ _ _ _ _ _ _
La temperature articulaire _ _ _ _ _ _ _ _ _ _ _ _ _ _ _
Achage couleur des resultants - fonction color check _ _
Mise en route du thermometer_ _ _ _ _ _ _ _ _ _ _ _ _ _ _ _
Memoires _ _ _ _ _ _ _ _ _ _ _ _ _ _ _ _ _ _ _ _ _ _ _ _ _ _ _ _
Fonction ‘Reponse Vocale’_ _ _ _ _ _ _ _ _ _ _ _ _ _ _ _ _ _ _
Reglage de l’heure et de la date _ _ _ _ _ _ _ _ _ _ _ _ _ _ _
Nettoyage et stockage du thermometre _ _ _ _ _ _ _ _ _ _
Resolution des erreur _ _ _ _ _ _ _ _ _ _ _ _ _ _ _ _ _ _ _ _ _
Remplacement des piles _ _ _ _ _ _ _ _ _ _ _ _ _ _ _ _ _ _ _
Specications _ _ _ _ _ _ _ _ _ _ _ _ _ _ _ _ _ _ _ _ _ _ _ _ _
3
3
3
4
4
4
5
6
6
6
7
7
7
7
10
10
10
11
11
12
12
12
13
13
15
17
18
18
19
19
19
20
20
21
21
21
22
22
24
27
27
28
28
28
28
29
29
30

3
POLSKI
UWAGA : Gwarancja na urządzenia nie obejmuje uszkodzeń wynikłych
np. z użytkowaniem niezgodnym z przeznaczeniem.
Przeczytaj uważnie instrukcje, obsługi przed pierwszym użyciem.
Urządzenie przeznaczone jest tylko i wyłącznie do pomiaru
temperatury ciała.
Nie zanurzać urządzenia w cieczach oraz nie narażać na działanie
wysokiej temperatury i wysoką wilgotność.
Nie należy dotykać sensora ( czujnika palcami), może to
spowodować uszkodzenie.
Jeżeli urządzenie nie będzie użytkowane prze dłuższy czas należy
wyjąć z niego baterie.
Urządzenie należy ustawić z dala od źródeł ciepła: np. kaloryferów,
kratek cieplnych, piecyków itp.
Wszystkie akcesoria przechowuj w miejscu niedostępnym na dla
dzieci.
Nie używaj i nie przechowuj urządzenia w miejscach zapylonych,
zabrudzonych.
Do czyszczenia używaj tylko wilgotnej szmatki (nie mokrej).
Nie używaj płynnych, ani w aerozolu środków czyszczących.
Poza przypadkami opisanymi w instrukcji – rozdział
ROZWIĄZYWANIE PROSTYCH PROBLEMÓW - urządzenia nie należy
samodzielnie naprawiać. W przypadku problemów z urządzeniem,
usterkę proszę zgłosić w serwisie Mescomp Technologies lub w
serwisie autoryzowanym (lista serwisów dostępna na stronie
internetowej Mescomp Technologies).
Otwarcie lub próba rozkręcenia zewnętrznej obudowy urządzenia
powoduje utratę gwarancji.
Urządzenie jest przeznaczone do użytku domowego.
•
•
•
•
•
•
•
•
•
•
•
•
•
•
II. Uwaga, przeczytaj zanim włączysz urządzenie!
UWAGA : Producent MESCOMP TECHNOLOGIES zastrzega sobie
możliwość wprowadzenia zmian w osprzęcie i oprogramowaniu
wynikające z postępu technicznego.
Duży kolorowy podświetlany wyświetlacz.
Podawanie wyniku za pomocą cyfr i koloru.
Ostrzeżenie o gorączce i podwyższonej temperaturze.
30 pamięci pomiarów wraz z datą.
Możliwość pomiaru w uchu oraz na czole.
Automatyczne rozpoznawanie rodzaju pomiaru (ucho, czoło).
Pomiar w 2 sekundy.
Sygnał dźwiękowy.
Ostrzeżenie o niskim stanie baterii.
Ostrzeżenie o błędach w pomiarze.
Automatyczne wyłączenie urządzenia.
Długa żywotność baterii.
Małe zużycie energii.
Instrukcja w 3 językach, w tym w języku polskim.
•
•
•
•
•
•
•
•
•
•
•
•
•
•
•
I. Właściwości:
Funkcja (głosowa) odczytywania wyników pomiaru w języku polskim.(op.)
POLSKI

4
HI- oznacza, że temperatura jest powyżej 42,9 º C.
LO- oznacza, że temperatura jest poniżej 32,0 º C.
Po 3 kolejnych pomiarach należy następny (4) pomiar rozpocząć
po odczekaniu 10 minut.
Przerwa pomiędzy pomiarami powinna wynosić min 30 sekund.
UWAGI DOTYCZĄCE TEMPERATURY CIAŁA.
Temperatura ciała człowieka zmienia się w ciągu dnia lub w
zależności od wieku. Występuję również różnica pomiędzy
partiami ciała. Dlatego też, pomiary między poszczególnymi
partiami ciała nie powinny być porównywalne. Należy więc
określić zakres normalnych temperatur. Zalecamy kilkukrotne
zmierzenie temperatury w odstępach 5 minutowych.
Zakres pomiaru urządzenia wynosi od 32 do 42,9 º C. Jeżeli
pomiar temperatury nie mieści się w tej granicy na wyświetlaczu
pojawią się następujące ostrzeżenia:
•
•
•
•
•
V. Uwagi dotyczące pomiarów:
Kiedy baterie będą bliskie wyczerpania, na wyświetlaczu pojawi
się ikona , która oznacza, że należy wymienić baterie na nowe,
wyłącznie alkaliczne.
Jeżeli urządzenie nie będzie używane przez dłuższy czas, należy
wyjąc z niego baterie.
Zużytych baterii nie należy wrzucać do ognia.
Jeden komplet baterii wystarcza na 200 pomiarów (2 razy
dziennie)
Po wyjęciu baterii nie zostanie usunięta pamięć pomiarów.
Do urządzenia nie należy wkładać starych i nowych baterii
jednocześnie.
•
•
•
•
•
•
IV. Uwagi dotyczące baterii:
UWAGA: Termometr posiada funkcję automatycznego wyłączania,
wyłączy się 1 minutę po ostatnim przyciśnięciu przycisku. Aby włączyć
urządzenie naciśnij dowolny przycisk.
o
C
o
F
o
C
o
F
Otwórz komorę na baterie, odciągając pokrywę.
Umieść baterię w przegrodzie zgodnie z biegunami.
Następnie należy założyć osłonę na baterie.
Po umieszczeniu baterii w przegrodzie, nastąpi włączenie
wyświetlacza.
1.
2.
3.
4.
III. Instalacja baterii:
POLSKI

5
Temperatura ciała w uchu jest różna i
jest uzależniona od miejsca pomiaru.
Jest również zależna od wieku.
37ºC 36ºC 35ºC 34ºC
VI. Ważne informacje dotyczące temperatury w uchu.
0-2 lat 36,4-38,0 ºC (97,5- 100,4 ºF)
3-10 lat 36,1-37,8 ºC (97,0- 100,0 ºF)
>11 lat 35,8-37,5 ºC (96,4-99,5 ºF)
Temperatura w różnych grupach wiekowych:
Usta: 35,5 –37,5 ºC (95,9- 99,5 ºF)
Pod pachą: 34,7-37,3 ºC (94,5-99,1 ºF)
Ucho: 35,8-38,0 ºC (96,4-100,4 ºF)
Czoło: 35,5-37,6 ºC (95,9-99,7 ºF)
Normalny zakres temperatur:
UWAGA: Podczas wizyty u lekarza należy poinformować go, o sposobie
wykonywania pomiaru, oraz jeżeli jest to możliwe należy przedstawić
wyniki pomiarów.
Urządzenie zapisuje automatycznie do 30 pomiarów wraz z datą.
Na wynik pomiarów mogą mieć wpływ również czynniki, takie jak:
dokonywanie pomiaru krótko po kąpieli lub pływaniu, zakrycie
uszu, wystawianie się na działanie czynników zewnętrznych
takich jak skrajne temperatury dodatnie lub ujemne.
Temperaturę należy mierzyć w zdrowym uchu, jeżeli do drugiego
są aplikowane krople bądź inne lekarstwa.
Nie należy dokonywać pomiaru u dzieci poniżej 3 miesiąca życia.
W przypadku pomiaru temperatury w uchu, urządzenie należy
umieścić w nim ostrożnie.
Jeżeli podawane wyniki nie odzwierciedlają odczuwalnego stanu
zdrowia należy powtórzyć pomiar.
•
•
•
•
•
•
POLSKI

UWAGA : wyświetlacz nie podświetli się na kolorowo w przypadku
wyniku poniżej 35,5º C. W przypadku wątpliwości prawdziwości
pomiaru należy powtórzyć pomiar po 5 minutach.
Wyświetlacz podświetli się na zielono gdy wynik pomiaru będzie
w granicy 35,6 – 37,2 º C i oznacza temperaturę ciała w normie
Wyświetlacz podświetli się na pomarańczowo, gdy wynik
pomiaru będzie w granicy 37,3- 37,5º C i oznacza ze temperatura
jest podwyższona.
Wyświetlacz podświetli się na czerwono, gdy wynik będzie
powyżej 37,6º C i oznacza gorączkę.
•
•
•
Dzięki nowoczesnej technologii, po prawidłowym zakończeniu
pomiaru urządzenie poda wynik, oraz w zależności od wartości
pomiaru, wyświetlacz podświetli się na kolorowo.
IX. Podświetlanie wyświetlacza.
HI
LO
‘ ’
‘ ’
Oznacza pomiar temperatury na czole.
Oznacza pomiar temperatury w uchu.
Oznacza, że temperatura jest powyżej 42,9 º C.
Oznacza, że temperatura jest poniżej 32,0 º C.
Słabe baterie, należy wymienić je na nowe.
VIII. Opis ikon na wyświetlaczu.
Nak
ł
adka do
mierzenia
teperatury na
czole
Wyb
ó
r ºC lub ºF
o
C
o
F
TEST
widok z ty
ł
u
Glo
ś
nik
Sensor na podczervie
ń
Przycisk rozpoczynaj
ą
cy
pomiar
widok z
przodu
RESETOWANIE
OK/GŁOS
Memo.
Reset
Pami
ęć
Przycisk OK/ GŁOS
widok z
boku
OK/GŁOS
VII. Opis urządzenia.
POLSKI
6

Istnieje możliwość pomiaru temperatury na czole jaki i w uchu. Przed
każdym pomiarem należy upewnić się, że sensor jest czysty.
UWAGA: Nie należy dotykać sensora palcami, może to spowodować
uszkodzenie urządzenia.
XIII. Pomiar temperatury:
Kalibracja
Urządzenie jest skalibrowane fabrycznie. Jeżeli jest użytkowane i
przechowywanie zgodnie z zaleceniami w instrukcji obsługi nie
wymagana jest okresowa kalibracja. W przypadku wszelkich
wątpliwości co do prawidłowego działania urządzenia należy
skontaktować się z działem serwisowym. Próba rozkręcenia urządzenia
spowoduje utratę gwarancji.
Urządzenie należy użytkować tylko i wyłącznie do pomiaru
temperatury ciała.
Należy stosować wszystkie zalecenia zawarte w instrukcji.
•
•
XII. Konserwacja i kalibracja urządzenia.
Naciśnij i przytrzymaj przez ok. 2 sekundy przycisk MEMO.
Godzina zacznie„migać”, na wyświetlaczu i pojawi się napis SET
(USTAW).
Przyciskaj przycisk MEMO, aby wybrać żądaną godzinę.
Aby potwierdzić naciśnij przycisk OK/GŁOS. Zacznie„migać”
minuta. Przyciskiem MEMO wybierz żądaną minutę. Aby
potwierdzić naciśnij przycisk OK/GŁOS.
Następnie zacznie migać rok, przyciskiem MEMO wybierz
żądany rok, a następnie naciśnij przycisk OK/GŁOS.
W ten sposób możesz ustawić miesiąc oraz dzień.
Urządzenie jest gotowe do pomiaru.
1.
2.
3.
4.
5.
6.
Data i godzina jest wyświetlana przy włączeniu termometru oraz
podawana przy przeglądaniu pomiarów. Aby ustawić datę i godzinę:
XI. Ustawianie daty i godziny.
Po zakończeniu pomiaru urządzenie podaje wynik za
pomocą º C (Celsjusza) lub º F (Fahernheit’a), aby
zmienić sposób podawania temperatury z º C na º F
lub z º F na º C należy nacisnąć przycisk znajdujący się
–wewnątrz urządzenia. (patrz rysunek)
Wyb
ó
r ºC lub ºF
o
C
o
F
TEST
X. Zmiany ustawień wyświetlania pomiarów
7
POLSKI

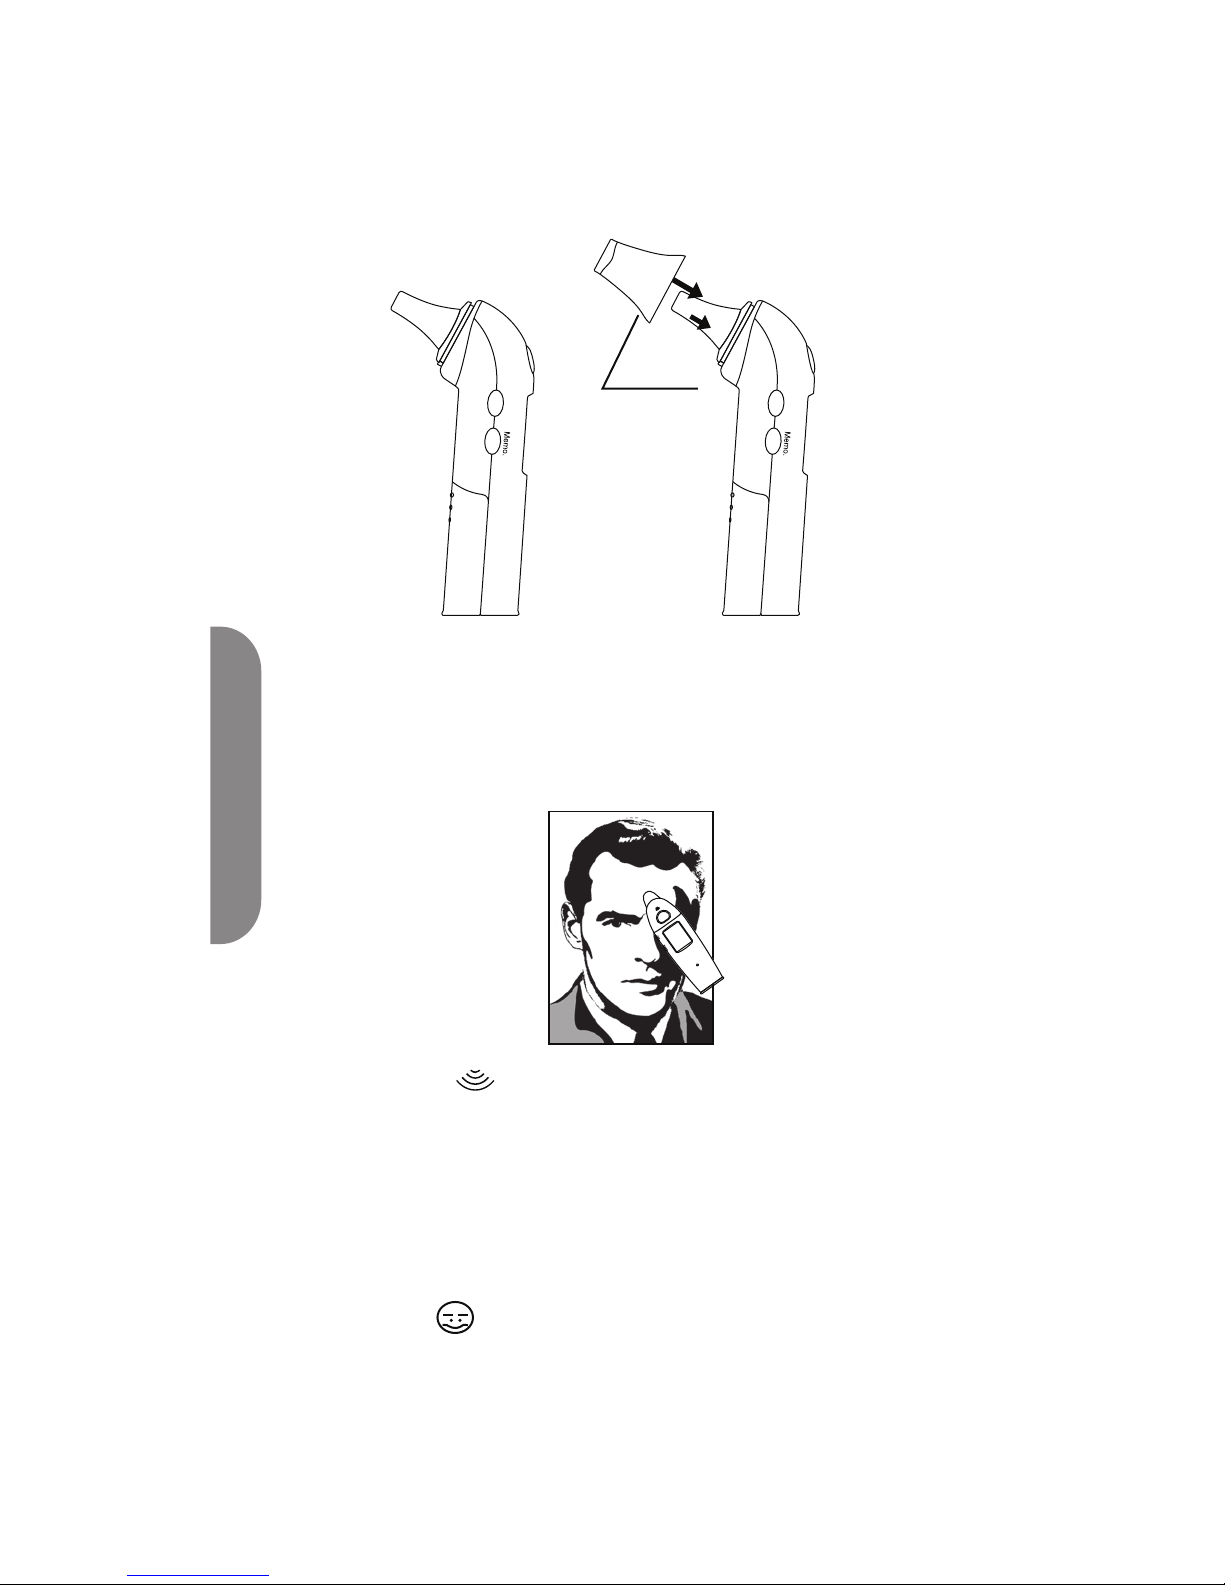
Aby rozpocząć pomiar temperatury w uchu należy zdjąć kapturek
(patrz rysunek poniżej)
1.
OK/GŁOS
OK/GŁOS
‘ ’
8
POLSKI
Załóż kapturek na urządzenie ( patrz rysunek poniżej)
Przyłóż sondę termometru na środku czoła (patrz rysunek poniżej)
Aby zacząć pomiar, naciśnij przycisk . Będzie słyszalny dźwięk
potwierdzający rozpoczęcie pomiaru.
Po 2 sekundach usłyszysz dźwięk potwierdzający zakończenie
pomiaru. Na wyświetlaczu pojawi się wynik pomiaru oraz w
zależności od rezultatu, wyświetlacz podświetli się na kolorowo.
1.
2.
3.
4.
Pomiar temperatury na czole:
Aby zmierzyć temperaturę ciała:
Kolor zielony oznacza temperaturę w normie.
Kolor pomarańczowy oznacza podwyższona temperaturę.
Kolor czerwony oznacza wysoką temperaturę.
UWAGA : Po zakończeniu pomiaru oprócz wyniku pojawi się ikona ,
oznacza ona pomiar temperatury na czole.
Pomiar temperatury w uchu:

Kolor zielony oznacza temperaturę w normie.
Kolor pomarańczowy oznacza podwyższona temperaturę.
Kolor czerwony oznacza wysoką temperaturę.
‘ ’
OK/GŁOS
OK/GŁOS
9
POLSKI
Aby wykluczyć błędy w pomiarach, upewnij się, że przewód
słuchowy jest czysty.
Następnie, w przypadku dzieci poniżej 1 roku życia złap
delikatnie palcami za małżowinę uszną dziecka i lekko odciągnij
ją do góry (patrz rys).
W przypadku dzieci powyżej 1 roku życia i osób dorosłych,
należy złapać delikatnie palcami małżowinę uszną i delikatnie
pociągnąć w kierunku tyłu głowy.
Następnie należy delikatnie wsunąć sondę termometru do
przewodu słuchowego.
Naciśnij przycisk . Będzie słyszalny dźwięk potwierdzający
rozpoczęcie pomiaru.
Po 2 sekundach usłyszysz dźwięk potwierdzający zakończenie
pomiaru. Na wyświetlaczu pojawi się wynik pomiaru oraz w
zależności od rezultatu wyświetlacz podświetli się na kolorowo.
2.
3.
4.
5.
6.
7.
UWAGA : Po zakończeniu pomiaru oprócz wyniku pojawi się ikona,
oznacza ona pomiar temperatury w uchu.

Aby zresetować urządzenie należy: nacisnąć i przytrzymać
przycisk, który znajduje się na przedniej stronie
urządzenia. Uwaga wszystkie ustawienia oraz
zapisy pomiarów zostaną usunięte.
XIV. Funkcja (głosowa) odczytywania wyników pomiaru w
języku polskim. (Opcja dla AC322 Plus/ MM 322 PRIMO PLUS.)
RESETOWANIE
OK/GŁOS
Memo.
Reset
10
POLSKI
UWAGA : Urządzenie jest w stanie zapisać do 30 pomiarów. W
przypadku przekroczenia pamięci zostanie automatycznie usunięty
najwcześniejszy pomiar.
XVI. Resetowanie urządzenia.
Aby przeglądać zapisane pomiary naciśnij przycisk MEMO.
Aby przeglądać pozostałe pomiary naciskaj przycisk MEMO.
Jeżeli w pamięci nie ma żadnych pomiarów, nawyświetlaczu pojawi
się napis„—”.
1.
2.
3.
Urządzenie po każdym prawidłowo zakończonym pomiarze
zapisuje wynik automatycznie. Istnieje możliwość zapisania do 30
pomiarów.
XV. Zapisywanie wyników w pamięci urządzenia.
UWAGA : Funkcja (głosowa) w ustawieniach fabrycznych jest włączona,
aby wyłączyć lub włączyć funkcję odczytywania pomiarów urządzenie
musi być w trybie czuwania (na wyświetlaczu wyświetlana jest data i
godzina). Nie ma możliwości zmiany podczas pomiaru lub
bezpośrednio po nim.
Naciśnij dowolny przycisk na urządzeniu aby włączyć urządzenie.
Naciśnij i przytrzymaj przez około 2 sekundy przycisk OK/GŁOS,
będzie słyszalny sygnał dźwiękowy.
Następnie naciśnij przycisk rozpoczynający pomiar , następnie
usłyszysz sygnał potwierdzający rozpoczęcie pomiaru.
Po zakończeniu pomiaru usłyszysz krótki sygnał dźwiękowy, a
następnie odczyt wyniku pomiaru w języku polskim, wynik będzie
również widoczny na wyświetlaczu. Np. twój wynik pomiaru to
36,6 ° C- będzie słyszalny: Twoja temperatura wynosi 36,6 °C.
1.
2.
3.
4.
Aby włączyć funkcję odczytywania wyników pomiarów w języku polskim:
Naciśnij dowolny przycisk na urządzeniu aby włączyć urządzenie.
Naciśnij i przytrzymaj przez około 2 sekundy przycisk OK/GŁOS,
będzie słyszalny sygnał dźwiękowy.
Gdy funkcja jest wyłączona, przed rozpoczęciem pomiaru i po jego
zakończeniu będzie słyszalny tylko sygnał dźwiękowy.
1.
2.
3.
Urządzenie posiada wbudowaną funkcję (głosową) odczytywania
wyników pomiaru w języku polskim, możesz włączyć lub wyłączyć te
funkcję.
Aby wyłączyć funkcję odczytywania wyników pomiarów w języku
polskim:

11
POLSKI
Model:
Zasilanie:
Wyświetlany zakres
temperatur:
Dokładność urządzenia:
Temperatura i wilgotność
robocza:
Temperatura i wilgotność
przechowywania:
Wymiar:
Automatyczne wyłączenie
zasilania:
Waga:
AC 322 (MM322 PRIMO)
MM 322 PRIMO Plus / AC 322 PLUS
2 baterie AAA-1,5 V
32.0°C ~ 42.9°C(lub 89.6°Fdo109.3°F)
+/- 0.2°C (lub +/- 0.4°F)
35.5°C~ 42.0°C (lub 95.9°F do 107.6°F)
+/- 0.3°C(lub +/- 0.5°F)
32.0°C~ 35.4°C (lub 89.6°F do 95.8°F)
42.1°C ~ 42.9°C (lub 107.7°F do 109.3°F)
10.0°C ~ 40.0°C (lub 50°F do 104 °F)
20%RH ~ 85%RH
-10.0°C ~ 55.0°C (lub 14.0°F do131.0°F)
20%RH ~ 85%RH
110x27x35 mm
3 minuty po naciśnięciu ostatniego
przycisku
69g ( z bateriami)
XVII. Specykacja techniczna:
XVIII. Rozwiązywanie prostych problemów.
Sprawdź, czy baterie są naładowane i prawidłowo zainstalowane. Zresetuj urządzenie.
• Nie można włączyć aparatu
• Nie podświetla się wyświetlacz
Sprawdź stan baterii. Przyczyną może byś za niska temperatura, przy wyniku poniżej
35,5 º C podświetlanie wyświetlacza nie będzie działać. Należy powtórzyć pomiar.
• Wyświetlacz jest nieczytelny
Sprawdź stan baterii. Jeżeli baterie są wyczerpane wymień je na nowe, wyłącznie
alkaliczne.
• Większość funkcji nie działa
Sprawdź stan baterii. Jeśli stan baterii jest niski wymień je na nowe, wyłącznie
alkaliczne. Zresetuj urządzenie.
• Niewiarygodne wyniki pomiarów.
Należy zresetować urządzenie.
• Na wyświetlaczu pojawiła się ikona
Należy wymienić baterie na nowe, wyłącznie alkaliczne.
• Na wyświetlaczu pojawia się napis Lo
Wynik pomiaru jest poniżej 32,0 °C, należy powtórzyć pomiar.
• Na wyświetlaczu pojawia się napis Hi
Sensor wyczuł temperaturę powyżej 42,9°C, należy sprawdzić czy sensor jest czysty i
powtórzyć pomiar.
• Na wyświetlaczu pojawia się napis „Err E’’
Urządzenie jest po za zasięgiem temperatury roboczej rządzenia. ( patrz rozdział
SPECYFIKACJA TECHNICZNA)
• Na wyświetlaczu pojawia się napis „ Err U”
Sprawdź , czy wykonałeś pomiar zgodnie z wskazówkami z instrukcji obsługi, należy
powtórzyć pomiar.
• Na wyświetlaczu pojawia się napis: „Err H”
Błąd urządzenia, należy je zresetować.
• Na wyświetlaczu pojawia się °F
Wynik pomiarów podawany jest w ° F, aby zmienić na °C patrz rozdział ZMIANY
USTAWIEŃ WYŚWIETLANI POMIARÓW
• Brak głosowej prezentacji wyników pomiarów
Sprawdź stan baterii. Jeśli baterie są wyczerpane wymień je na nowe wyłącznie
alkaiczne.
Sprawdź, czy funkcja głosowej prezentacji wyniku pomiaru jest włączona.

12
I. SAFETY PRECAUTIONS
ENGLISH
The infrared ear and forehead thermometer is easy and friendly to use. You can
check your temperature by simply putting the IR sensor at the center of your
forehead.
Thanks to the COLOR CHECK TECHNOLOGY, the screen lights in RED, ORANGE or
GREEN according to your body temperature, allowing you to understand the
results quickly and easily. Nonetheless, please take note of the exact reading on
the screen. It is dangerous for patients to perform a self-diagnosis or
self-prescription based on the measuring results. You should always cousult
your doctor for advice.
Please read this manual thoroughly for the proper usage of the products before
use. This manual should be kept on hand for easy reference.
II. RECOMMENDATIONS
IMPORTANT!
INSERT 2 BATTERIES INSIDE THE COMPARTMENT
BEFORE USING THE THERMOMETER.
ENSURE THAT THE + AND - POLARITY IS PLACED CORRECTLY.
WARNING !
Sudden change of ambient temperature may inuence the measurement accuracy. For
accurate measurement, store the thermometer in the same room where you usually
take your temperature.
Do not touch or blow the infrared sensor.
This thermometer is designed to take your body temperature on the forehead and in
the ear.
If in doubt, please consult your doctor for advice.
Do not drop, step on or subject the ear thermometer to any shock or vibration.
Do not use a portable phone near the thermometer when you are taking the
temperature as it will cause the thermometer to malfunction.
Do not submerge this product in water or any other liquid.
Do not discard batteries into the re.
1.
2.
3.
4.
5.
6.
7.
8.
This thermometer is calibrated at the time of manufacturing. If the
thermometer is used according to the instruction, periodic
re-calibration is not required. If there is any doubt about the accuracy
of the measurement, please contact the retailer immediately.
Use a cotton swab with a little alcohol to gently clean the surface of
the sensor. Before the next measurement, wait at least 15 minutes for
the unit to dry.
Keep your thermometer out of children and in a suitable place at
room temperature and avoid high temperatures, direct sunlight,
moisture and dust.
Do not use thinners, benzene or other harsh cleaners on the
thermometer.
Do not modify or disassemble your thermometer.
Discard the used batteries to the recycling collection point according
to local regulation.
The thermometer should be conditioned to room temperature for
about 30 minutes prior to use. Failure to do so may cause inaccuracy.
1.
2.
3.
4.
5.
6.
7.
ENGLISH

SIDE FRONT BACK
III. DESCRIPTION
Scan Button
Infra Red Sensor
Speaker
Memories
OK / Talk button
OK Memo.
OK / GŁOS
Reset
13
Selection ºC or ºF
o
C
o
F
Large Forehead
Probe Adaptor
TEST
IV. FOREHEAD TEMPERATURE
A. RECOMMENDATIONS
To use your thermometer, simply put the probe ush (with the large
forehead Probe) at the middle of your forehead and press the scan
button. However, prior to any measurement, please ensure the
following:
Ensure your foreheadis dry with no sweating, and not cover by your
hair or anything that could aect the measurement.
Do not use the thermometer in a humid environment.
It is recommended – especially for babies – to wait that baby is
quiet for a certain period of time (like 30 min) before doing
measurement (Do not take a measurement while or immediately
after nursing a baby, please wait 10 min to take measurement)
1)
2)
3)
Like any temperature (ear, anal, underarm, oral), the forehead
temperature may vary between individuals between 35°C and
37.9°C due to dierent phenomena known as vasodilatation and
vasoconstriction. It is highly recommended to try your thermometer
to dene your 'usual' forehead temperature.
For babies or individuals, if your symptoms and global health does
not reect the results of the measurement, you should double check
with a digital thermometer and/or contact your doctor immediately.
ENGLISH
OK/GŁOS
Forehead Probe
Adaptor
OK/GŁOS
14
Ensure that the large Forehead probe adaptor is properly inserted as
described below and ensure that the sensor is clean. Press any button
to switch on the thermometer.
Gently position the probe ush on the center of the forehead,
midway between the eyebrow and the hairline.
Press the scan【】button once to start the measurement & you
will hear a rst beep sound to conrm beginning of the scan. Once
the measurement is completed (1 to 2 seconds later), you will hear a
second beep sound and see the result on the screen with a dierent
color based on your temperature level (see below section VI DISPLAY
OF THE RESULTS - COLOR CHECK FEATURES). For talking version, you
can also hear the result (see section VIII, TALKING FEATURE).
The symbol ‘ ’ indicates that you are taking the forehead
temperature.
Once completed, ensure the probe cover is put back to protect the
Infra red sensor, and put back the product in its box.
2)
3)
4)
1)
B. HOW TO TAKE A MEASUREMENT?
ENGLISH

OK/GŁOS
OK/GŁOS
Forehead Probe
Adaptor
V. EAR TEMPERATURE
A. RECOMMENDATIONS
To use your thermometer to measure the temperature from the EAR,
REMOVE THE LARGE FOREHEAD PROBE ADAPTOR BEFORE ANY
INSERTION INSIDE THE EAR as described below; to discover a smaller
probe t for the ear, THE EAR PROBE.
After 3 consecutive readings, please wait 10 minutes before doing a
new measurement.
Wait 30 seconds between 2 measurements.
Keep thermometer at room temperature for around 15 to 30 min
before use in order to get accurate results.
The reading range is from 32,0 to 42,9°C ; if the reading is not with
this range, the following is displayed :
HI : Means temperature is above 42,9 °C
LO : Means temperature is below 32,0 °C
The screen will display time and date automatically after 30 seconds.
a)
b)
c)
d)
e)
1)
2)
3)
4)
5)
REMARKS :
15
Earwax in the ear cannel may cause a lower temperature reading.
Make sure your ear cannel is clean to ensure an accurate reading.
DO NOT USE WITH BABIES BELOW THE AGE OF 3 MONTHS
DO NOT USE IF YOUR EAR IS IRRITATED
INSERT WITH CARE inside the ear
Do not use the thermometer in a humid environment.
Besides, prior to any measurement, please ensure the following:
For babies or individuals, if your symptoms and global health does not
reect the results of the measurement, you should double check with a
digital thermometer and/or contact your doctor immediately.
ENGLISH

B. UNDERSTANDING OF THE EAR TEMPERATURE
The Ear temperature is dierent than other temperature and it is
important to respect certain procedures to check it. In case the ear
probe is not properly inserted, it may result in incorrect temperature
measurement.
Based on age, ear temperature may be classied as follow:
Below 2 years: between 36.4 and 38°C
3 to 10 years : between 36.1 and 37.8°C
11 years up : between 35.8 to 37.5°C
To take a correct measurement, please follow the instructions below:
OK/GŁOS
OK/GŁOS
Forehead Probe
Adaptor
TYMPAN
External
Temperature
Ear Information
37ºC 36ºC 35ºC 34ºC
16
Adult/Child
above 1 year old Child below 1 year old
Move the auricle up
and backward Move the auricle straight
and backward
HOW TO TAKE THE MEASUREMENT ?
To use your thermometer to measure the temperature from the
EAR, REMOVE THE FOREHEAD PROBE BEFORE ANY INSERTION
INSIDE THE EAR as described below; a smaller probe – the EAR
PROBE- t for the ear appears. Press any key to switch on the
thermometer.
C.
1)
ENGLISH

REMARKS :
Gently position the EAR PROBE inside the ear as described in
paragraph B above.
Press the scan【】button once to start the measurement & you
will hear a rst beep sound to conrm beginning of the scan. Once
the measurement is completed (1 to 2 seconds later), you will hear a
second beep sound; you will hear a second beep sound and see the
result on the screen with a dierent color based on your
temperature level (see below section VI DISPLAY OF THE RESULTS -
COLOR CHECK FEATURES). For talking version, you can also hear the
result (see section VIII, TALKING FEATURE).
You can see a ‘’ ‘’ symbol to indicate that you are taking the EAR
temperature.
Once completed, clean gently with a soft and dry cloth and put
back the large forehead probe to protect the Infra red sensor, and
put back the product in its box.
After 3 consecutive readings, please wait 10 minutes before doing a
new measurement.
Wait 30 seconds between 2 measurements.
Keep thermometer at room temperature for around 15 to 30 mins
before use in order to get accurate results.
The reading range is from 32,0 to 42,9°C ; if the reading is not with
this range, the following is displayed :
HI : Means temperature is above 42,9 °C
LO : Means temperature is below 32,0 °C
The screen will display time and date automatically after 30 seconds
2)
3)
4)
a)
b)
c)
d)
e)
17
Temperature below
35,5 °C
Between 35,6 °C
and 37,2 °C
Between 37,3 °C
and 37,5 °C
Above 37,6 °C
No lighting
Lighting in
GREEN
Lighting in
ORANGE
Temperature normal
Slightly high temperature
– check again later
High temperature
Lighting in RED
VI. DISPLAY OF THE RESULTS – 'COLOR CHECK' FEATURES
This unique feature will help you to read the results easily by lighting up
the screen in dierent colors.
The screen turns RED, ORANGE or GREEN as follow:
Please check on the packaging for example of lighting display.
ENGLISH

WARNING!
It is important to read the result displayed to understand your
health condition. For babies or individuals, if your symptoms and
global health does not reect the results of the measurement, you
should double check with a digital thermometer and/or contact
your doctor immediately.
Forehead temperature may vary between individuals; we
recommend that you try your forehead thermometer to dene
your forehead temperature.
The lighting screen will help you to read the results in some dark
place. This feature is very convenient when taking the temperature
in a child's room during the night for example.
18
VII. SWITCH ON/OFF THE THERMOMETER
Simply press one of the buttons to switch on the thermometer; the
Time and Date are then displayed on the screen and the thermometer is
ready to use The thermometer will automatically switch o after 3min
to save the battery life.
VIII. TALKING FEATURE
If your thermometer has talking feature, you can enable or disable the
voice of the thermometer.
REMARKS :
You can only disable or activate the talking function under the time
display mode.
If you cannot nd any‘OK/
GŁOS’
button, it means your thermometer
does not have the talking feature.
1)
2)
To disable the 'Talking feature’, press hold ‘OK/
GŁOS’
Button for 2
seconds until you hear a 'beep' sound. When you are taking your
temperature under the non-talking mode, you will then hear a beep
sound to indicate the beginning of measurement and then another
beep sound to indicate the end of the measurement. The result will
be shown on the LCD screen.
To enable the 'Talking feature', press hold ‘OK/
GŁOS’
Button for 2
seconds until you hear a 'beep' sound. Press the Scan button once to
start the measurement and you will hear a ‘beep’ sound. Once the
measurement has been completed you will hear a short melody and
the result via the speaker. Result will be shown on the LCD screen as
well.
ENGLISH

Remove any stains on the body of the thermometer with a soft and
dry cloth.
Do not wash with water or detergent containing abrasive or
benzene.
XI. MAINTENANCE, STORAGE and CALIBRATION
Maintenance
Storage
Always put back the large forehead probe if the unit is not in used.
Do not leave the thermometer exposed to or at high risk of direct
sunshine, high temperature, dampness, re, ame, vibration or
impact.
Remove the battery from the instrument if it is not required for
extended periods of time.
1.
2.
3.
1.
2.
PRESS 'MEMO' key for 2 sec. HOUR is blinking and the word SET is
displayed on the screen.
PRESS AGAIN 'MEMO' to adjust the correct HOUR gures.
PRESS 'OK.' to set now the MINUTES, then the DATE and the DAY ; At
each step, the related gure is blinking.
PRESS 'MEMO' to adjust the right MINUTES, DATE, and DAY
PRESS 'MEMO' to complete the operation once you have selected
the correct DAY.
1.
2.
3.
4.
5.
IX. MEMORIES
The thermometer keeps in memory the last 30 measurements.
For each measurement, time and date are also recorded.
1. Press the ‘MEMO’ key to check memories.
2.“--”is displayed if no record in memory.
3. Press ‘MEMO’ to display the dierent records in memory.
X. SETTING DATE AND TIME
Time and Date are displayed when you activate the thermometer
or 30 seconds after no key is pressed.
19
Calibration
This thermometer is calibrated at the time of manufactured. If the
thermometer is used according to the instruction, periodic
re-calibration is not required. If there is any doubt about the accuracy
of the measurement, please contact the retailer immediately.
* Do not attempt to modify or reassemble the thermometer.
ENGLISH

Ensure that your are
pressing properly the
SCAN key; check the
paragraph 'How to make a
measurement'
Consult your retailer.
"Err U" on screen is
displayed
"Err H" on screen is
displayed
No measure after pressing
the SCAN key
Errors detected during self
check
Press the button at the base
of the battery compartment
with a sharp object if you
want to switch back into
Celsius
Display '°F' on screen is
displayed
Temperature is displayed in
Fahrenheit
Check if working
environment is within the
range (temperature and
humidity) in the paragraph
SPECIFICATIONS.
"Err E" on screen is
displayed
Working environment is not
within the range.
Check paragraph 'how to
take a measurement?'
Check sensor (check
paragraph 'Maintenance,
storage and calibration')
"Lo" on screen is
displayed.(temp.
< 32,0 °C but health
condition seems normal)
"Hi" on screen is
displayed (temp.
> 42,9 °C but health
condition seems normal)
Is the thermometer properly
used?
Is the infra red sensor clean?
XII. ERRORS and TROUBLE SHOOTING
PROBLEMS CHECKING SOLUTIONS
1) put 2 new batteries
2) Adjust battery to proper
polarity
3) RESET thermometer by
pressing RESET button
with a sharp object
Change batteries with 2
fresh AAA 1.5v batteries
Nothing is displayed on
screen
Symbol 'used
batteries' on screen
1) batteries are used up
2) batteries are not inserted
in proper manner
3) problem of RESET
Batteries are used up
XIII. CHANGE THE BATTERIES
The thermometer is using 2 x AAA, 1,5 volt batteries.Once
batteries are used up, (see on screen), open the battery
compartment and replace the batteries. Respect the + and –
polarity.
Follow environment laws when changing the batteries.
o
C
o
F
o
C
o
F
20
ENGLISH
This manual suits for next models
1
Table of contents
Languages:


