Metabo WIG 170 AC User manual

115 168 8345 / 3805 - 3.0
WIG 170 AC/DC
Betriebsanleitung. . . . . . . . . . . . . . . . . . . . .3
Operating Instruction . . . . . . . . . . . . . . . . . .9
Instructions d'utilisation . . . . . . . . . . . . . . .15
Handleiding . . . . . . . . . . . . . . . . . . . . . . . .21
Manuale d’istruzioni. . . . . . . . . . . . . . . . . .27
Manual de uso . . . . . . . . . . . . . . . . . . . . . .33
Betjeningsvejledning . . . . . . . . . . . . . . . . .39
Bruksanvisning . . . . . . . . . . . . . . . . . . . . .45
Bruksanvisning . . . . . . . . . . . . . . . . . . . . .51
S0037IVZ.fm

2
U2S0037.fm

3
DEUTSCH
,
1. Zuerst lesen! ...............................3
2. Sicherheitshinweise ...................3
2.1 Bestimmungsgemäße V
erwendung ....................................3
2.2 Allgemeine Sicherheitshinweise ...3
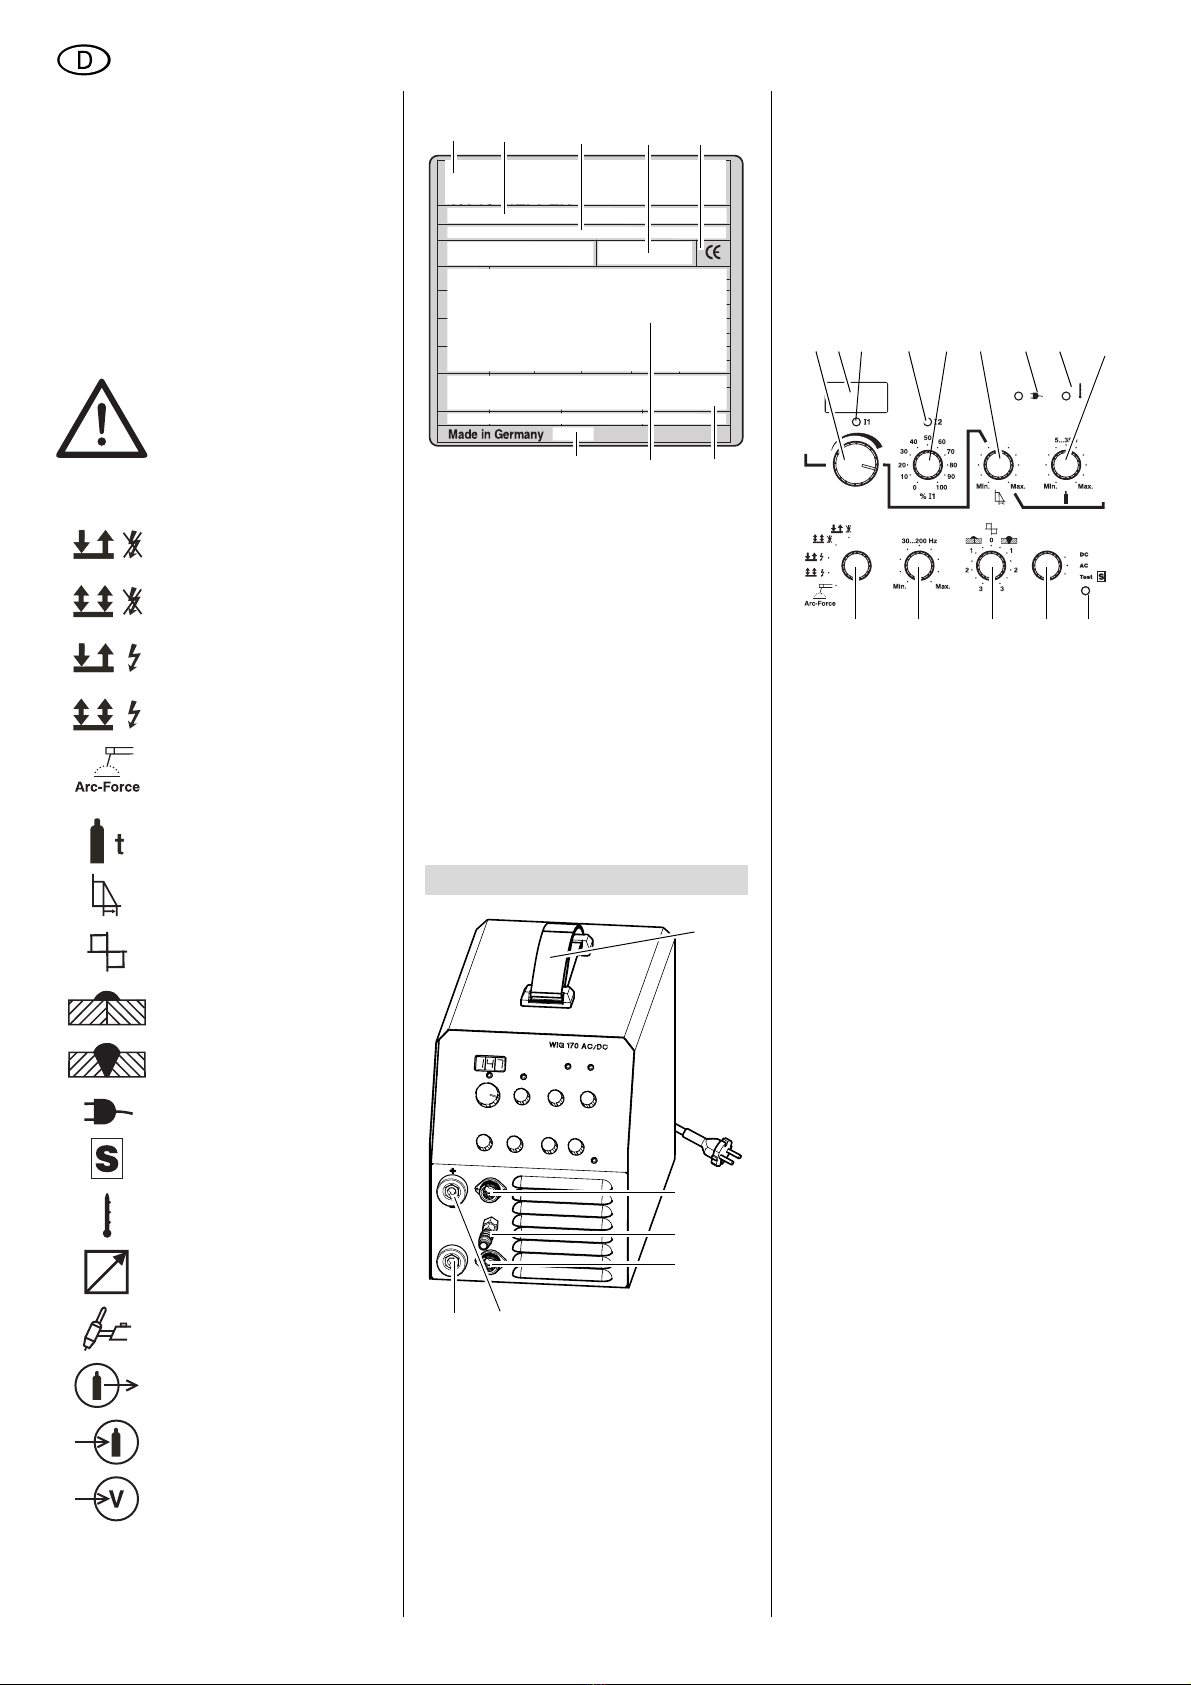
2.3 Symbole auf dem Gerät................4
3. Bedienelemente ..........................4
4. Betriebsvorbereitung .................5
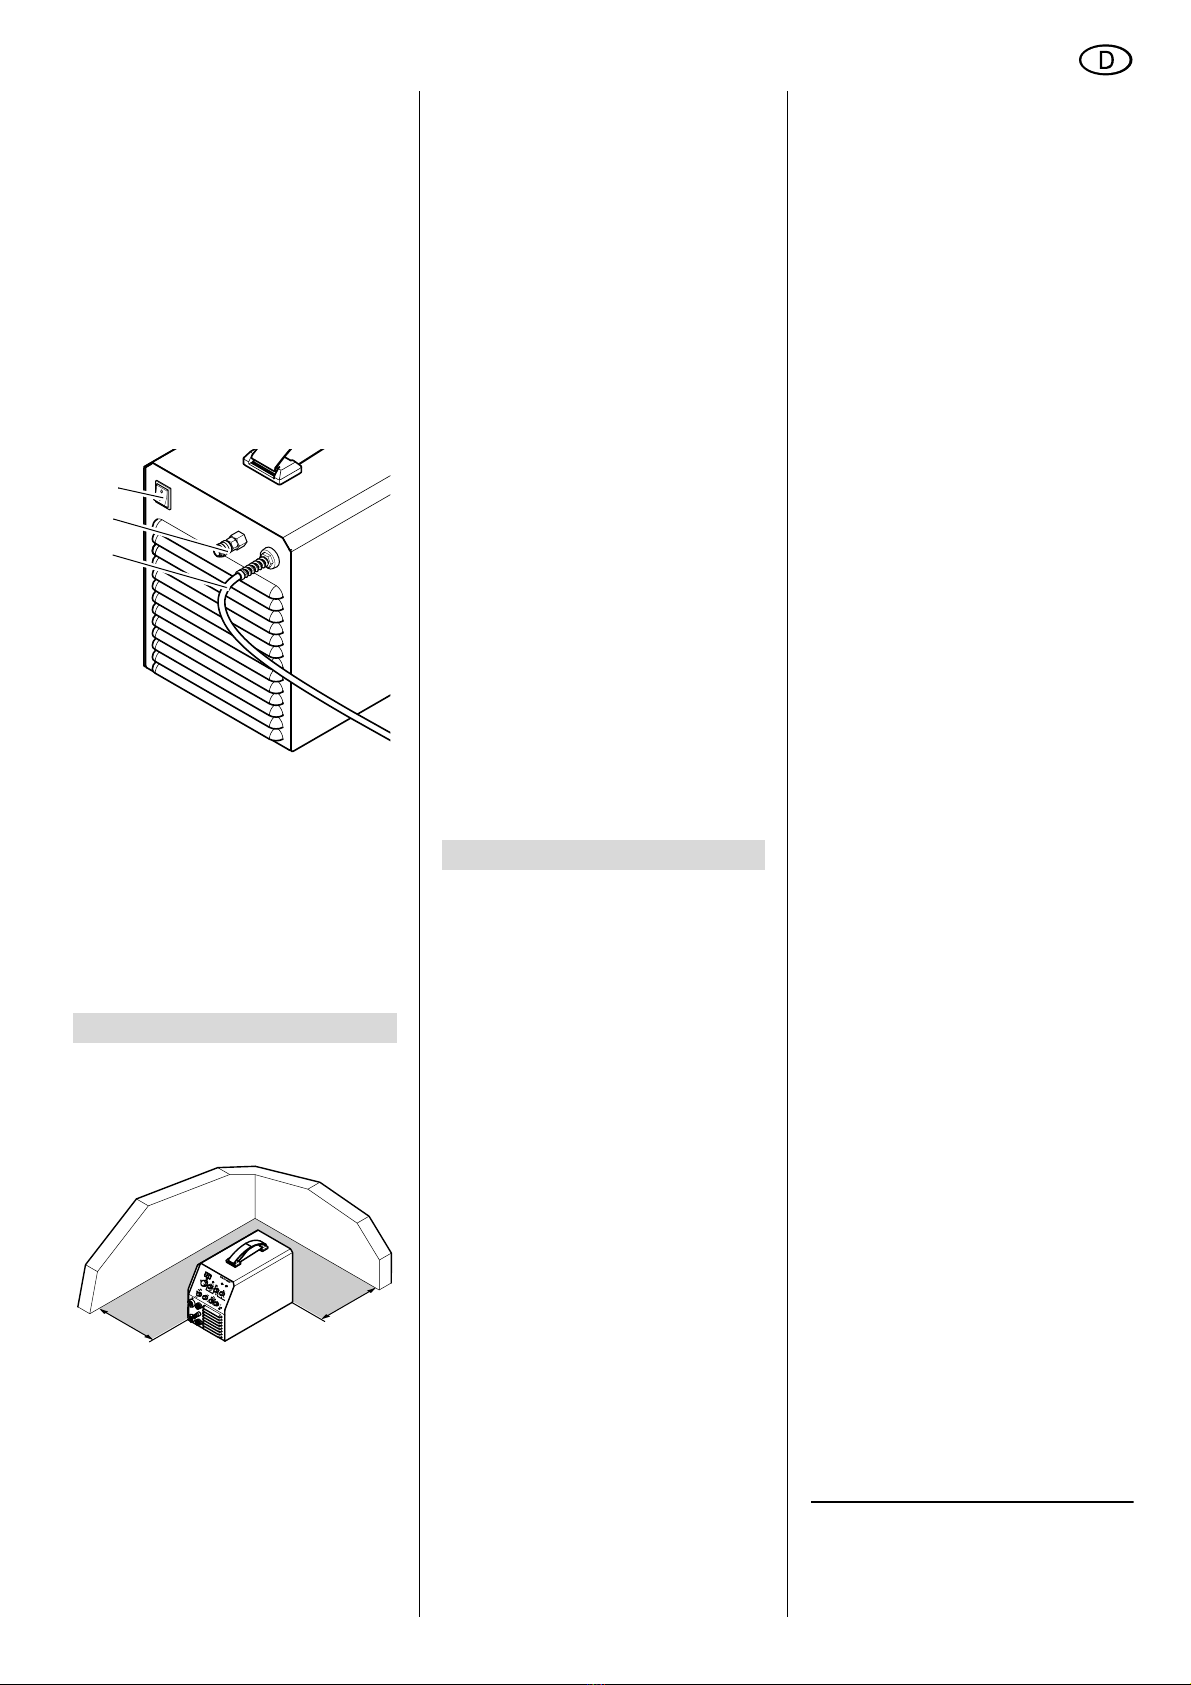
4.1 Aufstellen......................................5
4.2 Übrige Anschlüsse........................5
5. Bedienung ...................................5
5.1 Betriebsarten ................................5
5.2 Parameter.....................................6
5.3 Betrieb starten ..............................6
5.4 Betrieb beenden ...........................7
6. Wartung .......................................7
7. Lieferbares Zubehör..............7/59
8. Reparatur.....................................7
9. Umweltschutz..............................7
10. Störungen....................................7
11. Störungsbehebung.....................7
12. Technische Daten.......................8
Diese Betriebsanleitung wurde so
erstellt, dass Sie schnell und sicher mit
Ihrem Gerät arbeiten können. Hier ein
kleiner Wegweiser, wie Sie diese
Betriebsanleitung lesen sollten:
−Lesen Sie diese Betriebsanleitung
vor der Inbetriebnahme ganz durch.
Beachten Sie insbesondere die
Sicherheitshinweise.
−Diese Betriebsanleitung richtet sich
an ausgebildete Lichtbogenschwei-
ßer oder Fachkräfte mit ähnlicher
Qualifikation.
−Bewahren Sie alle mit diesem Gerät
gelieferten Unterlagen auf, damit
Sie sich bei Bedarf informieren kön-
nen. Bewahren Sie den Kaufbeleg
für eventuelle Garantiefälle auf.
−Wenn Sie das Gerät einmal verlei-
hen oder verkaufen, geben Sie alle
mitgelieferten Geräteunterlagen mit.
−Für Schäden, die entstehen, weil
diese Betriebsanleitung nicht beach-
tet wurde, übernimmt der Hersteller
keine Haftung.
Die Informationen in dieser Betriebsan-
leitung sind wie folgt gekennzeichnet:
Gefahr!
Warnung vor Personen-
schäden oder Umwelt-
schäden.
Stromschlaggefahr!
Warnung vor Personen-
schäden durch Elektrizi-
tät.
Achtung!
Warnung vor Sach-
schäden.
Hinweis:
Ergänzende Informationen.
−Zahlen in Abbildungen (1, 2, 3, ...)
−kennzeichnen Einzelteile;
−sind fortlaufend durchnumme-
riert;
−beziehen sich auf entspre-
chende Zahlen in Klammern (1),
(2), (3) ... im benachbarten Text.
−Handlungsanweisungen, bei denen
die Reihenfolge beachtet werden
muss, sind durchnummeriert.
−Handlungsanweisungen mit beliebi-
ger Reihenfolge sind mit einem
Punkt gekennzeichnet.
−Auflistungen sind mit einem Strich
gekennzeichnet.
2.1 Bestimmungsgemäße
Verwendung
Das Schweißgerät ist bestimmt für das
Verschweißen aller Metalle.
Es entspricht bei Auslieferung den ein-
schlägigen Bestimmungen.
Das Schweißgerät ist bestimmt für den
Gebrauch durch ausgebildete Lichtbo-
genschweißer oder Fachkräfte mit ähnli-
cher Qualifikation.
Zugelassene Schweißverfahren:
−WIG AC/DC (Wolfram-Inert-Gas),
für alle Metalle
−Elektrodenschweißen
Beim Schutzgasschweißverfahren ist
sicherzustellen, dass die Schutzglocke
des Schutzgases nicht durch Zugluft
weggeblasen wird.
Geräteleistungen siehe „Technische
Daten“.
Jede andere Verwendung gilt als
bestimmungswidrig und ist verboten.
Durch bestimmungswidrige Verwen-
dung, Veränderungen am Gerät oder
durch den Gebrauch von Teilen, die
nicht vom Hersteller geprüft und freige-
geben sind, können unvorhersehbare
Schäden entstehen!
2.2 Allgemeine Sicherheits-
hinweise
•Beachten Sie beim Gebrauch die-
ses Gerätes die folgenden Sicher-
heitshinweise, um Gefahren für Per-
sonen oder Sachschäden auszu-
schließen.
•Beachten Sie die speziellen Sicher-
heitshinweise in den jeweiligen
Kapiteln.
•Beachten Sie die gesetzlichen
Richtlinien oder Unfallverhütungs-
Vorschriften für den Umgang mit
Lichtbogenschweißgeräten.
BGefahr!
Elektrische Spannung.
•Setzen Sie das Gerät nur in Innen-
räumen und in trockener Umgebung
ein.
•Schließen Sie das Gerät nur an eine
Stromquelle an, deren Schutzein-
richtungen einwandfrei funktionie-
ren.
Wenden Sie sich im Zweifelsfall an
eine Elektrofachkraft!
•Reparaturen und Eingriffe in die
Geräte dürfen nur von ausgebilde-
ten Elektrofachkräften durchgeführt
werden.
•Vor Öffnen des Gerätes müssen Sie
die Netzverbindung trennen.
AGefahr!
•Tragen Sie bei Schweißarbeiten
unbedingt ausreichende Schutz-
kleidung.
•Verwenden Sie unbedingt Schutz-
schild und Schutzhandschuhe.
Sie schützen sich dadurch vor Fun-
kenflug und Lichtbogenstrahlung.
•Alle Metalldämpfe sind schädlich!
Sorgen Sie bei Arbeiten in geschlos-
senen Räumen immer für eine
ausreichende Belüftung und Absau-
gung, damit die maximalen Schad-
stoffkonzentrationen am Arbeits-
platz nicht überschritten werden.
Die Dämpfe von Blei, Cadmium,
Kupfer, Chrom, Nickel, Zink und
Beryllium sind besonders gefährlich!
AAchtung!
•Schweißen Sie niemals ein
Schweißgut, das geerdet ist.
Sie vermeiden so eine eventuelle
Beschädigung der Schutzleiter
durch vagabundierende Schweiß-
ströme (Potentialverschleifungen).
•Benutzen Sie das Schweißgerät nie-
mals zum Auftauen von Rohren.
•Befestigen Sie die Klemme der
Schweißstromrückleitung immer
direkt am Schweißgut und so nah
wie möglich an der Schweißstelle.
•Tragen Sie das Schweißgerät
immer am Tragegurt, wenn Sie es
transportieren.
Inhaltsverzeichnis
1. Zuerst lesen! 2. Sicherheitshinweise
XS0018D.fm Betriebsanleitung DEUTSCH

4
DEUTSCH
•Besondere Vorsicht ist geboten,
wenn Sie mit dem Gerät in der Nähe
von Computern, elektronisch
gesteuerten Anlagen oder in der
Nähe von magnetischen Datenträ-
gern (Tonbänder, Disketten, Daten-
bändern, Scheckkarten o.ä.) arbei-
ten.
Bei der Lichtbogenzündung kann es
zu Fehlfunktionen der Anlagen oder
Datenverlusten kommen.
2.3 Symbole auf dem Gerät
Gefahr!
Missachtung der folgen-
den Warnungen kann zu
schweren Verletzungen
oder Sachschäden füh-
ren.
2-Takt-Funktion ohne HF-
Zündung
4-Takt-Funktion ohne HF-
Zündung
2-Takt-Funktion mit HF-
Zündung
4-Takt-Funktion mit HF-
Zündung
Lichtbogenschweißen mit
umhüllter Stabelektrode
und Arc-Force-Funktion
Gas-Nachströmzeit
Abfallzeit
Balance
Geringere Reinigungswir-
kung
Höhere Reinigungswirkung
Netzspannung
S-Test
Übertemperatur
Anschluss für Fernregler
Anschluss für WIG-
Schweißbrenner
Gasanschluss für WIG-
Schweißbrenner
Anschluss für Gaszufuhr
Hauptschalter
Angaben auf dem Leistungsschild:
1Hersteller
2Gerätebezeichnung
3Seriennummer
4Normenhinweis – Diese Gerät
erfüllt die Anforderungen der
genannten Norm
5CE-Zeichen – Dieses Gerät
erfüllt die EU-Richtlinien gemäß
Konformitätserklärung
6Entsorgungssymbol – Gerät kann
über Hersteller entsorgt werden
7Elektrische Leistungsdaten
8Baujahr
3. Bedienelemente
9Trage-/Schultergurt
In der Länge verstellbar zum
Transport
−an der Hand (wie in der
Abb. dargestellt).
−über der Schulter.
10 Anschluss für Fernregler
2345
7
8
1
6
10
9
11
12
13
14
11 Anschluss für Brenner-Schutz-
gasleitung
12 Anschluss für Steuerleitung
WIG-Schweißbrenner
13 Anschluss Schweißstrom
(+ Pol)
14 Anschluss Schweißstrom (- Pol)
15 Schweißstromeinsteller
16 LED-Anzeige
zeigt den aktuell eingestellten
Schweißstrom.
17 Schweißstrom I1-Anzeige
−LED leuchtet:
Schweißstrom ist aktiv.
18 Zweitstrom I2-Anzeige
(nur in der Betriebsart 4-Takt)
−LED leuchtet:
Zweitstrom I2 ist aktiv.
19 Zweitstrom I2-Einsteller
20 Absenkzeiteinsteller
21 Betriebsabzeige
−LED leuchtet:
Gerät ist eingeschaltet und
es liegen keine Störungen
vor.
−LED aus:
Gerät ist ausgeschaltet,
oder es liegt eine Störung
vor.
22 Übertemperaturanzeige
−LED leuchtet:
Die Übertemperatursiche-
rung hat ausgelöst und die
Steuerung abgeschaltet.
23 Gasnachströmzeiteinsteller
15 16 17 18 19 20 21 22 23
24
25
2627
28

5
DEUTSCH
4.1 Aufstellen
AAchtung!
Stellen Sie das Gerät immer
nur auf den Gerätefüßen ab.
Das Gerät saugt an der Frontseite
und am Boden Luft an und gibt sie an
der Rückseite durch die Lüftungs-
schlitze wieder ab. Achten Sie unbe-
dingt auf einen ungehinderten Luft-
strom. Der Abstand des Gerätes zu
Wänden oder anderen Geräten muss
mindestens 20 cm betragen.
4.2 Übrige Anschlüsse
AAchtung!
Beachten Sie beim Anschluss
der Schweißstromleitungen die gefor-
derte Polarität für das gewünschte
Schweißverfahren und die verwende-
ten Elektroden.
Elektrodenschweißen
Vor der ersten Inbetriebnahme:
1. Schweißstromrückleitung am -Pol
anschließen.
2. Schweißleitung am +Pol anschlie-
ßen.
Schutzgasschweißen
Vor der ersten Inbetriebnahme:
1. Gewebedruckschlauch an Druck-
minderer anschließen.
2. Schweißstromrückleitung am +Pol
anschließen.
3. Schweißstrom WIG-Schweißbren-
ner am -Pol anschließen.
4. Steuerleitung WIG-Schweißbrenner
anschließen.
5. Gasleitung vom WIG-Schweißbren-
ner anschließen.
Sämtliche Gerätefunktionen steuern Sie
mit den Schaltern und Einstellern an der
Frontplatte.
Nach dem Einschalten leuchten alle
LEDs einmal kurz auf. In der LED-
Anzeige erscheint:
−für ca. 2 Sekunden die Software-
Version (blinkend), danach
−für ca. 1 Sekunde die gewählte Kon-
figuration, und
−der aktuell eingestellte Schweiß-
strom.
Voraussetzung:
Der Selbsttest war fehlerfrei (die
Betriebsanzeige und die LED S-Test
leuchten).
5.1 Betriebsarten
Wählen Sie mit dem Umschalter
Betriebsart eine der möglichen Betriebs-
arten aus:
2T
Betriebsart für das WIG-Schweißen im
2 Takt-Betrieb:
1. Werkstück mit Wolframelektrode
berühren.
2. Start-/Stopp-Taster am WIG-
Schweißbrenner betätigen.
−Die LED Schweißstrom I1 leuch-
tet.
−Schweißprozess startet mit dem
fest eingestellten Startstrom.
−Nach erfolgter Zündung steigt der
Schweißstrom auf den eingestell-
ten Betriebsstrom an.
3. Start-/Stopp-Taster loslassen.
−Der Schweißprozess endet.
−Die eingestellte Gasnachström-
zeit läuft.
4T
Betriebsart für das WIG-Schweißen im
4-Takt-Betrieb:
1. Werkstück mit Wolframelektrode
berühren.
2. Start-/Stopp-Taster am WIG-
Schweißbrenner betätigen.
−Die LED Schweißstrom I1 leuch-
tet.
−Der Schweißprozess startet.
−Solange der Start-/Stopp-Taster
gedrückt ist, brennt der Lichtbo-
gen mit dem fest eingestellten
Startstrom.
−Nach dem Loslassen steigt der
Strom auf den eingestellten
Betriebsstrom an.
3. Zweitstromtaster am WIG-Schweiß-
brenner drücken (bei Bedarf).
Solange der Zweitstromtaster
gedrückt ist:
−brennt der Lichtbogen mit dem
eingestellten Zweitstrom I2.
−leuchtet die LED Zweitstrom I2.
4. Start-/Stopp-Taster nochmals betäti-
gen.
Schweißstrom sinkt in der einge-
stellten Abfallzeit auf den Minimal-
strom ab.
−Solange der Taster gedrückt ist,
brennt der Lichtbogen mit dem
Minimalstrom weiter (Endkrater-
füllung).
−Nach dem Loslassen endet der
Schweißprozess.
2T + HF
Betriebsart für das WIG-Schweißen im
2 Takt-Betrieb, allerdings mit HF-Zün-
dung. Die Zündung erfolgt, ohne dass
die Wolframelektrode das Wekstück
berührt.
4T + HF
Betriebsart für das WIG-Schweißen im
4 Takt-Betrieb, allerdings mit HF-Zün-
dung. Die Zündung erfolgt, ohne das die
Wolframelektrode das Wekstück berührt.
Elektrode
Betriebsart für das Elektrodenschwei-
ßen. Die LED Schweißstrom I1 leuchtet.
3Hinweis:
Das Gerät verwendet beim Elek-
trodenschweißen immer die folgenden
Funktionen:
24 S-Testanzeige
−LED leuchtet:
Gerät ist betriebsbereit.
−LED ist aus:
S-Test hat ausgelöst, das
Gerät ist nicht betriebsbe-
reit.
25 Umschalter Stromart
26 Balanceeinsteller
27 Frequenzeinsteller
28 Umschalter Betriebsart
29 Hauptschalter
schaltet das Gerät ein oder aus.
30 Anschluss für Gaszufuhr
31 Netzanschlusskabel
LED = Licht-Emittierende Diode,
dient als Kontrolleuchte.
4. Betriebsvorbereitung
29
30
31
>20 cm
>20 cm
5. Bedienung

6
DEUTSCH
Hot-Start
−Bei Berührung des Werkstücks mit
der Elektrode wird der eingestellte
Schweißstrom für kurze Zeit erhöht,
um ein sicheres Zünden des Licht-
bogens zu erreichen.
Die kurzfristige Erhöhung des
Schweißstromes ist auf den maxi-
malen Elektrodenstrom begrenzt.
Arc-Force
−Während des Schweißprozesses
hält das Gerät die Energie (Wärme)
konstant, die in das Material einge-
bracht wird, auch wenn sich der
Abstand der Elektrode zum
Schweißbad ändert.
Anti-Stick
−Erkennt das Gerät einen Kurz-
schluss im Schweißprozess, wird
nach 0,5 Sekunden auf Minimal-
strom geschaltet, um ein Ausglühen
der Elektrode zu verhindern.
Mit dem Umschalter Stromart bestim-
men Sie die verwendete Schweißstrom-
art.
DC
Das Gerät liefert Gleichstrom.
AC
Das Gerät liefert Wechselstrom.
S-Test
Das Gerät prüft die internen Sicherheit-
einrichtungen zum Arbeiten unter erhöh-
ter elektrischer Gefährdung. Um den
Test zu starten:
1. Gerät einschalten
Die Betriebsanzeige und die LED
S-Test müssen leuchten.
2. Umschalter Stromart auf „Test“
schalten.
−Das Gerät simuliert intern einen
Fehler am Schweißstromaus-
gang. Die LED S-Test muss
nach kurzer Zeit erlöschen.
−Wenn die LED S-Test erlischt,
war der Test erfolgreich.
Das Gerät ist jetzt nicht mehr
betriebsbereit!
3. Gerät ausschalten.
4. Wahlschalter auf die gewünschte
Stromart zurückschalten und nach
ca. 10 Sek. wieder einschalten.
3Hinweis:
Erfolgreicher Test bedeutet, dass
kein Fehler in der Sicherheitseinrich-
tung erkannt wurde.
Nicht erfolgreicher Test bedeutet, dass
die Steuerung einen Fehler in der
Sicherheitseinrichtung erkannt hat.
Stellen Sie in diesem Fall die Arbeiten
ein und wenden sich an den Service!
5.2 Parameter
Die folgenden Parameter können Sie
variieren:
Schweißstrom I1
Maximaler Strom für den eigentlichen
Schweißprozess.
Einstellbereich, in 1 A-Schritten,
−beim WIG-Schweißen: 3 A…170 A
−beim Elektrodenschweißen:
10 A…140 A.
3Hinweis:
Während des Schweißprozesses
wird der aktuelle Sollwert des Schweiß-
stromes angezeigt.
Haben Sie eine Absenkzeit größer Null
eingestellt, ändert sich der Wert in der
Anzeige kontinuierlich, bis der Endwert
erreicht ist.
Eine Änderung des Schweißstromes
während des Schweißprozesses ist
jederzeit möglich.
3Hinweis:
Ist ein Fußfernregler an dem
Gerät angeschlossen, schaltet das
Gerät generell in den Zwei-Takt-Betrieb.
Ist ein Handfernregler angeschlossen,
kann der Betriebsstrom nur mit diesem
Regler variiert werden.
Stromeinstellbereich Fußfernregler:
Minimalstrom bis eingestellter Betriebs-
strom.
Stromeinstellbereich Handfernregler:
Minimalstrom bis Maximalstrom.
Zweitstrom I2
Strom, auf den während des Schweiß-
prozesses im 4-Takt-Betrieb umgeschal-
tet werden kann. Um den aktuell einge-
stellten Wert anzuzeigen:
1. Eine 4-Takt-Betriebsart einstellen.
2. Zweitstromtaster am WIG-Schweiß-
brenner drücken und gedrückt hal-
ten.
−Die LED Schweißstrom I2 leuch-
tet, und in der Anzeige erscheint
der aktuell eingestellte Wert von
I2. Der Wert kann jetzt mit dem
Zweitstromeinsteller variiert wer-
den.
3. Zweitstromtaster loslassen.
−LED Schweißstrom I2 erlischt, in
der Anzeige erscheint wieder der
Wert des Schweißstromes I1.
−Der eingestellte Wert für I2 wird
gespeichert.
Minimalstrom
Strom, auf den der Schweißstrom am
Ende des Schweißprozesses zur End-
kraterfüllung absinkt.
Absenkzeit
Zeitdauer, in der der Strom auf den Mini-
malstrom abfällt.
Einstellbereich: Min.…Max., gleichbe-
deutend 5 ms…10 sec.
Gasnachströmzeit t.
Zeitdauer, für die das Schutzgas nach-
strömt, nachdem der Schweißprozess
beendet wurde.
Einstellbereich 5…35 sec.
FREQUENZ
Frequenz der Schweißimpulse.
Mit der Formel 1 ÷ eingestellte
Frequenz [Hz] = Zeitdauer [sec] können
Sie die Zeitdauer eines Impulses errech-
nen.
Einstellbereich: 30 Hz…200 Hz.
BALANCE
(nur in der Betriebsart WIG AC...)
Verhältnis von Zeitdauer positiver Span-
nung zu Zeitdauer negativer Spannung
beim AC-Schweißen. Ein Wert von bei-
spielsweise 30 % bedeutet, dass für
30 % der Zeitdauer (t1) einer Periode (T)
die Schweißspannung an der Elektrode
positiv, und für 70 % der Zeitdauer (t2)
negativ ist.
Eine Erhöhung dieses Wertes bewirkt
eine höhere Reinigungswirkung (Alumi-
niumschweißen), hat aber gleichzeitig
eine höhere thermische Belastung der
Elektrode zur Folge.
Einstellbereich:
25 % … 75 %.
5.3 Betrieb starten
Schutzgasschweißen
AAchtung!
Vor Beginn der Arbeit prüfen:
−Richtiges Schutzgas angeschlos-
sen?
−Richtige Brennerdüse einge-
setzt?
−Elektrode noch spitz genug?
Schleifen Sie bei Bedarf die Elek-
trode nach.
+U
-U
t
T
t1t
2

7
DEUTSCH
3Hinweis:
Elektroden für das DC-Schwei-
ßen nur in Längsrichtung anschleifen!
1. Schweißstromrückleitung an geeig-
neter Stelle am Werkstück befesti-
gen.
2. Hauptabsperrventil an Gasflasche
öffnen und gewünschte Gasmenge
einstellen.
Bei Bedarf Gasdüse wechseln.
3. Hauptschalter einschalten.
4. Gewünschtes Schweißverfahren
wählen.
5. Gewünschten Schweißstrom ein-
stellen.
Das Schweißgerät ist jetzt betriebs-
bereit.
Elektrodenschweißen
1. Schweißstromrückleitung an geeig-
neter Stelle am Werkstück befesti-
gen.
2. Hauptschalter einschalten.
3. Schweißverfahren „Elektrode“ wäh-
len.
4. Gewünschten Schweißstrom ein-
stellen.
Das Schweißgerät ist jetzt betriebs-
bereit.
5.4 Betrieb beenden
1. Hauptabsperrventil an Gasflasche
schließen.
2. Hauptschalter auf „0“ stellen.
3. Verbindung der Schweißstromrück-
leitung zum Werkstück trennen.
4. Netzstecker ziehen.
Das Schweißgerät ist weitgehend war-
tungsfrei.
Je nach Staubbelastung sollte es alle 4
bis 6 Monate mit trockener und ölfreier
Druckluft ausgeblasen werden.
Zum Öffnen des Schweißgerätes entfer-
nen Sie die Gehäuseschrauben und
schieben das Gehäuseoberteil nach hin-
ten.
Überprüfen Sie in regelmäßigen Abstän-
den das Gerät auf sichtbare Mängel.
Benachrichtigen Sie bei Schäden an den
Kabeln eine Elektrofachkraft.
Für die Geräte WIG 170 AC/DC empfeh-
len wir das nachfolgend genannte Zube-
hör. Dieses Zubehör ist mit dem Gerät
getestet worden und garantiert ein pro-
blemloses Arbeiten.
AWIG-Schweißbrenner Mistral,
1) mit 4 m Anschlusslänge
2) mit 8 m Anschlusslänge
BDruckminderer mit 2 Manometern
1) ohne Absperrventil
2) mit Absperrventil
CFuß-Fernregler
zur stufenlosen Schweißstromregu-
lierung.
1) mit 5 m Kabel, Kunststoffge-
häuse
2) mit 5 m Kabel, Alugehäuse
3) mit 10 m Kabel, Alugehäuse
DHand-Fernregler
zur stufenlosen Schweißstromregu-
lierung,
1) mit 5 m Kabel
2) mit 10 m Kabel
EMassekabel, 25 mm2, 3 m
FSchweißkabel, 16 mm2, 3 m
GSchweißschild
1) als Kopfhaube
2) Automatik-Schutzschirm
AGefahr!
Reparaturen an Elektrowerk-
zeugen dürfen nur durch eine Elektro-
fachkraft ausgeführt werden!
Reparaturbedürftige Schweißgeräte
können an die Service-Niederlassung
Ihres Landes eingesandt werden. Die
Adresse finden Sie bei der Ersatz-
teilliste.
Bitte beschreiben Sie bei der Einsen-
dung zur Reparatur den festgestellten
Fehler.
Das Verpackungsmaterial der Maschine
ist zu 100 % recyclingfähig.
Ausgediente Elektrowerkzeuge und
Zubehör enthalten große Mengen wert-
voller Roh- und Kunststoffe, die eben-
falls einem Recyclingprozess zugeführt
werden können.
Die Anleitung wurde auf chlorfrei
gebleichtem Papier gedruckt.
Im Störungsfall erscheinen in der LED-
Anzeige drei Balken (---).
Gleichzeitig erlischt die LED Betriebsan-
zeige.
Übertemperatur
Die Übertemperaturanzeige leuchtet.
−Lassen Sie das Gerät eingeschaltet.
So kann der Lüfter das Gerät
schneller abkühlen.
−Der Betriebsstrom wird wieder
angezeigt, wenn die Temperatur auf
normale Werte abgesunken ist.
Sie können jetzt weiterarbeiten.
6. Wartung
7. Lieferbares Zubehör
8. Reparatur
9. Umweltschutz
10. Störungen
11. Störungsbehebung
Spröde oder poröse Schweißnaht
Gashahn
geschlossen?
Gashahn öffnen.
Leere Gasfla-
sche?
Gasflasche tau-
schen.
Ungeeignetes
Schutzgas?
Geeignetes
Schutzgas ver-
wenden.
Gasschlauchan-
schlüsse undicht?
Anschlüsse über-
prüfen.
Druckminderer
defekt?
Druckminderer
überprüfen.
Gasdüse am
Brenner oder
Schlauchpaket
verstopft?
Gasdüsereinigen.
Zugluft an der
Schweißstelle?
Schweißstelle
abschirmen bzw.
Gasdurchfluss
erhöhen.
Unsauberes
Werkstück?
Rost, Fett oder
Lackschicht ent-
fernen.
Ständiger Gasaustritt
Magnetventil
defekt oder ver-
schmutzt?
Magnetventil von
Elektrofachkraft
überprüfen las-
sen.
Kein Schweißstrom
Schweißstrom-
rückleitung gibt
keinen richtigen
Kontakt?
Schweißstrom-
rückleitung auf
richtigen Kontakt
prüfen.
Steuerplatine
defekt?
Service
informieren.
Keine Funktion des Gerätes
Netzsicherung
ausgelöst?
Netzsicherung
einschalten oder
wechseln.

8
DEUTSCH
12. Technische Daten
Gerät WIG 170 AC/DC
Netzanschlussspannung: 230 V (+15 %/-15 %) / 50 - 60 Hz
Leerlaufspannung: V 85
Arbeitsspannung WIG: V 10,12 - 16,8
Arbeitsspannung Elektrode: V 20,4 - 25,6
Stromeinstellbereich, WIG: A 3 - 170 A
Stromeinstellbereich, Elektrode: A 10 - 140 A
Eingangsleistung max., WIG: kVA 4,8
Eingangsleistung max., Elektrode: kVA 5,5
Eingangshöchststrom, WIG: A 21
Eingangshöchststrom, Elektrode: A 24
Max. Einschaltdauer WIG 40 °C: % 40
Max. Einschaltdauer E 40 °C: % 40
60% Einschaltdauer WIG 40 °C: A 140
60% Einschaltdauer E 40 °C: A 100
100% Einschaltdauer WIG 40 °C : A 110
100% Einschaltdauer E 40 °C : A 80
Schutzart: IP23C
Verschweißbare Elektroden: Ø mm 2,5
Kühlart: F
Netzsicherung: T16A
Maße L x B x H: mm 480 x 260 x 320
Gewicht: kg 22,1

9
ENGLISH
1. Please Read First!.......................9
2. Safety Information ......................9
2.1 Specified conditions of use...........9
2.2 General safety information............9
2.3 Symbols on the machine ..............9
3. Operating Elements..................10
4. Preparing for Operation ...........11
4.1 Placing the machine ...................11
4.2 Other connectors ........................11
5. Operation...................................11
5.1 Operating modes ........................11
5.2 Parameters .................................12
5.3 Starting up ..................................12
5.4 Shutting down.............................12
6. Maintenance..............................13
7. Available Accessories.........13/59
8. Repairs.......................................13
9. Environmental Protection ........13
10. Faults .........................................13
11. Trouble Shooting ......................13
12. Technical Specifications..........14
These instructions are written in a way
that will enable you to safely use the
equipment in a minimum of time. Here is
how to read the instructions:
−Read these instructions completely
before use. Pay special attention to
the safety information.
−These instructions are intended for
skilled arc welders or other special-
ists of similar qualification.
−Keep all documents supplied with
the machine for future reference.
Retain proof of purchase for possi-
ble warranty claims.
−If you hire out or sell this machine be
sure to hand over all documents
supplied with the machine.
−The equipment manufacturer is not
liable for any damage arising from
disregard of these instructions.
The information in these instructions is
marked as under:
Danger!
Warning of personal
injury or environmental
damage.
Risk of electric shock!
Risk of personal injury
by electric shock.
Caution!
Risk of material damage
Note:
Supplementary informa-
tion.
−Numbers in illustrations (1, 2, 3, ...)
−indicate component parts;
−are consecutively numbered;
−refer to the corresponding num-
bers in brackets (1), (2), (3) ... in
the neighbouring text.
−Instructions to be carried out in
sequence are numbered.
−Instructions which can be carried
out in any sequence are preceded
by a bullet (•).
−Listing are preceded by a M-dash (–).
2.1 Specified conditions of
use
This welding machine is intended for
welding metals.
It conforms to all relevant regulations at
the time of delivery.
This welding machine is intended for
operation by professional arc welders or
specialists with similar qualifications.
Permissible welding processes:
−TIG AC/DC (Tungsten Inert Gas),
for all metals
−Stick electrode welding
For TIG welding it must be ensured that
the shielding gas cover is not blown
away by air draft.
For machine performance see “Techni-
cal Specifications”.
Any other use is not as specified and
prohibited.
Unspecified use, modification of the
machine or use of parts not tested and
approved by the equipment manufac-
turer could cause unforeseeable dam-
age or even injury.
2.2 General safety informa-
tion
•When using this machine, observe
the following safety instructions to
exclude the risk of personal injury or
material damage.
•Follow the specific safety instruc-
tions in the respective chapters.
•Follow all legal directives or regula-
tions for the prevention of accidents
pertaining to the handling of arc
welding machines.
BDanger!
Electric potential!
•Use machine indoors and in dry
environment only.
•Connect machine only to a properly
earthed outlet.
If in doubt check with a qualified
electrician!
•Service and repairs to the machines
must only be made by qualified elec-
tricians.
•Unplug before removing the
machine's cover.
ADanger!
•Wear sufficient protective clothing
when welding.
•Always use a welding shield or hel-
met and welder's gloves.
They provide protection against
sparks and arc radiation.
•All metal fumes are detrimental to
health!
When working indoors ensure suffi-
cient ventilation and extraction in
order to not exceed the max. per-
missible workplace pollutant con-
centration.
The fumes of lead, cadmium, cop-
per, chromium, nickel, zinc and
beryllium are particularly harmful!
ACaution!
•Never weld earthed metal.
This will prevent possible damage to
the protective earth conductors by
stray welding currents.
•Never use the welding machine for
thawing pipes.
•Always attach the welding return
cable directly to the workpiece and
as close as possible to the welding
spot.
•Always carry the welding machine at
the carrying strap when transport-
ing it.
•Special care is required when work-
ing near computers, electronically
controlled equipment or in the prox-
imity of magnetic data media (sound
recording tapes, floppy disks, data
recording tapes, credit cards, etc.).
The arc start can cause misfunction
of this type of equipment or data
loss.
2.3 Symbols on the machine
Danger!
Disregard of the following
warnings could cause
severe personal injury or
material damage.
2-step mode without HF-
ignition
4-step mode without HF-
ignition
Table of Contents
1. Please Read First!
2. Safety Information
XS0018E.fm Operating Instruction ENGLISH

10
ENGLISH
2-step mode with HF-igni-
tion
4-step mode with HF-igni-
tion
Stick elevtrode welding and
Arc-Force function
Gas postflow time
Downslope time
Balance
Reduced cleaning action
Increased cleaning action
Mains voltage
S-Test
Excess temperature
Connector for remote con-
trol unit
Connector for TIG torch
Connector for TIG torch gas
hose
Connector for gas supply
Main switch
Information on the name plate:
2345
7
8
1
6
1Manufacturer
2Machine designation
3Serial number
4Standard information – This
machine meets the requirements
of the standards mentioned
5CE mark – This machine con-
forms to EC directives as per
declaration of conformity
6Waste disposal symbol – the
machine can be disposed of
through the manufacturer
7Electrical performance data
8Date of manufacture
3. Operating Elements
9Carrying strap/shoulder strap
Adjustable in length for carrying
−by hand (shown in illustra-
tion)
−on the shoulder.
10 Connector for remote control
unit
11 Connector for torch gas hose
12 Connector for TIG torch
pilot lead
13 Welding current connector
(+ pole)
14 Welding current connector
(- pole)
10
9
11
12
13
14
15 Welding current control
16 LED display
Displays the currently set weld-
ing current.
17 I1 welding current indicator
−LED illuminated:
welding current active.
18 I2 secondary current indicator
(4-step mode only)
−LED illuminated:
secondary current I2 is
active.
19 I2 secondary current control
20 Downslope time control
21 Equipment-on indicator
−LED illuminated:
Machine is turned on, no
faults detected.
−LED off:
Machine turned off or fault
present.
22 Excess temperature indicator
−LED illuminated:
Excess temperature fuse
tripped and control disa-
bled.
23 Gas postflow time control
24 S-Test indicator
−LED illuminated:
Machine ready to operate.
−LED off:
S-Test triggered, machine
not ready to operate.
25 Current type selector
26 Balance control
27 Frequency control
28 Operating mode selector
15 16 17 18 19 20 21 22 23
24
25
2627
28

11
ENGLISH
4.1 Placing the machine
ACaution!
Always stand machine on its
feet only.
The machine draws in air at its front
and bottom, which is given off
through the ventilating slots at the
rear. Ensure an unhindered airflow.
The distance of the machine to walls
or other equipment must be at least
20 cm/8".
4.2 Other connectors
ACaution!
When connecting the welding
cables observe the required polarity
for the desired welding process and
electrodes to be used.
Stick electrode welding
Prior to initial start-up:
1. Connect welding return cable to -
pole.
2. Connect welding cable to + pole.
Gas-shielded arc welding
Prior to initial start-up:
1. Connect reinforced pressure hose to
pressure regulator.
2. Connect welding return cable to +
pole.
3. Connect TIG torch welding current
cable to - pole.
4. Connect TIG torch pilot lead.
5. Connect TIG torch gas line.
All machine functions are controlled by
the front panel's switches and controls.
After turning ON all LEDs will illuminate
briefly. The LED display shows:
−for approx. 2 seconds the software
version (flashing), then
−for approx. 1 second the set configu-
ration, and finally
−the currently set welding current.
Condition:
The selftest is completed error-free
(both the equipment-on indicator
light and the S-Test LED are illumi-
nated).
5.1 Operating modes
Select one of the available operating
modes with the operating mode selector:
2T
Operating mode for TIG welding in 2-
step mode:
1. Touch workpiece with the tungsten
electrode.
2. press the Start/Stop button of the
TIG torch.
−The I1 welding current LED illu-
minates.
−The welding process starts with
the fixed starting current.
−After ignition the welding current
slopes up to the set working cur-
rent.
3. Release the Start/Stop button.
−The welding process stops.
−The set gas postflow time is run-
ning.
4T
Operating mode for TIG welding in 4
cycle mode:
1. Touch workpiece with the tungsten
electrode.
2. Press the Start/Stop button of the
TIG torch.
−The I1 welding current LED illu-
minates.
−The welding process starts.
−As long as the Start/Stop button
is held down the arc is burning at
the fixed starting current.
−When releasing the button the
welding current slopes up to the
set working current.
3. If required, press the secondary cur-
rent button of the TIG torch. While
the secondary current button is held
down:
−the arc burns at the set second-
ary current I2.
−the secondary current LED I2 is
illuminated.
4. Press the Start/Stop button again.
The welding current slopes down
within the preset downslope time to
the minimum current.
−While the button is pressed the
arc continues to burn at the mini-
mum current (end crater filling).
−Releasing the button ends the
welding process.
2T + HF
Operating mode for TIG welding in 2-
step mode, but with HF-ignition. The arc
is started without the tungsten electrode
making contact with the workpiece.
4T + HF
Operating mode for TIG welding in 4-
step mode, but with HF-ignition. The arc
is started without the tungsten electrode
making contact with the workpiece.
ELECTRODE
Operating mode for stick electrode weld-
ing. The I1 welding current LED illumi-
nates.
3Note:
For stick electrode welding the
machines always uses the following
functions:
Hot-start
−When contacting the weld metal
with the electrode, the set welding
current is increased for a short
period to ensure the arc will start.
The short-term welding current
increase is limited to the maximum
electrode current.
Arc-force
−During the welding process the
machine keeps the energy (heat)
brought into the weld metal at a con-
stant level, even if the distance
between electrode and weld pool
varies.
Anti-stick
−If the machine detects a short-circuit
in the welding process, it will switch
after 0.5 seconds to minimum cur-
rent to prevent electrode burn-out.
With the current type selector you deter-
mine the kind of welding current to be
used.
DC
The machine supplies direct current
AC
The machine supplies alternating current
29 Master switch
Switches unit ON or OFF
30 Gas supply connector
31 Power supply cable
LED = Light-Emitting Diode, used as
indicator light.
4. Preparing for Operation
29
30
31
>20 cm
>20 cm
5. Operation

12
ENGLISH
S-Test
The machine checks the integrated
safety device for working under
increased electrical hazards. To start the
test:
1. Turn machine ON
Both equipment-on indicator light
and the S-Test LED must be illumi-
nated.
2. Set current type selector to position
"Test".
−The machine internally simulates
a fault at the welding current out-
put. The S-Test LED must extin-
guish after a short time.
−The test was succesfull if the S-
Test LED extinguishes.
The machine is now no longer
ready to operate!
3. Turn the machine OFF.
4. Set the welding current selector
back to the desired type of current
and, after approx. 10 seceonds, turn
ON again.
3Note:
A successfully completed test
means that no fault was detected in the
safety device.
If the test is not successfully completed it
means that the machine's control has
detected a fault in the safety device.
If that is the case, stop using the
machine and contact your Elektra
service!
5.2 Parameters
The following parameters are adjustable:
Welding current I1
Maximum current for the actual welding
process.
Setting range, in 1 A increments,
−for TIG welding: 3 A…170 A
−for stick electrode welding:
10 A…140 A.
3Note:
During the welding process the
current nominal welding current value is
displayed.
If a slopedown time greater than zero is
set, the displayed value changes contin-
uously until the final value is reached.
The welding current can be changed
anytime during the welding process.
3Note:
If a foot-operated remote control
unit is connected, the machine will
always switch into 2-step mode.
When a hand-operated remote control
unit is connected, the working current
can only changed by this control.
Current setting range foot-operated
remote control unit: minimum current to
set working current.
Current setting range hand-operated
remote control unit: minimum current to
maximum current.
Secondary current I2
A current that can be switched to in 4-
step mode during the welding process.
To display the currently set value:
1. Select one of the 4-step modes.
2. Press and hold the secondary cur-
rent button of the TIG torch.
−The welding current LED I2 is illu-
minated and the currently set
value of I2 is shown in the dis-
play. The value can now be
changed with the secondary cur-
rent control.
3. Release the secondary current but-
ton.
−The I2 welding current LED extin-
guishes, the value of the welding
current I1 is on display again.
−The value set for I2 is stored.
Minimum current
Current level to which the welding cur-
rent slopes down for crater filling at the
end of the welding process.
Slopedown time
Period in which the current slopes down
to minimum current.
Setting range: Min.…Max., correspond-
ingto5ms…10sec.
Gas postflow time t.
Duration of shielding gas postflow after
the welding process has ended.
Setting range 5…35 sec.
FREQUENCY
Pulse frequency
With the formula 1 ÷ set
frequency [Hz] = duration [sec] the dura-
tion of the pulse can be calculated.
Setting range: 30 Hz…200 Hz.
BALANCE
(WIG AC..mode only)
Ratio of positive to negative voltage time
for AC welding. A value of for instance
30 % means that for 30 % of the dura-
tion (t1) of a period (T) the welding volt-
age at the electrode will be positive and
for the remaining 70 % (t2) it will be neg-
ative.
Increasing this value leads to a better
cleaning effect (aluminium welding), but
at the same time subjects the electrode
to a higher thermal stress.
Setting range:
25 % … 75 %.
5.3 Starting up
Gas-shielded arc welding
ACaution!
Check before starting any
work:
−Correct shielding gas connected?
−Correct gas shroud fitted?
−Electrode tip still pointed?
Regrind if necessary.
3Note:
Grind electrodes for DC welding
in lengthwise direction only.
1. Attach welding return cable at a suit-
able location to the workpiece.
2. Open cylinder valve and set desired
gas flow rate.
Change gas shroud, if necessary.
3. Turn main switch ON.
4. Select desired welding process.
5. Set desired welding current.
The welding machine is now opera-
tional.
Stick electrode welding
1. Attach welding return cable at a suit-
able location to the workpiece.
2. Turn main switch ON.
3. Select welding process “Electrode”.
4. Set desired welding current.
The welding machine is now opera-
tional.
5.4 Shutting down
1. Close gas cylinder valve.
2. Set master switch to “0”.
3. Disconnect welding return cable
from workpiece.
4. Unplug power cable.
+U
-U
t
T
t1t
2

13
ENGLISH
This welding machine contains no user-
serviceable parts.
Depending on dust accumulation the
dust should be blown out from the
machine with dry and oil-free com-
pressed air every 4 - 6 months.
To open the welding machine remove
housing retaining screws and slide
upper housing backwards.
Periodically perform a check for visible
damage.
Contact a qualified electrician if any of
the cables are damaged.
For machines of the WIG 170 AC/DC
series we recommend the following
accessories. These accessories have
been tested with the machine and
ensure unproblematic operation.
ATIG torch Mistral,
1) 4 m torch leads
2) 8 m torch leads
BDual clock pressure regulator
1) without stop valve
2) with stop valve
CFoot-operated remote control unit
for stepless welding current regula-
tion.
1) with 5 m leads, plastic shell
2) with 5 m leads, aluminium shell
3) with 10 m leads, aluminium
shell
DHand-operated remote control unit
for stepless welding current regula-
tion.
1) with 5 m leads
2) with 10 m leads
EWelding return cable, 25 mm2, 3 m
FWelding cable, 16 mm2, 3 m
GWelding visor
1) helmet
2) automatic screen
ADanger!
Repairs to power tools must be
carried out by qualified electricians
only!
Welding machines in need of repair can
be sent to the service centre of your
country. Refer to spare parts list for
address.
Please attach a description of the fault to
the power tool.
The saw's packaging can be 100 %
recycled.
Worn out power tools and accessories
contain considerable amounts of valua-
ble raw and rubber materials, which can
be recycled.
These instructions are printed on chlo-
rine-free bleached paper.
In case of malfunction three bars (---)
appear in the display.
At the same time the Equipment-on indi-
cator LED extinguishes.
Excess temperature
The excess temperature indicator is illu-
minated.
−DO NOT switch machine OFF,
in order for the fan to cool the
machine down faster.
−If the temperature has fallen off to
normal levels, the display will show
the welding current again.
You may now continue welding.
6. Maintenance
7. Available Accessories
8. Repairs
9. EnvironmentalProtection
10. Faults
11. Trouble Shooting
Brittle or porous weld seam
Gas valve
closed?
Open gas valve.
Gas cylinder
empty?
Replace.
Unsuitable shield-
ing gas?
Use a suitable
shielding gas.
Gas line connec-
tion not tight?
Check connec-
tions.
Pressure regula-
tor faulty?
Check pressure
regulator.
Gas shroud on
torch or torch
leads blocked?
Clean gas shroud.
Air draft at weld-
ing spot?
Screen off weld-
ing spot or
increase gas flow
rate.
Workpiece not
clean?
Remove rust,
grease or paint
coating.
Steady gas flow
Solenoid valve
faulty or dirty?
Have solenoid
valve checked by
a qualified electri-
cian.
No welding current
Welding return
cable making
poor contact?
Check welding
return cable for
proper contact.
Control PCB
faulty?
Contact
service centre.
No function of machine
Supply circuit fuse
blown or cut-out?
Replace or turn
ON again.

14
ENGLISH
12. Technical Specifications
Model WIG 170 AC/DC
Supply voltage: 230 V (+15 %/-15 %) / 50 - 60 Hz
Open-circuit voltage: V 85
Working voltage, TIG: V 10,12 - 16,8
Working voltage, electrode: V 20,4 - 25,6
Curren setting range, TIG: A 3 - 170 A
Current setting range, stick electrode: A 10 - 140 A
Maximum input power, TIG: kVA 4,8
Maximum input power, stick electrode: kVA 5,5
Peak input current, TIG: A 21
Peak input current, stick electrode: A 24
Maximum duty cycle, TIG 40 °C % 40
Maximum duty cycle, STICK ELECTRODE 40 °C: % 40
60% duty cycle, TIG 40 °C: A 140
60% duty cycle, stick electrode 40 °C: A 100
100% duty cycle, TIG 40 °C: A 110
100% duty cycle, stick electrode 40 °C: A 80
Protection class: IP23C
Max. electrode size: Ø mm 2,5
Cooling: F
Supply circuit fuse: T16A
Dimensions L x W x H: mm 480 x 260 x 320
Weight kg 22,1

15
FRANÇAIS
1. À lire impérativement !.............15
2. Consignes de sécurité .............15
2.1 Utilisation conforme aux
prescriptions ...............................15
2.2 Consignes générales
de sécurité ..................................15
2.3 Symboles figurant sur
l'appareil......................................16
3. Éléments de commande...........16
4. Mise en ordre de marche .........17
4.1 Mise en place..............................17
4.2 Autres raccordements.................17
5. Manipulation de l'appareil........17
5.1 Modes de fonctionnement ..........17
5.2 Paramètres .................................18
5.3 Démarrage de l'appareil..............19
5.4 Arrêt de l'appareil........................19
6. Maintenance..............................19
7. Accessoires disponibles.....19/59
8. Réparations...............................19
9. Protection de
l'environnement ........................19
10. Dérangements...........................19
11. Élimination des défauts ...........19
12. Caractéristiques techniques....20
Ces instructions d'utilisation ont été con-
çues de manière à vous permettre de
travailler rapidement avec l'appareil et
de manière sûre. Les remarques qui sui-
vent vous aideront à utiliser ces instruc-
tions :
−Avant la mise en service, lire soi-
gneusement les instructions d'utili-
sation dans leur intégralité. Obser-
ver en particulier les consignes de
sécurité.
−Ces instructions s'adressent à des
soudeurs à l'arc qualifiés ou du per-
sonnel de qualification équivalente.
−Conserver tous les documents four-
nis avec l'appareil afin de pouvoir en
prendre connaissance en cas de
besoin. Conserver le justificatif
d'achat au cas où vous auriez
besoin de faire valoir la garantie.
−Lorsque vous prêtez ou vendez
l'appareil, remettre au nouvel utilisa-
teur l'ensemble de la documentation
fournie.
−Le constructeur décline toute res-
ponsabilité en cas de dommages
liés au non-respect de ces instruc-
tions d'utilisation.
Les informations qui figurent dans ces
instructions d'utilisation sont signalées
comme suit :
Danger !
Risque de dommages
corporels ou d'atteinte à
l'environnement.
Risque d'électrocution !
Risque de dommages
corporels causés par
l'électricité.
Attention !
Risque de dégâts maté-
riels.
Remarque :
Informations complémen-
taires.
−Les numéros des illustrations (1, 2,
3, ...)
−désignent des pièces données ;
−sont attribués dans l'ordre ;
−se réfèrent aux chiffres entre
parenthèses (1), (2), (3) ... dans
le texte adjacent.
−Lorsqu'une manipulation doit être
effectuée dans un ordre précis, les
instructions sont numérotées.
−Les consignes pouvant être effec-
tuées dans n'importe quel ordre sont
identifiées par un point.
−Les énumérations sont signalées
par un tiret.
2.1 Utilisation conforme aux
prescriptions
L'appareil de soudage est conçu pour
souder tous les métaux.
Il est conforme aux dispositions légales
en vigueur à la livraison.
Cet appareil est prévu pour être utilisé
par des soudeurs à l'arc qualifiés ou du
personnel de qualification équivalente.
Procédés de soudage autorisés :
−Soudage TIG DC (gaz inerte tungs-
tène), tous métaux
−Soudage à électrodes
S'assurer, en cas de soudage sous pro-
tection, que le globe protecteur du gaz
n'est pas repoussé par le souffle d'air.
Performances de l'appareil : voir "Carac-
téristiques techniques".
Toute autre utilisation de cet appareil
est contraire aux prescriptions et
interdite.
Des dommages imprévisibles
peuvent survenir en cas d'utilisation non
conforme, de changements apportés à
l'appareil ou d'utilisation de pièces qui ne
sont pas contrôlées et autorisées par le
constructeur !
2.2 Consignes générales de
sécurité
•Lorsque vous utilisez l'appareil, res-
pecter les consignes de sécurité qui
suivent pour prévenir tout risque de
blessures ou de dommages maté-
riels.
•Tenir compte des consignes de
sécurité particulières figurant dans
chaque chapitre.
•Tenir compte des directives légales
et règles de prévention des acci-
dents relatives au maniement
d'appareils de soudage à l'arc.
BDanger !
Tension électrique.
•N'installer l'appareil que dans une
pièce close et dans un environne-
ment sec.
•Ne raccorder l'appareil qu'à une
source de courant dont les disposi-
tifs de sécurité fonctionnent parfaite-
ment.
S'adresser à un électricien en cas
de doute !
•Toute réparation ou modification de
l'appareil doit être effectuée par un
électricien qualifié.
•Débrancher l'appareil avant de
l'ouvrir.
ADanger !
•Porter impérativement des vête-
ments protecteurs adaptés aux tra-
vaux de soudage.
•Utiliser obligatoirement un bouclier
et des gants de protection.
Ils protègent des projections d'étin-
celles et du rayonnement de l'arc
électrique.
•Toutes les vapeurs métalliques sont
toxiques !
Veiller en permanence à un renou-
vellement d'air suffisant pendant les
travaux de soudage en intérieur afin
que les concentrations maximales
tolérées de produits toxiques ne
soient pas dépassées sur le lieu de
travail.
Les vapeurs de plomb, de cadmium,
de cuivre, de chrome, de nickel, de
zinc et de béryllium sont particuliè-
rement dangereuses !
AAttention !
•Ne jamais souder une pièce reliée à
la terre.
Vous préviendrez ainsi une éven-
tuelle dégradation du conducteur de
protection par des courants de fuite
(couplage).
Table des matières
1. À lire impérativement !
2. Consignes de sécurité
XS0018F.fm Instructions d'utilisation FRANÇAIS

16
FRANÇAIS
•Ne jamais utiliser l'appareil de sou-
dage pour dégeler des tuyaux.
•Toujours fixer l'étrier du circuit retour
du courant de soudage directement
sur la pièce et le plus près possible
de la soudure.
•Toujours porter l'appareil par la san-
gle de transport.
•Faire très attention lorsque les tra-
vaux de soudage s'effectuent à
proximité d'ordinateurs, d'appareils
à commande électronique ou
encore de supports de données
magnétiques (bandes de magnéto-
phones, disquettes, bandes magné-
tiques, cartes bancaires, etc.).
Des dysfonctionnements ou des
pertes de données peuvent se pro-
duire pendant l'amorçage à l'arc.
2.3 Symboles figurant sur
l'appareil
Danger !
Le non-respect des mises
en garde suivantes peut
entraîner des blessures
ou des dommages maté-
riels graves.
Soudage à 2 temps sans
amorce HF
Soudage à 4 temps sans
amorce HF
Soudage à 2 temps avec
amorce HF
Soudage à 4 temps avec
amorce HF
Soudage à l'arc avec
baguette enrobée et fonc-
tion Arc-Force
Durée post-gaz
Durée de descente
Balance
Décapage réduit
Décapage supérieur
Tension d'alimentation
Test de sécurité
Surchauffe
Raccordement du régula-
teur à distance
Raccordement du chalu-
meau TIG
Raccordement du gaz pour
chalumeau TIG
Raccordement de l'arrivée
de gaz
Interrupteur principal
Indications figurant sur la plaque
signalétique :
1Constructeur
2Nom de l'appareil
3Numéro de série
4Norme de référence – cet appa-
reil est conforme aux exigences
de la norme indiquée.
5Sigle CE – cet appareil est con-
forme aux directives européen-
nes comme indiqué dans la
déclaration de conformité.
6Symbole de mise au rebut –
l'appareil peut être remis au fabri-
cant.
7Caractéristiques électriques
8Année de construction
3. Éléments de commande
2345
7
8
1
6
10
9
11
12
13
14
9Sangle/bandoulière
Sangle de longueur réglable
pour le transport
−à la main (voir illustration)
−sur l'épaule
10 Connecteur pour régulateur à
distance
11 Connecteur pour conduite de
gaz protecteur du chalumeau
12 Connecteur pour câble de com-
mande du chalumeau TIG
13 Connecteur pour courant de
soudage (pôle +)
14 Connecteur pour courant de
soudage (pôle -)
15 Réglage du courant de sou-
dage
16 Affichage à DEL
Indique le réglage actuel du
courant de soudage.
17 Affichage I1 du courant de sou-
dage
−DEL allumée :
courant de soudage activé.
18 Affichage I2 courant secondaire
(uniquement en mode à 4
temps)
−DEL allumée :
courant secondaire activé.
19 Réglage I2 du courant secon-
daire
20 Réglage de la durée de des-
cente
21 Affichage de fonctionnement
−DEL allumée :
L'appareil est allumé et
aucun défaut n'est signalé.
−DEL éteinte :
L'appareil est éteint ou un
défaut a été signalé.
15 16 17 18 19 20 21 22 23
24
25
2627
28

17
FRANÇAIS
4.1 Mise en place
AAttention !
L'appareil doit toujours repo-
ser sur ses pieds.
L'appareil aspire l'air par la façade et
la face inférieure et le rejette par les
grilles d'aération à l'arrière. Veiller
impérativement à ce que la circula-
tion de l'air ne soit pas gênée. L'appa-
reil doit être situé à 20 cm au moins
des cloisons et des autres machines.
4.2 Autres raccordements
AAttention !
Lors du raccordement des
câbles pour le courant de soudage,
faire attention à la polarité exigée par
le procédé de soudage choisi et les
électrodes utilisées.
Soudage à électrodes
Avant la première mise en marche :
1. Raccorder le circuit retour du cou-
rant de soudage au pôle -.
2. Raccorder le courant de soudage au
pôle +.
Soudage sous protection gazeuse
Avant la première mise en marche :
1. Raccorder au détendeur le tuyau
structural à pression.
2. Raccorder le circuit retour du cou-
rant de soudage au pôle +.
3. Raccorder le courant de soudage du
chalumeau TIG au pôle -.
4. Raccorder le câble de commande
du chalumeau TIG.
5. Raccorder la conduite de gaz du
chalumeau TIG.
Toutes les fonctions de l'appareil se
commandent au moyen des commuta-
teurs et boutons de réglage en façade.
À la mise en marche, toutes les DEL
s'allument brièvement. L'affichage à
DEL indique :
−la version de logiciel durant 2 secon-
des environ (affichage clignotant),
puis
−la configuration sélectionnée durant
1 seconde environ et
−l'actuel réglage du courant de sou-
dage.
Condition :
Le contrôle automatique s'est
déroulé sans erreur (l'affichage de
fonctionnement et la DEL du test de
sécurité sont allumés).
5.1 Modes de fonctionne-
ment
À l'aide du commutateur de mode, sélec-
tionner l'un des modes au choix :
2T
Soudage TIG à 2 temps :
1. Toucher la pièce à usiner avec
l'électrode en tungstène.
2. Actionner l'interrupteur Marche/Arrêt
sur le chalumeau TIG.
−La DEL de courant de soudage l1
s'allume.
−Le soudage commence selon le
courant de démarrage pro-
grammé.
−À l'issue de l'amorce, le courant
de soudage augmente pour
atteindre le niveau programmé
pour le courant de service.
3. Relâcher l'interrupteur Marche/Arrêt.
−Le soudage s'arrête.
−La durée post-gaz programmée
démarre.
4T
Soudage TIG à 4 temps :
1. Toucher la pièce à usiner avec
l'électrode en tungstène.
2. Actionner l'interrupteur Marche/Arrêt
sur le chalumeau TIG.
−La DEL de courant de soudage l1
s'allume.
−Le soudage démarre.
−Tant que l'interrupteur Marche/
Arrêt est maintenu enfoncé, l'arc
de soudage jaillit selon le courant
de démarrage programmé.
−Lorsque vous relâchez l'interrup-
teur, le courant augmente pour
adopter le niveau programmé
pour le courant de service.
3. Actionner l'interrupteur de courant
secondaire sur le chalumeau TIG (si
nécessaire). Tant que l'interrupteur
de courant secondaire est enfoncé :
−L'arc jaillit selon le courant
secondaire I2 programmé.
−La DEL de courant secondaire l2
s'allume.
4. Actionner de nouveau l'interrupteur
Marche/Arrêt.
Le courant de soudage diminue
pendant la durée de descente pro-
grammée pour atteindre le niveau
minimal.
−L'arc continue de jaillir selon le
courant minimal tant que l'inter-
rupteur reste enfoncé (remplis-
sage du cratère final).
−Le soudage se termine lorsque le
bouton est relâché.
22 Affichage de surchauffe
−DEL allumée :
Le fusible de surchauffe
s'est déclenché et a éteint
la commande.
23 Réglage de la durée post-gaz
24 Affichage du test de sécurité
−DEL allumée :
L'appareil est prêt à
l'emploi.
−DEL éteinte :
Le test de sécurité s'est
déclenché, l'appareil n'est
pas prêt à l'emploi.
25 Commutateur de type de cou-
rant
26 Réglage de la balance
27 Réglage de la fréquence
28 Commutateur de mode
29 Interrupteur principal
Permet d'allumer et d'éteindre
l'appareil
30 Raccordement de l'arrivée de
gaz
31 Câble de raccordement au sec-
teur
DEL = Diode ElectroLuminescente,
sert de voyant de contrôle.
4. Mise en ordre de marche
29
30
31
5. Manipulation de l'appa-
reil
>20 cm
>20 cm

18
FRANÇAIS
2T + HF
Soudage TIG à 2 temps, mais avec
amorçage HF. L'amorce a lieu sans que
l'électrode en tungstène ne touche la
pièce à usiner.
4T + HF
Soudage TIG à 4 temps, mais avec
amorçage HF. L'amorce a lieu sans que
l'électrode en tungstène ne touche la
pièce à usiner.
Électrode
Soudage à électrodes. La DEL de cou-
rant de soudage l1 s'allume.
3Remarque :
Lors du soudage à électrodes,
l'appareil utilise toujours les fonctions
suivantes :
Hot-Start
−Lorsque la pièce à souder entre en
contact avec l'électrode, le courant
de soudage paramétré est intensifié
pendant un court instant afin
d'amorcer l'arc en toute sécurité.
La brève augmentation du courant
de soudage reste dans les limites du
courant d'électrode maximal.
Arc-Force
−L'appareil maintient constante
l'énergie (chaleur) apportée au
matériau pendant le soudage, y
compris lorsque la distance des
électrodes au bain de soudure varie.
Anti-Stick
−Si l'appareil détecte un court-circuit
en cours de soudage, il passe au
courant minimal au bout de 0,5
seconde pour éviter que l'électrode
ne se consume.
Le commutateur de type de courant
vous permet de choisir le courant de
soudage utilisé.
DC
L'appareil livre du courant continu.
AC
L'appareil livre du courant alternatif.
Test S
L'appareil vérifie les dispositifs de sécu-
rité internes en cas de travaux présen-
tant des risques électriques accrus. Pour
lancer le test :
1. Mettre en marche l'appareil :
L'affichage de fonctionnement et la
DEL du test de sécurité doivent être
allumés.
2. Placer le commutateur du type de
courant sur "Test".
−L'appareil simule une erreur
interne au niveau de la sortie du
courant de soudage. La DEL du
test de sécurité doit s'éteindre au
bout d'un court instant.
−Lorsque la DEL du test de sécu-
rité s'éteint, cela signifie que le
test est concluant.
L'appareil n'est pas en état de
marche lorsqu'il est dans cet
état !
3. Éteindre l'appareil.
4. Ramener le sélecteur sur le type de
courant souhaité et remettre en
marche l'appareil au bout de 10 s
environ.
3Remarque :
Le test est concluant
lorsqu'aucune erreur n'a été détectée
dans le dispositif de sécurité.
Le test n'est pas concluant si la com-
mande a détecté une erreur dans le dis-
positif de sécurité.
Dans ce cas, arrêter d'utiliser l'appa-
reil et contacter le service technique !
5.2 Paramètres
Vous pouvez ajuster les paramètres sui-
vants :
Courant de soudage I1
Courant maximal durant le soudage à
proprement parler.
Plage de réglage par paliers de 1 A,
−en cas de soudage TIG :
3A…170A
−en cas de soudage à électrodes :
10 A…140 A
3Remarque :
Durant le soudage, l'affichage
indique la valeur consigne actuellement
paramétrée pour le courant de soudage.
Si la durée de descente programmée est
supérieure à zéro, la valeur affichée se
modifie en continu jusqu'à ce qu'elle
atteigne la valeur finale.
Il est possible de modifier à tout moment
le courant de soudage en cours de tra-
vail.
3Remarque :
Si l'appareil est raccordé à un
régulateur à distance au pied, il passe
généralement en mode à deux temps.
Si un régulateur à distance manuel est
raccordé, le courant de service ne peut
être varié qu'à l'aide de ce régulateur.
Plage de réglage du régulateur à dis-
tance au pied : du courant minimal au
courant de service programmé.
Plage de réglage du régulateur à dis-
tance manuel : du courant minimal au
courant maximal.
Courant secondaire I2
Courant sur lequel l'appareil peut être
commuté en cours de soudage à 4
temps. Pour afficher la valeur actuelle-
ment programmée :
1. Régler l'appareil sur un mode à 4
temps.
2. Actionner l'interrupteur de courant
secondaire sur le chalumeau TIG et
le maintenir enfoncé.
−La DEL de courant de soudage I2
s'allume et la valeur actuellement
programmée pour I2 s'affiche.
Cette valeur peut alors être modi-
fiée à l'aide du bouton de réglage
du courant secondaire.
3. Relâcher l'interrupteur du courant
secondaire.
−La DEL de courant de soudage I2
s'éteint et la valeur actuellement
programmée pour le courant de
soudage I1 s'affiche à nouveau.
−La valeur programmée pour I2
est mise en mémoire.
Courant minimal
Valeur qu'atteint le courant de soudage
en fin de soudage pour le remplissage
du cratère final.
Durée de descente
Temps mis par le courant pour revenir
au niveau minimal.
Plage de réglage : min.…max., équiva-
lentà5ms…10s.
Durée post-gaz t.
Durée pendant laquelle le gaz protecteur
continue à circuler après la fin du sou-
dage.
Plage de réglage 5…35 s
FRÉQUENCE
Fréquence des impulsions de soudage.
La formule 1 ÷ fréquence
paramétrée [Hz] = durée [s] permet de
calculer la durée d'une impulsion.
Plage de réglage : 30 Hz…200 Hz
BALANCE
(uniquement en mode TIG AC...)
Relation entre la période de tension
positive et la période de tension négative
pour le soudage en courant alternatif.
Une valeur de 30 %, par exemple, signi-
fie que la tension de soudage est posi-
tive au niveau de l'électrode durant 30 %
(t1) d'une période (T) et qu'elle est néga-
tive durant 70 % (t2) de cette période.
+U
-U
t
T
t1t
2

19
FRANÇAIS
Une augmentation de cette valeur
entraîne un plus grand pouvoir décapant
(soudage aluminium), mais aussi une
charge thermique plus importante pour
l'électrode.
Plage de réglage :
25 % … 75 %.
5.3 Démarrage de l'appareil
Soudage sous protection gazeuse
AAttention !
À vérifier avant le soudage :
−Le gaz protecteur raccordé est-il
correct ?
−La buse installée est-elle
correcte ?
−L'électrode est-elle suffisamment
pointue ?
Affûter l'électrode en cas de
besoin.
3Remarque :
Affûter les électrodes uniquement
dans le sens de la longueur pour le sou-
dage DC !
1. Fixer le circuit retour du courant de
soudage à un endroit adéquat sur la
pièce à souder.
2. Ouvrir la vanne d'arrêt principale de
la bouteille de gaz et régler le débit
souhaité.
Changer la buse si besoin est.
3. Enclencher l'interrupteur principal.
4. Sélectionner le procédé de soudage.
5. Régler le courant de soudage sou-
haité.
L'appareil de soudage est mainte-
nant prêt à l'emploi.
Soudage à électrodes
1. Fixer le circuit retour du courant de
soudage à un endroit adéquat sur la
pièce à souder.
2. Enclencher l'interrupteur principal.
3. Sélectionner le procédé de soudage
"Électrode".
4. Régler le courant de soudage sou-
haité.
L'appareil de soudage est mainte-
nant prêt à l'emploi.
5.4 Arrêt de l'appareil
1. Fermer la vanne d'arrêt principale
de la bouteille de gaz.
2. Positionner l'interrupteur principal
sur "0".
3. Séparer le circuit retour du courant
de soudage de la pièce soudée.
4. Débrancher la fiche.
L'appareil de soudage ne nécessite
aucune maintenance.
Selon la quantité de poussière, l'appareil
doit être nettoyé tous les 4 à 6 mois en
soufflant de l'air comprimé sec et sans
huile.
Pour ouvrir l'appareil de soudage, retirez
les vis du boîtier et repoussez la partie
supérieure du boîtier vers l'arrière.
Effectuer régulièrement un contrôle
visuel de l'appareil.
Contacter un électricien en cas de dom-
mages au niveau des câbles.
Pour les appareils WIG 170 AC/DC,
nous recommandons les accessoires
indiqués ci-dessous. Ces accessoires
ont été testés avec l'appareil et garantis-
sent un travail sans problèmes.
AChalumeau TIG Mistral,
1) avec câble de 4 m
2) avec câble de 8 m
BDétendeur à 2 manomètres
1) sans vanne d'arrêt
2) avec vanne d'arrêt
CRégulateur à distance à pédale
pour un réglage en continu du cou-
rant de soudage.
1) avec câble de 5 m et carter en
plastique
2) avec câble de 5 m et carter en
aluminium
3) avec câble de 10 m et carter en
aluminium
DRégulateur à distance à main
pour un réglage en continu du cou-
rant de soudage.
1) avec câble de 5 m
2) avec câble de 10 m
ECâble de masse, 25 mm2, 3 m
FCâble de soudage, 16 mm2, 3 m
GBouclier
1) sous forme de visière
2) écran protecteur automatique
ADanger !
Toujours s'adresser à un élec-
tricien professionnel pour réparer des
outils électriques !
Les appareils à souder nécessitant une
réparation peuvent être envoyés au cen-
tre de service après-vente de votre pays.
L'adresse figure avec la liste des pièces
de rechange.
Prière de joindre à l'appareil expédié une
description du défaut constaté.
Le matériau d'emballage de la machine
est recyclable à 100 %.
Les outils et accessoires électriques qui
ne sont plus utilisés contiennent de
grandes quantités de matières premiè-
res et de matières plastiques de qualité
pouvant également être recyclées.
Les présentes instructions ont été impri-
mées sur papier blanchi sans chlore.
En cas de dérangement, vous voyez
apparaître trois tirets dans l'affichage à
DEL (---).
La DEL de fonctionnement s'éteint
simultanément.
Surchauffe
L'affichage de surchauffe s'allume.
−Laisser l'appareil allumé.
Le ventilateur peut ainsi refroidir
l'appareil plus rapidement.
−Le courant de service s'affiche à
nouveau lorsque la température est
descendue à des valeurs habituel-
les.
Les travaux de soudure peuvent
reprendre.
6. Maintenance
7. Accessoires disponibles
8. Réparations
9. Protection de l'environ-
nement
10. Dérangements
11. Élimination des défauts
Soudure cassante ou poreuse
Robinet à gaz
fermé ?
Ouvrir le robinet à
gaz.
Bouteille de gaz
vide ?
Remplacer la
bouteille de gaz.
Gaz protecteur
non approprié ?
Utiliser un gaz
protecteur appro-
prié.
Raccords du flexi-
ble pour gaz non
hermétiques ?
Contrôler les rac-
cords.
Détendeur défec-
tueux ?
Contrôler le
détendeur.
Buse bouchée au
niveau du chalu-
meau ou flexible
obturé ?
Nettoyer la buse.
Souffle d'air au
niveau de la sou-
dure ?
Couvrir la sou-
dure ou augmen-
ter le débit de gaz.
Pièce à souder
sale ?
Éliminer les tra-
ces de rouille,
graisse ou pein-
ture.
Fuite de gaz
Électrovanne
défectueuse ou
encrassée ?
Faire contrôler la
vanne magnéti-
que par un électri-
cien.

20
FRANÇAIS
Pas de courant de soudage
Mauvais contact
au niveau du cir-
cuit retour du cou-
rant de soudage ?
Contrôler le con-
tact du circuit
retour du courant
de soudage.
Platine de com-
mande défec-
tueuse ?
En informer
le service après-
vente.
Pas de courant de soudage L'appareil ne fonctionne pas
Fusible de sec-
teur déclenché ?
Réenclencher ou
remplacer le fusi-
ble de secteur.
12. Caractéristiques techniques
Appareil WIG 170 AC/DC
Tension secteur : 230 V (+15 %/-15 %) / 50 - 60 Hz
Tension à vide : V 85
Tension de service – TIG : V 10,12 - 16,8
Tension de service – électrode : V 20,4 - 25,6
Plage de réglage du courant – TIG : A 3 - 170
Plage de réglage du courant – électrode : A 10 - 140
Puissance d'entrée max. – TIG : kVA 4,8
Puissance d'entrée max. – électrode : kVA 5,5
Courant d'entrée max. – TIG : A 21
Courant d'entrée max. – électrode : A 24
Facteur de marche max. TIG 40 °C : % 40
Facteur de marche max. E 40 °C : % 40
Facteur de marche 60% TIG 40 °C : A 140
Facteur de marche 60% E 40 °C : A 100
Facteur de marche 100% TIG 40 °C : A 110
Facteur de marche 100% E 40 °C : A 80
Indice de protection : IP23C
Électrodes à souder : Ø mm 3,25
Mode de refroidissement : F
Fusible de secteur : T16A
Dimensions (LxlxH) : mm 480 x 260 x 320
Poids : kg 22,1
This manual suits for next models
2
Table of contents
Languages:
Other Metabo Welding System manuals

Metabo
Metabo MIG MAG 165 SP User manual

Metabo
Metabo Welding Technology User manual

Metabo
Metabo Basic 260 User manual

Metabo
Metabo Welding Machine MIG/MAG 160 User manual

Metabo
Metabo PW602 User manual

Metabo
Metabo E 130 User manual

Metabo
Metabo TIG 170 AC/DC Manual

Metabo
Metabo WIG 170 DC Set User manual