Metagenics Fitness MF-8000 User manual
Metagenics Fitness Inc.
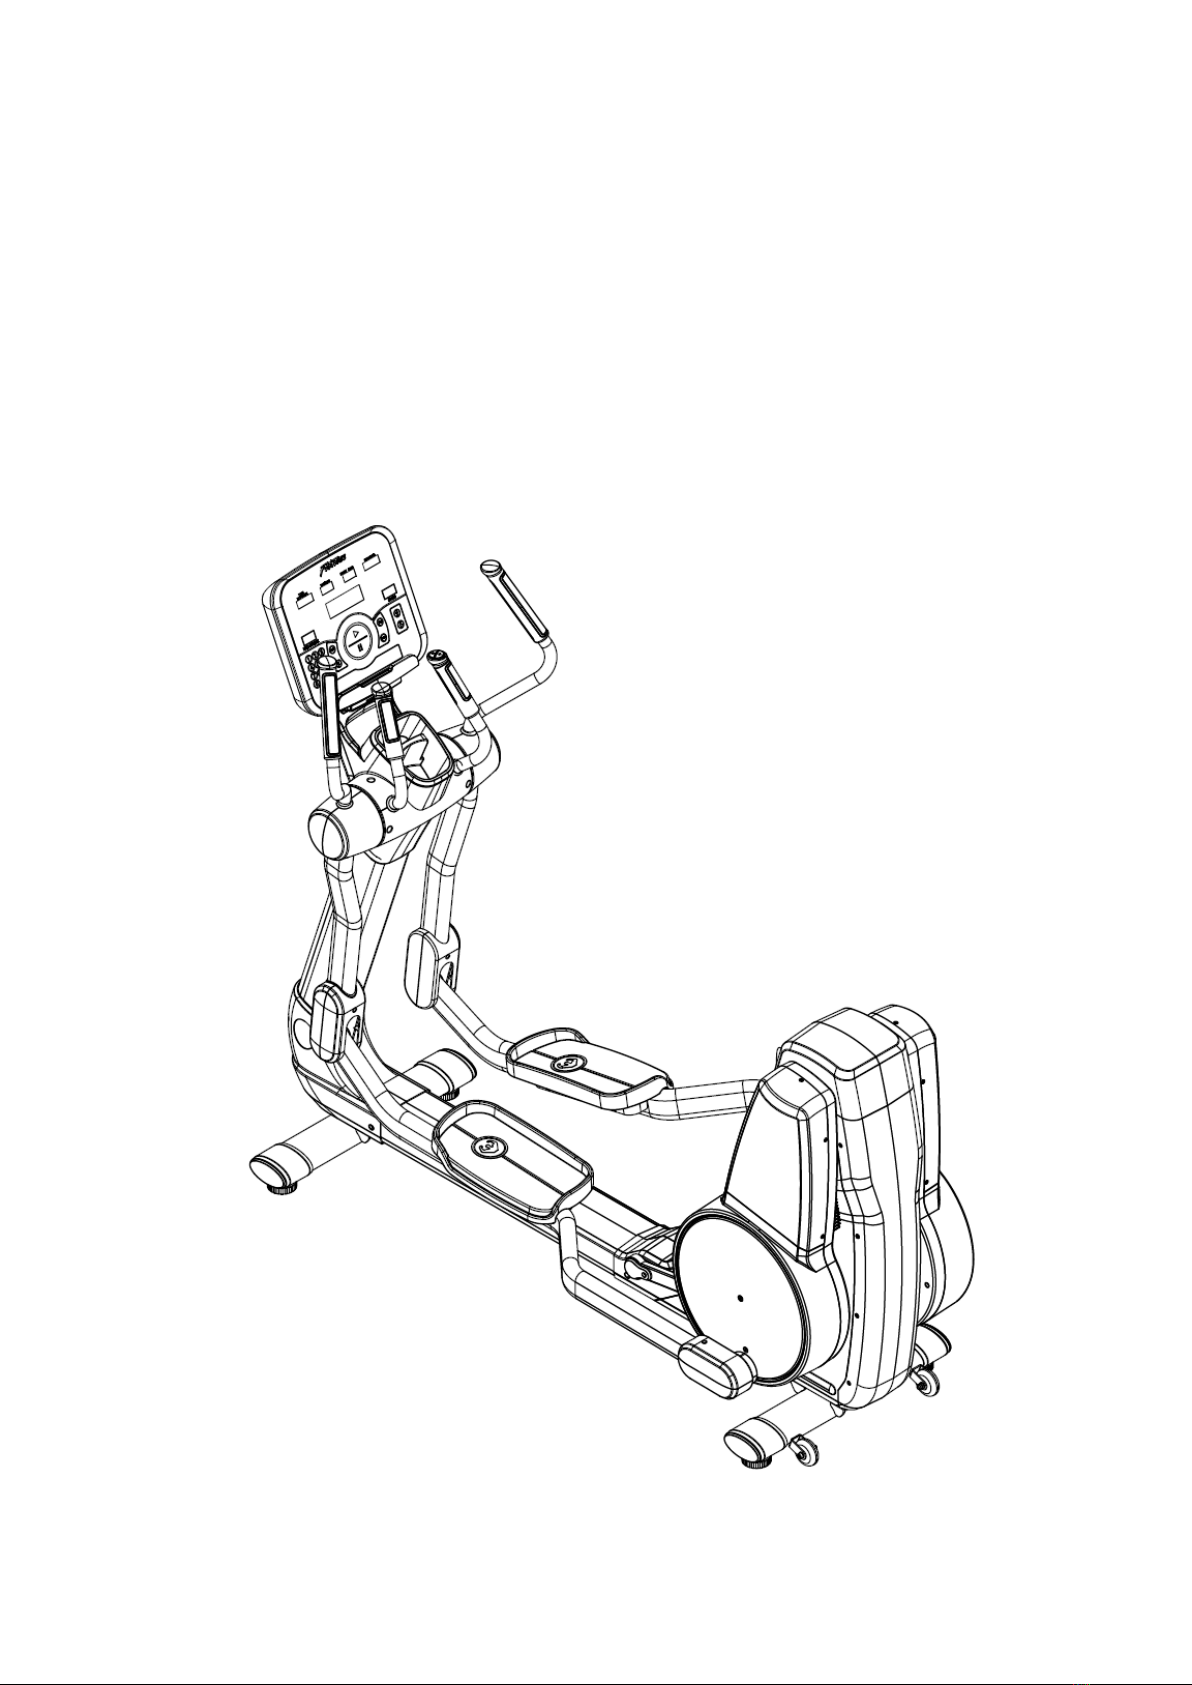
MF-8000 Elliptical Machine Owners Manual
Model: MF-8000
Dear Customer:
Thanks for choosing our products, which will bring you health and
happiness in the process of using this product.

Safety Precautions
Note: Please read this manual carefully before use and pay attention to the following
safety precautions.
Health-related injuries may result from incorrect or excessive use of exercise
equipment. The manufacturer STRONGLY recommends seeing a physician for a
complete medical exam before undertaking an exercise program, particularly if the
user has a family history of high blood pressure, heart disease, is over the age of 45,
smokes, has high cholesterol, is obese or has not exercised regularly in the past
year. The manufacturer also recommends consulting a fitness professional on the
correct use of this product. If, at any time while exercising, the user experiences
faintness, dizziness, pain, or shortness of breath, he or she must stop immediately.
This product is for heavy commercial use and there is no restrinction in the
number of hours it is used per day.
•The elliptical is meant for indoor use only to avoid moisture. Do not splash
water or liquids on the elliptical. Do not insert any objects anywhere on the
elliptical.
•Ensure that the elliptical is properly leveled.
•Wear shoes with rubber or high-traction soles. Do not use shoes with heels,
leather soles, cleats or spikes. Do not use the bike in bare feet.
•Keep all loose clothing, shoelaces, and towels away from the elliptical.
•Close supervision is necessary when used by or near children, invalids or
disabled persons.

Technical Parameters
Number of resistance levels: 26 . Self-propelled elliptical self generating system.
Packing size: wooden box outer size L2200*W850*H1140mm (L87” W33” H45”).
Equipment footprint: L2095*W780*H1685mm (L82” W31” H66”)
Maximum weight: 180KG/ 400 lbs.
Net weight of the elliptical: 200KG / 440 lbs.
Assembly Instructions
Part 1
Step 1: as shown in the above figure, first attach (left and right moving handles) with
A1 (M8*16 cylindrical head socket head cap screws) on the mainframe, and pry out
the a1-1 and a1-2 terminals;
Step 2: Fix 2 (left and right fixed handles) to the main frame with A3 (M8 self-locking
nut), and pry out the b1-1, b1-2, c1-1 terminals. The handle with the thumb switch
goes on the right side and has an extra cable c1-1 to control resistance.
Step 3: d1 terminal in the (console holder) to the d1-1 terminal coming from the
vertical tube frame that brings all the data and is the only cable that comes up from
the lower board.
Step 3: Two dual HR cables a1 and b1 come from the console and have to be routed
thru the console holder, connect a1 to a1-1 and a1-2, connect b1 to b1-1and b1 -2.
c1 from the console connects to c1-1 terminal from the handle to control resistance
with thumb switch.
Attach 3 (head holder) to the main frame by A1 (M8*16 cylindrical head socket head
cap screw).
Step 4: Attach 4 (plastic bottle holder) to the main frame with A2 (ST4.8*16
cross-flowered semi-circular head self-tapping).
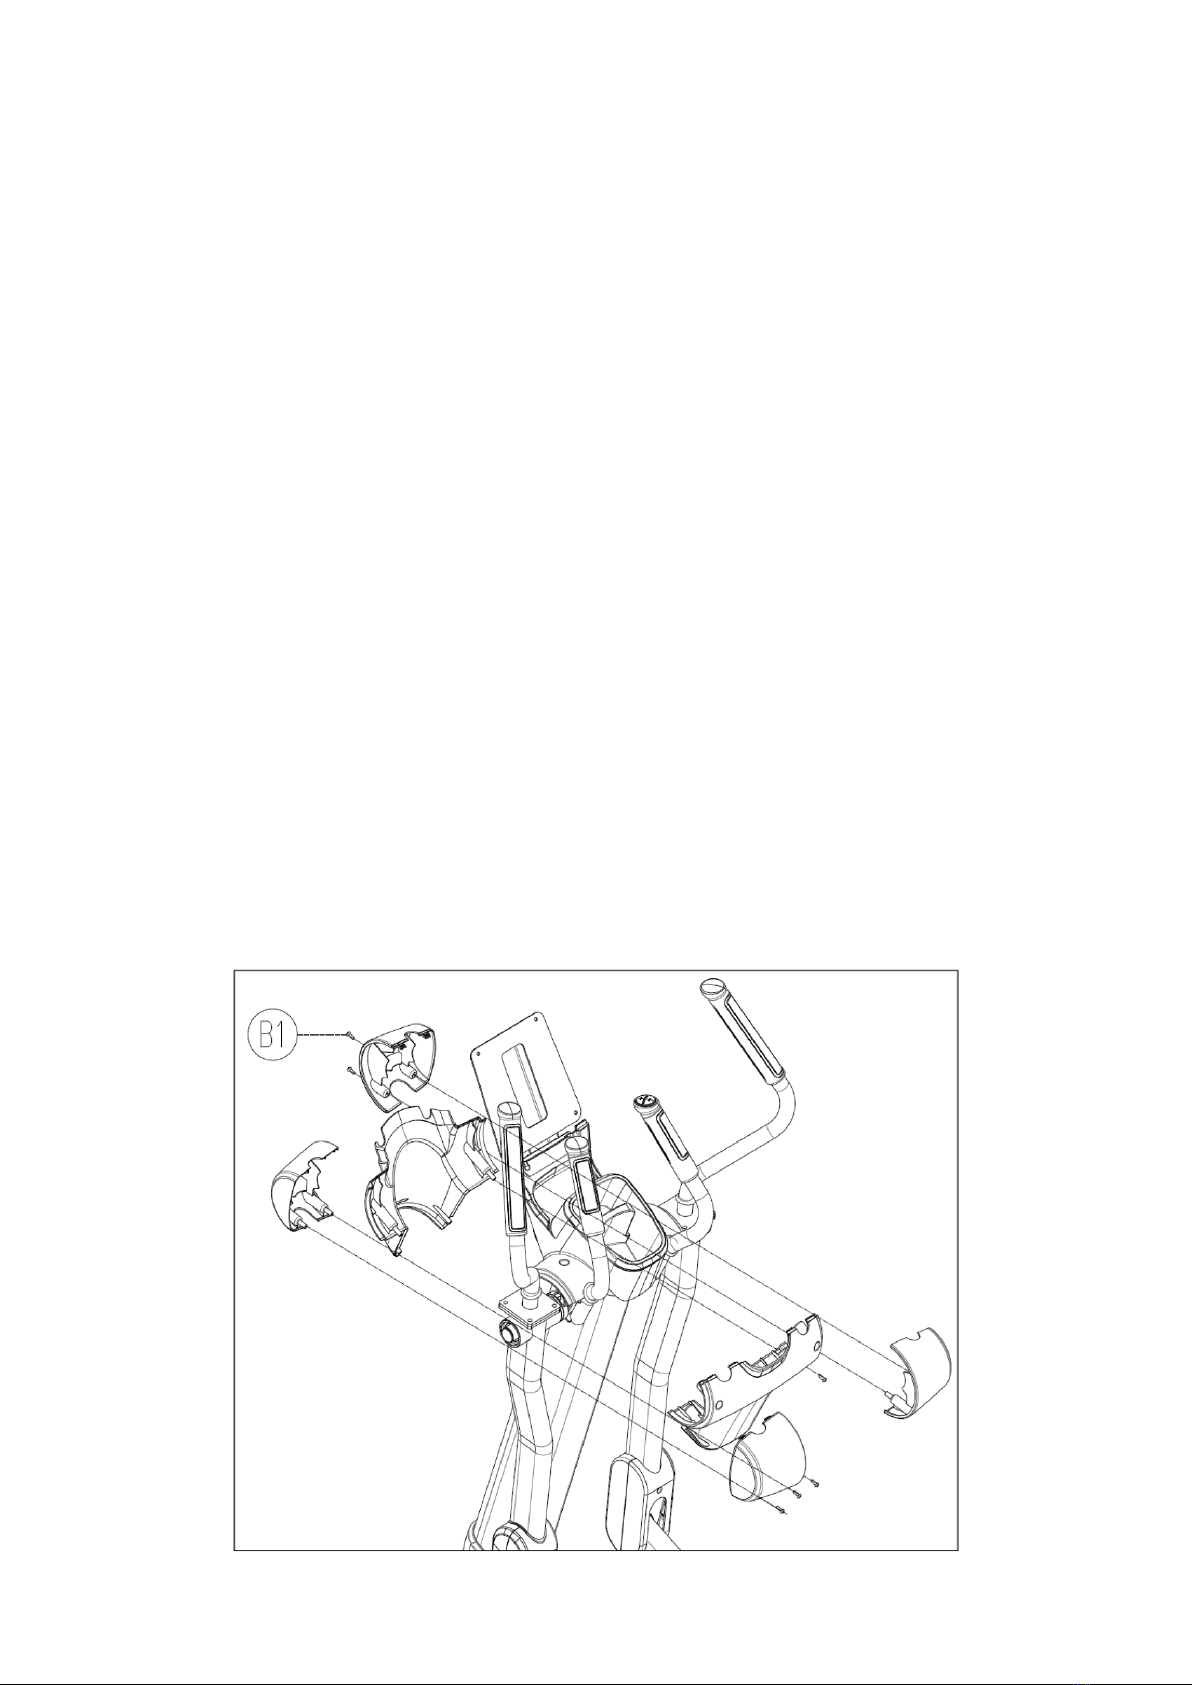
Part 2

As shown in the figure above, use B1 ST4.2*12 cross-flowered semi-circular head
self-tapping) to fix the plastic parts at the armrest of the boom to the main frame.
Section Three
Fix the front and rear plastic parts on the main frame with C1 (M5*10 semi-circular
head cross-stitch screws) and C2 (ST4.2*12 cross-flowered semi-circular head
self-tapping screws).
System operation instructions
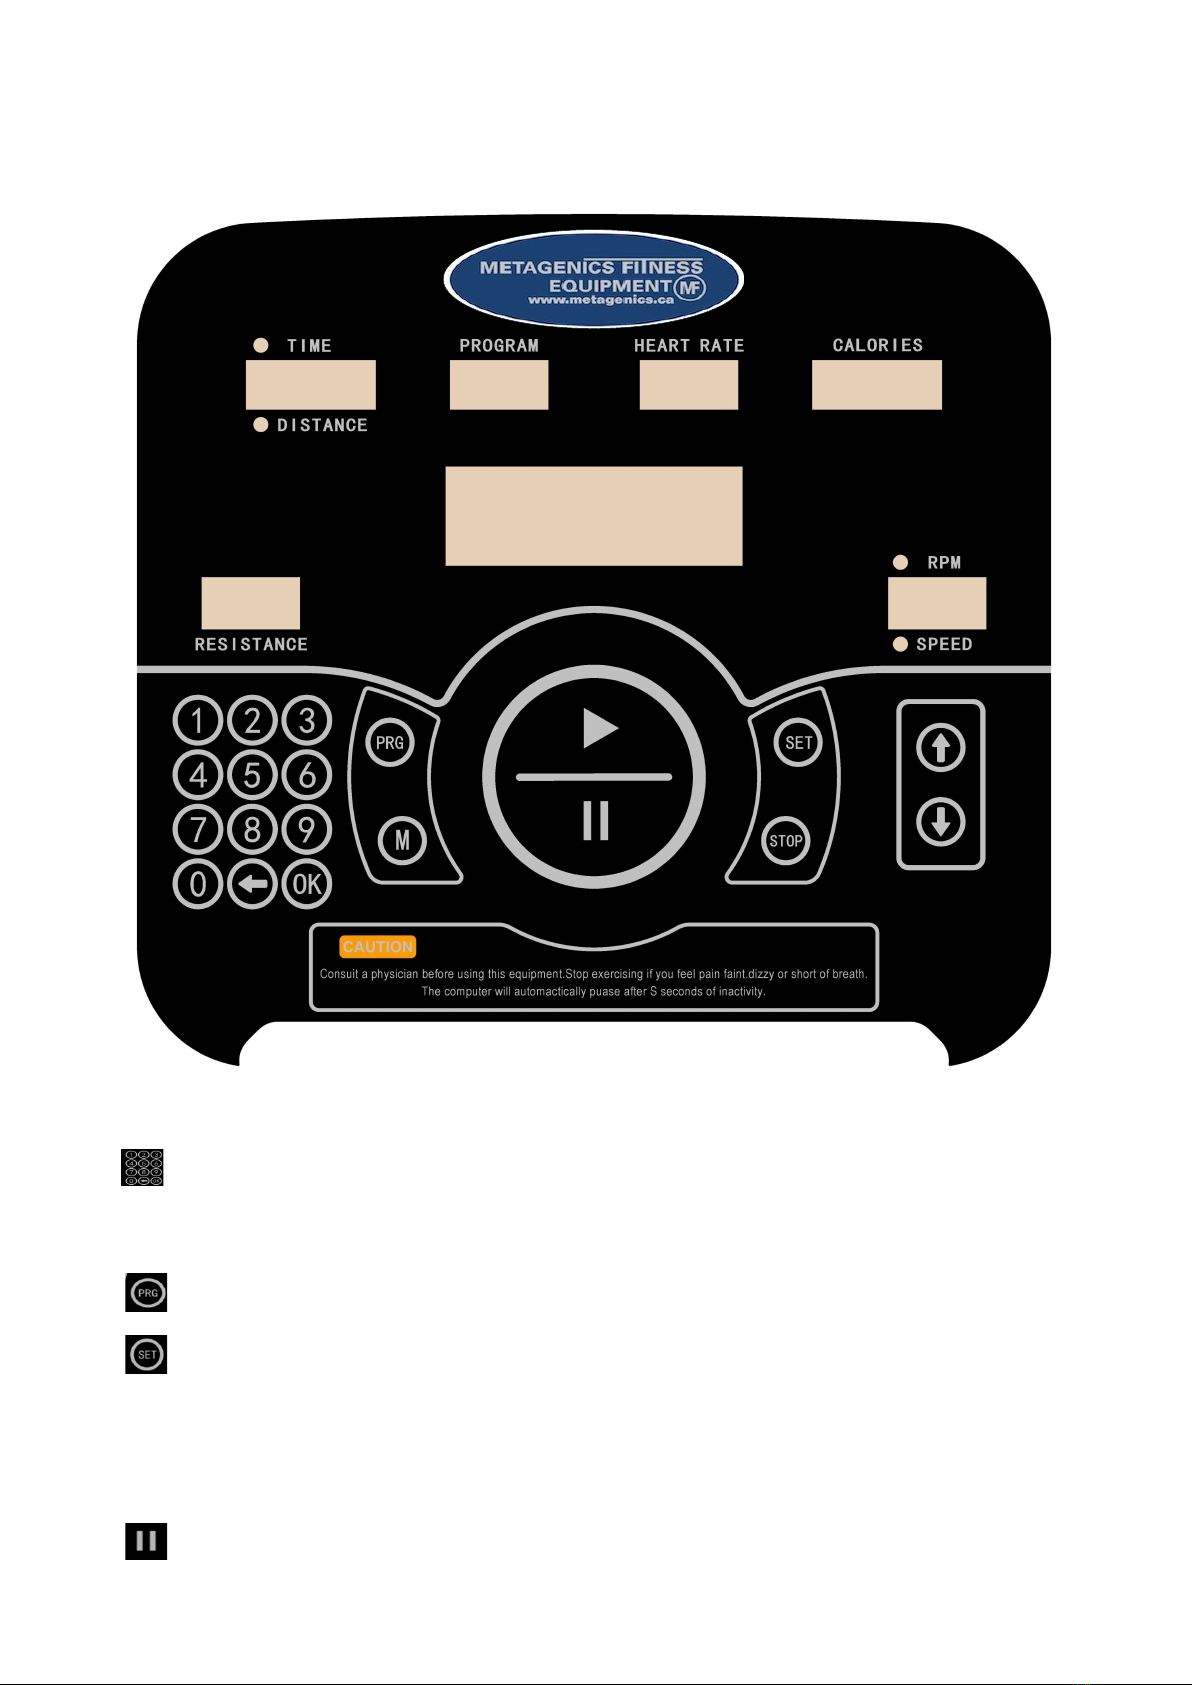
I. Button Functions:
Numeric keypad keys: Press the numeric keypad key during exercise to
quickly set the number of motion resistance segments;
Program key: Press this key to select the motion program (P-1 to P-8).
Set button: Press this button to select the sport mode (countdown time mode,
countdown distance mode, countdown calorie mode). In standby mode, to reset by
press this key for a longer time.
Pause button: Press this button to pause the motion, each motion data

pauses counting, press this button twice to end the motion
Quick Start button: Press this button to start the exercise, and the various
sports data starts counting.
Mode key: Switch between TIME and DISTANCE at the start of operation,
RPM and SPEED display.
Stop button: Press this button to stop the motion and the various motion data
is cleared.
Increase button: Increase the function value (time / distance / calories /
resistance)
Reduce button: reduce the function value (time / distance / calories /
resistance). Resistance level can also be adjusted using the centre POD in the
handle bar.
II. The Operation Brief:
1. After the user steps on the pedal, the electronic console enters the power-on mode:
the buzzer sounds and the LED is fully displayed for 2 seconds, then the
heartbeat display window of the LED displays the program board, the calorie
display window displays the Bluetooth address, and then the console enters the
P-0 mode interface (standby interface)
2.Turn on the machine (or press and hold the “Settings” button) to display →display
the program board and Bluetooth address →standby interface, then the user can
press the “Start” button to start the movement; or press the “Set” button to set the
sport mode and start the movement; Or you can press the “Program” button to set
the exercise program and start the exercise. You can press the “numeric keypad”
button or the “increase/decrease” button to set the resistance. You can press the

“pause” button to pause the motion or end the motion. Stop button to stop motion
III. Function data display instructions:
Item
Program
Display range
Setting
range
Zero
Discription
1.
TIME
0:00~99:59
Min Sec Min Sec
0:00~99:00
±1 minute
cycle
Yes
1.The number of cycles is counted when there
is no setting.
2.When the countdown to 0 is set, the system
STOP, the time window flashes.
2.
SPEED
0.0~99.9
KMH(MLH)
No
Yes
In motion:
1.The sensor signal is input for 3 seconds and
its value is displayed.
2.After no sensor signal input, its value is reset
to zero.
3.
RPM
0~15~999
No
Yes
In motion:
1.Display the value after inputting the sensor
signal for 3 seconds.
2.After no sensor signal input, the value
returns to zero after 4 seconds.
4.
DISTANCE
0.00~99.99
KM(ML)
0.00~99.50
±0.1 cycle
Yes
1.The number of cycles is counted when there
is no setting.
2. When there is a setting to count down to 0,
the system STOP, the distance window
flashes,
5.
CALORIES
0~999 CAL
0~990
±10 cycle
Yes
1.The number of cycles is counted when there
is no setting.
2.When there is a setting to count down to 0,
the system STOP, the distance window
flashes,
6.
PULSE
P,30~240
0→30~240
Yes
The heartbeat window displays the heartbeat
value when the heartbeat signal is detected,
and P when it is not detected.
7.
Small point
in the lower
right corner
of the
heartbeat
window
ON/OFF flicker
No
No
1.The heartbeat pulse “Hi Low” is displayed in
flashing speed.
2.When there is no input signal, the small dot
must disappear.
8.
LEVEL
1~26 LEVEL
(±1LEVEL)
No
Adjust the resistance during exercise

IV. Function Description:
1.Mode: Time (TIME) Mode / Distance (DISTANCE) Mode / CALORIES
mode
1) Pedal the elliptical and press “Settings” button in the standby interface, the
time window will flash. At this time, press the “ up/down arrows” button to set the
target time value. After setting, press the “Start” button to start the exercise. The time
window will count down. When the time window counts down to zero, the console will
stop. During the time countdown, press the “up /down arrow” button to adjust the
resistance (the number of resistance points is displayed in the resistance display
window of the meter). Press the “Pause” button to pause the motion or press twice
the “Pause” button to end the movement or press the “Stop” button to stop the
movement.
2) Pedal the elliptical and press settings once and when the time window is
flashing, press the “Settings” button again, the distance window will flash. At this time,
the target distance value of the user movement can be preset. When the distance
window flashes, press the “Settings” button again, and the calorie window will flash.
Set the target calorie value for user movement. After setting the preset value, press
the “Start” button and the countdown 3, 2, 1, GO will be displayed in the middle to
enter the start motion.
2.Program: P-1 to P-8
Press the “Program” button in the standby interface to select the moving program
graphics P-1 to P-8. The profile terrain of the program will be displayed in the LED
graphics and you can preset the time to complete it. For example: set 25 minutes,
and the meter has 25 columns, the first column flashes in first minute, the second
column flashes in second minute, and the number of columns in the dot matrix will
flash in sequence until the time countdown is completed. During the time countdown,
press the “up/down arrow” button to adjust the resistance. Press the “pause” button
to pause the motion or press the “pause” button twice to end the movement, or press
the “stop” button to stop the movement. When the program graphic is running, the
time is counted down, and other functions display the numerical value.
3.Heartbeat
When the user is exercising, hold the contact heart rate plates with both hands.
When the heartbeat signal is detected, the heartbeat display window will display the
heartbeat value of the user.
When the meter detects the user's heartbeat signal, it will flash the small dot in
the right corner of the heartbeat display window. The stronger the signal, the faster
the blinking frequency. When the heartbeat signal is not detected, the heartbeat
window displays "P". The heartbeat signal cannot be detected on the standby mode.

4.Bluetooth
After the meter is powered on, Bluetooth can be connected in the standby
interface, and the other interfaces are not connected to the Bluetooth.
Scan the QR code on the device, download the app (e-Health); open the Bluetooth
on the phone after installation, then open the Bluetooth app (e-health), select the
corresponding model (such as bike or elliptical machine) and then select in the next
interface Bluetooth to be connected (the console will display the Bluetooth address
when it is powered on). After the Bluetooth is connected, the user can pretty much
operate the bike with the phone and the display can start, pause, stop, etc. At the
same time, the exercise time, calories, distance, RPM, heart rate and other data can
be synchronized on the app and stored by day to track exercise. When you exit
Bluetooth, the meter will return to the standby screen.
Maintenance schedule
The safety of the equipment can be maintained only if the equipment is examined
regularly for damage or wear. If maintenance is required, keep the equipment out of
use until defective parts are repaired or replaced. Pay special attention to parts that
are subject to wear as outlined in the Preventive Maintenance Schedule.
•Pedal the elliptical forward and backwards to ensure smooth movement without
noise. Increase the resistance to maximum level to see that the belts are not
slipping and that the clutch is properly engaging.
•Check that the console is clean of salt residue from sweat and check all
functions to make sure all buttons work, longer finger nails can damage the
membrane. Check contact heart rate function. Console and pedal arms should
be cleaned after every workout with a damp cloth with water and or
antibacterial neutral solution.
•Check tightness on the bolts console and that the elliptical is levelled.
Manufactured for Metagenics Fitness Inc. www.metagenics.ca
Table of contents
Other Metagenics Fitness Elliptical Trainer manuals


