Metal-Fach U741 User manual

ul. KRESOWA 62
U741 CULTIVATOR
OPERATING INSTRUCTIONS
EDITION I, JUNE 2014 EN

2U741 CULTIVATOR – OPERATING INSTRUCTIONS MANUAL
CE DECLARATION OF CONFORMITY
FOR THE MACHINE
METAL-FACH COMPANY
ul. Kresowa 62
16-100 SOKÓŁKA
acting as the manufacturer
Machine:
Function: soil cultivation before sowing and after stubble
We declare that the machine which this declaration concerns meets the following requirements:
- Directive 2006/42/EC OF THE EUROPEAN PARLIAMENT AND OF THE COUNCIL dated
May 17th 2006 on machines and the Resolution of the Minister of Economy of October 21st
2008 concerning general requirements for machinery (Journal of Laws, issue 199 item 1228);
The following harmonised standards were used for compliance evaluation:
PN-EN ISO 4254-1: 2013
PN-EN ISO 13857:2010
PN-EN ISO 12100:2012
- and the following standards: PN-ISO 3600:1998, PN-ISO 11684:1998; and the Declaration of
the Ministry of Transportation, Construction and Marine Economy dated 06/06/2013 on the
publication of the consolidated text of the Resolution of the Ministry of Infrastructure on the
technical requirements for vehicles and the scope of their necessary equipment (Journal of Laws
of 22/08/2013, item 951), as amended.
Safety Test Report no.
Person authorised to prepare the technical documentation: Metal-Fach Technical Department
This Declaration of Conformity becomes null and void if the machine design is changed or
modied in any manner without prior consent from the manufacturer.
Sokółka President of the Managment Board
Jacek Marek Kucharewicz
CULTIVATOR
type/model: U741-............................................
serial number:......................................................
year of manufacture:...........................................

THIS IS A WARNING SYMBOL AND REQUIRES
SPECIAL ATTENTION TO THE OPERATOR AND
BYSTANDERS' SAFETY REQUIREMENTS OR SAFE
OPERATION REQUIREMENTS.
WARNING!
THIS SYMBOL REQUIRES SPECIAL ATTENTION TO
THE TEXT DESCRIBING HAZARDS OR IMPORTANT
INFORMATION ABOUT THE PRODUCT.
ATTENTION!
THIS SYMBOL INDICATES ADDITIONAL INFORMATION
WHICH ALLOWS TO OPTIMISE THE PRODUCT
OPERATION.
IMPORTANT
Symbols in the Operating Instructions
Legend:
3
U741 CULTIVATOR – OPERATING INSTRUCTIONS MANUAL

4U741 CULTIVATOR – OPERATING INSTRUCTIONS MANUAL
Thank you for choosing our U741 disc cultivator with hydropack, a machine designed for effective and reliable operation. The following Manual will
let you fully use the advantages of our cultivator and to optimise the soil cultivation process. The Manual contains a detailed table of contents followed
by descriptions which will allow to easily identify the device and to make the best use of it.
The information regarding safety and comfort of operation, description of coupling with a tractor, technical service activities and storage conditions
are listed on the following pages of the Manual.
A spare parts catalogue containing the list of the cultivator major components allowing for easy ordering is attached to the Manual in a digital form
on a CD. A printed version of the catalogue can be purchased at authorised service outlets or directly from the manufacturer.
Both the Manual and the Spare Parts Catalogue contain basic information on the product. The elements fitted to the equipment may be slightly
different from those presented in the Manual.
The manufacturer reserves the right to introduce changes without notice.
The latest Operating Manuals and Parts Catalogues are available on our website:
http://www.metalfach.com.pl/en/materialy-do-pobrania
IMPORTANT

5
U741 CULTIVATOR – OPERATING INSTRUCTIONS MANUAL
TABLE OF CONTENTS
1. CULTIVATOR IDENTIFICATION, GENERAL SAFETY RULES 6
1.1. Identification of the u741 disc cultivator – 3.0 M 6
1.2. Intended use 7
1.3. Cultivator design 7
1.4. Cultivator characteristics 7
1.5. Cultivator dimensions 8
1.6. Warning symbols 10
1.7. Location of symbols on the machine 11
1.8. General safety rules 11
2. DRIVE OPERATION 13
2.1. Coupling the cultivator with the drive 13
2.2. Decoupling the cultivator from the drive 13
2.3. Stability of the tractor/cultivator assembly 13
3. COMMISSIONING 14
4. ONGOING ADJUSTMENTS 15
5. OPERATING THE CULTIVATOR 15
5.1. Preparing the machine for work after storage 15
5.2. Operation of the cultivator with the hydropack coupled to a seeder 16
5.3. Cultivator hydraulic system 16
5.4. Finishing the work with the cultivator 16
6. PERIODIC INSPECTION 17
6.1. Lubrication and storage 17
7. AUTHORISED SERVICE 18
7.1. Warranty service 18
7.2. Ongoing maintenance 18
7.3. Ordering spare parts 18
8. TRANSPORTING THE CULTIVATOR 18
8.1. Load transport 18
8.2. Travelling on public roads 19
8.3. Light signalling (optional) 20
9. CULTIVATOR STORAGE 20
10. TROUBLESHOOTING 21
11. DISMANTLING, DISPOSAL AND ENVIRONMENTAL PROTECTION 21
12. RESIDUAL RISKS 22
12.1. Description of residual risks 22
12.2. Evaluation of the residual risk 22
13. WARRANTY CONDITIONS 23

6U741 CULTIVATOR – OPERATING INSTRUCTIONS MANUAL
CULTIVATOR IDENTIFICATION, GENERAL SAFETY RULES
1. CULTIVATOR IDENTIFICATION, GENERAL SAFETY RULES
1.1. IDENTIFICATION OF THE U741 DISC CULTIVATOR –
3.0 M
The cultivator is identified by its nameplate securely fastened to the main
frame of the machine. The information presented on the U741cultivator
3.0 m nameplate is shown in the diagram below.
Fig. 1. Nameplate
It is forbidden to drive the cultivator on public roads
without its nameplate or with an illegible nameplate.
WARNING!
Should you have any doubts about the intended use
of this machine, consult the manufacturer. The right
selection of your work machines and the understanding
of its use will improve your work safety.
ATTENTION!
THE MANUAL IS A PART OF THE CULTIVATOR
ESSENTIAL EQUIPMENT.
KEEP THE OPERATING INSTRUCTIONS FOR FUTURE
USE.
Fig. 2. Nameplate location on the machine
If the machine is sold to another user, it must be supplied with the
Operating Manual. It is advised that the supplier has a confirmation
stating that the Manual has been transferred together with the machine,
signed by the buyer and filed.
Carefully read the Operating Manual.
When purchasing the machine, check the serial number
indicated in the Manual and the warranty sheet against
the serial number stamped on the nameplate.
IMPORTANT
Nameplate

CULTIVATOR IDENTIFICATION, GENERAL SAFETY RULES
7
U741 CULTIVATOR – OPERATING INSTRUCTIONS MANUAL
Fig. 3. Cultivator design
1- lower hitch pins; 2 - machine frame, 3 - front/rear harrow disks; 4 -
outer plate folding support; 5 - round packer, 6 - mechanical working
depth adjustment; 7 - side screens; 8 - hydropack; 9 - lamps (optional).
1.4. CULTIVATOR CHARACTERISTICS
Item
no.
Content
I General data
1. Type Cultivator
2. Manufacturer METAL-FACH Sp. z o.o.
16-100 Sokółka, ul. Kresowa 62
3. Type (model) U741
5.
Nameplate location
main frame
6.
S/N stamping
location
on the nameplate and underneath
1.2. INTENDED USE
The cultivator is a universal tool for the cultivation of the top layer of
soil to the depth of 5 cm to 15 cm. It is designed for use after harvest and
before sowing following ploughing or in soil cultivation without ploughing,
when the vegetation remains are not covered but mixed with the top
soil layer (i.e. mulched). In combination with the integrated seeder, the
machine can be operated for soil cultivation and seeding. The cultivator
can be used on all types of soils including those with stones thanks to
the use of elastic suspension of the harrow discs. The harrow allows for
opening and mixing of the soil and in connection with the packer also for
packing and compressing of soil. Due to the resistance to clogging the
harrow is well suited for the cultivation of tall stubbles which remain after
the harvest of crops and corn and for cultivation of aftercrop intended to
be used as fertiliser.
1.3. CULTIVATOR DESIGN
The cultivator structure comprises the main frame built of sections,
the service assembly frame, the harrow discs with maintenance-free
hubs, the rear round packer, and the seeder hydraulic lift.
No person is allowed to remain on the machine or within
its operating area when the cultivator is working.
ATTENTION!
8U741 CULTIVATOR – OPERATING INSTRUCTIONS MANUAL
CULTIVATOR IDENTIFICATION, GENERAL SAFETY RULES
7.
Service width [m]
3.0
8.
Number of discs
[pcs]
24/2 rows
9.
Packer type:
round, Ø 500
Packer, Ø 500
10.
Main/outer disc
diameter [mm]
Ø 510/ Ø 460
11.
Depth adjustment
range [cm]
5 - 15
12.
Disc pitch [mm]
250
13.
Power demand
[kW/HP]
60-83/80-110
14.
Operators [no. of
persons]
1 operating person
15.
Efficiency [ha/h]
3.0 - 5.0
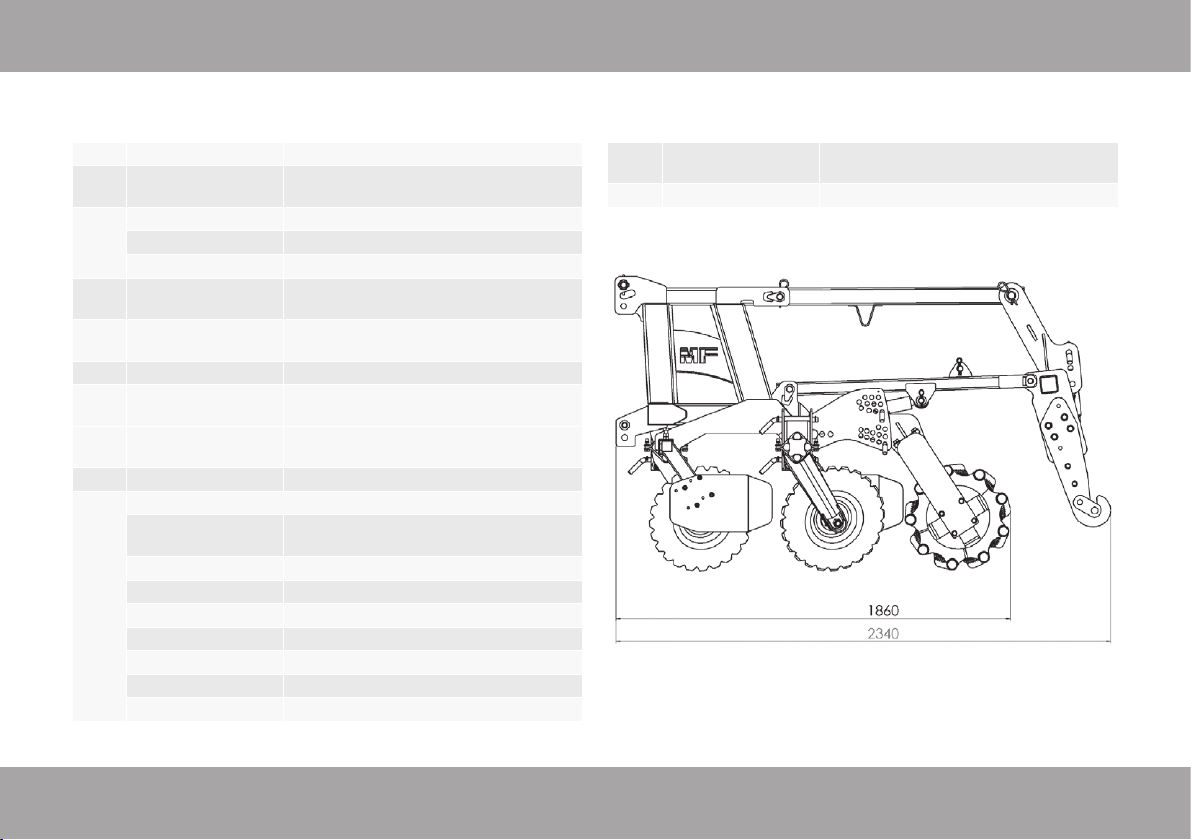
15.
Overall dimensions
transport position
(hydropack lifted)
width [mm]
3000
height [mm]
2340
length [mm]
1860
service position
width [mm]
3530
height [mm]
1390
length [mm]
1860
16.
Weight w/packer and
hydropack [kg]
1180
17.
Hitch category
2 or 3
1.5. CULTIVATOR DIMENSIONS
Fig. 4. Cultivator side view

CULTIVATOR IDENTIFICATION, GENERAL SAFETY RULES
9
U741 CULTIVATOR – OPERATING INSTRUCTIONS MANUAL
Fig. 5. Cultivator rear view

10 U741 CULTIVATOR – OPERATING INSTRUCTIONS MANUAL
CULTIVATOR IDENTIFICATION, GENERAL SAFETY RULES
Fig. 6. Cultivator side view, with the hydropack lifted
1.6. WARNING SYMBOLS
Item
no.
Safety symbol
(sign)
Meaning of the symbol
(sign) or text
1.
Read the Operating Instructions.
2. Turn off the engine and remove
the ignition key before servicing or repairs.
3. Keep a safe distance from the machine.
Danger of being crushed by the machine.
4. Do not reach into the crushing area if the
machine may move.
5.
Keep a safe distance from the machine.
Danger of crushing of toes or feet. Force
applied from above.
6. Attachment points for loading on a means of
transport.
7.
Lift the cultivator when turning around.

CULTIVATOR IDENTIFICATION, GENERAL SAFETY RULES
11
U741 CULTIVATOR – OPERATING INSTRUCTIONS MANUAL
8.
Cultivator service depth.
9. Lubrication point.
10. Check the disc hub tightening.
1.7. LOCATION OF SYMBOLS ON THE MACHINE
The cultivator user is required to keep the warning
symbols and text on the cultivator legible during its
entire operating life. If damaged or destroyed, replace
with new ones.
ATTENTION!
The symbols can be purchased directly from the
manufacturer or the nearest Metal-Fach authorised
representative.
ATTENTION!
Fig. 7. Locations of signs on the cultivator
1.8. GENERAL SAFETY RULES
The safety regulations given below apply to the machine. Regardless
of those regulations the user must also follow the general safety and
accident prevention regulations and the traffic code.
The machine (cultivator + tractor) should be operated maintaining all
rules of safe operation, in particular:

12 U741 CULTIVATOR – OPERATING INSTRUCTIONS MANUAL
CULTIVATOR IDENTIFICATION, GENERAL SAFETY RULES
1. Before every start-up check the machine and the tractor – whether
they are in condition which guarantees safety during movement and
operation;
2. To maintain steerability the machine may only be coupled to a tractor
with a full set of weights on the front axle. When the machine is
coupled the load on the tractor's front axle must be at least 20% of
the tractor's own weight, see Section 2.3;
3. Follow the maximum permissible axle loads, total weight and
transport dimensions;
4.
When coupling the machine to the tractor, raising and lowering the
machine using the tractor's hydraulic system, unfolding the machine to
its transport or working position, and on headlands, the operator must
make sure that there are no bystanders near by, especially children;
5. When the engine is running, no person is allowed between the tractor
and the machine;
6. Noise – the equivalent sound pressure emission corrected by A
characteristics (LpA) does not exceed 70 dB;
7. When connecting the hydraulic lines to the tractor's hydraulic system
the operator must make sure that the system is not under pressure;
the operator must check the positions of the tractor hydraulic system
control levers;
8. It is only allowed to operate the hydraulic elements when no person
is nearby;
9. The hoses and pipes in the hydraulic lines must be checked on a
regular basis and replaced with new ones it they are damaged;
10. All hydraulic lines must be replaced every 6 years;
11. Lifting, lowering, folding, unfolding, and moving the machine should
be done slowly and without jerking movements;
12. Do not reverse the tractor or make turns when the machine is
lowered to its working position;
13. When turning, bear in mind that there are protruding elements in the
machine, the use of tractor's independent brakes must be avoided;
14. The user must check the tyre pressure on the tractor and on the
machine;
15. During transport no person should be allowed to stand on the
machine nor any load may be placed on it;
16. Any repairs, lubrication or cleaning of the service assembly required
during work may only be performed with the engine turned off and
the machine lowered;
17. Uncouple the machine only when its service assembly rest on stable
firm ground and the engine is off;
18. The machine may only be stored in its unfolded position and resting
on all service assemblies;
19. When not in use, the machine should be stored in places where it
cannot be accessed by unauthorised persons and animals;
20. During operation, use appropriate protective clothing and shoes with
anti-slip soles;
21. Follow the traffic code regulations and the manufacturer's
recommendations when travelling on public roads, see section 8.2;
22. Before entering public roads, perform a visual inspection of the
transported machine;
23. It is forbidden to operate the cultivator while under influence of
alcohol;
24. Do not leave agricultural equipment on slopes or any other terrain
inclinations without securing it against accidental rolling;
25. The machine must not be used by underage persons, especially
children;
26. Do not operate the cultivator while under the influence of drugs or
medicinal products with narcotic effects;
27. If injured (by laceration/cutting), administer first medical aid; if the
injuries are severe, immediately seek medical attention;
28. If involved in a collision or a traffic accident, call emergency services
and follow the road traffic regulations.

DRIVE OPERATION
13
U741 CULTIVATOR – OPERATING INSTRUCTIONS MANUAL
2. DRIVE OPERATION
2.1. COUPLING THE CULTIVATOR WITH THE DRIVE
Couple the cultivator with the agricultural tractors rated at a
minimum of 80 HP and equipped with the three-point hitch system.
The cultivator is coupled with the tractor in the following way:
• Reverse the tractor to a distance which allows to couple the machine
with the tractor lower hitch links.
• Couple the upper 3-point hitch link to the cultivator and remove any
play; then level the cultivator.
• Connect the electric power supply and do a functional test (the lighting
system is an optional accessory).
• Connect the hydraulic line and check for proper seal.
• Lift the cultivator and verify that the tractor front axle load is over 20%
of the tractor weight. The tractor should remain fully steerable. See
Section 2.3.
• The machine should be adjusted during the first pass.
Be extremely careful when coupling the cultivator with
the tractor. Do not stay between the cultivator and the
tractor when coupling the machines together.
ATTENTION!
2.2. DECOUPLING THE CULTIVATOR FROM THE DRIVE
Do the following to decouple the cultivator from the tractor:
• Make sure that there are no bystanders, especially children, in the
coupling area.
• Place the cultivator for storage on a hard, flat and level ground.
• Disconnect the electric power supply (if applicable).
• Disconnect the hydraulic line.
• Disconnect the 3-point upper link and the tractor lower links.
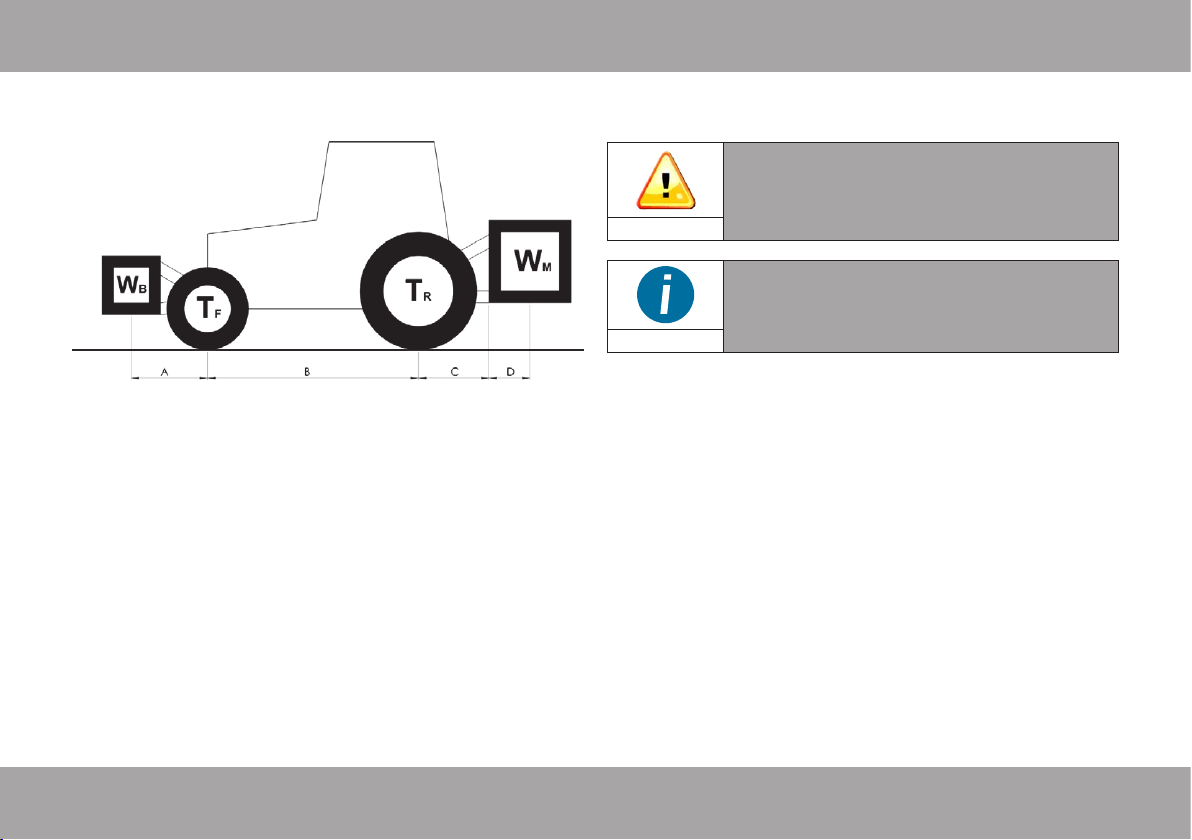
2.3. STABILITY OF THE TRACTOR/CULTIVATOR
ASSEMBLY
The tractor should have appropriate ballast at its front end to provide
proper steering and braking performance. When the machine is coupled
the load on the tractor's front axle must be at least 20% of the tractor's
own weight (Fig. 8).
Remember that the road and the coupled machine influence the
driving characteristics. The driving style should be adjusted to terrain
conditions and type of soil.
While negotiating corners with the coupled or suspended machine, it
is important to bear in mind the reach and weight of the machine.
Fig. 8. Minimum load on the tractor front axle.
kg
14 U741 CULTIVATOR – OPERATING INSTRUCTIONS MANUAL
DRIVE OPERATION / COMMISSIONING
Fig. 9. Static stability
The following data is required for the calculations:
WB=(WM*(C+D)-TF*B+0,2*TC*B)/(A+B)
A [m] – distance between the centre of gravity of the front ballast / front
mounted equipment and the centre of the front axle;
B [m] – distance between the tractor wheels;
C [m] – distance between the centre of the rear axle and the lower link
ball;
D [m] – distance between the lower link ball and the centre of gravity of
the rear mounted machine;
TC[kg] – tractor own weight;
TF[kg] – front axle load of an unloaded tractor;
TR[kg] – rear axle load of an unloaded tractor;
WM[kg] – total weight of the machine installed in the rear;
WB[kg] – total weight of the front ballast/front mounted machine.
3. COMMISSIONING
Before commissioning the cultivator, read and
understand this Manual, and pay special attention to
the sections concerning the safety of the operator and
bystanders.
ATTENTION!
If there are any doubts about safety, please contact your
sales representative or the manufacturer.
IMPORTANT

15
U741 CULTIVATOR – OPERATING INSTRUCTIONS MANUAL
ONGOING ADJUSTMENTS / OPERATING THE CULTIVATOR
4. ONGOING ADJUSTMENTS
The working depth of the harrow disks can be adjusted using
the tractor's three point hitch or the mechanical or hydraulic shaft
adjustment mechanism. Adjust the packers with the pins placed in
appropriate openings in the packer bracket plate and secured with cotter
pins (see Fig. 10).
Fig. 10. Machine adjustment
Hydropack position
adjustment – with
actuator
3 adjustment holes
Upper pin
Lower pin
5. OPERATING THE CULTIVATOR
Before commencing fieldwork with the machine, do the following:
• check the condition of the bolted joints – if any play is found, retighten
the bolts and nuts;
• check the folding and unfolding of the hydropack (if equipped);
• check the hydraulic lines; replace if necessary;
• remove the warning signs;
• set the cultivator service depth;
• lower the tractor lift to the set service depth.
If the cultivator is clogged with vegetation remains, it must be cleared
by operating the tractor hydraulic system to raise the machine for a short
time.
The machine should be adjusted during the first pass.
If the machine is properly levelled, the frame is parallel to the field's
surface.
• Avoid jerky movements while operating the cultivator.
• Make turns gently, with the machine raised in the
transport position.
• Do not reverse or turn the tractor around with the
machine in the working position as it may cause
damage to the machine.
ATTENTION!
5.1. PREPARING THE MACHINE FOR WORK AFTER
STORAGE
Do the following to prepare the machine for work after a period of
storage:
• check the condition of the bolted joints;
• check the condition of service/working units;
• check the condition of the hydraulic system;
• check the condition of the paint coats;
• check the condition of the hitch pins;
• relubricate as instructed in Section 6.1.

16 U741 CULTIVATOR – OPERATING INSTRUCTIONS MANUAL
OPERATING THE CULTIVATOR
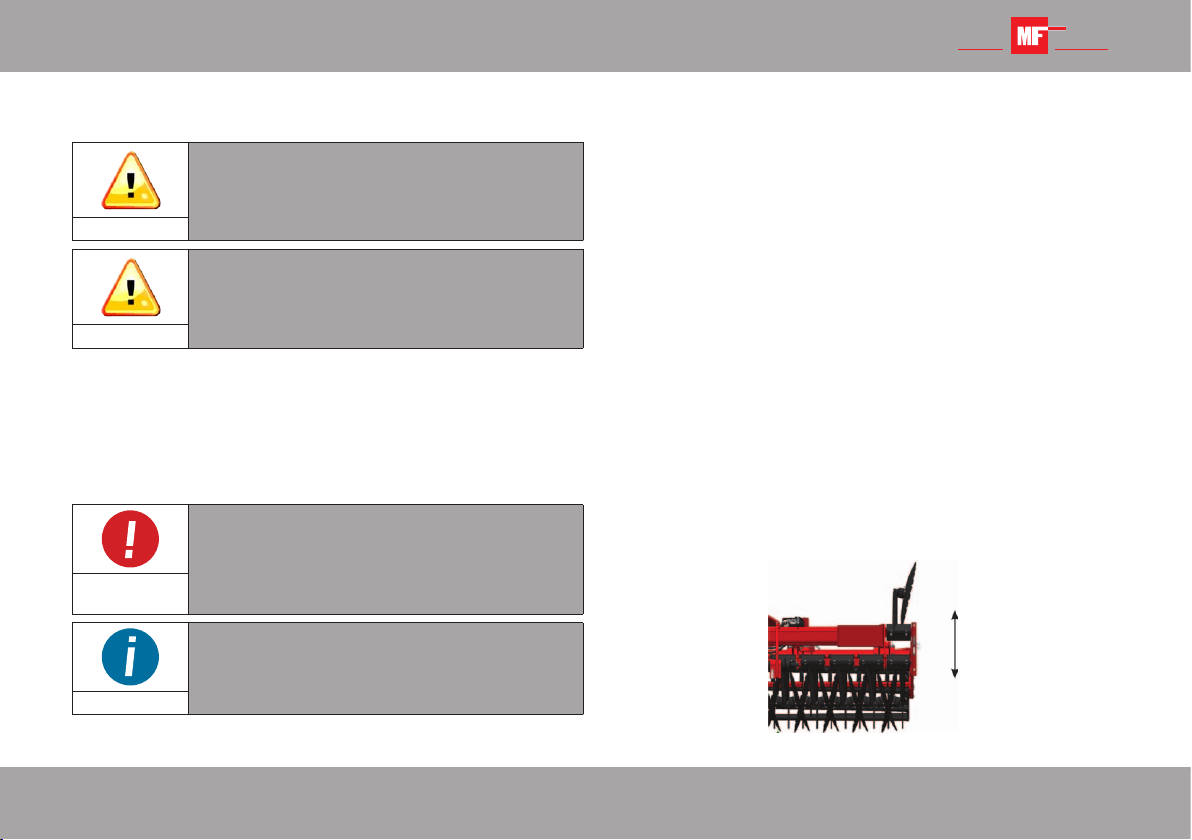
5.2. OPERATION OF THE CULTIVATOR WITH THE
HYDROPACK COUPLED TO A SEEDER
The cultivator fitted with the hydropack can be coupled with a seeder
by the three-point hitch. The hydropack position is shifted from transport
to service by a hydraulic actuator. In order to set the proper service
position, adjust the TPH upper link. Adjust during the first pass. Secure
the cultivator in the transport position as shown in Fig. 11.
Fig. 11. Securing the cultivator in the transport position
5.3. CULTIVATOR HYDRAULIC SYSTEM
• When the cultivator is running, its hydraulic system is under high
pressure.
• Inspect all hydraulic lines each time before work and replace them
every 6 years.
• Use only the oil grades recommended by the manufacturer. Do not mix
oils of different grades!
• Verify that the tractor hydraulic system is depressurized before
connecting with the machine hydraulic system. Keep the hydraulic
quick-release couplings clean at all times.
• If the hydraulic system is damaged, hydraulic oil may leak out. Have
the system repaired by qualified personnel.
• Return waste hydraulic oil to an authorised disposal point.
• The oil purity grade in the tractor hydraulic power system must meet
the 20/18/15 requirement according to ISO 4406-1996.
If injured by high-pressure jets of hydraulic oil,
immediately seek medical attention. If the hydraulic
oil contaminates the eyes, flush the eyes with plenty of
water and seek attention of an ophthalmologist. Wear
adequate protective clothing at work.
ATTENTION!
5.4. FINISHING THE WORK WITH THE CULTIVATOR
Place the machine on a hard, flat, level ground. Disconnect the
electrical power supply (if the optional lighting system is installed) and
the hydraulic supply line. Disconnect the 3-point upper link and the
tractor lower links. Before a long period of storage the cultivator should
be cleaned and all malfunctions should be repaired; also verify the
paint coat. If it is required to make some touch-ups, it is advised to use
the paint repair kit supplied by the manufacturer. Protect the machine
against weather conditions.
Transport position locking
pin

PERIODIC INSPECTION
17
U741 CULTIVATOR – OPERATING INSTRUCTIONS MANUAL
6. PERIODIC INSPECTION
While preparing the machine for work, it is required to check its
technical condition, and first of all, the condition of the service assemblies.
In addition it is required to:
• check the condition of the bolted joints – if any play is found, retighten
the bolts and nuts;
• check whether the packer rotates freely by turning them by hand;
• lubricate the elements of the machine in accordance with the
guidelines specified in section 6.1.
Secure the raised cultivator parts with safety pins
before servicing.
ATTENTION!
6.1. LUBRICATION AND STORAGE
Before a long period of storage the machine should be cleaned and
all malfunctions should be repaired. Protect the machine against weather
conditions. The machine should be stored in the unfolded position on a
level, hard surface. Secure the machine against access of children and
animals. The durability and efficiency of the machine depends to a large
degree on systematic lubrication.
Use mineral oils for lubricating the machine. Before adding grease
clean the lubrication points. Lubricate according to Fig. 12. Use the
ŁT-4S-3 grease for lubrication.
Always relubricate the service assemblies on the U741
cultivator before spring and winter.
IMPORTANT
Fig. 12. Lubrication points
1 – packer bearing assembly: 2 points;
2 – Hydraulic cylinders (with the hydropack option only): 4 points.

18 U741 CULTIVATOR – OPERATING INSTRUCTIONS MANUAL
AUTHORISED SERVICE / TRANSPORTING THE CULTIVATOR
7. AUTHORISED SERVICE
7.1. WARRANTY SERVICE
The manufacturer issues a warranty on conditions described in the
warranty card. During the period covered by the warranty, repairs shall
be made at authorised service stations or at the manufacturer's service
point.
7.2. ONGOING MAINTENANCE
After the warranty period, authorised service stations perform
periodical inspections, adjustments and repairs.
7.3. ORDERING SPARE PARTS
Spare parts should be ordered from authorised resellers or directly
from the manufacturer stating the full name of the user or company
name and address. Send your order with the name, symbol, serial
number and year of manufacture of the machine, catalogue name of the
part, catalogue number of drawing or standard, and number of ordered
items. Then arrange the terms of payment.
8. TRANSPORTING THE CULTIVATOR
8.1. LOAD TRANSPORT
The machine is supplied to the user partially disassembled. How
much the machine is disassembled depends on the used mean of delivery
transport.
The components disassembled for delivery include:
• rear packer;
• seeder hydraulic lift.
Assembly procedure:
Seeder hydraulic lift:
• locate the hydropack bottom frame in its mounting locations on the
cultivator frame, connect the assemblies with pins and secure the pins
with cotter pins;
• locate the hydraulic cylinders, install the pins and secure them with
cotter pins; next, install the threaded fasteners to mount the hydraulic
lines to the cultivator frame;
• locate the hydropack upper beam and secure it with the pin and cotter;
• locate the seeder TPH in its mounting locations, install the pins and
secure the pins with cotter pins.
Round packer:
• remove 8 packer bracket bolts;
• place the packer in the packer bracket support;
• install the packer bracket plate and secure with the removed bolts.
The cultivator is suitable for road and rail transport
using carriers with appropriate load bearing capacity.
IMPORTANT
TRANSPORTING THE CULTIVATOR
19
U741 CULTIVATOR – OPERATING INSTRUCTIONS MANUAL
While loading and unloading the machine, the parts of
the frame indicated as lifting points with appropriate
pictograms should be used for lifting the machine see
section 1.6.
ATTENTION!
Due to the heavy weight of the individual parts, it is
required to use lifting devices such as a gantry crane or
a forklift during the dismantling process.
ATTENTION!
8.2. TRAVELLING ON PUBLIC ROADS
The cultivator can be driven on public roads as a machine installed on
the tractor 3-point hitch (TPH).
According to the road travel safety rules /Regulation by the Minister
of Infrastructure of 21.12.2002 Journal of Laws no. 32 of 2002, item 262/.
A unit consisting of a tractor with a coupled farming machine must meet
the same requirements as an individual tractor.
The machine (part of the unit consisting of the tractor
and machine) is a part protruding outside the outline of
the vehicle and obstructing the tractor rear lights, and
as such it poses a threat to other vehicles travelling on
the road.
WARNING!
Do not travel on the roads if the unit (tractor + machine)
is without appropriate marking.
IMPORTANT
When travelling on public roads with a unit consisting of the tractor
and the machine, all rules of the Traffic Code specific to vehicles of this
type apply, in particular:
• the cultivator hydropack must be folded to the transport position and
secured with the pin against unfolding during transport;
• during transport on the road, the cultivator coupled to a tractor
requires:
• marking with warning plates with red and white stripes;
• lights;
• marking the elements protruding from the sides of the tractor (front
marker lights – white);
• repeated rear lights of the tractor (light clusters + reflective lights);
• marking with a triangle plate indicating a slow moving vehicle;
• do not exceed the maximum allowable transport speed, which is:
• 20 km/h maximum on paved roads;
• 6 to 10 km/h on dirt roads or cobblestone;
• 5 km/h maximum on uneven roads.
The speed must be adapted to road conditions and the condition of
the road surface.
Special caution must be taken while passing or overtaking other
vehicles and on corners. The maximum allowable width of the machine
on public roads is 3.0 m.
Fig. 13. Transport position

20 U741 CULTIVATOR – OPERATING INSTRUCTIONS MANUAL
TRANSPORTING THE CULTIVATOR / CULTIVATOR STORAGE
Fig. 14. Service position
8.3. LIGHT SIGNALLING (OPTIONAL)
Before entering public roads a warning plate with red and white
stripes, signal lights and a bracket for the plate indicating slow moving
vehicles must be installed (the means for installation are specified in Fig.
15). The power supply line shall be connected with the tractor electric
system, and a triangle plate must be installed in the bracket. The power
supply line shall be connected with the tractor electric system, and a
triangle plate must be installed in the bracket.
Fig. 15. Installation of the lighting system on the machine
9. CULTIVATOR STORAGE
Store the cultivator extended on a hard, flat, and level surface.
When the working season is over, clean the cultivator and check
the condition of the protective paint coating. If it is required to make
some touch-ups, it is advised to use the paint repair kit supplied by the
manufacturer.
Check the hydraulic system components; replace if damaged.
Check the condition and legibility of the nameplate. If the plate is
damaged, notify the service station.
Check the condition and legibility of the symbols. If they are damaged,
replace them with new ones.
Plug the hydraulic line ends.
Store the cultivator in an atmosphere free of aggressive
agents (e.g. ammonia, chemicals).
ATTENTION!
Table of contents
Other Metal-Fach Tiller manuals


Popular Tiller manuals by other brands


Scheppach
Scheppach MTP560 Translation from the original instruction manual

GARDEN WAY
GARDEN WAY 12194 owner's manual

Classen
Classen STAND-AER SA-25 Operator's manual and parts list

Altrad
Altrad ATIKA BH 1400 N Original instructions, safety instructions, spare parts

DR
DR PILOT 2 Safety & Operating Instructions

AL-KO
AL-KO TL 1820 Instructions for use