Metallkraft HKS 320 User manual

HKS 320
Instruction Manual
HKS 320
HKS 320
Hand-held circular saw

2HKS 320 | Version 1.04
Imprint
Product identification
Hand-held circular saw Item number
HKS 320 3840321
Manufacturer
Stürmer Maschinen GmbH
Dr.-Robert-Pfleger-Str. 26
D-96103 Hallstadt
Fax: 0049 (0) 951 96555 - 55
E-Mail: [email protected]
Internet: www.metallkraft.de
Information about the operating instructions
Genuine operating instructions
Published: 09.03.2021
Version: 1.04
Language: English
Author: SN
Copyright information
Copyright © 2021 Stürmer Maschinen GmbH, Hallstadt,
Germany.
Stürmer Maschinen GmbH is the sole owner of the con-
tent of these operating instructions.
Forwarding and reproduction of this document as well
as use and notification of its content is not permitted
without explicit consent. Infringements will lead to
claims for damages.
Subject to technical changes and errors.
Contents
1 Introduction .............................................................3
1.1 Copyright............................................................ 3
1.2 Customer service................................................ 3
1.3 Limitation of liability ............................................ 3
2 Safety........................................................................3
2.1 Legend of symbols............................................. 3
2.2 Operator responsibility ....................................... 4
2.3 Operating staff qualification ............................... 4
2.4 Personal protective equipment........................... 5
2.5 General safety instructions for power tools ........ 5
2.5.1 General safety instructions.......................... .7
2.6 Specific safety regulations during the sawing
process ............................................................... 7
2.7 Safety data sheets.............................................. 7
2.8 Safety labels on the device ................................ 8
3 Intended use ............................................................8
3.1 Improper use ...................................................... 8
3.2 Residual risks ..................................................... 8
4 Technical Data.........................................................8
4.1 Type plate........................................................... 9
5 Transport, packaging, storage...............................9
5.1 Delivery and transport ........................................ 9
5.2 Packaging........................................................... 9
5.3 Storage ............................................................... 9
6 Description of the device......................................10
6.1 Presentation...................................................... 10
6.2 Scope of delivery.............................................. 11
6.3 Accessories ...................................................... 11
6.4 Saw blade selection ......................................... 11
7 Settings and commissioning ...............................11
7.1 Function of the lower protective cover ............. 11
7.2 Additional safety rules ...................................... 12
7.3 Electrical connection ........................................ 12
7.4 Installation of the saw blade............................. 12
7.5 Removing the saw blade.................................. 13
7.6 Setting the cutting depth .................................. 13
7.7 Using the sighting notch................................... 14
7.8 Application of the saw blade protection device .14
7.9 Kicker lever....................................................... 14
7.10 Dust collection system.................................... 14
7.11 Switch the tool on and off ............................... 15
7.12 Electronic overload protection and load
indicator light ................................................. 15
7.13 Using the device............................................. 16
7.14 Clamping the workpiece................................. 16
7.15 Guide rail ........................................................ 16
8 Care, maintenance and repair .............................17
8.1 Cleaning of the device...................................... 17
8.2 Changing the carbon brushes.......................... 18
8.3 Changing the connecting cable ....................... 18
9 Disposal, recycling of old equipment ................... 18
9.1 Taking out of service ........................................ 18
9.2 Disposal of electrical equipment...................... 18
9.3 Disposal via municipal collection points .......... 18
9.4 Disposal of lubricants....................................... 18
10 Spare parts...........................................................19
11 Wire connection ..................................................21
12 EC-Declaration of Conformity ............................22

Introduction
HKS 320 | Version 1.04 3
1Introduction
You have made an excellent choice in purchasing a
METALLKRAFT metal cutting circular saw.
Carefully read the operating instructions prior to commission-
ing.
They describe correct commissioning, intended use
and safe as well as efficient operation and maintenance
of the metal cutting circular saw. The operating instruc-
tions form part of the metal cutting circular saw. Always
keep them at the metal cutting circular saw's location of
use. In addition to this, the local accident prevention
regulations and general safety provisions for the appli-
cation scope of the metal-cutting circular saw apply.
Figures in this operation manual serve to provide a ba-
sic understanding and may differ from the actual de-
sign.
1.1 Copyright
The contents of these operating instructions are pro-
tected by copyright. Their use is permitted within the
context of using the metal cutting circular saw. Any fur-
ther use shall not be permitted without written consent
by the manufacturer.
To protect our products, we register our rights to our
brands, patents and designs where possible in each in-
dividual case. We take strong action against any viola-
tion of our intellectual property.
1.2 Customer service
Please contact your specialist retailer if you have any
questions regarding your metal-cutting circular saw or
require any technical information. Your specialist retailer
will be happy to support you with specialist advice and
information.
Germany:
Stürmer Maschinen GmbH
Dr.-Robert-Pfleger-Str. 26
D-96103 Hallstadt
Repair service:
Fax: 0951 96555-111
E-Mail: service@stuermer-maschinen.de
Spare parts orders:
Fax: 0951 96555-119
E-Mail: ersatzteile@stuermer-maschinen.de
Please submit any information and experiences you
make during application of the machine as these may
be valuable for product improvements.
1.3 Limitation of liability
All data in this operation manual has been compiled on
the basis of the state-of-the-art, valid standards and
guidelines as well as our many years of expertise and
experience.
The manufacturer shall not be liable for damage in the
following cases:
- Failure to comply with the operation manual,
- Unintended use
- Deployment of untrained staff
- Unauthorized conversions,
- Technical changes,
- Use of unauthorised spare parts
The actual scope of delivery may deviate from the de-
scriptions and illustrations in this document as a result of
special variants, optional extras or recent, technical
modifications.
The obligations defined in the supply contract shall ap-
ply in addition to the general terms and conditions and
the manufacturer's general terms and conditions as well
as the statutory regulations valid at the time of the con-
clusion of the contract.
2 Safety
This section provides an overview of all important safety
packages for personal protection as well as safe and re-
liable operation. The individual sections contain addi-
tional, task-specific safety information.
2.1 Legend of symbols
Safety instructions
Safety instructions in this operation manual have been
highlighted with symbols. Safety instructions are indi-
cated by signal terms that express the degree of risk in-
volved.
WARNING!
This combination of symbol and signal term indi-
cates a directly dangerous situation which may
cause death or serious injury if not averted.
CAUTION!
This combination of symbol and signal term indi-
cates a potentially hazardous situation which may
cause minor or light injuries if it is not averted.

4HKS 320 | Version 1.04
Safety
Tips and recommendations
Observe the safety information in these operating in-
structions to minimise the risk of personal injury as well
as material damage and prevent hazardous situations.
2.2 Operator responsibility
Operators are defined as the persons who operate the
machine for commercial or profit-based purposes or
provide the machine to third parties for use or applica-
tion and bear the legal product responsibility in terms of
the protection of users, staff or third parties during oper-
ation.
Obligations of the operator:
If the machine is used for commercial purposes, opera-
tors are subject to the legal stipulations in terms of occu-
pational safety. For this reason, the safety instructions in
these operating instructions as well as the safety, acci-
dent prevention and environmental protection regula-
tions valid at the installation location must be complied
with. In this process, the following shall apply in particu-
lar:
- Operators shall obtain information about valid oc-
cupational safety regulations and determine addi-
tional hazards as part of a risk assessment which
result from the specific operating conditions at the
machine's installation location. Said risk assess-
ment shall be reflected in operating instructions for
machine operation.
- During the entire machine operating time opera-
tors must check whether the operating instructions
they created meet current standards and adapt
the operating instructions where necessary.
- Operators shall clearly manage and specify the re-
sponsibilities for installation, operation, trouble-
shooting, maintenance and cleaning.
- Operators must make sure that all persons han-
dling the machine have read and understood
these operating instructions. Operators must also
regularly train staff and notify of the hazards.
- Operators shall provide staff with the required pro-
tective equipment and wearing the required pro-
tective equipment shall be mandatory.
Operators shall also be responsible for maintaining the
machine in a technically perfect condition. For this rea-
son, the following shall apply:
- Operators shall make sure that the maintenance
intervals described in these operating instructions
are complied with.
- Operators shall regularly check that the safety
equipment is fully functional and complete.
2.3 Operating staff qualification
The different tasks described in these operating instruc-
tions require different levels of skills in terms of the qual-
ifications of operating staff working with the machine.
Exclusively persons of whom it can be expected that
they reliably complete assigned tasks shall be author-
ised to carry out any tasks. Persons whose reactions
have been impaired shall not be authorized, e.g. drug
users, users under the influence of alcohol or medica-
tion.
These operating instructions specify the following per-
sonal qualifications for the different tasks:
ATTENTION!
This combination of symbol and signal term indi-
cates a potentially dangerous situation which may
cause material damage or harm the environment if it
is not averted.
NOTE!
This combination of symbol and signal term indi-
cates a potentially dangerous situation which may
cause material damage or harm the environment if it
is not averted.
Tips and recommendations
This symbol highlights useful tips and recommenda-
tions as well as information for efficient and reliable
operation.
WARNING!
Risk from inadequately qualified persons!
Inadequately qualified persons are unable to assess
the risks when handling the machine, thus putting
themselves and others at risk of severe injuries.
- All work must be carried out by qualified persons
only.
- Keep inadequately qualified persons and children
away from the work area.

Safety
HKS 320 | Version 1.04 5
Operating staff:
Operating staff has undergone an induction by the oper-
ator about the entrusted tasks and potential hazards re-
sulting from improper behaviour. Tasks which go be-
yond normal operation may only be carried out by the
operator if they are listed in the operation manual and
the operator has made him/herself familiar with them.
Qualified electrician
Due to the electrician's specialised training, know-how,
experience and knowledge of pertinent standards and
regulations the electrician is in a position to work on the
electrical systems, and autonomously identify and avoid
potential hazards.
Specialist staff:
As a result of specialist training, expertise, experience
and skills in terms of the relevant standards and regula-
tions, specialist staff is able to complete the tasks they
are entrusted with and independently identify hazards
and avert risks.
Manufacturer:
Certain work must be carried out by manufacturer spe-
cialist staff only. Other staff is not permitted to carry out
this work. Contact our customer service to have the work
carried out.
2.4 Personal protective equipment
Personal protective equipment is intended to protect the
health and safety of persons at work. Staff must wear the
personal protective equipment indicated in individual
sections of these operating instructions when carrying
out the different tasks on the device.
The personal protective equipment is described in the
following section:
2.5 General safety instructions for power tools
Keep all safety notes and instructions for future reference.
1 Workplace safety
a) Keep your work area clean and well lit. Disorder and
unlit work areas can lead to accidents.
b) Do not work with the power tool in a potentially explo-
sive environment containing flammable liquids, ga-
ses or dust. Power tools generate sparks that can
ignite the dust or vapours.
c) Keep children and other persons away when using
the power tool. If distracted, you may lose control of
the power tool.
2 Electrical safety
a) The plug of the power tool must fit into the socket. The
plug must not be altered in any way. Do not use ad-
apter plugs together with earthed power tools.
Unchanged plugs and suitable sockets reduce the
risk of electric shock.
b) Avoid physical contact with grounded surfaces such
as pipes, heaters, cookers and refrigerators. There is
an increased risk of electric shock if your body is
earthed.
c) Keep power tools away from rain or moisture. Water
ingress into a power tool increases the risk of electric
shock.
Eye protection
Protective glasses protect the eyes against pro-
jected parts and splashes of liquid.
Hearing protection
Hearing protection protects the ears against hear-
ing damage caused by noise. .
Respiratory protection
Respiratory protection serves to protect the respira-
tory tract and lungs against absorbing dust parti-
cles.
Protective gloves
Protective gloves protect the hands from compo-
nents with sharp objects as well as friction, abrasion,
and deep-cut injuries.
Safety shoes
Safety shoes protect feet from pinching, falling parts
and slipping on slippery surfaces.
Protective clothing
Protective work clothing means tight-fitting clothing
with low tear resistance.
WARNING!
Read all safety instructions, instructions, illustrations
and technical data provided with this power tool.
Failure to comply with the following instructions may
result in electric shock, fire and/or serious injury.

6HKS 320 | Version 1.04
Safety
d) Do not misuse the connecting cable to carry or hang
up the power tool or to remove the plug from the soc-
ket. Keep the power cord away from heat, oil, sharp
edges or moving parts. Damaged or tangled connec-
ting cables increase the risk of electric shock.
e) If you use a power tool outdoors, only use extension
cords that are suitable for outdoor use. Using an ex-
tension cord suitable for outdoor use reduces the risk
of electric shock.
f) If operation of the power tool in a humid environment
cannot be avoided, use a sensor current circuit brea-
ker. The use of an earth leakage circuit breaker re-
duces the risk of electric shock.
3 Safety of persons
a) Be alert, pay attention to what you are doing and use
common sense when using a power tool. Do not use
a power tool if you are tired or under the influence of
drugs, alcohol or medication. A moment of careles-
sness while using a power tool can cause serious in-
jury.
b) Wear personal protective equipment and always
wear safety goggles. Wearing personal protective
equipment, such as a dust mask, non-slip safety
shoes, safety helmet or hearing protection, depen-
ding on the type and use of the power tool, reduces
the risk of injury.
c) Avoid unintentional commissioning. Make sure that
the power tool is switched off before connecting it to
the power supply and/or battery, picking it up or car-
rying it. If you have your finger on the switch when
carrying the power tool or connect the power tool to
the power supply while it is switched on, this may
cause accidents.
d) Remove adjusting tools or spanners before turning on
the power tool. A tool or spanner that is in a rotating
part of the power tool may cause injury.
e) Avoid abnormal posture. Ensure a secure stand and
keep your balance at all times. This will help you to
control the power tool in unexpected situations.
f) Wear suitable clothing. Do not wear loose clothing or
jewellery. Keep hair and clothing away from moving
parts. Loose clothing, jewellery or long hair can be
caught by moving parts.
g) If dust extraction and collection devices can be fitted,
they must be connected and used correctly. The use
of a dust extraction system can reduce dust hazards.
h) Do not lull yourself into a false sense of security and
do not ignore the safety rules for power tools, even if
you are familiar with the power tool after many uses.
Careless action can lead to serious injury within a
fraction of a second.
4 Use and treatment of the power tool
a) Do not overload the power tool. Use the power tool in-
tended for the job. With the right power tool you will
work better and safer in the specified power range.
b) Do not use a power tool whose switch is defective. A
power tool that can no longer be switched on or off is
dangerous and must be repaired.
c) Unplug the power cord and/or remove a detachable
battery pack before making adjustments to the ma-
chine, changing insert tool parts or putting away the
power tool. This precaution prevents the power tool
from starting accidentally.
d) Keep unused power tools out of the reach of children.
Do not allow anyone to use the power tool who is not
familiar with it or who has not read these instructions.
Power tools are dangerous if they are used by inex-
perienced persons.
e) Carefully maintain power tools and insert tools. Check
that moving parts function properly and do not jam,
that parts are not broken or damaged in such a way
that the function of the power tool is impaired. Have
damaged parts repaired before using the power tool.
Many accidents are caused by poorly maintained po-
wer tools.
f) Keep cutting tools sharp and clean. Carefully mainta-
ined cutting tools with sharp cutting edges are less li-
kely to jam and are easier to guide.
g) Use power tool, insert tool, insert tool, etc. according
to these instructions. Take into account the working
conditions and the task to be performed. The use of
power tools for applications other than those inten-
ded can lead to dangerous situations.
h) Keep handles and grip surfaces dry, clean and free
of oil and grease. Slippery handles and grip surfaces
do not allow safe operation and control of the power
tool in unforeseen situations.
5 Service
a) Have your power tool repaired only by qualified per-
sonnel and only with original spare parts. This will
ensure that the safety of the power tool is maintained.

Safety
HKS 320 | Version 1.04 7
2.5.1 General safety instructions
The following must be observed:
- Use the safety devices and fasten them securely. Ne-
ver work without guards and keep them in working or-
der.
- Always keep the machine and its working environment
clean. Ensure adequate lighting.
- Always secure your workpiece when working. Ensure
that there is an adequate supporting surface.
- The design of the circular metal saw must not be chan-
ged and it must not be used for purposes other than
the operations foreseen by the manufacturer.
- Never work under the influence of concentration disor-
ders, fatigue, drugs, alcohol or medication.
- Keep children and persons not familiar with the circular
metal saw away from their working environment.
- Do not pull on the power cord to remove the plug from
the socket. Protect the cable from heat, oil and sharp
edges.
- Immediately rectify any faults that impair safety.
- Protect the metal circular saw from moisture (danger of
short circuit).
- Before each use of the metal circular saw, make sure
that no parts are damaged. Damaged parts must be
replaced immediately to avoid sources of danger.
- Do not overload the metal circular saw! You will work
better and safer in the specified performance range.
Use the correct saw blade! Make sure that the saw
blade is not damaged.
- Only use original spare parts and accessories to avoid
possible dangers and risks of accidents..
2.6 Specific safety regulations during the sa-
wing process
Keep hands away from the cutting area and the saw
blade. Hold your second arm by the auxiliary handle or
the motor housing. If both hands hold the saw, they can-
not be cut by the saw blade.
Never reach under the workpiece. The cover offers no
protection under the workpiece.
Adjust the cutting depth to the thickness of the work-
piece. Less than one full tooth of the saw blade should
be visible under the workpiece.
Never hold the workpiece in your hands or above your
leg when cutting. Fix the workpiece to a stable platform.
It is important to support the workpiece properly to mini-
mise the strain on the body and prevent loss of control..
Hold the unit in the insulated places when performing an
application where the saw blade may come into contact
with hidden wires or its own cable.
By contact with a "live" wire, exposed metal parts of the
tool become "live" and the operator receives an electric
shock.
Always use a rip fence or straight edge guide when rip-
ping. This improves cutting accuracy and reduces the li-
kelihood of blade jamming.
Always use saw blades with the correct size and shape
(diamond versus round) of the mandrel holes. Saw bla-
des that do not match the mounting parts of the saw run
off-centre and lead to loss of control.
Never use damaged or incorrect mandrel flanges or
screws. The mandrel flanges and bolts have been spe-
cially designed for your saw to ensure optimum perfor-
mance and operational reliability.
Never use damaged or incorrect saw blade washers or
screws. The blade washers and bolts have been speci-
ally designed for your saw to ensure optimum perfor-
mance and reliability.
2.7 Safety data sheets
You can obtain safety data sheets for dangerous goods
from your specialist dealer or by calling +49 (0) 951 /
96555-0
Specialist dealers can find safety data sheets in the
download area of the partner portal.
8HKS 320 | Version 1.04
Intended use
2.8 Safety labels on the device
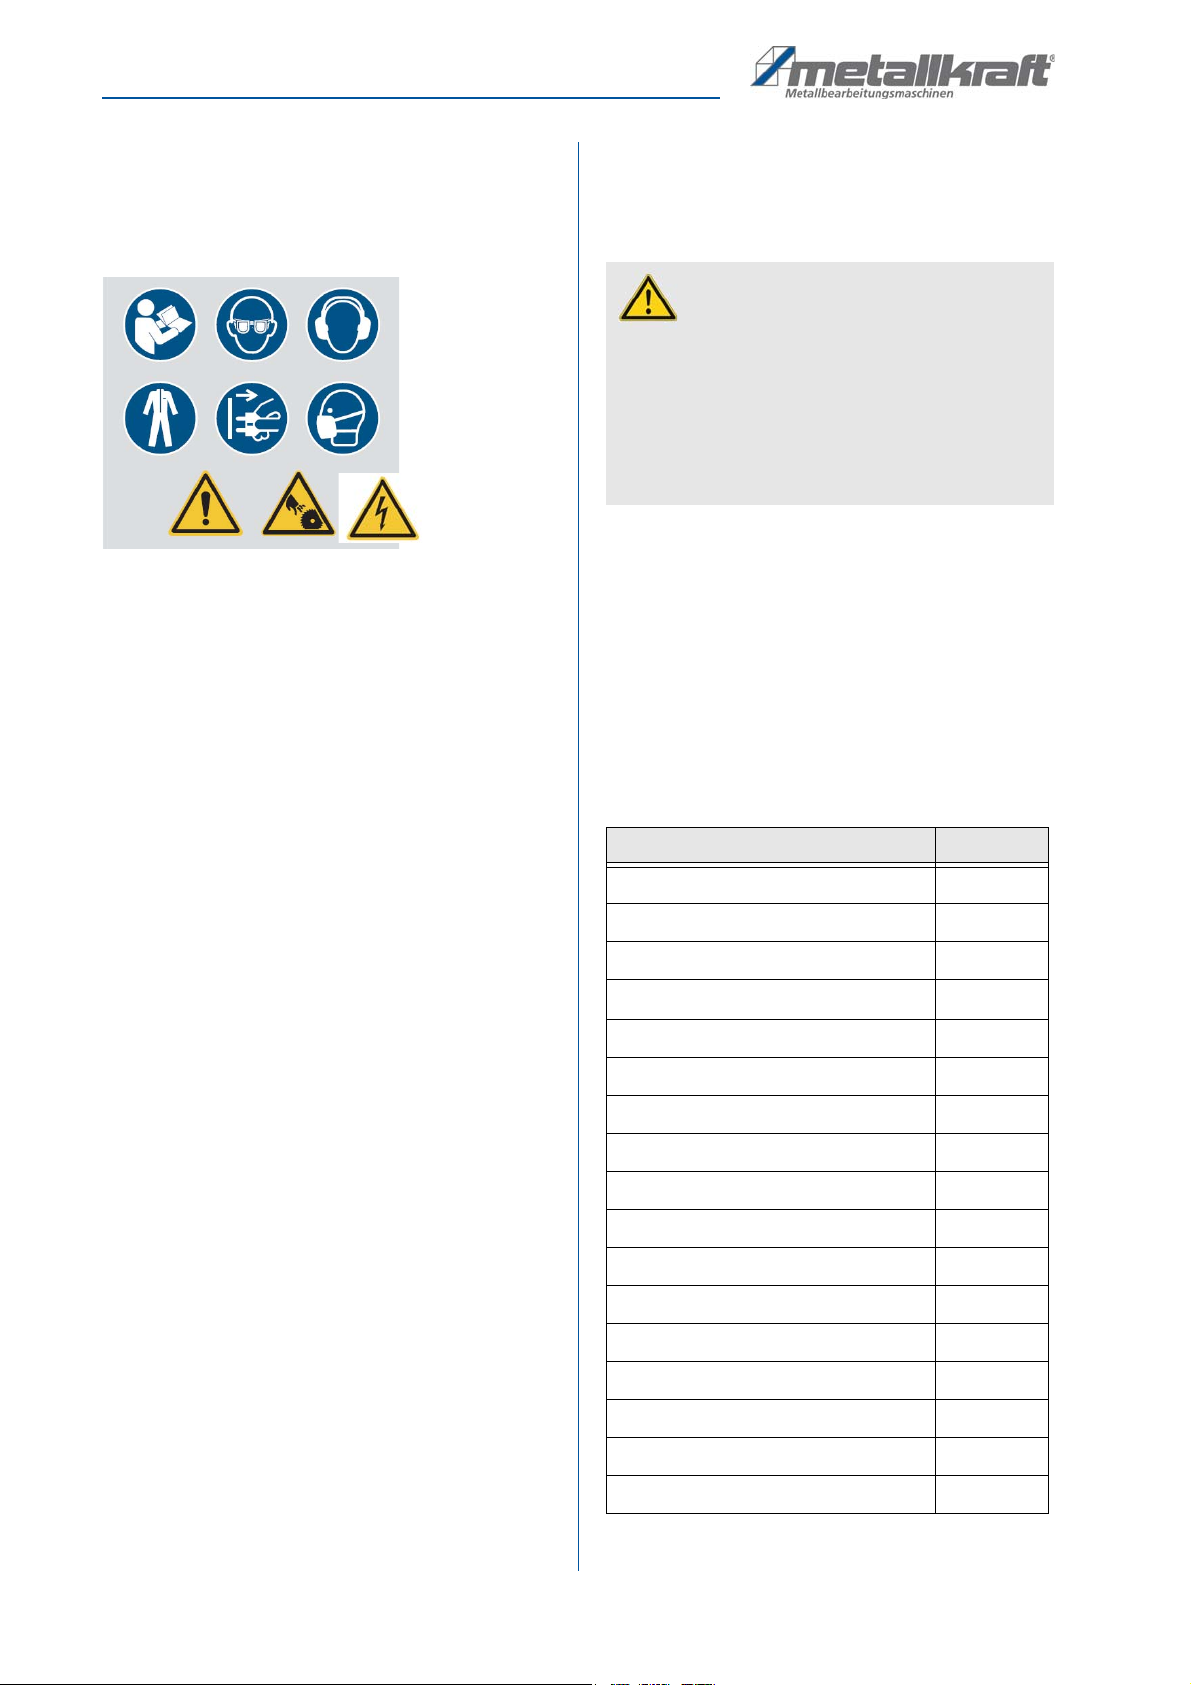
Safety markings and instructions are attached to the cir-
cular metal saw (Fig.1), which must be observed and
followed.
Fig. 1: Safety labels
Damaged or missing safety symbols on the machine
can lead to incorrect handling with personal injury and
damage to property. The safety symbols attached to the
machine must not be removed. Damaged safety sym-
bols must be replaced immediately.
From the time when the signs are not immediately re-
cognisable and understandable at first sight, the ma-
chine must be taken out of operation until the new signs
are attached.
3 Intended use
This saw is designed exclusively for sawing metal and
aluminium. This machine must not be used for cutting
other materials. Do not use this saw for cutting wood.
The metal circular hand saw may only be operated by
persons who are trained and instructed in the use and
maintenance of these machines.
The compact dimensions of the HKS 320 ensure easy
handling. It is suitable for both private and commercial
use. This saw is not intended for working with wood or
mineral materials.
The machine must not be operated in explosive environ-
ments.
Proper use also includes compliance with all the infor-
mation in this manual. Any use beyond the intended use
or any other use is considered as misuse.
Stürmer Maschinen GmbH accepts no liability for any
design or technical modifications to the machine.
Claims of any kind for damage due to improper use are
excluded.
3.1 Improper use
The metal circular saw must not be used for sawing
flammable materials (e.g. magnesium, wood or similar).
3.2 Residual risks
Even if all safety regulations are observed and the ma-
chine is used in accordance with the instructions, there
are still residual risks, which are listed below:
- There is a risk of injury to the upper limbs (e.g. hands,
fingers).
- Danger from falling or flinging workpieces or chips.
4 Technical Data
1
2
WARNING!
Danger in case of misuse!
Misuse of the circular metal saw can lead to dange-
rous situations.
- Only operate the circular metal saw within the po-
wer range specified in the technical data.
- Never bypass or disable the safety devices.
- Only operate the metal circular saw in a technically
perfect condition.
General data HKS 320
Length (product) approx. [mm] 500
Width/depth (product) approx. [mm] 342
Height (product) approx. [mm] 355
Net weight approx. [kg]
8,4
Supply voltage [V] 230
Phase(s) [Ph] 1
Current type AC
Mains frequency [Hz] 50
Drive motor output [kW] 1,8
Saw blade speed(s) [1/min] 1700
Saw blade diameter [mm] 320
Saw blade bore [mm] 25,4
Saw blade thickness [mm] 2
Sound pressure level [dB(A)] 99
Sound power level [dB(A)] 110
Cutting Depth [mm] 128
Cutting depth on the guide rail [mm] 121
Transport, packaging, storage
HKS 320 | Version 1.04 9
4.1 Type plate
Fig. 2: Type plate HKS 320
5 Transport, packaging, storage
5.1 Delivery and transport
Delivery
Check the metal-cutting circular saw for visible transport
damage upon delivery. In case of visible damage to the
metal-cutting circular saw, immediately notify the carrier
or your retailer.
Transport
Improper transport of individual devices, unsecured de-
vices stacked on top of each other or next to each other
in packed or already unpacked condition is accident-
prone and can cause damage or malfunctions for which
we do not grant any liability or guarantee.
Transport the scope of delivery secured against shifting
or tilting with a sufficiently dimensioned industrial truck
to the installation site.
General risks during internal transport
Devices may only be transported by authorized and
qualified persons. Act responsibly during transport and
always consider the consequences. Refrain from daring
and risky actions.
Gradients and descents (e.g. driveways, ramps and the
like) are particularly dangerous. If such passages are
unavoidable, special caution is required.
Before starting the transport check the transport route
for possible danger points, unevenness and disturban-
ces as well as for sufficient strength and load capacity.
Danger points, unevenness and disturbance points
must be inspected before transport. The removal of
danger spots, disturbances and unevenness at the time
of transport by other employees leads to considerable
dangers.
Careful planning of internal transport is therefore essen-
tial.
5.2 Packaging
All packaging materials and packing aids of the metal-
cutting circular saw are suitable for recycling and must
always be disposed of using material-based recycling
systems. Packaging materials made of cardboard must
be shredded and recycled as waste paper. The foils are
made of polyethylene (PE), padding is made of polysty-
rene (PS). Dispose of these substances at a recycling
centre or hand them over to a qualified waste disposal
company.
5.3 Storage
Store the metal circular saw thoroughly cleaned in a dry,
clean and frost-free environment. It must not be placed
in the same room with chemicals. During storage, the
metal circular saw should be covered with a plastic foil.
All bare metal surfaces must be provided with a suitable
rust protection.
CAUTION!
Injuries caused by parts falling over or off a forklift,
pallet truck or transport vehicle.
Only use means of transport that can carry the total
weight and are suitable for it.
CAUTION: DANGER OF TIPPING!
The device may be lifted unsecured by a maximum
of 2cm.
Employees must be outside the danger zone, the
reach of loads. Warn employees and, if necessary,
advise employees of the hazard.
NOTE!
Protect the metal circular saw from moisture.

10 HKS 320 | Version 1.04
Description of the device
6 Description of the device
6.1 Presentation
Illustrations in these operating instructions are for basic un-
derstanding and may differ from the actual design.
Fig. 3: Description of the HKS 320
1 Load indicator lamp
2 Release button of the locking device
3 Vacuum cleaner connection
4 Main handle
5 Power cable
6 Release switch
7 Depth locking lever
8 Depth scale
9 Base plate
10 Motor unit
11 Clip switch
12 Dust connection cap
13 Vacuum cleaner connection
14 Cover of the dust chamber
15 Lower saw blade protection
16 Upper saw blade guard
17 Guide play adjusters
18 Mandrel locking lever
19 Side handle
20 Kicker lever
21 L-hexagon key stored in the main handle
1
2
3
4
21
5
6
7
8
9
10
11
12
13
14
15
16
17
18
19
20

Settings and commissioning
HKS 320 | Version 1.04 11
6.2 Scope of delivery
- Metal circular hand saw HKS 230
- Allen key
- Operating instructions
6.3 Accessories
- Guide rail 1400 mm
Item number: 3850030
- Saw blade for stainless steel Ø 320 x 2,2 x 25,4 mm Z84
Item number: 3853203
- Saw blade for steel Ø 320 x 2,2 x 25,4 mm Z80
Item number: 3853204
6.4 Saw blade selection
When sawing with a metal circular saw, make sure that
you choose the right saw blade or the correct tooth pitch
of the saw blade.
If the tooth pitch is too small and the cutting length too
long, the cut material cannot be absorbed by the
spaces between the teeth.
If the tooth pitch is too large, the saw tooth will start to
chop; this can cause teeth to break out.
7 Settings and commissioning
Causes of a setback and related warnings
A kickback is a sudden reaction to a jammed, jammed
or misaligned saw blade. It causes an uncontrolled lif-
ting of the saw out of the workpiece towards the opera-
tor.
If the saw blade is jammed or tied up by closing the kerf,
the saw blade stops and the motor reaction quickly
drives the unit back towards the operator.
If the saw blade is twisted or misaligned during cutting,
the teeth on the rear edge of the blade can dig into the
top of the wood, causing the blade to climb out of the
kerf and jump back towards the operator.
The kickback is a result of misuse of the saw or incorrect condi-
tions. This can be avoided by taking precautions.
a) Hold the saw with both hands and position your arms
so that they can withstand kickback forces. Position
your body on both sides of the saw blade, but not in
line with the blade. A kickback can cause the saw to
jump backwards. However, the kick-back forces can
be controlled by the operator if the appropriate
precautions are taken.
b) If the saw blade is jammed or if a cut is interrupted for
any reason, release the switch and hold the saw mo-
tionless in the material until the saw blade comes to a
complete stop.
c) Never attempt to remove the saw from the workpiece
or pull the saw backwards while the blade is moving.
Doing so may result in kickback.
d) When restarting a saw in the workpiece, centre the
saw blade in the kerf and check that the teeth do not
interfere with the material. If the saw blade is jam-
med, it may run up or kick back from the workpiece
when the saw is restarted.
e) Support large panels to minimise the risk of the blade
jamming and kickback. Large panels tend to sag un-
der their own weight. Supports must be placed on
both sides under the plate near the cut line and near
the edge of the plate.
f) Do not use blunt or damaged saw blades. Dull saw
blades create a narrow kerf that causes excessive
friction, blade jamming and kickback.
g) The locking levers for blade depth and bevel must be
set firmly and securely before cutting. If the saw
blade setting shifts during cutting, this can cause
jamming and kickback.
h) Be especially careful when blindly sawing into exi-
sting walls or other areas. The protruding blade may
cut objects that may cause kickback.
7.1 Function of the lower protective cover
a) Before each use, check that the lower guard is pro-
perly closed. Do not operate the saw if the lower guard
does not move freely and close immediately. Never
clamp or tie the lower guard in the open position. If the
saw is accidentally dropped, the bottom guard may
be bent. Lift the lower guard with the pull-back handle
and ensure that it moves freely and does not touch the
blade or other parts at any angle or depth of cut.
b) Check the function of the lower protection spring. If the
protection and the spring do not function properly, they
must be serviced before use. The lower protection may
be sluggish due to damaged parts, rubbery deposits
or accumulation of dirt.
DANGER!
Verwenden Sie nur Sägeblätter, deren maximal
zulässige Drehzahl der Maximaldrehzahl der Säge
entspricht oder darüber liegt.
12 HKS 320 | Version 1.04
Settings and commissioning
c) The lower guard may only be retracted manually for
special cuts such as "plunge cuts" and "compound
cuts". Raise the lower guard by pulling back the
handle. As soon as the blade enters the material, the
lower guard must be released. For all other sawing
applications the lower guard should work automati-
cally.
d) Always make sure that the lower guard covers the
saw blade before placing the saw on the workbench
or floor. An unprotected rotating saw blade causes
the saw to run backwards and cut everything in its
path. Note that it takes a while for the saw blade to
stop after the switch is released.
7.2 Additional safety rules
- Tighten the saw blade holding screw and all
clamps before operation.
- Secure the workpiece properly. The workpiece
should be straight and firmly clamped to avoid
possible movement and jamming.
- Allow the saw blade to come to a complete stop
before removing or securing the workpiece or
changing the workpiece angle.
- Check the inner surfaces of the mandrel flanges
and the sides of the saw blade for foreign objects.
- Check the saw blade for cracks or other damage
before operation. Replace the cracked or dama-
ged saw blade immediately.
- Never start the tool with the workpiece against the
saw blade.
- Let the motor reach full speed before cutting.
- Important: When the cut is complete, release the
switch and wait until the rotating saw blade has
come to a complete stop before stopping the saw.
- Never operate the tool in an area with combustible
solids, liquids or gases. Sparks from the commuta-
tor / carbon brushes can cause a fire or explosion.
- There are certain applications for which this tool is
designed. The manufacturer strongly recom-
mends NOT to modify and/or use this tool for ap-
plications other than those for which it was desi-
gned. If you have any questions about the
application, DO NOT use the tool, but contact the
manufacturer.
- When cutting plastics, avoid melting the plastic by
using a saw blade specially designed for cutting
plastics.
- Do not overheat the tips of the saw blade. The use
of excessive force will not speed up the cutting
process. Let the tool determine the best feed
speed.
7.3 Electrical connection
The mains voltage must correspond to the voltage indi-
cated on the tool's nameplate.
Under no circumstances should the tool be used if the
power supply cable is damaged. A damaged cable
must be replaced immediately by an authorised service
agent. Do not attempt to repair the damaged cable
yourself. Using damaged power cords may result in
electric shock.
Extension cable
If an extension cable is required, it must have a suffi-
cient cross-section to avoid excessive voltage drop or
overheating. An excessive voltage drop will reduce the
power and may cause the motor to fail. Use only U.L.
and CSA listed extension cords. Never use two exten-
sion cords together. Use a long cable instead.
Saw blade
Only use saw blades with a diameter according to the
markings on the tool's nameplate: Only use saw blades
with a blade set (cutting width) of 1.8 mm to 3.6 mm and
a blade core thickness of at least 1.5 mm to a maximum
of 3.0 mm.the saw blades must be suitable for speeds
of up to 1700 rpm or faster. Do not use a grinding wheel
on this machine.
7.4 Installation of the saw blade
Wear breathing protection!
Wear hearing protection!
WARNING
Disconnect the machine from the electrical mains
before installing or removing the saw blade.
CAUTION
Only use saw blades that are permissible in terms of
dimensions and maximum speed. For your own
safety, only use original metal power saw blades.
CAUTION
Avoid injuries by touching the saw teeth.

Settings and commissioning
HKS 320 | Version 1.04 13
Step 1: Remove all accumulated residue in the guards
and around the assembly mandrel.
Step 2: Clean the inner flange of the mandrel (Fig.4)
Align the flange so that the correct side faces
the saw blade and place the new saw blade
on the shaft. Make sure that the teeth are poin-
ting forward.
Step 3: Place the outer mandrel flange on the mandrel
with the correct side towards the saw blade.
Step 4:Replace the saw blade holding screw and
tighten it hand-tight by turning it clockwise.
Step 5: Push the mandrel locking lever in and turn the
mandrel by hand until the lock engages the
mandrel. Tighten the saw blade holding
screw. Turn the arbor with the spanner to en-
sure that the arbor lock has loosened and re-
lease the arbor lock.
Fig. 4: Mounting the saw blade
7.5 Removing the saw blade
Removal is in the reverse order to the installation of the
saw blade. However, special care must be taken to en-
sure that no one is injured by the saw blade.
Step 1: Push the saw blade locking lever in and turn the
shaft with the spanner on the holding bolt until
the lock engages the shaft. Loosen the saw
blade holding bolt with the spanner supplied
and release the mandrel lock.
Step 2: Loosen the saw blade holding screw completely
and lift it and the outer flange away. Make sure
that the saw blade does not fall down.
Step 3: Carefully turn the lower blade guard out of the
way. The saw blade can now be removed.
7.6 Setting the cutting depth
Set the required cutting depth. A depth scale is availa-
ble.
Step 1: Release the depth adjustment locking lever.
Step 2: Set the value to the required depth.
Protective gloves
Wear protective gloves for all work connected with
the saw blade.
NOTE!
Use saw blades with a suitable arbor hole. The saw
blade must be designed for the maximum nominal
speed of the machine or higher. Avoid contact with
the blade teeth to prevent injury.
NOTE!
Make sure that the saw blade is centred (it is possi-
ble to tighten the saw blade at an angle between the
flanges).
WARNING
Disconnect the machine from the electrical mains
before adjusting the cutting depth.

14 HKS 320 | Version 1.04
Settings and commissioning
Step 3: Tighten the lever (Fig.5)
Fig. 5: Setting the cutting depth
7.7 Using the sighting notch
To facilitate free-hand cutting, there is a sight notch on
the front of the base (Fig.6). Align the cutting line on the
workpiece with the visor notch. In addition, the saw
blade is visible through small gaps in the cover to per-
fectly align the saw blade to the intended cutting line.
Fig. 6: Sighting notch
7.8 Application of the saw blade protection de-
vice
To test the function of the lower blade guard, rotate the
guard the entire stroke. Make sure that the guard can
fully return to the closed position under its own spring
tension. If the guard is found to be sluggish or stuck in
any position, the problem must be corrected before the
unit is used again. It usually only needs to be cleaned.
To clean, first remove the saw blade and then clean the
swivel joint of the guard all around. All other repairs
should be carried out by an authorized service techni-
cian.
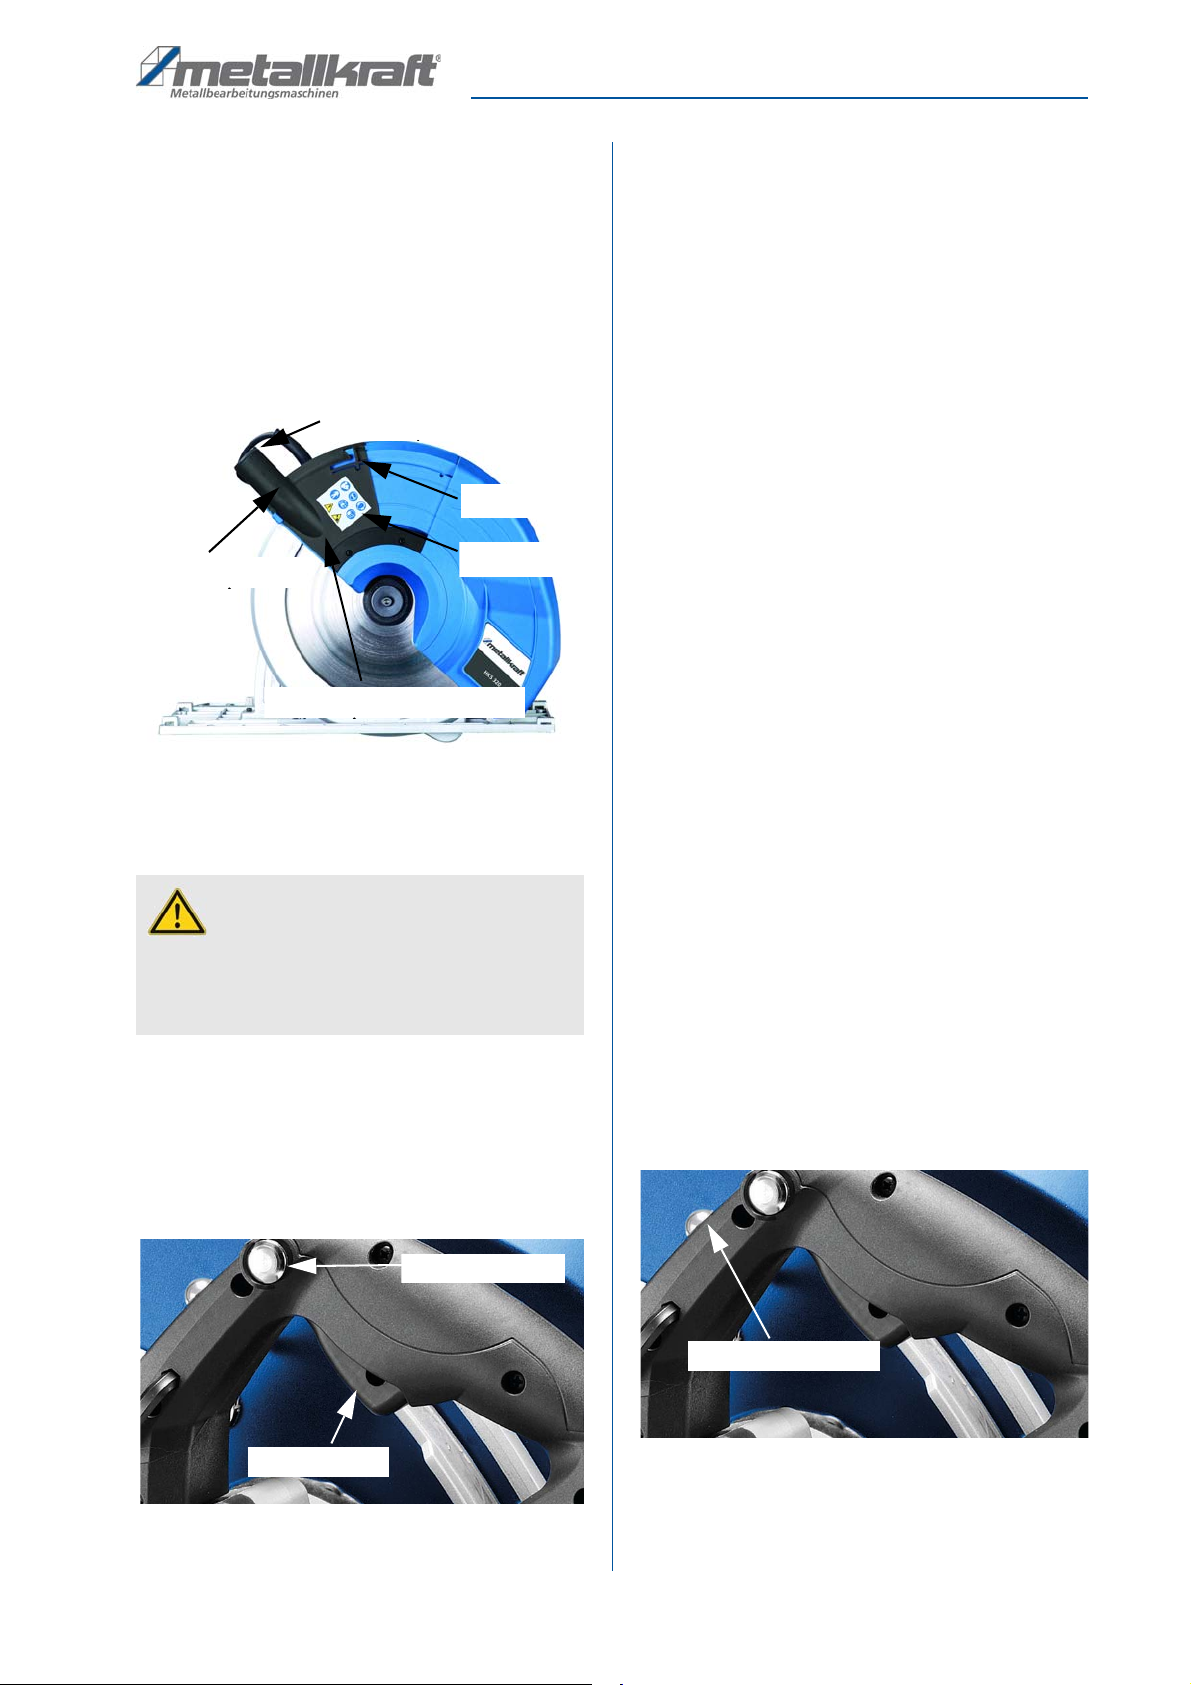
7.9 Kicker lever
When cutting materials with a soft core, such as a com-
posite panel, the lower saw blade guard often does not
open automatically. In this case, the kicker lever (Fig.7)
can be used so that the lower saw blade guard (Fig.8)
can open just enough. Simply press the lever with the
thumb of your left hand without taking your hand off the
side handle. Let the protection work automatically as
usual after starting.
Fig. 7: Lever
Fig. 8: Lower blade guard
7.10 Dust collection system
A suction device should always be used. Connect a
suitable hose and an extraction system to the dust ex-
traction port of the machine.
If no suction system is available, close the cap of the
dust port (Fig.9). There is a dust chamber in which a
small amount of dust or chips can accumulate. The dust
WARNING
The locking lever for the depth adjustment must be
firm and secure before cutting. If the saw blade
adjustment shifts during cutting, this can cause jam-
ming and kickback.
Locking lever for the
depth setting
Depth scale
Sighting notch
Kicker lever
Lower blade guard
Settings and commissioning
HKS 320 | Version 1.04 15
chamber is built into the upper saw blade guard. Clean
the dust chamber frequently to avoid overfilling.
Step 1: To clean the dust chamber, push the clip
upwards.
Step 2: Turn the dust chamber cover to the open posi-
tion and release the dust.
Step 3: When you are finished, put the cover back in the
closed position.
Fig. 9: Dust chamber
7.11 Switch the tool on and off
Step 1: Hold the device with both hands. Hold the de-
vice by the main handle and the side handle.
Switch on
Step 2: Press the button (Fig.10) to unlock.
Step 3: Press the release button (Fig.10).
Fig. 10: Trigger switch
Switch off
Step 1: Release the trigger switch.
Step 2: Wait until the saw blade stops rotating.
Step 3: Make sure that no body parts come into contact
with the saw blade while it is still rotating!
Step 4: Always have the lower saw blade guard closed
as soon as you remove the device from the
workpiece.
In this way the saw blade is again completely covered
by the outer protective cover.
7.12 Electronic overload protection
and load indicator light
This unit is equipped with a load indicator light that
shows the operator the load conditions, and whenever
the switch is turned on and the load conditions are nor-
mal, the indicator light is solid green (Fig. 11).
When the load approaches the overload conditions, the
indicator light will flash red.
If the operator continues to operate the machine under
overload conditions for an extended period of time, the
electronic overload protection unit will shut down the
machine.
The higher the overload, the faster the machine swit-
ches off.
In this case, always remove the machine from the work-
piece and let the machine run without load for a few mi-
nutes to allow the motor to cool down before continuing.
This prevents the motor from burning out.
Fig. 11: Load indicator light
WARNING
Make sure that the voltage of the circuit corresponds
to the voltage indicated on the machine's name-
plate and that the switch is set to "OFF" before
connecting the tool to the circuit.
Dust chamber
Clip
Dust port cap
Dust extractor port
Dust chamber cover
Lock release button
Trigger switch
Load indicator light

16 HKS 320 | Version 1.04
Settings and commissioning
7.13 Using the device
Effective control of this powerful saw requires two-hand
operation for maximum protection.
Do not use this tool continuously for 30 minutes. Pro-
perly support the workpiece and hold the saw BOTH
HANDS to avoid loss of control that could result in injury.
Always hold the side handle with your left hand and the
rear handle with your right hand to properly support the
saw by hand. Protect your eyes from injury with safety
glasses. Do not use cutting fluids or lubricants for the
saw blade.
Sawing
The unit must reach full speed before cutting starts and
should only be switched off after cutting is finished.
Operate the saw only away from you (push the circular
saw forward) and never in your direction (do not pull the
circular saw backward).
If you saw in your direction, there is a risk that the circu-
lar saw will accelerate out of the cutting groove (kick-
back) and cause serious injury.
The lower saw blade guard should open automatically
when it hits the edge of the workpiece. If it does not
open automatically, help it at the beginning of the cut by
pressing the kicker lever with the thumb of the left hand.
This will open the lower saw blade guard by about 20
degrees.
Saw cut:
Step 1: Make sure that the cutting depth is set as desi-
red.
Step 2: Place the front part of the sawing plate on the
workpiece.
Step 3: Switch on the machine.
Step 4: Push the device in cutting direction. Make sure
that the sawing plate remains firmly on the
workpiece.
Step 5: Switch off the device and let the lower blade
guard close completely after the cutting pro-
cess is finished.
Immersion cut
Step 1: Set the depth stop to the maximum cutting depth
and manually open the lower saw blade guard
until the saw blade touches the workpiece.
Step 2: When the device dips, the circular saw must be
held very securely, otherwise there is a risk of
kickback!
Step 3: Switch on the machine, let it reach full speed
and dip the saw into the workpiece.
Step 4: As soon as the saw is completely cut, push the
machine forward.
Step 5: When the cutting is complete, turn the machine
off and let it stop before removing it from the
workpiece.
7.14 Clamping the workpiece
Secure the workpiece properly. The workpiece should
be straight and firmly clamped to avoid possible move-
ment and jamming when the cut is almost complete.
Provide adequate support for long or wide workpieces.
Never position large or long workpieces so that they
bend in the middle or on the cutting surface, as this can
cause the saw blade to jam and bounce back. Instead,
support the workpiece with several wooden slats near
the cutting surface. Make sure that the saw blade has
come to a complete stop before removing, securing or
changing the workpiece angle.
Do not force the cut. Let the saw cut at the speed all-
owed by the type of cut and the workpiece.
7.15 Guide rail
Guide rails (Fig.12) help to achieve precise straight cuts
and increase safety (This is an optional accessory). The
guide rail can be secured with C-clamps on request.
There are 2 guide play adjusters for optimum fit and sa-
fety. Adjust them evenly so that there is no looseness
and the base still slides freely.
Fig. 12: Guide rail
DANGER!
Keep the cable away from the cutting area so that it
does not get caught in the workpiece.
Guide clearance adjustor

Care, maintenance and repair
HKS 320 | Version 1.04 17
Visor / shatter protection:
The visor / shatter protection strip must be cut over its
entire length before first use. The rubber strip must be
backed up when first cutting from a workpiece.
If no backing workpiece is used for the first cut, the rub-
ber strip can be torn or damaged by the saw blade.
Once it is cut, it perfectly matches the cut edge and pro-
tects the material from splinters. Once the size is deter-
mined, the operator can see at a glance exactly where
the cutting line is located. This saves a lot of time and ef-
fort for precise cuts.
8 Care, maintenance and repair
8.1 Cleaning of the device
.
The metal circular saw should always be cleaned after
each use.
Blow out all air channels with dry compressed air at re-
gular intervals. All plastic parts should be cleaned with a
soft, damp cloth.
Wear protective goggles when using compressed air.
Clean all parts of the lower saw blade protection mecha-
nism to ensure smooth operation.
Cleaning and maintenance table
Treat bare metallic work surfaces with anti-rust spray.
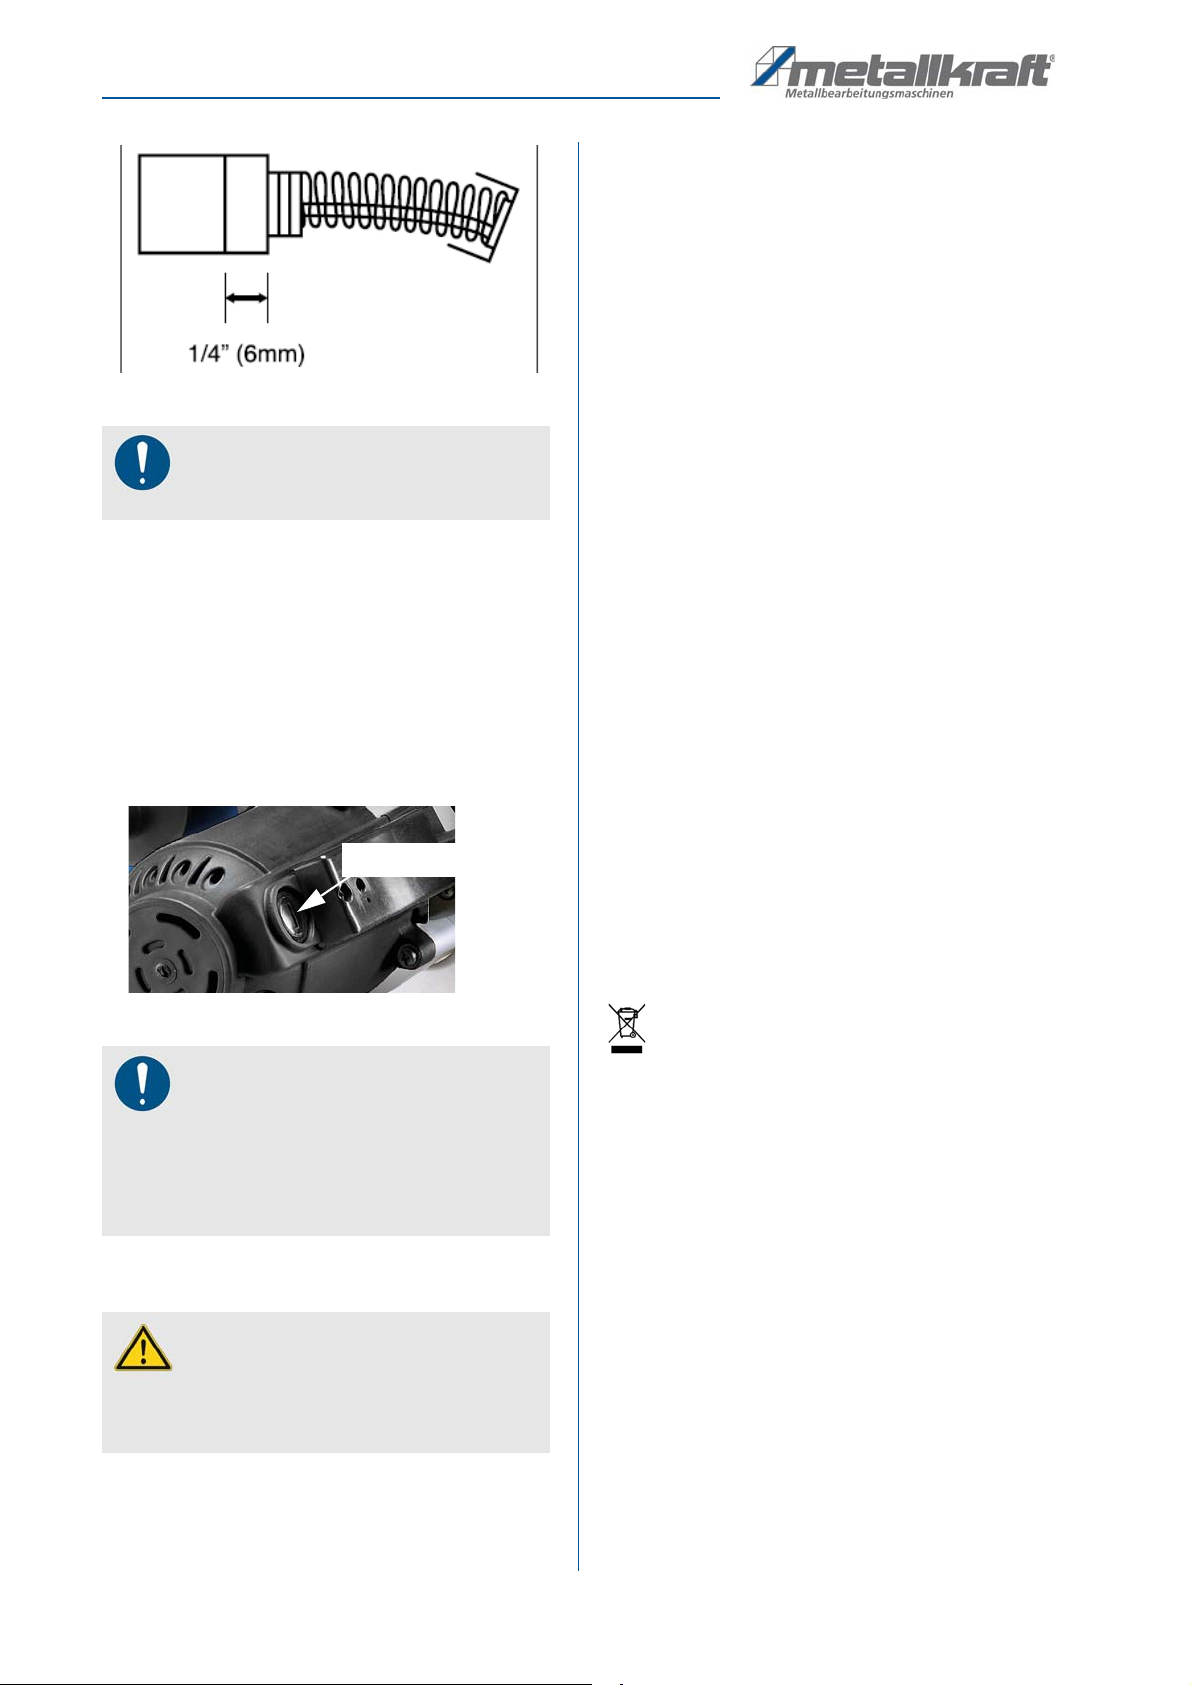
8.2 Changing the carbon brushes
The carbon brushes are subject to normal wear and
must be replaced when they reach the end of their ser-
vice life (Fig.13).
DANGER
Before each use of the circular saw, the space
inside the saw blade guard must be cleared of chips
and deposits.
DANGER!
Before starting cleaning and maintenance work on
the machine, pull the mains plug.
Tips and recommendations
To ensure that the metal circular saw is always in
good operating condition, regular care and main-
tenance work must be carried out.
WARNING!
Danger with insufficient qualification of
persons!
Insufficiently qualified persons cannot assess the
risks involved in repair work on the device and
expose themselves and others to the risk of serious
injury.
Have all maintenance work performed only by quali-
fied personnel.
DANGER!
Danger to life through electric shock!
Contact with live components may cause danger to
life.
- Always disconnect the mains plug before starting
cleaning and maintenance work.
- Connection and repair of the electrical equipment
may only be carried out by a qualified electrician.
NOTE!
After care, maintenance and repair work, check
whether all coverings and protective devices have
been properly reinstalled on the machine.
Damaged safety devices and machine parts must be
repaired or replaced by the customer service.
DANGER!
- Never use solvents to clean plastic parts or painted
surfaces. Dissolving of the surface and resulting
consequential damage can occur.
Maintenance
interval in
operating hours
Maintenance point
every day before
use
Remove chips and clean ma-
chine
every day before
use
Check saw blade, replace if
necessary.
ATTENTION!
Never remove the chips or grinding dust with your
bare hand. There is a risk of cuts from sharp-edged
chips.
18 HKS 320 | Version 1.04
Disposal, recycling of old equipment
Fig. 13: Wear carbon brushes
Proceed as follows:
Step 1: Remove the brush caps (Fig.14) and pull out the
old brushes.
Step 2: Replace them with new brushes (always replace as
a pair).
Step 3: Make sure they are properly aligned and slide
freely. Installation is in reverse order to removal.
Step 4: Then put the brush caps back on.
Fig. 14: Brush cap
8.3 Changing the connecting cable
9 Disposal, recycling of old equipment
In the interest of the environment, care must be taken to
ensure that all components of the machine are disposed
of only via the designated and approved channels.
9.1 Taking out of service
Discarded equipment must be taken out of service im-
mediately in a professional manner in order to avoid la-
ter misuse and danger to the environment or persons.
- Dispose of all environmentally hazardous operating
materials from the old device.
- If necessary, disassemble the machine into manage-
able and recyclable assemblies and components.
- Dispose of the machine components and operating
materials in the designated disposal route.
9.2 Disposal of electrical equipment
Electrical devices contain a large number of recyclable
materials and environmentally harmful components.
These components must be disposed of separately and
professionally. In case of doubt, contact the municipal
waste disposal service. If necessary, use the services of
a specialized waste disposal company for processing.
9.3 Disposal via municipal collection points
Disposal of used electrical and electronic equipment
(Applicable in the countries of the European Union and
other European countries with a separate collection sy-
stem for this equipment).
The symbol on the product or its packaging in-
dicates that this product should not be treated as nor-
mal household waste, but should be handed in at a col-
lection point for the recycling of electrical and electronic
equipment. By helping to dispose of this product cor-
rectly, you will help protect the environment and the
health of those around you. Environment and health are
endangered by incorrect disposal. Material recycling
helps to reduce the consumption of raw materials. For
more information about recycling this product, contact
your local authority, municipal waste disposal service or
the store where you purchased the product.
9.4 Disposal of lubricants
The lubricant manufacturer provides the disposal inst-
ructions for the lubricants used. If necessary, ask for the
product-specific data sheets.
NOTE!
The carbon brushes must always be replaced in pairs.
NOTE!
If you have removed the carbon brushes only for
inspection, make sure that you reinsert them in the
same place and in the same order. Otherwise, the
result would be a reduction in performance and
increased brush wear.
DANGER!
Danger to life through electric shock!
To avoid danger from electricity, work on the power
supply line may only be carried out by the manu-
facturer or an authorized specialist workshop.
Brush cap

Spare parts
HKS 320 | Version 1.04 19
10 Spare parts
10.1 Ordering spare parts
The spare parts can be obtained through the authorized
dealer or directly from the manufacturer.
Contact details:
Fax: 0049 (0) 951 96555-119
E-Mail: ersatzteile@stuermer-maschinen.de
Please specify the following key data when making in-
quiries or ordering spare parts:
- Device type
- Item number
- Position number
- Year of manufacture
- Quantity
- desired mode of shipment (mail, freight, sea, air,
express)
- Shipping address
Orders for spare parts without the above information
cannot be considered. In the absence of information
about the mode of shipment, the shipment will be made
at the discretion of the supplier.
Information on the device type, article number and year
of manufacture can be found on the type plate attached
to the device.
Example
The handle for the Hand-held circular saw HKS 320
must be ordered. The handle has the number 49 in the
spare parts drawing 1.
By ordering spare parts, send a copy of the spare parts
drawing (1) with the marked part (handle) and marked
positon number (49) to the dealer or spare parts depart-
ment and provide the following information:
- Type of device: HKS 320
- Item number: 3840321
- Position number: 49
- Drawing number: 1
NOTE!
The manufacturer's warranty is void if non-approved
spare parts are used.
DANGER!
Risk of injury due to use of incorrect spare
parts!
The use of incorrect or faulty spare parts can cause
danger for the operator and damage and malfuncti-
ons.
- Only original spare parts from the manufacturer or spare
parts approved by the manufacturer must be used.
- In case of any uncertainties, always contact the manu-
facturer.

20 HKS 320 | Version 1.04
Spare parts
10.2 Spare parts drawing
The following drawing should help to identify necessary spare parts in case of service.
Fig. 15: Spare parts drawing 1
This manual suits for next models
1
Table of contents
Other Metallkraft Saw manuals


