Metallkraft HKS 230 User manual

HKS 230
Instruction Manual
HKS 230
HKS 230
Metal-cutting manual circular

2HKS 230 | Version 3.06
Imprint
Product identification
Metal-cutting manual circular saw Article number
HKS 230 3840231
Manufacturer
Stürmer Maschinen GmbH
Dr.-Robert-Pfleger-Str. 26
D-96103 Hallstadt
Germany
Fax: +49 (0) 951 96555 - 55
E-mail: [email protected]
Internet: www.metallkraft.de
Information about the operating instructions
Genuine operating instructions
according DIN EN ISO 20607:2019
Published: 22.11.2021
Version: 3.06
Language: English
Author: MS
Copyright information
Copyright © 2021 Stürmer Maschinen GmbH, Hallstadt,
Germany.
Subject to technical changes and errors.
Contents
1 Introduction .............................................................3
1.1 Copyright ............................................................ 3
1.2 Customer service................................................ 3
1.3 Limitation of liability............................................. 3
2 Safety........................................................................3
2.1 Legend of symbols.............................................. 3
2.2 Operator responsibility........................................ 4
2.3 Operating staff qualification ................................ 4
2.4 Personal protective equipment ........................... 5
2.5 General safety precautions................................. 5
2.6 Safety labels on the metal cutting circular saw... 6
2.7 Safety data sheets .............................................. 6
3 Intended Use............................................................6
3.1 Reasonably foreseeable misuse......................... 6
3.2 Residual risks ..................................................... 6
4 Technical Data.........................................................7
4.1 Table................................................................... 7
4.2 Type plate ........................................................... 7
5 Transport, packaging, storage...............................7
5.1 Delivery and transport......................................... 7
5.2 Packaging........................................................... 7
5.3 Storage ............................................................... 7
6 Machine Description ...............................................8
6.1 Illustrations.......................................................... 8
6.2 Scope of supply .................................................. 8
6.3 Selecting the saw blade...................................... 8
7 Settings and commissioning .................................8
7.1 Installing the saw blade ...................................... 8
7.2 Setting the cutting depth..................................... 9
7.3 Setting the bevel angle ....................................... 9
7.4 Using the cutting guide display......................... 10
7.5 Switching the circular saw on and off ............... 10
7.6 Setting the rip fence.......................................... 10
7.7 Saw blade guard function ................................. 11
7.8 Handling the manual circular saw..................... 11
7.9 Securing workpieces......................................... 12
8 Care, Maintenance and Repairs ...........................12
8.1 Cleaning the machine ....................................... 13
8.2 Changing the carbon brushes........................... 13
8.3 Changing the power supply cable..................... 13
9 Disposal, Recycling of used Device..................14
9.1 Decommissioning ............................................. 14
9.2 Waste disposal of electric equipment ............... 14
9.3 Disposal of lubricants........................................ 14
10 Spare Parts ..........................................................14
10.1 Ordering spare parts....................................... 14
10.2 Spare parts drawing....................................... 15
11 EC Declaration of Conformity ............................18
12 Notes ....................................................................19

Introduction
HKS 230 | Version 3.06 3
1Introduction
You have made a good choice by purchasing the
METALLKRAFT hand-held circular saw.
Read the operating instructions carefully before using the ma-
chine.
These are an important part of the machine and must be
kept near the machine and accessible to every user.
The operating instructions inform you about the proper
commissioning, the intended use as well as the safe and
efficient operation and maintenance of the metal hand-
held circular saw.
In addition, observe the local accident prevention regula-
tions and general safety regulations for the area of appli-
cation of the metal hand-held circular saw.
1.1 Copyright
The contents of these instructions are protected by copy-
right and are the sole property of Stürmer Maschinen
GmbH. Their use is permitted within the scope of use of
the metal hand-held circular saw. Any other use is not
permitted without the written consent of the manufac-
turer.
Passing on and reproduction of this document, utilisation
and communication of its contents are prohibited unless
expressly permitted. Violations will result in liability for
damages. We register trademark, patent and design
rights to protect our products, insofar as this is possible
in individual cases. We emphatically oppose any in-
fringement of our intellectual property.
1.2 Customer service
Please contact your specialist retailer if you have any
questions regarding your metal-cutting circular saw or
require any technical information. Your specialist retailer
will be happy to support you with specialist advice and
information.
Germany:
Stürmer Maschinen GmbH
Dr.-Robert-Pfleger-Str. 26
D-96103 Hallstadt
Germany
Repair service:
Fax: +49 (0) 951 96555-111
email: service@stuermer-maschinen.de
Spare parts orders:
Fax: +49 (0) 951 96555-119
email: ersatzteile@stuermer-maschinen.de
Please submit any information and experiences you
make during application of the machine as these may be
valuable for product improvements.
1.3 Limitation of liability
All data in this operation manual has been compiled on
the basis of the state-of-the-art, valid standards and
guidelines as well as our many years of expertise and
experience.
The manufacturer shall not be liable for damage in the
following cases:
- Failure to comply with the operation manual,
- Unintended use
- Deployment of inexperienced staff
- Unauthorized conversions,
- Technical changes,
- Use of unauthorised spare parts
The actual scope of delivery may deviate from the de-
scriptions and illustrations in this document as a result of
special variants, optional extras or recent, technical
modifications.
The obligations defined in the supply contract shall apply
in addition to the general terms and conditions and the
manufacturer's general terms and conditions as well as
the statutory regulations valid at the time of the conclu-
sion of the contract.
2 Safety
This section provides an overview of all important safety
packages for personal protection as well as safe and reli-
able operation. The individual sections contain addi-
tional, task-specific safety information.
2.1 Legend of symbols
Safety instructions
Safety instructions in this operation manual have been
highlighted with symbols. Safety instructions are indi-
cated by signal terms that express the degree of risk in-
volved.

4HKS 230 | Version 3.06
Safety
Tips and recommendations
Observe the safety information in these operating in-
structions to minimise the risk of personal injury as well
as material damage and prevent hazardous situations.
2.2 Operator responsibility
The operator is the person who operates the machine
himself for commercial or economic purposes or who
makes it available to a third party for use or application
and who bears the legal product responsibility for the
protection of the user, the personnel or third parties dur-
ing operation.
Obligations of the operator:
If the machine is used for commercial purposes, opera-
tors are subject to the legal stipulations in terms of occu-
pational safety. For this reason, the safety instructions in
these operating instructions as well as the safety, acci-
dent prevention and environmental protection regula-
tions valid at the installation location must be complied
with. In this process, the following shall apply in particu-
lar:
- Operators shall obtain information about valid oc-
cupational safety regulations and determine addi-
tional hazards as part of a risk assessment which
result from the specific operating conditions at the
machine's installation location. Said risk assess-
ment shall be reflected in operating instructions for
machine operation.
- During the entire machine operating time operators
must check whether the operating instructions they
created meet current standards and adapt the op-
erating instructions where necessary.
- Operators shall clearly manage and specify the re-
sponsibilities for installation, operation, trouble-
shooting, maintenance and cleaning.
- Operators must make sure that all persons han-
dling the machine have read and understood these
operating instructions. Operators must also regu-
larly train staff and notify of the hazards.
- Operators shall provide staff with the required pro-
tective equipment and wearing the required protec-
tive equipment shall be mandatory.
Operators shall also be responsible for maintaining the
machine in a technically perfect condition. For this rea-
son, the following shall apply:
- Operators shall make sure that the maintenance in-
tervals described in these operating instructions
are complied with.
- Operators shall regularly check that the safety
equipment is fully functional and complete.
2.3 Operating staff qualification
The different tasks described in these operating instruc-
tions require different levels of skills in terms of the quali-
fications of operating staff working with the machine.
Exclusively persons of whom it can be expected that
they reliably complete assigned tasks shall be author-
ised to carry out any tasks. Persons whose reactions
have been impaired shall not be authorized, e.g. drug us-
ers, users under the influence of alcohol or medication.
These operating instructions specify the following per-
sonal qualifications for the different tasks:
DANGER !
This combination of symbol and signal word indicates
an imminently hazardous situation which, if not avoi-
ded, will result in death or serious injury.
WARNING!
This combination of symbol and signal word indicates
a potentially dangerous situation that will result in
death or serious injury if not avoided.
CAUTION!
This combination of symbol and signal word indicates
a potentially hazardous situation which, if not avoi-
ded, may result in minor or slight injury.
ATTENTION!
This combination of symbol and signal word indicates
a potentially hazardous situation which, if not avoi-
ded, may result in damage to property and the env-
ironment.
Tips and recommendations
This symbol highlights useful tips and recommenda-
tions as well as information for efficient and reliable
operation.
WARNING!
Risk from inadequately qualified persons!
Inadequately qualified persons are unable to assess
the risks when handling the machine, thus putting
themselves and others at risk of severe injuries.
- All work must be carried out by qualified persons
only.
- Keep inadequately qualified persons and children
away from the work area.

Safety
HKS 230 | Version 3.06 5
Operating staff:
Operating staff has undergone an induction by the oper-
ator about the entrusted tasks and potential hazards re-
sulting from improper behaviour. Tasks which go beyond
normal operation may only be carried out by the operator
if they are listed in the operation manual and the opera-
tor has made him/herself familiar with them.
Qualified electrician
Due to the electrician's specialised training, know-how,
experience and knowledge of pertinent standards and
regulations the electrician is in a position to work on the
electrical systems, and autonomously identify and avoid
potential hazards.
Specialist staff:
As a result of specialist training, expertise, experience
and skills in terms of the relevant standards and regula-
tions, specialist staff is able to complete the tasks they
are entrusted with and independently identify hazards
and avert risks.
Manufacturer:
Certain work must be carried out by manufacturer spe-
cialist staff only. Other staff is not permitted to carry out
this work. Contact our customer service to have the work
carried out.
2.4 Personal protective equipment
Personal protective equipment is intended to protect the
health and safety of persons at work. Staff must wear the
personal protective equipment indicated in individual
sections of these operating instructions when carrying
out the different tasks on the machine.
The personal protective equipment is described in the
following section:
2.5 General safety precautions
Note the following:
- Use the safety devices and fasten them securely.
Never work without safety equipment and keep it in
good working order.
- Keep the machine and your work environment clean at
all times. Ensure sufficient illumination.
- Always secure the workpiece when working. Ensure a
sufficient support surface.
- The metal-cutting circular saw's design must not be
changed; the machine must not be used for work not in-
tended by the manufacturer.
- Never work under the influence of illnesses that impair
concentration, drugs, alcohol or medication.
- Keep children and persons who are not familiar with the
metal-cutting circular saw clear of your work environ-
ment, the machine and tools.
- Do not use the mains cable to pull the plug out of the
socket. Protect the cable against heat, oil and sharp
edges.
- Immediately resolve malfunctions that impair safety.
- Protect the metal-cutting circular saw against humidity
(risk of short circuit!).
- Before using the metal-cutting circular saw, make sure
that no parts are damaged. Replace damaged parts im-
mediately to avoid sources of danger!
- Never overload the metal-cutting circular saw! Working
within the stated performance limits is better and safer.
Use the right saw blade! Make sure that the saw blade
is not damaged.
- Use only genuine spare parts and accessories to avoid
potential risks and risk of accident.
Eye protection
Protective glasses protect the eyes against pro-
jected parts and splashes of liquid.
Hearing protection
Hearing protection protects the ears against hearing
damage caused by noise. .
Respiratory protection
Respiratory protection serves to protect the respira-
tory tract and lungs against absorbing dust particles.
Suitable protective gloves
Protective gloves protect the hands from compo-
nents with sharp objects as well as friction, abrasion,
and deep-cut injuries.
Safety shoes
Safety shoes protect feet from pinching, falling parts
and slipping on slippery surfaces.
Protective clothing
Protective work clothing means tight-fitting clothing
with low tear resistance.

6HKS 230 | Version 3.06
Intended Use
2.6 Safety labels on the metal cutting
circular saw
The following safety labels and instructions are attached
to the metal-cutting circular saw (Fig. 1) and must be ob-
served.
Fig. 1: Safety labels -
1 Warning symbols | 2 Ground symbol | 3 Mandatory sign
If safety labels on the machine are damaged or missing,
this can cause errors, personal injury and material dam-
age. The safety symbols attached to the machine must
not be removed. Damaged safety symbols must be re-
placed immediately.
As soon as the signs are not clearly visible and compre-
hensible at first glance, the machine must be stopped
until new signs have been attached.
2.7 Safety data sheets
Safety data sheets on hazardous goods can be obtained
from your specialist dealer or by calling +49 (0)951/
96555-0. Specialist dealers can find safety data sheets in
the download area of the partner portal.
3 Intended Use
The metal hand-held circular saw is intended exclusively
for sawing solid or hollow profiles made of steel and
other metallic materials. The processing possibilities
also depend on the operating conditions of the suitable
saw blades used.
Intended use also includes compliance with all the infor-
mation in these instructions.
3.1 Reasonably foreseeable misuse
Any use beyond the intended use or any other use is
considered misuse.
Possible misuses can be:
- The metal hand-held circular saw must not be used
for sawing flammable materials (e.g. magnesium
or similar).
- Use of the metal hand-held circular saw for materi-
als other than aluminium, PVC or wood materials
(e.g. machining of hard metal or similar, plastic,
etc.).
- Modifications to the machine or accessories.
- Maintenance work on an unsecured machine
- Non-observance of wear and damage marks.
- Service work carried out by untrained or unauthor-
ised personnel.
- Use of accessories or spare parts not approved by
the manufacturer.
- Misuse of the machine
- Operating the metal hand-held circular saw if the
operating instructions have not been fully read and
understood.
- Deliberate or careless handling of the metal hand-
held circular saw during operation.
- Using an incompletely assembled machine.
Misuse of the metal hand-held circular saw can lead to
dangerous situations. Stürmer Maschinen GmbH ac-
cepts no liability for design and technical modifications to
the metal hand-held circular saw. Claims of any kind for
damage due to improper use are excluded.
3.2 Residual risks
Even if all safety instructions are observed and the ap-
pliance is used according to the instructions, there are
still residual risks, which are listed below:
- Risk of injury to the upper limbs (e.g. hands, fingers).
- Risk of injury from tripping over cables.
- Impairment of hearing during prolonged work without
hearing protection or if this is defective.
- Electrical hazard due to contact with parts and high
voltage (direct contact) or with parts under high
voltage due to a defect in the metal hand-held circular
saw (indirect contact).
- Heat build-up on components can cause burns and
other injuries.
- Risk of breakage or ejection of workpieces.
- Risk of injury to the eye from flying parts, even with
safety goggles on
12 3

Technical Data
HKS 230 | Version 3.06 7
4 Technical Data
4.1 Table
4.2 Type plate
Fig. 2: Type plate HKS 230
5 Transport, packaging, storage
5.1 Delivery and transport
Delivery
Check the metal-cutting circular saw for visible transport
damage upon delivery. In case of visible damage to the
metal-cutting circular saw, immediately notify the carrier
or your retailer.
5.2 Packaging
All packaging materials and packing aids of the metal-
cutting circular saw are suitable for recycling and must
always be disposed of using material-based recycling
systems. Packaging materials made of cardboard must
be shredded and recycled as waste paper. The foils are
made of polyethylene (PE), padding is made of polysty-
rene (PS). Dispose of these substances at a recycling
centre or hand them over to a qualified waste disposal
company.
5.3 Storage
Always store the metal-cutting circular saw in a clean
condition and a dry, clean and frost-free environment. It
must not be stored in the same room as chemicals. Dur-
ing storage, the metal-cutting circular saw must be cov-
ered with a plastic film. All bare metal surfaces must be
protected with corrosion protection agent.
General data HKS 230
Idle speed 2200 rpm
Adjustment range for an-
gled cuts
0° - 45°
Gross weight 13.6 kg
Net weight 7.1 kg
Dimensions (L x W x H) 620 x 320 x 270 mm
Electrical data
Voltage 230 V/50 Hz
Output 1700 W
Fuse min. 10 A
Connecting cable length 2.8 m
Cutting data
Maximum cutting depth below 90° 80 mm
below 45° 56 mm
Saw blade data
max. perm. speed 2200 rpm
max. outer diameter 230 mm
max. saw blade width 2.4 mm
Hole diameter 25.4 mm (1")
Emissions
Noise levels approx. 91 dB
Vibration 3.6 m/s2
Ambient data
Transport/storage temper-
ature
0 °C - 40 °C
Deployment temperature 0 °C - 40 °C
NOTE!
Protect the metal-cutting circular saw against mois-
ture.
8HKS 230 | Version 3.06
Machine Description
6 Machine Description
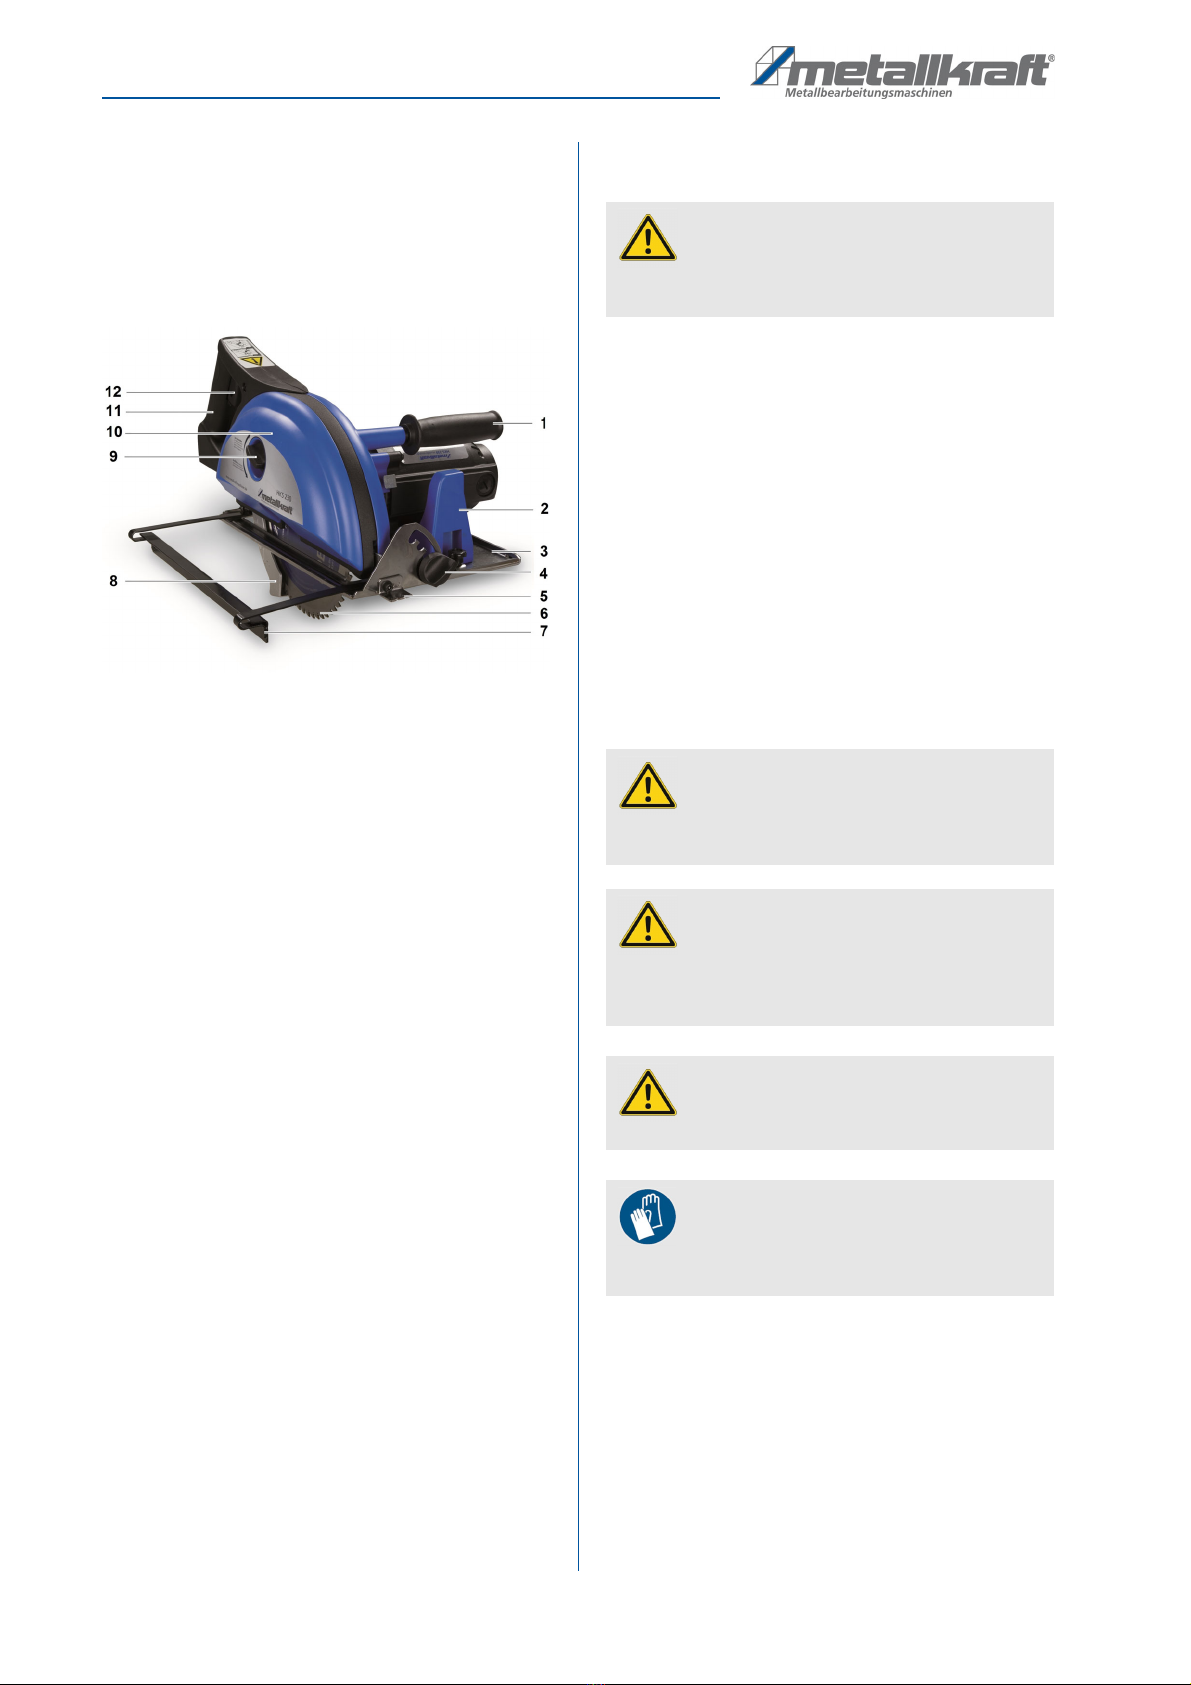
6.1 Illustrations
Figures in this operation manual serve to provide a basic under-
standing and may differ from the actual design.
Fig. 3: Machine description HKS 230
1 Handle at side
2 Housing
3 Machine support
4 Clamping screw for adjusting the bevel angle
5 Cutting guide display
6 Saw blade
7 Rip fence
8 Saw blade guard
9 Lock on saw blade cover
10 Cutting depth adjustment (hidden)
11 Hand grip
12 On/off switch
6.2 Scope of supply
- Metal-cutting manual circular saw HKS 230
- Rip fence
- Hexagon spanner
- Operating manual
- Bag with screws and fastening material
6.3 Selecting the saw blade
During sawing with the metal-cutting circular saw, pay at-
tention to the choice of the correct saw blade, or the cor-
rect tooth form and set of the saw blade.
If the TPI value is too small and the cutting length is too
long, the cut material cannot be easily taken up by the
gullet.
If the TPI value is too high, the saw teeth starts to chop;
this can lead to teeth breaking out.
7 Settings and commissioning
7.1 Installing the saw blade
Step 1: For assembly (also removal) it is necessary to re-
move the outer saw blade cover.
Step 2: Open the cutting depth adjustment clamp with a
hexagon spanner and rotate the saw blade to the
top limit position in order to reveal the saw blade
screw connection at the side.
Step 3: To remove a saw blade, press the saw blade lock
and release the saw blade screw connection.
ATTENTION!
Only use saw blades whose maximum rotational
speed matches or exceeds the maximum saw speed.
WARNING!
Disconnect the machine from the power supply
before installing or removing the saw blade
ATTENTION!
Only use saw blades that are permissible in terms of
dimension and maximum rotational speed. For your
own safety, only use original Metallkraft saw blades.
CAUTION!
Avoid injuries caused by touching the saw teeth.
Suitable protective gloves
During all work related to the saw blade, wear protec-
tive gloves.

Settings and commissioning
HKS 230 | Version 3.06 9
Step 4: Wearing protective gloves, remove the saw
blade and insert the new blade in its place on the
contact flange. Make sure that the teeth are
pointing forwards. In case of doubt, check the di-
rectional display printed on the saw blade.
Step 5: Position the outer saw blade flange with the flat
side facing the saw blade; then fit the fastening
screw and hand-tighten (Fig. 3).
Step 6: Use a hexagon socket wrench to turn the fasten-
ing screw clockwise. Press the saw blade lock
while doing so, and turn the saw blade support
with the wrench until you notice it engage.
Step 7: After the saw blade lock has engaged, tighten
the fastening screw to final torque by turning
clockwise.
Step 8: Before operating the saw, make sure that the
saw blade lock is back in its original position.
Fig. 4: Saw blade assembly
7.2 Setting the cutting depth
Adjust the cut so that the saw blade can penetrate the
entire depth of cut.
Step 1: Lift the cutting depth adjustment lever.
Step 2: Raise or lower the saw housing until you reach
the desired cutting depth. You can read off the
set value at the pointer on the integrated scale.
Step 3: Push the clamping lever fully down to ensure suf-
ficient clamping.
Fig. 5: Adjusting the cutting depth
7.3 Setting the bevel angle
When setting the bevel angle make sure that the saw
blade can penetrate through the entire material thick-
ness.
Step 1: Loosen the clamping screws for the bevel angle
at the front and rear (Fig. 6).
Step 2: Set the desired bevel angle.
Detents for bevel angles of 0°, 15°, 30° and 45° are
provided on the front. If other angles are required,
clamp the clamping screw at the desired position
outside the detents.
Step 3: Firmly tighten the clamping screw on the back.
Saw blade
Screw
Flange
Sawblade
lock
Cutting depth adjust-
ment
WARNING!
Disconnect the machine from the power supply
before setting the cutting depth.
WARNING!
Never cut material thicker than 9 mm
WARNING!
Disconnect the machine from the power supply
before setting the bevel angle.
Clamping lever
Scale depth of cut

10 HKS 230 | Version 3.06
Settings and commissioning
Fig. 6: Setting the bevel angle
7.4 Using the cutting guide display
To support manually guided sawing, the cutting guide
display is located on the front end of the machine sup-
port.
During sawing, align the orientation slots with the cut
line.
Use the right orientation slot (between the two marks) for
straight cuts.
Use the left orientation slot for cuts below a bevel angle
of 45°.
Fig. 7: Cutting guide display
7.5 Switching the circular saw on and
off
Proceed as follows to switch on the manual circular saw:
Step 1: Connect the manual circular saw to the power
supply using the power plug.
Step 2: Press the button on the safety lock to release the
on/off switch.
Step 3: Press the on/off switch to start the machine.
Step 4: To switch off the manual circular saw, release
the on/off switch and allow to snap back to its
original position.
Fig. 8: On/off switch
7.6 Setting the rip fence
For cuts parallel to a straight workpiece edge, you will
achieve more precise straight ahead motion by using the
rip fence while guiding the cut than by guiding the work-
piece with your free hand.
Step 1: Insert the rip fence into the mounting straps pro-
vided on the machine support.
Clamping screw for bevel
angle (front)
Scale
Clamping screw for
bevel angle (rear)
Orientation groove
for 45 ° cuts
Orientation groove
for 90 ° cuts
ATTENTION!
Make sure that the connection voltage of the power
supply matches the value printed on the type plate.
Make sure that the on/off switch is on off position
before you connect the power plug to the power sup-
ply.
ATTENTION!
Before setting the rip fence disconnect the manual
circular saw from the power supply.
ON/OFF
Switch
Lock

Settings and commissioning
HKS 230 | Version 3.06 11
Step 2: Set the desired gap between the rip fence and
the cutting guide display.
Step 3: Fix the rip fence in the set position using the
clamping screws provided for the purpose.
Fig. 9: Adjusting the rip fence
7.7 Saw blade guard function
The bottom part of the saw blade guard which folds back
is a safety device that is essential for accident prevention
during use of the machine. Before using the manual cir-
cular saw, always ensure that the saw blade guard can
move freely and does not jam at any point. Make sure
that the guard quickly and fully snaps back into the
closed original position.
7.8 Handling the manual circular saw
The machine hast two positions at which the second
handle can be fitted: on the saw blade cover or the ma-
chine base.
Only use the assembly position on the machine base for
mitre cutting because it allows for more stable handling
of the manual circular saw (see Fig. 10).
WARNING!
A soiled and clogged saw blade guard may jam and
not fold back. Before using the manual circular saw,
always clean the space inside the saw blade guard to
remove chips and deposits.
Using a machine with the saw blade guard not work-
ing, or not working correctly, is prohibited.
Immediately hand over machines with a saw blade
malfunction for repair to an authorised or qualified
workshop.
ATTENTION!
Before using the manual circular saw, any chips and
deposits must be removed from the space inside the
saw blade guard.
ATTENTION!
Never lubricate the bearing and guide parts of the
saw blade guard. The bearings on the saw blade
guard are equipped with dry lubrication. Additional
lubrication with grease or oil can impair the anti-fric-
tion effect.
Side stop
ATTENTION!
Never using cutting oils or cooling lubricant when
using the manual circular saw. The machine is exclu-
sively designed for dry cutting.
ATTNETION!
When sawing, make sure that the power supply
cable does not enter the cutting area of the saw
blade.
ATTENTION!
For your own protection, use the manual circular saw
in combination with the handle at the side only. This
grab handle gives you the ability to guide the
machine safely with both hands.
ATTENTION!
Never use the manual circular saw for longer than 30
minutes without interruption.
NOTE!
Adjust the feed speed and contact pressure to suit the
material and achieve optimum cutting results. In-
crease the contact pressure when sawing thicker ma-
terial sections and reduce it for thinner materials.
NOTE!
Always hold the machine with your right hand on the
rear handle, and your left hand on the handle at the
side.

12 HKS 230 | Version 3.06
Care, Maintenance and Repairs
Fig. 10: Handling
Follow these steps for sawing:
Step 1: Mark the desired cutting line, using a marker pen
for example.
Step 2: Clamp the workpiece and make sure that it is se-
curely clamped.
Step 3: Locate the front edge of the machine support on
the workpiece. Make sure that the cutting
guide display lines up with the desired or
marked cutting line and that the saw blade is
parallel to the cutting line and pointing in its di-
rection. The swivelling saw blade guard must
not be open at this point, not even partially.
Step 4: Release the safety lock and then press the on/off
switch.
Step 5: Allow the saw blade to run up to final speed and
then move the manual circular saw forward.
While doing so, make sure that the saw blade
guard swivels back without jamming.
Step 6: After completing the cut, release the pressure on
the on/off switch without letting go of the ma-
chine. Make sure that the saw blade is at a
standstill and the saw blade protection is
closed before taking the machine off the work-
piece.
7.9 Securing workpieces
Clamp the workpiece correctly on a suitable and stable
support and using suitable aids. Support long work-
pieces to prevent them dropping or tilting.
8 Care, Maintenance and Re-
pairs
ATTENTION!
Secure the workpiece carefully against bending or
slipping before machining. Note that the saw blade
can be trapped by the cut-off dropping at the end of
machining.
ATTENTION!
Make sure that the saw blade has fully run down and
is at a standstill before changing the clamping situa-
tion, for example, the clamping position or the cut-
ting angle
ATTENTION!
Before starting cleaning and maintenance work of
the machine, disconnect the power plug.
Tips and recommendations
To keep the metal-cutting circular saw in a good
operational condition at all times, regular care and
maintenance work must be performed.
WARNING!
Risk due to inadequately qualified persons!
Inadequately qualified persons are unable to assess
the risks in case of repairs to the machine, thus put-
ting themselves and others at risk of severe or fatal
injuries.
All maintenance work must be carried out by quali-
fied persons only.
DANGER!
Risk of fatal injury through electric shock!
There is a risk of fatal injury on touching live compo-
nents.
- Before starting cleaning and maintenance work, al-
ways unplug the mains connector.
- The machine's electrical equipment must be con-
nected and repaired by a qualified electrician only.
NOTE!
After cleaning, maintenance and repairs, make sure
that all panels and protective guards are once again
correctly in place on the machine and that there are
no tools on the inside or outside of the machine.
Damaged protective guards and machine parts must
be professionally repaired by an approved workshop,
or replaced.
Care, Maintenance and Repairs
HKS 230 | Version 3.06 13
8.1 Cleaning the machine
.
The metal-cutting circular saw should always be thor-
oughly cleaned after use.
Cleaning and maintenance table
Brush or wipe off all open machine parts with a brush or
cloth at regular intervals.
Treat bare metal work surfaces with anti-corrosive spray.
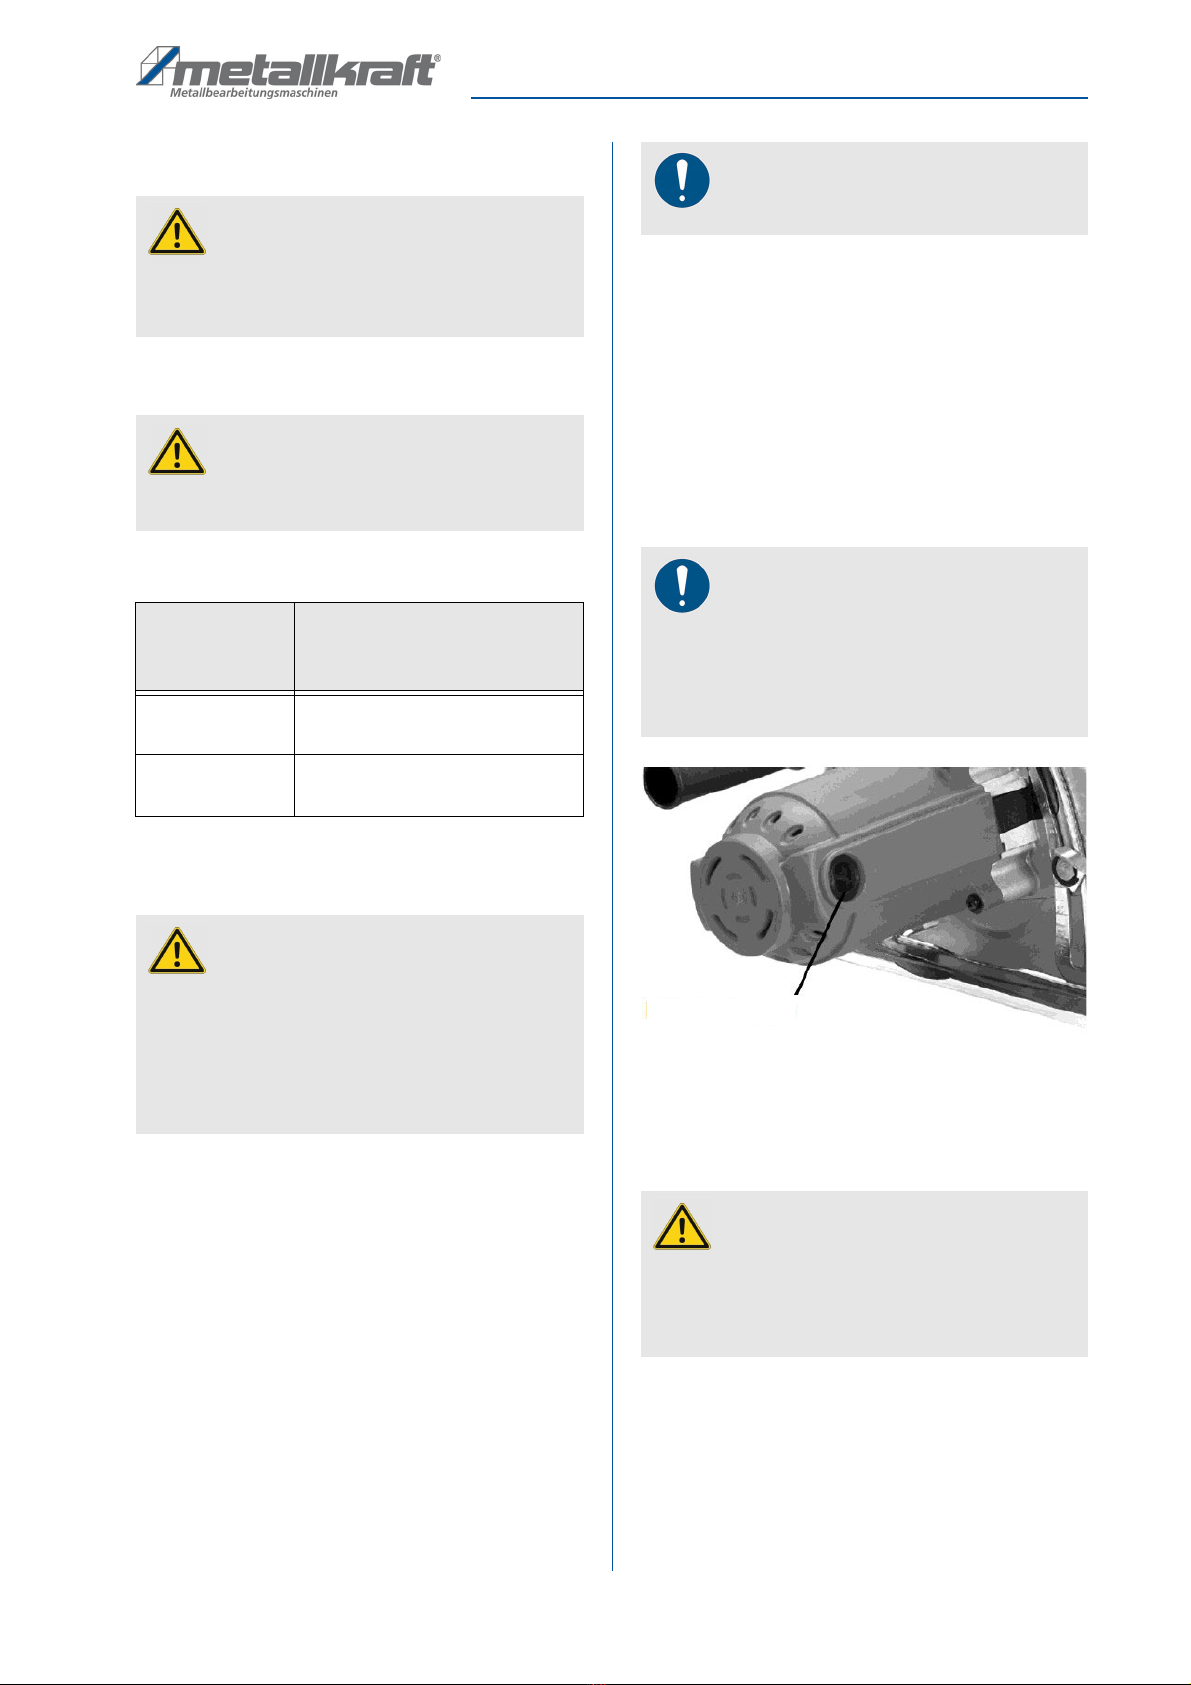
8.2 Changing the carbon brushes
The carbon brushes are subject to normal wear and
must be replaced when they reach their end-of-life.
The machine is equipped with a self-disconnecting brush
type. In other words, the motor will no longer run after
reaching the wear limit. For this reason, the carbon
brushes first need to be checked and possibly replaced if
the machine unexpectedly fails to start.
Proceed as follows:
Step 1: Unscrew and remove the brush caps with a suit-
able screwdriver.
Step 2: Pull the carbon brushes out of the holder.
Step 3: Insert the brushes.
Step 4: Replace the brush caps and screw them back
down.
Fig. 11: Brush cap
8.3 Changing the power supply cable
ATTENTION!
- Never use solvents for cleaning plastic parts or
painted surfaces. This may cause the surface to
disintegrate and cause consequential damage.
ATTENTION!
All moving parts must be free of dirt and dust and
regularly greased or oiled (e.g., bolts).
Maintenance
interval in
operating hours
Maintenance point
Daily before use Remove chips and clean the ma-
chine
Daily before use Check the saw blade; replace if
needed.
ATTENTION!
- Never remove chips or grinding dust with your bare
hands. There is a risk of cuts through sharp edged
chips!
- Never remove chips or grinding dust with a com-
pressed air gun. This can lead to eye injuries and
damage machine components.
NOTE!
Always replace the carbon brushes as a pair.
NOTE!
If you only removed the carbon brushes for inspec-
tion, make sure that you reinsert them at the same
position and in the same order. Otherwise this will
cause reduced performance and increased brush
wear.
DANGER!
Risk of fatal injury through electric shock!
To reduce the risk due to electricity, work on the
power supply cable may only be performed by the
manufacturer or an authorised professional work-
shop.
Brush cap

14 HKS 230 | Version 3.06
Disposal, Recycling of used Device
9 Disposal, Recycling of used
Device
Please take care in your own interest and in the interest of
the environment that all component parts of the machine
are only disposed of in the intended and permitted way.
9.1 Decommissioning
Immediately decommission disused machines in order to
avoid later misuse and endangering of the environment
or personal safety.
- Eliminate all environmentally hazardous operating
materials from the used device.
- If required, disassemble the machine into easy-to-
handle and usable components and parts.
- Dispose of machine components and operating ma-
terials by the disposal channels provided.
9.2 Waste disposal of electric equip-
ment
Please note that electrical devices contain a variety of re-
cyclable materials as well as environmentally harmful
components.
You contributes to that these components are disposed of
separately and properly. In case of doubt, please contact
your municipal waste disposal. As necessary, a specialized
waste disposal company can help be used for the treatment.
9.3 Disposal of lubricants
Please pay attention to an environmentally friendly dis-
posal of the used coolants and lubricants.Observe the
disposal instructions of your municipal disposal compa-
nies. Disposal notes for used lubricants are available
from the manufacturer of the lubricants. If necessary, re-
quest the product-specific data sheets.
10 Spare Parts
10.1Ordering spare parts
The spare parts may be purchased with the authorised
dealer or directly with the manufacturer. Please find the
corresponding contact data in Chapter 1.2 Customer
service.
Indicate the following basic information for requests or
orders of spare parts:
- Type of device
- Item No.
- Position No.
- Year of construction:
- Quantity
- Required mode of dispatch (mail, freight, sea, air,
express)
- Address of dispatch
Example
The handle for the HKS 230 metal hand-held circular
saw must be ordered. The saw blade has the number 42
in the spare parts drawing.
When ordering spare parts, send a copy of the spare
parts drawing with the marked component (handle) and
marked item number (42) to the authorised dealer and
provide the following information:
Type of appliance: Metal hand-held circular saw
HKS 230
Item number: 3840231
Item number: 42
DANGER!
Danger of injury by the use of wrong spare
parts!
Dangers may result for the user and damages as well
as malfunctions may be caused by using wrong or
damaged spare parts
- Only use original spare parts of the manufacturer or
spare parts admitted by the manufacturer.
- Always contact the manufacturer in case of uncer-
tainties.
Loss of warranty!
The manufacturer's warranty will become null and
void if non-permissible spare parts are used.
Spare Parts
HKS 230 | Version 3.06 15
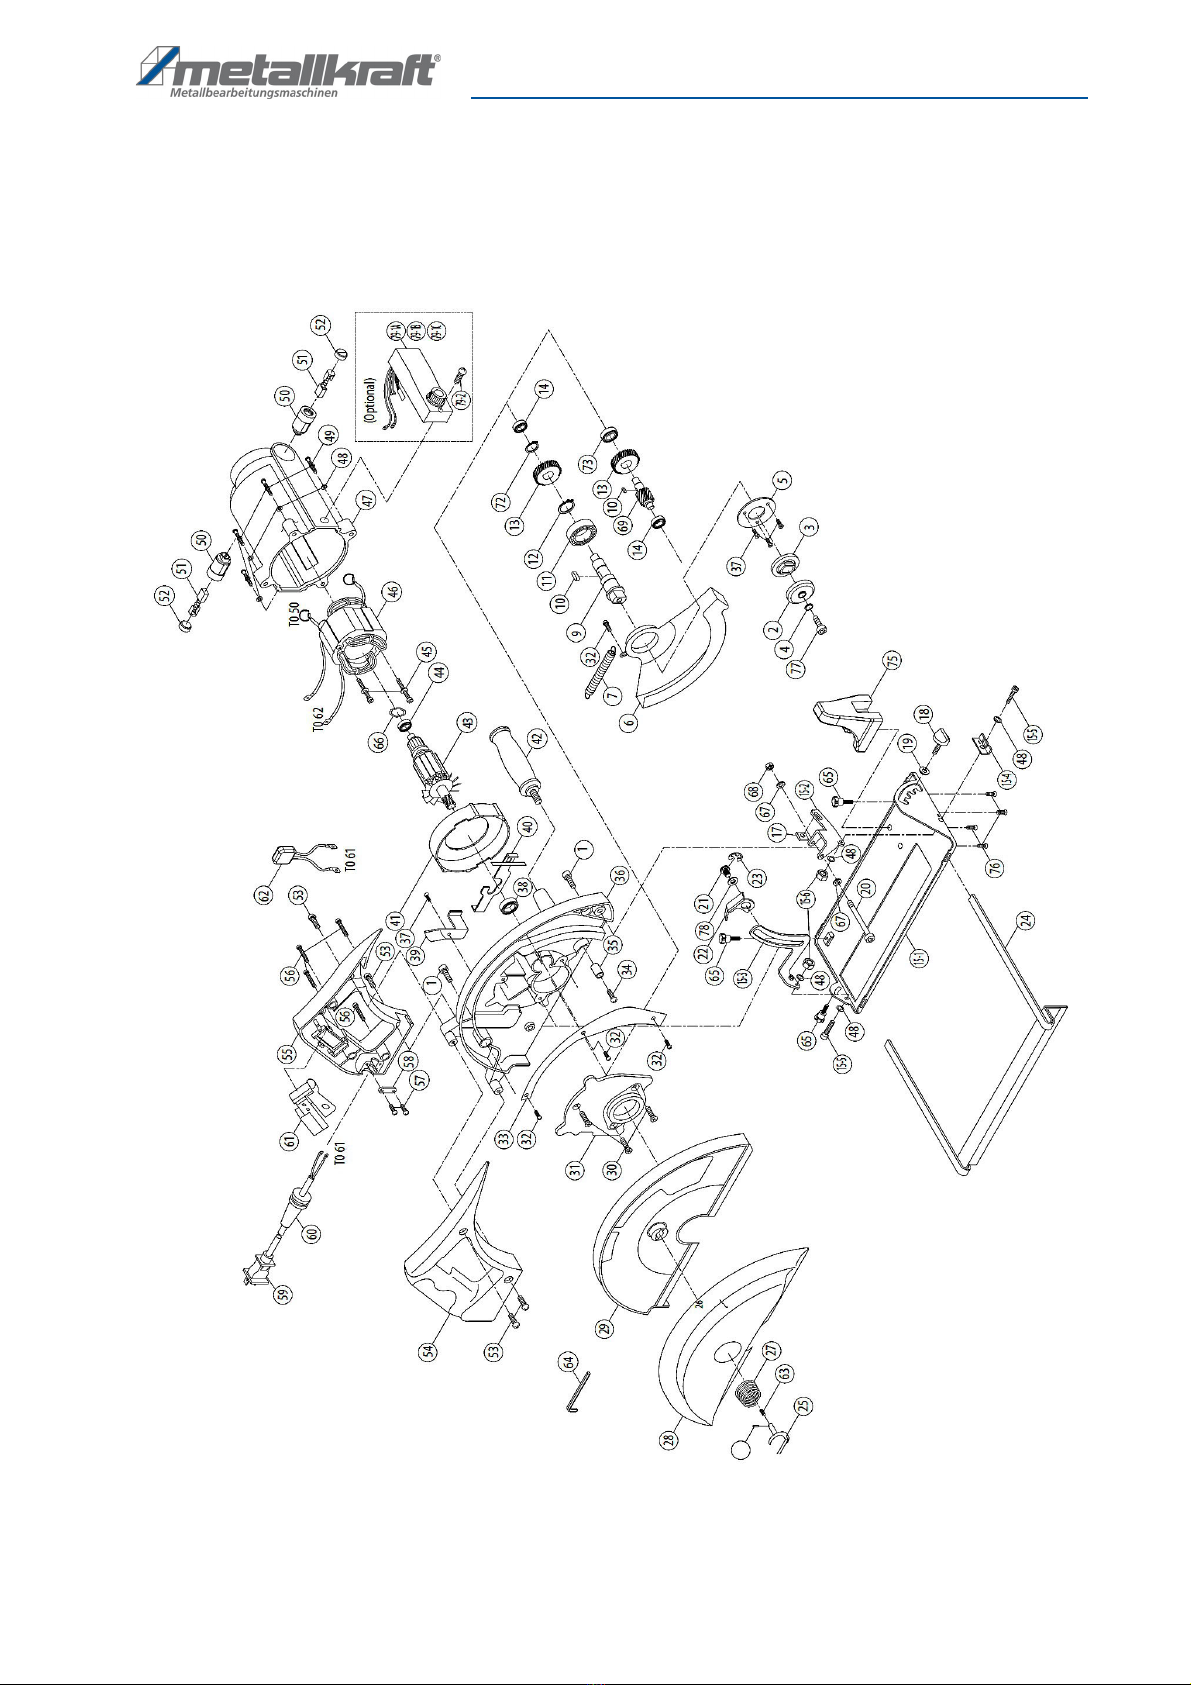
10.2 Spare parts drawing
Spare parts drawing HKS 230
The following drawing is intended to identify the required spare parts in the event of service. If applicable, submit a copy
of the parts drawing including the highlighted components to your authorised retailer.
Fig. 12: Spare parts drawing

16 HKS 230 | Version 3.06
Spare Parts
Parts list
Pos. Description Qty,
1 INTERNAL CIRCLIP (R-19) 1
2 Flat washer
(Ø10xØ18.5x0.810xØ18.5x
0.8)
1
3 Water seal (Ø12x15) 1
4 Spring
(Ø1.2xØ10xØ12.4x11Tx54)
1
5 Lock pin (12,3mm) 1
6 Panhead machine screw
(M3x4xP0,5)
1
7 Lock pin spring 1
8 Check ball (Ø 8 mm) 1
9 Spindle (141mm) 1
10 Ring ( Ø40xØ44x9 schwarz) 1
11 Collar pin ( Ø 8 mm ) 1
12 Qick release collar 1
13 Spring
(Ø2.3xØ39xØ43.6x3Tx30L)
1
14 Spring seat ring
(Ø35.1xØ44.5x2)
1
15 External circlip ( S-35) 1
16 Internal circllip ( R-47) 1
17 Ball bearing ( 6005) 1
18 Qill tube 1
19 External circlip ( S-25) 3
20 Gear plate 1
21 Bushing ( Ø30xØ36x12 ) 1
22 Output gear ( M1.25x47T ) 1
23 Bushing( Ø30xØ36x12 ) 1
24 Ball bearing ( 608 ) 1
25 Bevel gear (M1.0x46T) 1
26 Parallel key (4x4x7) 1
27 Input shaft (M1.25x9T) 1
28 Panhead tapping screw-b
(M5x25)
2
29 Panhead tapping screw-b
(M5x30)
2
30 Gear housing 1
31 Panhead machine screw-
Washer (M5x25xP0.8)
1
32 Ball bearing (6001) 1
33 Armatur (220V-73x42x45) 1
34 Panhead tapping screw-b
(M5x60)
1
35 Stator (220V-73x42x45) 1
36 Motor housing (BLUE-
7462C)
1
37 Carbon brush (7x11x17) 2
38 Carbon brush holder (7x11) 2
39 Hex nut (M4xP0.7) 2
40 Brush spring (0.35x3x3T) 2
41 Panhead machine screw
(M4-0.7x10)
2
43 Motor tail Casting 1
44 Panhead tapping screw-b
(M4x25)
2
45 Crank spindle (Ø28) 1
46 Bushing ((Ø28xØ32x12) 2
47 Pressure disc
(Ø25.5xØ40x2)
2
49 Check ball (Ø5) 2
50 Crank hub 1
51 Spring
(Ø0.6xØ4.1xØ5.3x4Tx6.5L)
1
55 Crank handle 1
57 Socket cap screw
(M6x30xP1.0)
2
58 Spring washer (M6) 3
59 LED lamp 1
60 Flat head machine screw
(M4x6xP0.7)
1
61 Electromagnet (164x80x48) 1
62 Panhead machine screw-
washer (M4x12xP0.7)
1
63 Cable clip 1
65 Power supply cable 1
66 Motor switch 1
67 Magnet switch 1
Pos. Description Qty,

Spare Parts
HKS 230 | Version 3.06 17
68 Panhead machine screw
(M4-0.7x8)
8
69 Switch bracket 1
70 Mouting plate 1
71 Rectifier and EMC
(110V&220V)
1
72 Socket set screw
(M5x10xP0.8)
1
73 Socket cap screw (M6-
1.0x16)
1
74 Panhead machine screw-
washer (M4x16xP0.7)
1
75 External star washer (M5) 1
76 Wave sping (Ø30xØ38.5) 2
77 Seal (5cm) 1
78 Strap cover 1
79 Flat head machine screw
(M5x15xP0.8)
1
80 Flat hear machine screw
(M5x20xP0.8)
1
81 Bevel washer
(Ø10.1xØ14x1.2)
1
82 Safety belt 1
84 Wire lead (1015-16#18CM) 2
85 Female spade terminal 4
86 Spade terminal boot 6
87 Crimp cab connector (C4) 1
88 Zip tie (2.5x100MM) 1
92 O-Ring (Ø12x4) 1
93 E-Clip(E-3) 1
94 Panhead tapping
screw(M4x12)
4
98 Bracket top 1
99 Bracket bottom 1
100 Panhead tapping screw-b
(M4x16)
2
101 Hex nut (M5xP0.8 1
103 Socket set screw
(M4x8xP0.7)
1
105 Flat washer (Ø6xØ13x1) 2
Pos. Description Qty,
106 Butterfly screw
(M6x10xP1.0)
1
107 Plunger 1
108 Fan baffle 1
109 Earting marking 1
111 Seal 1
112 Wire lead (1015-16#9CM) 2
113 Male spade terminal 2
114 Terminal cover 2
115 Chip guard 1
Pos. Description Qty,

18 HKS 230 | Version 3.06
EC Declaration of Conformity
As per machine directive 2006/42/EC, Appendix II 1.A
Manufacturer/distributing company: Stürmer Maschinen GmbH
Dr.-Robert-Pfleger-Straße 26
D-96103 Hallstadt, Germany
hereby declares that the following product (hereafter)
Product group: Metallkraft® metalworking machines
Machine type: Metal-cutting manual circular saw
Machine designation: HKS 230
Serial number: ______________________
Year of manufacture: 20___
complies with all relevant regulations of the aforementioned directive as well as any other, applicable directives (subse-
quently added) – including the changes applicable at the time the declaration was made.
Applicable EU directives 2014/30/EU EMC Directive
The following, harmonised standards have been applied:
DIN EN 16093:2017-10 Machine tools - Safety - Sawing machines for cold metal (ISO 16093:2017)
DIN EN ISO 12100:2010 Safety of machinery - general design principles -
Risk assessment and reduction of risks (ISO 12100:2010)
EN 60204-1:2007-06 Safety of machinery - Electrical equipment of machines –
Part 1: General requirements
Responsible for documentation: Kilian Stürmer, Dr.-Robert-Pfleger-Str. 26, D-96103 Hallstadt
Hallstadt, 15 April 2014
______________________
Kilian Stürmer
Managing Director
11 EC Declaration of Conformity

Notes
HKS 230 | Version 3.06 19
12 Notes

www.metallkraft.de
This manual suits for next models
1
Table of contents
Other Metallkraft Saw manuals


