Metcalfe PN158 N User manual

To construct this kit you will need the
following:
GLUES
UHU Solvent Free All Purpose
Adhesive Glue
PN158 N Scale
Gardener’s Cottage
Works superbly well in our fine glue
applicators. Dries quickly, but allows time
for positioning of kit parts as described
further on in the instructions.
CHECK LIST
This kit should contain the following:
2 x PRINTED SHEET. Kit parts.
1 x GREY SHEET. Strengthener parts.
1 x BROWN SHEET. Laser cut parts.
1 x GLAZING SHEET. Windows.
1 x INSTRUCTION BOOKLET.
1 x EXTRA BITS SHEET. Chimney pots, curtains.
1 x RIDGE TILES SHEET.
1. A modellers knife.
2. A pair of sharp scissors.
3. A steel ruler.
4. Glue - See glues.
5. Ultra Fine Tip Glue Applicator, see below.
6. A cutting surface -
a sheet of card or cutting mat.
7. Fine point tweezers.
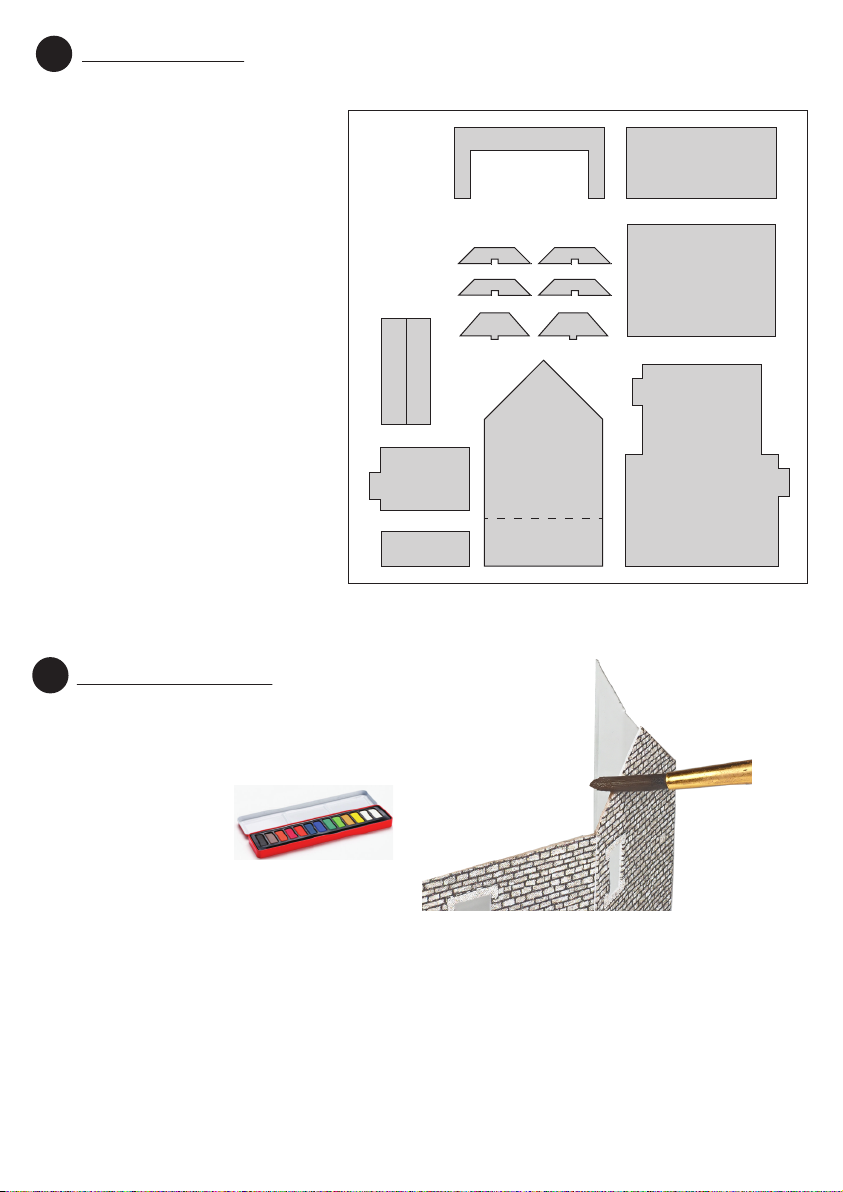
8. Water colour paints and a very fine
brush for painting edges and corners.
These bottles are essential for gluing the
smaller components in this kit.
1
2
As you extract the components from the
base sheets they need to be kept away from
your working area on a thick piece of card
or a tray until needed. Keep the components
organised to which building they belong to.
GETTING STARTED
EXTRACTING COMPONENTS
FROM THE BASE SHEETS.
To stop the components from falling off the
sheets, they are held secure with score lines.
These are cuts that only go about 75% of
the way through the card.
To release them run the point of your knife
along these score lines and they will come
seamlessly away. These score lines are
marked with blue arrows: WARNING, Cut
with care using a knife that is not too sharp,
this will reduce the risk of the blade running
off the score and cutting the components.
MAKE YOUR ‘BUILDERS YARD’.
METCALFE
Ultra Fine Glue Tip Applicators.
Tiny strips and spots of glue
can be
accurately
laid down
with
precision.
INSTRUCTIONS
Also Deluxe Materials ‘SPEEDBOND’
A fast drying PVA.
see www.deluxematerials.com
1
READ THROUGH ALL THE
INSTRUCTIONS BEFORE YOU START.
This is a complex kit that requires
particular attention to detail, so proceed
with care!

The white card that shows on the corners and
edges is best painted before you build the kit.
Mix your colour with lots and lots of water,
apx. 1 part paint to 5 parts water or more.
TEST ON WASTE CARD FIRST UNTIL YOU
HAVE THE CORRECT SHADE & COLOUR.
All you need is a simple set of water colour
paints and a fine brush.
Paint all exposed edges, window frames,
roof ridge as well as the wall edges..
4
Something like this set of
‘Reeves’ watercolours
or even simple child’s
watercolours.
2
STRENGTHENERS.
3
To help identify the strengtheners, below is a key to the components.
PAINTING THE EDGES
1 - House Base
2 - Chimney Wall Support
3 - Centre Wall Support
4 - Inner Floor
5 - Centre Wall Joiner
6 - Chimney Supports (x2)
7 - Lean-to Base
8 - Extension Base
9 - Bay Window Bases (x4)
10 - Bay Window Roof Supports (x2)
Fold the edges of the card back fully and gently run the point of your brush along the exposed white card.
Only tiny amounts of paint on your brush. It’s better to have to go over it a few times than to flood it with paint.
Before the paint dries, run your finger along the edge to rub the colour into the absorbent white card. Then wipe
away any paint that has run onto the printed surface before it dries.
Remember, you only need to just slightly tint the card with a little colour. DON’T paint a thick solid line down the
edges, you will only make it look worse.
1
2
3
4
5
6
7
8
9
10

LETS START TO BUILD!
Fig. 1. THE MAIN HOUSE
3
1. Carefully cut out the glazing along the outer white lines. For the main house you need the
following windows:
F1 - Front Inner wall lower window
F2 - Front Inner wall upper window
R1 - Rear Inner wall window
C1 - Chimney Inner wall windows (x2)
Fix each window to the
openings with the matt printed
side facing through the
openings. Make sure the
window is centred correctly
within the frame.
Then add the front door aligned to the opening on the front inner
wall, keeping the bottom edges flush.
To fit curtains fix a small strip of waste card
to each side of the window, then glue the
curtain to the waste card so that it shows
through the window (the waste card will
space the curtain back from the window a
little giving a greater effect of depth).
For extra curtains, visit this product on our
website www.metcalfemodels.com
Curtain
Curtain
Cut each
curtain to
shape
Curtain
Waste card
cut into a
thin strip Curtain with
coloured portion
facing through
the window opening
If you wish to add curtains, now is the time to do so.
2. Wrap the main walls around the wider section of the
house base (strengthener 1).
Like so.
Now glue the chimney
wall support
(strengthener 2) flush
to the base and
centred on the far
wall.
Strengthener 2 fits
here.

4
3. Now add the front and rear
inner walls, carefully align the
windows to the openings on the
main walls.
The centre wall support
(strengthener 3) acts as a joiner
for the two end walls, fold the
walls around and glue fast to the
support.
Now add the inner floor (strengthener 4) this fits flush to
the top of the 2 wall supports (strengtheners 2 & 3)
4. Next add the chimney inner wall, carefully align the
windows to the openings and keep the chimney stack
edges flush.
Fold back and glue the base of the centre wall joiner flush to create
double thick base (strengthener 5).
This then fits flush into the gap of the centre wall.
Keep the apex edges flush at the top and sides flush with the base.
Like so.
Fold back this position tab.
Which then slots here.

5
5. Combine the 2 chimney supports (strengtheners 6)
into a solid block with all edges flush, then fix to the back
of the chimney inner wall, keeping the top and side
edges flush.
Now add the chimney stack, wrap the top
section around the chimney supports and glue in
place.
Like so.
6. Now to add the gable end. First add the windows, then any curtains.
GE1 - Door frame window
GE2 - Gable end window Then add the gable door to the
back of the door frame,
keeping the bottom edges flush
7. Wrap the gable end walls around the house base
fixing the walls flush to the centre wall joiner.

6
Now add the gable end inner wall
and door frame, again keeping the
windows/door aligned to the
openings.
8. Now add the gable roof, make sure the
edge is tight against the centre wall.
Paint the
underside of the
overhanging
sections of roof.
Then add the main roof so it fits
flush to the gable roof.
Add the smaller chimney
capping stone to the
centre of the larger
capping stone
Then add to the chimney
stack.
9. Below is a key to the laser cut barge board
components.
Large Barge board B (x3)
Large Barge board A
(x3)
Large Barge board C
(x3)
Small Barge board A
(x2)
Small Barge board B (x4)
Glue 2 of the small barge
board B’s into a block
keeping the edges flush.
Then add the small barge
board A, keeping the apex
edges flush, the longer
edges overlapping at the
base.
Like so.
Repeat to get a second set.
2B’s + A
B + B

7
Add the small barge boards to the chimney
dormer windows, keeping the apex edges flush.
Then add the dormer roofs.
Test the fit first so you know where to apply glue.
Now combine the large barge
boards. Combine 1 large barge
board C with A, keeping all
edges flush.
C
A
Then add one large barge board B
to the top of the combined A & C,
keeping the apex edges flush with
an overhang at the bottom edge.
Repeat to finish with 3 identical sets.
B
Glue into place the barge boards with the edges
flush with the edge of the rear, front and gable
roofs.
10. Lean-to.
Fig. 2. OPTIONAL ADD-ONS
1. Fix the lean-to door flush with
the door frame.
3. Align the roof window to the
openings of the lean-to roof.
2. Wrap the lean-to
walls around the
lean-to base
(strengthener 7)
4. Add the door
to the opening
on the walls
5. Then the roof, centred
and flush with the side
and rear wall.
Like so.

© Copyright 2019 Metcalfe Models and Toys Ltd.
8
11 . Extension.
1. Add the window,
E1 to the extension
window frame.
2. Wrap the extension
walls around the
extension base.
(strengthener 8)
4. Then add the roof,
keeping the rear and
side edges flush.
Like so.
12 . Bay Windows.
Wrap the bay window around two of the bay
window bases (strengthener 9) keeping them
flush to the top and bottom edges.
Carefully score the glazing along the dashed line
and gently bend the glazing to the same angle of
the bay windows. Test the fit and glue into place.
Then add the bay roof,
first test the fit so you
can see where to
apply glue.
Lay flat and fit the roof support
(strengthener 10) into the rear
slot on strengthener 9.
Like so.
Add a black square backing to the
rear of the bay window before fixing
to the main building, so the stonework
of the walls doesn’t show through the
bay windows.
13 . Finishing Touches. Add ridge tiles and chimneys.
The optional add-ons can be
placed in multiple locations
around the main building.
They also can be interchanged
with the add-ons from PN159
crofter’s cottage for more
customisation.
3. Add the window frame,
aligned to the window
openings.
Table of contents
Other Metcalfe Toy manuals
Popular Toy manuals by other brands

Hasbro
Hasbro Star Wars Revenge of the Sith Jedi Lightsaber... instruction manual

Mattel
Mattel HOT WHEELS DC THE JOKER FUNHOUSE instructions

E-FLITE
E-FLITE Viper 70mm EDF instruction manual

PLAYTIVE
PLAYTIVE 337988 2001 Instructions for use

Hasbro
Hasbro Hulk Attack Vehicle AGES 4+ owner's manual

Lil' Ride
Lil' Ride 80-109 instruction manual