METER TEROS BOREHOLE INSTALLATION TOOL User manual

TEROS BOREHOLE INSTALLATION TOOL
ASSEMBLY INSTRUCTIONS
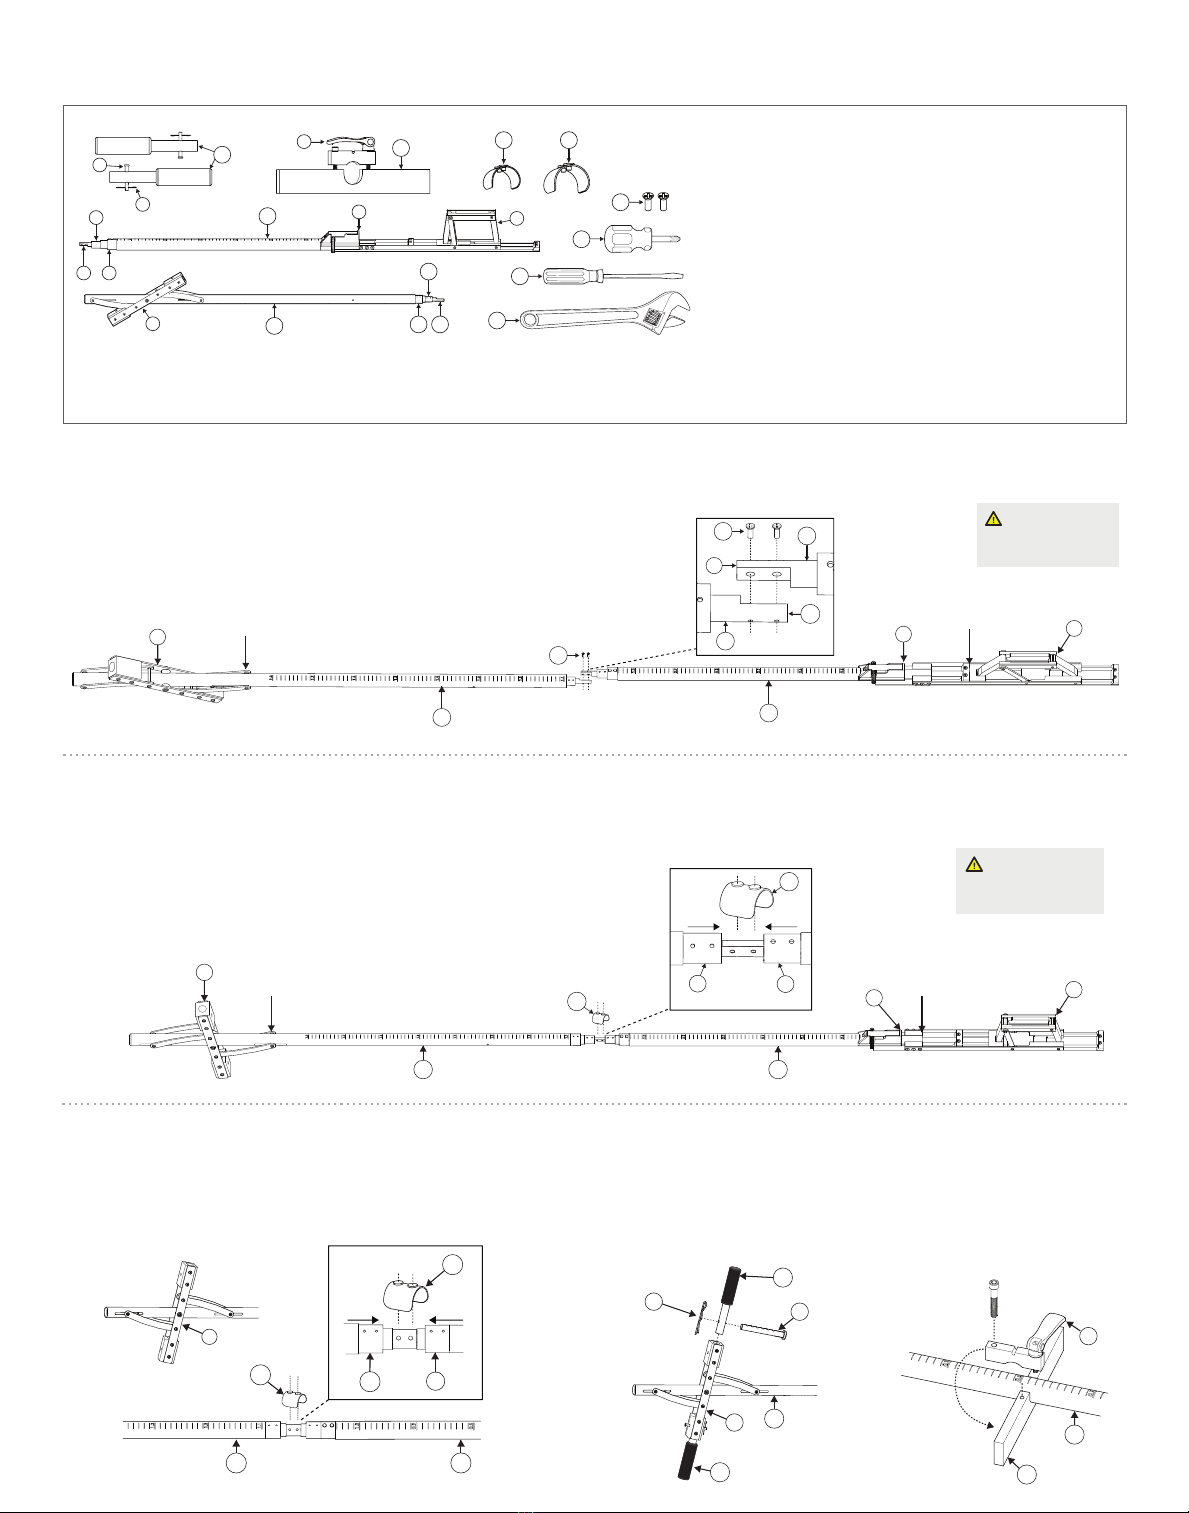
TEROS BIT ASSEMBLY INSTRUCTIONS
ATTACH UPPER INNER ROD + LOWER INNER ROD
1.Lay F and G as shown.
2. Move (9) on G to Upper position 1.
3. Move (8) on F to Upper position 1.
4. Align (4) and (12) so screw holes line up.
5. Insert E screws in each screw hole and tighten with I.
ATTACH UPPER MIDDLE SLEEVE + LOWER MIDDLE COLLAR
1. Move (9) on G to Upper position 2.
2. Move (8) on F to Lower position 2.
Lower position 2 is when the inner rod is pushed all the way to (7);
the sensor carriage will be in an extended position as shown.
3. Insert (5) into (11) and align holes.
Some wiggling, twisting, and pushing may be necessary.
4. Insert C into holes of (5) and (11). Make sure clip is seated all the way.
ATTACH OUTER SLEEVE + COLLAR
1. Rotate (9) on G and pull (6) until it slips over (10);alignholes.
2. Install D into the holes of (6) and (10). Make sure clip is seated
allthe way.
HANDLES + BASE PLATE
1. Insert A on (9). Insert (1) through hole in A and (9) and secure with (2).
2. Install B on F. Rotate top of B over F. Insert bolt and tighten. Leave
the bolt a little loose so B can be moved up and down F.
3. Use (3) to adjust B when preparing for desired installation depth.
A. Handles
B. Base plate
C. Middle clip (1.0 in)
D. Outer clip (1.25 in)
E. Screws
F. Lower assembly
G. Upper assembly
H. Flat-head screwdriver
I. Phillips®-head
screwdriver
J. Crescent wrench
1. Hair pin
2. Clevis pin (adjustable)
3. Cam lever
4. Lower inner rod
5. Lower middle sleeve
6. Lower middle collar
7. Stop
8. Sensor carriage
9. Lever
10. Upper inner rod
11. Upper middle collar
12. Upper outer sleeve
A
E
F
G
H
I
2
3
1
4
5
6
78
910
11
D
C
J
B
12
Connect inner rods
1
Upper
position 1
Lower
position 1
21
2
12
G
G
F
F
E
4
E
CAUTION
Be careful to not pinch
fingers when moving (8).
978
Connect middle sleeve + collar
21 21
Upper
position 2
Lower
position 2
11 5
C
C
GF
8
CAUTION
Be careful to not pinch
fingers when moving (8).
7
7
Connect outer sleeve + collar
6
D
D10
GF
9
F
G
A
A
B
9
3
1
2
NOTE: The assembled TEROS BIT is more than 8 ft long. Find a suitable assembling area that is at and large enough.
A 4-in auger with handle and extensions is included to aid in sensor installation.
18228-02
6.30.2018

SUPPORT
Have a question or problem? Our support team can help.
We manufacture, test, calibrate, and repair every instrument in house. Our scientists
and technicians use the instruments every day in our product testing lab. No matter
what your question is, we have someone who can help you answer it.
Email: support.environment@metergroup.com Phone: +1.509.332.5600
Popular Valve Positioner manuals by other brands


Burkert
Burkert 8694 operating instructions

Samson
Samson 3730-4 Mounting and operating instructions

Soldo Controls
Soldo Controls IOM-SX-SH01-01 Installation & operation manual

halstrup-walcher
halstrup-walcher PS*3**DN series instruction manual

tissin
tissin TS800 Series instruction manual

Ytc
Ytc YT-1200L user manual


