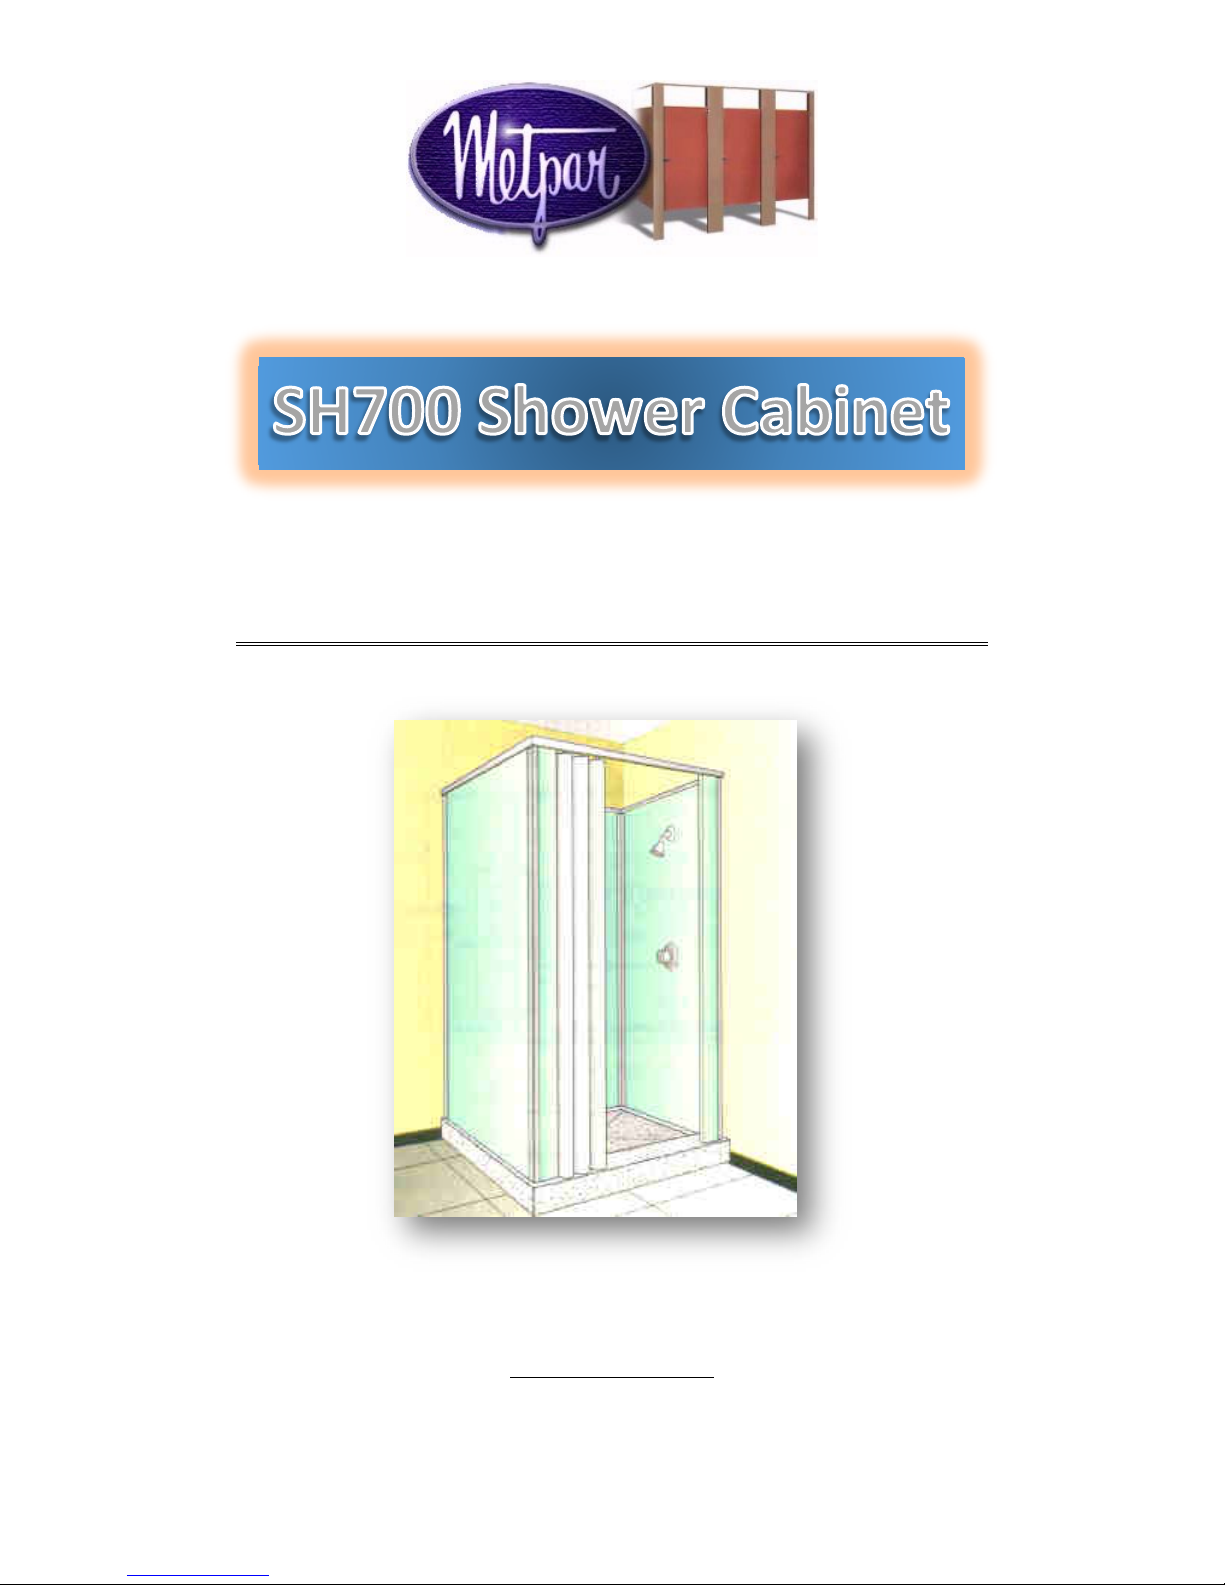
Metpar SH700 User manual
SH700 Installation.docx Page 1 of 6 7/6/2017
Installation Manual
Metpar Corp
95 State Street, Westbury, New York, USA, 11590 Tel: 516-333-2600 Fax: 516-333-2618
Internet: http://www.Metpar.com E-mail: Serv[email protected]
with Terrazzo Base

SH700 Installation.docx Page 2 of 6 7/6/2017
Table of Contents
•Stop! Before you begin Page 2
•A note to the plumber Page 2
•Metpar tips Page 3
•Step 1 - Preparation Page 3
•Step 2 - Terrazzo Base Page 4
•Step 3 - Prepare Rear Panel Page 5
•Step 4 - Install Rear Panel Page 5
•Step 5 - Install Side Panels Page 5
•Step 6 - Install Front Pilasters Page 5
•Step 7 - Set Top Cap Page 5
•Step 8 - Install Thresholds Page 5
•Step 9 - Secure Top Cap Page 6
•Step 10 - Accessories Page 6
•Step 11 - Care & Maintenance Page 6
•Step 12 - Need Help? Page 6
Before you begin, note the following…
•Caution, safety first! Be certain to have and use the proper safety gear.
•Plumbing fixtures and associated connections are
not
supplied by Metpar. Verify that pipes and waste
lines have been installed in their proper location before you proceed.
•This installation manual is intended to be used in conjunction with the toilet partition layout drawings or
standard SH700 shower details prepared by Metpar. Refer to the drawings/details for further information
such as; shower sizes, shower positions, pipe chase covers (if applicable) etc.
•When the material is shipped to you, an Initial Release (packing list) is included. Be certain that all items
you need have been ordered and shipped properly.
•Normally the shower terrazzo base will be installed by a professional plumber. It is this person who will be
responsible for setting the base(s) properly. Otherwise, there is no adjustment in the SH700 shower
cabinets. The plumb and level condition of the cabinet is solely dependent upon the properly level
installation of its base.
•
A note for the plumber…
•When planning the pipes, plumbing fixtures and waste lines, review the Metpar layout drawings carefully to
determine the position and location of the shower cabinets. Verify where the shower heads will be installed.
Also verify the location for the waste lines. Some shower bases have a center drain while others have one
that is offset.
•Plan ahead… the customer has an option to install the handicap shower cabinet on top of the finished
floor, or to have it recessed down into the floor by 2¼” so that the shower entrance is now flush with the
finished floor. If the base is set on top of the floor, then it is suggested to have a “ramp” installed to meet
the entrance of the shower base for easier handicap accessibility.

SH700 Installation.docx Page 3 of 6 7/6/2017
•Something else to consider… All SH700 shower cabinets are 82” high. If a handicap shower cabinet is
recessed into the floor, then the top will no longer align with top of another shower cabinet next to it.
Furthermore, if there are dressing compartments in front of the shower cabinets, or if there are toilet
partitions next to them, the headrail from these units will not align with the top of the handicap shower
cabinet. If the customer wants to avoid this, then the terrazzo base from the handicap shower cabinet
should be installed on top of the finished floor with a “ramp” to meet the base entrance.
•To determine the correct position of a square standard size shower base, look at the small inner lock flange
and find two (2) “V” grooves on two sides. Either of these two sides must face the entry to the shower.
Metpar tips…
•Plan ahead… coordinate all of the materials and hardware for each specific layout. Study your layout
drawings and evaluate any special conditions that may require custom size materials, unique hardware or
special tools.
•Read all of these instructions carefully and thoroughly. Reading this manual first will better prepare you
for the entire installation.
Step 1 - Preparation - Review the layout for the shower cabinets on the Metpar shop drawings. Carefully
check that the flange around the perimeter of the base is evenly spread and not crushed from installation. Note
that the smaller inner lock flanges have “V” grooves in them. One of these sides must face the entry to the
shower. Also review these 2 details.

SH700 Installation.docx Page 4 of 6 7/6/2017
Step 2 – Terrazzo Base – Level the terrazzo base with a layer of mortar in case the subfloor is uneven.
Grout any exposed edges.
DO NOT drop the terrazzo base over an exposed pipe. It is suggested that you remove the drain pipe, set the
base down, insert the pipe through the drain in the base into the trap and then tighten with an internal pipe
wrench.
A lead caulked joint permits limited movements such as normal structural settlement without leakage.
SH700 Installation.docx Page 5 of 6 7/6/2017
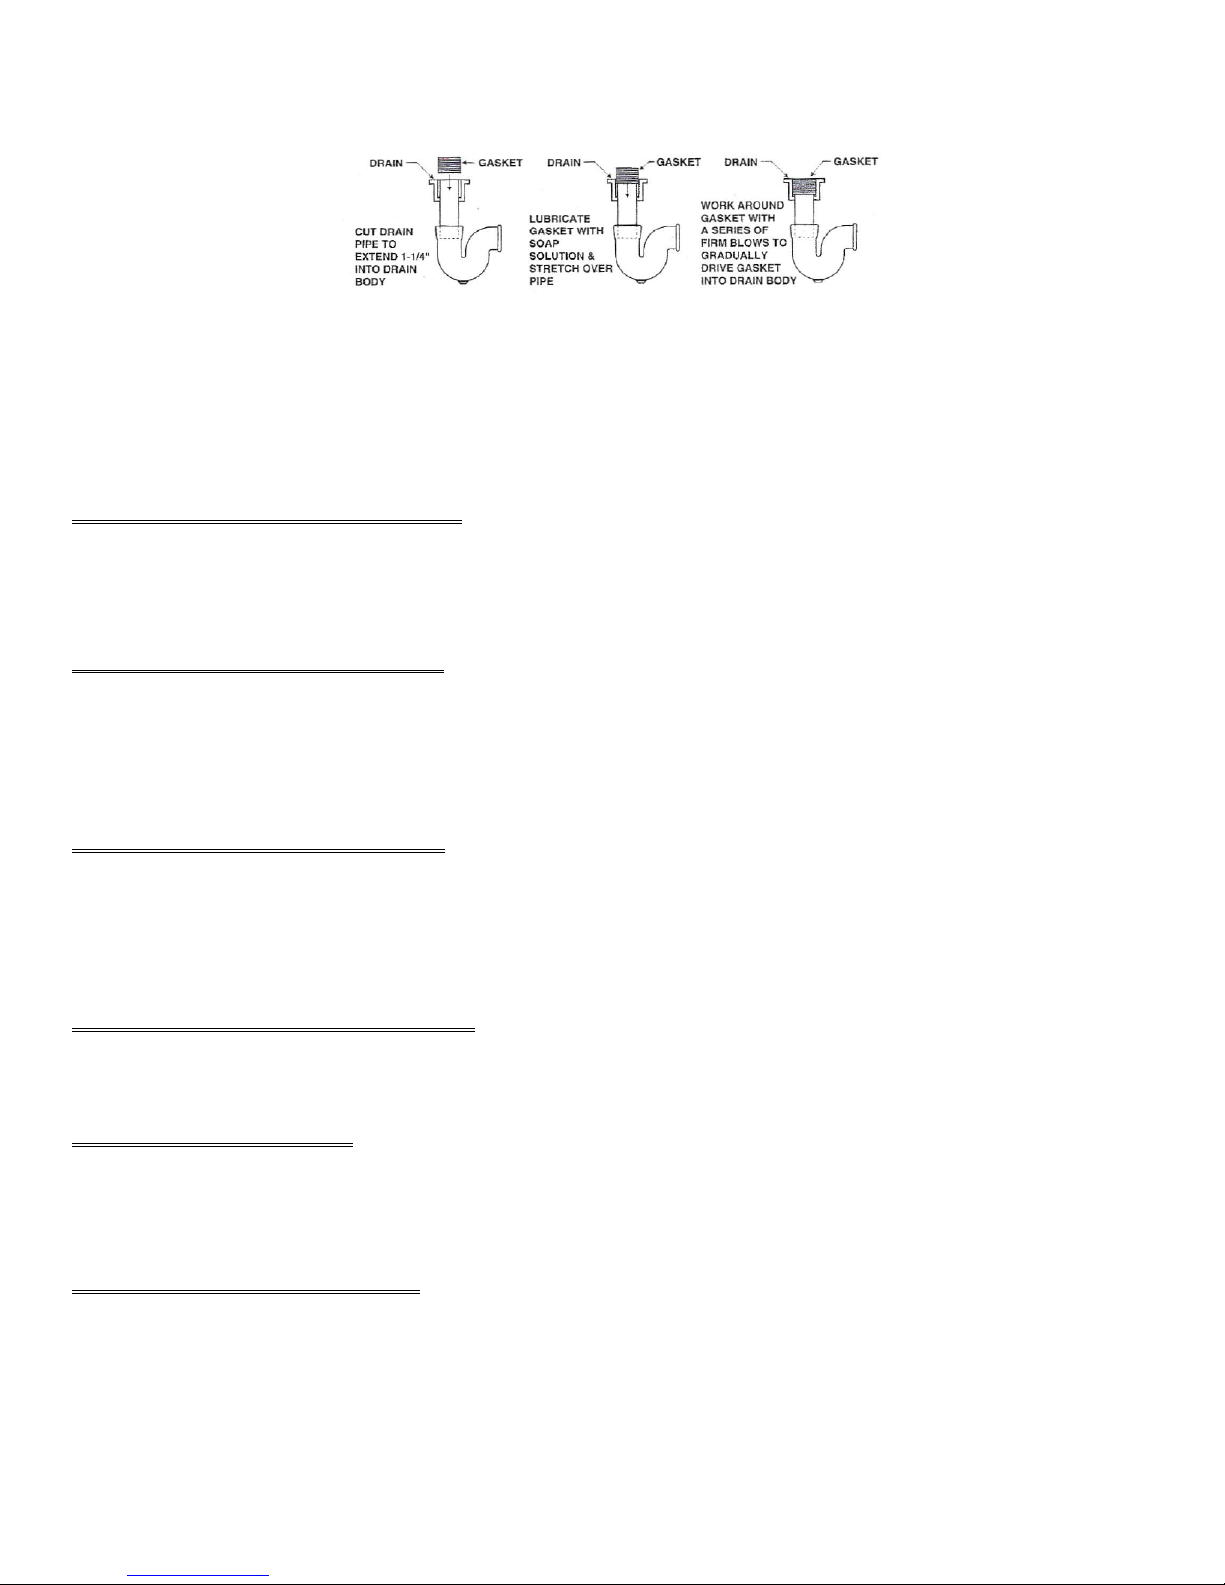
Cut the drain pipe to extend 1¼” into the drain body. The drain pipe should be even with the top of the gasket
when installation is complete. Position the terrazzo base over the waste pipe making sure that the pipe is
centered in the drain body.
Lubricate the gasket with a soap solution and stretch over the pipe. Push the gasket as far as possible into
the joint. Using a hammer and caulking tool, or a ¼” x ¾” x 6” piece of wood instead of a caulking tool, work
around the gasket with a series of firm blows and gradually drive the gasket into the drain body until it
bottoms out. The drain pipe should be even with the top of the gasket.
Step 3 - Prepare Rear Panels - Take the rear panel and place one aluminum corner post on each side.
The beveled end of the corner post points downward. The top end of the panel is flat while the bottom is uneven
due to one face of the panel being longer. The inside face of the panel is identified as the longer of the two faces.
Step 4 - Install Rear Panels - Lift the rear panel along with the corner posts and place the outside
bottom edge of the panel firmly against the inside of the rear flange of the base. Make sure that the corner
posts have fit between the two side flanges. Lower the panel into place so that it engages with the small lock
flange on the base.
Step 5 - Install Side Panels - Take one side panel and slide it into the rear corner post previously
installed with the rear panel. As you slide the panel into the back post, slowly lower it so it engages into the lock
flange inside the base. Repeat this for the other side panel. CAUTION: make sure that the bottoms of the panels
are down and the longer faces are toward the inside.
Step 6 - Install Front Pilasters - In a similar fashion as the other panels, install the two small front
pilasters along with the two front corner posts.
Step 7 - Set Top Cap - Slide the top cap over the top of the shower so that the top of each panel fits
inside the top cap. The cap has an additional flange along one edge which sits above the front entry of the
shower and accepts the curtain track.
Step 8 - Install Thresholds - Take one threshold and slide it down between the two small front pilasters
so it engages with the lock flange in the base. Take the other threshold and slide it up between the two small
front pilasters so it fits into the void under the cap. Secure this piece with screws through the holes in the top
cap.

SH700 Installation.docx Page 6 of 6 7/6/2017
Step 9 - Secure Top Cap - Make sure all of the panels are even at the top into the cap and secure in
place with screws through the holes in the cap.
Step 10 - Accessories - At this time, you can now install your accessories such as the soap dish, curtain
track, glides and shower curtain. If it is a handicap shower, you may also have grab bars and/or a seat to install
within the cabinet. A pipe chase cover may have been ordered to conceal any spaces between two or more showers
which were installed side-by-side.
Step 11 - Care & Maintenance - For general care and maintenance, all surfaces must be kept clean
with water and a mild soap solution or equivalent cleaner free from alkali, acids or strong ingredients. Water left
on units for extended periods will damages the surface. The finish must be wiped dry following cleaning. Areas
with high humidity must be properly ventilated.
A clean terrazzo base is not slippery. The factors of a slippery surface are the same as those encountered on
any smooth surface, primarily surface films. A residual film of cleaning material is a common cause. Take extra
care to rinse all surfaces thoroughly.
A penetrating sealer has been applied to the terrazzo base. A surface sealer that has been specifically designed
for the terrazzo surface can be reapplied periodically.
Step 12 - Need Help? - In the unlikely event that you need further help, you have several resources. First,
contact the Metpar representative from which you purchased the materials. They are best suited to assist you.
Another quick and easy source of information is the Metpar web site at Metpar.com. Here you will find a wealth
of information, details, specifications, technical support and so much more. Or, you can also contact us by email,
phone or fax.
Metpar Corp
95 State Street, Westbury, New York, USA, 11590 Tel: 516-333-2600 Fax: 516-333-2618
Table of contents
Popular Shower Cabin manuals by other brands


American Bath Factory
American Bath Factory Sistine Stone Double Corner-Hdm installation guide

TdA
TdA New Speedy Angolo manual

EAGO
EAGO DA333F8 Installation instruction

ERLIT
ERLIT Comfort 4512PL manual

glass 1989
glass 1989 SOHO QR Installation & maintenance manual

American Bath Factory
American Bath Factory Sistine Stone Corner installation guide