American Bath Factory Sistine Stone Corner User manual

ee the cloc n each secton or estmate nstallaton tme.
Please inspect shipment thoroughly upon receipt and before starting the installation.
Missing or damaged hardware and tiles should be reported within 24 hours of receiving this
shipment. If you need assistance, call 1-800-44-2284 Mon - Fri from :1am - 4 pm (PT)
ABF Corner Basic Hinged Install Guide Rev
CORNER
TM
Corner hoer ystem nstallaton e or asc ne acaes
Congratulations on the purchase of your new shower package. This guide will give you
the instructions on the installation of your new shower.
stne tone shoers are eal or an eperence er. lease rea throh ths entre nstallaton
e eore ennn yor nstallaton. yo eel yo can not conently nstall ths shoer y yorsel
hre a lcense contractor hanyman or proessonal nstaller that can o t or yo. nstallaton tme may
ary epenn on yor eperence complety o shoer an re-nstall rep or hch may
ncle plmn anor ran relocaton athroom emolton an sarn p sts an loor.
Watch our Installation and Product Videos on americanbathfactory.com/pages/videos
ror to emolton scheln yor nstaller or ln yor shoer ole chec that yo hae all the
parts rom the actory. ome applcatons may rere a lcense plmer or contractor. o not se any
proct spec sheets to en nstallaton eore recen proct. hese spec sheets are or reerence
only. se actal proct measrements only. he arams throhot ths e llstrate a
shoer th a hne oor. epenn on the se o the shoer prchase actal parts may ary n
se an loo rom the arams shon.
Or oal s to help yo achee a c an sccessl shoer nstallaton.

1CHEC YOUR SHIPMENT AGAINST APPROPRIATE PACING LIST
Mae sre yo hae recee all the tems necessary or the nstallaton. hs ll also amlare yo th all the parts an
harare yo ll nee to nstall yor shoer. acae contents are epenent pon hch pacae yo orere.
T T P
ea-ree hoer an
hreshol or oor
Channel hreshol or lass anel 2 pcs.
T T P
GD G D T
lass oor
e lass anels 2
oor anle
nes op ottom nstalle
oor ottom eep
oor ealtop 2
ran ssemly may e sol separately
op ne all racet
Corner pport racet
P
TD
et all anels 2
ht all anels 2
et ol tone or Mosac ner 1
ht ol tone or Mosac ner 1
e Casn or lass oor Cap
e Casn or lass anel Cap
TP
P
TD
L1
L2
CD
CP
L1 L2
GD GP GP
DH
GH
GH
DB
GS
GS
DA
HB
P
H
H
S
H
S
SB
CD CP
2
TP
CAUTION: handle glass door and glass
panels with care. Glass is heavy and fragile.
For best results, keep direct water sprays
(handshower/showerheads) away from the door.
Never install them directly opposite of the door or
opening. The vulnerable area of a frameless shower
enclosure is the door, so keeping direct water spray
away will ensure you have minimal water escaping.
Store panels and liners on a clean, flat surface only, as
well as all stone items. Leaning panels against a wall
will cause them to bow. Laying them out will also allow
the pieces to acclimate.
CAUTION: Do not use an elastomeric waterproofing
membrane on your backer board as silicone will not
properly stick to it.
Store
panels
and
liners
on
a
clean,
flat
surface
only,
as
well
as
all
stone
items.
Leaning
panels
against
a
wall
will cause
them
to
bo
w.
Laying
them
out
will
also
allow
the pieces
to
accli
mate.
CAUTION:
Do
not
use
an
elastomeric
waterproofing
membrane
on
your
backer
board
as
silicone
will
not
properly
stick
to
it.

hs shoer system s esne to e nstalle on a leel are loor. t s necessary or any estn shoer to e
completely remoe. ear ot an remoe all ol materal to epose the 2 all sts. Clean p the shoer area
remon all st an ol materal rom the area.
Cold Weather Warning e recommen not nstalln yor shoer elo the temperatre o . he shoer ll e
ne n col eather ater nstallaton t rn nstallaton enn an hanln shoer components n col eather
can case reaae. r contons can mae some shoer components rttle an ssceptle to cracn rn
roh nstallaton hanln.
DRY-FITTING THE PAN M
½ to 1 HR
cement oar
2 st
pan
diagram 1
loor o pan
metal lane
slcone ea
P
t s easer to chec alnment o sts an pan thot the
ran nstalle nto the pan.
lace the pan n the planne poston. Chec to see that
the spacn eteen the metal pan lane an 2 sts
are lsh. ome shmmn or sann o the 2 sts may
e rere to lsh the sts th the metal pan lane.
hen scren n the cement oar the metal lane
ll pll ast to the sts an ll secre the pan n place.
dia. 1
PRE-INSTALLATION TEAR DOWN M
8-16 HRS
2
OPTIONAL ITEMS
SHAMPOO BO SHOWER BENCH
NOTE: Due to some rough handling during shipping, water
test pan before installation to check for any issues.
SILINE
ach shoer ll typcally rere eteen 12-2 tes epenn on yor se an conraton. here are erent
rans that mae slcone e.. OC or ... or e also recommen the se o lcone . o
can prchase slcone on or este ner hoer ccessores.

diagram
diagram 2
11 or shampoo shel
11
trple sts
oerhan
mnmm
ap rere
or shampoo
shel
oerhan hen sn trple sts no oerhan hen sn ole sts
ole sts rere trple sts recommene or etra strenth
2 x 4 STUDS ALIGNMENT & POSITIONING M
½ to 1 HR
sn the pan an all panels yo ll e ale to chec to mae sre yor 2 sts are n the neee poston
an spporte aeately. o ll see n a. 2 etra 2 sts are ae to the oor an lass se threshols
or etra strenth. o may nee to mae astments or yor a shampoo shel. hen yo place the ottom
sectons o the all nto the shoer pan yo can also calclate the neee th an heht o areas to eep ree
o 2 sts. ee nstallaton nstrctons or shampoo shel hs s also hen yo shol a yor etra spport racn
or those ho nee them or yor other accessores sch as the shoer ale ra ars enches or sheles.
INSTALLING DRAIN (may be sold separately) M
½ to 1 HR
1.
ocate the ran assemly to nstall nto pan.
2.
.
.
ae ran assemly apart an set parts 1- n a sae place or
nstallaton later.
pply a eneros ea o 1 slcone aron the shoer
pan ran hole an aron the otse o the ran collar
nsert the ran collar nto the ran hole.
pply a eneros ea o 1 slcone aron the ran collar
rom the nerse o the pan.
nstall the rer aset oer the ran collar to the
nerse o the pan net nstall the sle rn .
.
.
cre on the ran loc nt an han thten. rn ran loc
nt appromately 1 trn th the rench to ensre a
ater-tht t. Chec or a oo seal. O O O.
pe o ecess 1 slcone an allo to ry. ollo the
manactrers rectons or applcaton an ryn tme.
1 trm plate
2 ran tool
3 pressre rn
4 rer seal
apply slcone
ner ran collar
lp an on threas
hole n loor th
2 ran ppe
ran collar
pan
6 rer aset
sle rn
8 ran loc nt
.
shoer pan
ran hole
SET ASIDE FOR
INSTALLATION
LATER
ran
collar
LATER

CEMENT BOARD INSTALLATION M
1-2 HRS
diagram
slcone
apply
slcone diagram
e recommen the se o thc cement oar as yor shoer acer. hs s a common acer or stone an tle.
sn ths acer ll help comply th almost all cty coes. proct le oneroar or areacer may e
se t meets yor local coes. ome coes may also rere a apor arrer e nstalle. e recommen sn a
ml. plastc aterapor arrer an shol e nstalle pror to the cement oar. o o ths staple plastc so that t
hans 1 aoe the loor. DO NOT USE AN ELASTOMERIC WATERPROOFING MEMBRANE ON YOUR CEMENT BOARD (such as
RedGard). oon nals may e se to attach the cement oar nstea o scres ths preents the plastc rom
rappn aron the scres.
SETTING PAN M
½ HR
ct ot e
o ran
collar oer
2 ran ppe
1 trm plate
2 ran tool
3 pressre rn
4 rer seal
1.
o that the ran s nstalle onto the pan an has re ry t the pan an yor
ran or alnment. Chec to mae sre the 2 ran ppe s n the center o the
pan ran hole an that the 2 ran ppe oes not eten past the nse threas
o the ran collar.
2.
Mae sre the pan an ran t leel to the loor.
.
emoe pan an apply 1 lcone to loor. a.
.
Carelly lt the shoer pan an set nto place. Mae sre the ppe s stll
centere.
.
nsh nstalln the ran assemly. n the rer seal an sle onto the 2
ppe. o can se soapy ater to help t sle on the ppe t shol seat
aanst the ottom o the ran collar.
.
et rop the pressre rn nto the ran collar an se the ran tool 2 an
a lat hea screrer to scre t ntl t toches the rer seal. emoe the
ran tool ater the pressre rn s nstalle.
.
est an snap that the ecorate trm plate 1 sts nto poston. o may nee to
ast the tas or a oo t. emoe the ecorate trm plate an store n secre
area ntl nstallaton s complete ran ll e rote hen shoer s rote
.
ter nstalln pan coer th caroar or rop cloth to protect pan rom
scs.
IMPORTANT se yor cement oar as an ncator o sareness. he cement oar
comes n sare sheets. yo see aps or areas here the cement oar s not ttn
lsh the prolem y remon the cement oar an shmmn the oar ntl ts
sare an lsh. the seams o the cement oar are not lsh an sare yor all
panels ll not e sare an lsh.
1. Ct cement oar to t nse the metal lane. ann or shmmn the 2 s
at the top rm o the pan may e rere to lsh the cement oar.a.
2. lace a ea o 1 slcone on the ront ace o the shoer pan lane.
he ea shol e n a -a pattern.
. lace the cement oar aanst the sts an rest t nse the shoer pan
aanst the ac lane. ttach the cement oar to the sts th scres or
nals. o not scre or nal nto the shoer pan lane.
. Contne nstalln the remann cement oar.

TP
pan
threshol or oor
PAN THRESHOLD & SIDE CASINGS M
1/2 - 1 HR
- Pan Tresold
threshol or panels
TD
B - Glass Door and Glass Panel id Casing Trim
1. ocate the oor se casns an the lass panel se casns P.
2. o help th the se casn nstallaton se a leel an ra a plm
lne rom the nse o the pan threshol p to the top o the shoer. o
ths on oth ses. hs lne ll e here the se casns an the all
panels meet ths ll e yo a sal reerence pont hen ry-ttn
yor all panels.
. pply 1 slcone sn a crclar pattern to the cement oar
alon the plm lne appromately nches e to the ee o the
shoer pan. a. 1
. lace the rst se casn nto poston man sre to aln the se ral
th the ertcal plm lne preosly ran on the cement oar.
pply pressre to the se casn to on t to the cement oar. he
se casn ll e lsh th the nse o the shoer pan threshol an
hae a small ap here the pan threshol slopes. a. 11 o can shm
the ap neee. Mae sre to also aln the channels.
. lace the remann se casns nto poston to each se an cap.
se a leel an the plm lne preosly ran on the cement oar to
aln the se casns ertcally.
diagram
panel channel se
Casns Cap CP
diagram 9
oor se Casns
Cap CD
diagram 1 diagram 11
cement
oar
slcone
lsh th threshol
small ap
diagram
pan
silicone
Threshold for No Glass or Hinged Door
TD
diagram
pan
silicone
Threshold for Hinged Glass Panel
TP
1. ocate the threshol peces
o lass shoers hae 2- threshol peces TD a. top
ne lass shoers hae 1 oor threshol an 2 lass channel
threshols T P a. ottom
2. ry t threshols onto the ront o the pan. he oor threshol oes not
hae a channel n t. he oor threshol s not reersle.
. emoe an apply 1 slcone n the pan here the threshols sts n
eteen each se ner an n ront o the threshols themseles.
hs s yor ater seal se a contnos ea an apply slcone enerosly.
hen re-nstall threshols onto pan an press rmly n place. here may
e a small ap eteen the ottom o threshols an the loor ths
can e rote later t s stll epose ater nstalln athroom loor.
diagram

WALL PANEL/LINER INSTALLATION M
3-4 HR
- nseing all Panelsiners
nspectn panels at ths pont ll e yo conence that the all panels are straht an sare rom the actory.
hen nstalln all panels yo may nee to mae astments to the panels to accommoate or neenness o
yor estn alls. rn the nspecton process anor ry-ttn process yo hae any concerns aot the
alnment or t o the all panels please call s an e ll laly assst yo th yor nstall.
1.
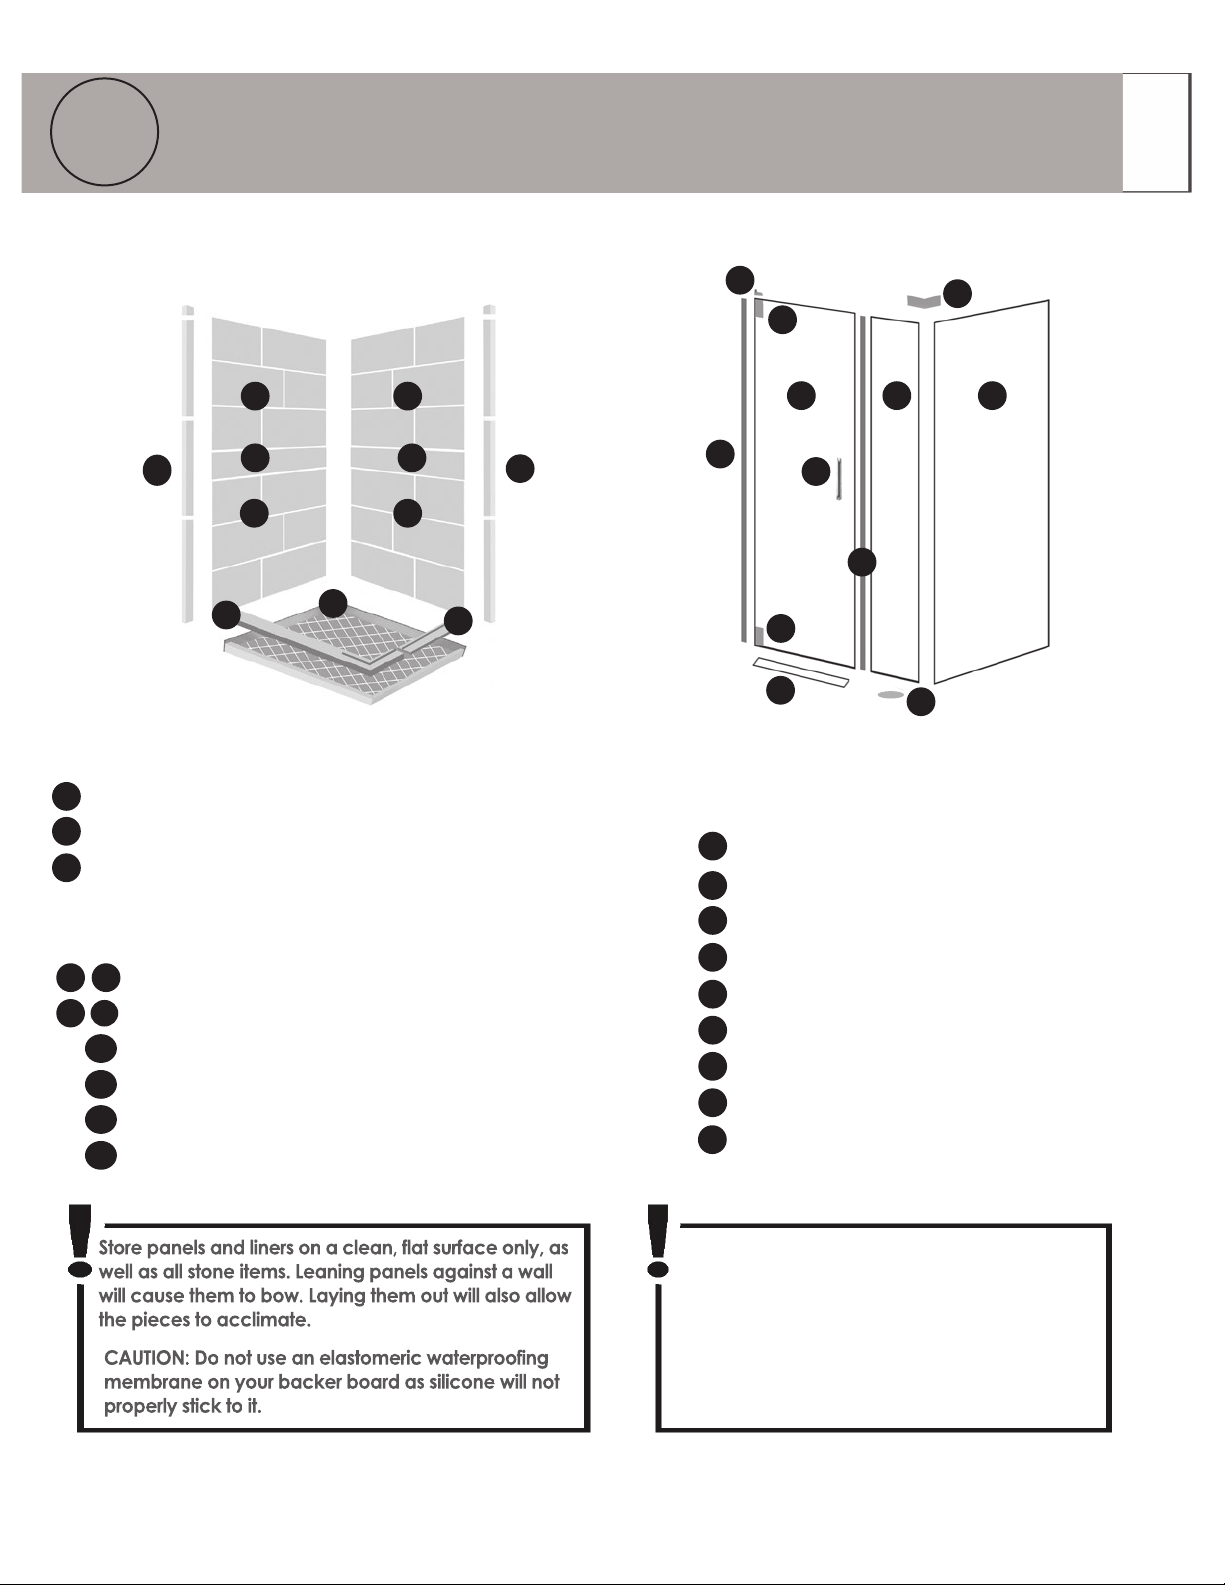
n a lare lat area to layot an nspect all panels.
2.
ln all panels an lners to chec or strahtness. Mae sre rot lnes are straht an sare to each other.
.
stne tone all panels are mae to e lele an may hae a slht o. hs conton s normal an all
panels ll latten ot hen properly nstalle. all panels hae een store mproperly or hae ecome
ecessly oe they can e correcte eore nstallaton. (ee troueshooting setion on ast age or detais)
B - Dr-i all Panelsiners
1.
2.
.
.
.
diagram 12
diagram 1
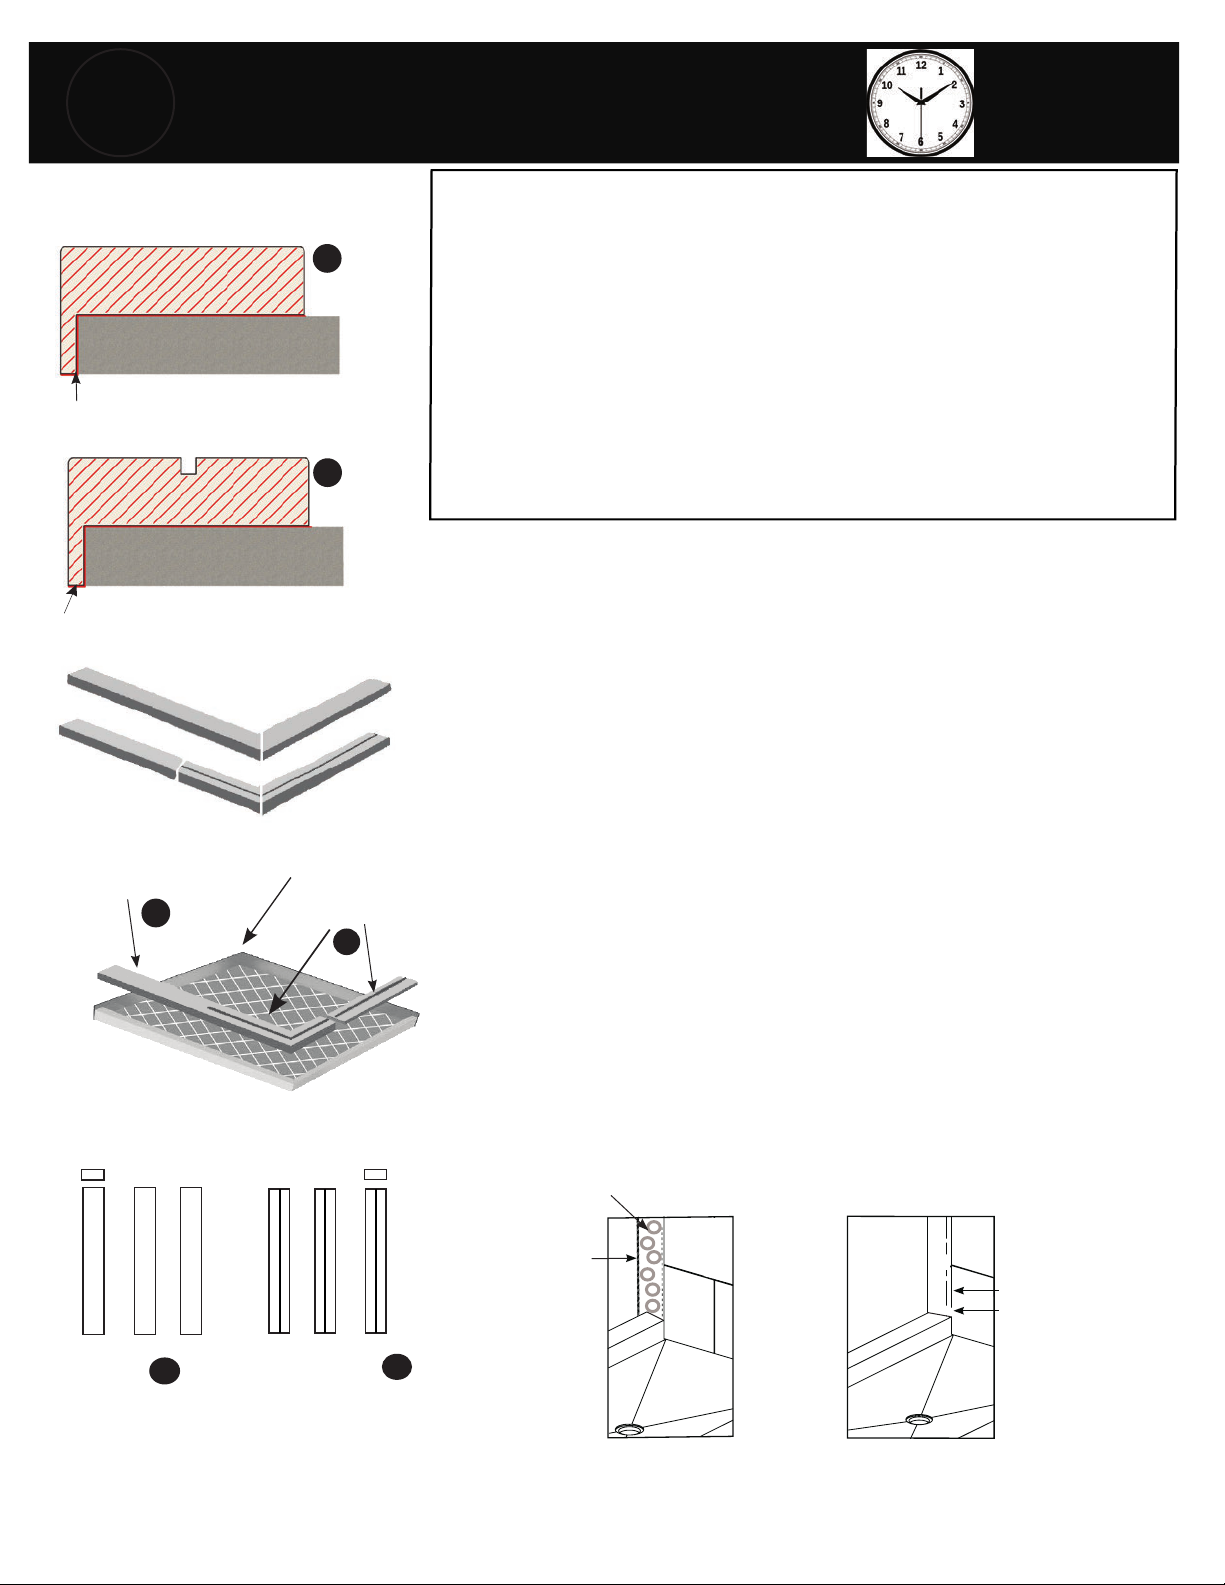
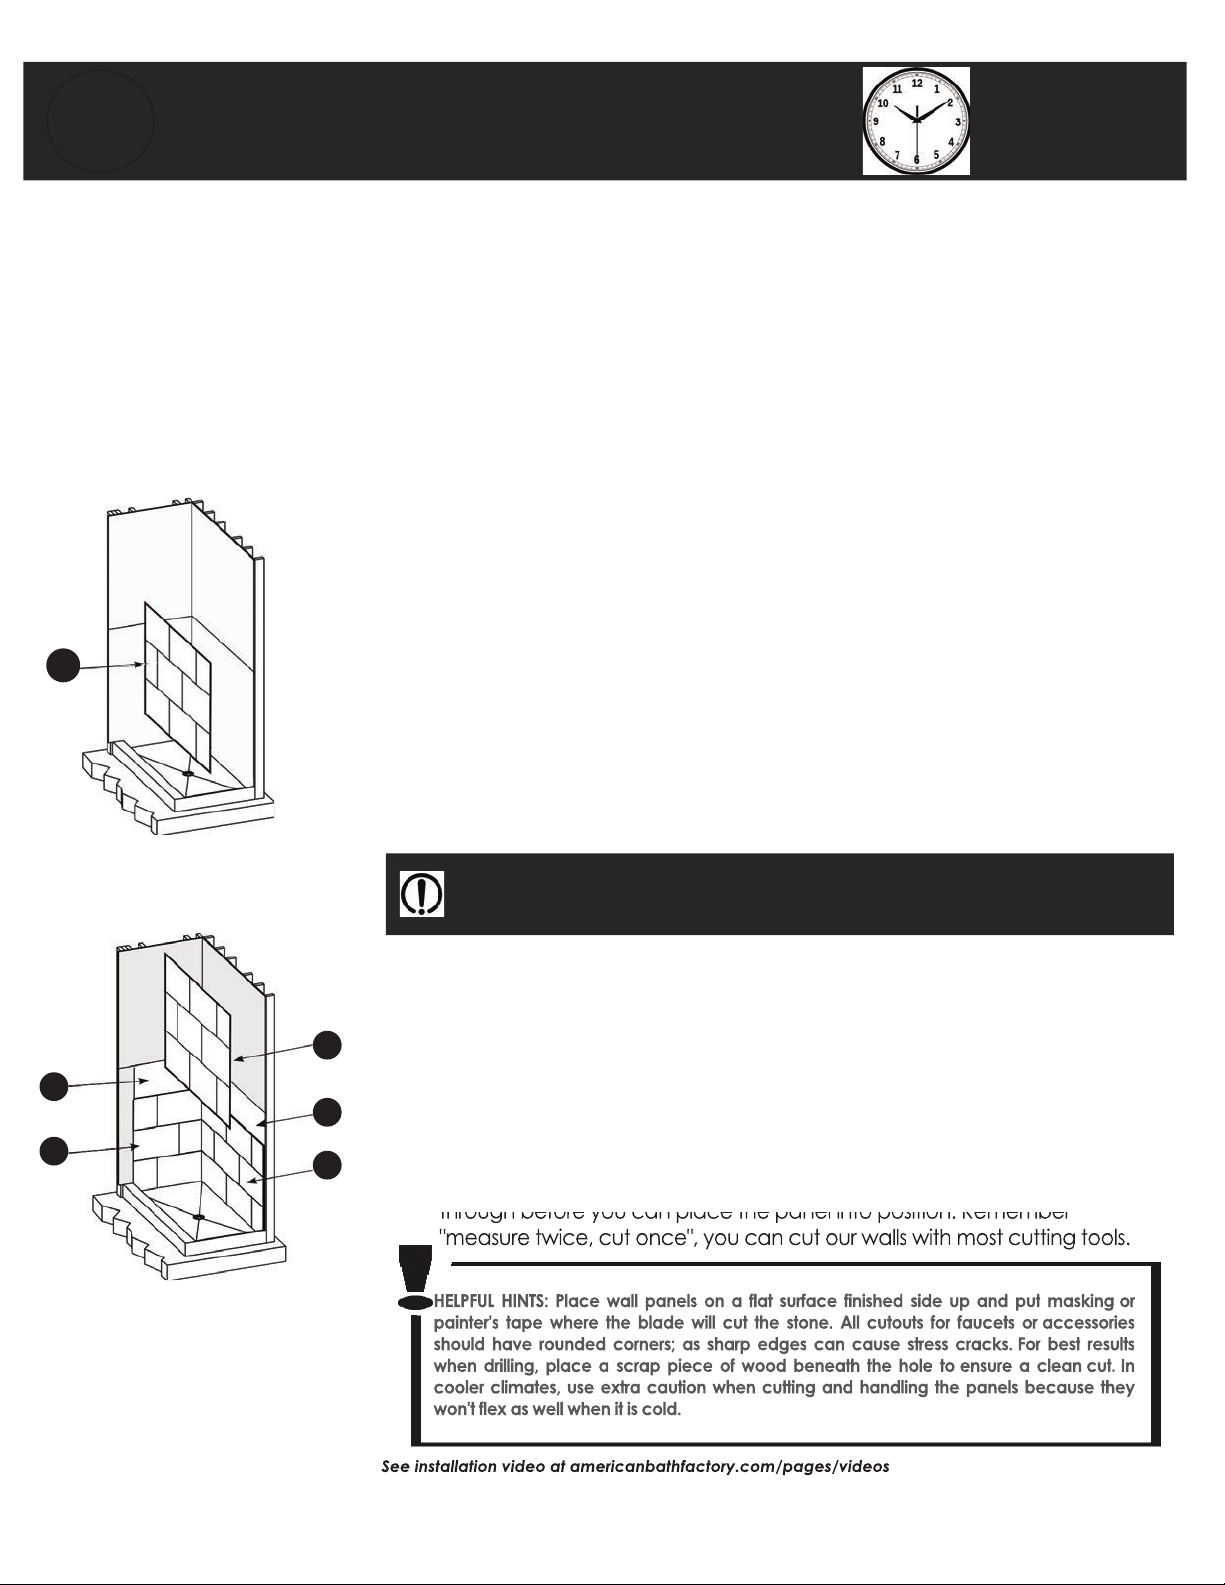
. lace the se lner nto poston. a. 1
. lace one o the top se panels
nto poston.
. epeat steps throh or other se o shoer.
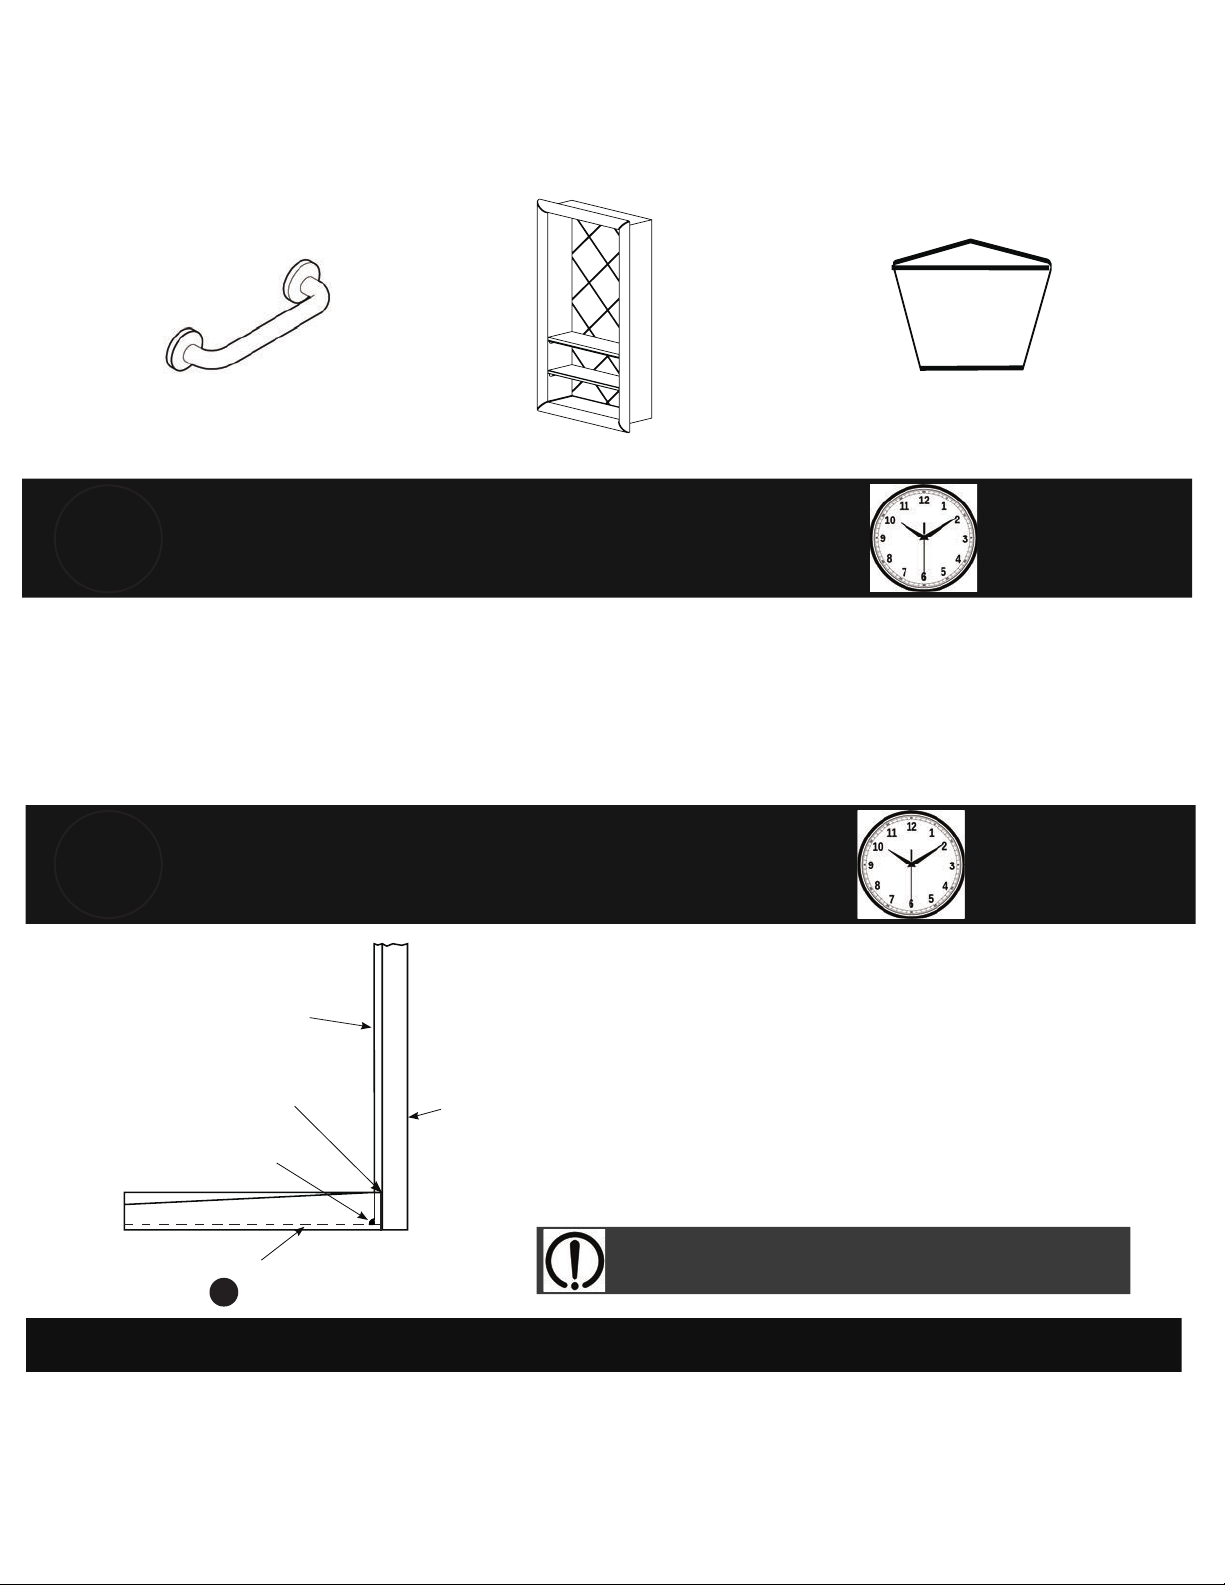
1. epenn on yor acet selecton yo may nee to mar an ct
ot holes or yor acet an other accessores .e. shampoo shel to t
throh eore yo can place the panel nto poston. ememer
measre tce ct once yo can ct or alls th most cttn tools.
L1
L2
.
lace yor rst ottom ac panel nto poston. a.12 est onto the pan
loor yo can se spacers eteen the loor an the panel to mae the
top o the panel leel.
lace the ac lner nto poston. Mae sre the rot lnes are alne
se spacers to mae the top leel. nspect the spacn eteen the all
panels an the se threshol plm lne.
lace the top panel nto poston psh the to panels toether. Mae sre
the rot lnes are alne se spacers to mae the top o the panel leel.
nspect the spacn eteen the all panels an the se threshol
plm lne.
epenn on yor cement oar alnment some sann o the all
panel ees may e rere or a tht t.
DO NOT force the panels or liners to fit in a tight space. This will cause the panels to bow or
curve and can cause them to break. Due to the resilient flex in the panels any bowing
will cause the silicone bond to break away from the walls surface.
oln the pper panels an lner n place th another person helps
chec the lenth an oerlap alnment. ome ttn may e rere.
lace one o the ottom se panels nto poston an chec or leelness
an lenth.
ee insallaion ideo a amerianaaoromagesideos
HELPFUL HINTS: Place wall panels on a flat surface finished side up and put masking or
painters tape where the blade will cut the stone. All cutouts for faucets or accessories
should have rounded corners; as sharp edges can cause stress cracks. For best results
when drilling, place a scrap piece of wood beneath the hole to ensure a clean cut. In
cooler climates, use extra caution when cutting and handling the panels because they
wont flex as well when it is cold.
throh
eore
yo
can
place
the
panel
nto
poston.
ememer
measre
tce
ct
once
yo
can
ct
or
alls
th
most
cttn
tools.
ee insallaion ideo a amerianaaoromagesideos
HELPFUL
HINTS:
Place
wall
panels
on
a
flat
surface
finished
side
up
and
put
masking or
painters
tape
where
the
blade
will
cut
the
stone.
All
cutouts
for
faucets
or accessories
should
have
rounded
corners;
as
sharp
edges
can
cause
stress
cracks. For
best
results
when
drilling,
place
a
scrap
piece
of
wood
beneath
the
hole
to ensure
a
clean
cut.
In
cooler
climates,
use
extra
caution
when
cutting
and
handling the
panels
because
they
wont
flex
as
well
when
it
is
cold.

C - nsalling Panels
1.
2.
. ress the all rmly nto poston. e sre to se spacers eteen the
ottom panel an the shoer pan to ensre panel s leel. aram 1
. nstall the remann panels n the ollon orer L L
diagram
L
L
. Match the space eteen the panels th the rest o the rot lnes
on the panel. se spacers necessary to mae the alls sare an
straht.
OPTIONAL SHAMPOO SHELF INSTALLATION M
1/2 - 1 HR
11
.
On the 2 tles the hampoo hel ll e replacn
mar 1 rom the otse o the rot lne the ct-
ot area ll e 1 22. Ct ot the hole or the
hel. he smaller the hole the etter.
.
ry-t the hampoo hel or alnment o rot
lnes.
.
sn 1 lcone n-place th a eneros
ea aron the ac o the lp pe o ecess
slcone th tsse.
1.
he hampoo hel as esne to match yor tle
se. 12 2 tles the ct-ot hole se s 1 22.
2.
here s a 1 lp or rame aron the hampoo hel
ths ll e the ater seale area or the hampoo
hel.
.
he est ay to ct the hole s th a small ron
amon lae an th a sa to ct the corners.
ee deailed insrions enlosed i amoo
el
WALL PANEL/LINER INSTALLATION (continued)
M
3-4 HR
1
emoe all st an rt th a clean ry cloth. hs ll ncrease the
on to the 1 slcone.
tart th the ottom panel apply a eneros amont o 1
slcone to the cement oar an to the ac se o the all
panel. eer to the manactrers recommenatons or
applcaton an ryn tme.
Br aces may be reuired to keep walls flush
applcaton
an
ryn
tme.
Br
aces
may
be
reuired
to
keep
walls
flush

hne
pn
se
plate
diagram
se
plate
hne
pn
inside
soer
oside
soer
telon sle
asher
telon sle
asher
hne all
racet
scre
places
1.
2.
.
.
.
.
nscre the lon olt rom the hanle. eep all rer peces attache to the
scre.
emoe the rst set o lat clear ashers rom the olt.
tart th the top hole on the lass oor. lace the lon olt throh the hole n
the oor eepn the remann rer peces on the olt. On the other se o the
lass place the lat ashers onto the threae porton o the olt. a. 1
ae one se o the hanle an scre the lon olt nto the en. st start the
olt ntl a e threas catch. eep loose. a. 1
t the secon olt throh the loer hole. lace the lat asher onto the olt.
cre the olt nto the ottom hanle. a. 1
ln the hanle on the oor an carelly thten the lon olts. o not oer
thten.
lace the opposte hanle oer the lon olts an thten the set scres to
secre the hanle.
B - inge nsallaion
ocate the top hne GH an remoe the se plate y loosenn the to
scres. a. 1
pply a eneros amont o slcone onto the hne an se plate.
oston the hne onto the lass oor lnn p the holes so that the scres are
on the nse o the shoer oor.
ttach the se plate th slcone apple to the lass an thten the scres
ntl the hne s secre. pe o the ecess an allo to ry.
epeat these steps or the ottom hne.
o ll also n a nyl ater hel or the ottom hne. hs can e ae
n eteen the lass oor an the se plate to help eep ater n the shoer
shol yo hae a smaller shoer or a shoer-hea ponte toars the oor.
a. 1a ee maes elo or llstrate nstallaton eamples. o may trm
the ater hel as neee.
- andle nsallaion
1. et the lass oor n a poston to enale the assemly o the hanle.
2. oosen the set scres so yo can separate the hanles.
.
.
.
.
.
.
.
diagram 18
clear asher
clear
spacer
clear
asher
set scre
shower
inside
shower
outside
scre
DH
DH
HB
GH
12
lass
poston
assemly
Be careful not to rest the edges of the on hard
surfaces. Tempered glass is very strong and impact
resistant but its weakest point is impact on the edges.
HINGED DOOR INSTALLATION
SIP THIS SECTION FOR NO GLASS
in water shied
diagram 19a
se
plate
in water shied
diagram 19a
se
plate

1
1.
ently nsert the se lass panel nto the channels. th someone helpn yo
place the oor retrn lass panel nto the oor ral. nstall the corner spport
racet. dia 2 o ll e astn the e lass panel so ts leel th the
oor an has an een ap eteen the oor an the lass panel. se rer
settn loc to ast heht an leel necessary.
2.
et to etermne the poston o the ottom hne pn hole place the top hne
pn racet pse on on ottom pan threshol as a template. dia 2 ln
racet hole to center o se lass panel. Mar the hole an remoe the racet.
Carelly rll a hole or hne pn appromately 1 eep nto the pan
threshol.
.
c p the oor yo hae nstalle the hnes an hanle onto an ently place
the ottom hne pn nto the hole yo hae rlle nto the pan threshol.
maig r a id ar i
D - nsall ied Glass Panel Glass Door
1.
2.
.
th someone helpn to hol the shoer oor place the top hne montn
racet dia 22 oer the top hne pn maig r a id ar
i. Chec to mae sre oor s plm an leel then mar th a pencl
throh the holes on top hne montn racet.
Moe oor an top hne mont to one se an pre-rll the holes nto the sts.
he rlle holes shol e lare enoh so the scres ont n n the stone.
nsert an thten scres.
et ry-t the se panel nto the correct alnment th the oor remoe the
lass an apply a ea o 1 slcone nto the channels. e-nsert the e
lass panel an chec alnment aan. llo the slcone to ry. o can slcone
any aps eteen the stone an lass to ensre ater thtness.
diagram
diagram
aset aset
SB
C - Dr-i ied Glass Panel Glass Door
se all
casn top hne
pn racet
pn hole
pan threshol
diagram
lass
oor
to nse
o shoer
o eep oor
close ast heht
o oor seep to
proe proper
tenson an seal
*
hoer hreshol
diagram
lass
panel
stre
se
oor
hne
se
inside soer
oside soer
GD
GP
GS GH
h-seal
L-seal
hne
pn
se
plate
diagram
se
plate
hne
pn
inside
soer
oside
soer
elon sle
asher
telon sle
asher
hne all
racet
scre
places HB
GH
- nsall Door ee eals
ocate the clear oor seep an attach t to the ottom o the lass oor. he
relecte shel shol ace nto the shoer. a 2 The door sweep is what keeps the
door closed. st the oor seal ntl the rere tenson s achee. he oor
seep has een ct to t oer the hne. Ct o the ecess lenth opposte o hne
se.
e hae proe oor seals or ater senste areas sch as oo loors. lass
panels an oor are nstalle correctly th the proper spacn otse ater spllae
ll e mnmal an the se seals ont e necessary.
yo ol le to se these se seals ollo the steps elo
1.
2.
.
.
.
.
.
he L-shape seal oes alon the hne se o the oor on the threshol trm
peces. a. 2
lace the seal alon the ee o the lass an ct the seal to the proper
lenth.
emoe the acer rom the seal eposn the ole-se tape only
remoe a small amont at a tme.
tartn rom the top aln the seal alon the ee o the oor an stc the
seal to the threshol.
or yor ay on the oor. o small sectons at a tme sloly peeln the
acer o the seal.
ocate the plastc h-shape seal. t oes on the e lass net to the hanle
ee. a. 2 Measre an ct the seal to lenth.
tartn rom the top psh the seal onto the lass panel sloly orn yor
ay on.

1 ACCESSORIES
lcone
rll t
S I: rst place yor shel n esre locaton. se a
pencl to mar the montn holes. et rll ot the plot holes. nsert
the anchor throh plot holes apply slcone to ac ee o shel
an then scre shel to all.
HELPFUL HINTS :
hen rn ot the proper heht or yor shel ts a oo ea to conser eeryone that ll se the shoer.
erocally chec the slcone an cal or any ear or eteroraton an correct as necessary.
TS:
encleel
Cal n
rll
1. horohly clean the srace on hch the shel ll e ahere.
2. lan heht or nstallaton o the shel. ry t the shel an san the ac
ee as neee to allo or a oo t.
. o can nstall the shel th slcone or the scres ncle
a S I: pply slcone to the ac ee o shel an press
rmly n place applyn een pressre. o may se panters tape to
help hol t n place hle t res. llo to ry or 2 hors.
anters ape
Cal
hllps ea crerer
pone
Clean Cloth
ne rt anpaper
ac ee o 12 shel
S S
11
.
o can nstall the soap sh th slcone
a.
S I:
pply slcone to the ac ee o shel an
press rmly n place applyn een pressre. o may se panters
tape to help hol t n place hle t res. llo to ry or 2 hors.
. Once slcone has lly cre apply a ea o slcone cal aron the
permeter o the shel to seal ot ater. se a et ner to smooth the
cal an then clean o ecess th a amp spone.
. llo to lly ry eore se.

1
GROUT
hone --22 a 1--1
st s at .amercanathactory.com
T TBTG
C TC T
Correcting Bowed Wall Panels stne tone all anels are mae to e lele an may hae a slht o. hs
conton s normal an the panels ll latten hen properly nstalle. the panels hae een store mproperly or
hae ecome ecessely oe ollo nstrctons elo. sn a har ryer or heatn palanet arm p the
acse o the panel n the most oe area. Once the panel ecomes malleale lay panel on a lat srace an
apply eht ntl cool an lat.
Cracked Tile s th any tle proect a tle can ecome amae. mply ct ot the amae tle slcone a
replacement tle n place an rot.
Cracked Wall Panel Seam yor all panel eelope a crac n a rot lne smply rot oer the crace seam
hen t s nstalle. he rot ll correct the prolem yo ll not e ale to tell the crac as eer there.
Scratches & Blemishes Can e remoe y et-sann the tle srace. Mae sre tle srace an sanpaper are
et an san tles ntl scratches an lemshes are remoe.
Door Will Not Stay Closed st heht o oor seep to proe proper tenson an seal.
Door Leaking he shoer oors are esne not to lea ner normal sae hen nstalle properly an the ater
lo s not ponte rectly at the nyl seals hnes or openn.
or mercan ath actory shoer has a non-poros srace hch maes t easy to clean. ecorate lnes n the
shoer all panels an stne tone loor accents e.. amon can e rote preerre t t s not necessary.
hoers th any lass tle accents mst e rote. rot mst contan an CC to ensre proper
onn to the tles. e sest rotn n eery non ont o shoer components.
hese are to recommenatons e hae or rotn the shoer
1.
ratonal poere rot that s non-sane an nstea o ater e recommen mn th an acrylc ate
to a n aheson
2.
o can also se a pre-me non-sane rot ths comes reay to apply no mn necessary ths normally
comes n caln tes no ate neee
o not let the rot ry completely onto the shoer eore remon an cleann o the ecess rot. rot s
alloe to ry onto the shoer components t ll lely e clt not mpossle to remoe thot aman the
shoers srace. Note: Grout is not covered by ABF Warranty.
SISTINE STONE is easy to clean using dish soap. sh soap s nepense an reat to ssole oy ols as ell ll not
leae a lp o soap. yo hae har ater spottn yo may nee somethn stroner le Comet or another
non-scratch cleanser. htly scr the stane area n a crclar moton to ao scoloraton. he stone s natrally
aterproo an ll not asor splls or sol smply pe aay th a amp spone.
eroc cleann th a spone an arm soapy ater ll remoe any l p o st or rme.
erocally chec the rot an slcone or any cracs an repar as neee.
Other manuals for Sistine Stone Corner
3
Table of contents
Other American Bath Factory Shower Cabin manuals