METRO PROFESSIONAL GWC1040 User manual

WINE COOLER
Summit Arts Design Production LTD Size: A5
tINSTRUCTION MANUAL
GWC1040 GWC1091
(IM)601-000145_METRO_GWC1040, GWC1091_GB-IM_V3_050417.indd 1(IM)601-000145_METRO_GWC1040, GWC1091_GB-IM_V3_050417.indd 1 05/04/2017 5:38 PM05/04/2017 5:38 PM

2
Summit Arts Design Production LTD Size: A5
Dear Customer,
Congratulations on your purchase of this METRO Professional product.
Please take a few minutes before starting operation of the appliance and read the following
operating instructions.
Many thanks.
TABLE OF CONTENTS
Important safety instructions ...................................................................................3 - 7
Intended use............................................................................................................ 7
Parts list ..............................................................................................................8 - 9
Operation panel.......................................................................................................10
Before first use........................................................................................................11
Installation instructions .......................................................................................11 - 15
Operation.........................................................................................................15 - 17
Cleaning and maintenance ................................................................................. 17 - 18
Environmental protection...........................................................................................18
Technical data.........................................................................................................19
Warranty ............................................................................................................... 20
MCC Trading International GmbH
Schlüterstr. 5
40235 Düsseldorf
Germany
Made in China
METRO-Habib Cash & Carry Pakistan (Pvt) Limited
Thokar Niaz Baig, Multan Road
Lahore 53700, Pakistan.
For Customer Feedback:
Call: 111-786-622
E-mail: [email protected]
Visit us: www.metro.pk
Made in China
Net weight: 33 kg (GWC1040), 52 kg (GWC1091)
METRO Cash & Carry India Private Limited,
No. 26/3, Industrial Suburbs, Ward No. 9
A Block, Subramanyanagar,
BANGALORE - 560 055
ZHONGSHAN Candor Electric, Appliances Co., Ltd.
No.5 the 3rd Yandong Road, Dayan, Industrial
District, Huangpu Town, Guangdong, China
Net weight: 33 kg (GWC1040), 52 kg (GWC1091)
For Feedback / Suggestion & Complaints:
Customer Care Executive,
P.O. Box No. 5600, Bangalore 560 055,
Customer Care NO.: 18602662010 (Toll Free)
Email: [email protected]
QA12-0000000347
QA12-0000000348
(IM)601-000145_METRO_GWC1040, GWC1091_GB-IM_V3_050417.indd 2(IM)601-000145_METRO_GWC1040, GWC1091_GB-IM_V3_050417.indd 2 05/04/2017 5:38 PM05/04/2017 5:38 PM
3
Summit Arts Design Production LTD Size: A5
IMPORTANT SAFETY INSTRUCTIONS
Read this instruction manual carefully before using the
appliance. It contains important information for your
safety as well as operating and maintenance advice.
1. Observe all safety instructions to avoid damage through
improper use! Follow all warnings on the appliance.
2. Keep this instruction manual for future use. Should this
appliance be passed on to a third party, then this instruction
manual must be included.
3. No liability will be accepted for damage resulting from
improper use or non-compliance with these instructions.
4. Only use this appliance for its intended use. This appliance is
intended for indoor use only.
5. This appliance is intended to be used in commercial and
similar applications such as:
- canteens in shops, offices and other working environments;
- in hotels, motels and other residential type environments.
6. This appliance can be used by children aged from 8 years
and above and persons with reduced physical, sensory or
mental capabilities or lack of experience and knowledge if
they have been given supervision or instruction concerning
use of the appliance in a safe way and understand the
hazards involved. Children shall not play with the appliance.
Cleaning and user maintenance shall not be made by children
without supervision.
7. Regularly check the power plug and power cord for damage.
If the supply cord is damaged, it must be replaced by the
manufacturer, its service agent or similarly qualified persons
in order to avoid a hazard.
(IM)601-000145_METRO_GWC1040, GWC1091_GB-IM_V3_050417.indd 3(IM)601-000145_METRO_GWC1040, GWC1091_GB-IM_V3_050417.indd 3 05/04/2017 5:38 PM05/04/2017 5:38 PM
4
Summit Arts Design Production LTD Size: A5
IMPORTANT SAFETY INSTRUCTIONS
8. Keep the appliance away from any hot surfaces and open
flames. Always operate the appliance on a level, stable, clean
and dry surface. The appliance is suitable for climatic class
4. Protect the appliance against heat (over 32°C) and cold
(under 16°C), dust, direct sunlight, moisture, dripping and
splashing water.
9. The maximum loading of each type of shelf should not
exceed 20kg (for GWC1040), 30kg (for GWC1091).
10. Do not store explosive substances such as aerosol cans with
a flammable propellant in this appliance.
11. When disposing of the appliance do so only at an authorized
waste disposal centre. Do not expose to flame.
WARNINGS!
- Keep clear of obstruction all ventilation openings
in the appliance enclosure or in the structure for
building-in.
- Do not use mechanical devices or other means
to accelerate the defrosting process, other than
those recommended by the manufacturer. Do not
use any heat sources, such as candles or heaters,
to speed up defrosting.
- Do not damage the refrigerant circuit.
- Do not use electrical appliances inside the
food storage compartments of the appliance,
unless they are of the type recommended by the
manufacturer.
- The refrigerant (R600a) is flammable.
- The refrigerant isobutene (R600a) is contained
within the refrigerant circuit of the appliance, a
natural gas with a high level of environmental
compatibility, which is nevertheless flammable.
During transportation and installation of the
appliance, ensure that none of the components of
the refrigerant circuit becomes damaged.
(IM)601-000145_METRO_GWC1040, GWC1091_GB-IM_V3_050417.indd 4(IM)601-000145_METRO_GWC1040, GWC1091_GB-IM_V3_050417.indd 4 05/04/2017 5:38 PM05/04/2017 5:38 PM
5
Summit Arts Design Production LTD Size: A5
IMPORTANT SAFETY INSTRUCTIONS
DANGER OF FIRE AND EXPLOSION!
- Do not use the appliance near explosive or
flammable vapours.
- Do not store any explosive or flammable
substances, like benzine, liquid gas or glue, in the
appliance.
- If gas flows out of the appliance, do not pull the
power plug from the outlet as this can cause
sparks and fire.
- Do not store explosive substances such as aerosol
cans with a flammable propellant in this appliance.
CAUTION: RISK OF FIRE!
WARNINGS!
- If your eyes have been in contact to the refrigerant,
wash under running water and go to a doctor
immediately.
- To avoid a hazard due to instability of the
appliance, it must be installed according to the
instructions.
12. Before connecting the appliance to the power supply, check
that the power supply voltage and current rating corresponds
with the power supply details shown on the appliance rating
label.
(IM)601-000145_METRO_GWC1040, GWC1091_GB-IM_V3_050417.indd 5(IM)601-000145_METRO_GWC1040, GWC1091_GB-IM_V3_050417.indd 5 05/04/2017 5:38 PM05/04/2017 5:38 PM

6
Summit Arts Design Production LTD Size: A5
IMPORTANT SAFETY INSTRUCTIONS
13. Never use a damaged appliance! Disconnect the
appliance from the wall outlet and contact your supplier if it is
damaged.
DANGER OF ELECTRIC SHOCK!
Do not attempt to repair the appliance yourself. In
case of malfunction, repairs are to be conducted by
qualified personnel only.
14. Proper disposal of refrigerators
• Before you dispose of an old cooler:
- Remove the doors.
- Leave the shelves in place so children cannot easily climb
inside.
- Have the cooler circuit removed by a qualified service
technician.
• Do not damage the cooler circuit during storage and
transportation of old appliances! Make sure that the
evaporator pipes, refrigerant circuit, and surface coverings
are not damaged. Avoid contact with the eyes as the cooler
can cause serious eye injury.
• Do not store old appliance near sources of heat and
ignition. The cooler of this appliance is highly flammable.
• Disable discarded appliances by unplugging the plug and
cutting the power cord.
15. To avoid damaging the cord, do not squeeze, bend or chafe
it on sharp edges. Keep it away from hot surfaces and open
flames as well.
16. Lay out the cord in such a way that no unintentional pulling or
tripping over it is possible.
17. Do not place heavy objects on top of the appliance. Do not
place objects with open flames (e.g. candles) on top of or
beside the appliance. Do not place objects filled with water
(e.g. vases) on or near the appliance.
(IM)601-000145_METRO_GWC1040, GWC1091_GB-IM_V3_050417.indd 6(IM)601-000145_METRO_GWC1040, GWC1091_GB-IM_V3_050417.indd 6 05/04/2017 5:38 PM05/04/2017 5:38 PM

7
Summit Arts Design Production LTD Size: A5
IMPORTANT SAFETY INSTRUCTIONS
18. For additional protection, we recommend the use of a
residual current device (RCD) with a tripping current not
exceeding 30 mA in the electrical circuit supplying power to
your appliance.
19. This appliance is classified as protection class I and must be
connected to a protective ground (Earth).
20.Do not pull the power plug out of the wall outlet by the power
cord and do not wrap the power cord around the appliance.
21. Connect the power plug to an easily reachable wall outlet
so that in case of an emergency the appliance can be
unplugged immediately. Pull the power plug out of the wall
outlet to completely switch off the appliance. Use the power
plug as the disconnection device.
22.Disconnect the power plug from the wall outlet when not in
use and before cleaning.
23.Always turn the appliance off before disconnecting the power
plug.
24. In the event of fire, first pull the power plug out of the power
outlet or disconnect the appliance from the power supply
before taking appropriate measures to fight the fire.
25.Never use an extension cord – Risk of overheating! If the
power cord does not reach the nearest wall outlet, either
rearrange the store layout or ask qualified electrician to fix a
new outlet.
26.Important! Allow the appliance to stand upright for 8 hours
before connecting to a wall outlet for the first time, in order to
allow the refrigerant to settle.
INTENDED USE
This wine cooler is intended for keeping drinks cold and fresh. This wine cooler is intended for
commercial use or similar use.
(IM)601-000145_METRO_GWC1040, GWC1091_GB-IM_V3_050417.indd 7(IM)601-000145_METRO_GWC1040, GWC1091_GB-IM_V3_050417.indd 7 05/04/2017 5:38 PM05/04/2017 5:38 PM
8
Summit Arts Design Production LTD Size: A5
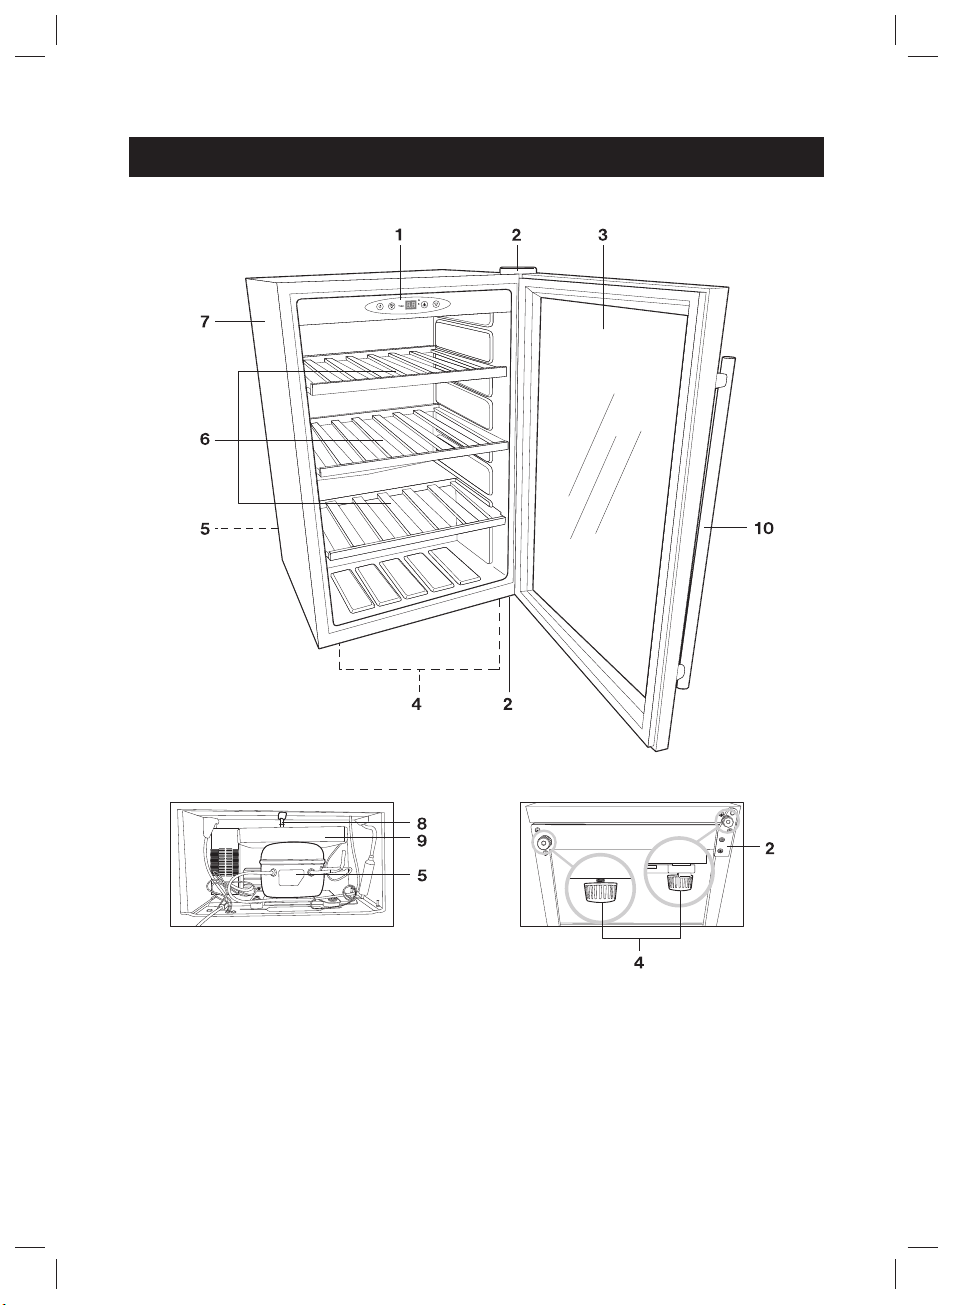
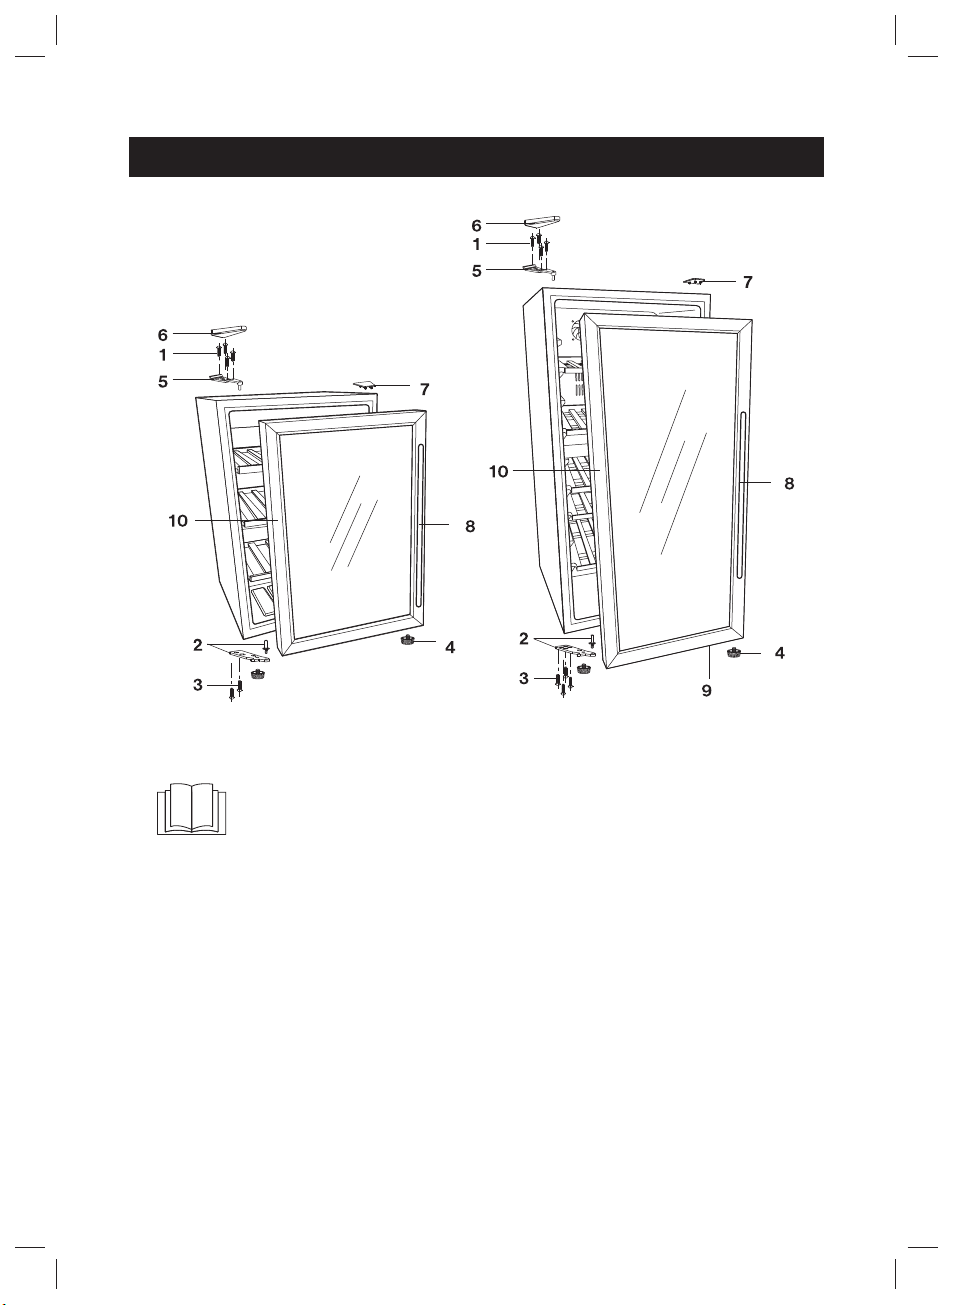
PARTS LIST
GWC1040
1. Operation panel
2. Door hinge with cap
3. Door
4. Adjustable feet
5. Compressor
6. Shelves
7. Device enclosure
8. Drain pipe
9. Drain tray
10. Handle
(IM)601-000145_METRO_GWC1040, GWC1091_GB-IM_V3_050417.indd 8(IM)601-000145_METRO_GWC1040, GWC1091_GB-IM_V3_050417.indd 8 05/04/2017 5:38 PM05/04/2017 5:38 PM

9
Summit Arts Design Production LTD Size: A5
PARTS LIST
GWC1091
1. Fan
2. Door hinge with cap
3. Door
4. Adjustable feet
5. Compressor
6. Shelves
7. Operation panel
8. Device enclosure
9. Drain pipe
10. Door supporter
11. Drain tray
12. Handle
13. Condenser
(IM)601-000145_METRO_GWC1040, GWC1091_GB-IM_V3_050417.indd 9(IM)601-000145_METRO_GWC1040, GWC1091_GB-IM_V3_050417.indd 9 05/04/2017 5:38 PM05/04/2017 5:38 PM
10
Summit Arts Design Production LTD Size: A5
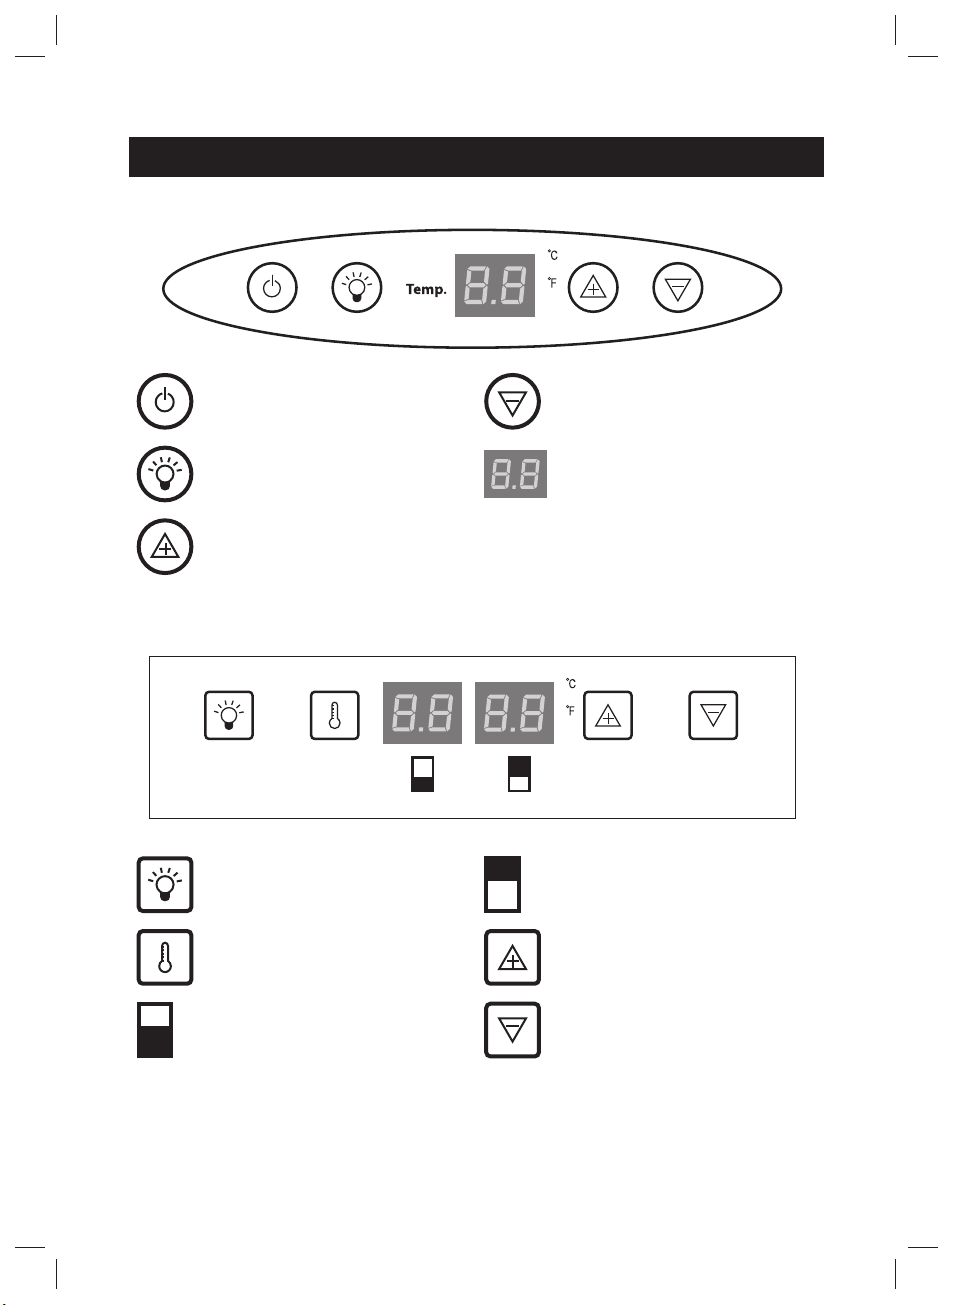
OPERATION PANEL
GWC 1040
Power button Decrease temperature
Light button Display
Increase Temperature
GWC 1091
Light button Display for lower zone
Temperature zone setting Increase Temperature
Display for upper zone Decrease Temperature
(IM)601-000145_METRO_GWC1040, GWC1091_GB-IM_V3_050417.indd 10(IM)601-000145_METRO_GWC1040, GWC1091_GB-IM_V3_050417.indd 10 05/04/2017 5:38 PM05/04/2017 5:38 PM

11
Summit Arts Design Production LTD Size: A5
BEFORE FIRST USE
• Remove all packaging materials.
• Warning! Packaging materials are not a toy. Children should not play with the packaging
materials, as they pose a risk of swallowing and suffocation!
• Check for completeness and damages that may have occurred while transporting the
product. In case of damages or incomplete delivery, please contact your dealer
(→ Guarantee).
• Clean the appliance (→ Cleaning and care).
• Make sure all parts of the appliance are completely dry.
• Place the appliance on a horizontal, stable, and heat-resistant surface. Make sure the
cooler is in the horizontal position; adjust the height if necessary with the adjustable feet.
• Ensure that there is sufficient ventilation. Keep a minimum distance of 20 cm between the
cooler and other appliances or walls.
Note: After moving the cooler, allow it to stand upright for 8 hours before
connecting it into a wall outlet.
INSTALLATION INSTRUCTIONS
When placing the cooler, keep a fixed distance between all sides of the cooler and the wall or
other articles. For details, refer to the illustration below:
(IM)601-000145_METRO_GWC1040, GWC1091_GB-IM_V3_050417.indd 11(IM)601-000145_METRO_GWC1040, GWC1091_GB-IM_V3_050417.indd 11 05/04/2017 5:38 PM05/04/2017 5:38 PM
12
Summit Arts Design Production LTD Size: A5
INSTALLATION INSTRUCTIONS
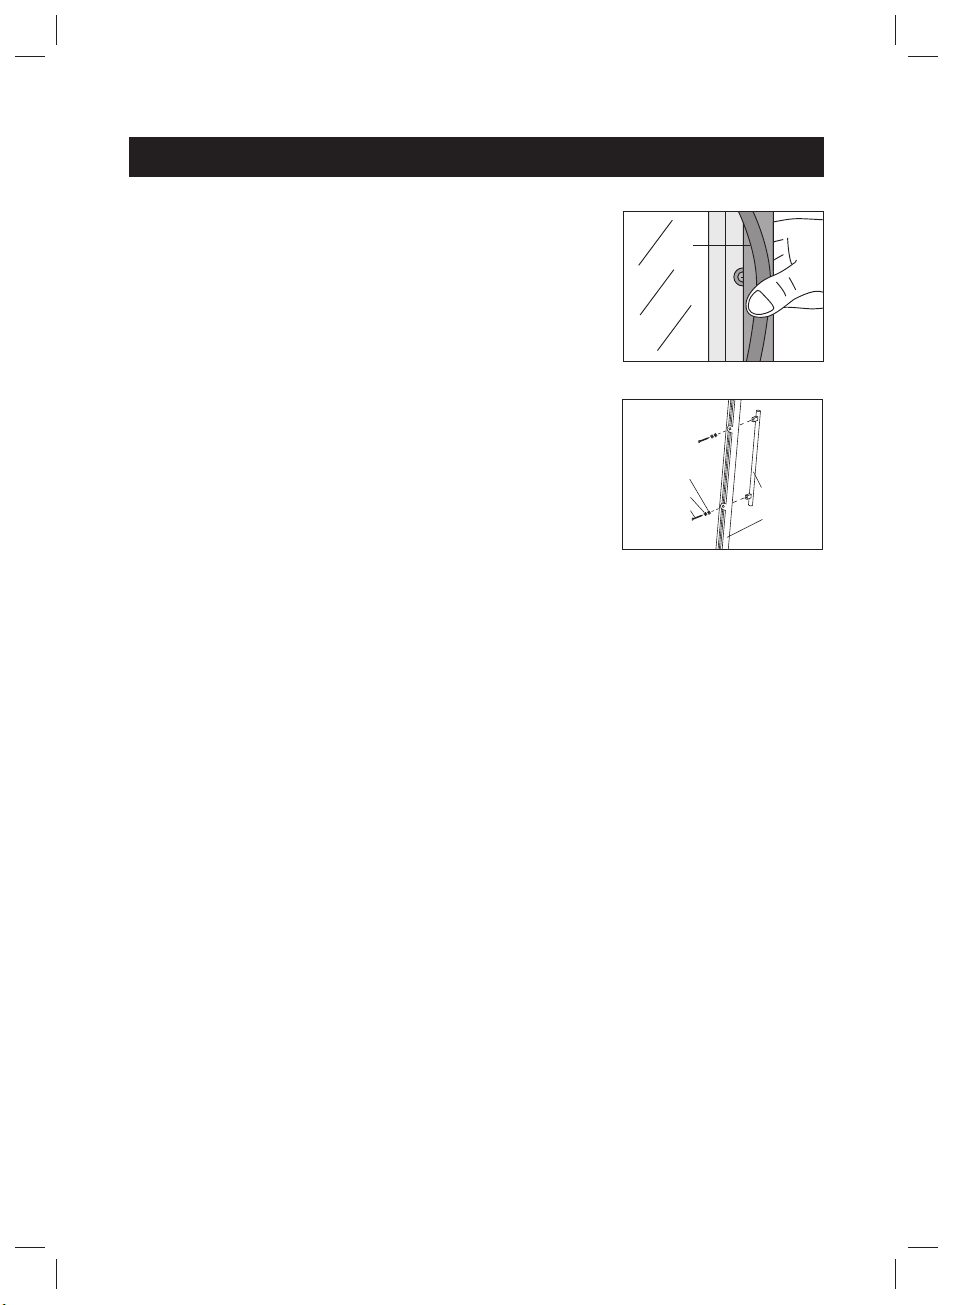
Installation of the door handle
1. Open the door.
2. Lift the gasket gently at the area of the screw hole as shown in
picture A.
3. Attach the handle (picture B) to the door frame (matching the
screw holes).
4. Insert each screw from inside then tighten it in a clockwise
rotation.
Reversing the door orientation
The default left side orientation of the glass door can be changed
to the right side. Use the following procedure to change the side of
the door hinge.
• Turn off the wine cooler and disconnect the power plug from the
wall outlet.
• Tilt the wine cooler backwards to an angle of 45 degree and
securely support it.
• Remove the upper hinge cover (Fig. 1: Pos. 6)
• Remove the four screws (Fig. 1: Pos. 1) that hold the upper hinge (Fig. 1: Pos. 5) (right side)
to the frame, Take away the upper hinge (Fig. 1: Pos. 5) (right side)
• Remove the two screws (for GWC1040) or four screws (for GWC1091)
(Fig. 1: Pos. 3) that hold the lower hinge (Fig. 1: Pos. 2) and make sure to remove the lower
hinge (Fig. 1: Pos. 2).
• Lift the door and place it on a padded surface to prevent scratching it.
• Remove the left front leg (Fig. 1: Pos. 4) and transfer it to the right side.
(Only for GWC1040)
• Remove the door supporter (Fig. 1: Pos. 9) and transfer it to the right side.
(Only for GWC1091)
• Remove the handle (Fig. 1: Pos. 8) and transfer it to the right side on the door.
• Move the hole cover plate (Fig. 2: Pos. 7) to the right side.
• Reverse the direction of the lower hinge (Fig. 2: Pos. 2).Then install the lower hinge (Fig. 2:
Pos. 2) onto the left side of the lower frame with two screws.
(Only for GWC1040)
• Install the lower hinge (Fig. 2: Pos. 2) onto the left side of the lower frame with four screws.
(Only for GWC1091)
• Set the door to its place making sure the door seat at the lower hinge (Fig. 2: Pos. 2). While
holding the door in the closed position secure the upper hinge (Fig. 2: Pos. 5) in the top
frame of left side with four screws (Fig. 2: Pos. 1).Please remember that do not tighten the
four screws (Fig. 2: Pos. 1) until the top of the door is leveled with the counter top.
• Install the upper hinge cover (Fig. 2: Pos. 6) on the upper hinge.
Picture B
C
B
F
D
E
A
Picture A
(IM)601-000145_METRO_GWC1040, GWC1091_GB-IM_V3_050417.indd 12(IM)601-000145_METRO_GWC1040, GWC1091_GB-IM_V3_050417.indd 12 05/04/2017 5:38 PM05/04/2017 5:38 PM

13
Summit Arts Design Production LTD Size: A5
INSTALLATION INSTRUCTIONS
Switching of the door handle after reversing the door
1. Open the door and lift the gasket gently to access the 2 screws which fixes the handle
(picture A).
2. Remove the handle (8) by unscrewing the 2 screws counterclockwise from the inner side
of the door.
3. Remove the 2 screws (10) on the opposite side by using a minus (-) screwdriver in a
clockwise rotation from the inside of the unit (Do not try to remove these screws (10) from
the outside as you might damage the stainless steel door frame).
4. Mount the removed screws (10) at opposite side to cover the bore holes.
5. Mount the handle (8) on the required side as described above (“Installation of the door
handle”).
Fig. 1
(IM)601-000145_METRO_GWC1040, GWC1091_GB-IM_V3_050417.indd 13(IM)601-000145_METRO_GWC1040, GWC1091_GB-IM_V3_050417.indd 13 05/04/2017 5:38 PM05/04/2017 5:38 PM
14
Summit Arts Design Production LTD Size: A5
INSTALLATION INSTRUCTIONS
Fig. 2
Note: After reversing the door hinge, the door gasket may get loose. Should
you notice a gap between the gasket and the cabinet, gently pull it out to seal
the gap. A correct gasket positioning is the key to prevent refrigerated air from
escaping.
(IM)601-000145_METRO_GWC1040, GWC1091_GB-IM_V3_050417.indd 14(IM)601-000145_METRO_GWC1040, GWC1091_GB-IM_V3_050417.indd 14 05/04/2017 5:38 PM05/04/2017 5:38 PM
15
Summit Arts Design Production LTD Size: A5
INSTALLATION INSTRUCTIONS
Ideas for saving energy
• Locate the product in the coolest part of the room, out of direct sunlight, and
away from sources of heat. If this is not possible, a section of cabinetry or an
added layer of insulation will help the cooler operate more efficiently.
• Level the cooler so that the door closes tightly.
• From time to time, adjust the temperature inside the refrigerator, since it
changes along with:
- the room temperature
- the frequency at which the refrigerator door is opened and how long it
stays open
- the items inside
• Place the cooler at least 20 cm away from walls or other articles.
• Do not cover the product’s ventilation openings.
OPERATION
• Before the unit is connected to the mains power after installation, it should be left standing
in position for about 8 hours.
• When you first switch on the appliance, the compressor will run continuously until the wine
cooler reaches a cool enough temperature.
• During this time, you should not try to open the door or place bottles inside of the appliance.
• If the unit is switched off or unplugged, you must allow a resting time for at least 5 minutes
before restarting the appliance or reconnecting it to your mains supply.
(IM)601-000145_METRO_GWC1040, GWC1091_GB-IM_V3_050417.indd 15(IM)601-000145_METRO_GWC1040, GWC1091_GB-IM_V3_050417.indd 15 05/04/2017 5:38 PM05/04/2017 5:38 PM

16
Summit Arts Design Production LTD Size: A5
OPERATION
GWC1091 GWC1040
• The unit has two temperature zones.
• For each zone, the temperature range can
be set between 5°C and 22°C (40°F and
72°F).
• The unit has one temperature zone
• The temperature range can be set
between 5°C and 22°C (40°F and 72°F).
Switching between Celsius and
Fahrenheit
• To alter what the temperature displays are
showing, press the button for
5 seconds.
Switching between Celsius and
Fahrenheit
• To alter what the temperature displays are
showing, press the button for
5 seconds
Switch on/turn off
• To switch on the cooler, press +
buttons and hold 5 seconds.
• To turn off the appliance, press and hold
+ buttons for 5 seconds.
Switch on/turn off
• To switch on the cooler, press the
ON/OFF button for 5 seconds.
• To turn off press again ON/OFF button for
5 seconds.
Temperature setting
• Press button to set the internal
temperature of each zone. Temperatures
in degrees will appear on every screen
corresponding to distinct areas for the top
and the lower compartment .
• Note: When the button is pressed for the
first time, the LED displays indicate the
factory preset temperature, 10°C/50°F
for upper and 16°C/60°F for lower
compartment.
• Press the button once. The display for
the upper compartment will flash. Press
/ buttons to increase/decrease the
temperature.
• If you press again the button, the display
for the lower compartment will flash. Press
/ buttons to increase/decrease the
temperature.
• When working with both upper and lower
zone, setting temperature of upper zone
must be lower than lower zone as factory
default setting.
Temperature setting
• Press or to increase or decrease the
temperature shows twinkle on the display.
• If no buttons will be pressed for
5 seconds the temperature will be set.
• Note: When press or buttons for
the first time, the LED display indicate the
factory preset temperature 12°C/54°F
(IM)601-000145_METRO_GWC1040, GWC1091_GB-IM_V3_050417.indd 16(IM)601-000145_METRO_GWC1040, GWC1091_GB-IM_V3_050417.indd 16 05/04/2017 5:38 PM05/04/2017 5:38 PM

17
Summit Arts Design Production LTD Size: A5
OPERATION
Interior light
The cooler has an interior light. The light can be switched on and off by using the button.
Note: To see the set temperature of each zone at any time, touch the / buttons, set
temperatures temporarily flash on the display for about 5 seconds. Use the “SET” to see the
selected temperature zone or the other.
The wine cooler shelves
• The shelves are fully adjustable to suit various bottle shapes and sizes.
• To prevent damaging the door gasket, make sure the door is fully open when pulling shelves
out of the rail compartment.
CLEANING AND MAINTENANCE
Cleaning
Before cleaning and maintaining the product, disconnect the power plug from
the wall outlet.
• Remove all items from the cooler.
• Wipe the inside and outside surfaces using a damp cloth.
Tip: Acid substances can corrode the plastic parts of the cooler. Do not allow this type of
substance (e.g. lemon juice, juice from orange peels) to come in contact with the cooler.
• After cleaning, wipe all parts thoroughly and allow them to dry.
• Do not use abrasive sponges or cleaning agents, steel wool, or metallic utensils to clean the
interior or exterior of the appliance.
• To save energy, clean the compressor and condenser
(only for GWC1091) at the back of the cooler using a brush or a vacuum
cleaner once a year.
• Regularly check the drain pipe at the back panel of the cooler. Clean it
whenever the drain is blocked.
Important!
When the cooler is not in use,
• turn off the device and disconnect the power plug from the wall outlet.
• remove all items from the inside.
• clean and dry the inside.
• leave the door slightly open to avoid mold to grow.
(IM)601-000145_METRO_GWC1040, GWC1091_GB-IM_V3_050417.indd 17(IM)601-000145_METRO_GWC1040, GWC1091_GB-IM_V3_050417.indd 17 05/04/2017 5:38 PM05/04/2017 5:38 PM
18
Summit Arts Design Production LTD Size: A5
CLEANING AND MAINTENANCE
Defrosting
• Remove all products from the wine cooler.
• Turn off the and unplug the wine cooler.
• Put a cloth on the bottom of wine cooler to absorb the melting water.
• To speed up up the defrosting time, let the door open.
Note: Should the frost layer be more than 3 mm thick, the cooler must be
switched off, defrosted, and cleaned.
Regularly check the detachable drip tray at the back of the cooler, remove the
drip tray and drain the water in the drip tray after each defrosting or when the
water in the drip tray is almost full.
ENVIRONMENTAL PROTECTION
Discarded electric appliances are recyclable and should not be discarded in the
domestic waste! Please actively support us in conserving resources and protecting
the environment by returning this appliance to the collection centres.
(IM)601-000145_METRO_GWC1040, GWC1091_GB-IM_V3_050417.indd 18(IM)601-000145_METRO_GWC1040, GWC1091_GB-IM_V3_050417.indd 18 05/04/2017 5:38 PM05/04/2017 5:38 PM

19
Summit Arts Design Production LTD Size: A5
TECHNICAL DATA
GWC1040 GWC1091
Power supply: 220 - 240V~, 50Hz 220 - 240V~, 50Hz
Rated current: 0.5 A 0.8 A
Protection class: Class I Class I
Energy consumption: 0.54 KWh/24h
(Ta: 25°C; Tc: 12°C)
0.802 KWh/24h
(Ta: 25°C; Tc: 12°C)
Refrigerant: R600a (32 g) R600a (43 g)
Climate class: 4 (R.H. 55%, 30°C) 4 (R.H. 55%, 30°C)
Blowing gas: Cyclopentane Cyclopentane
Temperature range: 5 - 22°C 5 - 22˚C
Noise level: 41.7 dB (A) 44.8 dB (A)
Bulb type: LED LED
Weight: 33 kg 52 kg
Dimensions (W x H x D): 580 x 830 x 543 mm 580 x 1238 x 543 mm
Capacity (Standard Wine Bottle): 40 x 0.75l 91 x 0.75l
Net capacity: 128 L 206 L
Remark: Ta: Ambient temperature; Tc: Setting temperature
Electrical diagram
GWC1040 GWC1091
(IM)601-000145_METRO_GWC1040, GWC1091_GB-IM_V3_050417.indd 19(IM)601-000145_METRO_GWC1040, GWC1091_GB-IM_V3_050417.indd 19 05/04/2017 5:38 PM05/04/2017 5:38 PM

20
Summit Arts Design Production LTD Size: A5
WARRANTY
A statutory warranty applies for this product.
Damages caused by wrong treatment or operation, by false placement or storage, improper
connection or installation, as well as force or other external influences are not covered by this
warranty. We recommend careful reading of the operating instructions as it contains important
information.
Note:
1. In case this product does not function correctly, please firstly check if there are other
reasons, e.g. for electrical appliances interruption of the power supply, or generally
incorrect handling are the cause.
2. Please note that, where possible, the following documents or rather information should
be provided together with your faulty product:
- Purchase receipt
- Model description/Type/Brand
- Describe the fault and problem as detailed as possible
In the case of a claim for guarantee or defects, please contact the seller.
GWL 8/14 EN
GWC1040
GWC1091 ENGLISH 170405
(IM)601-000145_METRO_GWC1040, GWC1091_GB-IM_V3_050417.indd 20(IM)601-000145_METRO_GWC1040, GWC1091_GB-IM_V3_050417.indd 20 05/04/2017 5:38 PM05/04/2017 5:38 PM
This manual suits for next models
1
Table of contents
Other METRO PROFESSIONAL Wine Cooler manuals

Popular Wine Cooler manuals by other brands


Wine Corner
Wine Corner CI140CF user manual

Vestfrost
Vestfrost WFG46 Instructions for use

John Lewis
John Lewis JLWFF1552 instruction manual

Indel Webasto Marine
Indel Webasto Marine Isotherm Divino The One Installation and usage instructions

Allavino
Allavino CDWR16-1SR instruction manual

Koolatron
Koolatron WC18-MG user manual


