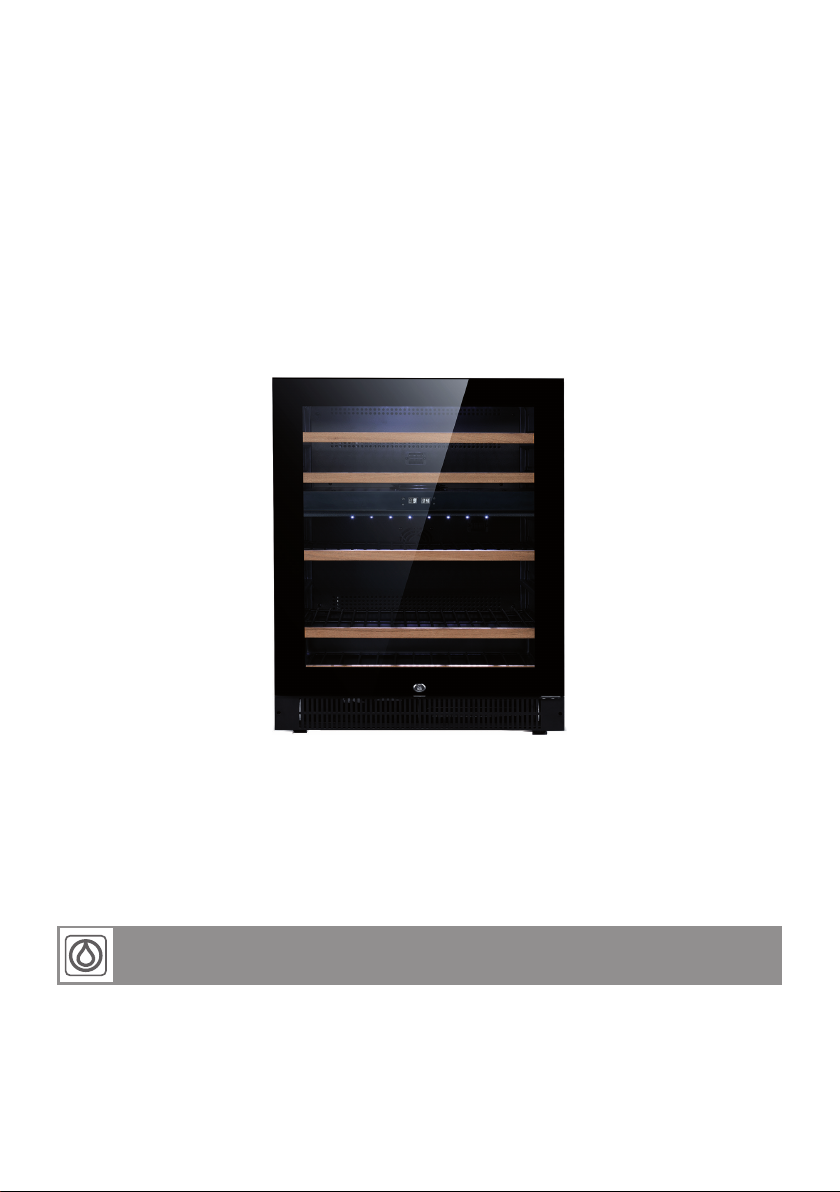
Vestfrost WFG46 User manual

Compact Wine cabinet WFG46 - WFG47
NO Bruksanvisning
SE Brugsanvisning
FI Käyttöohjeet
GB Instructions for use
DE Bedienungsanleitung
FR Mode d’emploi
DK Brugsanvisning

2
GB
As the appliance contains a
ammable refrigerant, it is es-
sential to ensure that the refrig-
erant pipes are not damaged.
The quantity and type of the
refrigerant used in your appli-
ance is indicated on the rating
plate.
Standard EN378 species that
the room in which you install
your appliance must have a
volume of 1m³ per 8 g of hydro-
carbon refrigerant used in the
appliances. This is to avoid the
formation of ammable gas/air
mixtures in the room where the
appliance is located in the event
of a leak in the refrigerant circuit.
WARNING:
Keep ventilation openings in
the appliance’s cabinet or in the
built-in structure clear of obstruc-
tion.
WARNING:
Do not use other mechanical
devices or other means to ac-
celerate the defrosting process
than those recommended by the
manufacturer.
WARNING:
Do not damage the refrigerant
system.
WARNING:
Do not use electrical appli-
ances inside the refrigerated
storage compartment, unless
they are of a type recommended
by the manufacturer.
WARNING:
Do not expose the appliance to
rain.
WARNING:
This appliance may be used by
children over the age of 8 years
old and by persons with reduced
physical, sensory or mental
capabilities or by persons with
a lack of experience or knowl-
edge if they are supervised or
are instructed by a person re-
sponsible for their safety how
to use the appliance safely and
have understood the associated
hazards.
WARNING:
Children must not play with, on,
or around the appliance.
Warning

3
GB
WARNING:
Children must not clean the
appliance or carry out general
maintenance unless they are at
least 8 years old and are being
supervised.
WARNING:
Do not store explosives, such
as aerosol cans with ammable
propellants in the unit.
WARNING:
Danger risk of re or explosion if
ammable refrigerant are used.
To be repaired only by trained
personnel.
WARNING:
When positioning the appliance,
ensure the power cord is not
trapped or damaged.
WARNING:
Do not locate multiple portable
socket-outlets or portable power
supplies at the rear of the appli-
ance.
●Always keep the keys in a sep-
arate place and out of reach of
children.
●Before servicing or clean-
ing the appliance, unplug the
appliance from the mains or
disconnect the electrical power
supply.
●Frost formation on the interior
evaporator wall and upper
parts is a natural phenom-
enon. Therefore, the appliance
should be defrosted during
normal cleaning or mainte-
nance.
●Please note that changes to
the appliance construction will
cancel all warranty and product
liability.
●If the supply cord is damaged,
it must be replaced by the
manufacturer, its service agent,
or similarly qualied persons
inorder to avoid a hazard.
●This appliance is intended to
be used exclusively for the
storage of wine.
CLASS 1 LED PRODUCT

4
GB
The energy consumption reduces ..
1)..the lower the ambient temperature is.
2)..the warmer thermostat set point is.
3)..the lower the number and the shorter
the length of the door openings is.
Savings in energy consumption in the use
Contents
Warning ......................................................2
Savings in energy consumption in the use . 4
Before use ..................................................5
Technical data .............................................5
Get to know your wine cooler .....................6
Installation and start-up ..............................7
Operation and function ...............................9
Change of hinge side ...............................11
Defrosting, cleaning, and maintenance ....12
Fault nding ..............................................13
Warranty, spare parts and service ............14
Disposal ....................................................15

5
GB
Before operating your new appliance,
please read the following instructions care-
fully as they contain important information
on safety, installation, operation and main-
tenance. Keep the instructions for future
reference. On receipt, check to ensure that
the appliance has not been damaged dur-
ing transport. Transport damage should be
reported to the local distributor before the
wine cooler is put into use.
Remove the packaging. Clean the inside of
the cabinet using warm water with a mild
detergent. Rinse with clean water and dry
thoroughly (see cleaning instructions). Use
a soft cloth. If the appliance has been laid
down during transport, or if it has been
stored in cold surroundings (colder than
+5°C), it must stabilise in an upright position
for at least one hour before being switched
on.
Before use Technical data
Wiring and connections in power supply
systems must been all applicable (local and
national) electrical codes. Consult these
codes lengths and sizes prior to cabinet
installation.
This device complies with relevant EU
directives including Low Voltage Directive
2014/35/EU and Electromagnetic Compat-
ibility Directive 2014/30/EU
The socket should be freely accessible.
Connect the appliance only to 220/240 V
/ 50Hz alternating current via a correctly
installed earthed socket.
The socket must be fused with a 10-13 A
fuse.
If the appliance is to be operated in a non-
European country, check on the rating plate
whether the indicated voltage and current
type correspond to the values of your mains
supply.
Information regarding voltage, current or
power are given on the rating plate
The power cord may be replaced by a
technician only.
The rating plate provides various techni-
cal information as well as type and serial
number.

6
GB
g.1
Get to know your wine cooler
Rating plate (on the back)
Lighting
Identication plate
Control panel
Wooden shelf
Kick plate
Adjustable feet

7
GB
Installation and start-up
Placement
For safety and operational reasons, the ap-
pliance must not be installed outdoors.
The appliance should be placed on a level
surface in a dry, well ventilated room (max.
75% relative air humidity). Never place the
appliance close to sources of heat such as
cookers or radiators, and avoid placing it in
direct sunlight.
Installation
The surface on which the appliance is to be
placed must be level. Do not use a frame
or similar. It is important that the appliance
be absolutely level. It can be levelled by
screwing the adjustable feet at the front of
the appliance up or down (g. 2).
Use a spirit level to check that the appliance
is absolutely level sideways.
Along with your new cabinet is a replace-
able kick plate which can be xed with the
two screws. These two screws are located
in the accessories.Hinge side requires a 5
mm space.
NOTE: The kick plate should not be in-
stalled if the unit installed behind a kitchen
shelf.
g. 2
If needed there is a kit in the accessories
bag, for xing the cabinet up against a table
top.
g. 2
Room temperature
The climate class is stated on the rating
plate.
Note: The appliance operates best at room
temperatures between 10° to 32° C
g. 3

8
GB
g. 4

9
GB
Operation and function
To control the inner light on/o.
Indicator light illuminates to signify the
cooling mode is currently in operation.
To control this appliance, turn on/o
(press and hold this button for
3 seconds)
Press once the “UP” button, the
temperature will raise 1°C
Press once the “DOWN” button, the
temperature will lower 1°C
Flashing indication = Cabinet Temperature.
Steady indication = Set Temperature.
Setting the Temperature Con-
trols
● The temperature range +5 to +18°C
When the system enter the set up tempera-
ture. Each press once the or button,
the temperature setting will increase or
lower 1°C,When the temperature set-
ting reach the upper limit 18°C and lower
limit 5°C, the temperature setting will not
increase or lower.
If you want to know the actual temperature-
please press up or down for 3 seconds,
display panel will show actual temperature.
After 5 seconds, it will show the setting
temperature.
Alarms
If the temperature is higher than 23°C,
The “HI” is shown in display, the alarm will
sound after one hour and the reason must
be controllede.If the temperature is lower
than 0°C the “LO” is shown in display, and
the buzzer alarm and the malfunction indi-
cator light at the same time.
g. 5

10
GB
Power interruption
Most power failures are corrected within a
few hours and should not aect the tempe-
rature of your appliance if you minimize the
number of times the door is opened. If the
power is going to be o for a longer period
of time, you need to take the proper steps
to protect your contents.
LED light
In order to reduce energy consumption, the
LED light will automatically switch o after
10 minutes.
If you want the LED light to remain on con-
tinuously, this is possible. Please press and
hold the “LIGHT” bottom for 5 seconds, the
display will show “LP”. After 4 seconds the
display will revert back to normal and the
light will remain on until manually switched
o.
If you want to revert and conserve energy
(recommended), please press and hold the
“LIGHT” button for 5 seconds, the display
will show “LF”. After 4 seconds, the display
will revert to normal, and the light will auto-
matically switch o after 10 minutes.
(If the wine cooler equipped with the door
switch. The light will be on when door open
and the light turn o when door closed).
NOTE:
If the unit is unplugged, power lost, or turned
o, you must wait 3 to 5 minutes before
restarting the unit. If you attempt to restart
before this time delay, the Wine cooler will
not start.
When you use the wine cooler for the rst
time or restart the wine cooler after having
been shut o for a long time, there could be
a few degrees variance between the tem-
perature you select and the one indicated
on the LED readout. This is normal and it
is due to the length of the activation time.
Once the Wine cooler is running for a few
hours everything will be back to normal.

11
GB
g. 6.2
The door can be changed from right-hinged to left-hinged and vice versa as follows:
Change of hinge side
1. Lower hinge (right) 2. Screws 3. Door hinge 4. Door 5. Top hinge (right)
6. Hinge screws 7. Top hinge (left) 8. Hole cover 9. Lower hinge (left)
10. Door ttings 11. Screws
1. Open the door to a 90 degrees angle, take out the 2 screws (2) from lower door hing (3),
remove the door (4), Remove the door hing (3) from the door, (Fig. 6.1).
2. Unscrew the screws (11) from the door ttings (10), and relocate it at the opposite side of the
door (g. 6.1)
3. Unscrew the 3 hinge screws (6) from the top hinge (5) and remove it (g. 6.3).
4. Remove hole covers (8) and mount the spare top hinge (7) at the opposite side of the cabinet
with the 3 screws (g. 6.4).
5. Mount the spare lower hinge (9) (g. 6.5).
6. Mount and align the door.
7. Insert the hole covers to cover the holes (8).
g. 6.1
g. 6.4g. 6.3
g. 6.5
Ensure that the cabinet is not
connected to the mains and
place the cabinet on the back.
SUPPORT THE DOOR !

12
GB
Automatic defrosting
The wine cooler is defrosted automatically.
Defrost water runs through a pipe and is
collected in a tray above the compressor
where the heat generated by the compres-
sor causes it to evaporate.
Cleaning
Before cleaning the appliance, unplug it
from the main supply. The cabinet is best
cleaned using warm water (max. 65°C) with
a little mild detergent. Never use cleaning
agents that scour. Use a soft cloth. Rinse
with clean water and dry thoroughly. Never
use sharp or pointed implements. Avoid un-
necessary cleaning of the wooden shelves,
as these are made of untreated natural
material. Cleaning agents may discolour the
shelves.
The sealing strip around the door must be
cleaned regularly to prevent discolouration
and prolong service life. Use clean water.
After cleaning the sealing strip, check that it
continues to provide a tight seal.
Dust collecting on the condenser under-
neath the cabinet, on the compressor and
in the compressor compartment is best
removed using a vacuum cleaner.
Defrosting, cleaning, and maintenance
Replacing the lighting
Light-emitting diodes designed to last the
entire service life of the appliance are
used. If it, however, becomes necessary
to replace the light source, please call for
service.
Removing the shelves
Push the shelf all the way back and tip it. It
is now possible to remove the shelf.

13
GB
Fault nding
Fault Possible cause Remedy
The appliance is not
running
The appliance is switched o.
Power failure; the fuse is blown;
the appliance is not plugged in
correctly.
Press the on/o switch.
Check that power is connected.
Reset the fuse.
Water collects in
the bottom of the
cabinet.
The defrost water pipe is
blocked.
Clean the defrost water channel
and the drain hole on the rear
wall of the cabinet.
Vibration or
bothersome noise.
The appliance is not level.
The appliance is resting against
other kitchen elements.
Containers or bottles inside the
cabinet are rattling against one
another.
Level the appliance using a spirit
level.
Move the appliance away from
the kitchen elements or appli-
ances it is in contact with.
Move containers and/or bottles
apart.
Compressor runs
continuously.
High room temperature. Ensure adequate ventilation.
Wine cooler is not
cold enough
Check the temperature setting.
The door is opened too often.
The door is not completely
closed.
The door gasket does not seal
properly.
Set the desired temperature.
Keep the door closed for an
extended period of time.
Close the door.
Align the door.

14
GB
Warranty, spare parts and service
Warranty disclaimer
Faults and damage caused directly or
indirectly by incorrect operation, misuse,
insucient maintenance, incorrect building,
installation or mains connection. Fire, ac-
cident, lightening, voltage variation or other
electrical interference, including defective
fuses or faults in mains installations are not
covered by the warranty.
Repairs performed by others than approved
service centres and any other faults and
damage that the manufacturer can sub-
stantiate are caused by reasons other than
manufacturing or material faults are not
covered by the warranty.
Please note that changes to the construc-
tion of the appliance or changes to the
component equipment of the appliance will
invalidate warranty and product liability, and
the appliance cannot be used lawfully. The
approval stated on rating plate will also be
invalidated.
Transport damage discovered by the buyer
is primarily a matter to be settled between
the buyer and the distributor, i.e. the dis-
tributor must ensure that such complaints
are resolved to the buyer’s satisfaction.
Before calling for technical assistance,
please check whether you are able to rectify
the fault yourself. (see the fault nding list)
If your request for assistance is unwar-
ranted, e.g. if the appliance has failed as a
result of a blown fuse or incorrect operation,
you will be charged the costs incurred by
your call for technical assistance.
Spare parts
When ordering spare parts, please state
the model and production numbers of your
appliance. This information is given on the
rating plate. The rating plate contains vari-
ous technical information, including type
and serial numbers.
Note: Always use approved service centres
when your appliance is to be repaired or
replaced!
g. 7
MODE L : 0-S 703003H9030803
Wine cellar WFG46

15
GB
Disposal
Information for Users on Collection
and Disposal of Old Equipment and
used Batteries
These symbols on the products,
packaging, and/or accompanying
documents mean that used electri-
cal and electronic products and
batteries should not be mixed with
general household waste. For proper
treatment, recovery and recycling
of old products and used batteries,
please take them to applicable collec-
tion points, in accordance with your
national legislation and the Directives
2012/19/EU and 2006/66/EC.
By disposing of these products and
batteries correctly, you will help to
save valuable resources and prevent
any potential negative eects on
human health and the environment
which could otherwise arise from
inappropriate waste handling.
For more information about collec-
tion and recycling of old products and
batteries, please contact your local
municipality, your waste disposal
service or the point of sale where you
purchased the items.
Penalties may be applicable for incor-
rect disposal of this waste, in accord-
ance with national legislation.
For business users in the Euro-
pean Union.
If you wish to discard electrical and
electronic equipment, please contact
your dealer or supplier for further
information.
Information on Disposal in other
Countries outside the European
Union
These symbols are only valid in the
European Union. If you wish to dis-
card this product, please contact your
local authorities or dealer and ask for
the correct method of disposal.
Note for the battery symbol:
This symbol might be used in combi-
nation with a chemical symbol. In this
case it complies with the requirement
set by the Directive for the chemical
involved.

2
DE
beschleunigen, als die Geräte,
die vom Hersteller empfohlen
sind.
WARNUNG:
Beschädigen Sie nicht den Kühl-
kreislauf.
WARNUNG:
Verwenden Sie keine elektri-
schen Geräte im Gerät, es sei
denn, dass die Geräte vom Her-
steller empfohlen sind.
WARNUNG:
Das Gerät nicht dem Regen
aussetzen.
WARNUNG:
Dieses Gerät kann von Kindern
ab 8 Jahren und Personen mit
reduzierten physischen,, sen-
sorischen oder mentalen Fähig-
keiten oder Mangel an Erfahrung
oder Wissen benutzt werden,
wenn sie von einer Person, die
für ihre Sicherheit verantwortlich
ist, beaufsichtigt oder von ihr
bezüglich des sicheren Gebrau-
chs des Gerätes unterwiesen
wurden und sie die daraus resul-
tierenden Gefahren verstanden
haben.
WARNUNG:
Kinder dürfen nicht mit dem
Gerät spielen.
Da ein brennbares Gas
als Kältemittel in diesem
Gerät dient, ist es wichtig
sicherzustellen, dass kein Teil
des Kühlkreislaufs oder der
Röhren beschädigt ist.
Die Menge und der Typ von
Kältemittel im Gerät sind auf
dem Typenschild angegeben.
Der Standard EN378 speziziert,
dass der Raum, in dem das
Gerät installiert wird, ein
Volumen von 1m³ pro 8 g
Kohlenwassersto-Kältemittel,
das im Gerät verwendet ist,
haben soll. Dies ist zu beachten,
um die Bildung von leicht
entzündlichen Gasgemischen
in dem Raum, wo das Gerät
installiert ist, zu vermeiden,
falls eine Undichtigkeit des
Kuhlkreislaufs entsteht.
WARNUNG:
Decken Sie die
Lüftungsönungen am Geräte
oder am Einbaumodul nicht ab.
WARNUNG:
Verwenden Sie keine
anderen mechanischen
Geräte oder Hilfsmittel um
den Entfrostungsprozess zu
Warnung

3
DE
Warnung
WARNUNG:
Reinigung und Benutzer-War-
tung dürfen nicht durch Kinder
durchgeführt werden, es sei
denn, sie sind 8 Jahre und älter
und werden beaufsichtigt.
WARNUNG:
Der Schlüssel ist an einer sepa-
raten Stelle und unzugänglich für
Kinder aufzubewahren.
WARNUNG:
Keine Produkte mit brennbaren
Treibgasen (z. B. Spraydosen)
und keine explosiven Stoe
lagern. Explosionsgefahr!
WARNUNG:
Gefahr von Feuer oder
Explosion wenn brennbares
Kältemittel ist verwendet. Darf
nur von Fachpersonal repariert
werden.
WARNUNG:
Achten Sie beim Aufstellen des
Geräts darauf, dass das Net-
zkabel nicht eingeklemmt oder
beschädigt ist.
WARNUNG:
Platzieren Sie keine Verteiler-
steckdosen, Verlängerungskabel
oder andere Netzteile an der
Rückseite des Gerätes.
●Vor Reparatur oder Reinigung
des Gerätes den Netzstecker
von der Steckdose ziehen.
●Wenn die Anschlussleitung
beschädigt ist, muss sie
nur vom Hersteller, dem
Serviceagent des Herstellers
oder einem anderen
Fachmann ausgewechselt
werden, um Gefahr zu
vermeiden.
●Bildung von Reif auf der
inneren Verdampferplatte und
den obersten Teilen ist normal.
In Verbindung mit Reinigung
oder Wartung muss das Gerät
deshalb entfrostet werden.
●Verwenden Sie keine
Verlängerungskabel.
●Beachten Sie bitte, dass
Änderungen der Konstruktion
dieses Gerätes zur Folge
haben, dass die Garantie und
Produkthaftung erlöschen.
●Dieses Gerät ist ausschließlich
zur Lagerung von Wein
bestimmt
Beleuchtung: Klasse 1, LED Produkt

4
DE
Der Energieverbrauch ist geringer…
1) ..je niedriger die Umgebungstemperatur
ist
2) ..je wärmer der Thermostatsollwert ein-
gestellt ist
3) ..je weniger man die Tür önet und umso
kürzer die Türönungszeit ist.
Energieeinsparung während des Gebrauchs
Inhalt
Warnung .....................................................2
Energieeinsparung während des
Gebrauchs ..................................................4
Vor dem Gebrauch .....................................5
Technische Daten .......................................5
Lernen Sie Ihren Weinschrank kennen ......6
Inbetriebnahme und Installation .................7
Bedienung und Funktion .............................9
Wendbare Tür ..........................................11
Abtauen, Reinigung und Wartung.............12
Fehlersuche ..............................................13
Reklamation, Ersatzteile und Service .......14
Entsorgung ...............................................15

5
DE
Vor dem Gebrauch Ihres neuen Geräts soll-
ten Sie diese Bedienungsanleitung gründ-
lich lesen. Sie enthält wichtige Informatio-
nen zu Sicherheit, Installation, Betrieb und
Wartung. Bewahren Sie die Bedienungs-
anleitung auf. Sie könnten sie zu einem
späteren Zeitpunkt eventuell benötigen.
Kontrollieren Sie das Gerät sofort bei
Lieferung auf eventuelle Beschädigungen.
Transportschäden sind dem Händler zu
melden, bevor das Gerät in Gebrauch
genommen wird.
Verpackung entfernen. Das Schrankinnere
mit lauwarmem Wasser und etwas mildem
Spülmittel reinigen. Mit klarem Wasser
nachwischen und gründlich trocknen (siehe
“Reinigung”). Verwenden Sie ein weiches
Tuch.
Falls das Gerät liegend transportiert wurde
oder einer Temperatur von weniger als +5
°C ausgesetzt war, muss es vor dem Ein-
schalten mindestens eine Stunde lang bei
höherer Außentemperatur aufrecht stehen.
Vor dem Gebrauch Technische Daten
Verkabelung und Anschlüsse in Stromver-
sorgungssystemen müssen allen (örtlichen
und nationalen) Elektrovorschriften entspre-
chen. Machen Sie sich vor dem Einbau mit
den Angaben in diesen Vorschriften vertraut
Dieses Gerät entspricht den einschlägigen
EU-Richtlinien einschließlich:
Niederspannungsrichtinie 2014/35/EU.
Elektromagnetische Kompatibilitätsrichtlinie
2014/30/EU.
Die Steckdose sollte frei zugänglich sein.
Das Gerät an 220/240 V / 50Hz Wechsel-
strom über eine vorschriftsmäßig installierte
Steckdose anschließen.
Die Steckdose muss mit einer 10- 13A
Sicherung abgesichert sein.
Bei Geräten, die in nicht-europäischen Län-
dern betrieben werden, ist auf dem Typen-
schild zu überprüfen, ob die angegebene
Spannung und Stromart mit den Werten
Ihres Stromnetzes übereinstimmt.
Informationen über Spannung und Leis-
tungsaufnahme / Strom sind auf dem
Typenschild.
Das Typenschild, das sich im Gerät be-
ndet, enthält verschiedene technische
Angaben sowie Typen- und Seriennummer.
Ein eventuell notwendiger Austausch der
Netzanschlussleitung darf nur durch einen
Fachmann erfolgen

6
DE
Typenschild (auf der Rückseite)
Beleuchtung
Identikationsschild
BedienungselementeHolzfach
Holzfach
Fußleiste
Einstellbare Füße
Lernen Sie Ihren Weinschrank kennen
Abb.1
This manual suits for next models
1
Table of contents
Languages:
Other Vestfrost Wine Cooler manuals

Vestfrost
Vestfrost W155 User manual

Vestfrost
Vestfrost Tecfrigo 32 Quick start guide

Vestfrost
Vestfrost WFG 22 User manual

Vestfrost
Vestfrost WFG48 User manual

Vestfrost
Vestfrost FZ W Series User manual

Vestfrost
Vestfrost WFG 18 User manual

Vestfrost
Vestfrost FUNCTION User manual

Vestfrost
Vestfrost Compact User manual

Vestfrost
Vestfrost WFG 185 User manual

Vestfrost
Vestfrost FZ375W User manual