Wine Corner CI140CF User manual

USER MANUAL
D E F Y I N G C O N V E N T I O N
CI140CF - CI140IX - CI141CF - CI141IX

BUILT-IN AIR-CONDITIONED CELLARS
Thank you for choosing our product!
We welcome you into the ever increasing circle of people who are happy to own an IP product.
We hope you will get the maximum satisfaction from this air-conditioned cellar, which has been specically
designed to preserve and serve wine.
Please, read this instruction manual carefully and always keep it within reach for further reference.
N.B.: For this unit to work correctly you must fully comply with all the instructions and warnings provided.
The Manufacturer cannot be held responsible for any malfunction due to non compliance with the instructions
given in this manual.
All the packaging materials used are environmentally-friendly and recyclable so please conform with
environmental guidelines for disposal of waste.
Any materials not used should be recycled and should not be wasted.
Disposal according to environment protection regulations
will make it possible to recover and recycle precious materials.
IMPORTANT
The device has been designed and manufactured according to the following applicable
Provisions and regulation: EEC Directive 98/37/CEE (EN 60335-1; EN 60335-2-24)
89/336CEE EMC 9EN55014-1;EN 55014-2). Many strict checks and tests have been carried out during the
production process in order to deliver a device capable of ensuring the best possible performance in the best
safety and cost –effective conditions.

CONTENTS
1. Unit Performances and Features Page 1
2. Checking the Unit on Delivery Page 1
3. Cleaning and Positioning Accessories Page 1
4. Connection and Installation Page 2-3
5. Power Consumption Page 3
6.Temperature Settlng Page 4
7. Storage Page 5
8. Reversing the Door Page 5-6
9. Support Page 7
10. Safety Recommendations Page 7
11. Maintenance and Cleaning Page 8
12. Light Replacement Page 8
13. Disposal Page 8
14. Guarantee Page 8

BUILT-IN
SINGLE-TEMPERATURE AIR-CONDITIONED CELLARS
GENERAL INSTRUCTIONS FOR USE
UNIT PERFORMANCES AND FEATURES
This unit has been designed to recreate the ideal conditions of a good natural cellar.
In order to recreate such a peculiar atmosphere, IP uses a double automatic "warm/cold"
circuit ensuring that the specified temperature is maintained inside the cellar. An external temperature ranging between
0°C and + 32°C will not affect the stability of the internal temperature.
Optimal humidity, stable temperatures, anti-UV glass and the use of special compressors installed on rubber supports
guarantee operation free from vibration, silent and with low energy consumption therefore keeping your wines in the best
of conditions
ON DELIVERY OF UNIT
On delivery, check that the unit packaging and the cabinet have not been damaged during transport.
Any damage should be reported without delay to the carrier.
In no circumstances can the cabinet be returned directly to the Manufacturer without first giving prior notice and then
obtaining written authorisation to do so.
CLEANING AND POSITIONING ACCESSORIES
Prior to using the cabinet, clean the inside of the cellar and the accessories with a mild non-perfumed cleaner.
The accessories can then be positioned to give optimal use of the space inside the cabinet.

CONNECTION AND INSTALLATION
The cabinet must be placed on a level surface: this will ensure that the cabinet door seals and closes properly and the
motor can run efficiently and quietly. If the floor is uneven then the cabinet legs can be adjusted (front and rear) to help
level the unit.

Make sure that the mains electric is compatible with the voltage ratings on the
plate which is located at the back of the unit.
A+/-of 6% tolerance is allowed.
It is necessary to check the voltage value during the running of the unit, as you
should take into account that a lower voltage than the tolerance allowed may
also cause damage to the compressor motor.
The unit must be plugged into a single-phase earthed socket.
Remember that earthing the installation is not only a safety recommendation, but
a statutory requirement.
As this unit is a built-in appliance the plug socket must be placed where it will
be easily accessible so that the unit can be disconnected from the mains
supply whenever necessary.
IMPORTANT:
It is essential that the vent provided is fitted, either into the plinth or bottom
of the furniture, to ensure that the air can circulate freely – DO NOT PLACE ANYTHING
IN FRONT OR BEHIND THE VENT THAT COULD BLOCK THE AIR FLOW.
We strongly recommend that ventilation is also provided in the work top at the back or at either side of the built-
in appliance.
The Manufacturer cannot be held responsible for any damage that has been caused
because the rules and regulations, as laid out in the manual, have not been
complied with

POWER CONSUMPTION
In order to keep the power consumption as low as possible the cabinet should
NOT be placed in direct sunlight, next to a direct heat source (radiators, cookers,
fires etc) or placed in an environment with excessive humidity.
TEMPERATURE SETTING
SYMBOLS
1) ON/OFF SWITCH
2) LIGHT SWITCH
3) PROGRAMME SETTING BUTTON
4) TEMPERATURE "UP" SETTING
5) TEMPERATURE "DOWN" SETTING
6) TEMPERATURE DISPLAY
7) GREEN PILOT LIGHT: REFRIGERATION ON
8) RED PILOT LIGHT: HEATING ON
9) OPERATING PROBE PILOT LIGHT -MANUAL DEFROSTING PILOT LIGHT
10) MANUAL DEFROSTING BUTTON
Viewing and changing the temperature programmed:
Push and hold down button 3 (SET), the display will show "SP1" (this indicates that you have
entered the setting function).
Press button 3 (SET) again, the display will show the temperature that you have programmed
for the cellar.
To change the temperature programmed, press buttons 4 or 5 (▼▲)
Press button 3 (SET) again to confirm.
Indicators:
-Display (6) shows the internal cellar temperature
-The green pilot light (7) is on; this means that the refrigeration system is running
(normal cellar operation)
-The red pilot light (8) is on; this means that the heating system is running
(normal cellar opera:tion)
Manual Defrosting:

Your cellar is provided with an automatic defrosting system.
If for any reason manual defrosting is required, press and hold down button 10
for a few seconds and the refrigeration will be interrupted for ten minutes: the
pilot light (9) will flash.
Once the 10 minute interval has passed, the cellar will resume its normal operation
at the previously programmed temperatures.
STORAGE
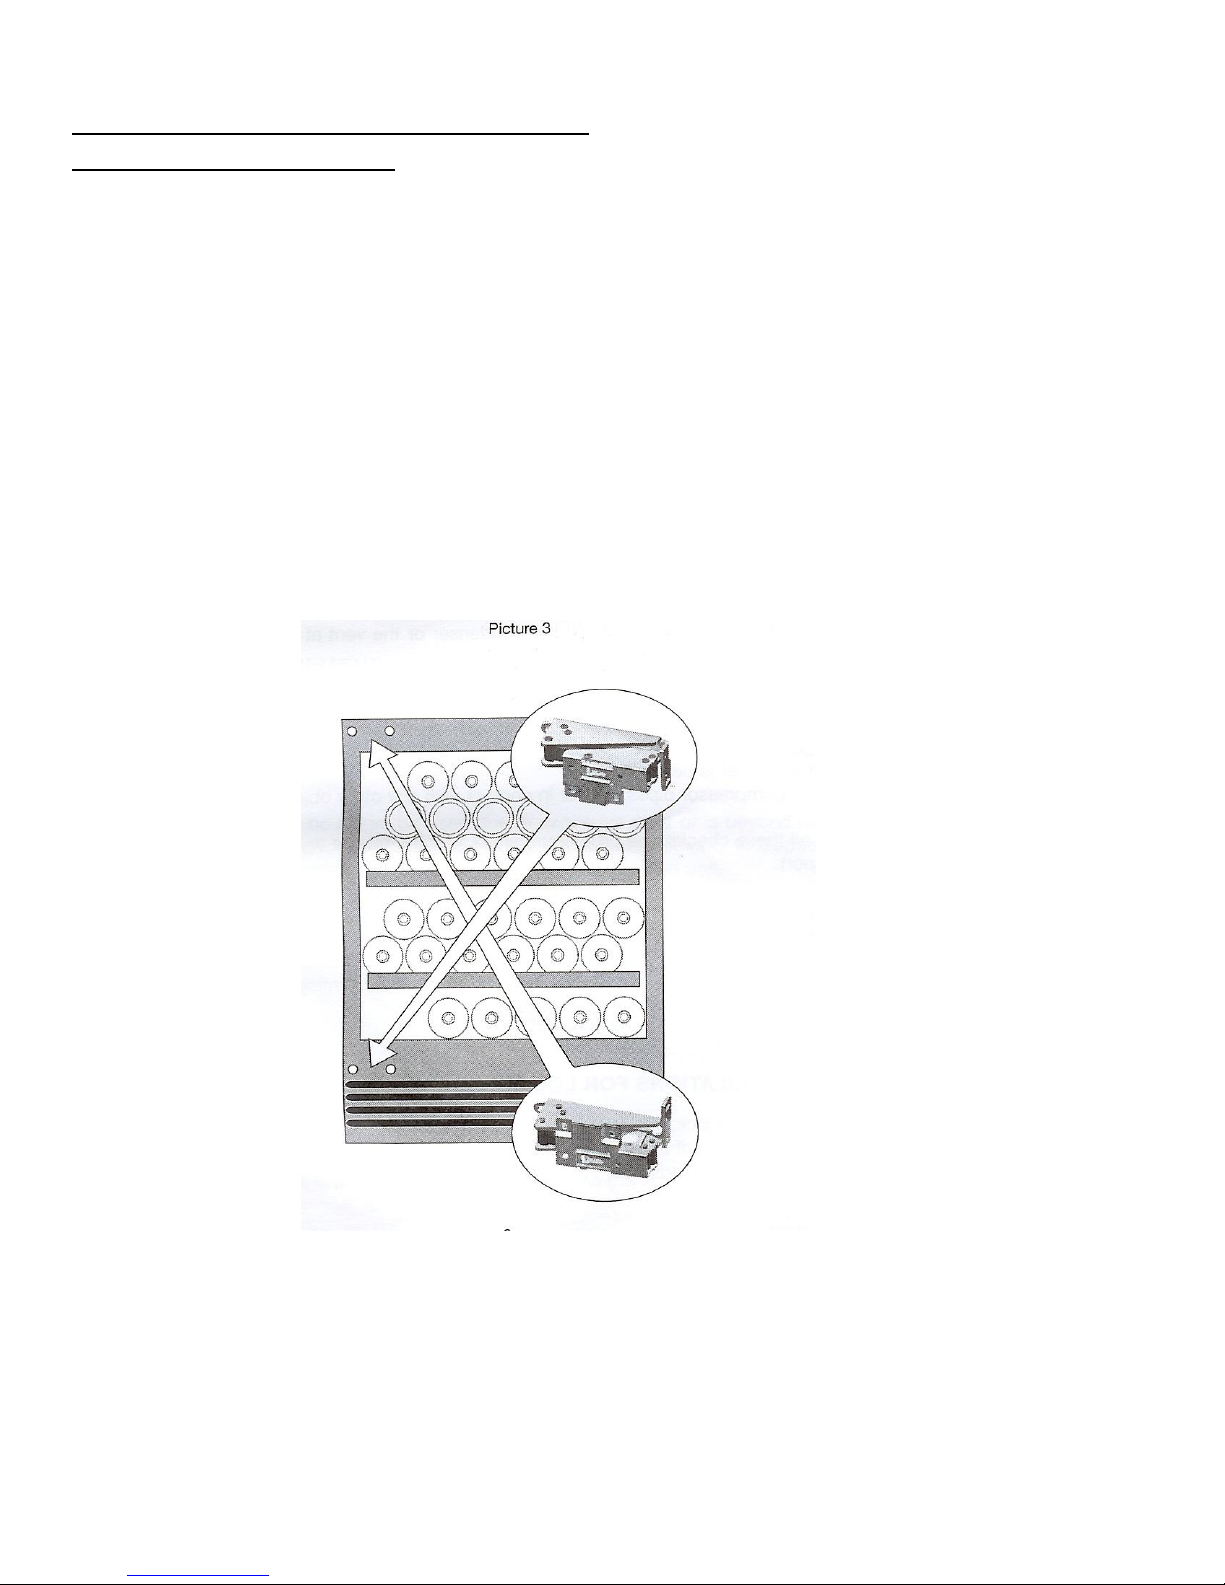
The plasticized steel or wooden shelves inside the cellar are very sturdy and can
be arranged in the cellar to take various size bottles
To position the shelves at different heights, follow these steps:
Take out the shelf, remove the side guides (rails) by unscrewing the 2 fastening
screws, replace the rails in the position required (and make sure that the screws
are in tight) and then place the shelf back into the unit.
As an alternative to static shelves (except for CI 140 CF Model) sliding shelves
can be fitted - these should be requested on ordering
REVERSING THE DOOR
The door can be EITHER LEFT OR RIGHT HINGED according to requirements.
CI 140 CF Model with panelled door
To change which way the door is hinged, follow these instructions:
-To remove the door, remove the screws (pictures 1-2) at the top and bottom
-Remove the screws from the upper and lower hinge;
-To reverse the door: rotate the hinges by 180°, remember that when you are
changing the position of the hinges on the door that the top hinge becomes
the bottom and vice versa.
-Secure the hinges in the holes provided on the opposite side;
-Secure the lock plates of the door panel into the opposite side; Secure the door to the hinges.


CI 140 IX Model with stainless steel door and
C 141 Model with glass door
To change which way the door is hinged, follow these instruction:
-Gently lay the cellar on its back;
-Remove the lower hinge by unscrewing the 2 screws;
- Lift the door to remove it from the upper hinge pin;
-Unscrew the upper hinge pin;
-Reposition the upper hinge pin in the opposite special threaded housing;
-Replace the door again;
-Position the lower hinge after rotating it by 180°and fasten it with the screws provided
-Move the handle on to the opposite side.
All the holes needed to reverse the door are pre-drilled and cover plugs are provided for a
cleaner finish

SUPPORT
Please Note:
Any problems that may arise are due to simple basic faults or a fault with the electrical
supply, therefore these faults are usually very easy to rectify on site by an electrician or
even by the customer.
If the cellar is not working:
-If the display (6) is not lit even after pressing the ON/OFF push-button, check that:
-the plug is properly inserted in the power socket
-power is regularly supplied by the mains
To check the above, try to plug another device into the same power outlet.
If there is no power at the socket:
-Call an electrician to check the main power supply line
If the internal temperature of the cabinet is not cool enough, ensure that:
-there is nothing in the way to prevent the door being closed and sealing properly
-the cellar is not near a heat source
-there are no obstructions around the condenser or the vent at the bottom as
this will affect the air flow around the unit
-there is no excessive frost inside
-the temperature programmed is the one required
If the device is noisy, check:
-that the cabinet is perfectly level
-that the compressor pipes are not in contact with any other objects
If, after all these checks, the problems persist, call the retailer to ask for
technical support.
GENERAL SAFETY RECOMMENDATIONS
Disconnect the device from the power supply before performing any cleaning and/or maintenance operation.
SAFETY REGULATIONS FOR LOCK-PROTECTED CELLARS
If your cellar has a lock, keep the keys out of reach of children. If at some stage
you need to dispose of a wine cabinet please ensure that the lock has been
dismantled and the door removed.

MAINTENANCE AND CLEANING
The maintenance for the wine cellar is very basic, the parts do not need periodic
maintenance and should only be replaced by an engineer if faulty, however the cellar must
be cleaned on a regular basis.
Inside: Defrost the cellar manually, if necessary. Clean using warm water and a
mild detergent (unperfumed)
Do not use any type of corrosive product: when cleaning the shelves do not use
abrasive or cutting materials as this may remove or damage the protective film
Plastic parts: Wash with warm water and a mild detergent (unperfumed).
N.B. It is very important to keep the door seal clean to prevent unpleasant
odours from being created inside the cellar and to ensure that the door seals
properly.
Clean the vent at the bottom of the cabinet on a regular basis as this can get
clogged with dust and dirt preventing the flow of air around the unit -the cabinet
should be disconnected from the power supply when the vent is being cleaned
LIGHT REPLACEMENT
To replace the light, switch off the power supply to the cabinet and remove the 2
screws located on the light cover, remove old bulb and replace with a new 8W bulb.
DISPOSAL OF UNIT
If the cabinet can no longer be used due to excessive wear or is beyond repair,
it should be arranged for a qualified company who have authority to dispose of
this type of refrigerator system to collect and dispose of the unit.
PRODUCT GUARANTEE (As agreed in import country)
The Manufacturer reserves the right to make the necessary changes as may be required
to improve its products without substantially modifying its essential features.

Unit 4 Brunel Close,
Harworth, Doncaster DN11 8QA
Tel: 01302 744916 Fax: 01302 751233
E-mail: info@winecorner.co.uk
www.winecorner.co.uk
© Wine Corner Limited 2012. We reserve the right to change product specifications and prices without prior notice.
Wine Corner Limited does not accept any responsibility for any loss, which may arise as a consequence of reliance on information contained in this document.
This manual suits for next models
3
Table of contents
Other Wine Corner Wine Cooler manuals

Wine Corner
Wine Corner Wine C25 User manual

Wine Corner
Wine Corner Winemaster C50 IN User manual

Wine Corner
Wine Corner SP40DUPRO Operation manual

Wine Corner
Wine Corner Wine PC15 User manual

Wine Corner
Wine Corner WINEMASTER WINE ARM 15 Operation manual

Wine Corner
Wine Corner JG32 User manual

Wine Corner
Wine Corner WINE SP100 User manual

Wine Corner
Wine Corner WINE IN50+ User manual