METVISA BIMG PAC Series User manual

1

2
Cogratulations,
You just acquired a BIMG-BRAZIL equipment, higher product quality, safety and efficiency.
Founded in 1989, BIMG-BRAZIL is a company respected as one of the best and most
complete companies in the manufacturing industry of equipment for gastronomy.
The constant innovation and improvement of its products, using raw materials of the first line,
ensuring top quality products, consumed in Brazil and in more than 25 countries worldwide.
CONFIDENCE AND CERTAINTY OF A GOOD PRODUCT IS ON NAME
BIMG-BRASIL - BIMG-METVISA
IMPORTANT:
FOR PROFESSIONAL USE. DO NOT USEWITHOUT READING CAREFULLYTHEMANUAL.
IF INDOUBT,CONTACTUS :
BIMG-BRASIL Gastronomy Machinery Industry Ltda.
CNPJ 11.193.347/0001-14 - CREA 131726-3
Rod. Antônio Heil –KM 23 Nº 5825 –Bairro: Limoeiro –CEP 88352-502 - Brusque –SC –Brasil
Phone/fax. +55 47 3251-5555 - www.metvisa.com.br
+

3
INDEX
1.
Safety Information ..………………...….................................................................. 4
1.1
General Instructions ...................................................….................................................... 4
1.2
Mechanical Safety...................................................……..................................................... 5
1.3
Electrical Safety....................................................……….................................................... 6
2.
Technical Specifications...................................................................................... 7
2.1
Main Components.……...................................................................................................... 7
2.2
Technical Data.................................................................................................................... 8
2.3
Supply and Disposal of Packing ……………………………................................................. 8
3.
Installation............................................................................................................. 9
3.1
Device Layout ………….................................................................................................... 9
3.2
Electrical Connection....................................................................................................... 10
3.3
Security Measures and User Instructions ……………....…............................................... 11
4.
Device’s Use ....................................................................................................... 11
4.1
Utility.…............................................................................................................................. 11
4.2
Commands …................................................................................................................... 11
4.3
Operating Procedures ………........................................................................................... 12
5.
Cleaning and Maintenance................................................................................. 16
5.1
Procedures for Cleaning and Products to be used…........................................................ 16
5.2
Maintenance and Behavior in case of Malfunctions ……….............................................. 17
5.3
Prolonged interruption in use of the Device ..................................................................... 18
6.
Analysis and Resolution of Problems .............................................................. 19
6.1
Problems, possible causes and solutions ........................................................................ 19
7.
Life of the Device and its components ............................................................. 20
8.
Applicable Standards ......................................................................................... 20
9.
Annex................................................................................................................... 21
Electric Scheme –INMETRO Version…........................................................................... 21
Electric Scheme –CE Version.......................................................................................... 22
Exploded Drawing……...................................................................................................... 21
Exploded Drawing ………….............................................................................................. 23
Spare Parts List………………........................................................................................... 24
WARNING!
Features, photos and figures presented in this manual should be considered for information
purposes. BIMG BRASIL reserves the right to make modifications as may be necessary
without prior notice.

4
1. Safety Information
1.1 General Instructions
• There are care/precautions that should be observed when assembling, use, maintenance and
discontinuing the use of this device;
• Before performing any operation (installation, use (use), maintenance and reuse prolonged
interruption in the use of the device), read the manual;
• The device must be used by people trained and knowledgeable in use and safety requirements
described in this manual;
• This device is not intended for use by persons (including children) with physical, sensory or mental
capacities reduced, or people with lack of experience and knowledge, unless they have received
instructions regarding the use of the device or under the supervision of a person responsible for their
safety;
• It is recommended that children be supervised to ensure that they are not playing with the device;
•In case of alternation of staff to work with the device, the new operator must be instructed on the
rules and the operation of the device;
• The operator must use the appropriate PPE (personal protective equipment). For example: use cap
in hair preventing it from locking up in the moving parts;
• The operator must always be alert to situations that can cause risks of accidents and avoid them.
For example: avoid working with loose sleeves uniforms, where they can lock in the moving parts,
causing accidents;
• After being held reading and clarified all doubts, this manual should be stored carefully in an easily
accessible place, known to all the people who will operate the unit and placed the willingness of
people to carry out maintenance, for any queries. Whenever there is any doubt, be sure to consult the
manual. Do not operate in any way with any questions;
• Upon installation, it is essential to put this manual available for the professionals who will do the
same;
• Before you start cleaning and any maintenance, it is essential to disconnect the device from the
power network;
• Periodically check the condition of cables and electrical parts.
• Do not turn on the device with the gear box without lubricating oil and check if the rollers and the
protection of the rollers are fixed to the front cover and the knobs. Insert only specific products to
which the device is intended and never place your hands, fingers or objects in the nozzle or the
moving parts with the power on, it might cause an accident;
• Do not leave the device switched on without supervision.
WARNING!
Do not make repairs yourself. Go to technical assistance authorized by the manufacturer.
Use only original parts in your device.

5
1.2 Mechanical Safety
• Never place your hands, fingers or objects in the nozzle or the moving parts with the power on, it
might cause an accident;
• When the power is off and you are going to clean the rollers, take the maximum care. The rollers
have blades that are very sharp and can easily cause accidents (cuts, for example) if not handled
carefully.
• Before Turn on the device, make sure the rollers are fitted on the shafts of the gears, and also if the
rollers and the protection of the rollers are fixed to the front cover and the knobs.
The device described in this manual guide meets the regulation against the risk of
mechanical type. These standards were observed: NR-12 and CE (check item 8 Applicable
Standards).
Mechanical safety is achieved with:
1. Mechanical design that prevents access by hand to electrical parts and cutting rotating parts;
6
2. Cabinet, top and back cover, protects the engine and the gearbox, preventing operator access
and contact with water, dust and other materials;
3. Base, has the function of hold the processed meat. In addition to preventing operator access to
electrical parts;
4. Handle reversal that rotates the rollers when a piece of meat is locked in the blades. It works the
operator has no direct contact with the rollers during the procedure;
5. The protection of rolls, further prevent access to the rollers during processing of meat, has a
feeding tube that directs the meat to the rolls, and a lower tube that directs the output of
processed meat. During processing there is no need for the aid of hands or sockets to push the
meat against the rollers. The tubes have a reduced aperture, avoiding the operator having access
to the rollers;
6. Front cover and lever, set the rollers inside the protection of the rollers, preventing access and
displacement of the rollers during processing;
7. Reverser Handle Protection, prevents operator contact with the reverser handle during the
process.
8. Nonskid feet to ensure stability of the device during operation.
For viewing of the parts described above, see picture in section 2.1 (Principal Component -
Page 7) of this manual.
WARNING!
Whenever you remove any safety item of the device (for example, during cleaning or
maintenance), reset in place and confirm that is performing its function properly.
1.3 Electrical safety
• Periodically check the condition of cables and electrical parts;
• If the power cord is damaged it must be replaced by a new one. The exchange must be made by the
manufacturer, authorized agent or a qualified person in order to avoid risks;
• Do not use water jets because it could cause electric shock. For cleaning your device, follow the
instructions in item 5 of this manual;
• Do not operate the device in humid or with wet clothes and shoes. Put proper footwear, this will
avoid electric shock and even death;
• Use the device on a firm, dry and well level surface;
• Do not use extension cords and adapters with various other appliances connected to the device.
This may cause fire or overload;
• Never do any maintenance, adjustment and disassemble with the device on. For such procedures,
make sure that it is turned off by removing the plug from the electrical outlet.
The components used for safety against electrical hazards were selected according to the
standard: NR-12 (check item 8 Applicable Standards). Given the perfect insulation of all electrical

7
parts and the great resistance of all the materials used, this device is able to perform the work to
which it propose.
WARNING!
Whenever you remove any safety item of the device (for example, during cleaning or
maintenance), reset in place and confirm that is performing its function properly.
2. Technical Features
2.1 Main Components
To the device described in this manual, safety in use, cleaning, maintenance and maximum
hygiene are guaranteed by design and the special design of all parts, and also used stainless steel
and other suitable materials for the contact with the meat.
he device is designed with the following features:
• All metal parts including combs and blades of the rollers, are produced in stainless steel, which has
corrosion resistance besides other steels. It is a material resistant from attack by various corrosive
agents;
See below the main components of the device:
Note: To design exploded with
spare parts list, see the annexes
(page 23 to 24).

8
2.2 Technical Data
Model
Nominal Measures
Width x Height x
Length
(mm)
Net
Weight
(kg)
Voltage
(V)
Nominal
Current
(A)
Capacity
(kg/h)
Lubricant
SAE140
(ml)
PAC127M60N5
419x440x230
23,5
127
5,9
400*
150
PAC220M60N5
419x440x230
23,5
220
3,2
PAC220M50C7_
419x440x230
24,3
220
2,9
*May vary due to the user's speed and according to the quality of processed meat.
Noise level (device with load): 65 dB.
WARNING!
Features such as model, serial No. and electrical device voltage are indicated on the data
label (figure below). Before installation, check if device’s voltage is according to the
electrical outlet.
2.3 Supply and Disposal of Packing
The device is packed with wood or cardboard, to ensure the perfect integrity during
transportation and is accompanied by the following:
• Instruction Manual for Installation, Maintenance, Use and Safety;
• Guarantee Agreement (for Brazilian market).
IMPORTANT
The packaging components (cardboard, wood, foam, foil, etc.) are products assimilable to
urban solid waste and can be disposed off without difficulty. In the event that the device is
installed in countries where there are different standards, eliminate the packaging in
accordance with current standards. Perform the correct disposal of the product helping to
protect the environment. For more information about recycling the same, contact the local
authorities, the garbage collect service or the shop where you purchased the product.
Foot
9
3. Installation
3.1 Device Layout
The connection to the Electrical Outlet and the arrangement for the operation must be
performed by a qualified professional. Check if the device voltage is according to the electrical outlet.
During installation, it is essential to indicate this manual for the professionals who will make
it.
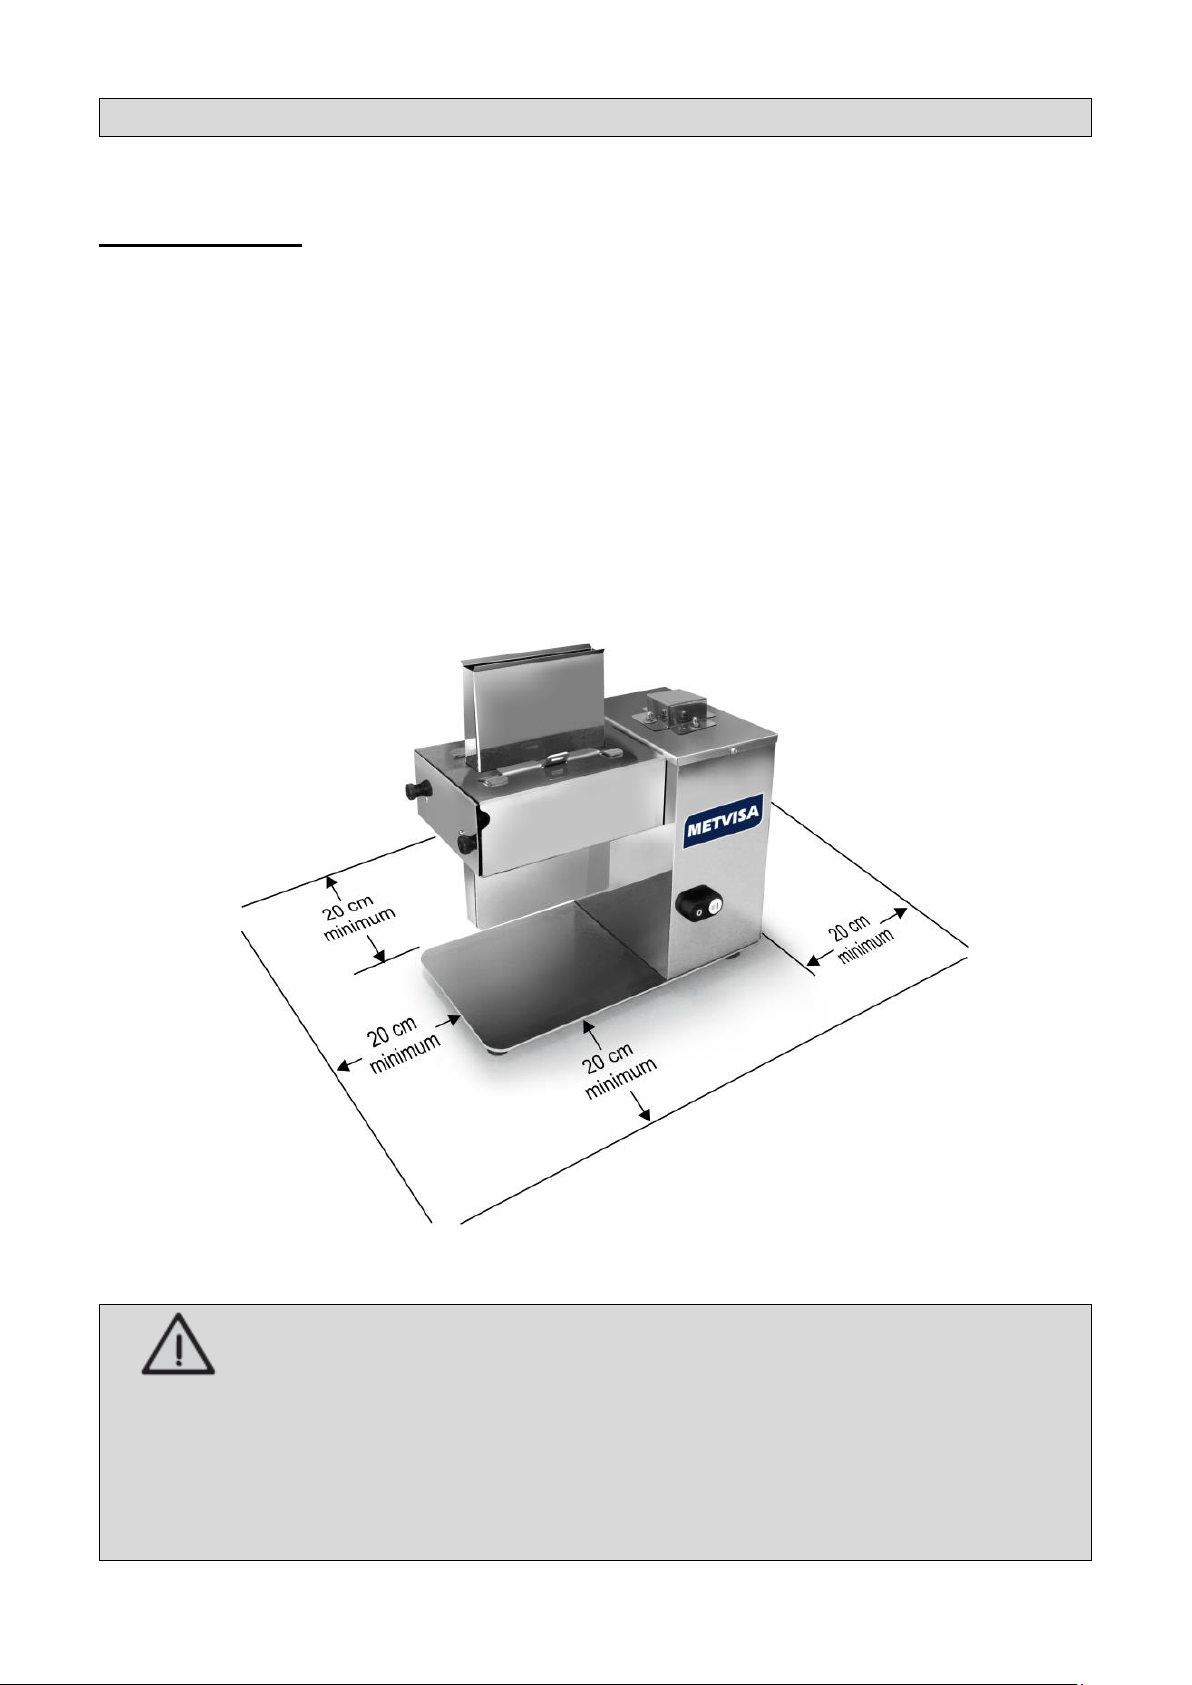
To ensure the correct operation and safety, you should position the device in a ventilated
environment and in wide support surface, well leveled, dry and stable, away from sources of heat and
water taps, and an average height 80 cm. Install your device leaving a distance of at least 20 cm
around it, doing this you have enough space to perform inspection, maintenance, cleaning and use.
WARNING!
The installation and the place where it will be set must comply with the rules of prevention
of risk and safety at work (Regulatory Standard NR-12 for Brazil or as current regulatory
standard in others country).
The manufacturer is not responsible for possible direct or indirect damages caused by the
non-compliance of the said rules and other instructions in this manual.

10
3.2 Electrical Connection
The device is supplied with a power cable to be connected to an electrical outlet. If the power
cable is damaged, it must be replaced by a new cable. The exchange must be carried out by the
manufacturer, dealer or qualified person in order to avoid risks.
In INMETRO version, the power cord plug has three round pins, existing just below each pin
a corresponding mark (phase, ground and neutral). It is mandatory to carry out a good ground
connection, according to the current regulations.
It is supplied with the device an Equipotential Grounding Terminal (Terminal Block), located on
the right of the base.
The Terminal Block shown on figure beside is an additional protection to the
main supply grounding, it must be connected to a bar of Grounding
Terminals, not depending on the main supply connection, other devices that
have accessible metal parts and are stationary, must also be connected to this bar, as well
as the workbench, if it is metallic. This way, all devices will be at the same electric potential
avoiding harmful electric current.
The devices described in this manual have a single voltage, ie 127 V or 220 V. If voltage
changes are required, contact the manufacturer or your authorized dealer.
WARNING!
Before connecting your device, always checks if the main supply voltage is the same as the
device voltage. If it is not, proceed changing the voltage on the device as instructed.
The INMETRO version of the device supply voltage is 127 V or 220 V (60 Hz) and CE version
is 220 V (50 Hz), as can be seen in the voltage label pasted on the power cord or as indicated
on the identification label, which is at the back of the device (see figure on this label in item
2.2 of this manual).
Make sure that the main voltage where the device will be installed the device is compatible
with the voltage in those labels.
For more details about the electrical part of the device, see the wiring diagram in the
manual (p. 21 to 22).
11
IMPORTANT
The manufacturer is not responsible for possible direct or indirect damages caused by non-
compliance with rules and instructions in this manual.
3.3 Security Measures and User Instruction
The professional who sell the device must instruct the user on the correct operation and
must deliver him this instruction manual.
The user must be informed of the necessary safety measures and have to respect them, and
also respect all the measures described in this manual.
Your appliance has mechanical protections (see item 1.2 Mechanical Safety) that prevent
access to moving parts and electrical components. Removal or tampering with these safety
components can cause serious risks to the operator's upper limbs.
4. Device's Use
4.1 Utility
The device is designed exclusively to tenderize steaks. If you have the (Meat Strips) kit as an
accessory, your device can also cut meat in strips.
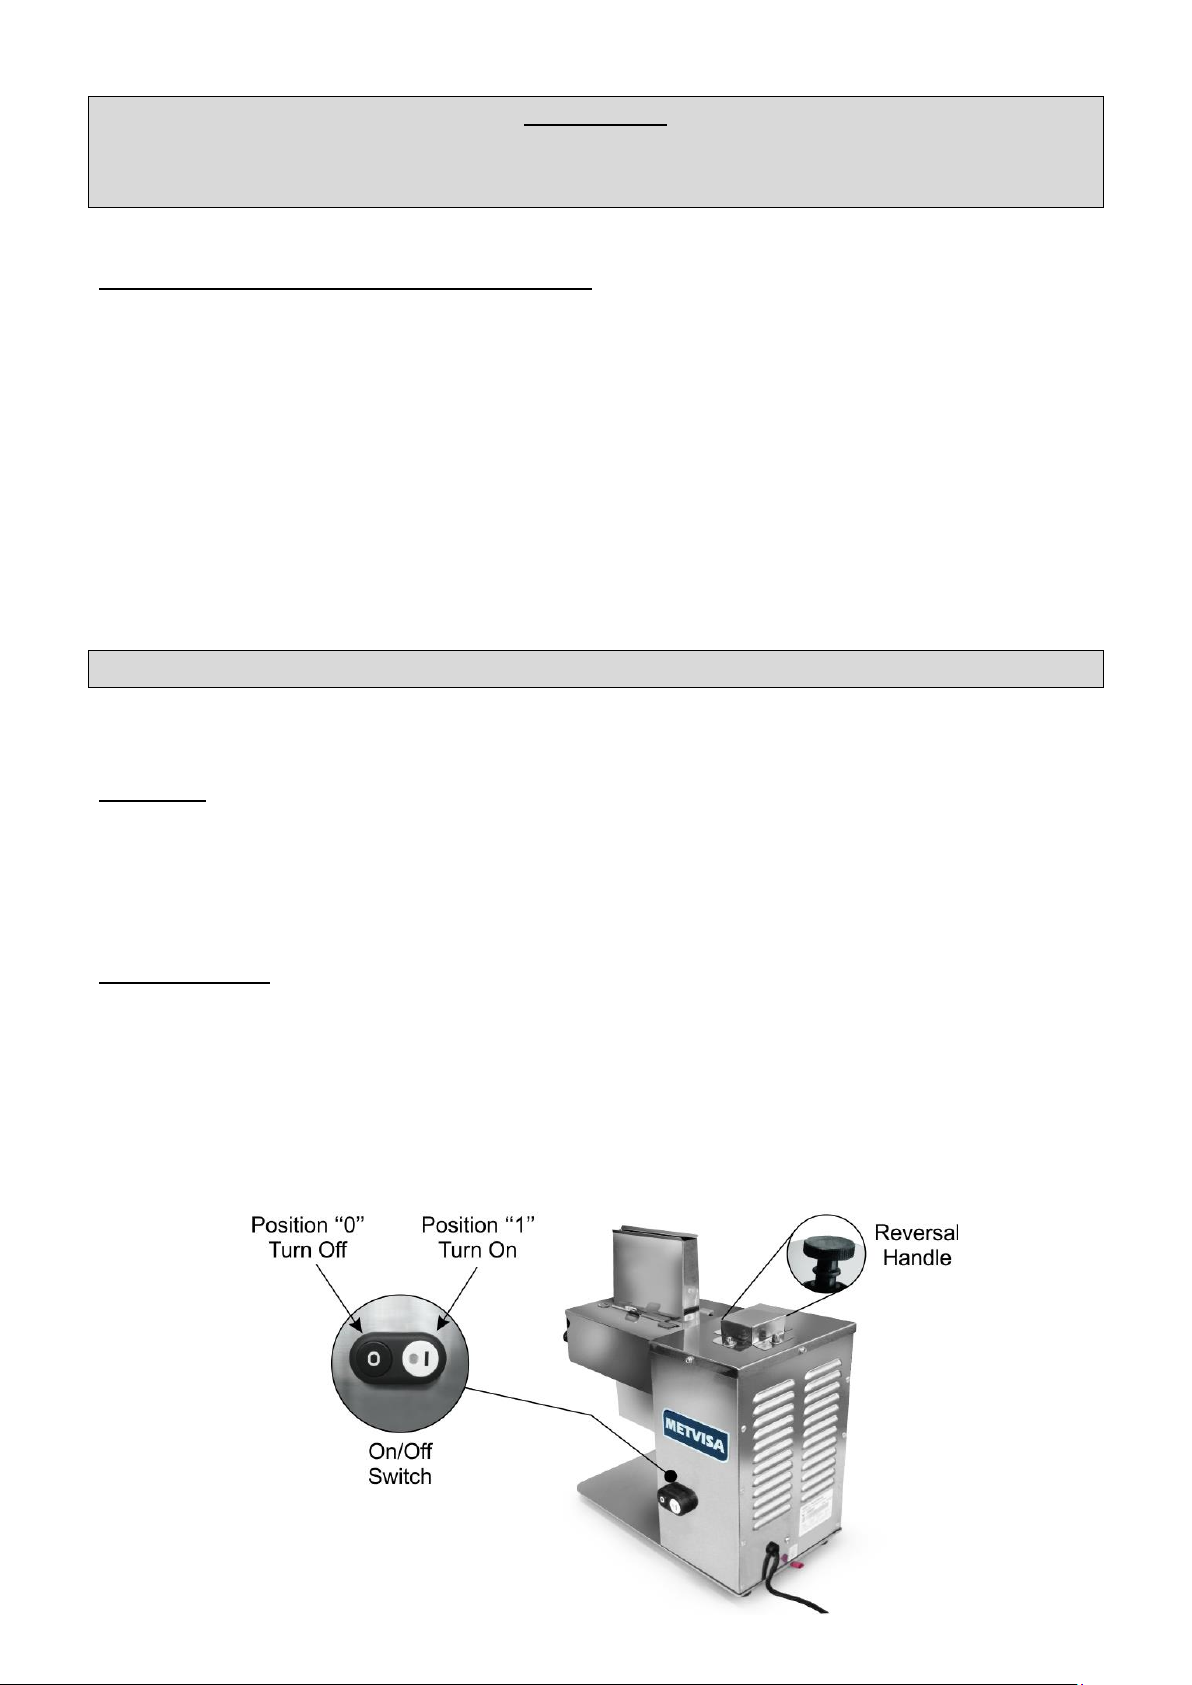
4.2 Commands
The device has an On/Off Switch and Reversal Handle.
The On/Off Switch is located on the front of the cabinet. The Reversal Handle is located on
the top cover.

12
See description of each command:
• On/Off Switch - used to turn on and off the device. In position "1" turn on, in position "0" turn off.
• Reversal Handle - it is used to facilitate the removal of meat pieces that could eventually stay in the
rollers. To move the rolls simply manually rotate the knob counter-clockwise and the meat will be
directed to the lower nozzle of the device.
Obs.: Optionally you can also remove the entire nozzle kit (combs, rollers and protection of rollers) to
remove the locked meat.
Besides meat removal, the reversal handle also assists in assembling the rollers, because rotate the
shafts of the gears facilitating the engagement of the slit of the rolls.
4.3 Operating Procedures
Before operating your device, perform a cleaning of components that have contact with the
meat (combs, rollers, front cover, protection of rolls, etc.), to so make sure that the appliance is
disconnected from the power outlet. Follow the cleaning instructions in section 5 of this manual.
To facilitate the disassembly and assembly procedure, follow the images of the main
components of the disassembled device:

13
Check the assembly and disassemble procedure described below:
• Disassembly:
WARNING!
When handling the rolls that contains the blades, take care. The blades are very sharp and
can easily cause accidents (cuts, for example) if not handled carefully and with proper
gloves.

14
• Assembly: The assembly procedure is the reverse of removal. First mount the protection of the
rollers. Note that the Protection Guide should stay on top of the Sustainer Shaft.
When mounting the roller in the drawer, place the slit of the rolls inside of the drawer.
Note that on the roll 01 there is a disc and it should be assembly against the plate of the drawer.
Another attention that you must have is regarding the first blade of the roller 02. The blade has to stay
behind the disc of the roller 01, as the image below.
After mounting the drawer inside of the Rollers Protection, rotate the rollers until the slit fits the
shoulder of the axes of the gears. To check if the rollers are properly seated, turn the knob reverse
and see if the two rollers are rotating.

15
With the rollers seated, assembly the front cover fixing it with the two knobs and the reverser
handle protection with the nuts. Finally put the comb with the handle facing out.
Assemble all the pieces perfectly to be guaranteed the safety of the operator and the correct
functioning of the device. If any part is not firm, it may not have been properly seated. In this case,
repeat the operation and not getting success, contact technical assistance.
ATTENTION!
Never turn on the device without fixing the rollers, and with the protection of the rollers, the
front cover and the knobs or the combs out of position because it could cause accidents.
• Operation: Before turn on the device, make sure all parts are well fitted, the protection of the rollers
attached to the front cover and the knobs, and if the device supply voltage is according to the power
outlet.
After checked these items, follow the machine's operating procedure:
• Connect the power cord to the power outlet;
• Press the On/Off switch in position "1" (on) and leave the device turned on for a few seconds;
• Place the meat to be processed in the nozzle and release it. At this point the rollers will send the
meat to the bottom nozzle. To tenderize the meat, repeat the procedure as necessary. When using
the Strip Meat Kit, should process the meat only once since in the end of the process the meat will
already cut;
• After finish the process, turn off the device by pressing the power button to "0" (off).
IMPORTANT
If during the process the meat lock in the rollers, turn off the device on the power button on
the "0" position (off). Rotate the Reversal Handle counter-clockwise and the meat will be
directed to the lower nozzle. If you cannot remove the meat locked in this way, you can
disassemble the nozzle kit (combs, rollers and protection of rollers) to remove the locked
meat.
16
WARNING!
Never use meat with bone or frozen. Remove as much as possible cartilage and tendons of
the meat.
If you notice that the device cannot process the meat or that process is slow, reduce the
size and thickness of the meat before inserting it in the nozzle.
Add the meat in the nozzle gradually, only put another meat on the nozzle after the meat in
progress come processed out by the lower nozzle, like this will not affect the speed and
engine performance, and the life of device.
Failure to follow these guidelines will be considered unsafe act and machine abuse.
WARNING!
Do not remove the protection of the rollers with the device on, also should not put your
fingers, hands or objects (such as spoons and knives) into the nozzle, as this might cause
accidents.
Any irregularity contact the nearest authorized service.
IMPORTANT
The operator must use the appropriate PPE (personal protective equipment). For example:
use cap in hair preventing it from locking up in moving parts and appropriate gloves in
addition to ensure hygiene when handling meat, protect the operator during meat
processing.
IMPORTANT
The manufacturer is not responsible for possible direct or indirect damages caused by non-
compliance with rules and instructions in this manual.
5. Cleaning and Maintenance
5.1 Procedures for cleaning and the use of the Product
Your device was built with first class materials, so use it correctly and get great satisfaction.
Keep your device always clean and well maintained, that it will have longer life cycle.
You must make a daily cleaning in the device for a good operation and durability.
WARNING!
Before performing maintenance or cleaning, ensure that the On/Off Switch is in position "0"
(off) and that the plug is disconnected from the mains.
17
WARNING!
Do not use water jet to clean the device.
IMPORTANT
This device is not intended to be fully immersed in water for cleaning.
Follow the instructions below to learn what parts that can be immersed and what special
care take it.
Demountable parts (rollers, combs, front cover, drawer and protection of rolls) should be
removed from the device and washed with warm water and mild soap. Thoroughly clean the corners,
eliminating waste from the meat.
The device must be cleaned as many times as possible, to prevent dry food waste stick in the
parts. For cleaning, dilute soap or mild detergent in warm water and use with a soft cloth. With a cloth
humidified with water, rinse and then dry the parts with a soft, dry cloth.
Never use products or abrasive sponges for cleaning as it may scratch or damage the surface
of the pieces. Do not pour water into the unit for cleaning, it can cause electric shock or even burn the
device.
WARNING!
Take care when cleaning the rollers, they have blades that are extremely sharp. Handle with
care, otherwise, could cause accidents. Same warn for any other cutting part of the device.
Never operate the device without the protection of the rollers attached to the front cover and
the knobs because it could cause accidents.
IMPORTANT
The manufacturer is not responsible for possible direct or indirect damages caused by non-
compliance with rules and instructions in this manual.
WARNING!
It is extremely important that the products used in cleaning ensure maximum hygiene and
are non-toxic.
5.2 Maintenance and Behavior in Case of Malfunctions
The operator must be instructed to perform routine inspections, making small adjustments,
cleaning and watch evidence of malfunction that may occur. Examples: check strange noises; power
loss; device non-performance the result; oil leak; among others. These actions are indispensable to
ensure a longer life of the machine.

18
WARNING!
When maintenance is made (even if minor adjustments), always disconnect the device from
the power outlet.
It is recommended to perform preventive maintenance from 6 in 6 months, checking and
adjusting clearances, cleaning the internal parts, etc.. By detecting broken or impaired functioning
parts, make the replacement, always using original parts.
WARNING!
Never let your device work without oil in the gearbox, it will cause damage.
It is recommended to change the oil every 6 months of use or 800 hours worked.
For oil change, take your device to a closer technical assistance.
This device uses 150 ml of lubricating oil SAE 140.
The preventive maintenance eliminates the inconvenience of staying with the device stopped
when most needed, reduces the cost of maintenance and reduce the risk of accidents.
WARNING!
Preventive maintenance requires skilled professional.
Make sure the device is unplugged from the power outlet.
Whenever you remove any safety item of the device (for example, during cleaning or
maintenance), reset in place and confirm that is performing its function properly.
To detect any malfunction or nonconformity, send your device to the nearest service. See list
of technical assistance in the link on our website: www.metvisa.com.br
5.3 Prolonged interruption in use of the Machine
When you have to leave the device stopped for a long period of time, disconnect it from the
power outlet and clean it, including the different accessories. It is advised to protect all device’s parts
with white Vaseline Oil or with suitable products. Also protect the device from dust, covering it with a
nylon fabric or other material.

19
6. Analyses and Resolution of Problems
6.1 Problems, possible causes and solutions
All products with BIMG quality are designed with materials and components that ensure
longer life to your device. However, due to natural wear, inappropriate use or lack of maintenance, the
device may present irregularity during functioning.
On table below, you can check possible causes and solutions:
PROBLEMS
POSSÍBLE CAUSES
SOLUTIONS
Device does not turn on.
- Lack of electric energy.
- Check if there is energy on the
power network;
- Check if power cord is plugged
into the power outlet;
- Check if On/Off Switch is in
position “1” (ON).
- Poor contact on internal
electrical connections.
Contact or send the device to the
Authorized Technical Assistance.
- Device Voltage different from
Power Network Voltage.
- Problems with Electric Motor.
Rollers stop spinning during
operation.
- Lack of electric energy.
- Check if there is poor contact
between power cord and power
outlet.
- Misfit Rollers.
- Follow the assembly procedure
(page 14).
- Excessive wear of the Gears.
- Contact or send the device to
the Authorized Technical
Assistance.
- Meat locked on the Rollers.
- Rotate the Reversal Handle
counter-clockwise and the meat
will be directed to the lower
nozzle of the device;
- Follow the assembly and
disassembly procedure (page 13
and 14).
The device turns on, but rotate
slower when process the meat.
- Starting Capacitor defect.
Contact or send the device to the
Authorized Technical Assistance.
- Electric Motor issues.
- Thick steaks, with bones or with
much cartilage and tendons.
Reduce the size and the
thickness of the steaks and
remove the maximum of cartilage
and tendons, before insert the
steak on the nozzle.
Burn smell and/or smoke.
- Device voltage differs from
power network voltage.
Contact or send the device to the
Authorized Technical Assistance.
- Electric Motor issues.
- Problems on internal or external
electric circuit of the device.
Strange noises.
- Misfit Rollers.
- Follow the assembly and
disassembly procedure (page 13
and 14).
- Wear or defect of the Gears.
Contact or send the device to the
Authorized Technical Assistance.
- Lack of oil into Gear Box.
Damaged Electric Cable.
- Transport damage;
- Use and/or layout.
The exchange of the Electric
Cable must be made by the
manufacturer, authorized agente
or qualified person in order to
avoid risks.

20
For more information and clarification, contact your nearest Authorized Service Center. See
the list of technical assistance on our website: www.metvisa.com.br
7. Life of the Device and its components
The life of the device can vary from 3 to 5 years depending on the proper form of use,
cleaning, maintenance and quality of its components.
The list bellow shows the life of the main components:
On/Off Switch: 10000 maneuvers;
Electric Cables and Wires: 25 years;
Electric Terminals: 8 years.
8. Applicable Standards
The applicable standards for development of the device and elaboration of this manual are:
IEC 60335-1;
IEC 60335-2-64;
Ordinance 371 of December 29, 2009 from INMETRO;
NR-12 - Ordinance 197 of December, 2010;
Directive CE.
This manual suits for next models
3
Table of contents
Other METVISA Commercial Food Equipment manuals


