METVISA FIE.30 User manual

1
2
ÍNDICE
1.
Safety Information………………........................................................................... 3
1.1
General warnings…............................................................................................................ 3
2.
Technical Characteristics..................................................................................... 4
2.1
Main Components……….................................................................................................... 4
2.2
Technical Data…................................................................................................................. 5
3.
Installation............................................................................................................. 6
3.1
Equipment Layout……...................................................................................................... 6
3.2
Electrical Connection.......................................................................................................... 7
4.
Equipment Use......................................................................................................... 9
4.1
Utility................................................................................................................................... 9
4.2
Commands.......................................................................................................................... 9
4.3
Operating Procedures....................................................................................................... 10
5.
Cleaning and Maintenance..................................................................................... 13
5.1
Cleaning Procedures and Products Used......................................................................... 13
5.2
Maintenance and Procedures in Case of Breakdowns..................................................... 15
6.
Annexes............................................................................................................... 16
Electrical Schematic FIE.30 - 220 V …............................................................................. 16
Electrical Schematic FIE.30 - 380 V.................................................................................. 17
Electrical Schematic FIE.44 - 220 V.................................................................................. 18
Electrical Schematic FIE.44 - 380 V.................................................................................. 19
Exploded View………........................................................................................................ 20
Spare Parts List………………........................................................................................... 21
ATTENTION!
The characteristics, pictures and figures presented in this manual should be considered for
information. IMG BRASIL reserves the right to make such modifications as may be deemed
necessary without prior notice.

3
1. Safety Information
1.1 General Warnings
• Cautions / precautions must be observed when installing, using, maintaining and discontinuing use of
this equipment;
• Before carrying out any operation (assembly, use, maintenance and reuse after prolonged non-use of
the equipment), read the manual carefully;
• The equipment must be used by trained people familiar with the use and safety regulations described
in this manual;
• This equipment is not intended for use by people (including children) with reduced physical, sensory
or mental capacities, or people with lack of experience and knowledge, unless they have received
instructions regarding the use of the equipment or are under the supervision of a person responsible for
their safety.
• It is recommended that children be supervised to ensure that they are not playing with the equipment;
• In case of rotation of the people that will work with the equipment, the new operator must be educated
about the standards and the operation of the equipment;
• The operator must use the Adequate PPE (personal protective equipment). As for example: use
kevlar hoses or non-flammable fabric to avoid oil burns; wear non-slip shoes; among others;
• The operator must always be aware of situations that can cause a risk of accidents and avoid them.
For example: work with dirty floors, where someone can slip and fall on the equipment.
• After reading and clarifying all doubts, this manual should be carefully stored in an easily accessible
location, known to all people who will operate the equipment and make it available to those who will
carry out maintenance for any inquiries. Whenever any questions arise, be sure to check the manual.
Do not operate the equipment in any way with doubts;
• In the installation, it is essential to make this manual available to the professionals who will do the
work.
• Never pour water on hot oil as it can cause major accidents. In case of accident, use non-flammable
material to extinguish the focus;
• Make sure the resistance is completely submerged in oil before turning on your equipment;
• Before starting cleaning and any maintenance, it is essential to disconnect the equipment from the
mains and wait for the oil to cool completely; Must only be carried out by properly trained personnel;
• Periodically check the condition of the cables and electrical parts;
• Never put your hands, fingers or objects (such as spoons and knives) in the resistance or in the oil
when the equipment is on or cooling down, as they will be hot and will cause burns.
ATTENTION!
Do not perform repairs on your own. Go to a service center authorized by the manufacturer. Use
only original parts in your equipment.
4
2. Technical Characteristics
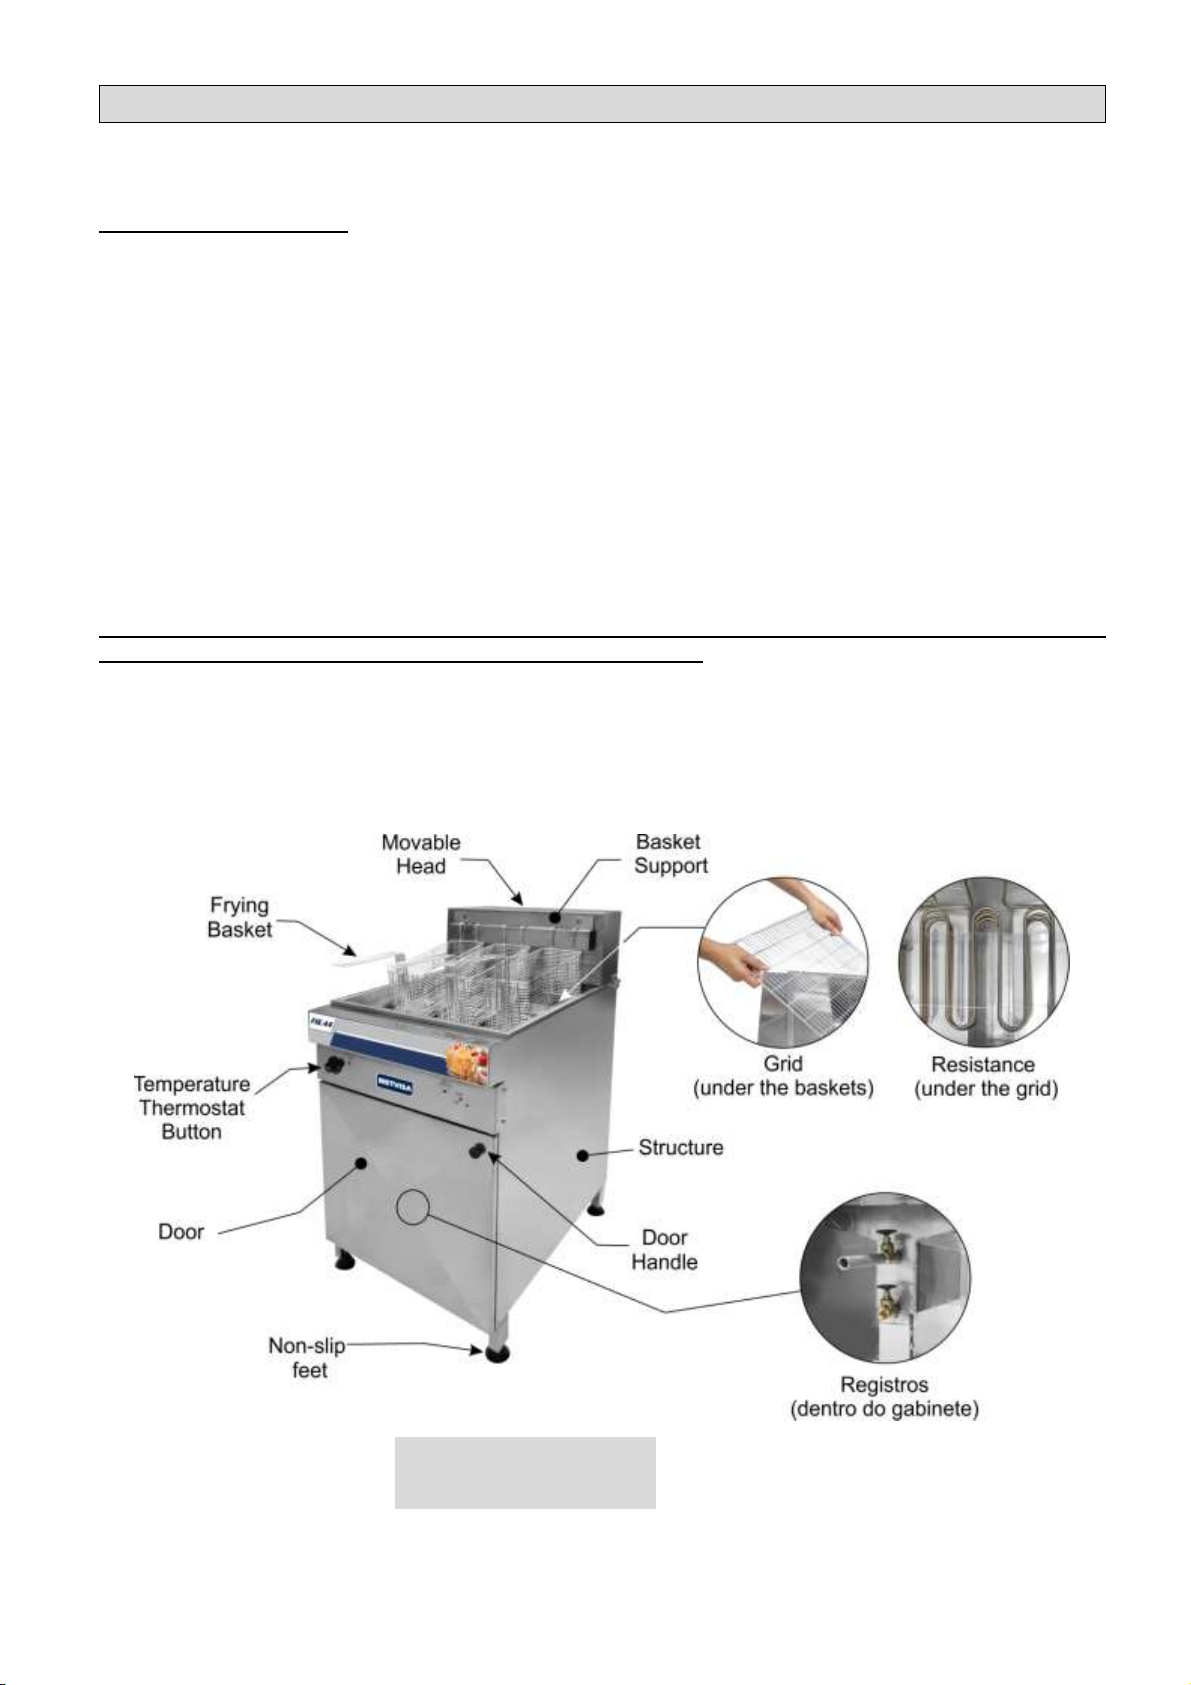
2.1 Main Components
For the equipment described in this manual, safety in use, cleaning, maintenance and
maximum hygiene are guaranteed by the project and special design of all parts and also by using
stainless steel and other materials suitable for contact with the food.
The equipment was built with the following features:
• Frying basket and grid in galvanized steel protecting the steel surface against corrosion. Non-toxic
material and ideal for contact with food.
• Tank, structure, movable head and basket support made of stainless steel, which resists the attack of
various corrosive agents, such as most organic acids, organic substances in general, alkalis, oxi-salts,
etc.
Note: Stainless steel is attacked by sulfuric acid, and also does not withstand hydrochloric
acid, dilute sulfuric acid, chlorides and halides in general.
Following are the main components of the equipment:
Note: For exploded view with
spare parts list, see the
annexes.
5
2.2 Technical Data
Model
Standard Measures
for Operation
Length.xHt.xWidth
(mm)
Net
weight
(kg)
Power
(W)
Voltage
(V)
Maximum
Indicated
Temperature
(°C)
Rate (A)
Quant.
Basket
(unit.)
Maximum
Weight per
Basket (kg)
FIE30220T
370x1080x800
34,5
12.000
220
180
34
02
1,0
FIE30380T
370x1080x800
34,5
12.000
380
180
20
02
1,0
FIE44220T
580x1080x800
43,0
18.000
220
180
48
03
1,0
FIE44380T
580x1080x800
43,0
18.000
380
180
28
03
1,0
Note: The equipment power supply chain requires a circuit breaker of 50 A for 220 V and 25 A for 380 V.
* Dimensions considered with frying baskets mounted.
Guideline Quantity for Fries
Model
Coarse Salt
(kg)
Water
(L)
Oil
(L)
FIE30220T
0,3
4
26
FIE30380T
FIE44220T
0,5
6
38
FIE44380T
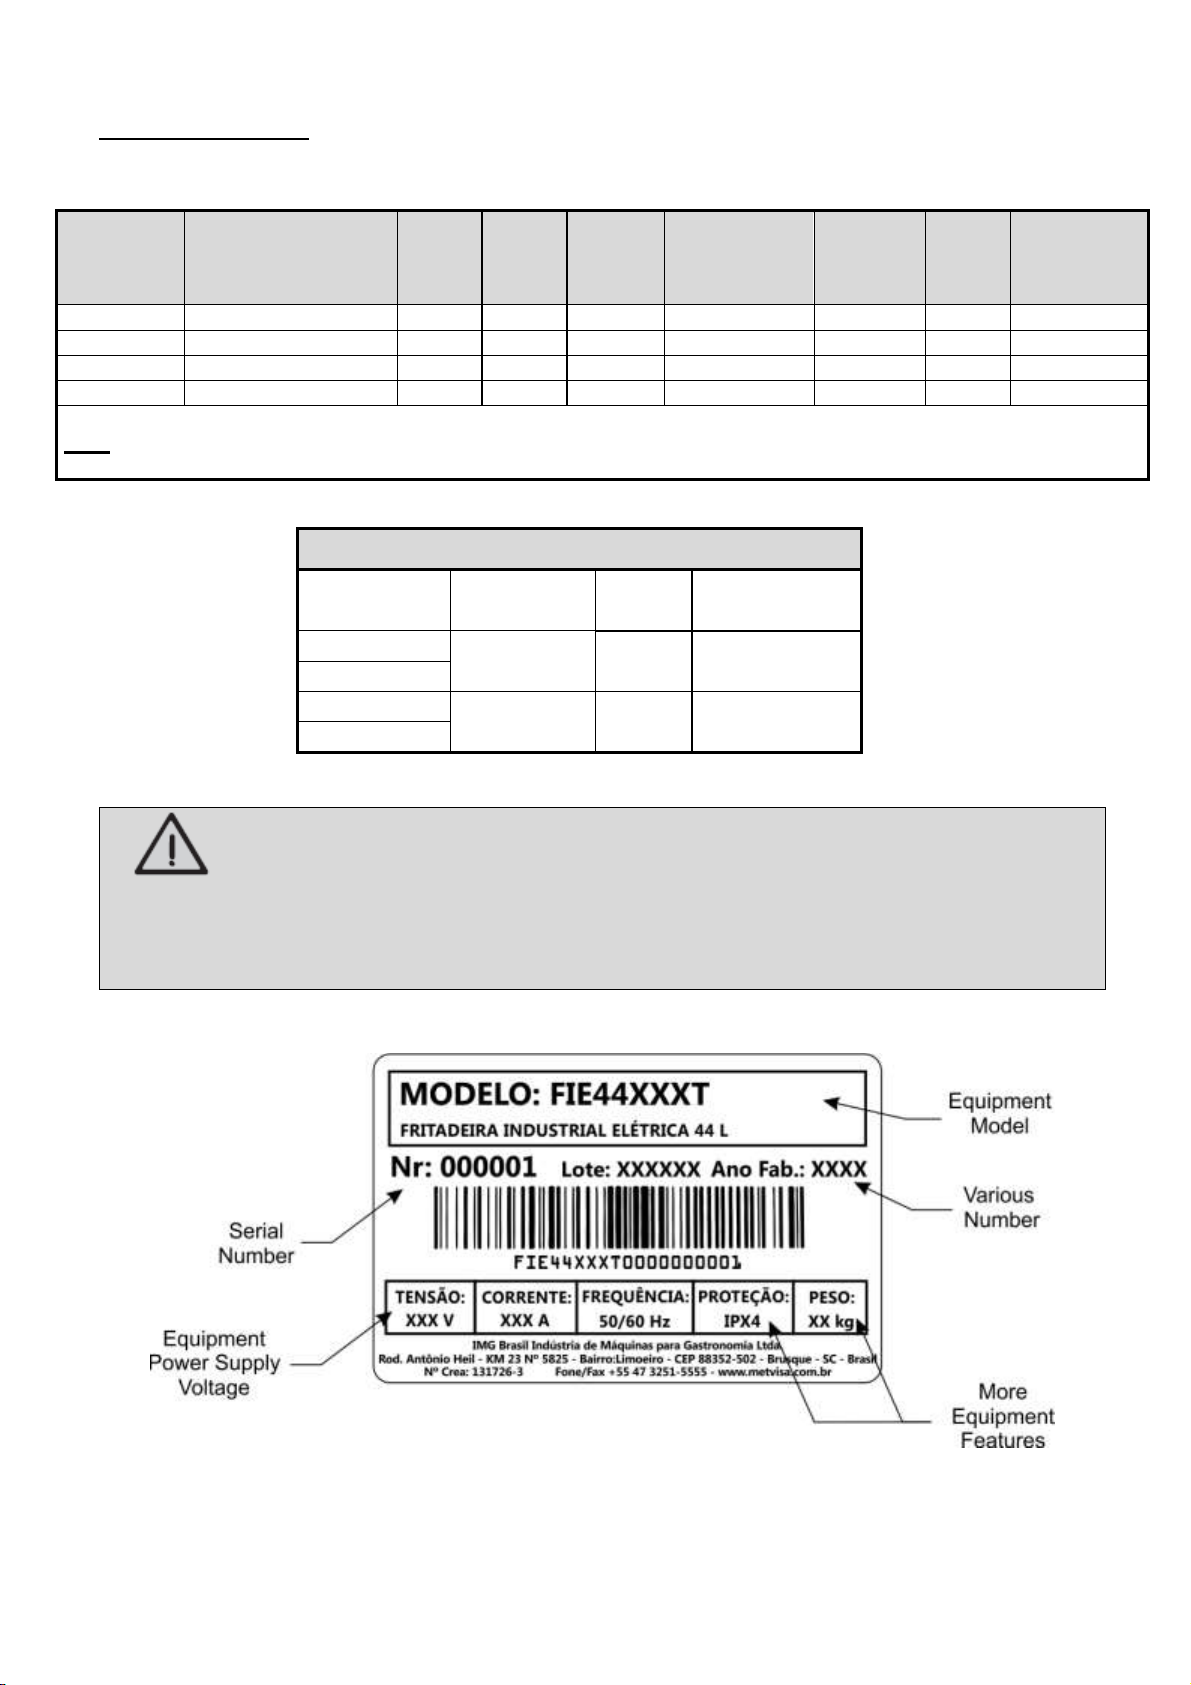
ATTENTION!
Characteristics like: model, serial number and voltage of the equipment are provided on the
label (figure below). Before installation, check that the power supply voltage of the equipment
corresponds to that of the mains
6
3. Installation
3.1 Equipment Layout
The connection to the mains and the arrangement for operation must be carried out by a
qualified professional. Check that the equipment voltage matches the mains voltage.
In the installation, it is essential to make this manual available to the professionals who will do
the work;
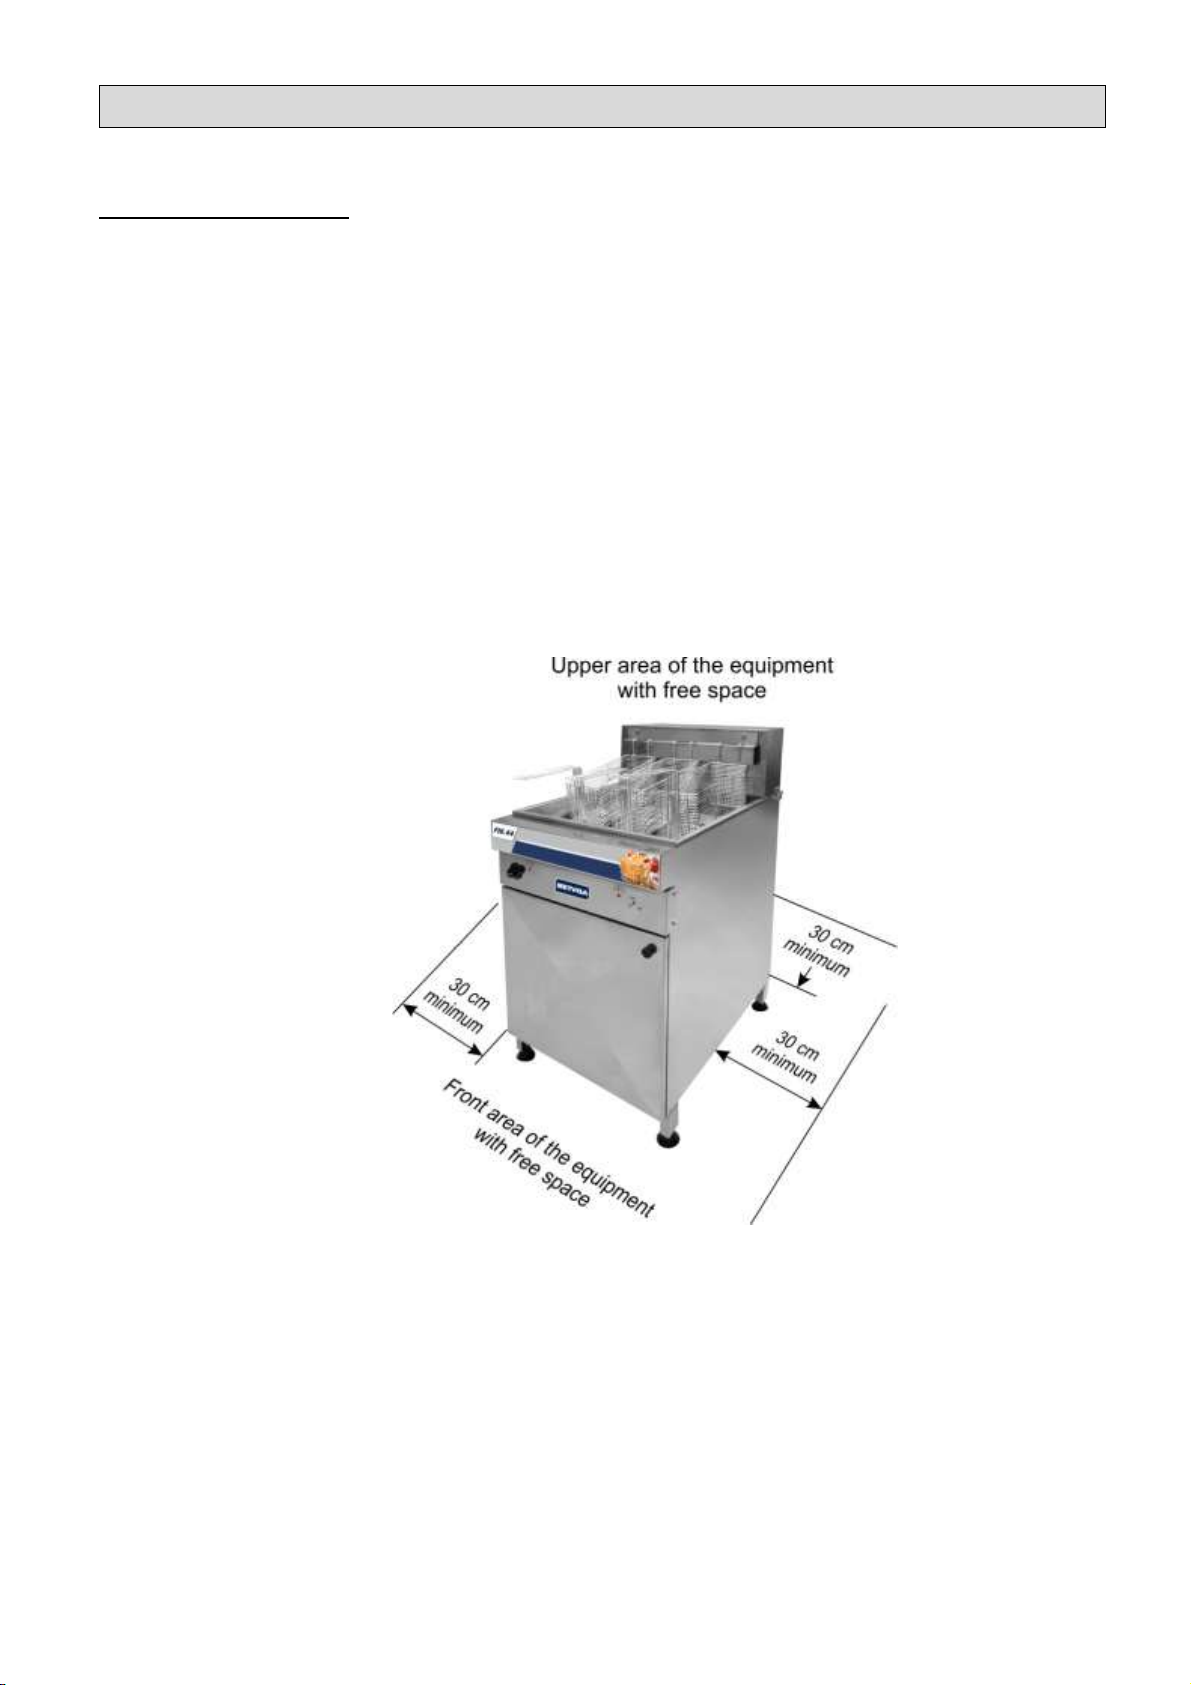
To ensure correct operation and safety, the equipment must be positioned in a sufficiently
large area, with a well leveled, dry and stable floor, away from heat sources, water s and in a place
where there is no heavy traffic of people. Install your equipment leaving a clear area in front of and on
top of the equipment and a distance of at least 30 cm on the sides and rear, so that you have enough
space for inspection, maintenance, cleaning and use.
It is recommended that the place/establishment where this equipment is installed/used is
equipped with an appropriate fire extinguisher, in accordance with the rules and requirements of local
legislation. The use of carbon dioxide fire extinguishers (also known as CO2 carbon dioxide fire
extinguisher) is recommended. Do not use chemical powder or water extinguishers, as these will only
increase the fire.
Another important recommendation is the installation of a range hood or exhaust fan above
the equipment to collect vapors, preventing them from spreading into the environment.

7
IMPORTANT
To install the range hood, follow the manufacturer's instructions, as this item does not come
with the equipment.
ATTENTION!
The installation and the place where the equipment will be disposed must comply with the
norms of risk prevention and safety at work (regulatory norm in force in your country).
Do not install the equipment near flammable materials or products.
The manufacturer does not take responsability for any direct or indirect damages caused by
non-compliance with these rules and other instructions presented in this manual.
3.2 Electrical Connection
The equipment is supplied with a power cable without a plug to be connected directly to the
electrical network or to an industrial-type plug suitable for each type of current and voltage (see the
current and voltage for each equipment model in the table in item 2.2 Technical Data).
The power cable for the model with 220 V three-phase connection voltage has four wires
(Ground and RST Phases) and 380 V three-phase connection voltage has 5 wires (Ground, Neutral
and RST Phases).
For the cable that has Neutral, its color is blue and it is identified with a sticker. It is mandatory
to make the connection of the neutral wire with the neutral of the electrical network.
If the power cable is damaged, must be replaced for a new one. The exchange must be
carried out by the manufacturer, authorized agent or qualified person, in order to avoid risks.

8
ATTENTION!
In order to avoid accidents, it is mandatory to connect the neutral wire with the neutral of the
electrical network. Also, the ground wire for all types of voltage, according to current
regulations.
Never connect the ground wire to the neutral wire of the mains, water pipes, gas pipes, etc.
For a correct grounding, consider the instructions of standard NBR 5410 –ABNT.
Also included with the equipment is an equipotential grounding terminal (post), located on the
lower rear base of the structure.
The terminal identified in the figure aside is an additional protection to the
grounding that is provided for in the electrical network, it must be connected
to a grounding terminals, regardless of the connection to the electrical
network, and the other products that have accessible metallic parts, and that are stationary,
must also be connected to this bus as well as the service bench itself, if it is made of metallic
material. In this way, all these products will be under the same electrical potential, avoiding
undesirable leakage currents.
The equipment described in this manual are single voltage, 220 V or 380 V. If you need to
change the voltage of your equipment, please contact the manufacturer or authorized dealer.
ATTENTION!
Before turning on your equipment, always check that the mains supply voltage is the same as
the equipment's voltage. If it is not the same and it is necessary to change the voltage of your
equipment, contact the manufacturer or authorized dealer.
The supply voltage of the equipment is 220 V or 380 V three-phase, as can be seen on the
voltage label affixed to the power cable or as indicated on the nameplate data label located on
the back of the equipment (see figure of this label in item 2.2 of this manual).
Make sure that the voltage of the electrical network where the equipment will be installed is
compatible with the voltage indicated on these labels.

9
For more details on the rest of the electrical part of the equipment, refer to the electrical
diagram in the manual annexes.
IMPORTANT
The manufacturer does not take responsibility for any direct or indirect damages caused by
non-compliance with these rules and other instructions presented in this manual.
4. Equipment Use
4.1 Utility
This equipment can be used to fry various food products using a water and oil system.
4.2 Commands
Positioned in front of the equipment, there is the thermostat temperature adjustment button,
the two indicator lamps and the reset button (safety thermostat). Inside the structure under the tank are
the valves.
See the figure above and the description of each command:
Valves: used to drain the brine and oil, in case of need to change them or in case of maintenance of
the equipment.
Temperature Adjustment Button: used to regulate the desired temperature, according to the
product to be fried.

10
Indicator Lamp of Turned On Equipment: has the function of indicating when the equipment is
energized (on). When unplugging the equipment (switching off), the lamp will turn off automatically.
Indicator Lamp of Turned On Resistance: It has the function of indicating when the resistance is
on. When the selected temperature is reached, the lamp will automatically turn off, turning off the
resistance.
Reset Button: it is a component of the safety thermostat. It is used to reset the equipment when the
temperature thermostat has a fault and/or defect. To activate the button, use some sharp object (a
pen, for example).
ATTENTION!
When any defect is found in the temperature thermostat, immediately take your equipment to
an authorized technical assistance service for a replacement. After changing the temperature
thermostat, it is necessary to reset the equipment, pressing the “RESET” button, and in
another thermostat, adjust the temperature again according to the product to be fried.
4.3 Operating Procedures
Before operating your equipment, make the perfect sanitation, especially of the components
that will come in contact with the food. Do the cleaning with the equipment disconnected from the
mains. Follow the cleaning instructions in item 5 of this manual (below).
After these initial precautions, confirm that the power supply voltage is the same as that of the
equipment and that the temperature and safety thermostat lamps are in perfect condition, that is, they
cannot be dented or have any other damage. Faulty thermostats affect the correct functioning of the
equipment and the reading of the temperature, which can cause accidents.
The equipment can only be turned on and operated with the elements (water, salt and oil)
placed in the tank. Never turn on your equipment with an empty tank, as this will cause the resistance
to burn and damage the entire structure.
ATTENTION!
There is a fire hazard if the oil level is below the “MIN. OIL” (top marking indicated on the
inside of the tank) or if the heater is not fully immersed in the oil. Always respect the
minimum and maximum oil level, as indicated on the tank, as this prevents accidents and
eliminates the risk of burning the heater.
11
Operation:
1. Check that the valves under the tank are closed;
2. Prepare the brine (see table 2.2 with the guideline quantity) by dissolving the salt well in the water
and adding it to the tank;
3. Top up with oil to the “MAX. OIL” - upper marking indicated on the inside of the tank. Note: Type of
edible oil recommended: sunflower, soybean or corn. Hydrogenated or vegetable fat is not suitable
for this equipment;
4. Wait at least 30 minutes for the water and oil to decant, preventing the oil from boiling;
5. Connect the power cable to the electrical network;
6. Set the thermostat button to the desired temperature range, where it varies according to the product
to be fried. Note: We recommend adjusting the thermostat up to a maximum of 180°C, preventing
the oil from overheating. When the selected temperature is reached by the thermostat, the indicator
lamp will automatically turn off, turning off the resistance;
7. Add the product to be fried to each basket, and place in the oil properly heated to the desired
temperature;
ATTENTION!
Add the products to be fried slowly and gradually in the basket, thus avoiding bubbling and
oil spillage from the tank. Bubbling will be intense when pouring frozen or wet products.
Attention must be paid to the effect of increasing boiling in wet foods and for very large
loads.
Never pour water on hot oil or move the equipment during use, as this could cause a serious
accident.
Use proper PPE and whenever the floor is dirty, clean it.
In case of an emergency, unplug the equipment from the power outlet.
8. Allow enough time for the product to fry completely (until it turns brown). After that, hang the
basket on the support to let the excess oil drain;
ATTENTION!
Do not shake any of the baskets immersed in the oil, this may cause an oil overflow or the oil
mixing with the water causing hot oil splash.

12
9. After the end of the work and total cooling of the equipment, remove the baskets from the
support and lift the mobile head, turning it backwards, lifting the resistances and allowing the oil
to drain for better use.
Always clean the equipment after use (see instructions in item 5 of the manual), replace the
equipment components in their proper place and check the brine and oil levels (fill in the levels if
necessary). Never operate the equipment with the oil level below the “MIN. OIL” indicated inside the
tank. After these procedures, the equipment will be available again to restart the operation process.
IMPORTANT
It is recommended not to use the same oil for too many operating cycles. It is dangerous to
use old oil as it may have a low flash point and may be more prone to boiling outbreaks.
To extend oil life, set the thermostat button to 100°C during the fry interval.
ATTENTION!
When you have to leave the equipment stopped for an extended period of time, disconnect it
from the electrical network and turn off the circuit breaker.
Do not open drain valves or other vent devices until the pressure has been reduced to about
atmospheric pressure level.
5. Cleaning and Maintenance
5.1 Cleaning Procedures and Products Used
Your equipment was built with first-line materials, so use it properly and you will get great
satisfaction. Keep your equipment always clean and well-cared for, which will make it much more
durable.

13
ATTENTION!
Before performing maintenance or cleaning, make sure that the plug is disconnected from the
mains. Also, wait for the oil to cool down completely.
The equipment must be cleaned daily to ensure it works properly and lasts longer. Clean the
sides and top of the tank. Scrape it with a plastic spatula, making the accumulated residues sink to the
bottom, especially in breaded frying.
Change the brine every 3 (three) days and change the oil as needed. Check the instructions,
warnings and recommendations regarding the following brine and oil change.
ATTENTION!
Do not use water jet to clean the equipment.
IMPORTANT
This equipment is not intended to be immersed in water for cleaning.
Follow the instructions below to find out which parts can be immersed and what special care
should be taken with the other parts.
During cleaning, care must be taken to eliminate the risk of electric shock and burning of the
equipment’s electrical components. It is recommended:
• Never wet the structure or external parts, as water may run out onto the electrical parts;
• Never splash water directly on the power cord;
Procedure for removing oil and brine:
To change the brine or oil, always disconnect the equipment from the electrical network and wait
for it to cool down completely;
Place an appropriate container for collecting oil or water below the valves;
In the case of the FIE.44 model, which has two valves, screw the outlet tube on the upper valve to
remove the oil;
After total removal of oil, place another container below the valves;
Screw the outlet tube into the lower valve to remove the brine and frying residues;
As the FIE.30 model only has one valve, the brine is removed first and then the oil is removed in
the same valve.

14
Cleaning procedure:
Close the valves and clean the inside of the tank. Use mild soap or detergent and a non-abrasive
sponge;
Place a container for collecting soap under the register and open the lower register;
Rinse the inside of the tank to completely remove the soap, after drying the tank with a soft, dry
cloth.
ATTENTION!
After cleaning, never leave water, soap or any other residue inside the tank before adding the
brine and oil.
The baskets, the grid and the basket support, as they are removable, can be immersed and
washed separately with soap or neutral detergent. The rest of the equipment should only be cleaned
with a damp cloth as often as possible to prevent food residues from drying out.
Never use sharp objects and sponges or abrasive products, as they can scratch or damage
the surface of the parts.
Thoroughly clean the existing corners of the equipment, eliminating food and oil residues.
ATTENTION!
It is extremely important that products used in cleaning ensure maximum cleanliness and are
non-toxic.
5.2 Maintenance and Procedures in Case of Breakdowns
The operator must be instructed to perform routine inspections, making minor adjustments,
cleaning and observing signs of breaches that may occur. Examples include: checking for strange
noise; loss of equipment power; the non-execution by the equipment of the service to which it is
proposed; among others. Actions like these are indispensable to ensure a longer equipment life.

15
ATTENTION!
When servicing (even minor adjustments), always disconnect the equipment from the mains.
It is also recommended to always carry out preventive maintenance, checking and adjusting
clearances, cleaning the internal parts, etc. When detecting broken or poorly functioning parts, replace
them, always using original parts.
By performing preventive maintenance, you eliminate the inconvenience of getting the
equipment stopped when you need it most, reducing the cost of maintenance and reducing the risk of
accidents.
ATTENTION!
Preventive maintenance requires a trained professional.
Make sure that the equipment is disconnected from the mains.
Whenever any item regarding the safety of the equipment (such as cleaning or maintenance) is
removed, reset it and confirm that it is performing its function correctly.
When you experience any malfunction or non-compliance, refer your equipment to the nearest
service center. See technical assistance on our website: www.metvisa.com.br
16
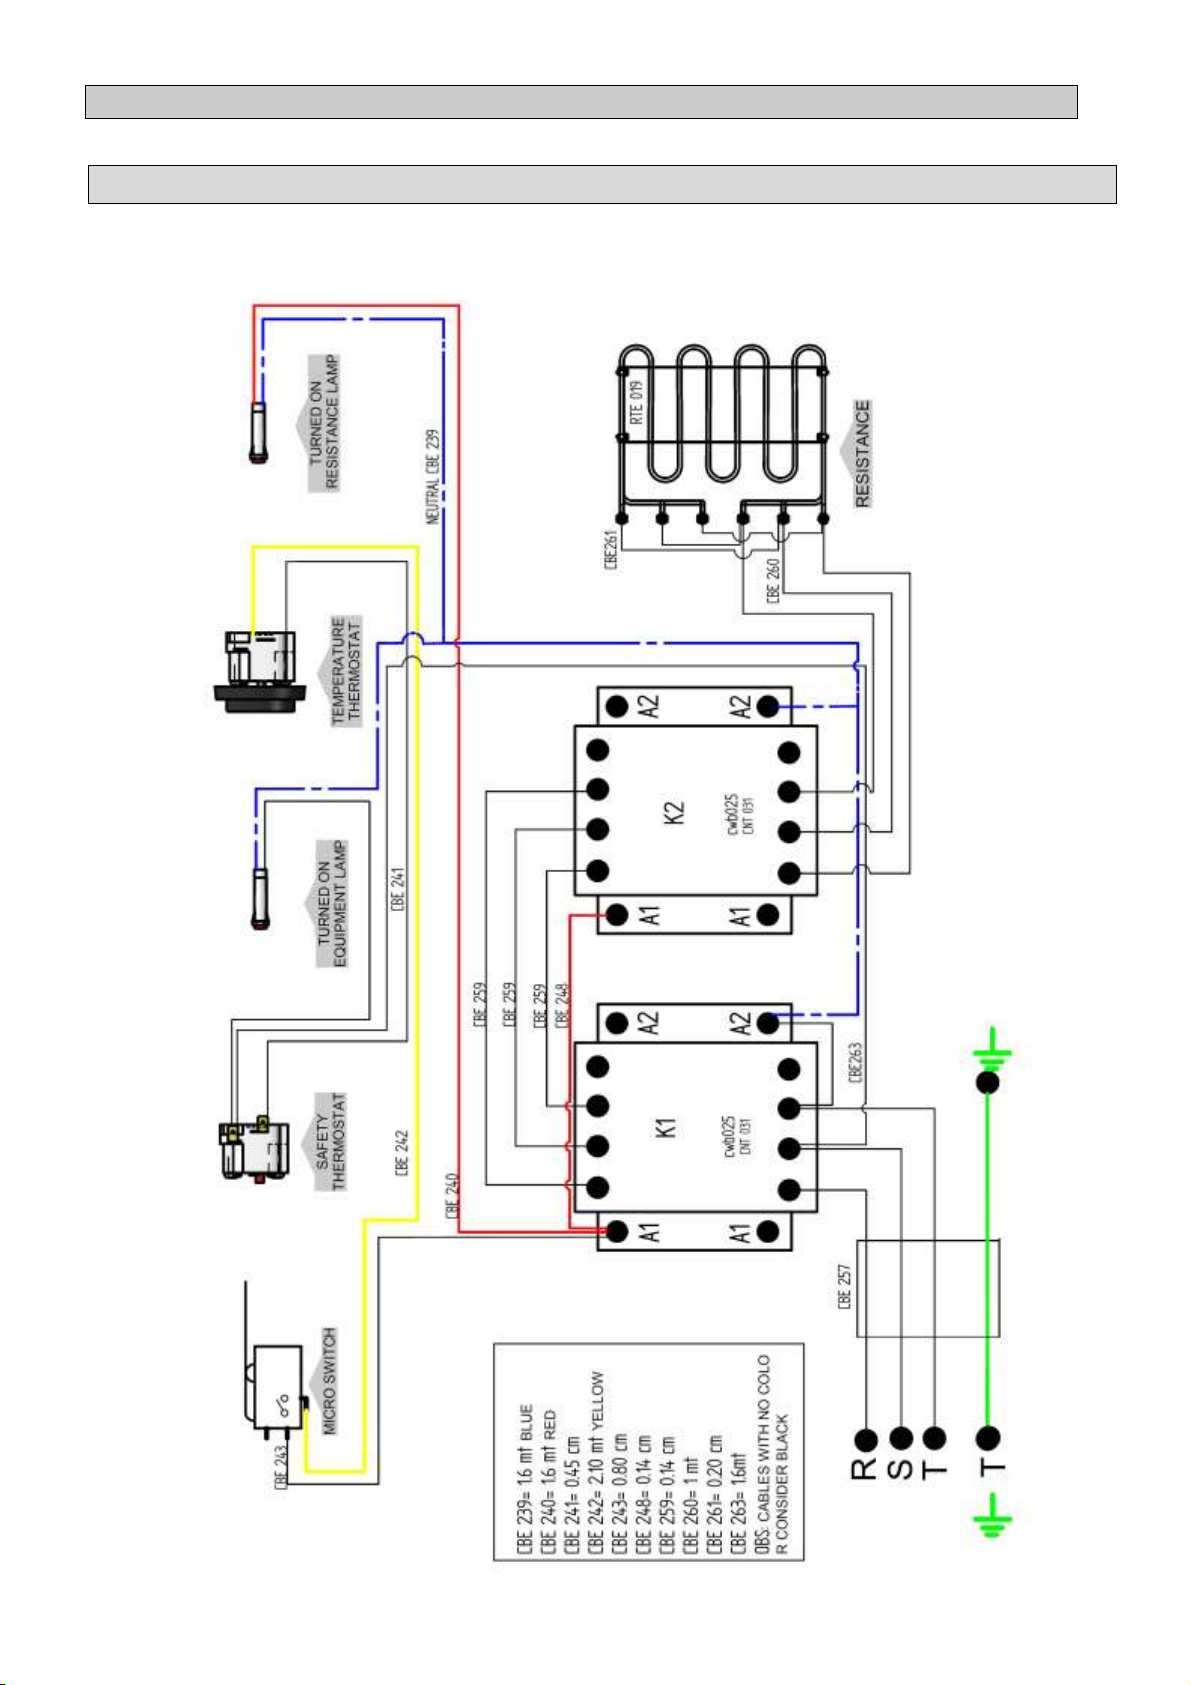
6. ANNEXES
Electrical Schematic FIE.30 –Voltage 220 V Three Phase
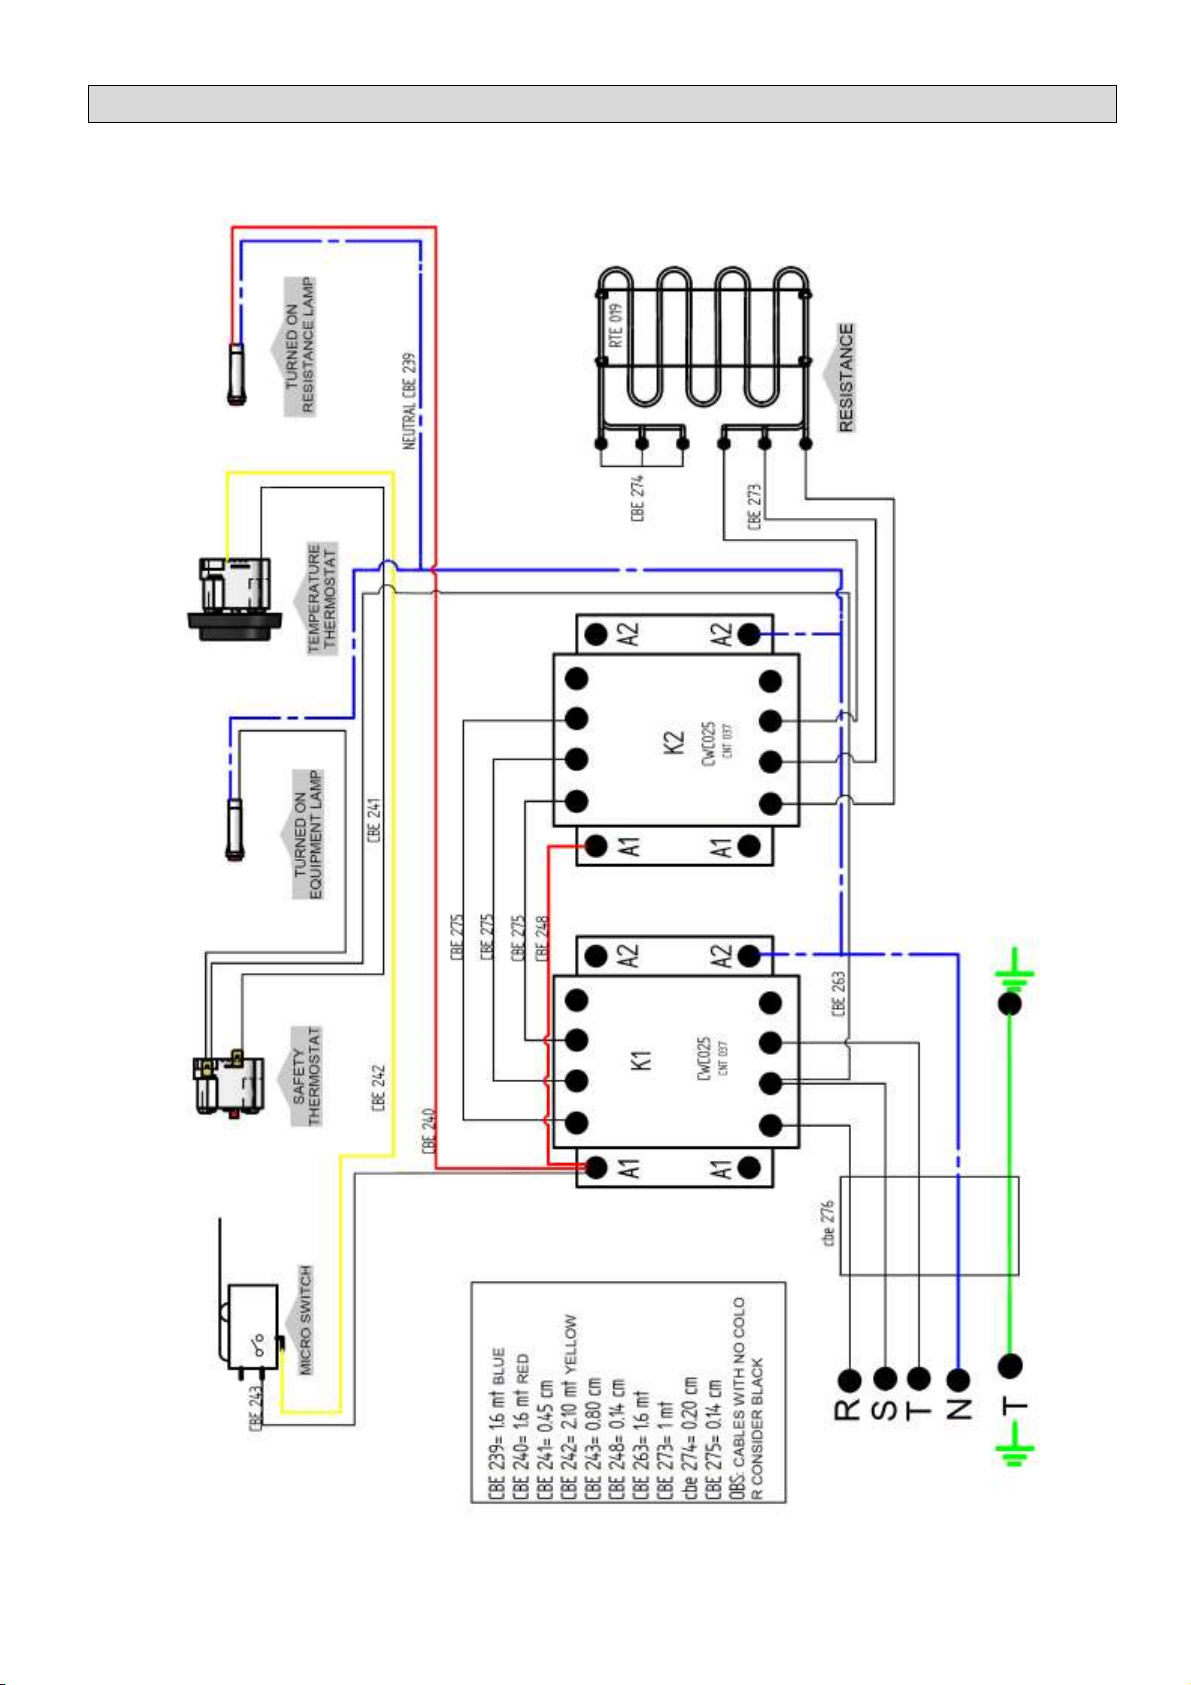
17
Electrical Schematic FIE.30 –Voltage 380 V Three Phase
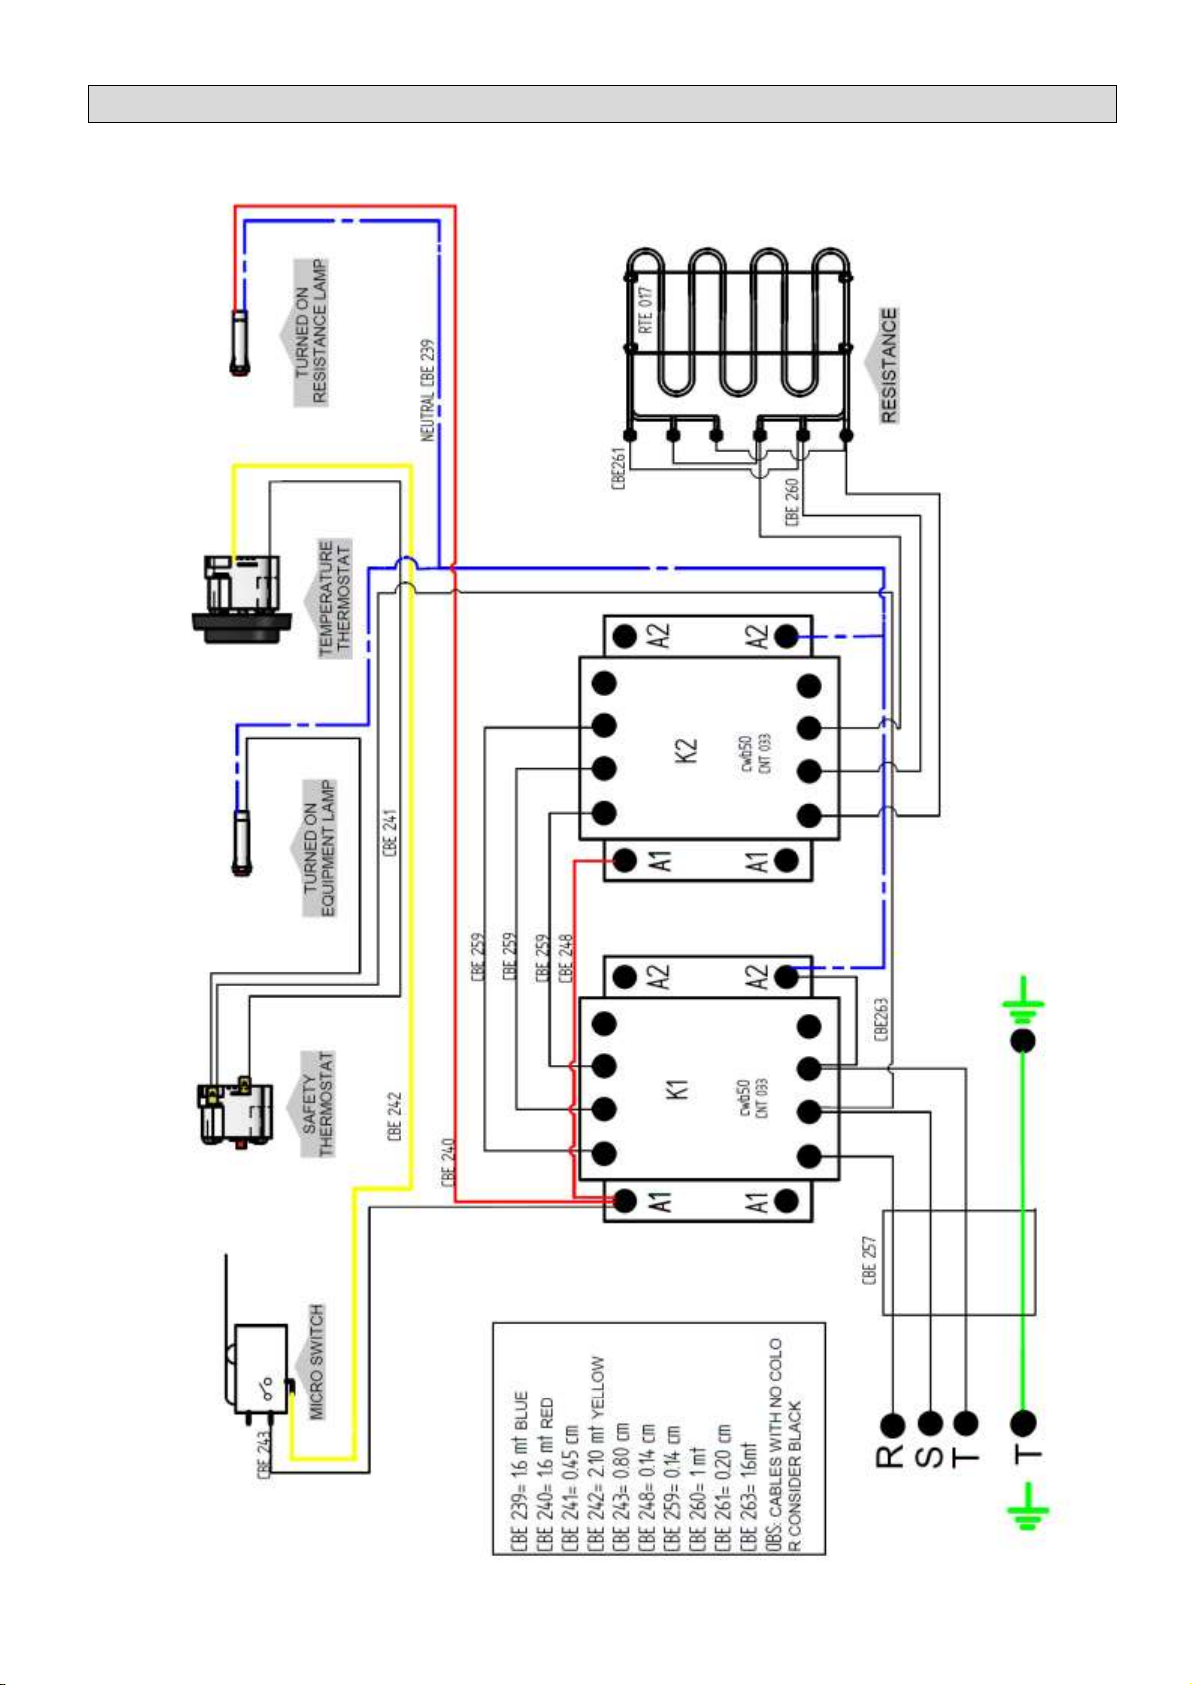
18
Electrical Schematic FIE.44 –Voltage 220 V Three Phase

19
Electrical Schematic FIE.44 –Voltage 380 V Three Phase
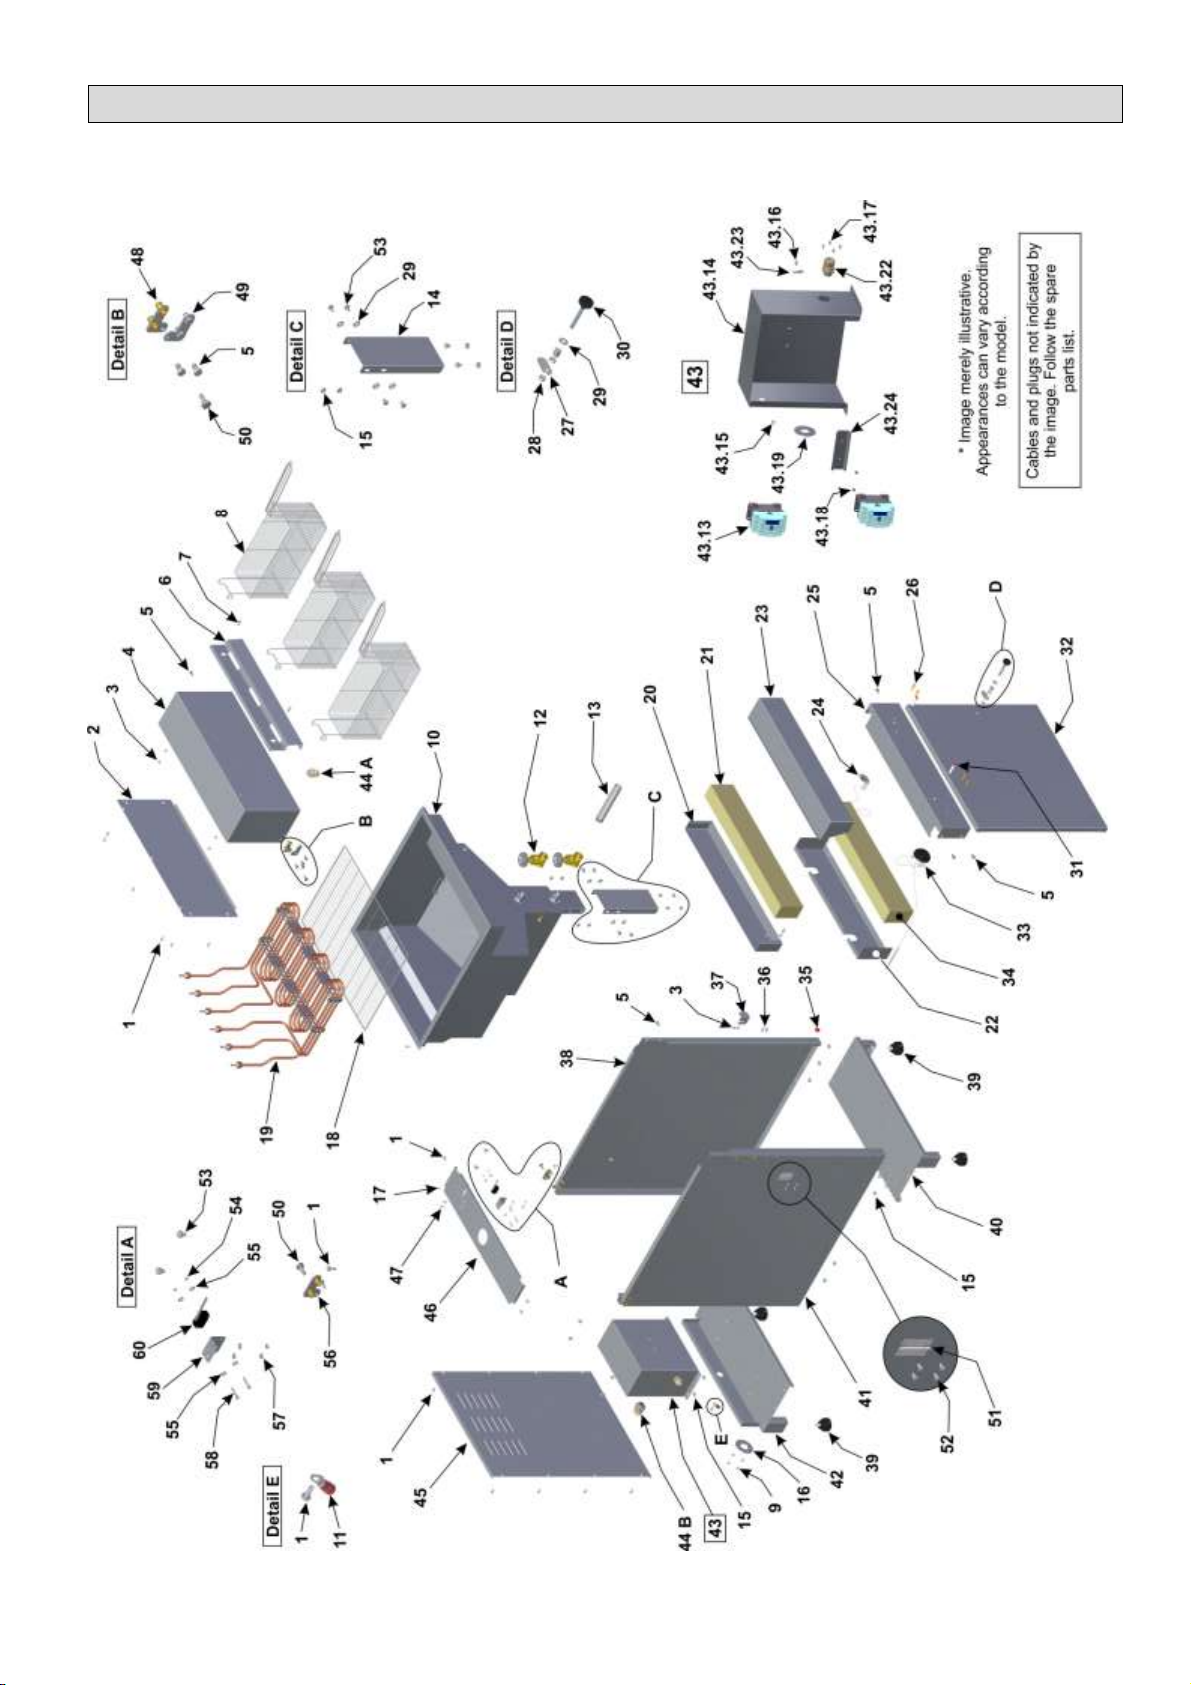
20
Exploded View
This manual suits for next models
5
Table of contents
Other METVISA Commercial Food Equipment manuals


Popular Commercial Food Equipment manuals by other brands


Diamond
Diamond AL1TB/H2-R2 Installation, Operating and Maintenance Instruction

Salva
Salva IVERPAN FC-18 User instructions

Allure
Allure Melanger JR6t Operator's manual

saro
saro FKT 935 operating instructions

Hussmann
Hussmann Rear Roll-in Dairy Installation & operation manual

Cornelius
Cornelius IDC PRO 255 Service manual

Moduline
Moduline HSH E Series Service manual

MINERVA OMEGA
MINERVA OMEGA DERBY 270 operating instructions

Diamond
Diamond OPTIMA 700 Installation, use and maintenance instructions

Diamond
Diamond G9/PLCA4 operating instructions

Cuppone
Cuppone BERNINI BRN 280 Installation

Arneg
Arneg Atlanta Direction for Installation and Use