Mex COCO 350 User manual

COCO 350
COCO 450
COCO 350
COCO 450
ฝกบัวปรับสายน้ำ
Shower Head
ชุดสไลดบาร
Slide Bar
NAME OF PARTS
INSTALLATION
3. การตอสายดิน
• ควรติดตั้งเบรกเกอรหรือสวิตซตัดไฟกอนเขาเครื่องขนาด
20 แอมป สายไฟกอนเขาเครื่องตองใชสายไฟคู ขนาด 2.5
ตารางมิลลิเมตรสำหรับรุน COCO 350 และเบรกเกอร
30 แอมป สายไฟคูขนาด 4.0 ตารางมิลลิเมตรสำหรับรุน
COCO 450
Wiring connection
The circuit breaker (20 Amp) must be installed
before connecting the electric line to the unit.
- Use 2.5 mm2 double wire for wiring for COCO 350
model and breaker 30 Amp, double wire 4.0 mm2
for COCO 450 model.
4. ตองตอสายดินเขากับเครื่องเสมอ โดยสายดินจะตองมีขนาด
2.5 ตารางมิลลิเมตรและสายดินจะตองตอกับแทงสายดิน
ที่ทำดวยทองแดง หรือแทงเหล็กอาบโลหะชนิดปองกันการ
ผุ กรอน ซึ่งแทงสายดินจะตองฝงลงดินอยางนอยกวา 70 ซม.
และจะตองแนใจวา ความตานทานของดินจะตองนอยกวา
100 โอหม ถาความตานทานของดินเกินกวา 100 โอหม
ใชแทงสายดินที่มีความยาวไมนอยกวา 2.40 เมตร
Grounding connection The shower heater must
always be grounded by using 2.5 mm2. Ground
wire and the ground wire length have to be longer
than the other wires. It has to be connected to
the copper ground rod. The ground rod must be
placed under the ground at least 70 cm. away
from the surface. Make sure that the resistance
of the ground must not exceed 100 ohms.
However, if it exceeds 100 ohms, it may be
necessary to use the ground rod longer than 2.40 m.
5. ทดลองกดปุม ELCB TEST วาทำงานปกติหรือไม ถาทำงาน
ปกติใหดันแกนสวิตชตัดไฟอัตโนมัติสีขาวดานลางขึ้น เพื่อให
ELCB พรอมทำงานตอไป
Turn the ELCB reset switch to see if the water
heater works normally or not. If it works normally,
push the ELCB lever up so the ELCB will be ready
to operate.
6. การประกอบสายฝกบัวดานน้ำออก เมื่อเรียบรอยแลว
ทดสอบเปดน้ำเขาเครื่องดูวามีรอยรั่วหรือไม ถามีแกไขใหม
ใหเรียบรอย
Connect the shower hose to the water outlet.
Then open the water valve to check and repair
if the water leaks.
การติดตั้งเครื่องทำน้ำอุน จะตองติดตั้งโดยชางผูชำนาญงานเครื่องทำน้ำอุนจะตองตอสายดินเขากับเครื่อง หากมีขอสงสัยให
ติดตอรานคา หรือผูแทนจำหนาย
Installation task must be done by the specialized mechanic. Make sure to ground the ground wire. If you
have any question or doubt, please contact or consult to dealer directly.
1. ยึดเครื่องติดกับผนังที่แข็งแรง ใหสูงจากพื้นประมาณ
150-170 ซม. หรือตำแหนงที่เหมาะสมขึ้นอยูกับความสูง
ของผูใชงาน ประกอบสายน้ำจากวาลวในหองน้ำเขากับ
เครื่องทางน้ำเขา (Water Inlet)
The machine must be installed at the stable wall
above the floor 150-170 cm. or at the proper position
depending on the user's height. The water hose have
to be connected at the water inlet only.
2. การตอทอน้ำและสายฝกบัว
ใชเครื่องมือที่ถูกตองในการติดตั้ง การขันขอตอทางน้ำเขา
และสายฝกบัว หามใชเทปพันเกลียว ใหใสประเก็นยางและ
ขันเขาดวยมือ ไมควรใชประแจ
Water hose and shower hose connection Using the
proper equipments to install the machine. Do not
use any tape at the water inlet and the shower
hose and do not forget to put in the rubber gasket
on them. After that tighten the plastic nut by hand,
shall not use wrench.
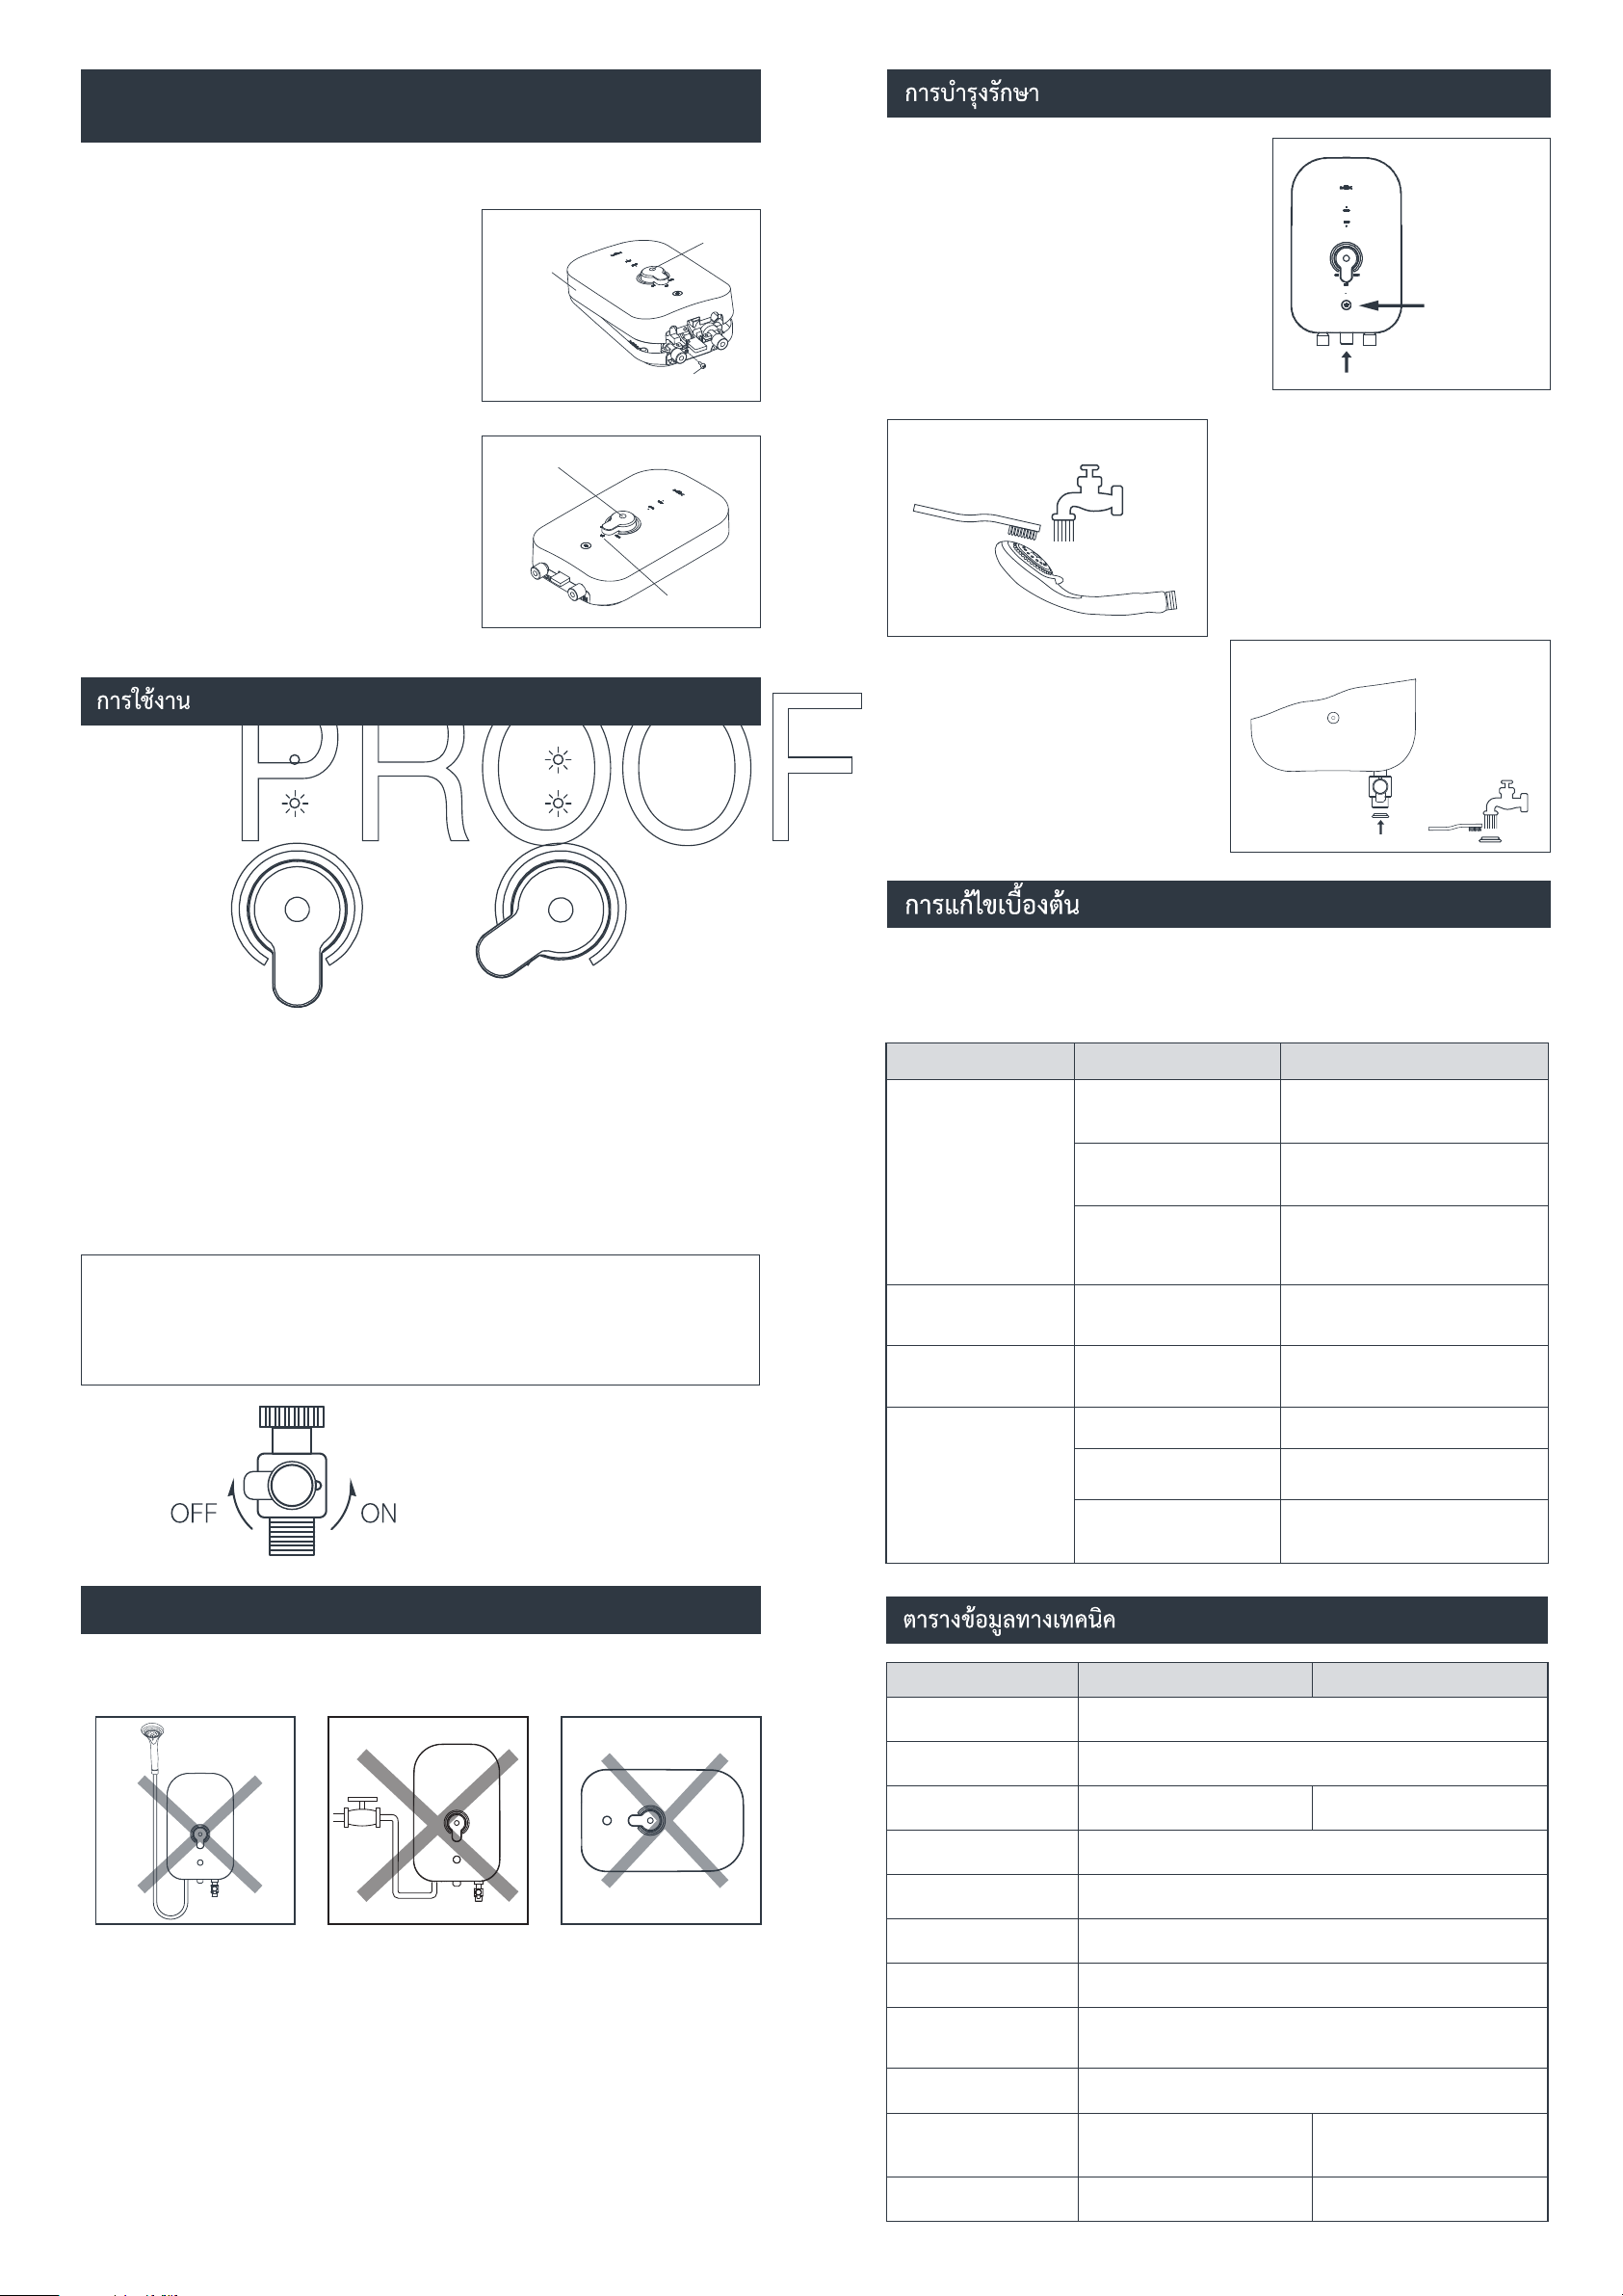
• ติดตั้งวาลวปรับระดับแรงดันน้ำที่ทางน้ำเขา
Install water volume control at inlet
• หามติดตั้งวาลวที่ทางน้ำออก
Do not install any value to water outlet
• ควรปรับลูกบิดปรับปริมาณน้ำเฉพาะที่ลูกบิดปรับบริเวณ
ดานทางน้ำเขาของเครื่องทำน้ำอุนเทานั้น
Should be adjust water volume at only inlet side
150-170 Cm.
13 mm.
อยางนอย 70 ซม.
at lease 70 Cm.
13 mm.
190mm.
210mm.
คำชี้แจง : เมื่อทานเปดกลองเพื่อนำเครื่องออก อาจจะพบน้ำที่คางอยูในเครื่องซึ่งเปนปกติ เนื่องจากเปนการ
ทดสอบการทำงานของเครื่องในขั้นตอนการผลิต
NOTE : You may find some water remaining in the shower heater at your first operation.
This is caused by the production line test. It is not a malfunction.
จัดจำหนายโดย Distributed by
บริษัท เพ็น เค อินเตอรเทรดดิ้ง จำกัด Pen K Intertrading Co.,Ltd.
1000/63-64 อาคาร พี.บี. ทาวเวอร ชั้นที่ 16 ถนนสุขุมวิท 71 แขวงคลองตันเหนือ เขตวัฒนา กรุงเทพฯ 10110
1000/63-64, PB Tower 16 th Floor, Sukhumvit 71 Road, North Klongtan, Wattana, Bangkok, 10110.
Phone. 0-23910919 Fax. 0-2391-1141
ศูนยบริการ Service Center
66/3 หมู 6 ซอยสุขสวัสดิ์ 76 ถนนสุขสวัสดิ์ บางจาก พระประแดง สมุทรปราการ 10130
66/3 Moo 6, Suksawat 76 Rd., Bangchak, Phrapradang, Samutprakarn 10130
Phone. 0-2817-8999 Fax. 0-2464-1600 Email: [email protected]
ควรติดตั้งเครื่องกรองน้ำกอนน้ำไหลเขาเครื่องจะชวยกรองสิ่งสกปรกและตะกรันที่จะจับกระเปาะทองแดง
เมื่อตะกรันสะสมมากขึ้นจะทำใหน้ำไหลไมสะดวก และทำใหอายุการใชงานของเครื่องทำน้ำอุนสั้นลง
The filter unit should be installed before water flow into the shower unit. So it can filter the
dirt or calces which will be accumulated at the copper bulb inside the heater. Consequently
the water will flow improperly and shorten its usage life.
สวิตชตัดกระแสไฟฟา (เบรกเกอร)
Circuit Breaker
หลอดไฟแสดงการทำงานของสวิตช Heater
Operation Lamp
หลอดไฟแสดงการทำงานของสวิตชตัดไฟ
อัตโนมัติ ELCB Lamp
ทางน้ำเขา
Inlet
ตะแกรงกรองสิ่งสกปรก Water Filter
วาลวปรับแรงดันน้ำเขา Inlet Water Value
แกนสวิตชตัดไฟอัตโนมัติ ELCB Lever
ทางน้ำออก
Outlet
รุน COCO 350 และ COCO 450
(MRA),(MRB),(MLR),(MLB) มีชุดสไลดบาร
Model COCO 350 and COCO 450
(MRA),(MRB),(MLR),(MLB) with in Slide bar
ลูกบิดปรับอุณหภูมิ
Temperature control knob
ปุมทดสอบการทำงานของสวิตชตัดไฟ
ELCB Test
แถบแสดงระดับความรอน Heat Display
ประเก็นยาง
Rubber gasket
ทอฝกบัว
Shower
on max
off
on max
off
Heater
Power
Heater
Power
SPECIFICATION
TROBLE SHOOTING
CAUTION
HOW TO USE
HOW TO REASSEMBLE
THE COVER MAINTENANCE AND CARE
เครื่องทำน้ำอุน MEX ผานการตรวจสอบคุณภาพอยางพิถีพิถันจากโรงงานผูผลิตใหมีประสิทธิภาพในการใชงานตามมาตรฐาน
ในบางกรณีอาจมีขอขัดของเล็กนอย ซึ่งทานสามารถตรวจสอบไดโดยงายกอนที่จะติดตอตัวแทนจำหนายเพื่อทำการซอม
MEX Electric Water Heater are passed Q.C. testing and manufactured to the highest quality standards.
If you find the following symptoms appear, please check it before calling the technician.
ขอขัดของ TROUBLE สาเหตุ CAUSE การแกไข TROUBLE SHOOTING
1. เครื่องไมทำงาน ไฟฟาไมเขาเครื่อง ตรวจสอบขั้วไฟฟาวาติดตั้งถูกขั้วหรือไม
The machine does not No electric current flow Check the connection of the wire
operate. through the machine. to the correct terminals or not.
สวิตชตัดไฟอัตโนมัติตัดการทำงาน
สวิตชตกมาในตำแหนง OFF ใหดันกานสวิตซขึ้น
The circuit breaker or fuses The circuit breaker has drop down to
are cut off. "OFF" position. Push it to "ON" position.
• แรงดันน้ำไมพอ • แกไขระบบแรงดันน้ำ
There is not sufficient water Fix the water pressure system.
pressure. • ถอดลางตะแกรงกรองสิ่งสกปรก
Cleaning the filter.
2. น้ำอุนไมพอ น้ำแรงเกินไป ลดปริมาณน้ำโดยปรับลดที่วาลวปรับแรงดันน้ำ
The water is not heated There is too much water Decrease the water amount by
as desired. flowing into the machine. adjusting at the water inlet valve.
3. อุณหภูมิน้ำไมสม่ำเสมอ แรงดันน้ำไมสม่ำเสมอตลอดเวลา แกไขระบบแรงดันน้ำ
The water temperature The water pressure remains Fix the water pressure system.
remains unstable. unstable.
4. น้ำไหลนอย จุดอื่นๆ ไหลแรง ตะแกรงกรองสิ่งสกปรกอุดตัน ถอดลางทำความสะอาด
The water doesn't flow The filter is obstructed by dust. Clean the filter.
well while the water
from the other tap are ฝกบัวอุดตัน หมุนปรับสายน้ำที่หัวฝกบัว
strong. The shower head is clogged. Clean the shower head.
ปรับสายน้ำที่ฝกบัวไมถูกตอง
The stream on the shower
head is adjusted improperly.
ระบบจายน้ำ จายน้ำจุดเดียว
WATER SYSTEM Single point
แรงดันน้ำต่ำสุด 20 กิโลพาสคัล / 0.2 กิโลกรัมตอตารางเซนติเมตร
MIN.Water Pressure 20 kPa / 0.2 kg/cm2
กำลังไฟ (กิโลวัตต/โวลต/แอมป) 3.5 / 220 / 16 4.5 / 220 / 20
Power (KW/Volt/Amp)
ระบบความปลอดภัย ELCB, THERMOSTAT, FLOW SWITCH
Safety System
ไฟสัญญาณ POWER / HEATER
Indicator
ขนาด (สูง × กวาง × ลึก ) มม. 298 × 188 × 75
Dimension (HxWxD mm.)
น้ำหนัก (กก.) 1.5
Weight (Kg)
อุปกรณพิเศษ
Accessories
ปริมาณน้ำ (ลิตร/นาที) 3.5
Water Flow (L/m)
อุณหภูมิของน้ำเพิ่มขึ้น
โดยประมาณ (˚C) 15˚C 19˚C
Incnease Temperature (˚C)
ขนาดสายไฟ
2.5 mm
2
4.0 mm
2
WIRE SIZE
2. การทำความสะอาดตัวเครื่อง ควรปดสวิตชตัดกระแส
ไฟกอนทุกครั้ง ทำความสะอาดดวยผาชุบน้ำสบูบิดแหง
อยาใชน้ำมันเบนซิน, ทินเนอร ฯลฯ ในการทำความ
สะอาด
To clean the water heater body, Please make
sure to switch off the power current first. Clean
the body of shower heater by wiping with a
cloth dampened in mild soap water. Don’t use
solvent.
• ใชแปรงทำความสะอาดภายในหัวฝกบัวเปนประจำทุกเดือน
Monthly Clean by brush
3. การทำความสะอาดหัวฝกบัว และตะแกรงกรองสิ่งสกปรก
Water volumm knob and filter cleaning ตัวกรองถอดออกลางน้ำ
ดวยแปรงขนออน หรือ
แปรงสีฟน
Take off the filter and
clean by brush
ELCB Test Button
ปุมทดสอบสวิตชนิรภัย
Push up ดันขึ้น
1. ตรวจสอบการทำงานของสวิตชตัดไฟอัตโนมัติ ELCB เดือนละ
ครั้งโดยกดปุมทดสอบ ELCB TEST ในขณะที่เครื่องทำน้ำอุน
มีการตอกระแสไฟฟาเขาเครื่อง ถาปกติแกนของ ELCB จะ
เลื่อนลงมา (ถาแกนไมเลื่อนลงใหติดตอผูจำหนายเพื่อทำการ
แกไข) ดันแกน ELCB TEST ใหกลับขึ้นไปตามปกติเพื่อตั้งการ
ทำงานของ ELCB TEST ใหทำงานตามปกติ
Check the operation of earth leakage circuit breaker
(ELCB) once a month by push the ELCB reset switch
while the power supply is still inside the machine if
it’s normal, the ELCB lever will be drop down. (If it
not, please inform the dealer to repair the machine)
Push up the ELCB reset lever to the default position
the reset the operation of ELCB.
1. หามติดตั้งฝกบัวสูงกวาตัวเครื่อง
Do not install the shower
head above the water heater.
2. หามตอวาลวทางดานน้ำออก
Do not connect the valve at
the water outlet.
ขั้นตอนการใชงาน
1. เปดวาลวน้ำเขาเครื่อง
Open the water inlet value
2. เมื่อไฟเขาเครื่อง สัญญาณไฟ POWER (สีเขียว) ติด ตามรูป ก
Power lamp (Green) will light up (See Fig.A)
3. ปรับลูกบิดอุณหภูมิ จากตำแหนง OFF หมุนไปทางขวามือตามเข็มนาิกาเพื่อเปนการปรับอุณหภูมิ เมื่อหมุนปรับอุณหภูมิ
ไปที่ตำแหนง ON และสัญญาณไฟที่ตำแหนง HEATER จะสวางเปนสีแดง ตามรูป ข สงผลใหความรอนจะเพิ่มมากขึ้นตาม
การปรับระดับความรอน และความรอนจะลดลง ถาหมุนลูกบิดปรับอุณหภูมิไปทางซายมือทวนเข็มนาิกา
Turn Temp Control button from “OFF” position clockwise to the right. Heater lamp will increase and
the heat will decrease when turning anticlockwise to left. heat will decrease when turning anticlockwise
to left. (See Fig.B)
4. ลูกบิดปรับปริมาณน้ำ
Water Volume knob
สัญญาณไฟแสดงการทำงานตามปกติ Lamp indicating normal operation.
• ไฟ POWER (สีเขียว) ติด แสดงถึง มีไฟเขาเครื่องและมีน้ำไหลเขามาในเครื่อง
Green Lamp (Power) on means power and water run into the heater.
• ไฟ HEATER (สีแดง) ติด แสดงถึง HEATER ทำงานใหความรอน
Red Lamp (Heater) on means heater is operating. Water will gradually warmer.
วิธีการประกอบฝาครอบกับฐานเครื่องทำน้ำอุน HOW TO REASSEMBLE THE COVER
COCO 350
COCO 450
การถอดฝาครอบเครื่อง Take off the plastic cover.
1. ใชไขควงขันสกรูดานลางออก
Unscrew the fixing screw of the bottom.
2. ใชมือดึงฝาครอบพลาสติกออกโดยการดึงจากดานลางขึ้นดานบน
Pull out the plastic cover from the below to the top
by hand.
วิธีการสวมประกอบฝาครอบ How to reassemble the cover
1. กอนครอบฝาพลาสติก ตองใหลูกบิดปรับอุณหภูมิที่ฐานเครื่องอยู
ในตำแหนง “ปด” โดยหมุนไปทางซายมือสุด
Before closing the plastic cover, you must always adjust
the temperature to OFF position by turning the axis of
rotation at base to the left.
2. ใหตำแหนงลูกบิดปรับอุณหภูมิตรงกับตำแหนง OFF
Make sure the temperature knob to off position.
3. ครอบฝาพลาสติก โดยสวมจากดานบนใหเขาล็อคพอดี จากนั้น
ขันสกรูใหแนน
Close the plastic cover by putting on from top.
Make sure it fits into place,then tighten the screw.
ฝาครอบเครื่อง
Cover
ลูกบิดปรับอุณหภูมิ
Temperature control knob
ลูกบิดปรับอุณหภูมิ Temperature control knob
ตำแหนง OFF
สกรู
Sku
วิธีการประกอบฝาครอบ
กับฐานเครื่องทำน้ำอุน
3. หามติดตั้งเครื่องทำน้ำอุนในแนวนอน
Do not install the water heater
on horizontal position
รูป ก
Fig. A
รูป ข
Fig. B
ทอทางน้ำเขา inlet
ถอดทำความสะอาดตะแกรงรองสิ่งสกปรกเปนประจำทุกเดือน
Monthly clean filter
รุน MODEL COCO 350 COCO 450
คำเตือน
4. เครื่องใชไฟฟานี้ไมมีเจตนาใหใชโดยบุคคล (รวมถึงเด็ก) ที่ดอยความสามารถทางรางกาย ทางประสาทสัมผัสหรือจิตใจ หรือ
ขาดประสบการณและความรู เวนแตวาจะไดรับการควบคุมดูแลหรือการสอนเกี่ยวกับการใชเครื่องใชไฟฟาโดยบุคคลที่รับผิด
ชอบตอความปลอดภัยของบุคคลเหลานั้น
This appliance is not intended for use by persons (including children) with reduced physical, sensory or
mental capabilities, or lack of experience and knowledge, unless they have been given supervision or
instruction concerning use of the appliance by a person responsible for their safety.
เด็กควรไดรับการควบคุมดูแลเพื่อใหแนใจวาจะไมเลนเครื่องใชไฟฟา
Children should be supervised to ensure that they do not play with the appliance.
5. เพื่อหลีกเลี่ยงความเสี่ยงอันตรายเนื่องจากการตั้งกลับโดยบังเอิญของคัตเอาตความรอนตองไมจายไฟฟาแกเครื่องใชไฟฟานี้
ผานอุปกรณสวิตชภายนอก เชน ตัวตั้งเวลา เปนตน หรือตอกับวงจรไฟฟาที่ปกติเปดไฟ (on) และปดไฟ (off) โดยแหลงจาย
ไฟฟาสาธารณูปโภค (Utility)
In order to avoid a hazard due to inadvertent resetting of the thermal cut-out, this appliance must not
be supplied through an external switching device, such as a timer, or connected to a circuit that is
regularly switched on and off by the utility.
ฝกบัวปรับสายน้ำ 3 ระดับ พรอมชุดวางฝกบัว
3 Stream levels for the shower head with in Slide bar set.
This manual suits for next models
1
Other Mex Water Heater manuals


Popular Water Heater manuals by other brands

 user manual")


EemaX
EemaX EX280T2T Installation guide and owner's manual

Whirlpool
Whirlpool FLAME LOCK 315420-000 Installation and use manual

A.O. Smith
A.O. Smith AOS GPHE-50 Replacement parts list

RED-RING
RED-RING Powerstream Professional brochure

German pool
German pool GPI-M8 instructions

Shuang Ri
Shuang Ri SR501 Operation manual