on max
off
on max
off
Heater
Power
Heater
Power
SPECIFICATION
TROBLE SHOOTING
CAUTION
HOW TO USE
HOW TO REASSEMBLE
THE COVER MAINTENANCE AND CARE
เครื่องทำน้ำอุน MEX ผานการตรวจสอบคุณภาพอยางพิถีพิถันจากโรงงานผูผลิตใหมีประสิทธิภาพในการใชงานตามมาตรฐาน
ในบางกรณีอาจมีขอขัดของเล็กนอย ซึ่งทานสามารถตรวจสอบไดโดยงายกอนที่จะติดตอตัวแทนจำหนายเพื่อทำการซอม
MEX Electric Water Heater are passed Q.C. testing and manufactured to the highest quality standards.
If you find the following symptoms appear, please check it before calling the technician.
ขอขัดของ TROUBLE สาเหตุ CAUSE การแกไข TROUBLE SHOOTING
1. เครื่องไมทำงาน ไฟฟาไมเขาเครื่อง ตรวจสอบขั้วไฟฟาวาติดตั้งถูกขั้วหรือไม
The machine does not No electric current flow Check the connection of the wire
operate. through the machine. to the correct terminals or not.
สวิตซตัดไฟอัตโนมัติตัดการทำงาน
สวิตซตกมาในตำแหนง OFF ใหดันกานสวิตซขึ้น
The circuit breaker or fuses The circuit breaker has drop down to
are cut off. "OFF" position. Push it to "ON" position.
• แรงดันน้ำไมพอ • แกไขระบบแรงดันน้ำ
There is not sufficient water Fix the water pressure system.
pressure. • ถอดลางตะแกรงกรองสิ่งสกปรก
Cleaning the filter.
2. น้ำอุนไมพอ น้ำแรงเกินไป ลดปริมาณน้ำโดยปรับลดที่วาลวปรับแรงดันน้ำ
The water is not heated There is too much water Decrease the water amount by
as desired. flowing into the machine. adjusting at the water inlet valve.
3. อุณหภูมิน้ำไมสม่ำเสมอ แรงดันน้ำไมสม่ำเสมอตลอดเวลา แกไขระบบแรงดันน้ำ
The water temperature The water pressure remains Fix the water pressure system.
remains unstable. unstable.
4. น้ำไหลนอย จุดอื่นๆ ไหลแรง ตะแกรงกรองสิ่งสกปรกอุดตัน ถอดลางทำความสะอาด
The water doesn't flow The filter is obstructed by dust. Clean the filter.
well while the water
from the other tap are ฝกบัวอุดตัน หมุนปรับสายน้ำที่หัวฝกบัว
strong. The shower head is clogged. Clean the shower head.
ปรับสายน้ำที่ฝกบัวไมถูกตอง
The stream on the shower
head is adjusted improperly.
ระบบจายน้ำ จายน้ำจุดเดียว
WATER SYSTEM Single point
แรงดันน้ำต่ำสุด (กก./ตร.ซม.)
0.2
MIN.Water Pressure
กำลังไฟ (กิโลวัตต/โวลต/แอมป) 3.5 / 220 / 16 3.7 / 220 / 17 4.5 / 220 / 20
Power (KW/Volt/Amp)
ระบบความปลอดภัย ELCB, THERMOSTAT, FLOW SWITCH
Safety System
ไฟสัญญาณ
POWER / HEATER
Indicator
ขนาด (สูง × กวาง × ลึก ) มม.
298 × 188 × 75
Dimension (HxWxD mm.)
น้ำหนัก (กก.)
1.5
Weight (Kg)
- ฝกบัวสีขาว White shower
อุปกรณพิเศษ - อุปกรณวางฝกบัวสีขาว White slide bar
Accessories - สายฝกบัวสีขาว White shower hose
- วาลวควบคุมแรงดันน้ำสีขาว White water volumm
ปริมาณน้ำ (ลิตร/นาที)
3.5
Water Flow (L/m)
อุณหภูมิของน้ำเพิ่มขึ้น
โดยประมาณ (˚C) 15˚C 19˚C
Incnease Temperature (˚C)
ขนาดสายไฟ
2.5 mm
2
4.0 mm
2
WIRE SIZE
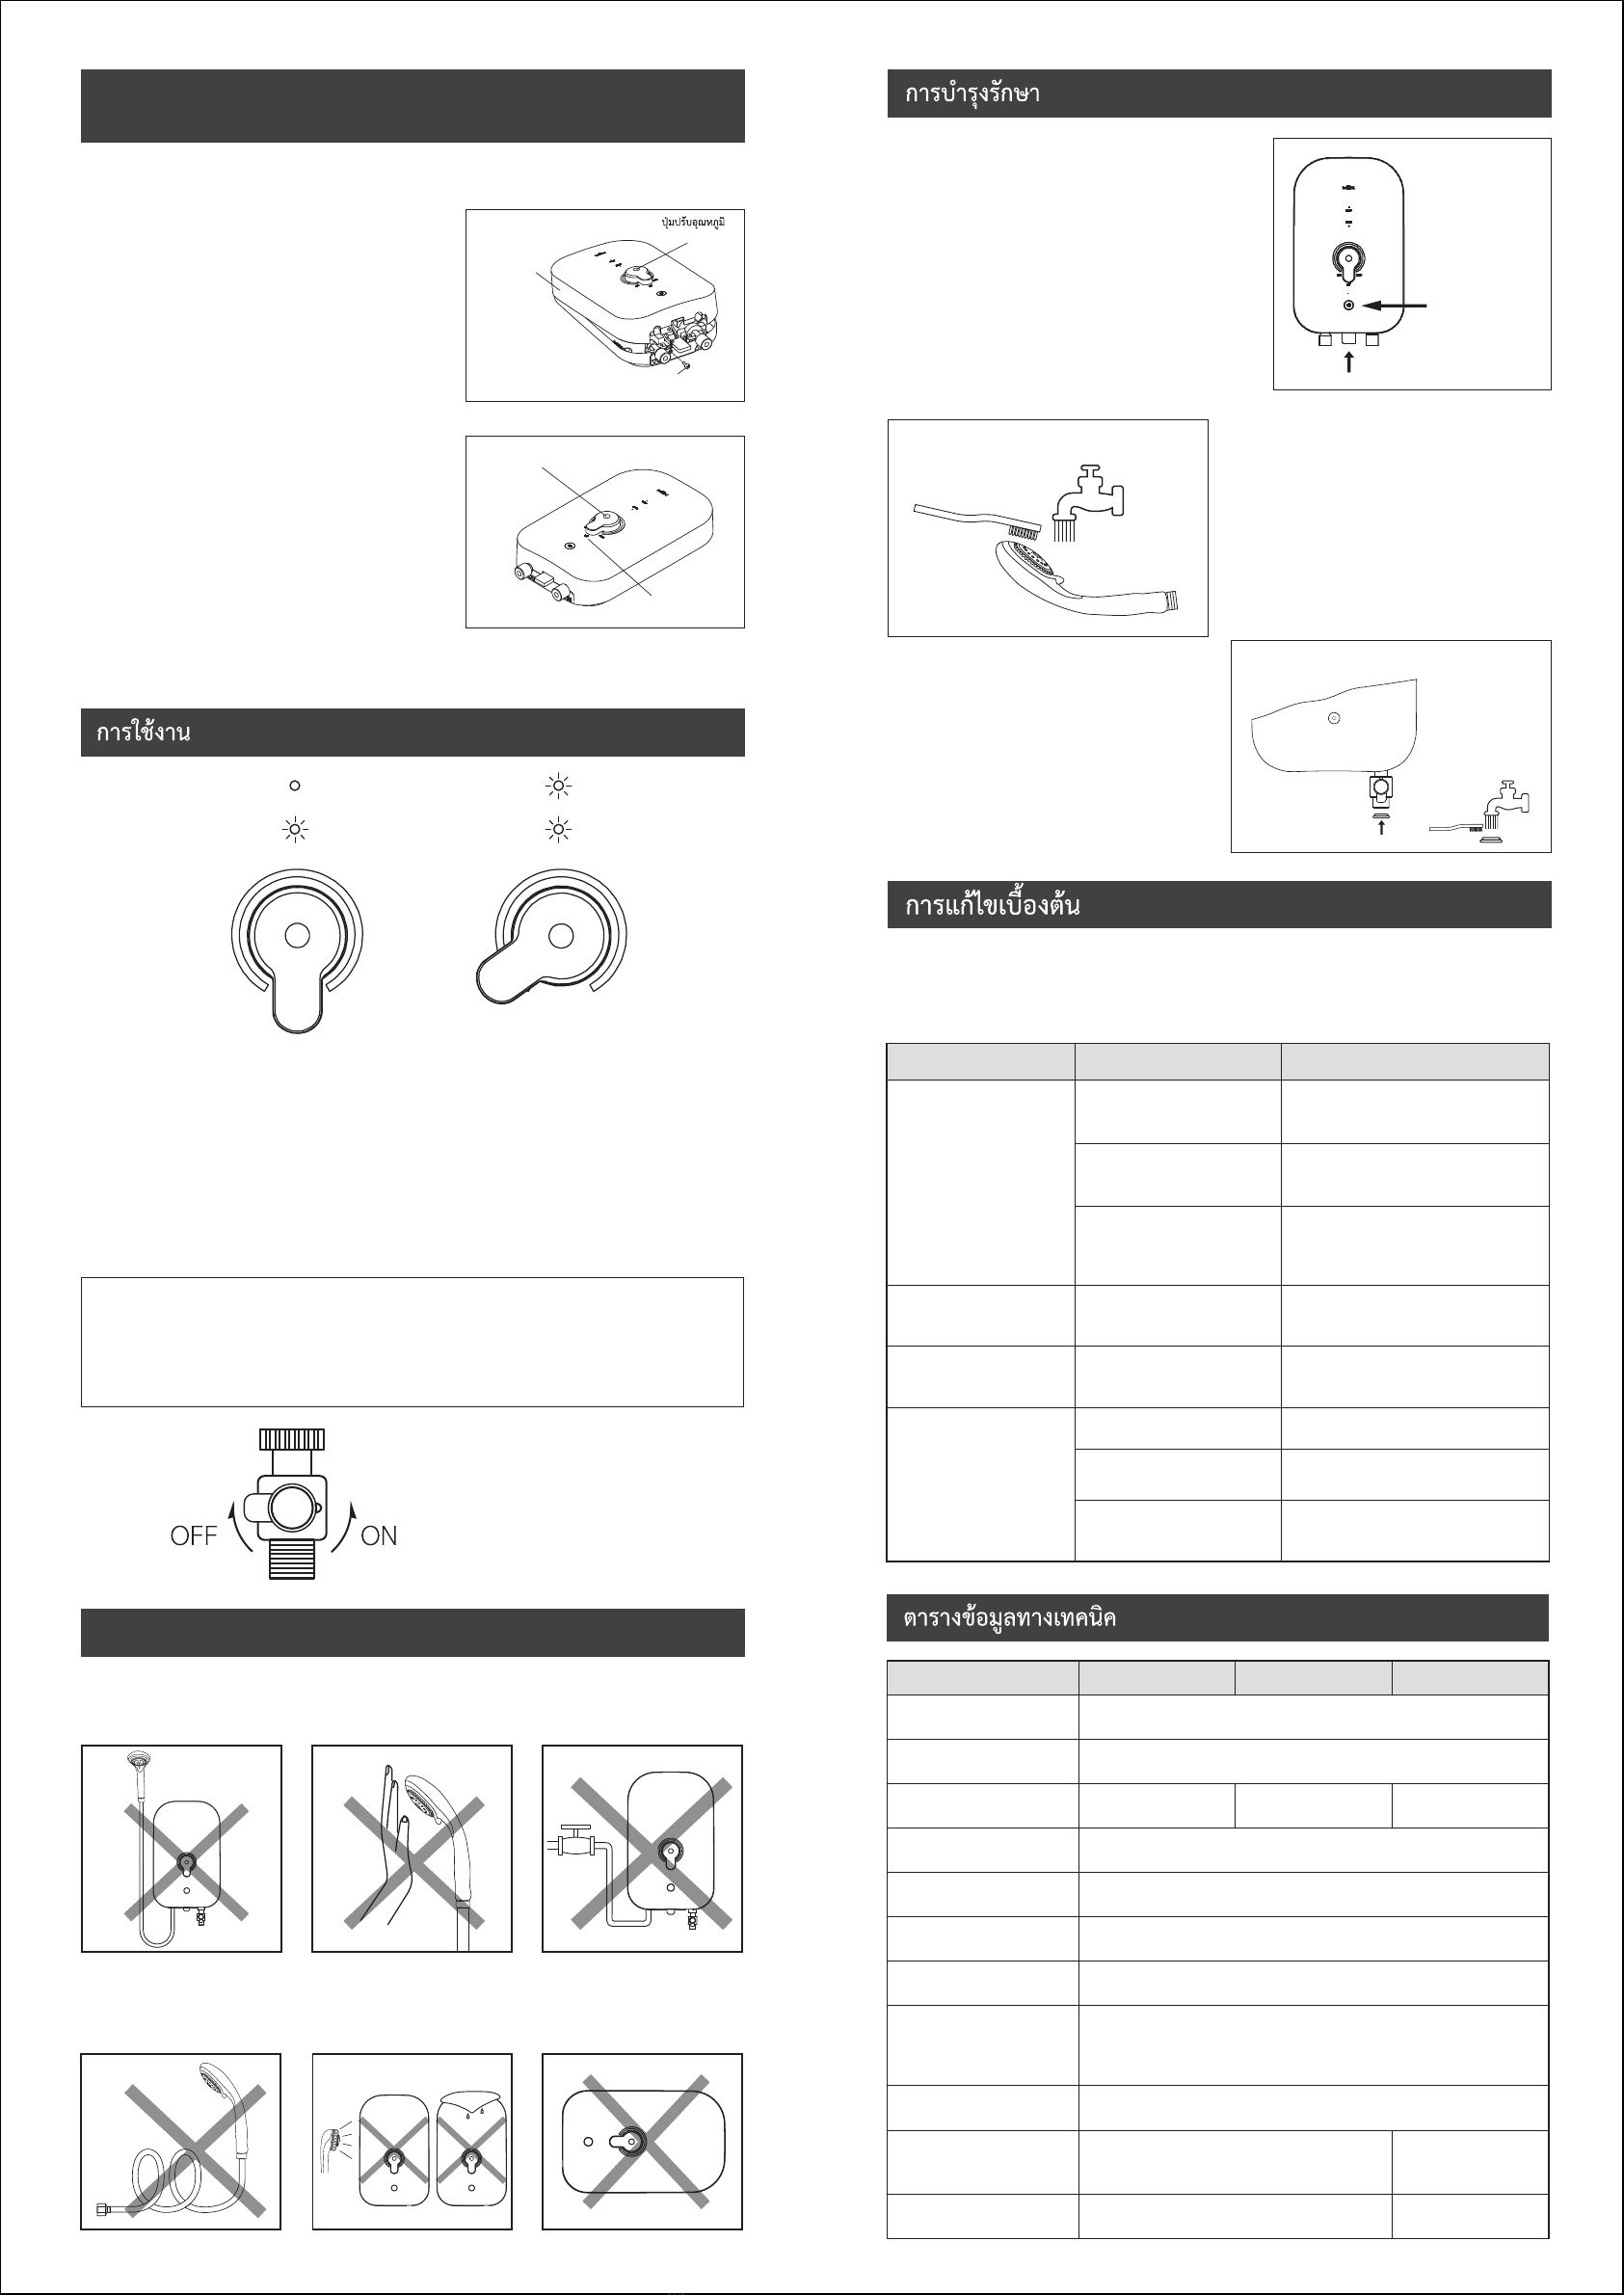
2. การทำความสะอาดตัวเครื่อง ควรปดสวิตซตัดกระแส
ไฟกอนทุกครั้ง ทำความสะอาดดวยผาชุบน้ำสบูบิดแหง
อยาใชน้ำมันเบนซิน, ทินเนอร ฯลฯ ในการทำความ
สะอาด
To clean the water heater body, Please make
sure to switch off the power current first. Clean
the body of shower heater by wiping with a
cloth dampened in mild soap water. Don’t use
solvent.
• ใชแปรงทำความสะอาดภายในหัวฝกบัวเปนประจำทุกเดือน
Monthly Clean by brush
3. การทำความสะอาดหัวฝกบัว และตะแกรงกรองสิ่งสกปรก
Water volumm knob and filter cleaning ตัวกรองถอดออกลางน้ำ
ดวยแปรงขนออน หรือ
แปรงสีฟน
Take off the filter and
clean by brush
ELCB Test Button
ปุมทดสอบสวิตซนิรภัย
Push up ดันขึ้น
1. ตรวจสอบการทำงานของสวิตซตัดไฟอัตโนมัติ ELCB เดือนละ
ครั้งโดยกดปุมทดสอบ ELCB TEST ในขณะที่เครื่องทำน้ำอุน
มีการตอกระแสไฟฟาเขาเครื่อง ถาปกติแกนของ ELCB จะ
เลื่อนลงมา (ถาแกนไมเลื่อนลงใหติดตอผูจำหนายเพื่อทำการ
แกไข) ดันแกน ELCB TEST ใหกลับขึ้นไปตามปกติเพื่อตั้งการ
ทำงานของ ELCB TEST ใหทำงานตามปกติ
Check the operation of earth leakage circuit breaker
(ELCB) once a month by push the ELCB reset switch
while the power supply is still inside the machine if
it’s normal, the ELCB lever will be drop down. (If it
not, please inform the dealer to repair the machine)
Push up the ELCB reset lever to the default position
the reset the operation of ELCB.
1. หามติดตั้งฝกบัวสูงกวาตัวเครื่อง
Do not install the shower
head above the water heater.
2. หามเอามืออุดทางน้ำออกของฝกบัว
Do not cover the shower head
with your hands.
ขั้นตอนการใชงาน
1. เปดวาลวน้ำเขาเครื่อง Open the water inlet value
2. เมื่อไฟเขาเครื่อง สัญญาณไฟ POWER (สีเขียว) ติด ตามรูป ก Power lamp (Green) will light up
3. ปรับปุมอุณหภูมิ จากตำแหนง OFF หมุนไปทางขวามือตามเข็มนาิกาเพื่อเปนการปรับอุณหภูมิ เมื่อหมุนปรับอุณหภูมิ
ไปที่ตำแหนง ON และสัญญาณไฟที่ตำแหนง HEATER จะสวางเปนสีแดง ตามรูป ข สงผลใหความรอนจะเพิ่มมากขึ้น
ตามการปรับระดับความรอน และความรอนจะลดลง ถาหมุนปุมปรับอุณหภูมิไปทางซายมือทวนเข็มนาิกา
Turn Temp Control button from “OFF” position clockwise to the right. Heater lamp will increase
and the heat will decrease when turning anticlockwise to left. heat will decrease when turning
anticlockwise to left.
4. ปุมปรับปริมาณน้ำ
Water Volume knob
สัญญาณไฟแสดงการทำงานตามปกติ Lamp indicating normal operation.
• ไฟ POWER (สีเขียว) ติด แสดงถึง มีไฟเขาเครื่องและมีน้ำไหลเขามาในเครื่อง
Green Lamp (Power) on means power and water run into the heater.
• ไฟ HEATER (สีแดง) ติด แสดงถึง HEATER ทำงานใหความรอน
Red Lamp (Heater) on means heater is operating. Water will gradually warmer.
วิธีการประกอบฝาครอบกับฐานเครื่องทำน้ำอุน HOW TO REASSEMBLE THE COVER
COCO 350
COCO 3C
COCO 5C
การถอดฝาครอบเครื่อง Take off the plastic cover.
1. ใชไขควงขันสกรูดานลางออก
Unscrew the fixing screw of the bottom.
2. ใชมือดึงฝาครอบพลาสติกออกโดยการดึงจากดานลางขึ้นดานบน
Pull out the plastic cover from the below to the top
by hand.
วิธีการสวมประกอบฝาครอบ How to reassemble the cover
1. กอนครอบฝาพลาสติก ตองใหปุมปรับอุณหภูมิที่ฐานเครื่องอยูใน
ตำแหนง “ปด” โดยหมุนไปทางซายมือสุด
Before closing the plastic cover, you must always adjust
the temperature to OFF position by turning the axis of
rotation at base to the left .
2. ใหตำแหนงปุมปรับอุณหภูมิตรงกับตำแหนง OFF
Make sure the temperature knob to off position.
3. ครอบฝาพลาสติก โดยสวมจากดานบนใหเขาล็อคพอดี จากนั้น
ขันสกรูใหแนน
Close the plastic cover by putting on from top.
Make sure it fits into place,then tighten the screw.
ฝาครอบเครื่อง
Cover
ปุมปรับอุณหภูมิ Temperature control knob
ตำแหนง OFF
สกรู
Sku
Temperature control knob
วิธีการประกอบฝาครอบ
กับฐานเครื่องทำน้ำอุน
6. หามติดตั้งเครื่องทำน้ำอุนในแนวนอน
Do not install the water heater
on horizontal position
5. หามฉีดน้ำใสเครื่องทำน้ำอุนหรือ
วางผาเปยกๆ บนตัวเครื่อง
Do not spray water to the
water heater.
4. อยาใหสายฝกบัวบิดหรือหักงอ
Do not twist or bend the
shower hose
3. หามตอวาลวทางดานน้ำออก
Do not connect the valve at
the water outlet.
รูป ก A รูป ข B
ทอทางน้ำเขา inlet
ถอดทำความสะอาดตะแกรงรองสิ่งสกปรกเปนประจำทุกเดือน
Monthly clean filter
รุน MODEL COCO 350 COCO 3C COCO 5C
คำเตือน


 use and care manual")
