manuals.online logo
Brands
  1. Home
  2. •
  3. Brands
  4. •
  5. Mex
  6. •
  7. Water Heater
  8. •
  9. Mex CRAVE 35E User manual

Mex CRAVE 35E User manual

1
2
3
4
5
6
7
8
12
13
9
10
11
สวิตชตัดกระแสไฟฟา (เบรกเกอร)
Circuit Breaker
ฝกบัวปรับสายน้ำ
Shower Head
ชุดสไลดบาร
Slide Bar Set
NAME OF PARTS
INSTALLATION
การติดตั้ง
การติดตั้งเครื่องทำน้ำอุน จะตองติดตั้งโดยชางผูชำนาญงานเครื่องทำน้ำอุนจะตองตอสายดินเขากับเครื่อง หากมีขอสงสัยให
ติดตอรานคา หรือผูแทนจำหนาย
Installation task must be done by the specialized mechanic. Make sure to ground the ground wire. If you
have any question or doubt, please contact or consult to dealer directly.
CRAVE 35E
CRAVE 45E
CRAVE 35E
CRAVE 45E
150-170 cm
อยางนอย 70 ซม.
at lease 70 cm
ปุมกดทดสอบสวิตชนิรภัย
ELCB Test
ดันขึ้น
Push Up
สายดิน
Ground
คำชี้แจง : เมื่อทานเปดกลองเพื่อนำเครื่องออก อาจจะพบน้ำที่คางอยูในเครื่องซึ่งเปนปกติ เนื่องจากเปนการ
ทดสอบการทำงานของเครื่องในขั้นตอนการผลิต
NOTE : You may find some water remaining in the shower heater at your first operation.
This is caused by the production line test. It is not a malfunction.
จัดจำหนายโดย Distributed by
บริษัท เพ็น เค อินเตอรเทรดดิ้ง จำกัด Pen K Inter Trading Co.,Ltd.
1000/63-64 อาคาร พี.บี. ทาวเวอร ชั้นที่ 16 ถนนสุขุมวิท 71 แขวงคลองตันเหนือ เขตวัฒนา กรุงเทพฯ 10110
1000/63-64, PB Tower 16 th Floor, Sukhumvit 71 Road, North Klongtan, Wattana, Bangkok, 10110
Phone. 0-2493-6565 Fax. 0-2391-1141
ศูนยบริการ Service Center
66/3 หมู 6 ซอยสุขสวัสดิ์ 76 ถนนสุขสวัสดิ์ บางจาก พระประแดง สมุทรปราการ 10130
66/3 Moo 6, Suksawat 76 Rd., Bangchak, Phrapradang, Samutprakarn 10130
Phone. 0-2493-6565 Fax. 0-2464-1600 Email: [email protected]
ควรติดตั้งเครื่องกรองน้ำกอนน้ำไหลเขาเครื่องจะชวยกรองสิ่งสกปรกและตะกรันที่จะจับกระเปาะทองแดง
เมื่อตะกรันสะสมมากขึ้นจะทำใหน้ำไหลไมสะดวก และทำใหอายุการใชงานของเครื่องทำน้ำอุนสั้นลง
The filter unit should be installed before water flow into the shower unit. So it can filter the
dirt or calces which will be accumulated at the copper bulb inside the heater. Consequently
the water will flow improperly and shorten its usage life.
ตัวเลขแสดงคาอุณหภูมิของน้ำ
The number show temperature
ปุม ON-OFF เครื่อง
ON-OFF button
ปุมปรับเพิ่มอุณหภูมิ
Temperature increase button
ไฟแสดงสถานะไฟฟาผานเขามายังเครื่องแลว
LED Show LED on
ปุมปรับลดอุณหภูมิ
Temperature decrease button
วาลวปรับแรงดันน้ำเขา
Inlet Water Valve
ตะแกรงกรองสิ่งสกปรก
Water Filter
ทางน้ำเขา
Inlet
ทางน้ำออก
Outlet
แกนสําหรับดันขึ้นเพื่อ ON สวิตช ตัดไฟ
อัตโนมัติ (ELCB)
ELCB Lever ON
ปุมทดสอบการทำงานของสวิตชตัดไฟ
ELCB Test
ประเก็นยาง
Rubber gasket
ทอฝกบัว
Shower
ทางน้ำเขา
Inlet
ทางน้ำเขา
Inlet
ทางน้ำออก
Outlet
HOW TO REASSEMBLE
THE COVER
วิธีการประกอบฝาครอบกับฐานเครื่องทำน้ำอุน HOW TO REASSEMBLE THE COVER
CRAVE 35E
CRAVE 45E
การถอดฝาครอบเครื่อง Take off the plastic cover.
1. ใชไขควงขันสกรูดานลางออก
Unscrew the fixing screw of the bottom.
2. ใชมือดึงฝาครอบพลาสติกออกโดยการดึงจากดานลางขึ้นดานบน
Pull out the plastic cover from the below to the top by hand.
วิธีการสวมประกอบฝาครอบ How to reassembly the cover
1. ครอบฝาพลาสติก โดยการสวมจากดานลางใหเขาล็อคพอดี จากนั้น
ขันสกรูใหแนน
Close the plastic cover by putting on from the bottom.
Make sure it fits into place. Then tighen the screw.
2. ใชไขควงขันสกรูเขากับเครื่องใหแนน
Use a screwdriver to tighten the screw on the EWH
วิธีการประกอบฝาครอบ
กับฐานเครื่องทำน้ำอุน
ฝาครอบเครื่อง
Cover
สกรู
Screw
ฝาครอบเครื่อง
Cover
สกรู
Screw
ควรปรับลูกบิดปรับปริมาณน้ำเฉพาะที่
ลูกบิดปรับบริเวณดานทางน้ำเขาของ
เครื่องทำน้ำอุนเทานั้น
Should be adjust water volume
at only inlet side
3. การตอสายดิน
ควรติดตั้งเบรกเกอรหรือสวิตซตัดไฟกอนเขาเครื่องขนาด 20 แอมป
สายไฟกอนเขาเครื่องตองใชสายไฟคู ขนาด 2.5 ตารางมิลลิเมตร
สำหรับรุน CRAVE 35E และเบรกเกอร 30 แอมป สายไฟคู
ขนาด 4.0 ตารางมิลลิเมตรสำหรับรุน CRAVE 45E
Wiring connection
The circuit breaker 20 Amp must be installed before
connecting the electric line to the unit.
Use 2.5 mm2 double wire for wiring for CRAVE 35E
model and breaker 30 Amp double wire 4.0 mm2 for
CRAVE 45E model.
4. ตองตอสายดินเขากับเครื่องเสมอ โดยสายดินจะตองมีขนาด
2.5 ตารางมิลลิเมตรและสายดินจะตองตอกับแทงสายดินที่ทำ
ดวยทองแดง หรือแทงเหล็กอาบโลหะชนิดปองกันการผุกรอน
ซึ่งแทงสายดินจะตองฝงลงดินอยางนอยกวา 70 ซม. และจะตอง
แนใจวา ความตานทานของดินจะตองนอยกวา 100 โอหม ถา
ความตานทานของดินเกินกวา 100 โอหม ใชแทงสายดินที่มี
ความยาวไมนอยกวา 2.40 เมตร
Grounding connection The shower heater must always
be grounded by using 2.5 mm2. Ground wire and the
ground wire length have to be longer than the other
wires. It has to be connected to the copper ground
rod. The ground rod must be placed under the ground
at least 70 cm. away from the surface. Make sure that
the resistance of the ground must not exceed 100
ohms. However, if it exceeds 100 ohms, it may be
necessary to use the ground rod longer than 2.40 m.
5. ทดลองกดปุม ELCB TEST วาทำงานปกติหรือไม
ถาทำงานปกติใหดันแกนสวิตชตัดไฟอัตโนมัติสีขาวดานลางขึ้น
เพื่อให ELCB พรอมทำงานตอไป
Turn the ELCB reset switch to see if the water heater
works normally or not. If it works normally, push the
ELCB lever up so the ELCB will be ready to operate.
6. การประกอบสายฝกบัวดานน้ำออก เมื่อเรียบรอยแลวทดสอบ
เปดน้ำเขาเครื่องดูวามีรอยรั่วหรือไม ถามีแกไขใหมใหเรียบรอย
Connect the shower hose to the water outlet. Then open
the water valve to check and repair if the water leaks.
•
ควรใชฝกบัวที่ติดมากับเครื่อง เพื่อใหใชงานไดอยางมีประสิทธิภาพ
Should use the shower head that comes with the
machine for efficient use.
•
ตองติดตั้งวาลวปรับแรงดันน้ำเขา ที่มาพรอมกับเครื่องที่ทางน้ำเขา
เพื่อใชปรับแรงดันน้ำ สำหรับจุดติดตั้งที่มีแรงดัน
Must be install water volume at inlet that comes with
the machine at the water inlet to adjust the water
pressure for installation with water pressure.
• หามติดตั้งวาลวน้ำใดๆ ทางดานน้ำอุนออกเด็ดขาด
Do not install any water valve on the hot water out side.
• ทางน้ำเขาของเครื่องทำน้ำอุนไฟฟาตองไมเชื่อมตอกับทางน้ำเขา
ที่ไดรับจากระบบทำน้ำรอนอื่นๆ
The water inlet of this appliance shall not be connected
to inlet water obtained from any other water heating
system. 190 mm
13 mm
210 mm
LN
นำสายดินมาตอย้ำเขากับ Connector หางปลาแฉกหุม
Connect the ground wiring to the wire terminals.
1. ยึดเครื่องติดกับผนังที่แข็งแรง ใหสูงจากพื้นประมาณ 150-170 ซม.
หรือตำแหนงที่เหมาะสมขึ้นอยูกับความสูงของผูใชงาน ประกอบ
สายน้ำจากวาลวในหองน้ำเขากับเครื่องทางน้ำเขา (Water Inlet)
The machine must be installed at the stable wall
above the floor 150-170 cm. or at the proper position
depending on the user's height. The water hose have
to be connected at the water inlet only.
• วิธียึดติดดังกลาวตองไมขึ้นอยูกับการใชสารยึดติด เนื่องจาก
สารยึดติดไมถือวาเปนตัวกลางยึดติดเชื่อถือได
• The method of fixing stated is not to depend on the
use of adhesives since they are not considered to be
a reliable fixing means.
2. การตอทอน้ำและสายฝกบัว
ใชเครื่องมือที่ถูกตองในการติดตั้ง การขันขอตอทางน้ำเขาและ
สายฝกบัว หามใชเทปพันเกลียว ใหใสประเก็นยางและขันเขา
ดวยมือ ไมควรใชประแจ
Water hose and shower hose connection Using the
proper equipments to install the machine. Do not use
any tape at the water inlet and the shower hose and
do not forget to put in the rubber gasket on them.
After that tighten the plastic nut by hand, shall not
use wrench.
• ติดตั้งวาลวปรับระดับแรงดันน้ำที่ทางน้ำเขา
Install water volume control at inlet
• หามติดตั้งวาลวที่ทางน้ำออก
Do not install any value to water outlet
• ควรปรับลูกบิดปรับปริมาณน้ำเฉพาะที่ลูกบิดปรับบริเวณ
ดานทางน้ำเขาของเครื่องทำน้ำอุนเทานั้น
Should be adjust water volume at only inlet side
SPECIFICATION
TROBLE SHOOTING
MAINTENANCE AND CARE
เครื่องทำน้ำอุน MEX ผานการตรวจสอบคุณภาพอยางพิถีพิถันจากโรงงานผูผลิตใหมีประสิทธิภาพในการใชงานตามมาตรฐานใน
บางกรณีอาจมีขอขัดของเล็กนอย ซึ่งทานสามารถตรวจสอบไดโดยงายกอนที่จะติดตอตัวแทนจำหนายเพื่อทำการซอม
MEX Electric Water Heater are passed Q.C. testing and manufactured to the highest quality standards. If you
find the following symptoms appear, please check it before calling the technician.
ระบบจายน้ำ จายน้ำจุดเดียว
WATER SYSTEM Single point
แรงดันน้ำต่ำสุด 20 กิโลพาสคัล / 0.2 กิโลกรัมตอตารางเซนติเมตร
MIN.Water Pressure 20 kPa / 0.2 kg/cm2
กำลังไฟ (กิโลวัตต/โวลต/แอมป) 3.5 / 220 / 16 4.5 / 220 / 20
Power (kW/Volt/Amp)
ระบบความปลอดภัย ELCB, THERMISTOR, HALL EFFECT SENSOR
Safety System THERMO CUT-OFF AND FUNCTION CHECK LNG
ไฟสัญญาณ
SEVEN SEGMENT LED DISPLAY, SIDE LED x 2
Indicator
ขนาด (สูง × กวาง × ลึก ) มม. 350 × 220 × 95
Dimension (HxWxD mm)
น้ำหนัก (กก.) 1.6
Weight (Kg)
อุปกรณพิเศษ
Accessories
ปริมาณน้ำ (ลิตร/นาที) 3.5
Water Flow (L/m)
อุณหภูมิของน้ำเพิ่มขึ้น
โดยประมาณ (˚C) 6-15˚C 6-19˚C
Incnease Temperature (˚C)
ขนาดสายไฟ
2.5 mm2 4.0 mm2
Wire Size
2
. การทำความสะอาดตัวเครื่อง ควรปดสวิตชตัดกระแสไฟกอนทุกครั้ง
ทำความสะอาดดวยผาชุบน้ำสบูบิดแหง อยาใชน้ำมันเบนซิน,
ทินเนอร ฯลฯ ในการทำความสะอาด
To clean the water heater body, Please make sure to
switch off the power current first. Clean the body of
shower heater by wiping with a cloth dampened in mild
soap water. Don’t use solvent.
• ใชแปรงทำความสะอาดภายในหัวฝกบัวเปนประจำทุกเดือน
Monthly Clean by brush
ตัวกรองถอดออกลางน้ำดวย
แปรงขนออน หรือแปรงสีฟน
Take off the filter and
clean by brush
ปุมทดสอบ
สวิตชนิรภัย
ELCB Test
Button
Push up
ดันขึ้น
1. ตรวจสอบการทำงานของสวิตชตัดไฟอัตโนมัติ ELCB เดือนละครั้งโดยกดปุมทดสอบ
ELCB TEST ในขณะที่เครื่องทำน้ำอุน มีการตอกระแสไฟฟาเขาเครื่อง ถาปกติแกน
ของ ELCB จะเลื่อนลงมา (ถาแกนไมเลื่อนลงใหติดตอผูจำหนายเพื่อทำการแกไข)
ดันแกน ELCB TEST ใหกลับขึ้นไปตามปกติเพื่อตั้งการทำงานของ ELCB TEST ให
ทำงานตามปกติ
Check the operation of earth leakage circuit breaker (ELCB) once a month
by push the ELCB reset switch while the power supply is still inside
the machine if it’s normal, the ELCB lever will be drop down. (If it not,
please inform the dealer to repair the machine) Push up the ELCB
reset lever to the default position the reset the operation of ELCB.
สัญญาณไฟแสดงผล เมื่อเครื่องเกิดสัญญาณ ERROR CODE
Notification to cause the error by show on LED Display
1. ชองตัวเลขแสดง “E1” , “E2” และ “E3” เครื่องตรวจสอบระบบฟงกชันการตอสาย L , N และสายดินผิดปกติ
The numbers LED show “E1”, “E2” and “E3” the EWH check function system connect L, N and Ground not correct
• ถาตัวเลขแสดง “E1” พรอมเสียงแจงเตือน 3 ครั้ง เครื่องจะกลับมาทำงานปกติ
If the numbers LED show “E1” with a sound notification within 3 times the EWH will return to normal operation
1.1 ตอสายไฟเขาเครื่อง L , N ถูกตองแตไมตอสายดิน
Wiring to the EWH L , N Connect Correct but not grounded
1.2 ตอสายไฟเขาเครื่อง L , N สลับกันแตไมตอสายดิน
Wiring to the EWH reversed but not grounded
• ถาตัวเลขแสดง “E2” พรอมเสียงแจงเตือน 3 ครั้ง คือตอสายไฟเขาเครื่อง L, N สลับกันและตอสายดิน เครื่องจะกลับมาทำงานปกติ
If the numbers LED show “E2” with a sound notification within 3 times. It is mean wiring to the EWH revered and
grounded then the EWH will return to normal operation.
• ถาตัวเลขแสดง “E3” พรอมเสียงแจงเตือน 3 ครั้ง เครื่องไมทำงาน ตอสายไฟเขาเครื่อง L , N และสายดินถูกตองแตมีไฟรั่ว
หรือไฟยอนมาที่สายดิน
If the numbers LED show “E3” with a sound notification within 3 times. It is mean the EWH not operate which
wiring to the EWH L , N connect and grounded correct but there is a leakage current or back to the grounded
2. ชองตัวเลขแสดง “E4” เครื่องตรวจจับอุณหภูมิไมได อุปกรณตรวจจับอุณหภูมิ (Thermistor) ชำรุดเสียหายหรือช็อต
The numbers LED show “E4” it’s mean the thermistor operate fault
3. ชองตัวเลขแสดง “E5” อาการที่ผิดปกติ น้ำในหมอตมมีอุณหภูมิสูงเกินไป (65°C) และเครื่องแสดงการทำงาน
The numbers LED show “E5” it’s mean water inside the tank has over temperature 65°C and EWH operated
4. ชองตัวเลขแสดง “E6” อาการที่ผิดปกติ น้ำในหมอตมมีอุณหภูมิสูงเกินไป (75°C) และเครื่องไมทำงาน
The numbers LED show “E6” it’s water inside the tank has over temperature 75°C and EWH not operated
ขั้นตอนการ Reset Error “E6”
Reset Error “E6”
1. ดันกาน ELCB ขึ้นไฟที่ตำแหนงชองตัวเลขคาจะวิ่ง 00-99 ขณะที่ตัวเลขวิ่งอยู ใหทำตามขั้นตอนที่ 2 ทันที
ON ELCB the lights at position the number LED will run from 00 to 99 then take the next step
2. กดปุม คางไว รอจนกวาชองตัวเลขแสดง “E6” แลวหายไป หลังจากนั้นใหกดปุม เครื่องก็ใชงานไดตามปกติ
Touching hold and wait until the number will show “E6” then “E6” off after that touching the
EWH with return to normal operation
การบำรุงรักษา
การใชงาน HOW TO USE
ตะแกรงกรองสิ่งสกปรก
Filter
ถอดทำความสะอาดตะแกรงกรองสิ่งสกปรกเปนประจำทุกเดือน
Monthly clean Filter
รุน MODEL CRAVE 35E CRAVE 45E
CAUTION
1. หามติดตั้งฝกบัวสูงกวาตัวเครื่อง
Do not install the shower
head above the water heater.
2. หามตอวาลวทางดานน้ำออก
Do not connect the valve at
the water outlet.
7. ลูกบิดปรับปริมาณน้ำ
Water Volume knob
8. ฝกบัวชนิดพิเศษในรุน CRAVE 35E, CRAVE 45E สามารถปรับแรงดันน้ำได 3 ระดับมีดังตอไปนี้
Special shower head for model CRAVE 35E and CRAVE 45E
can be adjust water 3 level.
• ปรับเปนสายน้ำกระจายกวางออกดานขาง
Shower flow out from side.
3. หามติดตั้งเครื่องทำน้ำอุนในแนวนอน
Do not install the water heater
on horizontal position
คำเตือน
4. เครื่องใชไฟฟานี้ไมมีเจตนาใหใชโดยบุคคล (รวมถึงเด็ก) ที่ดอยความสามารถทางรางกาย ทางประสาทสัมผัสหรือจิตใจ หรือขาด
ประสบการณและความรู เวนแตวาจะไดรับการควบคุมดูแลหรือการสอนเกี่ยวกับการใชเครื่องใชไฟฟาโดยบุคคลที่รับผิดชอบตอ
ความปลอดภัยของบุคคลเหลานั้น
This appliance is not intended for use by persons (including children) with reduced physical, sensory or mental
capabilities, or lack of experience and knowledge, unless they have been given supervision or instruction
concerning use of the appliance by a person responsible for their safety.
ฝกบัวปรับสายน้ำ 3 ระดับ พรอมชุดสไลดบาร
3 Stream levels for the shower head with in slide bar set
1. เมื่อไฟฟาเขาเครื่องและสัมผัสปุม ไฟที่
ตำแหนงตางๆจะแสดงดังนี้
ON ELCB and Touching there will
be a display of various position lights
as show below
ขั้นตอนการใชงาน HOW TO USE
2. เปดวาลวน้ำเขาเครื่องไฟที่ตำแหนง Side LED
ทั้งสองขางจะสวางเปนสีขาว
Open the water inlet valve. The lights
at the side LED position on both sides
will light ON “White”
3. เมื่อตองการปรับเพิ่มอุณหภูมิที่ตองการเพียงสัมผัสปุม (ปรับเพิ่มไดสูงสุด 48°C) และเมื่อตองการปรับลดอุณหภูมิที่ตองการ
เพียงสัมผัสปุม (ปรับลดไดต่ำสุด 32°C)
Adjust the temperature increase by touch button (Max 48°C) and adjust the temperature decrease by
button (Min 32°C)
4. ถาปดวาลวน้ำแลวไฟที่ตำแหนง Side LED ทั้งสองขางจะดับลง เหลือไฟที่ตำแหนง สวางเปนสีขาวและไฟที่ตำแหนง
สวางเปนสีเขียว หรือถาปดวาลวน้ำเขามายังเครื่องแลวเกิน 15 นาที ไฟที่ตำแหนงตางๆจะดับหมดเหลือแตไฟที่ตำแหนง
สวางเปนสีเขียว
If close the water inlet valve. The lights at the side LED position on both sides will off which position will
light ON “White” and position light ON “Green” or if close the water inlet valve long time over
15 minutes LED at various positions will be off. Leaving only the position light ON “Green”
5. เมื่อตองการปดเครื่องเพียงสัมผัสปุม เครื่องจะหยุดทำงาน โดยไฟที่ตำแหนงตางๆจะดับหมดเหลือเพียงไฟตำแหนง จะ
สวางเปนสีเขียว
To turn off the EWH by touch button the EWH will stop operate which LED at various position will be off.
Leaving only the position light ON “Green”
สวางเปนสี "ขาว"
Light on “white”
ไฟ LED ดานขาง
Side LED ไฟ LED ดานขาง
Side LED
ไฟ LED ดานขาง
Side LED ไฟ LED ดานขาง
Side LED
สวางเปนสี "ขาว"
Light on “white” สวางเปนสี "เขียว"
Light on “Green”
เด็กควรไดรับการควบคุมดูแลเพื่อใหแนใจวาจะไมเลนเครื่องใชไฟฟา
Children should be supervised to ensure that they do not play with the appliance.
5. เพื่อหลีกเลี่ยงความเสี่ยงอันตรายเนื่องจากการตั้งกลับโดยบังเอิญของคัตเอาตความรอนตองไมจายไฟฟาแกเครื่องใชไฟฟานี้ผาน
อุปกรณสวิตชภายนอก เชน ตัวตั้งเวลา เปนตน หรือตอกับวงจรไฟฟาที่ปกติเปดไฟ (on) และปดไฟ (off) โดยแหลงจายไฟฟา
สาธารณูปโภค (Utility)
In order to avoid a hazard due to inadvertent resetting of the thermal cut-out, this appliance must not be
supplied through an external switching device, such as a timer, or connected to a circuit that is regularly
switched on and off by the utility.
ขอขัดของ TROUBLE สาเหตุ CAUSE การแกไข TROUBLE SHOOTING
1. เครื่องไมทำงาน ไฟฟาไมเขาเครื่อง ตรวจสอบขั้วไฟฟาวาติดตั้งถูกขั้วหรือไม
The machine does not No electric current flow Check the connection of the wire
operate. through the machine. to the correct terminals or not.
สวิตชตัดไฟอัตโนมัติตัดการทำงาน สวิตชตกมาในตำแหนง OFF ใหดันกานสวิตซขึ้น
The circuit breaker or fuses The circuit breaker has drop down to
are cut off. "OFF" position. Push it to "ON" position.
แรงดันน้ำไมพอ แกไขระบบแรงดันน้ำ
There is not sufficient water Fix the water pressure system.
pressure. ถอดลางตะแกรงกรองสิ่งสกปรก
Cleaning the filter.
2. น้ำอุนไมพอ น้ำแรงเกินไป ลดปริมาณน้ำโดยปรับลดที่วาลวปรับแรงดันน้ำ
The water is not heated There is too much water Decrease the water amount by
as desired. flowing into the machine. adjusting at the water inlet valve.
3. อุณหภูมิน้ำไมสม่ำเสมอ แรงดันน้ำไมสม่ำเสมอตลอดเวลา แกไขระบบแรงดันน้ำ
The water temperature The water pressure remains Fix the water pressure system.
remains unstable. unstable.
4. น้ำไหลนอย จุดอื่นๆ ไหลแรง ตะแกรงกรองสิ่งสกปรกอุดตัน ถอดลางทำความสะอาด
The water doesn't flow The filter is obstructed by dust. Clean the filter.
well while the water
from the other tap are ฝกบัวอุดตัน ถอดลางทำความสะอาด
strong. The shower head is clogged. Clean the Shower Head.
ปรับสายน้ำที่ฝกบัวไมถูกตอง หมุนปรับสายน้ำที่หัวฝกบัว
The stream on the shower Clean the shower head.
head is adjusted improperly.
3. การทำความสะอาดหัวฝกบัว และตะแกรงกรองสิ่งสกปรก
Water volumm knob and filter cleaning
สวางเปนสี "ขาว"
Light on “white”
สวางเปนสี "ขาว"
Light on “white” สวางเปนสี "เขียว"
Light on “Green”
ที่ชองตัวเลขคาจะอาน "Real Temp"
The number LED will show
“Real Temp”
• ปรับเปนสายน้ำกระจายแคบออกตรงกลาง
Shower flow out from center. • ปรับเปนระบบสายน้ำชวยนวดผิวตัว
Massage system.

This manual suits for next models

1

Other Mex Water Heater manuals

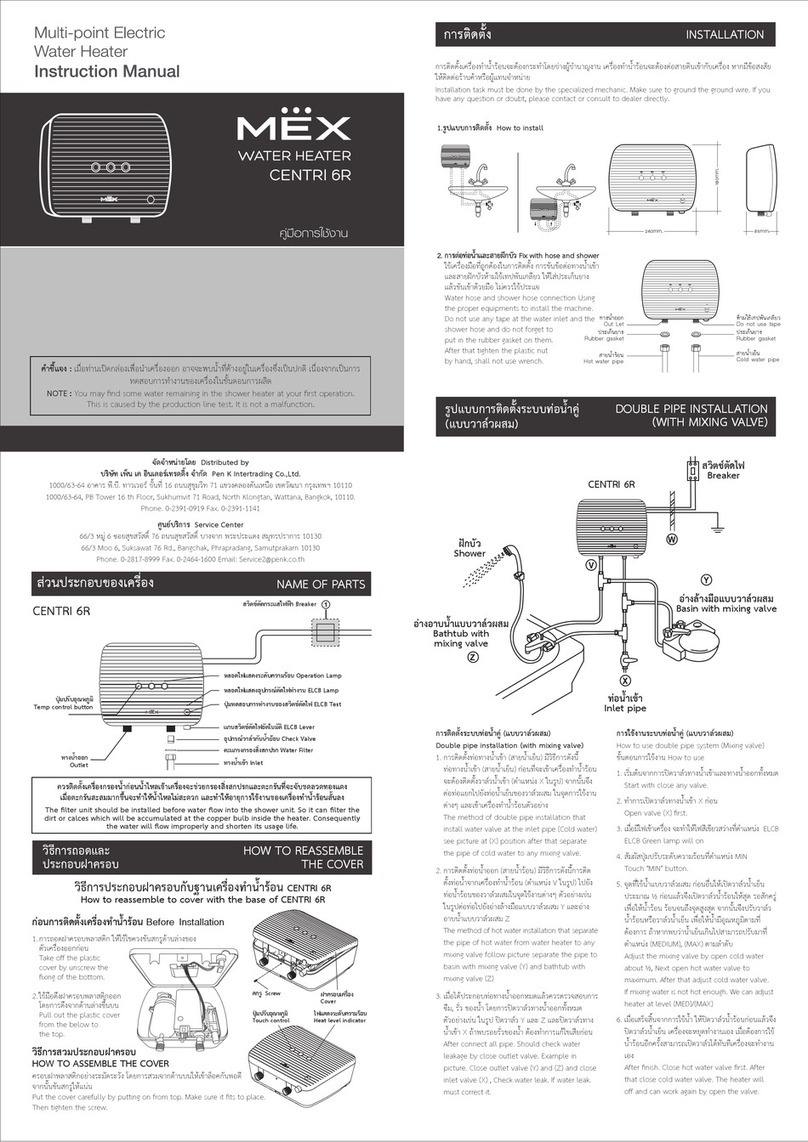
Mex CENTRI 6R User manual

Mex

Mex CENTRI 6R User manual

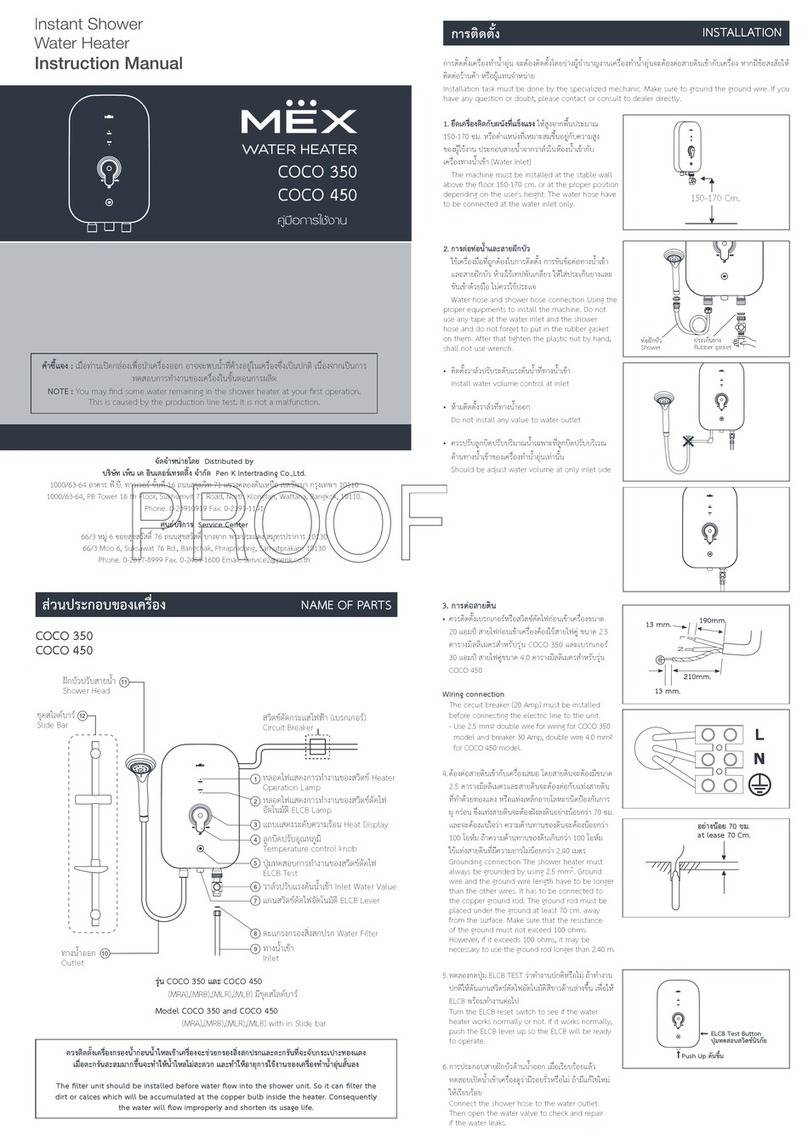
Mex COCO 350 User manual

Mex

Mex COCO 350 User manual

Mex CUBE 6000R User manual

Mex

Mex CUBE 6000R User manual

Mex CUBE 35E User manual

Mex

Mex CUBE 35E User manual

Mex COCO 350 User manual

Mex

Mex COCO 350 User manual

Mex CENTRI 6R User manual

Mex

Mex CENTRI 6R User manual

Mex CRYSTAL 35E User manual

Mex

Mex CRYSTAL 35E User manual

Mex CODE 35E User manual

Mex

Mex CODE 35E User manual

Popular Water Heater manuals by other brands

Bradford White LT199NXX1 Installation and instruction manual

Bradford White

Bradford White LT199NXX1 Installation and instruction manual

Glen WH-7051 user guide

Glen

Glen WH-7051 user guide

Aplast AQUAstay Instructions for installing

Aplast

Aplast AQUAstay Instructions for installing

Natco VW Installation and operating instructions

Natco

Natco VW Installation and operating instructions

TESY EV15/9 S2 2000 manual

TESY

TESY EV15/9 S2 2000 manual

ThermoFlow Elex Compact Series Installation Guide, User Manual, and Warranty Information

ThermoFlow

ThermoFlow Elex Compact Series Installation Guide, User Manual, and Warranty Information

A.O. Smith BTP-600-2500 Replacement parts list

A.O. Smith

A.O. Smith BTP-600-2500 Replacement parts list

Kospel Luna inox POC.D-5/2 Operating and installation instructions

Kospel

Kospel Luna inox POC.D-5/2 Operating and installation instructions

Aspes ATE15C Instructions for use and maintenance

Aspes

Aspes ATE15C Instructions for use and maintenance

State Water Heaters Gas-Fired Water Heaters Specifications

State Water Heaters

State Water Heaters Gas-Fired Water Heaters Specifications

A.O. Smith Residential Gas Water Heaters instruction manual

A.O. Smith

A.O. Smith Residential Gas Water Heaters instruction manual

A.O. Smith PEC/TE-120 parts list

A.O. Smith

A.O. Smith PEC/TE-120 parts list

Webasto Thermo Top E installation instructions

Webasto

Webasto Thermo Top E installation instructions

Zip VARIPOINT II Series Installation instructions & user manual

Zip

Zip VARIPOINT II Series Installation instructions & user manual

Nibe COMPACT 300 SOL Installation and maintenance instructions

Nibe

Nibe COMPACT 300 SOL Installation and maintenance instructions

clage DEX Installing instructions for the professional

clage

clage DEX Installing instructions for the professional

Ketko CWM-DF24A Instruction manual and warranty card

Ketko

Ketko CWM-DF24A Instruction manual and warranty card

Regulus R0BC 200 Installation and operation manual

Regulus

Regulus R0BC 200 Installation and operation manual

manuals.online logo
manuals.online logoBrands
  • About & Mission
  • Contact us
  • Privacy Policy
  • Terms and Conditions

Copyright 2025 Manuals.Online. All Rights Reserved.