MG Biketec YR09 Assembly instructions
Hebel
Montagehilfe /
Lever installation
tips
Adapter ID: YR09
xxx1 994521
INSTALLATION TIPS ENGLISH
General:
We recommend having the upgradewith our components doneat an authorizedservice center.
The assembly instruction itself (see below) can’t replace experience and expertise. Before
starting to work onyour motorbike, please checkif it is in a stableandfirm position.
This component is only meant for the motorbike indicated on the list. Don’t try to mount it on a
motorbike of any other brand, model, type or year of manufacture. Always stick to the supplier’s
torque instructions.
Before assembly:
Before assembly, make sure to carefully read the complete assembly instruction. See to it that
you’re equipped with the necessary and right tools and that they are in perfect repair. Protect
your motorbike in the working area. Cover up all sensitive parts with blankets or similar
appropriatematerial.
During assembly:
Check all parts before, during and after each assembly step. Before assembly clean and
degrease all covers. Please take care during the assembly process that the motorbike isn’t
damaged or scratched. Ensure that you work in a relaxed and concentratedway. Mistakes
might happeneasily and parts might get damaged.
After assembly:
The functionof brake and clutch most not be restricted by the assembly of the levers. In case
the function is influencedin any way, changethe position of the restricting parts so that a
perfect functioningis ensured.
Before each ride:
Before each ride check:
-) That brake- and clutch levers are not damaged
-) That brake- and clutch levels perform flawlessly
-) That the engage of the lever-distance-adjustment is correct
The power of the trigging mechanism of the vertical folding device must be strong enoughto
avoid a folding by mistake during the ride.
ATTENTION: Only change or operate the adjustment of the handholddistance, the lever width
as well as the folding mechanism when stationary. Never try to change the position of the lever
while riding in traffic.
Maintenance:
For lever cleaning donot use anyaggressive cleaners, just water with special motorbike
cleaners. (In case of doubt check the result at a hiddenspot). Mind! When cleaningwith high-
pressure cleaners keep enough distanceto the levers! Bearing parts and the handhold-
distance-mechanismmust not be cleaned by high-pressure cleaners!
After rides in rain resp. after the general cleaning, the levers, the handhold distance
mechanism, as well as the bearingparts have to be greased andconservedwith oil spray (ex.:
WD40).
MONTAGEHILFE DEUTSCH
Allgemeine Hinweise:
Wir empfehlen den An- und Umbau unserer Zubehörprodukte durch eine Fachwerkstatt. Erfahrung
und Fachwissen sind nicht durch nachstehende Montageanleitungzu ersetzen. Bitte sorgen Sie vor
Beginn der Arbeiten an Ihrem Fahrzeug für einen sicheren Stand Ihres Motorrades.
Dieses Produkt darf nur für jenen Motorradtyp verwendet werden, der auf der Verwendungsliste
genanntwird. Versuchen Sie nicht dieses Produkt an einer anderen Motorradmarke, einem anderen
Modell, einer anderenType oder einemanderenBaujahrzu montieren. VerwendenSie immer die
Drehmoment-Angaben des Herstellers.
Vor der Montage:
Bitte lesen Sie vor Montagebeginndie kompletteAnleitungsorgfältigdurch. StellenSie sicher, dass
Sie alle notwendigenWerkzeugebesitzenund diese in tadellosemZustandsind. Schützen Sie Ihr
Motorrad im Arbeitsbereich.Decken Sie die empfindlichenTeile mit Decken oder sonstigen
geeignetenMaterialien ab.
Währendder Montage:
Überprüfen Sie alle Teile vor, währendund nach jedem Montageabschnitt.Reinigen undentfettenSie
alle Oberflächender Teile vor der Montage.Bitte um Vorsicht währenddes Montagevorgangs,damit
das Motorrad nicht beschädigt oder zerkratzt wird. Arbeiten Sie bitte entspannt und konzentriert. Es
passieren sehr schnell Fehler oder Teile werden beschädigt.
Nach der Montage:
Die Funktion der Bremse und Kupplungdarf durch die Montageder Hebel nicht beeinträchtig werden.
Ist die Funktion beeinflusst,dann verändernSie die Position der einschränkendenBauteile so, dass
die einwandfreieFunktionstüchtigkeitgewährleistetist. VergessenSie bitte nicht,die Befestigungder
Hebel nochmals zu überprüfen.
Vor jedem Fahrtantritt:
Prüfen Sie vor jedem Fahrtantritt:
-) Brems- und Kupplungshebel auf Beschädigungen
-) die einwandfreie Funktion von Bremse und Kupplung
-) das korrekte Einrasten der Hebelabstandsverstellung
Die Auslösekraft des vertikalen Klappmechanismus muss so hoch sein, dass versehentliches
Umklappen während der Fahrt nicht möglich ist.
ACHTUNG: Die Einstellung des Griffabstands,der Hebelweite sowie der Klappmechanismus darf nur
bei Fahrzeug Stillstandverändertbzw. betätigt werden. VersuchenSie niemals währendder Fahrt den
Hebel im Straßenverkehr zu verstellen.
Pflege und Wartung:
VerwendenSie zur Reinigungder Hebel keinescharfenReinigungsmittel, nur Wasser mit für
Motorräder geeigneten Reinigungsmitteln (im Zweifelsfall das Reinigungsmittel an einer nicht
sichtbaren Stelle zuerst auf Verträglichkeit prüfen).
Reinigung der Hebel mit Hochdruckreinigern nur in ausreichendem Abstand!Lagerstellenund
Griffweitenverstellmechanismus aussparen!
Nach Fahrten im Regen bzw. nach der allgemeinenReinigung sind die Hebel undder
Griffweitenverstellmechanismus, sowie die Lagerstellenmit Ölspray (z.B. WD40)zu schmieren und
zur konservieren.
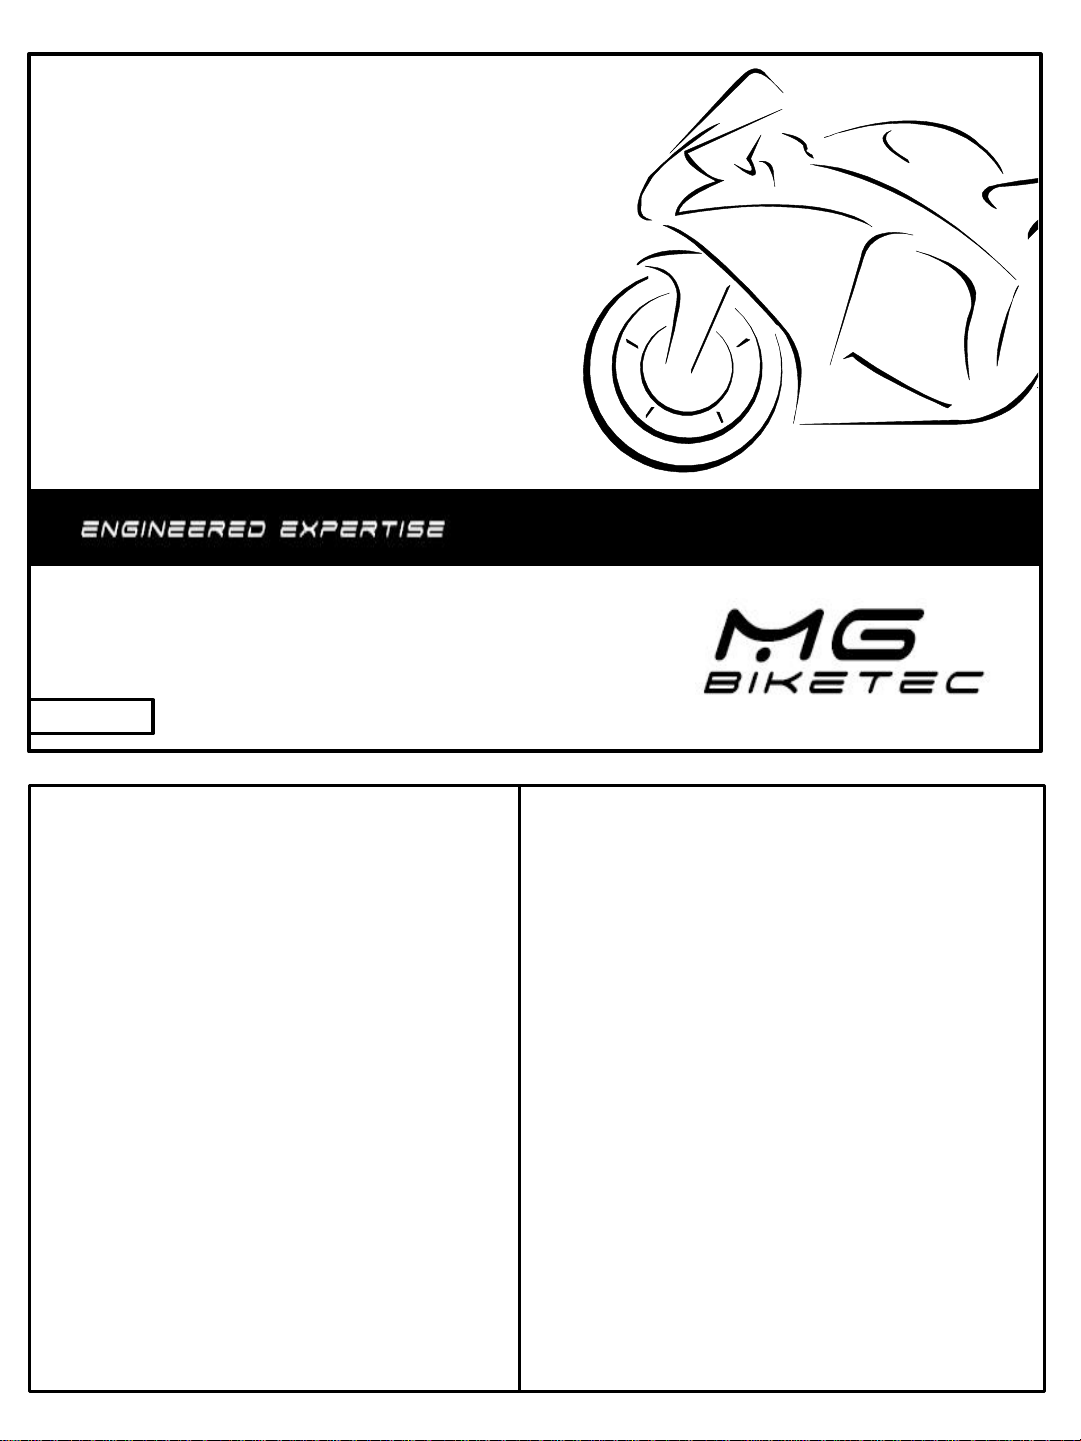
Entfernen Sie die originale Befestigungsschraube
indem Sie die Mutter an der Unterseite abdrehen
und anschließend die Schraube herausdrehen /
Loosen the nut underneath the lever, pull the bolt out
and remove the lever
Drücken Sie die Hülse von der Unterseite des
Originalhebels heraus. Verwenden Sie einen 10mm
Dorn als Hilfestellung (Achtung: Teil ist
federbelastet) /
Press out the bush from the under side of the original
lever with a 10mm pin or a suitable diameter socket
(Attention: these parts are spring loaded!)
Verwenden Sie den originalen Druckstift im Hebel.
Mit Hilfe der Einstellschraube kann der Abstand
zwischen Hebel und Pumpe eingestellt werden.
(Bremszylinder darf nicht vorgespannt sein!) /
Retain the original pressure pin in the lever assembly.
The distance between the lever and the pump can be
adjusted with the help of the adjusting screw. (The
brake cylinder must never be pre-tensioned!)
Montageanleitung Hebel / Installation tips
Adapter ADR1
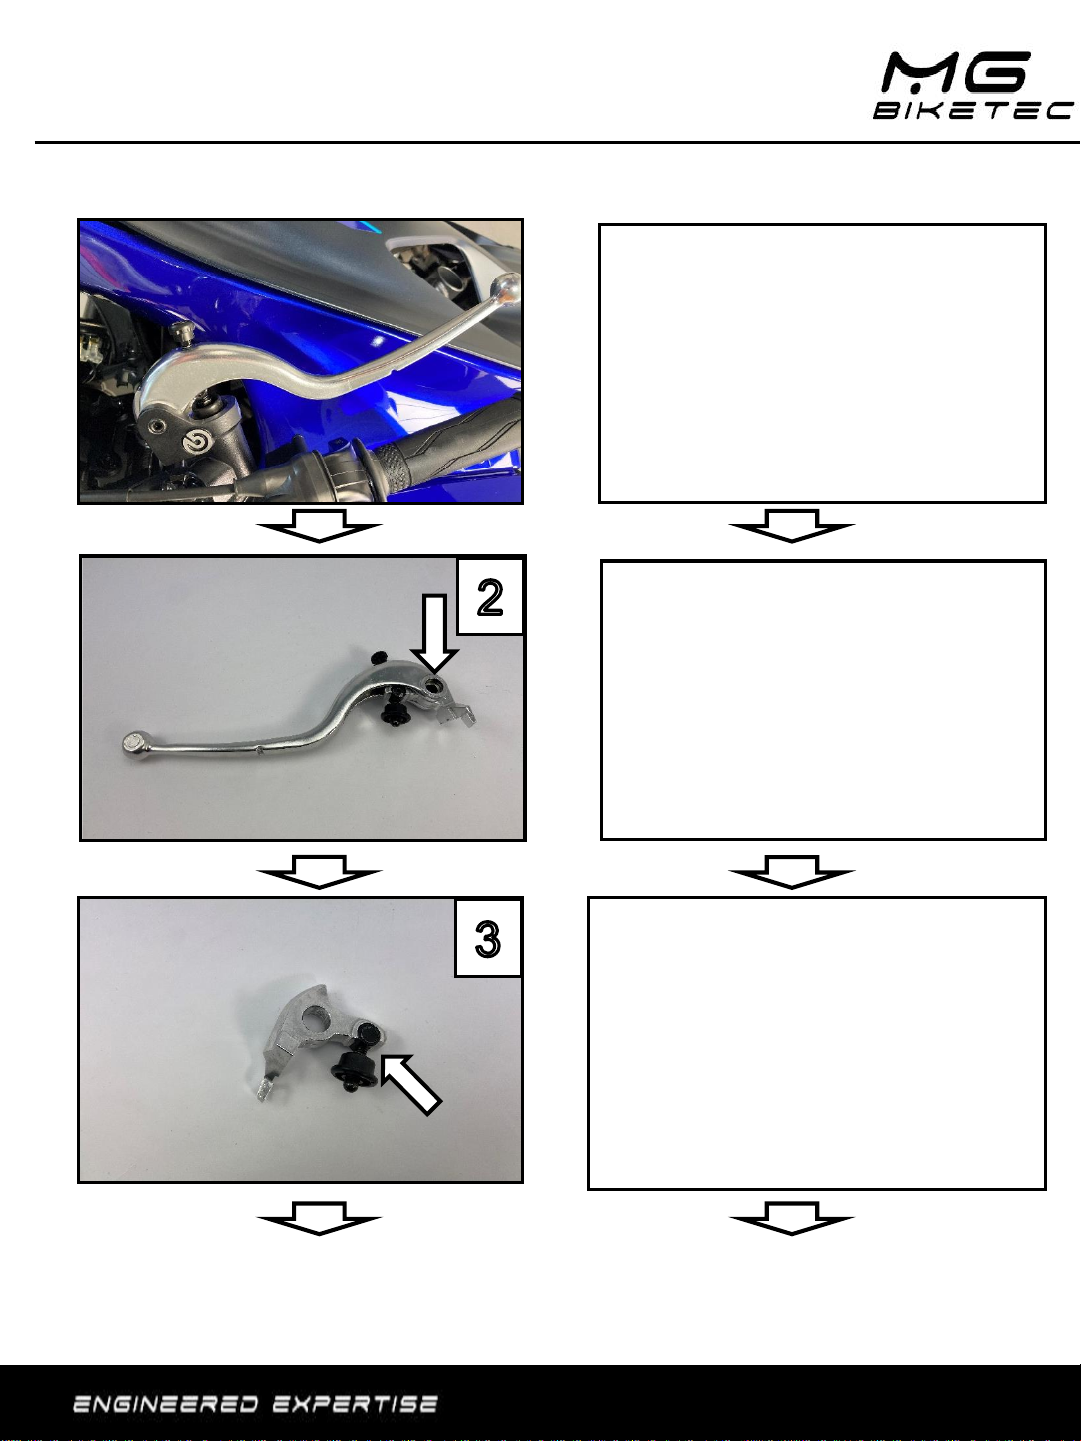
Führen Sie die Feder wie beim originalen Hebel wieder
zwischen den beiden Bauteilen ein. /
Re-insert the original spring between the original and
MG Biketec adapter just like it was with the original
lever.
Pressen Sie die Hülse nun wieder in den neuen MG
Biketec Adapter ein (von oben nach unten –Hülse
geht auf der obere Seite beim MG Biketec Adapter
leicht rein) /
Now press the sleeve back into the new adapter (from
the top to bottom - the sleeve goes in easily from
the top of the MG Biketec adapter)
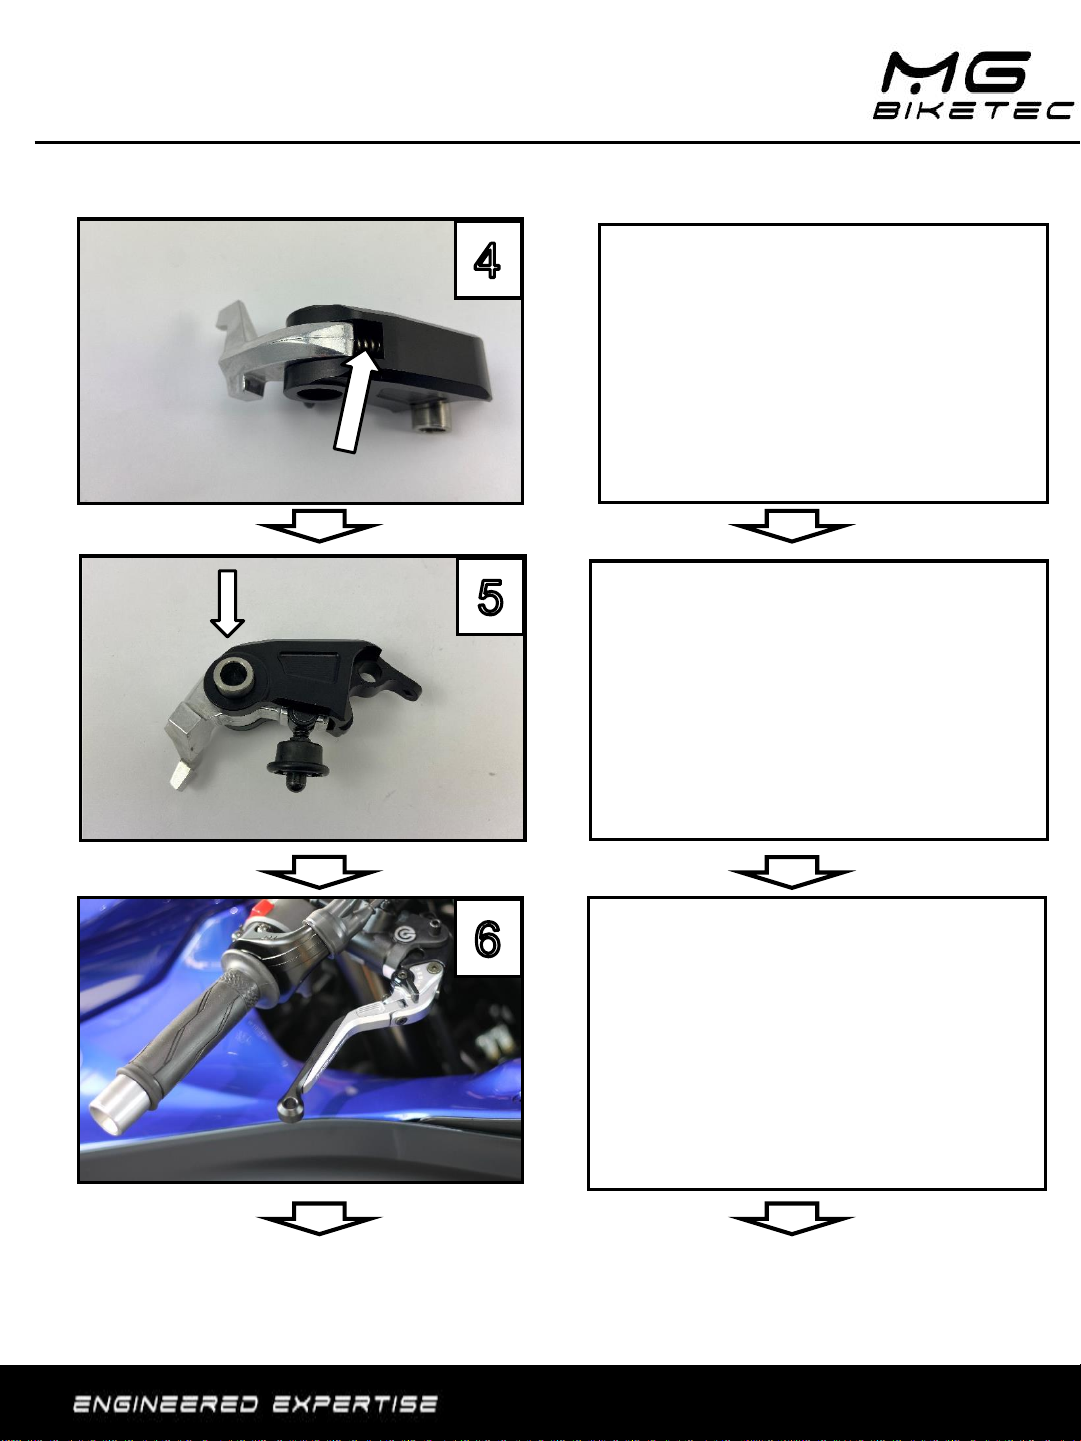
Montieren Sie den MG Biketec Hebel mit der
Originalschraube und Mutter wieder am Motorrad
(6Nm) /
Now install the MG Biketec lever on the motorcycle using
the original bolt and nut and tighten to 6Nm.
Montageanleitung Hebel / Installation tips
Adapter ADR1
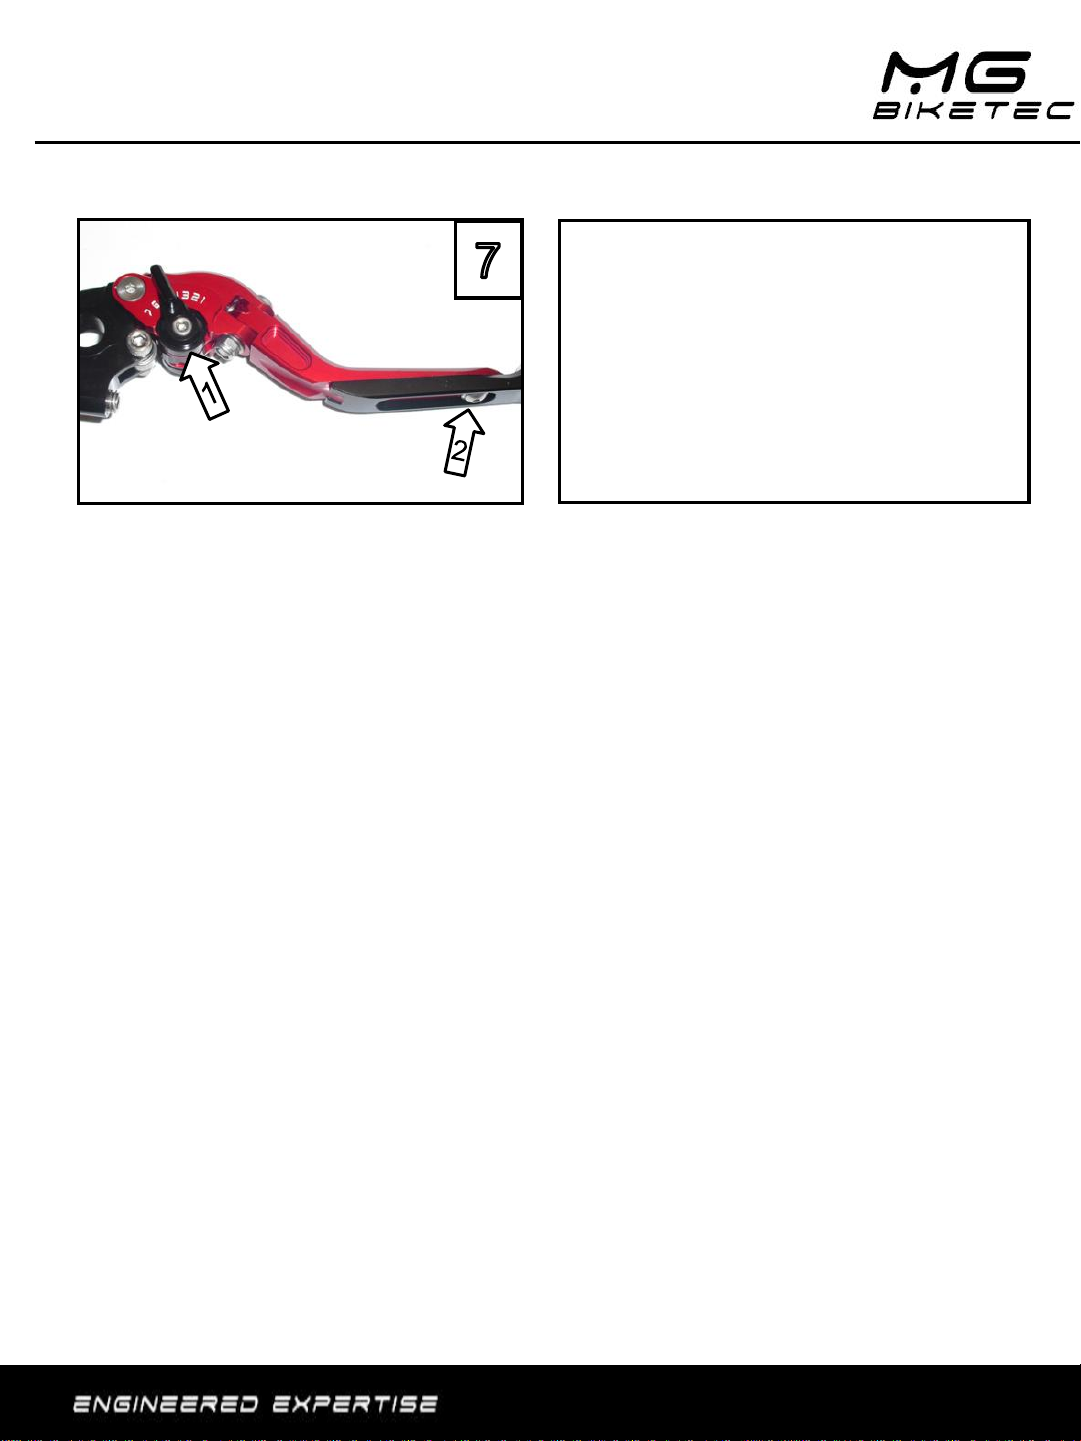
Der Hebel ist durch Drehen des Verstellhebels in 7
Positionen im Abstand einstellbar (Pfeil 1). Achtung
das Endstück des Hebels muss immer Montiert sein,
zur Befestigung verwenden Sie Schraubensicherung
(z.B. Loctite 270) und fixieren die Schraube mit einem
Drehmoment von 3 Nm. (Pfeil 2)
The lever distance can be adjusted in 7 positions by
rotating the adjustment lever (Arrow 1). ATTENTION:
the black slider of the lever must always be installed
during operation. Fasten the bolt using a bolt adhesive
such as Loctite 270 and tighten the bolt to 3Nm (Arrow
2)
Montageanleitung Hebel / Installation tips
Adapter ADR1
Other MG Biketec Motorcycle Accessories manuals


