MHC Medical Products SureLife Premium SL-BA202V User manual
Avoid smoking, eating, drinking caeinated drinks or
exercising for 30 minutes before taking measurement.
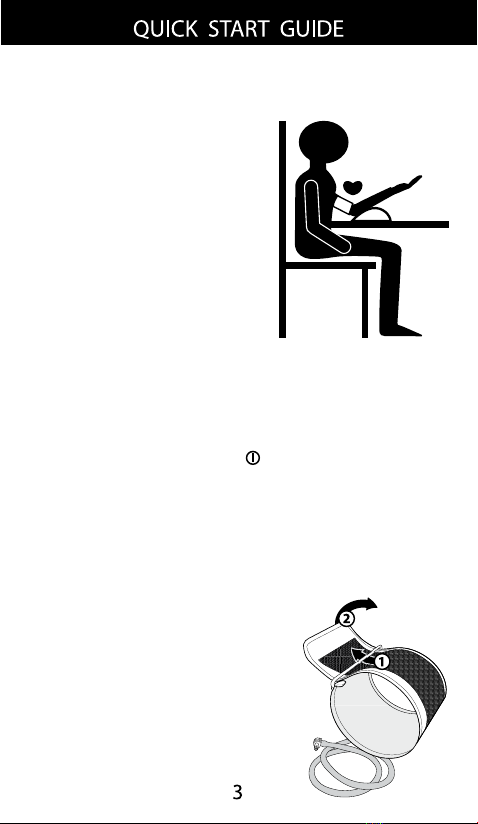
1. Sit upright in a chair at a
table with both feet at on
the oor.
2. Remove tight-tting/
thick clothing from your
upper arm.
3. Loop the end of the arm
cu through the metal bar
and wrap the cu securely
around your upper arm.
With your palm facing up, the tube should be on the
inside of your arm and running downward toward
the blood pressure unit. Make sure the cu is at the
same level as your heart.
4. Press the power button“ ”. The cu will
automatically inate and the measurement will begin.
Do not move or talk during the measurement process.
5. After the meaurement is complete, the cu will
automatically deate and your systolic and diastolic
readings and puse rate will be displayed.
Avoid smoking, eating, drinking caeinated drinks or
exercising for 30 minutes before taking measurement.
1. Sit upright in a chair at a
table with both feet at on
the oor.
2. Remove tight-tting/
thick clothing from your
upper arm.
3. Loop the end of the arm
cu through the metal bar
and wrap the cu securely
around your upper arm.
With your palm facing up, the tube should be on the
inside of your arm and running downward toward
the blood pressure unit. Make sure the cu is at the
same level as your heart.
4. Press the power button“ ”. The cu will
automatically inate and the measurement will begin.
Do not move or talk during the measurement process.
5. After the meaurement is complete, the cu will
automatically deate and your systolic and diastolic
readings and puse rate will be displayed.
Note: To loop the arm cu
correctly, rst thread the cu
through the metal bar (1).
Then pull the cu back in the
opposite direction to fasten (2).
Please note that the velcro
should face the outside of the cu.
Avoid smoking, eating, drinking caeinated drinks or
exercising for 30 minutes before taking measurement.
1. Sit upright in a chair at a
table with both feet at on
the oor.
2. Remove tight-tting/
thick clothing from your
upper arm.
3. Loop the end of the arm
cu through the metal bar
and wrap the cu securely
around your upper arm.
With your palm facing up, the tube should be on the
inside of your arm and running downward toward
the blood pressure unit. Make sure the cu is at the
same level as your heart.
4. Press the power button“ ”. The cu will
automatically inate and the measurement will begin.
Do not move or talk during the measurement process.
5. After the meaurement is complete, the cu will
automatically deate and your systolic and diastolic
readings and puse rate will be displayed.
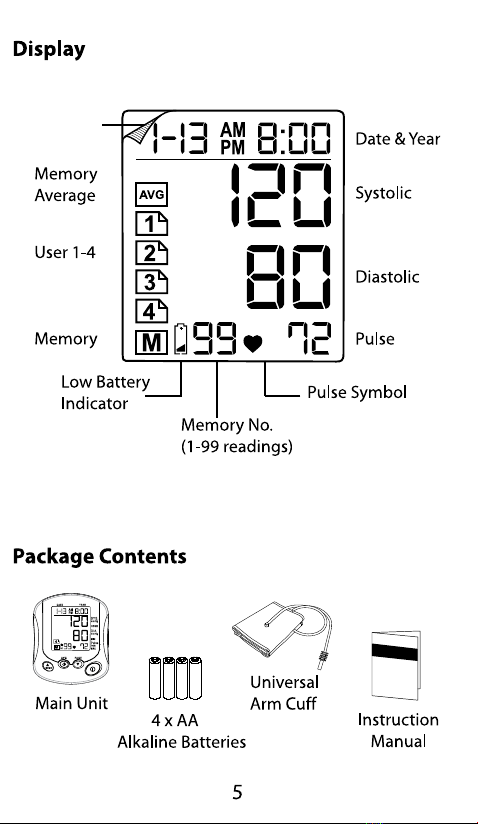
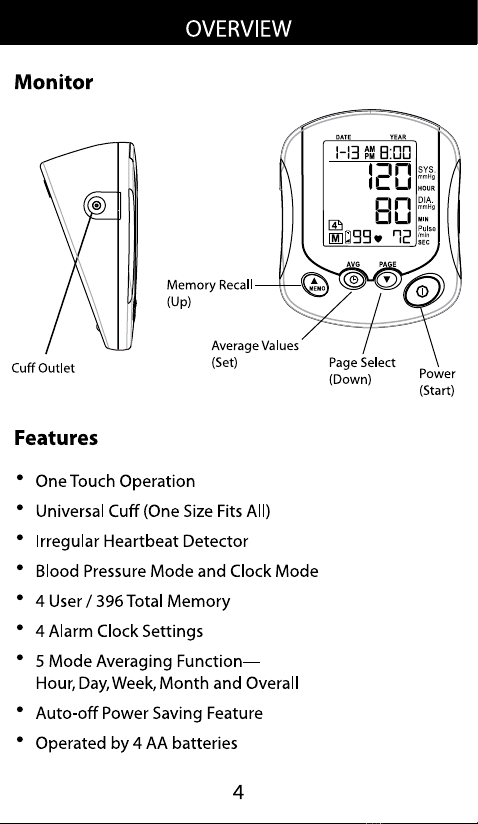
Display
Sticker
Note: Peel o and remove the display sticker before use
2.2 Date & Time Setting
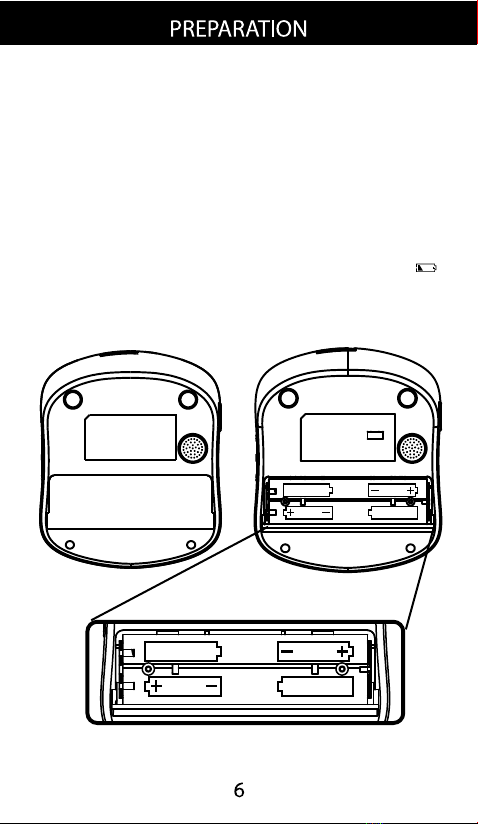
2.1 Battery Installation
1. Press down and slide the lock to remove the
battery cover.
2. Insert 4 AA batteries with the polarities in the
correct direction (shown below).
3. Replace the battery cover. Press it lightly
until the lock securely clicks into place.
Note: Replace batteries when the battery indicator “ ”
shows low voltage.
1.5V R6(LR6.AA)
1.5V R6(LR6.AA)
1.5V R6(LR6.AA)
1.5V R6(LR6.AA)
1.5V R6(LR6.AA)
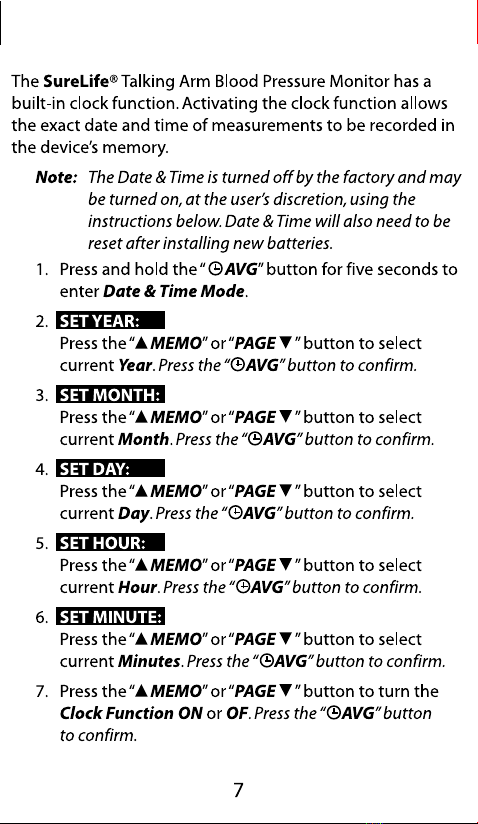
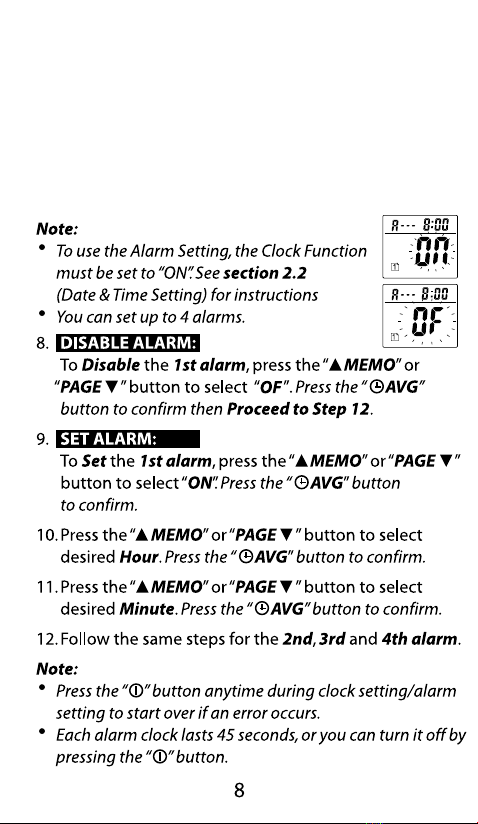
2.3 Alarm Setting
2.2 Date & Time Setting
2.3 Alarm Setting
2.4 Language/Sound Setting
Note:
•If you select Clock Function “ON”, you will continue to the
Alarm Setting section. Otherwise setting will end.
•When the clock function is enabled, the screen turn o
after 3 minutes of inactivity. To access the alarm settings,
you must rst follow steps 1–7.
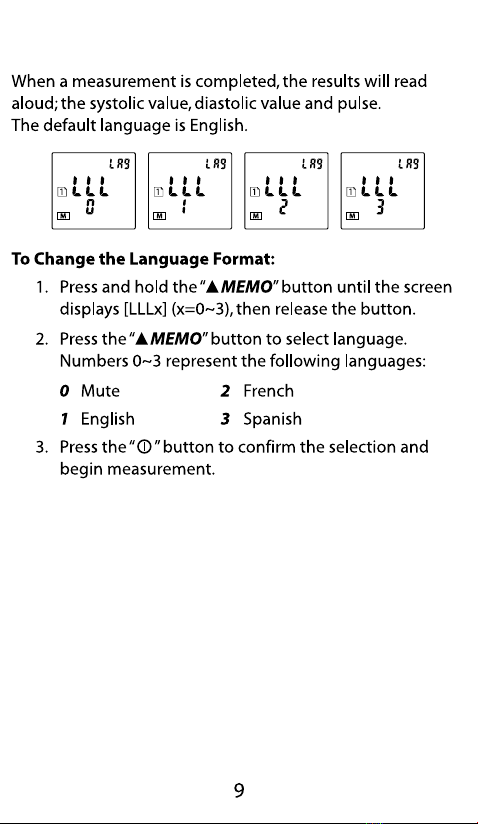
2.4 Language/Sound Setting
Note:
•Avoid smoking, eating, drinking any caeinated drinks or
exercising for 30 minutes before taking measurement.
•Do not move or talk during measurement.
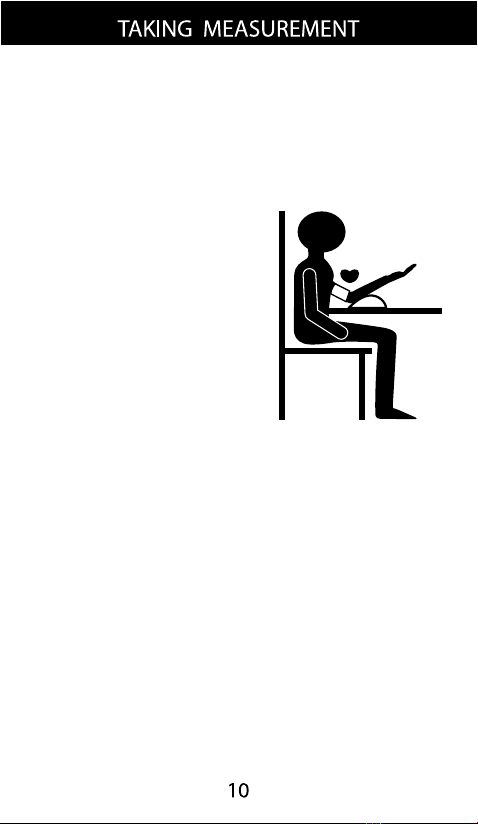
3.1 Taking Your Measurement
1. Relax
2. Sit upright in a chair at a
table with both feet at on
the oor.
3. Remove tight-tting/
thick clothing from your
upper arm.
4. Place your arm on the table
so that the cu will be at
the same level as your heart.
3.2 Applying the Arm Cu
1. Loop the end of the arm cu through the metal bar
and wrap the cu securely around your upper left arm.
Allow 1–2cm or 1/2 inch between the bottom of the
cu and your elbow joint. With your palm facing up,
the tube should be on the inside of your arm and
running downward toward the blood pressure unit.
2. Make sure the cu is at the same level as your heart.
Note:
•Avoid smoking, eating, drinking any caeinated drinks or
exercising for 30 minutes before taking measurement.
•Do not move or talk during measurement.
3.1 Taking Your Measurement
1. Relax
2. Sit upright in a chair at a
table with both feet at on
the oor.
3. Remove tight-tting/
thick clothing from your
upper arm.
4. Place your arm on the table
so that the cu will be at
the same level as your heart.
3.2 Applying the Arm Cu
1. Loop the end of the arm cu through the metal bar
and wrap the cu securely around your upper left arm.
Allow 1–2cm or 1/2 inch between the bottom of the
cu and your elbow joint. With your palm facing up,
the tube should be on the inside of your arm and
running downward toward the blood pressure unit.
2. Make sure the cu is at the same level as your heart.
3.3 User Setting
This unit allows up to 4 users to store measurement records
in dierent User Pages. Each User Page can store up to
99 measurements.
Press “PAGE ” button to switch between User Page 1, 2, 3,
and 4.
3.4 Taking Measurement
1. Press the power button“ ”. The cu will
automatically inate and the measurement will
begin. Do not move or talk during the
measurement process.
2. After the meaurement is complete, the cu will
automatically deate and your systolic and diastolic
readings and puse rate will be displayed.
3. Remove the arm cu and take note of your
measurement results.
Note: You can press the “ ” button to stop measurement
at any time.
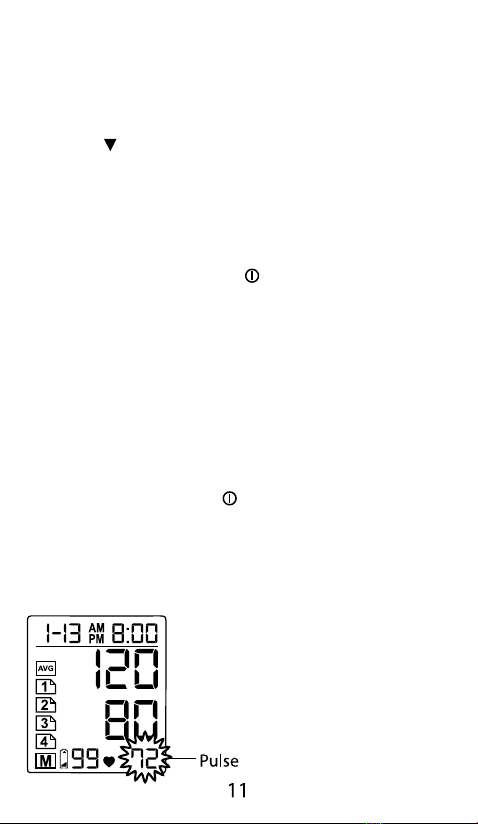
3.5 Heartbeat Readings
Besides Systolic and Diastolic
values, Pulse will also be
displayed after measurement.
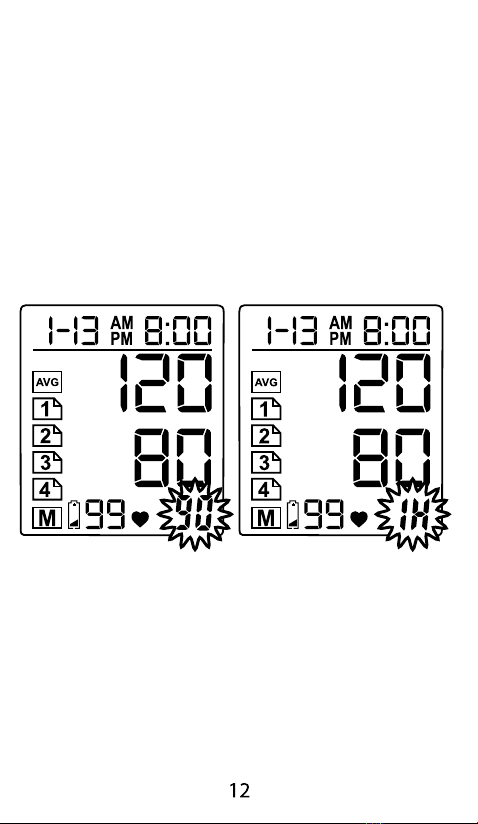
Irregular Heartbeat
This unit has a unique feature that alerts user of irregular
heartbeat detection during measurement.
Note: An irregular heartbeat is dened as a heartbeat
rhythm that has a variation of more than 25% from
the average rhythm detected during measurement.
If such irregular rhythm occurs twice or more during the
same measurement, the display screen will ash between
the pulse value and “IH” symbol. Example: (90/IH)
Note: Please consult your doctor if irregular heartbeat
occurs often.
3.3 User Setting
This unit allows up to 4 users to store measurement records
in dierent User Pages. Each User Page can store up to
99 measurements.
Press “PAGE ” button to switch between User Page 1, 2, 3,
and 4.
3.4 Taking Measurement
1. Press the power button“ ”. The cu will
automatically inate and the measurement will
begin. Do not move or talk during the
measurement process.
2. After the meaurement is complete, the cu will
automatically deate and your systolic and diastolic
readings and puse rate will be displayed.
3. Remove the arm cu and take note of your
measurement results.
Note: You can press the “ ” button to stop measurement
at any time.
3.5 Heartbeat Readings
Besides Systolic and Diastolic
values, Pulse will also be
displayed after measurement.
Irregular Heartbeat
This unit has a unique feature that alerts user of irregular
heartbeat detection during measurement.
Note: An irregular heartbeat is dened as a heartbeat
rhythm that has a variation of more than 25% from
the average rhythm detected during measurement.
If such irregular rhythm occurs twice or more during the
same measurement, the display screen will ash between
the pulse value and “IH” symbol. Example: (90/IH)
Note: Please consult your doctor if irregular heartbeat
occurs often.
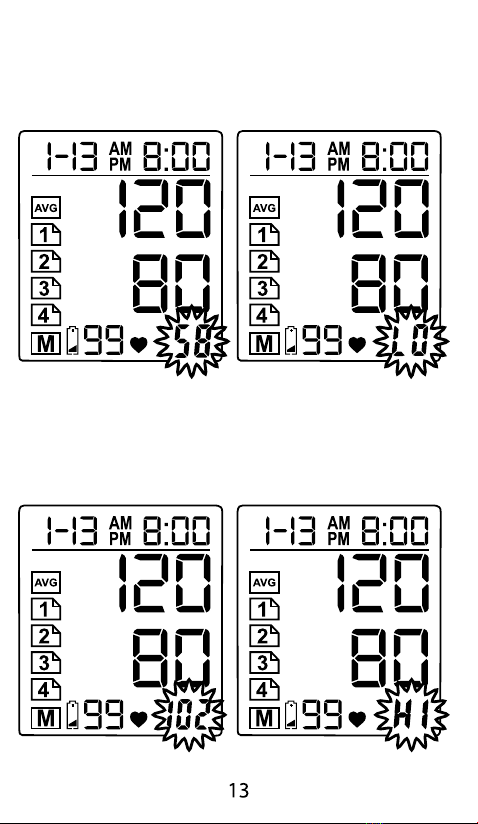
Regular but Below Normal Heartbeat
If the monitor detects a pulse rate below 60 beats per
minute during measurement, the monitor will ash between
the pulse value and “LO”symbol. Example: (58/LO)
Regular but Above Normal Heartbeat
If the monitor detects a pulse rate above 100 beats per
minute during measurement, the monitor will ash between
the pulse value and “HI” symbol. Example: (102/HI)
4.3 Delete Past Readings
1. Press the “PAGE ” button to select the User Page
you want to delete.
2. Press and hold the“ MEMO” and “PAGE ” button
simultaneously for 5 seconds. Symbol of “EE EE” will
be displayed and all past readings stored in that
User Page will be deleted.
To Delete an Individual Measurement from the Memory
1. First press the “PAGE ” button to select the user.
2. Press the “ MEMO” button to select the stored
measurement to be deleted from the memory.
Press and hold the“ AVG” button for 5 seconds
or until “dEL” appears in the display. Press the
“ MEMO” button to delete.
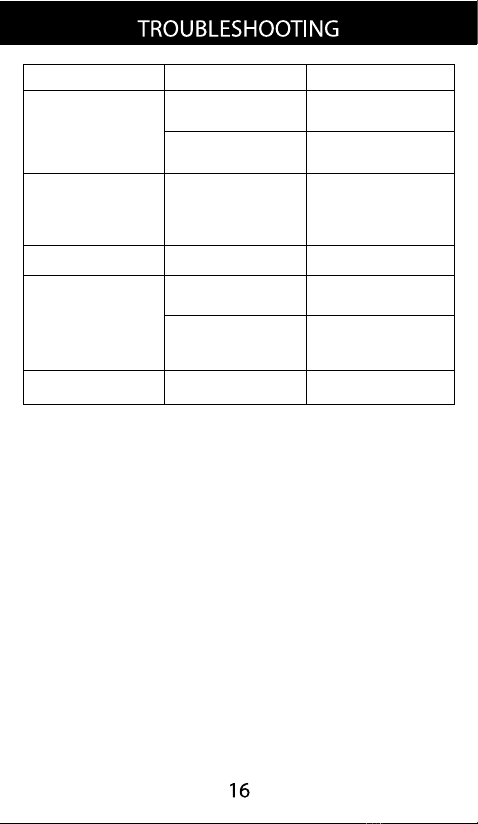
Check if the cu is
properly connected.
Replace the air tube
if it is broken.
Fail to inate“Err P” displayed
“Err 1” displayed
“Err 2” displayed
“Err 3” displayed Incorrect results Measure again.
Remove interfering
source e.g. mobile
phones, magnets.
Do not move during
measurement
Return for servicing.Deate too rapidly
Movement during
measurement
Signal interference
Problem Cause Solution
No display when
you press the
Power/Start
button
Have the batteries
run out?
Are the battery
polarities wrong?
Replace new
batteries.
Re-align batteries
in correct polarities.
Note: If your problem cannot be solved by the solutions
above, contact Customer Service at (877) 358-4342
(Mon–Fri, 9am–5pm, EST) . Do not disassemble
the unit.

•Keep the unit awa from direct sunlight, extreme
temperatures, humidity or moisture.
•Use a dry, soft cloth to clean the unit or, if desired, use a
cloth lightly dampened with water.
•Do not use alcohol, benzene, thinner or other volatile
liquids to clean the unit.
•Do not wash or expose the arm cu to liquid.
•Remove batteries from the unit when it will not be used
for more than 3 months.
•Disconnect the hose from the blood pressure monitor
prior to storage.
•Avoid bending the hose or from wrapping the hose
around the blood pressure cu.
A Full 5-Year Warranty on Your Monitor
The SureLife® Talking Arm Blood Pressure Monitor,
excluding the arm cu, is warranted to be free from
defects in materials and workmanship within 5 years
from the date of purchase.
A Full 1-Year Warranty on Your Arm Cu
The arm cu is warranted to be free from defects and
workmanship within 1 year from the date of purchase.
Both the monitor and arm cu must be used in accordance
with the instructions provided with the monitor.
Keep Your Proof of Purchase (Store Invoice)
The above warranty is extended to only the original
retail purchaser. Proof of Purchase required.
We will, at our discretion, repair or replace without charge
any monitor or arm cu covered by the above warranties.
To obtain warranty service, please contact MHC Medical
Products at (877) 358-4342.
ALL IMPLIED WARRANTIES, INCLUDING BUT NOT LIMITED
TO THE IMPLIED WARRANTIES OF MERCHANTABILITY
AND FITNESS FOR PARTICULAR PURPOSE, ARE LIMITED
TO THE DURATION OF THE APPLICABLE WRITTEN
WARRANTY ABOVE.

AD-091621.4
Manufactured in accordance with
FDA and International Standards
MHC Medical Products, LLC
8695 Seward Road
Faireld, Ohio 45011
www.MHCmed.com
Made in China. Distributed by MHC Medical Products, LLC.
Package design © 2010
SureLife® is a trademark of MHC Medical Products, LLC.
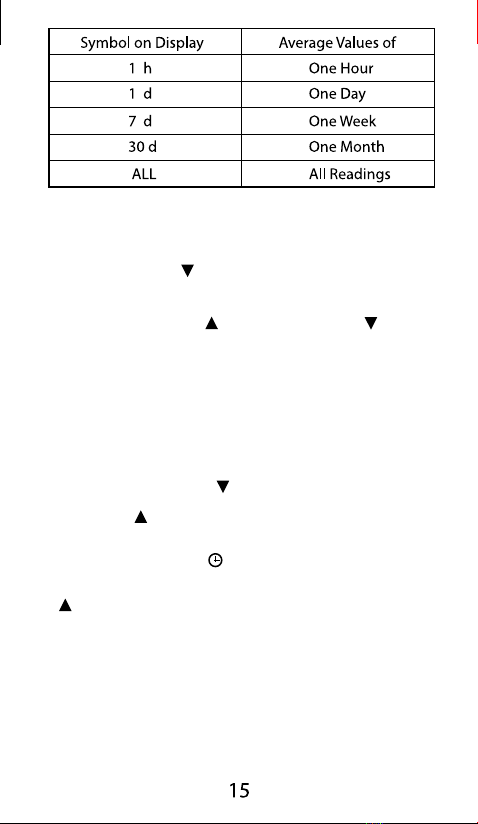
Table of contents
Other MHC Medical Products Blood Pressure Monitor manuals


