MHS Boilers DECORAL ELECTRIC WIFI User manual

INSTALLATION, USE AND MAINTENANCE MANUAL
DECORAL ELECTRIC WIFI
ALUMINIUM FLUID FILLED ELECTRIC RADIATOR

EN - 23
DEAR CUSTOMER,
WE THANK YOU FOR YOUR CONFIDENCE. BEFORE INSTALLING AND/OR USING THE PRODUCT, PLEASE
READCAREFULLYTHISMANUAL CONCERNINGTHECORRECTINSTALLATION,USEANDMAINTENANCEOF
THE APPLIANCE.
WE REMINDYOU AS WELLTHATTHIS MANUAL MUST ACCOMPANYTHE RADIATOR IN CASE OF TRANSFER
TO ANOTHER PLACE OF INSTALLATION.
THE PACKAGE INCLUDES:
ALUMINUM RADIATOR EQUIPPED WITH PROVIDED WITH ELECTRONIC THERMOSTAT,FASTENING KIT COMPOSED OF
TWOBRACKETS ANDRELEVANT PLASTIC PARTS,SCREWS ANDWALL BLOCKS, INSTRUCTION MANUAL.
TABLE OF CONTENTS
SUMMARY
1. WARNINGS ..................................................................................................................................................................24
2. ELECTRICAL CONNECTIONS.........................................................................................................................................25
2.1 DETAILS ON INSTALLATION INTHE BATHROOM.......................................................................................................25
3. INSTALLATION OFTHE APPLIANCE .............................................................................................................................26
3.1 RADIATORWALL MOUNTING....................................................................................................................................26
4. ADJUSTMENT AND PROGRAMMING .........................................................................................................................29
4.1 CONTROL PANEL........................................................................................................................................................29
4.2 FIRST START ..............................................................................................................................................................29
4.3 DESCRIPTION OF OPERATING MODES ......................................................................................................................30
4.3.1 SIMPLE MANUALMODE............................................................................................................................................30
4.3.2 PROGRAM MODE..........................................................................................................................................................30
4.3.3 TEMPORARY MODE ......................................................................................................................................................31
4.4 TEMPERATURE SETTING ...........................................................................................................................................31
4.4.1TEMPERATURE SETTING IN SIMPLE MANUALMODE...............................................................................................31
4.4.2TEMPERATURE SETTING IN PROGRAM MODE.............................................................................................................31
4.5 PROGRAMMING.........................................................................................................................................................32
4. 5.1 CHANGING THE TIME SLOTS .......................................................................................................................................32
4.5.2 RETURNING TO FACTORY PROGRAMMING..................................................................................................................33
4.6 PARAMETERS .........................................................................................................................................................33
4.6.1DETAILS OF SOME FUNCTIONS ....................................................................................................................................34
4.7 TIMER .........................................................................................................................................................................34
4.8 INFORMATION ...........................................................................................................................................................34
4.9 KEY LOCK ............................................................................................................................................................35
4.10 RADIATOR STANDBY .............................................................................................................................................35
4.11WIFI CONNECTION .......................................................................................................................................................35
4.11.1 RADIATOR REGISTRATION AND PAIRING .................................................................................................................36
5. RADIATOR CLEANING...................................................................................................................................................39
6. FAILURES .....................................................................................................................................................................39
7. WARRANTY .................................................................................................................................................................41
8. ENVIRONMENT ............................................................................................................................................................41
9. CHARACTERISTICS OFTHE APPLIANCE.......................................................................................................................42
10. INFORMATION REQUIREMENTS FORTHE REGULATION EU2015/1188 OF 28 APRIL 2015....................................43
11. DECLARATION OF CONFORMITY..................................................................................................................................44

EN - 24
1. WARNINGS
The symbol shown here appears on a label on the radiator, whose meaning is: to avoid the overheating of the
appliance, DO NOT COVERTHE RADIATOR with clothes or other objects.
The radiator shall in no case:
- be covered in part or in full
- be in direct contact or too close to curtains, furniture, etc.
IThe radiator shall in no case be installed:
- in a niche
- at less than 10 cm from room corners
- under a socket-outlet
- in front of a socket-outlet
- above a shelf
The radiator must be fixed to a wall through the supporting brackets provided with
the product.
Interventions on the appliance must be carried out by a qualified professional.
Reparations that require to open the fluid tank must be carried out by the
manufacturer, its agents or the customer service.
WARNING: some components of this product may become very hot and burn.
Pay particular attention in the presence of children or disabled people.
Children under the age of 3 must be kept away from the appliance unless they are supervised.
Children aged between 3 and 8 can only turn the radiator on or off, provided that it is positioned properly
and that children have been taught the safe use of the appliance and have understood the possible
correlated risks.
Children aged between 3 and 8 cannot connect the appliance to the power outlet,
cannot adjust or clean the appliance and cannot carry out any kind of maintenance.
The appliance can be used by children aged no less than 8 and by persons with reduced physical,
sensory or mental capabilities, or who do not have proper experience and knowledge, provided that they are supervised, or
they have been instructed on safe use of the appliance and
have understood the inherent risks.
Do not allow children to play with the appliance.
Cleaning and maintenance intended to be carried out by the user shall not be performed by unattended
children.
This appliance is filled with a precise quantity of oil.
Any reparations requiring the opening of the oil tank must be carried out only by the manufacturer or its technicians, that
should be contacted in case of oil leaks; when the appliance is scrapped, it is necessary to comply with regulations concerning
the disposal of oil.
EN - 25
2. ELECTRICAL CONNECTIONS
IMPORTANT
Duringinstallation, maintenanceandcleaning, the appliancemust not bepowered.
The appliance must be powered only with 230Vac voltage.
The radiator is supplied with a power cable with 3 wires as per table below:
Brown Phase
Blue or Grey Neutral
Black Pilot wire
The power cable must be absolutely connected to power supply through a junction box positioned at 25 cm from the floor and
without using any power plug.
WARNING
The PilotWire is intended for radiators sold in France.
If the black“pilot wire”is not used, safety standards impose to insulate it and not to connect it for any reason to the
ground wire.
It is compulsory to install a multipolar switching device. The minimum separation distance between contacts shall
be at least 3 mm.
It is compulsory that the power supply circuit of the appliance is protected by a high sensitivity differential protection device.
Donot introduceand donot trytopenetrate withmetal objectsintothe sideoftheradiator containing theadjustmentelectrical
system (right side). If the power cable is damaged, it must be replaced only by a qualified electrician.
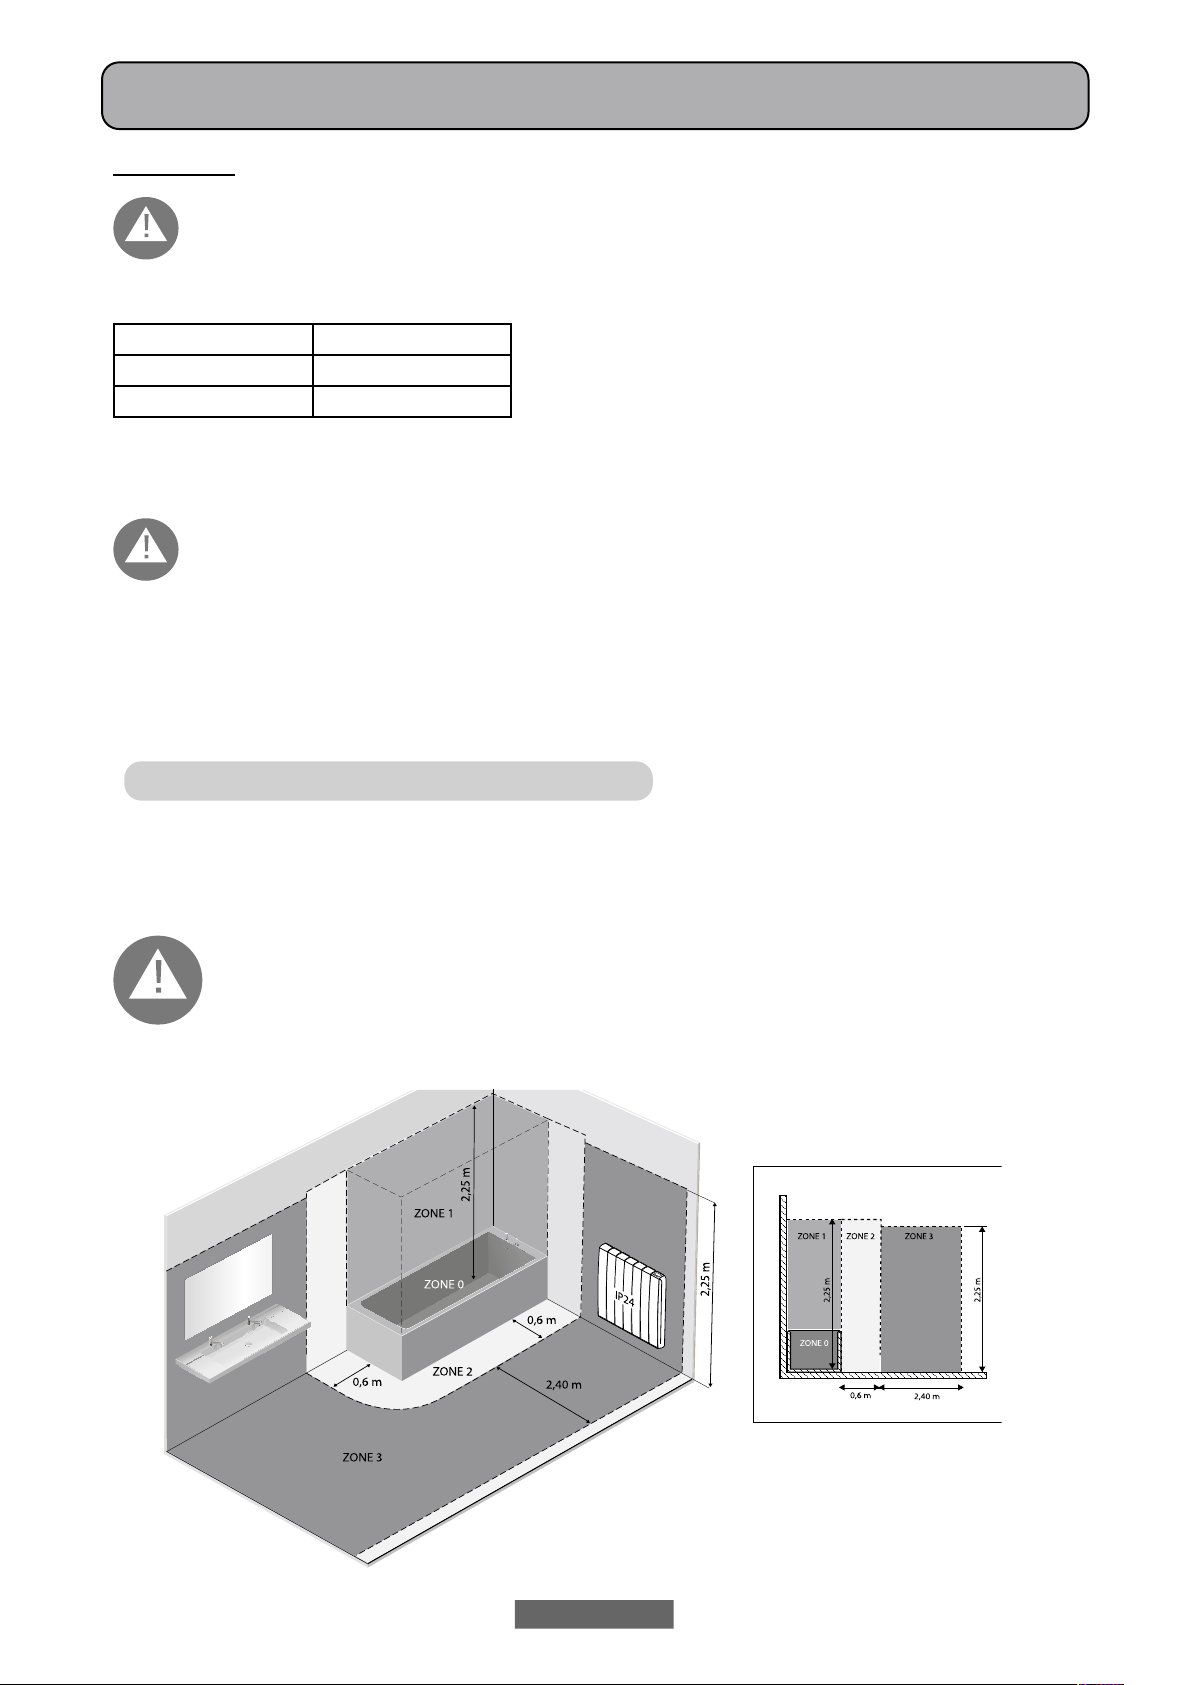
2.1 DETAILS ON INSTALLATION IN THE BATHROOM
Installation must be compliant with the standards and laws in force in the country of installation.
The radiator isinclass II andwith IP24electricalprotection.In thebathroom, it can be installed inareas 2and3 (seefigure) only
if the control device cannot be touched by people that are using the shower or the bath.
In the bathroom, protect the power line with a high sensitivity 30 mA differential protection device
Install a multipolar switching device. The minimum separation distance between contacts shall be at least 3 mm.
figura n°1

EN - 26
3. INSTALLATION OF THE APPLIANCE
To achievethe bestresultsintermsofheatoutputand comfortofyourappliance,werecommend to
installthe radiator, ifpossible, under a windowor near areaswith high heatloss of the roomto heat.
The radiator must not be installed in a niche or under a power outlet.
Curtains,furnitureorotherobjectsthatmay obstructthecorrect heat distributionmust beplaced at
a minimum distance of 50 cm from the front of the radiator.
Respect a distance of at least 10 cm from the lower edge of the radiator and the floor.
Respect a distance of at least 30 cm from the top edge of the radiator and the shelf above it.
30 cm
3.1 RADIATOR WALL MOUNTING
The radiator must be fastened to a wall through the suitable mounting brackets provided with the product.The fastening
system is composed of:
Follow the steps illustrated below:
1. Screw the crossbeam bto the two brackets a
using screws c .
2. Choose the radiator position, refer to the warnings of paragraphs 1, 2 and 2.1. Depending on the position chosen,
place the bracket aon the floor
Number of sections/power
4 / 750W 5 / 1000W 7 / 1250W 9 / 1500W 11 / 1800W
Distance R (mm) 160 240 240 560 640
dupper
supports
x 2
bcrossbeam
x 1
elower blocks
x 2
abrackets
x 2
cscrews + nut
x 2
Ø M4x8 mm
fscrews and dowels
x 4
a
a
c
x 2
b
a

EN - 27
3. Using a pencil, mark the position of holes T1 and T2:
4. Markedpoints T1 and T2 correspond to the position of the holes for the lower screws. Place the bracket so that the
lower slots of the bracket match the marks T1 and T2 :
5. Using a spirit level, check that the bracket is straight and mark the position of the two upper holes U1 and U2 .
6. Depending on the type of wall, select suitable screws and dowels, the screws and dowels supplied may not be
suitable for the type of wall of your home. Drill as indicated by the holes marked and then insert the blocks in the wall.
a
a
a
U1 U2
U2
B
B
C
C
EN - 28
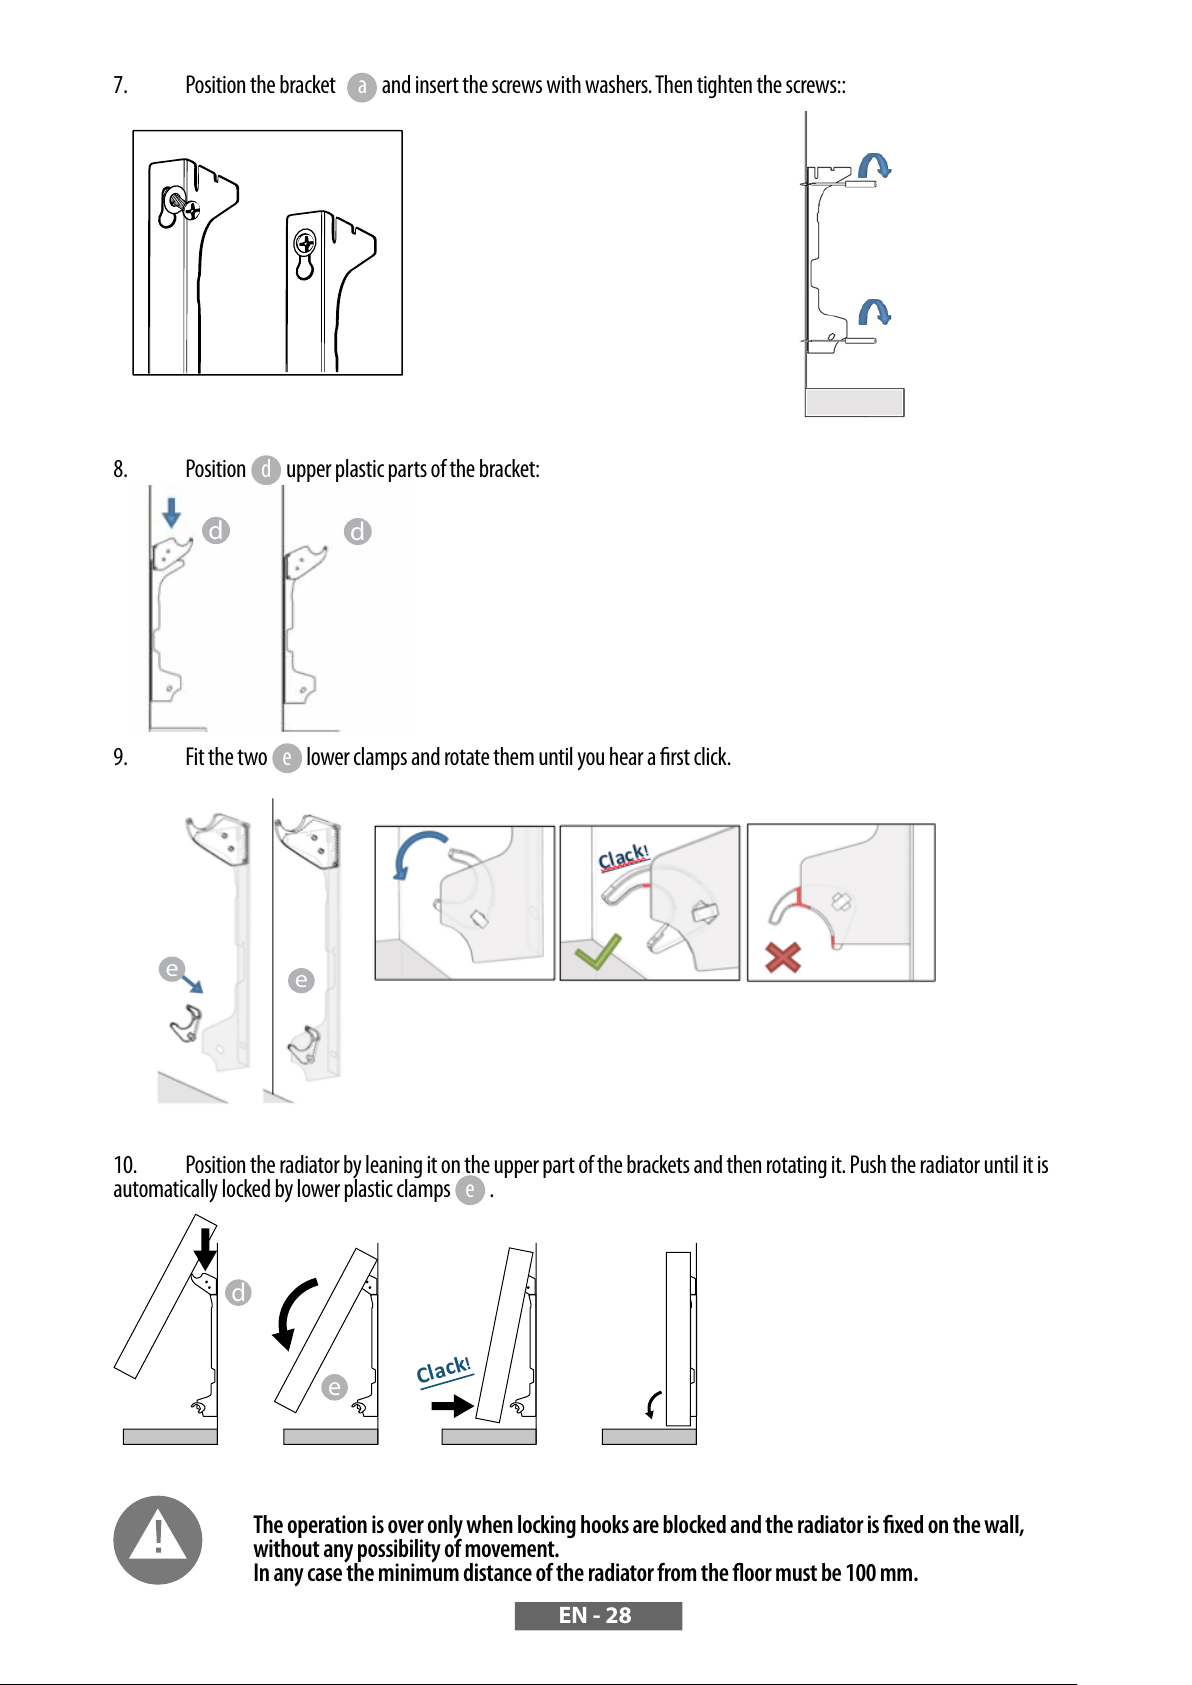
7. Position the bracket aand insert the screws with washers.Then tighten the screws::
8. Position dupper plastic parts of the bracket:
9. Fit the two elower clamps and rotate them until you hear a first click.
10. Position the radiator by leaning it on the upper part of the brackets and then rotating it. Push the radiator until it is
automatically locked by lower plastic clamps e.
Theoperationisoveronly whenlockinghooks areblockedand the radiator is fixed onthewall,
without any possibility of movement.
In any case the minimum distance of the radiator from the floor must be 100 mm.
d
d
ee
Clack!
d
e

EN - 29
11. If necessary, remove the radiator and operate on the lower plastic clamps by moving them horizontally and then
rotating them:
4. ADJUSTMENT AND PROGRAMMING
4.1 CONTROL PANEL
The appliance has an ON/OFF switch on the rear of the right plastic side (1).
To power the radiator, position the switch to I.
To switch offthe radiator, position the switch to 0.
Whentheradiatorisswitchedonagainusingtheswitch,thenewsettingofcurrent
date and day may be required.
Use the knob (2) to select the operating mode and increase or decrease the set
values (+/-); press the knob to confirm the selection.
.
4.2 FIRST START
1
2
The manual (simple) opera-
ting mode is selected, the set
temperature is 20 °C.
Set time and date.
20.0°C
PRESS -->MENU
SIMPLE SA 10:30
00:00
1 JAN 2020
TIME AND DATE
FRANCAIS
ENGLISH
LANGUAGE
Turn the knob, move to the desired
language and select it by pressing
the knob.
EN - 30
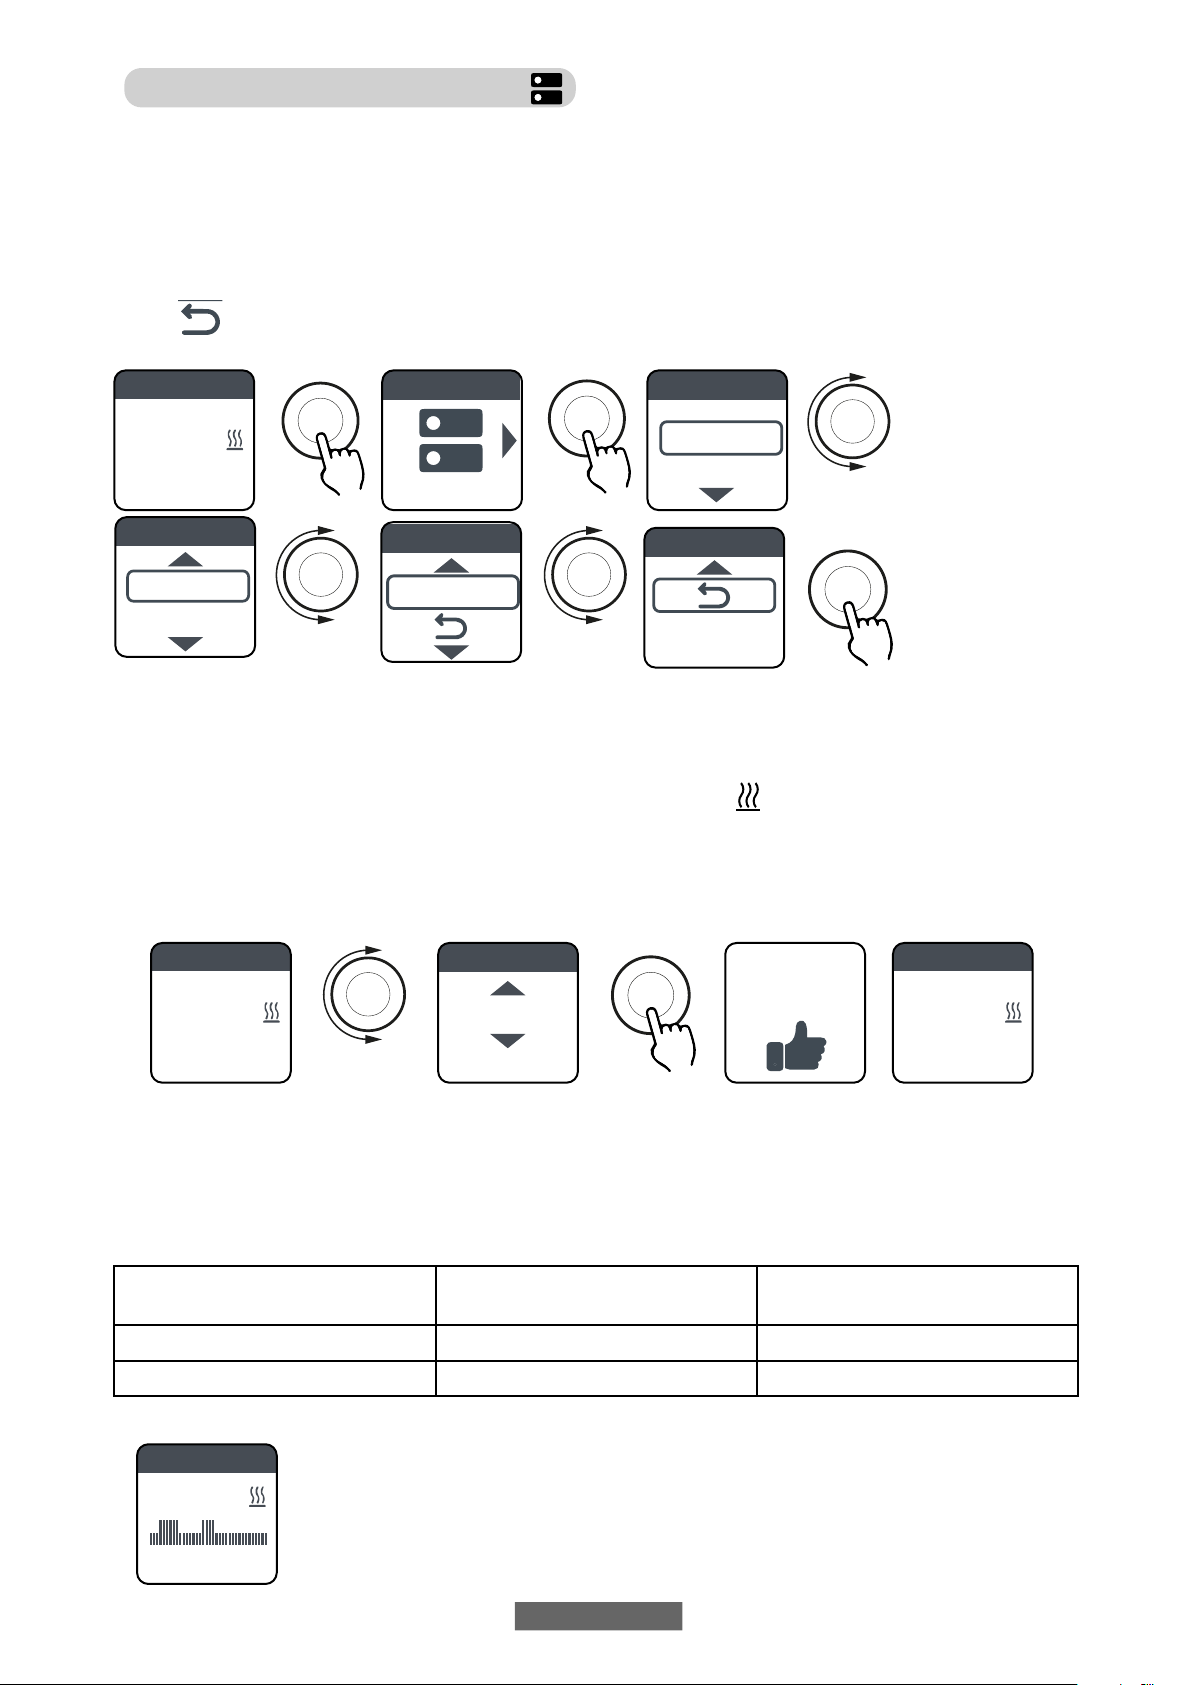
4.3 DESCRIPTION OF OPERATING MODES
Press the knob to access the MENU, press again to select MODE item and select one of the operating modes:
• SIMPLE (manual)
• PROGRAMMING
• TEMPORARY
A box on the display indicates the mode you are selecting, press the knob to confirm the selection.
Select
MODE
to return to the previous menu.
4.3.1 SIMPLE MANUALMODE
The appliance maintains the set temperature.
The display shows the set temperature and, if the radiator is in heating phase, the symbol.
This symbol is steady if the radiator is in heating phase or it flashes if the radiator operates intermittently because the room
temperature is close to the set temperature (adjustment operation).
To change the set temperature, turn the knob and confirm by pressing it.
4.3.2 PROGRAM MODE
When the appliance is in this mode, the radiator follows the program defined for each day of the week. Upon the first switching
on, the following program is preset:
First operating time slot in
Comfort mode Second operating time slot in
Comfort mode
Monday to Friday 6:30 ÷ 8:30 am 5:00 ÷ 11:00 pm
Saturday and Sunday 8:00 ÷ 11:00 pm ----
The display shows the graphic representation with the daily program and the set temperature for the
current time.
The program can be changed according to your needs and three different operating periods in Comfort
mode can be set for each day (see paragraph 4.5).
20.0°C
PRESS -->MENU
SIMPLE SA 10:30
OK
MODE
MENU
SIMPLE
PROG
MODE
PROG
TEMPORARY
MODE
TEMPORARY
MODE
MODE
OK
OK
20.0°C
PRESS -->MENU
SIMPLE SA 10:30
19.0°C
PRESS--> CONFI.
SIMPLE SA 10:30
OK
19.0°C
PRESS-->MENU
SIMPLE SA 10:30
OK
PRESS-->MENU
PROG SA 10:30
0 6 12 18 24
20.0°C
EN - 31
4.3.3 TEMPORARY MODE
The selection of this mode allows setting a temperature different from the programmed/set temperature for a limited period of
time,ranging from 30 minutesto24hours,afterwhichthe appliancereturns to operateattheprevious temperature selectedin
SIMPLE or PROGRAM mode.
When this mode is activated, the display shows the time remaining before returning to the previous mode (countdown).
The temporary operation can be changed or stopped at any time. Turn the knob to display a menu that allows cancelling or
changing the previous settings.
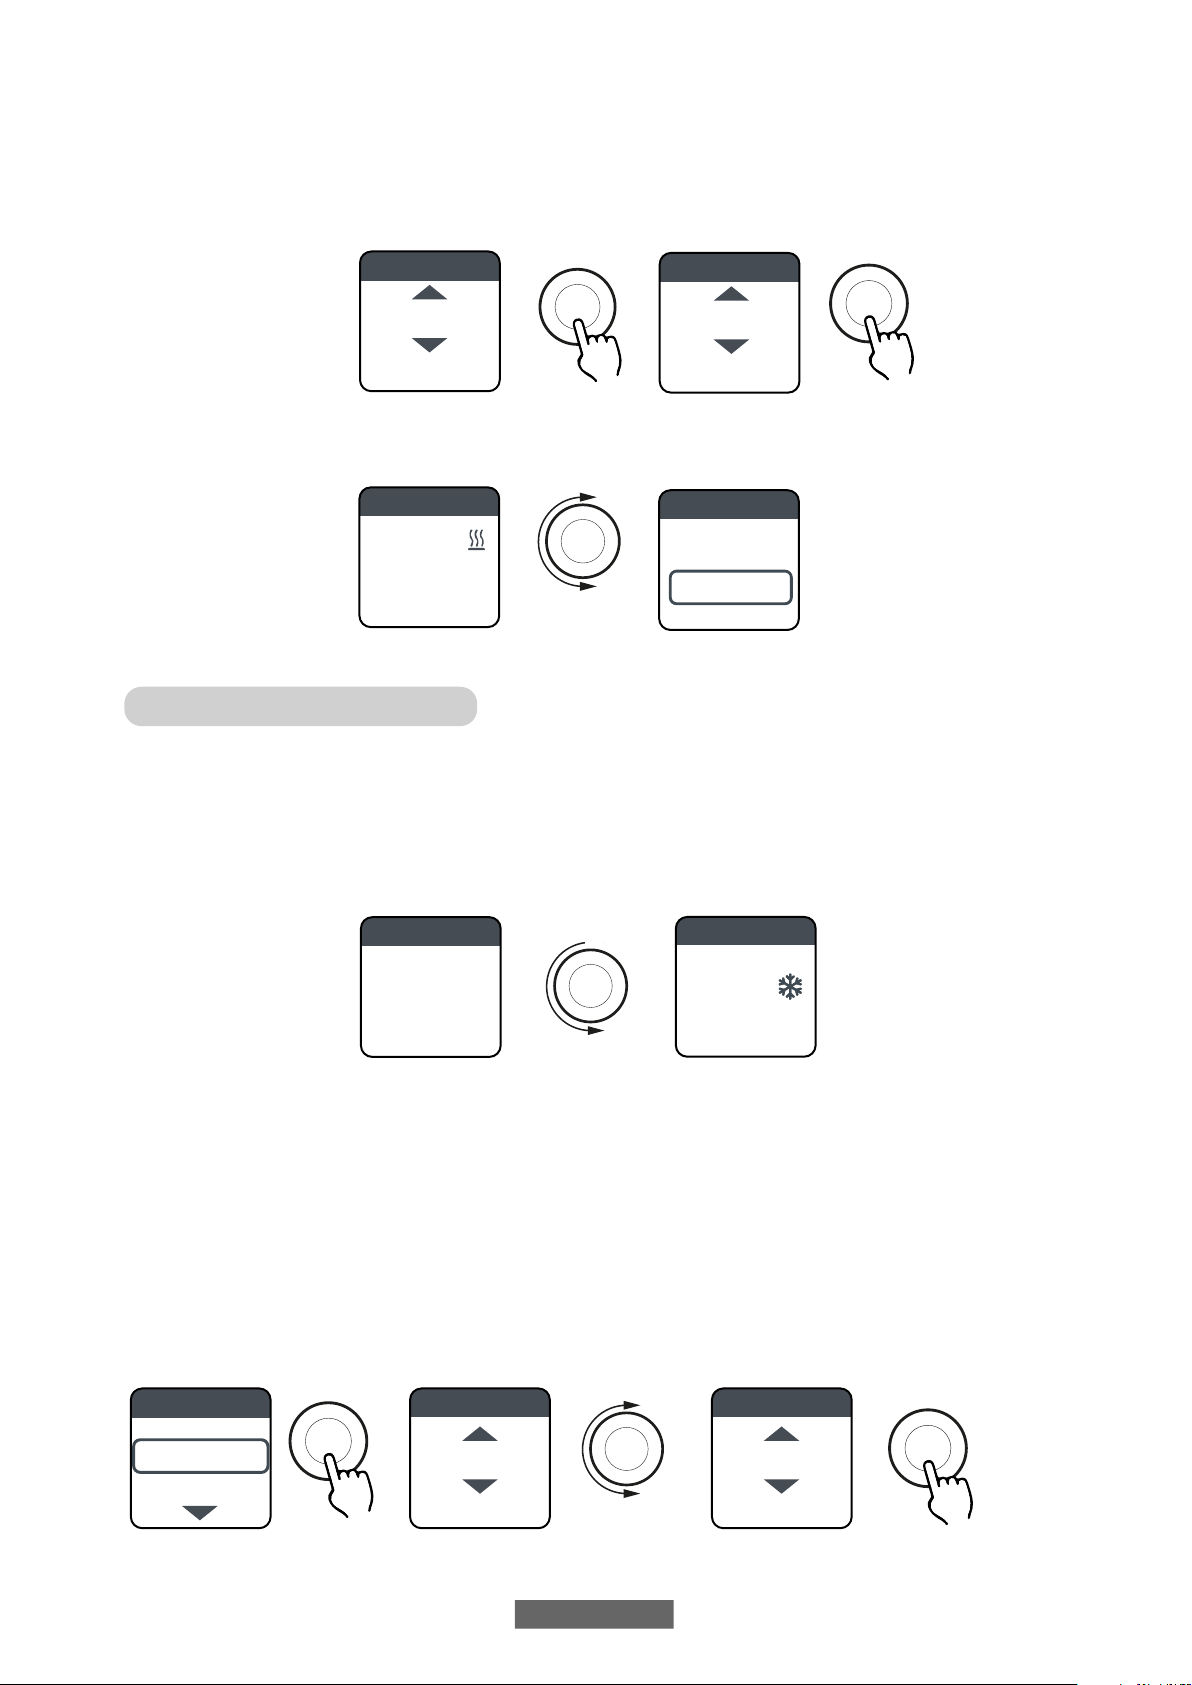
4.4 TEMPERATURE SETTING
4.4.1TEMPERATURE SETTING IN SIMPLE MANUALMODE
Turn the knob to change the set temperature, press the knob to confirm the selection.The maximum default temperature is 30
°C, but it can be changed using“MAXTEMP.”parameter of PARAMETERS/LIMITATIONS menu.
The minimum configurable temperature is 12 °C, below this value the appliance sets to the freeze protection temperature of 7 °C.
4.4.2TEMPERATURE SETTING IN PROGRAM MODE
In PROGRAM mode the set temperature depends on the set time and the program.
The factory set COMFORT mode temperature is 20 °C.
The factory set ECO (night) mode temperature is 18 °C.
To change COMFORT and ECO temperatures, access the PROGRAMMING menu, select the temperature to be changed and
change it by turning the knob and confirming the selection.
OK
TEMPERATURE
24.0°C
PRESS --> CONFI.
DURATION
1:00 H
PRESS --> CONFI.
OK
PROG SA 10:30
FOR 04:00 H
20.0°C
CHANGE
CANCEL
TEMPORARY
7.0°C
ANTI FREEZE
SIMPLE SA 10:30
12.0°C
PRESS -->MENU
SIMPLE SA 10:30
OK OK
21.0°C
CURRENT SETT.
COMFORT T°
COMFORT T°
ECO T°
PROGRAMMING
21.5°C
PRESS --> CONFI.
COMFORT T°
EN - 32
The maximum default temperature is 30 °C, but it can be changed using “MAX TEMP.” parameter of
PARAMETERS/RESTRICTIONS menu.
In PROGRAM mode, it is possible to change COMFORT and/or ECO temperatures by simply turning the
knob:thenewsettingwillbemaintaineduntilthenewautomatictemperaturechangesetinthe program
triggers.
The display shows EXCEPTION and the time at which the previously set programming is restored.
The exception operation can be changed or stopped at any time. Turn the knob to display a menu that
allows cancelling or changing the previous settings.
IfaFREEZEPROTECTIONtemperature(7°C)isset,theprogrammingisinterrupted.Toresettheprogramming,
when you return, it is necessary to set the temperature to a value other than 7 °C.
4.5 PROGRAMMING
In this menu it is possible to:
1. Set the Comfort temperature (see paragraph 4.4.2).
2. Set the ECO temperature (see paragraph 4.4.2).
3. Program each day of the week.
4. Return to factory preset programming.
In PROGRAMMING/DAY PROG, turn the knob to select the day to be programmed. Press the knob to start programming.
Eachdayoftheweekcanbeprogrammedseparately,andforeachday3operatingtimeslotscanbeconfiguredinComfortmode,
depending on your needs.
If you do not wish to use all the 3 time slots, simply do not select them.
The time slot you are selecting is shown in a box.
4. 5.1 CHANGING THE TIME SLOTS
Turntheknobtohighlightthetimeslotyouwanttochangeandselectitbypressingtheknob.
The selected time slot starts flashing.
To change the time slot, turn the knob and press it to confirm the selection.The minutes can
be selected in 30-minute intervals. The appliance will automatically position on the next
value to be set.
Attheendofprogramming,theComfortmodetimeslotscanstillbechangedbymovingback
with the knob.
Select OK to confirm programming.
When one day has been programmed, the appliance allows copying the programming just
set to other days, by simply selecting the days for which you want to copy the program and
then OK
COPY
TUE
THU
SAT
OK
MON
WED
FRI
SUN
COPY
TUE
THU
SAT
OK
MON
WED
FRI
SUN
COPY
TUE
THU
SAT
OK
MON
WED
FRI
SUN
OK OK
SATURDAY
0 6 12 18 24
DAY PROG.
DAY PROG.
MONDAY
0 6 12 18 24
MONDAY
06:30 \ 08:30
17:00 \ 22:00
--:-- \ --:--
CANCEL OK
OK
DAY PROG.
MONDAY
0 6 12 18 24
OK
MONDAY
07:00 / 08:00
17:00 / 22:00
--:-- / --:--
CANCEL OK
OK
EXEMPTION
UNTIL 17:00
PROG SA 10:30
20.0°C
CHANGE
CANCEL
PROG SA 10:30
EN - 33
4.5.2 RETURNING TO FACTORY PROGRAMMING
In PROGRAMMING select DEF. PROG. and press the knob. Select to cancel the operation.
Press RESET to confirm the return to the factory programming.
4.6 PARAMETERS
From SIMPLE / PROGRAM / TEMPORARY menus, press the knob to access the MENU and then select PARAMETERS to adjust/set
the following parameters:
1. WINDOW OPENING DETECTION (WINDOW): enabled/disabled type function. In the factory setting this function is
disabled.
2. ASC (Adaptive Start Control): enabled/disabled type function. In the factory setting this function is disabled. If this
parameter is enabled and the appliance is in PROGRAM mode, the electronics activates the radiator in advance (up to
2 hours) so as to ensure that the room reaches the set temperature at the desired time. ASC is displayed when
this parameter is enabled and has triggered, if it is enabled but has not triggered ASC is not displayed.
3. LANGUAGE: allows selecting the language.
4. PILOTWIRE: enabled/disabled type function. In the factory setting this function is disabled.
FP is displayed when this parameter is enabled and has triggered, if it is enabled but has not triggered ASC is not
displayed.The PilotWire is the black wire inside the power cable, used in France for control from remote control unit
(see paragraph 2“Electrical connections”).
5. Temperature CALIBRATION: allows calibrating the temperature probe (+/- 5 °C) if the a m b i e n t
temperature shown on the radiator display is different from the temperature
measured in the room.
The display shows the ambient temperature measured by the radiator in the position where it is
installed and the possible calibration already set.
The temperature of a room is not uniform, therefore it is possible that the temperature measured
by the radiator is different from that of another position in the room.The calibration function allows
compensating this difference.
Before using this function, the radiator must operate for at least 6 hours to stabilise the ambient temperature.
Example 1 :
If the temperature set on the radiator is 20 °C but the temperature measured in the room is 22 °C, set the calibration to 2 °C.
Example 2 :
If the temperature set on the radiator is 20 °C but the temperature measured in the room is 18 °C, set the calibration to -2 °C.
DEF. PROG.
PROGRAMMING
RESET
DEF. PROG.
DEF. PROG.
RESET
OK OK
0.0 °C
T. ROOM: 20.2°C
TEMP OFFSET
2.0 °C
T.ROOM: 22.2°C
TEMP OFFSET
OK
0.0 °C
T. ROOM: 20.2°C
TEMP OFFSET
-2.0 °C
T.ROOM: 18.2°C
TEMP OFFSET
OK
2.0 °C
T.ROOM: 22.2°C
TEMP OFFSET
EN - 34
6. FACTORY SETTINGS: allows returning to the factory parameter setting. Select VALIDATE and press and hold the knob for
approx. 5 seconds to reconfigure the factory settings.
7. RESTRICTIONS:Select this option in the PARAMETERS menu to:
- Set the maximum permitted temperature: the maximum temperature can be adjusted from 22 to 30 °C, 30 °C is the
factory setting
- Lock the use of PARAMETERS or the use of both PARAMETERS and PROGRAMMING (PAR & PR). No menu is locked in the
factory settings.
To lock the use of parameters or programming, it is necessary to enter a PIN code.
The PIN code is: 139.
ThePINcannotbechanged.
When the limitations have been activated, the PIN is required to access the locked menus.
In the RESTRICTIONS/MENU LOCK menu, the locked function is marked with a dot.
To remove the lock, enter the RESTRICTIONS/MENU LOCK menu and select NONE.
4.6.1 DETAILS OF SOME FUNCTIONS
WINDOW OPENING DETECTION FUNCTION
Theradiatorisabletoidentifywhetherawindowhasbeenopenedthroughdetectionofaquickambienttemperaturereduction
(5°Catleast ina maximumof30minutes).Ifthishappens, theradiatorswitchesofffor30minutesandthenitrestartsworking
inthepreviouslysetmodeifitdetectsa subsequentincreaseintemperatureofatleastonedegreecentigrade(the window has
been closed), otherwise it remains offfor an additional 30 minutes.
When the function is activated and the window opening is detected, the displayed symbol of the window flashes.
PILOT WIRE MODE FOR FRANCE ONLY
In this mode the radiator is controlled by a remote-control unit.
To use this function, the corresponding parameter must be enabled in the proper menu.
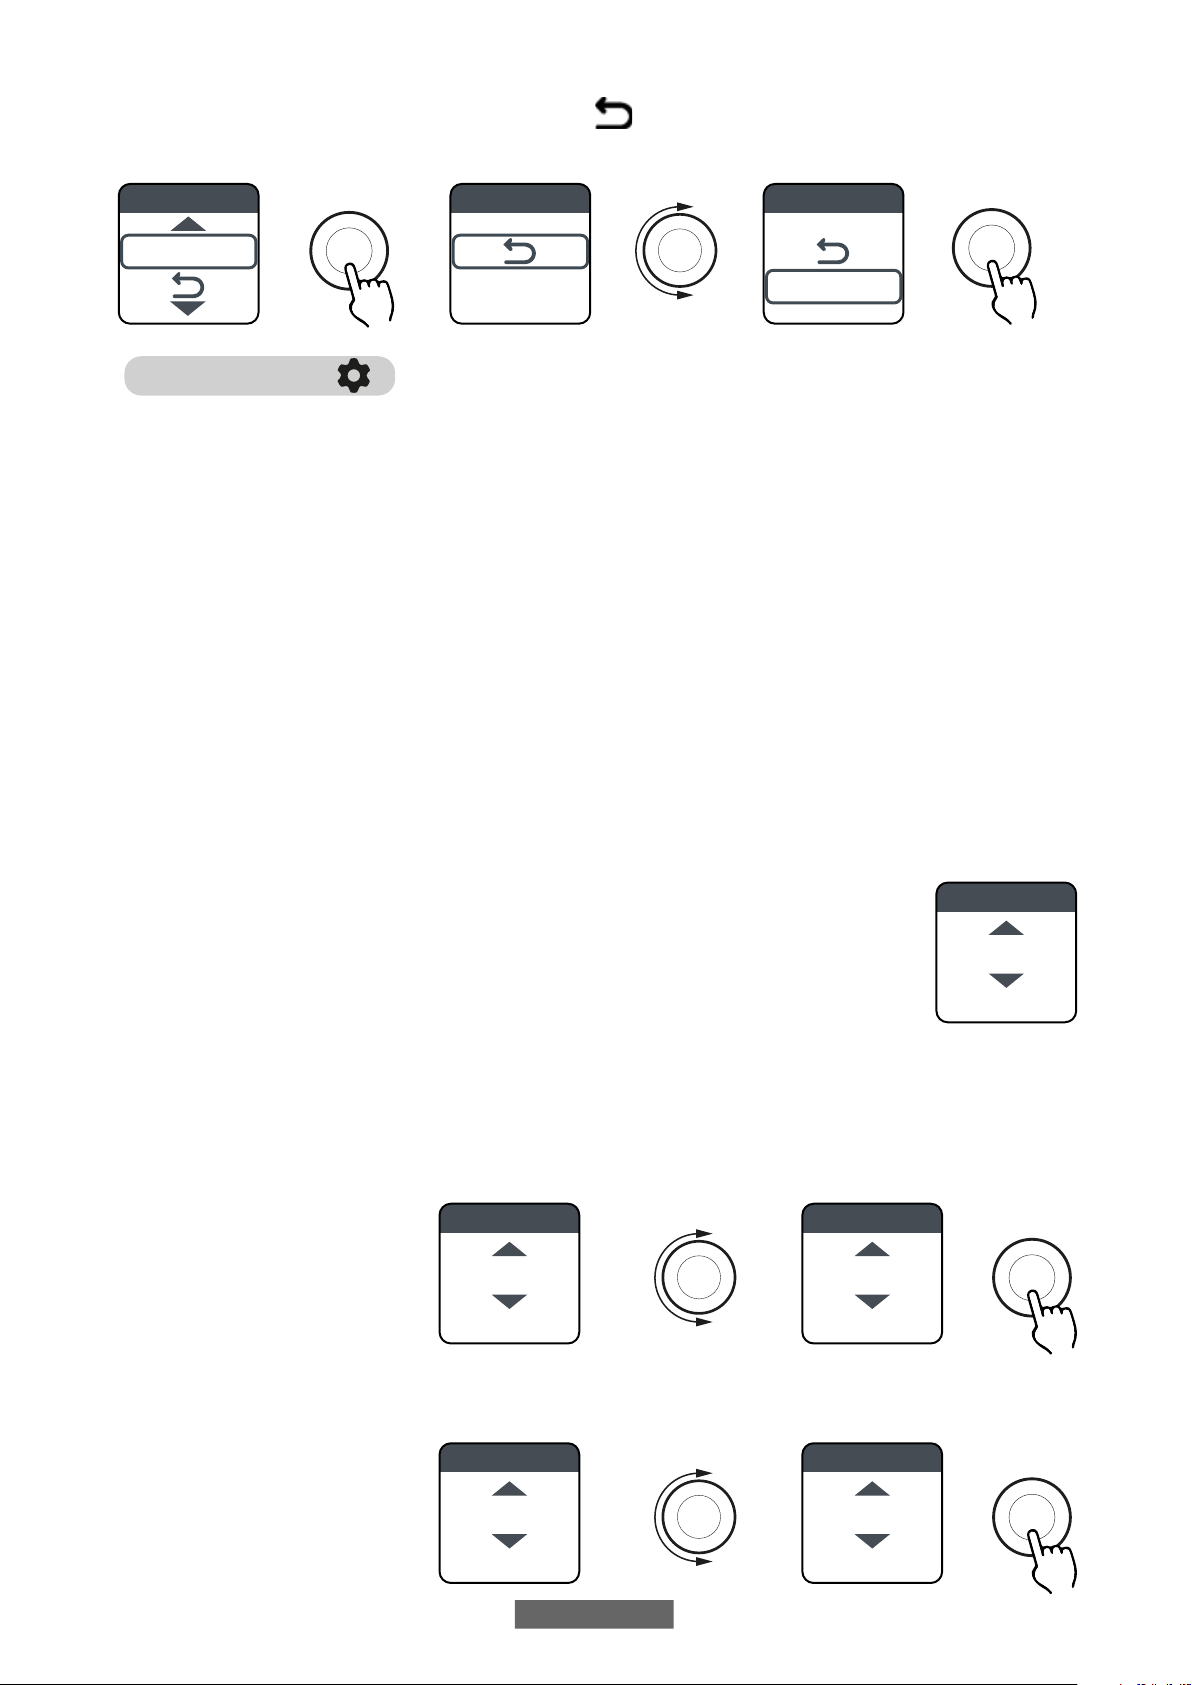
4.7 TIMER
From SIMPLE / PROGRAM menus, press the knob to access the MENU and then selectTIMER to adjust/set:
• The automatic switching to summer/winter time, of enabled/disabled type.The factory setting is: enabled.
• Adjusting time and date
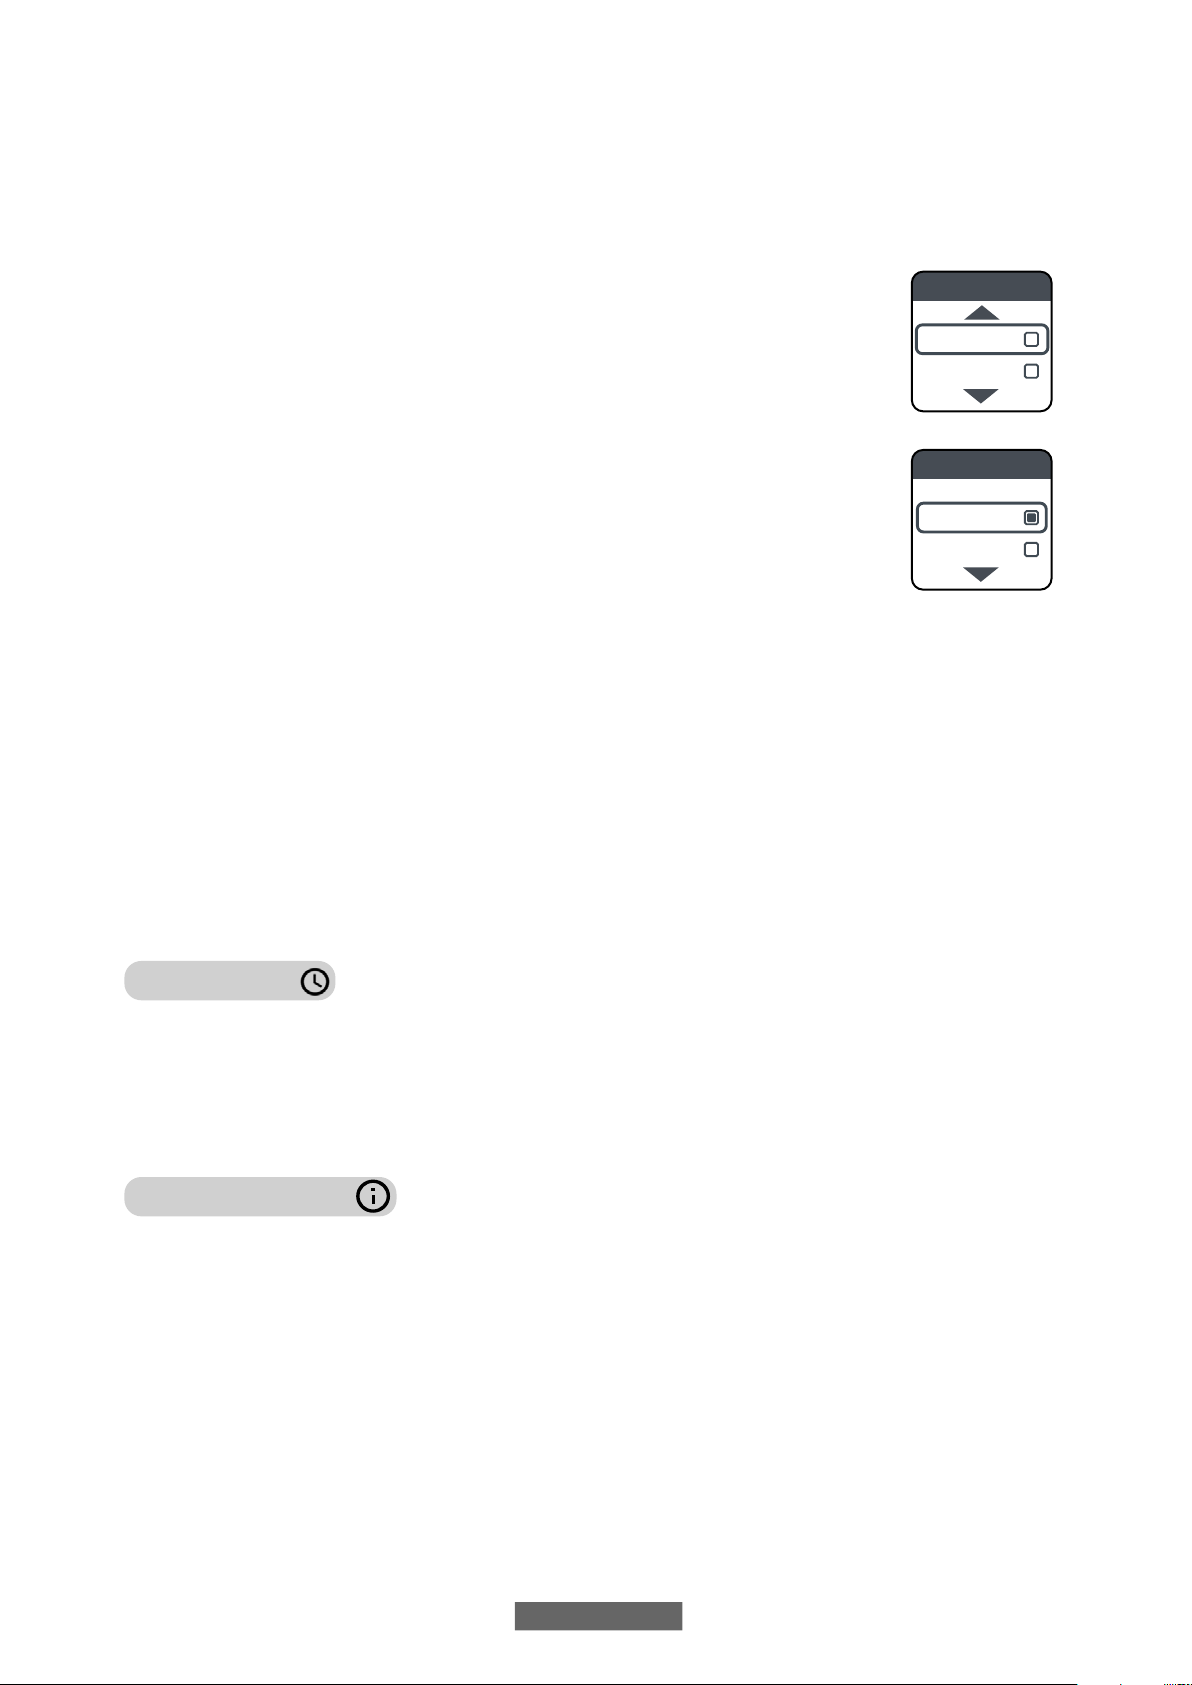
4.8 INFORMATION
FromSIMPLE/PROGRAMmenus,presstheknobtoaccesstheMENUandthenselectINFOtoaccessthefollowinginformation:
• AmbientT.: is the ambient temperature measured by the probe on board the radiator (See also par. 4.6, point 5).
• Radiator model
• Software version
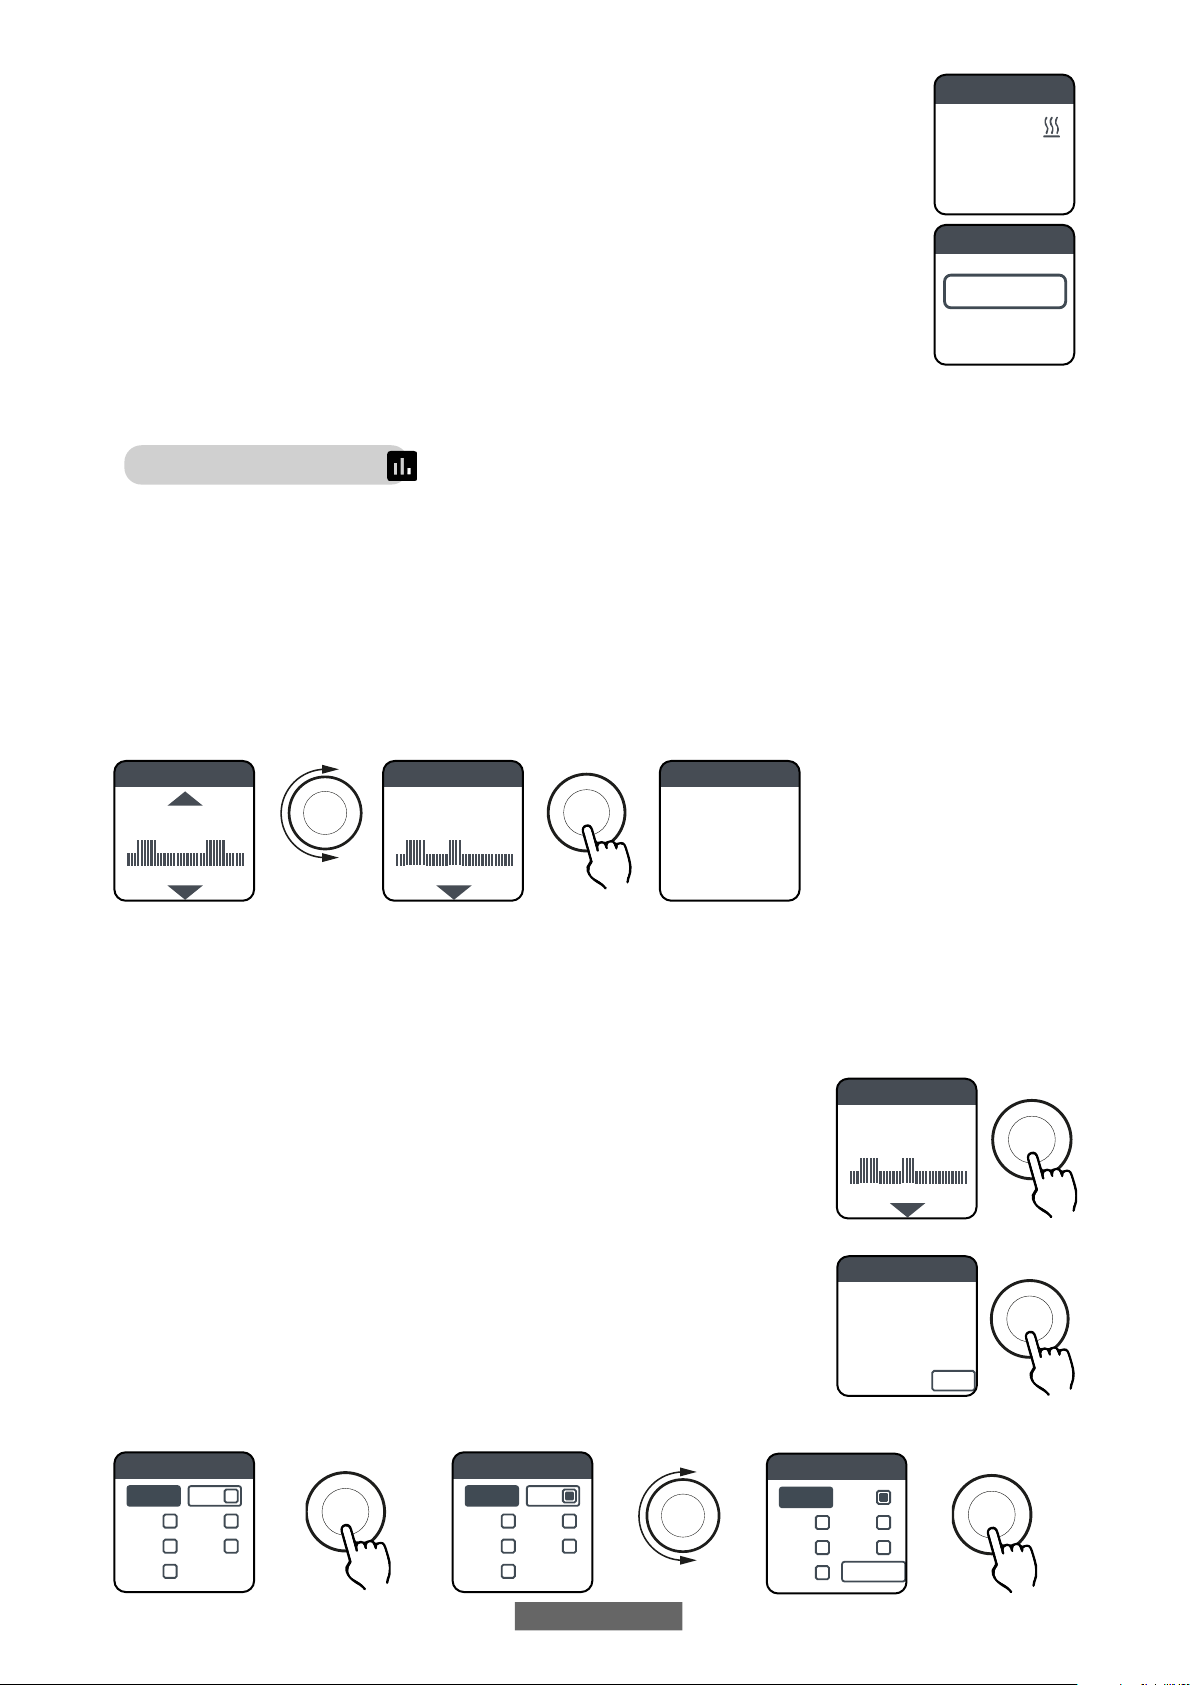
• Radiator consumption in kW/h.The following consumptions are shown:
a. Daily, for the previous 7 days.
b. Monthly, for the previous 12 months.
c. Annual, for the previous 4 years.
d. Total.
PARAM
PAR&PR
LOCKING MENUS
NONE
PARAM
LOCKING MENUS

EN - 35
4.9 KEY LOCK
Itis possible tolock the devicetoavoidan improperor unintentionaluse, forinstance for childrenprotection or in apublic space
Tolockthekeys(knob)fromoneofSIMPLE/PROGRAM/TEMPORARYmodes,pressandholdtheknobforafewsecondsandthen
select LOCK.
Theoperatingmoderemainsshownonthedisplay,ifyou touchtheknobonthedisplaythepadlocksymbolappearstoindicate
the lock.
To unlock the operation, press and hold the knob and then select UNLOCK.
4.10 RADIATOR STAND-BY
From SIMPLE/PROGRAM menus, press the knob to access the MENU and then select OFF to set the radiator to stand-by mode
(radiator offbut connected to power supply).
A long beep signals the stand-by status.
In this status OFF is displayed.
In OFF mode, turn or press the knob to display ON and OFF, select ON to switch the radiator back on. A double short beep signals
the switching on.
4.11 WI-FI CONNECTION
You can manage your radiator heating system from your smartphone through theWi-Fi of your home and, using the DOMUS
ONE APP, you can also send simple voice commands from your Google or Alexa assistant if you have one.
Minimum system requirements.
2.54 GHzWi-Fi network, with the following characteristics:
• WPA-PSK
• WPA2-PSK
• Open network (no security implemented)
Please note that no other system is supported, e.g. WEP (WEP systems still in use are not secure).
SSIDWi-Fi network passwords and names cannot have more than 50 characters.
The radiator is factory-set to be connected to the Wi-Fi network, when the radiator is ON the flashing
icon appears on the display.
The connectivity function can be disabled on the radiator: access the MENU, select and then Wi-Fi,
the connection mode can be enabled/disabled.
OFF
OFF
ON
ON/OFF
OK
20.0°C
PRESS -->MENU
SIMPLE SA 10:30
EN - 36
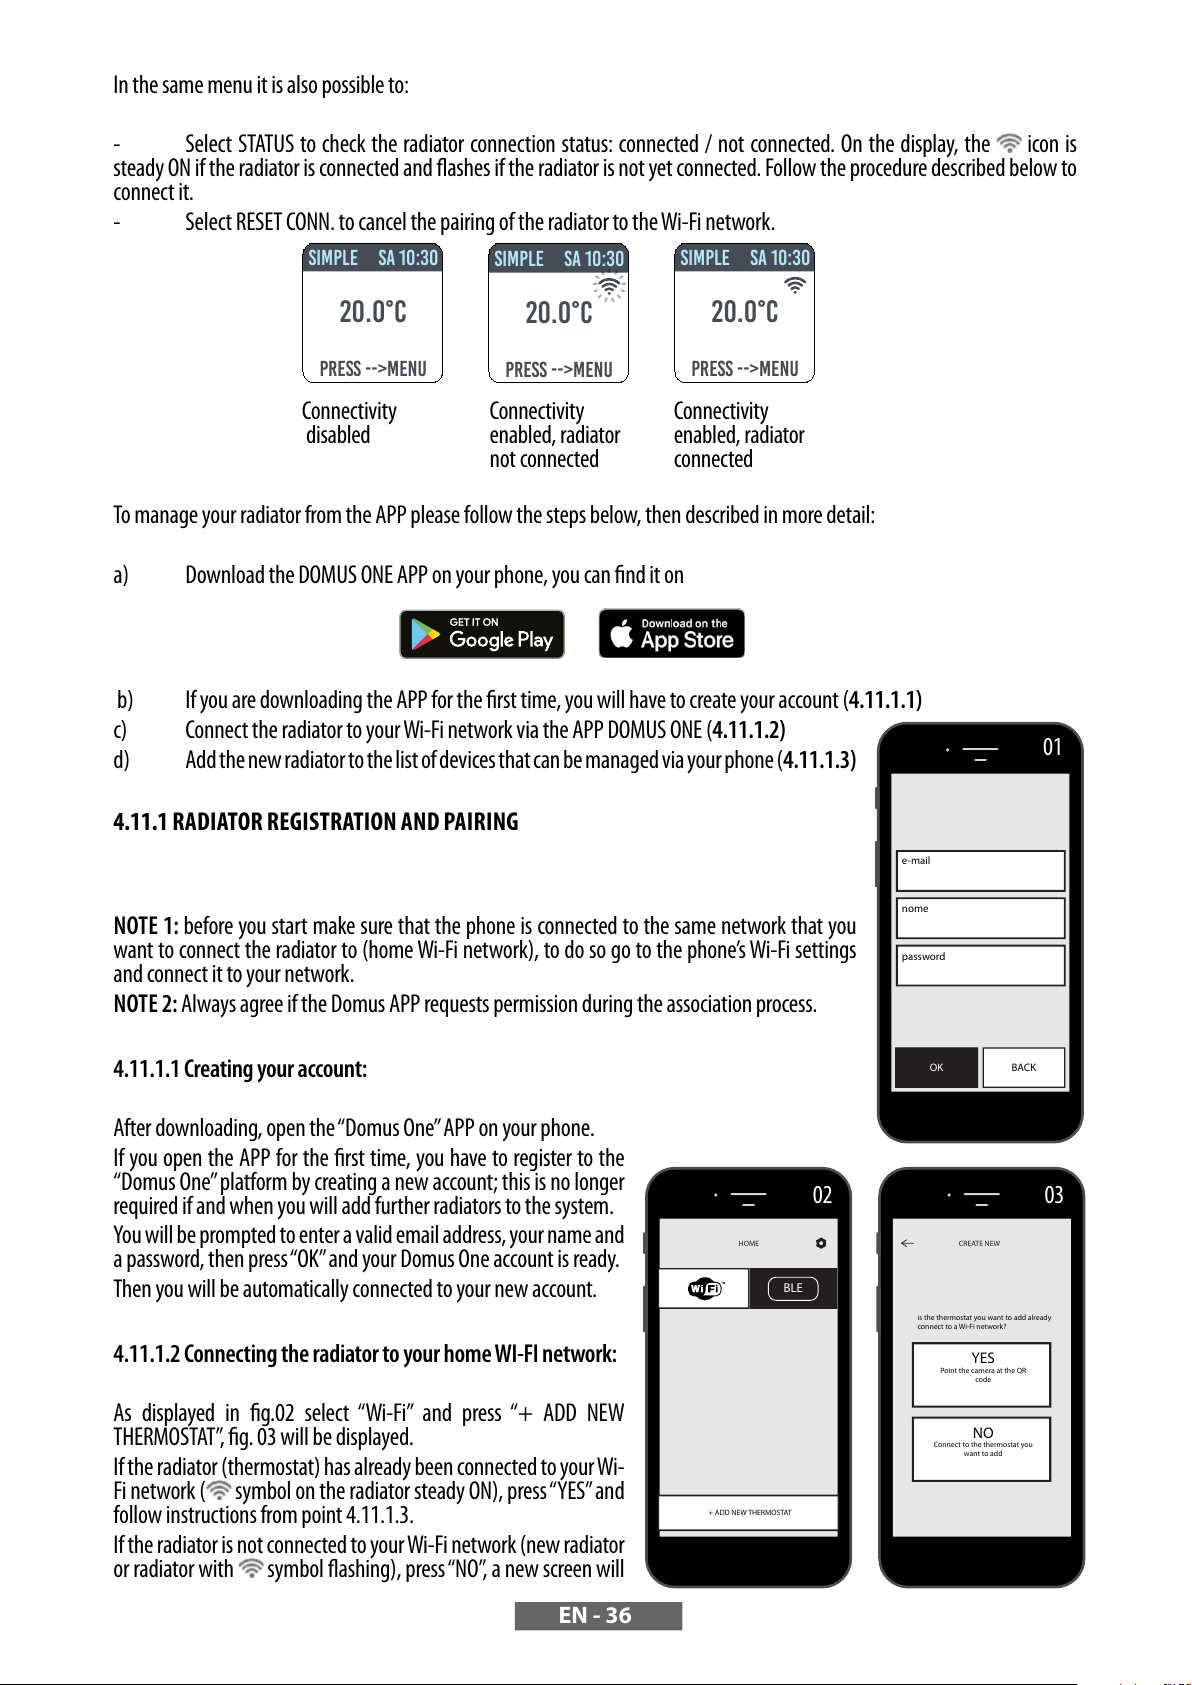
In the same menu it is also possible to:
- Select STATUS to check the radiator connection status: connected / not connected. On the display, the icon is
steady ON if the radiator is connected and flashes if the radiator is not yet connected. Follow the procedure described below to
connect it.
- Select RESET CONN. to cancel the pairing of the radiator to theWi-Fi network.
To manage your radiator from the APP please follow the steps below, then described in more detail:
a) Download the DOMUS ONE APP on your phone, you can find it on
b) If you are downloading the APP for the first time, you will have to create your account (4.11.1.1)
c) Connect the radiator to yourWi-Fi network via the APP DOMUS ONE (4.11.1.2)
d) Addthenewradiator tothelistofdevicesthatcanbemanaged viayourphone(4.11.1.3)
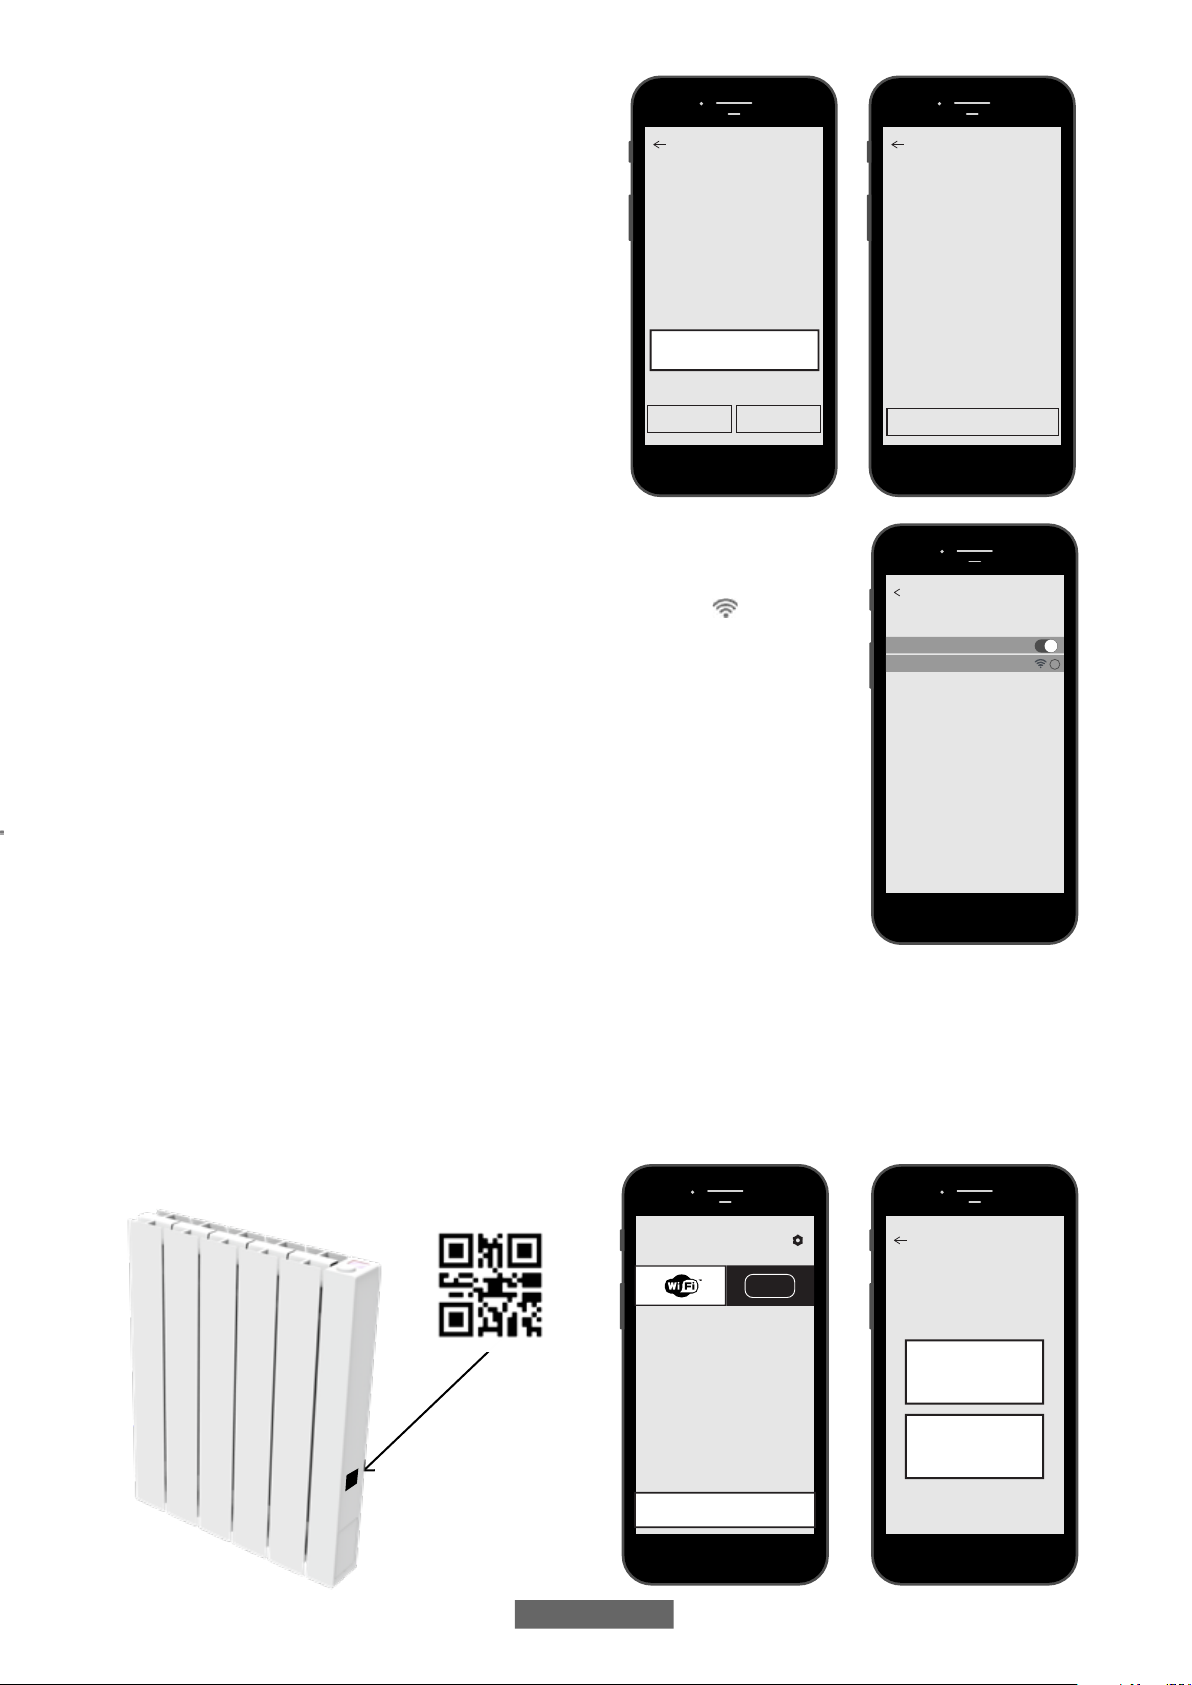
4.11.1 RADIATOR REGISTRATION AND PAIRING
NOTE 1: before you start make sure that the phone is connected to the same network that you
want to connect the radiator to (home Wi-Fi network), to do so go to the phone’s Wi-Fi settings
and connect it to your network.
NOTE 2: Always agree if the Domus APP requests permission during the association process.
4.11.1.1 Creating your account:
After downloading, open the“Domus One”APP on your phone.
If you open the APP for the first time, you have to register to the
“Domus One”platform by creating a new account; this is no longer
required if and when you will add further radiators to the system.
You will be prompted to enter a valid email address, your name and
a password, then press“OK”and your Domus One account is ready.
Then you will be automatically connected to your new account.
4.11.1.2 Connecting the radiator to your home WI-FI network:
As displayed in fig.02 select “Wi-Fi” and press “+ ADD NEW
THERMOSTAT”, fig. 03 will be displayed.
If the radiator (thermostat) has already been connected to yourWi-
Fi network ( symbol on the radiator steady ON), press“YES”and
follow instructions from point 4.11.1.3.
Iftheradiatoris notconnected toyourWi-Finetwork(newradiator
or radiator with symbol flashing), press“NO”, a new screen will
20.0°C
PRESS -->MENU
SIMPLE SA 10:30
20.0°C
PRESS -->MENU
SIMPLE SA 10:30
20.0°C
PRESS -->MENU
SIMPLE SA 10:30
Connectivity
disabled Connectivity
enabled, radiator
not connected
Connectivity
enabled, radiator
connected
CREATE NEW
YES
Point the camera at the QR
code
NO
Connect to the thermostat you
want to add
is the thermostat you want to add already
connect to a Wi-Fi network?
03
e-mail
OK BACK
nome
password
01
HOME
+ ADD NEW THERMOSTAT
BLE
02
EN - 37
be displayed (figure 04):
Enter the network password if required. Press, “CONFIGURE”, the
screen shown in figure 05 will be displayed.
Press “GO TO WI-FI SETTINGS”, the Wi-Fi setting page of the
operating system will be displayed (figure 06).
The Wi-Fi network “DOMUS WI-FI...” of the radiator will be
displayed.
Note: if the DOMUS network does not appear, check in the
phone’sWi-Fisettingsthat the“automaticreconnection”optionis
not selected for your home network. In case remove this setting.
In your phone, select the DomusWi-Fi network.
Waitforthesuccessful connectiontotheWi-Fi network.andthen
return to the APP.
Wait until successful connection message is displayed on your
phone and, if requested, confirm. Depending on the phone this
may take up to 2 minutes.
AWi-Fi connection message appears on the radiator and, once connected, the symbol on the
display is steady ON.
Now your radiator is connected to your home Wi-Fi network, and you can add it to the list of
radiators to be managed via your phone or to other phones with DOMUS ONE APP, as described
in the following paragraph.
4.11.1.3Addingthenewradiatortothelistofdevicesthatcanbemanagedviayourphone:
Log in to the APP.
The following screen is displayed on the radiator (figure 07):
Press“+ ADD NEW THERMOSTAT”, the screen shown in figure 08 is displayed.
Press“YES”, you will be prompted to frame the QR code on the right side of the radiator.
Frame the QR code, a message will appear on your phone, press“CONNECT”.
Youwillbepromptedtogiveanametotheradiatorandpairittoa group,forexampleyoucangivethenameeBlitz1000Wand
pair it to the group“Living room”, or create a new group, e.g.“Bedroom”.
The Group and the radiator registered in this way will be displayed on the main page of the APP and you can start managing it
from your phone.
Repeat the procedure described above for each new radiator.
To remove a radiator from your account, press and hold the name of the radiator for several seconds and then select “DELETE”.
Select the Wi-Fi network you want this thermostat to
connect to
You can change the Wi-Fi network from settings
menu.
The current Wi-Fi network is:
Home Network
Please type your password and press CONFIGURE
CONFIGURE GO TO SETTINGS
Switch Wi-Fi network
password
04
Wi-Fi
Domus WiFi H - 8xxxxxxxxxx
Settings Wi-Fi
i
06
Go to settings and select the Wi-Fi network of the
thermostat. Wait for the connection procedure to
complete. ONLY THEN come back here.
Make sure that the thermostat is ON and
that Wi-Fi in ON too.
Make sure that Location Service in turned on
Wait for the Wi-Fi icon to replace the cellular data icon
(it may take several seconds)
GO TO WI-FI SETTINGS
Configure Wi-Fi
05
HOME
+ ADD NEW THERMOSTAT
BLE
07
CREATE NEW
YES
Point the camera at the QR
code
NO
Connect to the thermostat you
want to add
is the thermostat you want to add already
connect to a Wi-Fi network?
08
EN - 38
4.11.2 APPoperation
From the APP, you can manage every single radiator, groups of radiators or even radiators in
different buildings, you can set many of the functions of the radiator and its programming, as
well as monitor the daily temperature to make sure that it meets your needs.
You can add new radiators to your personal list at any time and give them a name to easily
recognise them.
If you have several radiators in the same room, we recommend grouping them together.
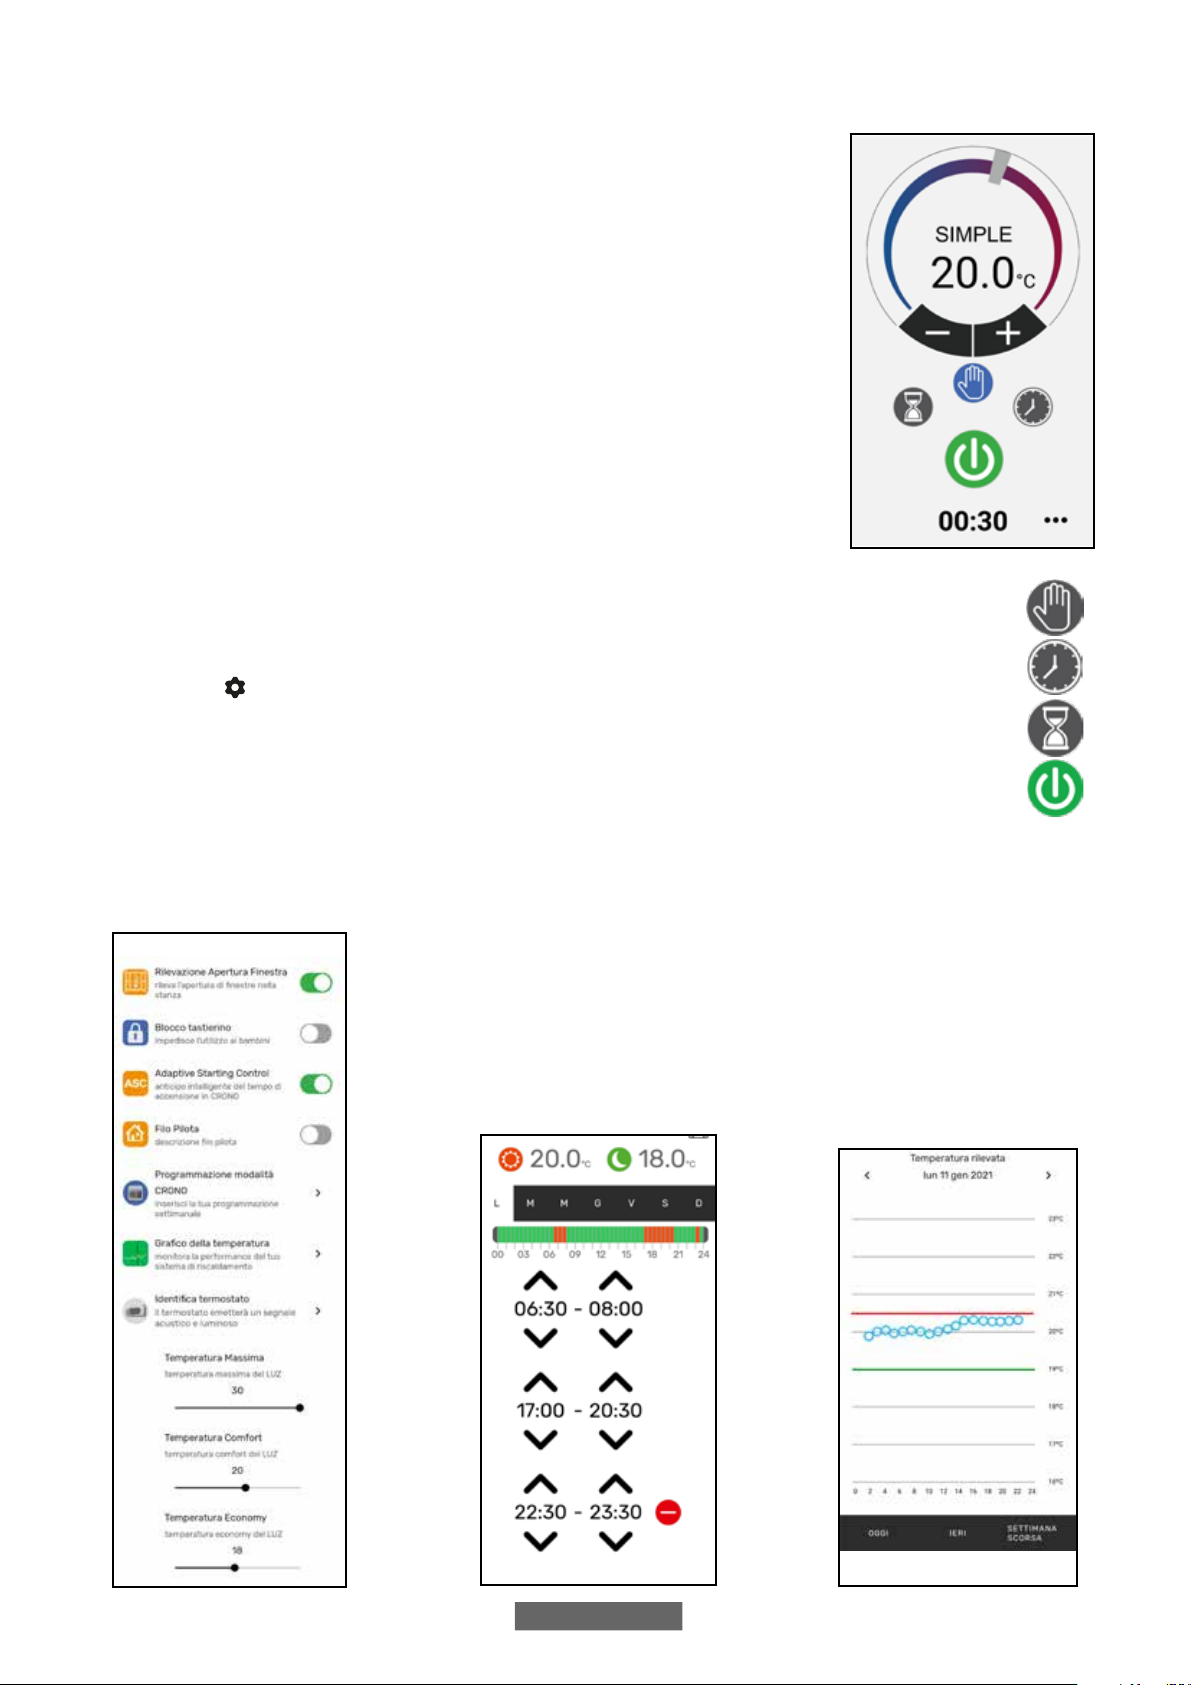
From the main APP page you can quickly switch a radiator offor on, or select it to change its
parameters.
You will access a page where you can change the temperature set on the radiator or select a
different operating mode from those already described in the previous sections on radiator
operation.
The main part of the screen shows the temperature, that can be changed by pressing“+”or“-”
or sliding the cursor.
Thelowerpartofthescreenshowstheselectableoperatingmodes,theactivemodeiscoloured,
the other modes are grey
.
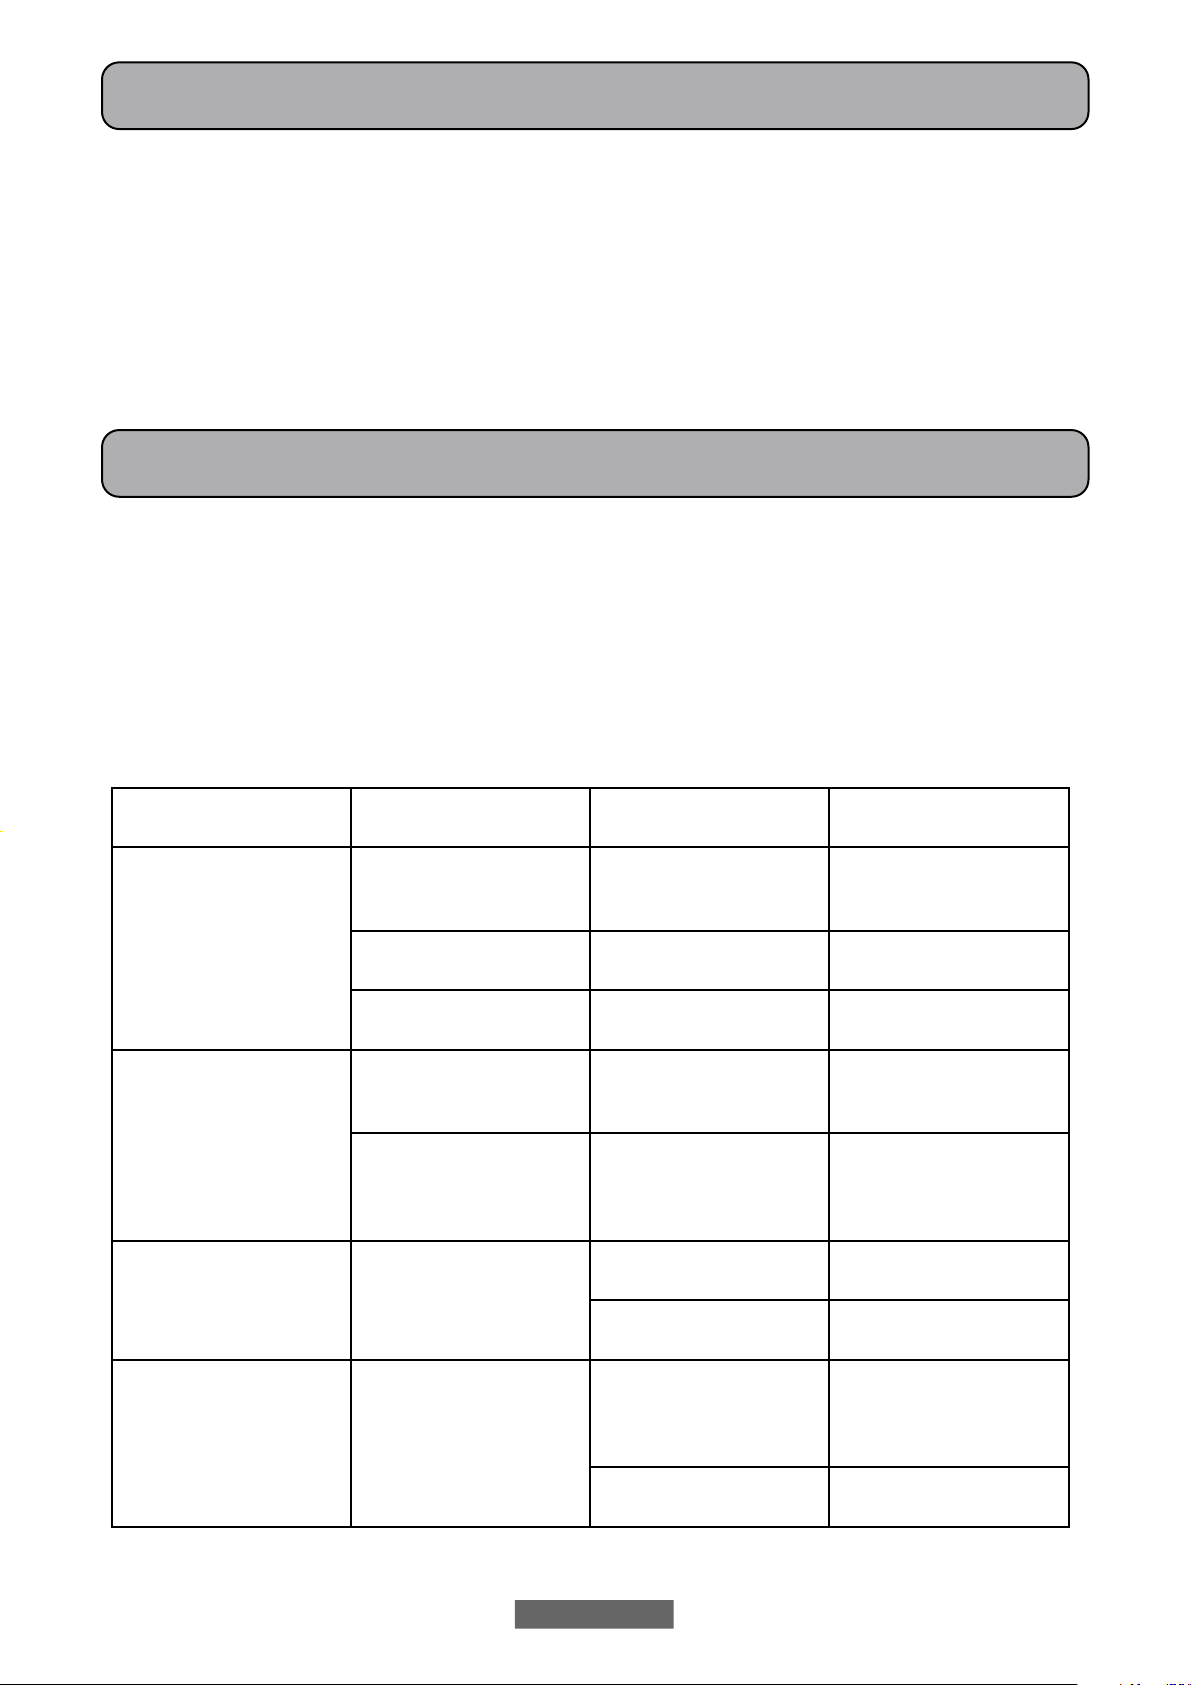
Press the icon in the upper
right corner to access the page
where it is possible to change
thesetparameters, activateor
deactivatethevariousradiator
functions, program the
radiator, activate the child
safety lock, display the
temperature trend in the
room.
Programming from APP
follows the same criteria as
described for the radiator,
with the possibility of setting
three comfort operating time
slotsfor eachday;instead,itis
notpossibletocopyprograms
from one day to another as in
programming from radiator.
The APP also allows displaying
the trend of the daily, the
previous day or the previous
week ambient temperature,
and comparing it with the
desired settings, so as to adapt
the most suitable settings
to your needs and manage
consumption.
Basic (manual) mode
Programming mode
Temporary mode
radiator switching on and off
EN - 39
5. RADIATOR CLEANING
For your safety, before any cleaning operation, disconnect power supply.
Cleaning operations must be carried out with radiator offand cold.
Do not use abrasive or corrosive products to clean the heating body. Use, for instance, soapy water and then dry the body using
a soft cloth.
To clean plastic components, controls and humidifier, use only a dry cloth and avoid contact with
chemicals or alcohol.
6. FAILURES
In case of failure do not use the appliance, disconnect it from power supply and for the repair address only to a technician
approved and authorized to operate on this product.
This appliance is filled with a precise quantity of mineral oil. Reparations that require to open the fluid tank must be carried
out by the manufacturer, its agents or the customer service.
The manufacturer shall not be held responsible for damage to people, animals, or property due to
tampering with or improper intervention to the radiator.
TABLE OF TECHNICAL FAULTS
PROBLEM STATE OFTHE RADIATOR PROBABLE CAUSE SOLUTION
The radiator does not heat.
The display does not show
any notice No power supply. Check that there is voltage
and that the radiator switch
is in I position.
Radiator in PROGRAM mode The program provides for
operation in ECO mode Check the programming
setting
Radiator in BASIC mode Malfunction of resistor or
adjustment board Contact a Service Centre
The radiator does not ensure
to reach the desired tempe-
rature in the room
Properly working The radiator power is insuf-
ficient to meet the need of
the room
Replace the radiator with a
more powerful one or add
another radiator.
Properly working The radiator position affects
excessively the temperature
detected in the room
Calibrate the temperature
read by the radiator, see
paragraph 4.6 PARAMETERS/
CALIBRATION
The radiator is faulty SENSOR ALARM is displayed
The temperature sensor is
faulty Contact a Service Centre
Radiator temperatures too
high Check that the radiator is not
covered.
The radiator heats
continuously Any The radiator is installed near
an air stream (entrance
doors, ventilation holes in
the wall)
Avoid installing the radiator
near air streams
The set temperature is too
high Correct the set temperature

EN - 40
PROBLEM STATE OFTHE RADIATOR PROBABLE CAUSE SOLUTION
Window opening detection
does not work properly Function enabled Lowering of temperature in
the rooms has not exceeded
5°C in the time provided or
----
The position of the radiator
does not allow the probe
to detect the temperature
correctly.
Relocate the radiator.
The PIN code is required Locked parameters and/or
programming The parameters and/or
programming have been
intentionally locked
The PIN code to be entered
is 139
Expansion noises in swi-
tching on and/or off phase Any Radiator supporting brackets
are not centred and scrape
on the radiator.
Position brackets properly.
The radiator leaks oil Any Defect of the heating body
or lack of sealing in connec-
tors.
Contact a Service Centre.
The wall behind the radiator
gets dirty Any These signs are due to the
quality of the air in the room
and the formation of dust in
the radiator or the fact that
people regularly smoke in
the room
Ventilate and keep the room
and the radiator clean. Do
not smoke in the room.This
situation does not legitimate
the replacement of the
radiator under warranty.
The radiator is too hot Radiator in heating phase The radiator normally rea-
ches high temperatures High temperatures comply
with safety standards, the
radiator is designed to with-
stand them
The APP cannot find the
homeWi-Fi network to
which the phone is con-
nected
----- During the APP installation,
not all the required authori-
sations were provided, e.g.
for geolocation.
Reinstall the APP and
provide the authorisations
required
The radiator does not con-
nect to theWi-Fi network
even if the password and the
network name are correct
----- TheWi-Fi network does not
have the technical features
required, see par. 4.11
Check that theWi-Fi network
complies with the required
technical features and if
necessary replace the router
with an upgraded version.
The radiator does not con-
nect to the Wi-Fi network The radiator display does not
show the symbol The connection mode is
disabled on the radiator Enable the connection mode
on the radiator, see para.
4.11
You do not find the QR code
to pair the radiator to the
WI-FI network
Waiting for connection The QR code label on the
radiator side has been remo-
ved
You can also find the QR code
on the back of the radiator.
EN - 41
7. WARRANTY
The body in aluminum alloy is warranted against manufacturing defects for 10 years from date of purchase. Electric and
electronic components are warranted for 2 years from the date of purchase of the radiator.To validate your warranty, it is
necessary to produce a document attesting the date of purchase (tax receipt, invoice, sales receipt).
For the validity of the warranty, the installation must comply with regulations and laws in force and must be
carried out in a craftsman like manner.
Warranty does not cover components subject to standard wear or consumption, as well as damages resulting from transport
or assembly.
8. ENVIRONMENT
The symbol applied to the appliance and shown here indicates that the product must be disposed of in separate collection for
electrical equipment.
At the end of the life of the appliance, it cannot beeliminated as solid urban waste, but itmustbesent to
thecollectioncenterofyourareaorreturnedtothe dealerwhen buyinga newapplianceofthesametype
and destined to the same purpose.
Separatecollectionofelectricandelectronicequipmentispartofapolicyonsafeguarding,protectingand
improving the quality of the environment and to avoid potential adverse effects on human health due to
the presence of hazardous substances as classified by the European directives.
Warning! Incorrect disposaloftheapplianceinvolvessanctions.
When the radiator is eliminated, respect standards and laws in force for oil disposal.
Table of contents
Other MHS Boilers Heater manuals


Popular Heater manuals by other brands

EOS
EOS Cubo 2 Installation and operating instructions

BMM Heaters
BMM Heaters BMG User and installation manual

Desa
Desa Master B35CEB owner's manual

Truma
Truma Combi D 6 AU installation instructions

atomi smart
atomi smart Wi-Fi Ceramic Tabletop Heater quick start guide

Curtis
Curtis 9PH20S58 owner's manual


Frico
Frico Elztrip EZ300 Series Mounting and operating instructions

DeLonghi
DeLonghi CERAMIC FAN HEATER instructions

wibo
wibo Thermatic Classic plus Series instruction manual

VONROC
VONROC EH503AC Original instructions

Purmo
Purmo COMPACT VENTIL PLINTH datasheet

All Seasons Hire
All Seasons Hire Red Star instruction manual